1、修改配置文件
[root@web01 nginx]# cat /application/nginx/conf/extra/edusoho.confserver {listen 80;server_name edu.etiantian.org;<br> client_max_body_size 1024M;root /application/nginx/html/edusoho/web;access_log logs/access_edusohu.log main;location / {index app.php;try_files $uri @rewriteapp;}location @rewriteapp {rewrite ^(.*)$ /app.php/$1 last;}location ~ ^/udisk {internal;root /application/nginx/html/edusoho/app/data/;}location ~ ^/(app|app_dev)\.php(/|$) {fastcgi_pass 127.0.0.1:9000;fastcgi_split_path_info ^(.+\.php)(/.*)$;include fastcgi_params;fastcgi_param SCRIPT_FILENAME $document_root$fastcgi_script_name;fastcgi_param HTTPS off;fastcgi_param HTTP_X-Sendfile-Type X-Accel-Redirect;fastcgi_param HTTP_X-Accel-Mapping /udisk=/application/nginx/html/edusoho/app/data/udisk;fastcgi_buffer_size 128k;fastcgi_buffers 8 128k;}location ~* \.(jpg|jpeg|gif|png|ico|swf)$ {expires 3y;access_log off;gzip off;}location ~* \.(css|js)$ {access_log off;expires 3y;}location ~ ^/files/.*\.(php|php5)$ {deny all;}location ~ \.php$ {fastcgi_pass 127.0.0.1:9000;fastcgi_split_path_info ^(.+\.php)(/.*)$;fastcgi_param SCRIPT_FILENAME $document_root$fastcgi_script_name;fastcgi_param HTTPS off;include fastcgi_params;}}
2、edusoho站点上线
第一个里程碑:上传解压文件
[root@web01 tools]# tar xf edusoho-8.0.16.tar.gz
第二个里程碑:移动站点文件到指定站点目录
[root@web01 tools]# cd edusoho[root@web01 edusoho]# lsapi app bootstrap plugins README.html src vendor vendor_user web# 移动站点目录,注意是整个edusohu文件夹下的所有文件[root@web01 edusoho]# mv ./* /application/nginx/html/edusohu/[root@web01 edusoho]# cd /application/nginx/html/edusohu/[root@web01 edusohu]# lsapi app bootstrap plugins README.html src vendor vendor_user web# 注意整个目录要进行授权www[root@web01 extra]# chown -R www.www /application/nginx/html/
第三个里程碑:修改PHP配置.
修改配置,让上传的文件能够更大(优化项)
[root@web01 ~]# vim /application/php/lib/php.inipost_max_size = 1024Mmemory_limit = 1024Mupload_max_filesize = 1024M
第四个里程碑:web浏览器访问地址进行安装
注意:访问之前要先进行修改hosts文件
http://edu.etiantian.org/install/start-install.php
第五个里程碑:进行系统检查
1)通过修改php的配置文件,让能上传的参数放大。 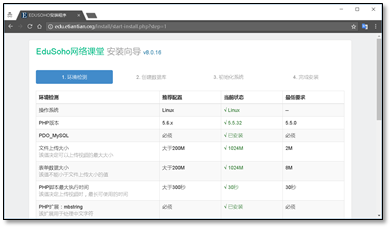
2)连接数据库,数据库名称为edusohu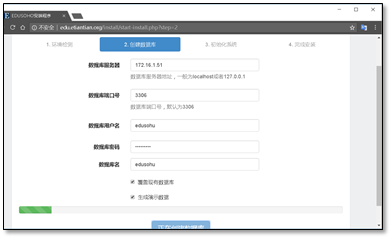
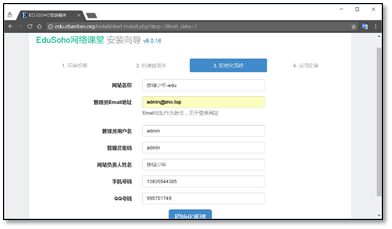
3)配置站点信息,设置站点名称
4)安装完成,进行系统
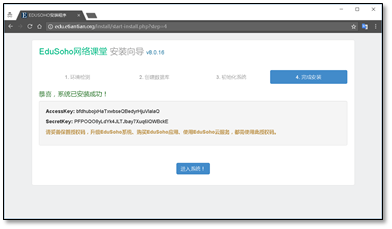
5)访问后台进行管理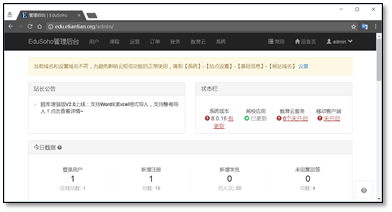

若有收获,就点个赞吧
0 人点赞
