1、for循环语句
在计算机科学中,for循环(英语:for loop)是一种编程语言的迭代陈述,能够让程式码反复的执行。
它跟其他的循环,如while循环,最大的不同,是它拥有一个循环计数器,或是循环变数。这使得for循环能够知道在迭代过程中的执行顺序。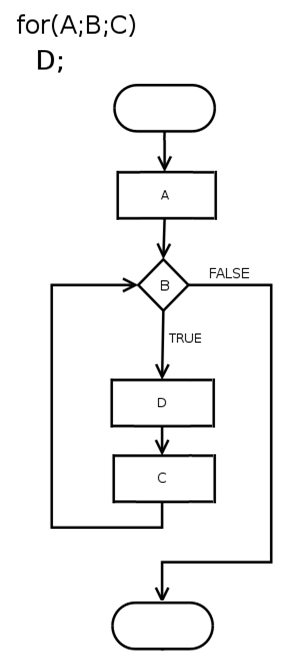
1.1 shell中的for循环
shell中的for 循环与在c中不同,它包含三种形式:第一种结构是列表for 循环;第二种结构就是不带列表的for循环;第三种就类似于C语言。
① 列表for循环(常用)
#!/bin/bashfor i in 取值列表do循环主体/命令done
② 不带列表for循环(示例)
#!/bin/abshecho "惨绿少年的博客是:"for idoecho "$i"done
脚本执行结果
[root@clsn for]# sh for2.sh http://blog.znix.top惨绿少年的博客是:http://blog.znix.top
③ 类似C语言的风格(这种用法常在C语语言中使用)
for((exp1;exp2;exp3))do指令...done
编写类似C语言风格脚本
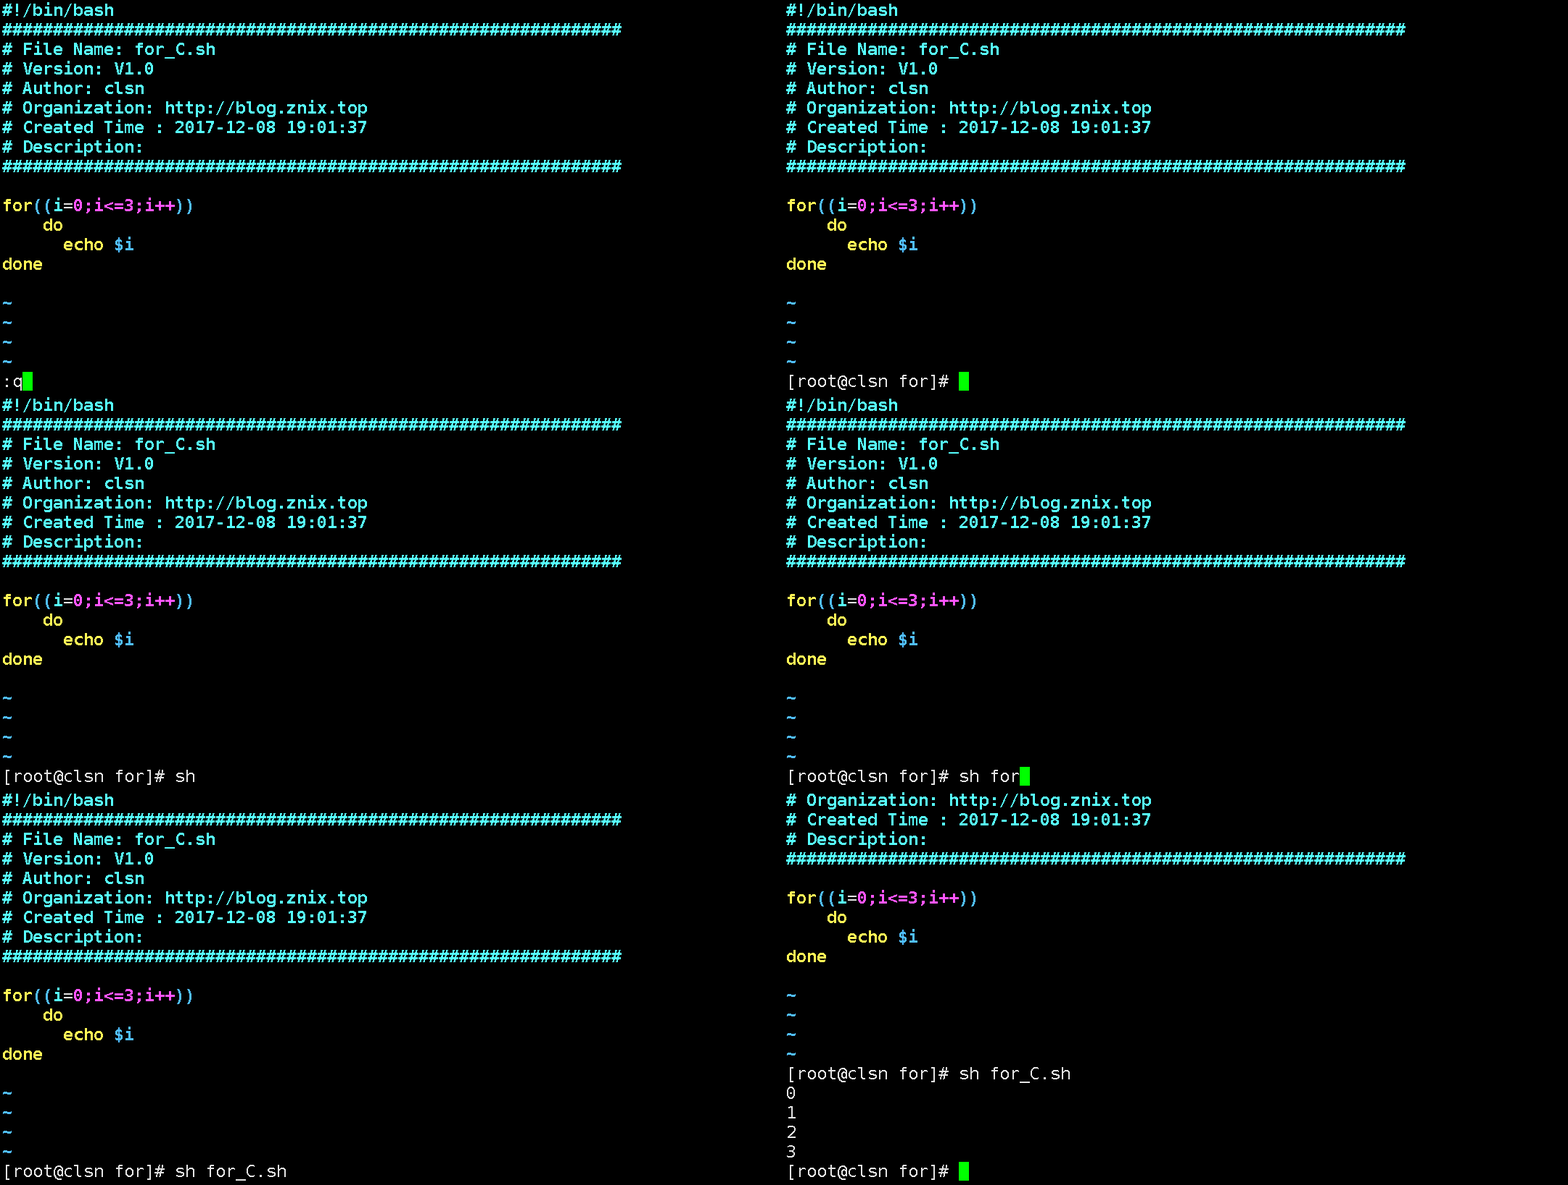
for((i=0;i<=3;i++))doecho $idone
1.1.2 不同语言的For循环
Shell中的两种样式
# 样式一:for i in 1 2 3doecho $idone# 样式二:for i in 1 2 3;do echo $i;done
JAVA
for(int i = 0; i < 5; i++){//循环语句;}
PHP
for ($i = 0; $i < 5; $i++) {# statements;}
VB
For i = 1 To 5===PASCAL===for not i=1 dobegini=0;writeln('Go on!');end.'循环语句Next i
swift
var x = 0for i in 1...100{x += i}print(x)//5050for _ in 1...100{x += 1}print(x)// 100var box = [1,2,3,4,5]for i in box{print(i)}/*12345*/---
1.2 for循环相关练习题
1.2.1 【练习题1】批量生成随机字符文件名案例
使用for循环在/clsn目录下批量创建10个html文件,其中每个文件需要包含10个随机小写字母加固定字符串clsn,名称示例如下:
[root@znix C19]# ls /clsnapquvdpqbk_clsn.html mpyogpsmwj_clsn.html txynzwofgg_clsn.htmlbmqiwhfpgv_clsn.html udrzobsprf_clsn.html vjxmlflawa_clsn.htmljhjdcjnjxc_clsn.html qeztkkmewn_clsn.html jpvirsnjld_clsn.htmlruscyxwxai_clsn.html
脚本内容
[root@clsn for]# cat make_file.sh#!/bin/bash############################################################## File Name: make_file.sh# Version: V1.0# Author: clsn# Organization: http://blog.znix.top# Created Time : 2017-12-08 11:01:19# Description:#############################################################[ -d /clsn ] || mkdir -p /clsnrpm -qa |grep pwgen &>/dev/nullif [ $? -eq 1 ]thenyum install pwgen -y &>/dev/nullficd /clsn &&\for i in {1..10}do#File_Name=`uuidgen |tr "0-9-" "a-z"|cut -c 1-10`File_Name2=`pwgen -1A0 10`touch ${File_Name2}_clsn.htmldone
脚本执行结果
[root@clsn for]# ls -l /clsn-rw-r--r-- 1 root root 0 12月 8 19:41 aegheiriek_clsn.html-rw-r--r-- 1 root root 0 12月 8 19:41 aifohxique_clsn.html-rw-r--r-- 1 root root 0 12月 8 19:41 caexahween_clsn.html-rw-r--r-- 1 root root 0 12月 8 19:41 ciefaivaib_clsn.html-rw-r--r-- 1 root root 0 12月 8 19:41 eixongooph_clsn.html-rw-r--r-- 1 root root 0 12月 8 19:41 foozaivedo_clsn.html-rw-r--r-- 1 root root 0 12月 8 19:41 ireeteethu_clsn.html-rw-r--r-- 1 root root 0 12月 8 19:41 ohmeebivae_clsn.html-rw-r--r-- 1 root root 0 12月 8 19:41 oiceehahth_clsn.html-rw-r--r-- 1 root root 0 12月 8 19:41 sheewaehoo_clsn.html
1.2.2 【练习题2】批量改名特殊案例
【练习题1】中结果文件名中的clsn字符串全部改成znix(最好用for循环实现),并且将扩展名html全部改成大写。
jpvirsnjld_clsn.html ===> jpvirsnjld_znix.HTML
脚本内容:
[root@clsn for2]# cat rename_file.sh#!/bin/bash############################################################## File Name: rename_file.sh# Version: V1.0# Author: clsn# Organization: http://blog.znix.top# Created Time : 2017-12-08 11:31:56# Description:#############################################################cd /clsn &&\File_name=`ls |sed -r 's#(.*)_clsn.html#\1#g'`for i in $File_namedoif [ -f ${i}_clsn.html ]thenmv ${i}_clsn.html ${i}_znix.HTMLelseecho "文件修改完成."exitfidone
查看结果
[root@clsn for2]# ls /clsn/aeyaesughi_znix.HTML caireasipi_znix.HTML uahahnieli_znix.HTMLaifaepheeb_znix.HTML eathixoong_znix.HTML zalipageen_znix.HTMLakuipheeye_znix.HTML ietoothaik_znix.HTMLapheikieno_znix.HTML lachohtaif_znix.HTML
2.2.1 批量改名其他方式
rename 方式(最方便,专业改名)
rename txt jpg *
非 for 循环方式批量改名(使用sed命令进行拼接,然后交给bash执行)
ls *jpg|sed -r 's#(.*).jpg#mv & \1.mp4#'|bash
2.3 【练习题3】批量创建特殊要求用户案例
批量创建10个系统帐号clsn01-clsn10并设置密码(密码为随机数,要求字符和数字等混合)。
脚本内容:
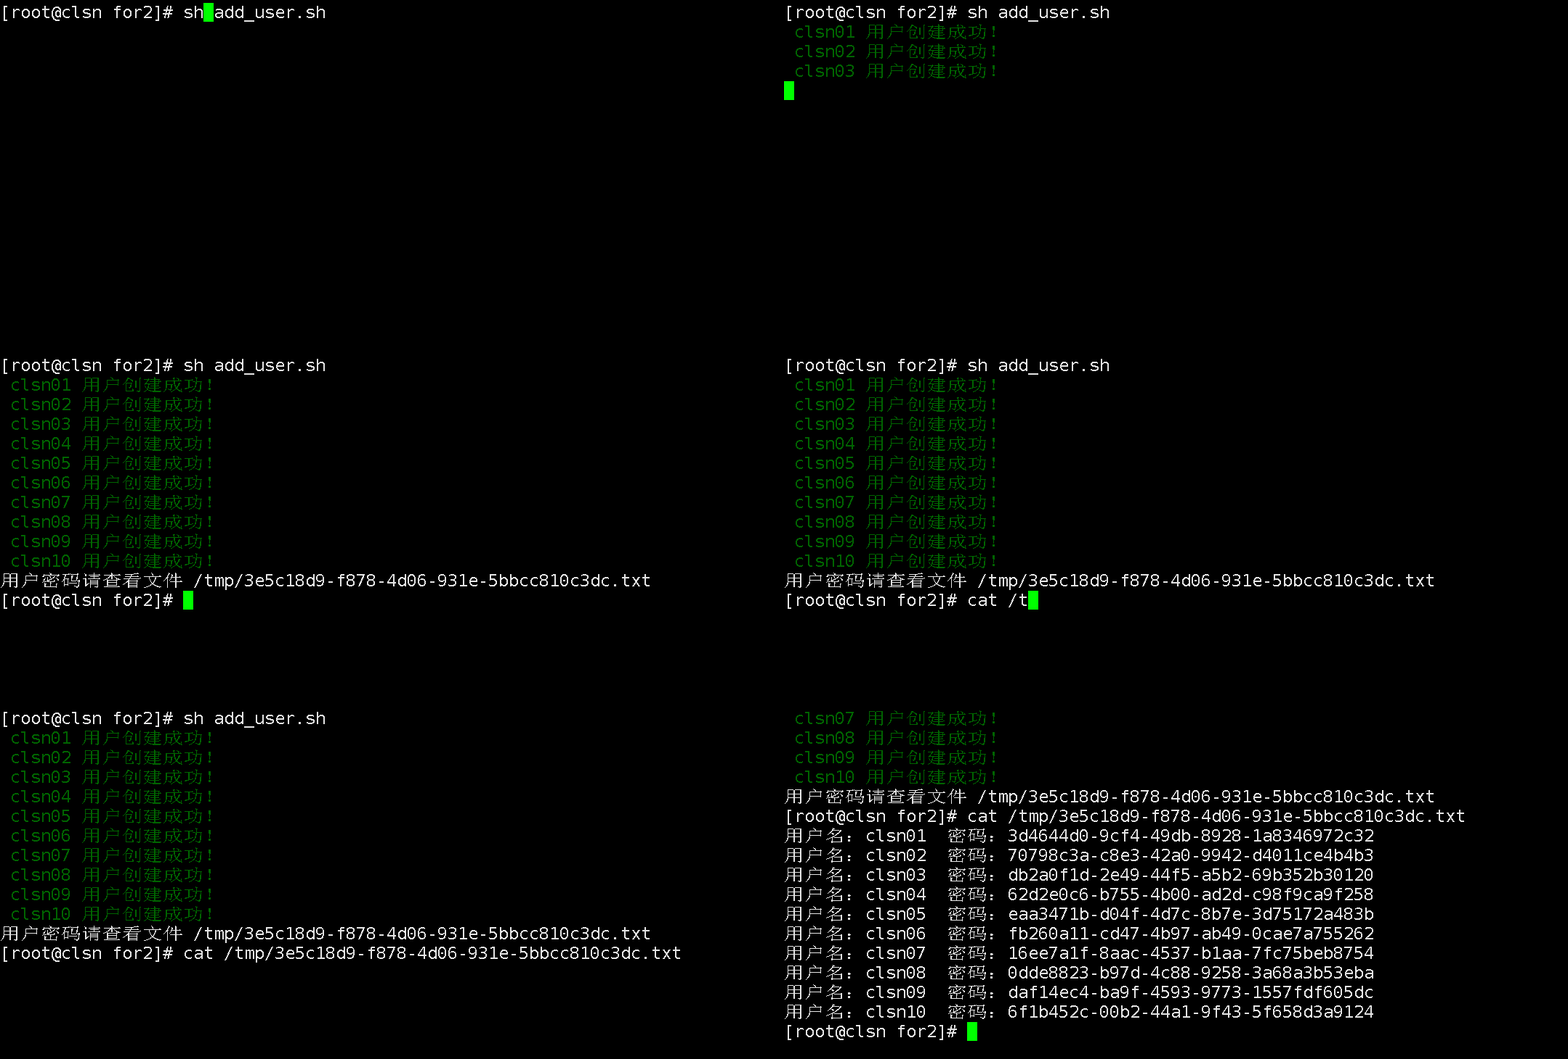
[root@clsn for2]# cat add_user.sh#!/bin/bash############################################################## File Name: add_user.sh# Version: V1.0# Author: clsn# Organization: http://blog.znix.top# Created Time : 2017-12-08 11:52:21# Description:#############################################################Passwd_File=/tmp/`uuidgen`.txt>$Passwd_Filechmod 400 $Passwd_Filefor i in clsn{01..10}douserdel -r "$i" &>/dev/nullid $i &>/dev/nullif [ $? -ne 0 ]thenuseradd $iPassWd=`uuidgen`echo $PassWd |passwd --stdin $i &>/dev/nullecho "用户名:$i 密码:$PassWd" >>$Passwd_Fileecho -e "\033[32m $i 用户创建成功!\033[0m"elseecho "$i 用户已存在"fiif [ "$i" == "clsn10" ]thenecho "用户密码请查看文件 $Passwd_File"fidone
查看成的密码文件
[root@clsn for2]# cat /tmp/3e5c18d9-f878-4d06-931e-5bbcc810c3dc.txt用户名:clsn01 密码:3d4644d0-9cf4-49db-8928-1a8346972c32用户名:clsn02 密码:70798c3a-c8e3-42a0-9942-d4011ce4b4b3用户名:clsn03 密码:db2a0f1d-2e49-44f5-a5b2-69b352b30120用户名:clsn04 密码:62d2e0c6-b755-4b00-ad2d-c98f9ca9f258用户名:clsn05 密码:eaa3471b-d04f-4d7c-8b7e-3d75172a483b用户名:clsn06 密码:fb260a11-cd47-4b97-ab49-0cae7a755262用户名:clsn07 密码:16ee7a1f-8aac-4537-b1aa-7fc75beb8754用户名:clsn08 密码:0dde8823-b97d-4c88-9258-3a68a3b53eba用户名:clsn09 密码:daf14ec4-ba9f-4593-9773-1557fdf605dc用户名:clsn10 密码:6f1b452c-00b2-44a1-9f43-5f658d3a9124
2.3.1 批量创建用户并设置随机密码(不使用shell循环)
方法一
echo user{1..20}|xargs -n1|sed -r 's#(.*)#useradd \1 \&\& echo \1 >>/tmp/passwd.txt \&\& echo $RANDOM |md5sum |cut -c 1-5>>/tmp/passwd.txt \&\& echo `tail -1 /tmp/passwd.txt`|passwd --stdin \1#g'|bash
方法二
echo user{1..20}|xargs -n1|sed -r 's#(.*)#useradd \1 \&\& pass=`echo $RANDOM |md5sum |cut -c 1-5` \&\& echo $pass |passwd --stdin \1 \&\& echo \1 $pass>>/tmp/user_passwd.txt#g'|bash
方法三
echo user{1..20}|xargs -n1|sed -r 's#(.*)#useradd \1 \&\& pass=`echo $RANDOM |md5sum |cut -c 1-5` \&\& echo \1:$pass>>/tmp/user_passwd.txt \&\& chpasswd</tmp/user_passwd.txt#g'|bash
2.4 【练习题4】扫描网络内存活主机案例
写一个Shell脚本,判断10.0.0.0/24网络里,当前在线的IP有哪些?
脚本内容:
[root@clsn for]# cat scan_ip2.sh#!/bin/bash############################################################## File Name: scan_ip.sh# Version: V1.0# Author: clsn# Organization: http://blog.znix.top# Created Time : 2017-12-07 21:58:47# Description:#############################################################Ip_File=/tmp/scan_ip.txt>$Ip_Filefor i in 10.0.0.{1..254}doping -c 1 -W 1 $i &>/dev/null && \if [ $? -eq 0 ] ;thenecho "存活主机: $i" &>>$Ip_Filefi &doneecho "使用 cat $Ip_File 查看扫描结果"
脚本执行结果
[root@clsn for]# time sh scan_ip2.sh使用 cat /tmp/scan_ip.txt 查看扫描结果real 0m0.290suser 0m0.001ssys 0m0.039s[root@clsn for]# cat /tmp/scan_ip.txt存活主机: 10.0.0.180存活主机: 10.0.0.254
2.5 【练习题5】筛选符合长度的单词案例
利用bash for循环打印下面这句话中字母数不大于6的单词(某企业面试真题)。
I am clsn Welcome to my blog http://blog.znix.top
脚本内容:
[root@clsn for]# vim changdu.sh#!/bin/bash############################################################## File Name: changdu.sh# Version: V1.0# Author: clsn# Organization: http://blog.znix.top# Created Time : 2017-12-07 22:36:48# Description:#############################################################Word='I am clsn Welcome to my blog http://blog.znix.top'for i in $Worddo#[ ${#i} -le 6 ] && echo $i #子串方法a=`echo $i |wc -L`if [ $a -le 6 ]thenecho $ifidone
脚本执行结果
[root@clsn for]# sh changdu.shIamclsntomyblog
方法二:
read -p "请输入要判断的语句:" aset -- $afor i in "$@"doif [ ${#i} -le 6 ];thenecho "$i"fidone
由 https://home.cnblogs.com/u/1233234 @贰佰 提供
使用expr 计算字符串长度
[root@clsn scripts]# expr length '111'3
2.6 【练习题6】破解RANDOM随机数案例
已知下面的字符串是通过RANDOM随机数变量md5sum后,再截取一部分连续字符串的结果,请破解这些字符串对应的使用md5sum处理前的RANDOM对应的数字?
2102929900205d1ca3da16771f6d12dd890684b
脚本内容
[root@clsn for]# vim pojie.sh#!/bin/bash############################################################## File Name: pojie.sh# Version: V1.0# Author: clsn# Organization: http://blog.znix.top# Created Time : 2017-12-07 22:41:01# Description:#############################################################md5File=/tmp/Randow_Md5.txtMd5_Word="21029299 00205d1c a3da1677 1f6d12dd 890684b"if [ ! -f $md5File ]then>$md5Filefor i in {0..32767}doecho `echo $i |md5sum` $i >> $md5Filedoneelsefor num in $Md5_Worddogrep $num $md5Filedonefi
脚本执行结果
[root@clsn for]# sh pojie.sh2102929901ee1aa769d0f479d7d78b05 - 2566700205d1cbbeb97738ad5bbdde2a6793d - 1346a3da1677501d9e4700ed867c5f33538a - 253451f6d12dd61b5c7523f038a7b966413d9 - 7041890684ba3685395c782547daf296935f - 10082
2.7 【练习题7】博客园博文爬虫案例
获取博客园(惨绿少年)博客列表倒序排序考试题
需求如下:
请把https://www.cnblogs.com/clsn/地址中的所有博文,按照时间倒序列表如下:
2017年12月8日 Shell编程基础篇-下
http://www.cnblogs.com/clsn/p/8006210.html
2017年12月7日 memcached 缓存数据库应用实践
http://www.cnblogs.com/clsn/p/7999510.html
高级要求:
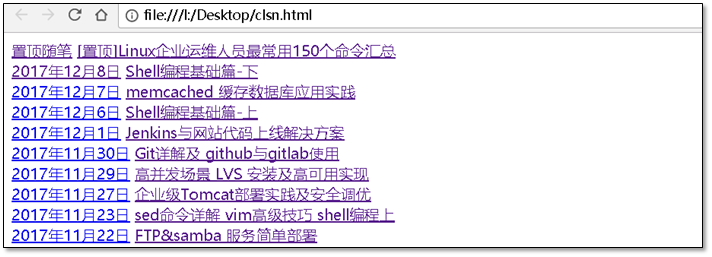
生成html页面,并设置超链接。
结果如改网页展示:http://www.cnblogs.com/clsn/p/8007232.html
脚本内容:
[root@clsn htmp]# cat clsn_blog.sh#!/bin/bash############################################################## File Name: clsn_blog.sh# Version: V1.0# Author: clsn# Organization: http://blog.znix.top# Created Time : 2017-12-08 21:19:12# Description:#############################################################Uri='http://www.cnblogs.com/clsn/default.html?page='clsn_Html=/tmp/html/clsn.htmlmkdir -p /tmp/html/>$clsn_Htmlfor i in {1..6}docurl -s $Uri$i |grep -A 5 'ImageLink' |sed 's#<.*div.*># #g'|sed 's#--#<br>#g' >> $clsn_Htmlecho '<br>' >>$clsn_Htmldone
2.7.1 51CTO博客爬虫案例
脚本内容
[root@clsn html]# cat oldboy_blog.sh#!/bin/bash############################################################## File Name: oldboy_blog.sh# Version: V1.0# Author: clsn# Organization: http://blog.znix.top# Created Time : 2017-12-08 22:30:57# Description:#############################################################Uri='http://blog.51cto.com/oldboy/p'Blog_Index_File=/tmp/html/oldboy_blog.htmlmkdir -p /tmp/html> /tmp/html/oldboy_blog.htmlfor i in {1..29}docurl -s $Uri$i |grep -A 5 '发布于' |\sed '/^.*zan fr.*/,+2d'|\sed 's#^--$#<br>#g'|\sed 's#<a.*fl">发布于:#<a>#g'|\sed 's#<sp.*an>##g' >>\$Blog_Index_Fileecho '<br>' >>$Blog_Index_Filedone
附文本编码转码
[root@clsn for]# iconv --help用法: iconv [选项...] [文件...]转换给定文件的编码。输入/输出格式规范:-f, --from-code=名称 原始文本编码-t, --to-code=名称 输出编码信息:-l, --list 列举所有已知的字符集输出控制:-c 从输出中忽略无效的字符-o, --output=FILE 输出文件-s, --silent 关闭警告--verbose 打印进度信息-?, --help 给出该系统求助列表--usage 给出简要的用法信息-V, --version 打印程序版本号长选项的强制或可选参数对对应的短选项也是强制或可选的
常用:
iconv -f gb2312 -t utf-8 -c clsn.html
3、while循环语句
在编程语言中,while循环(英语:while loop)是一种控制流程的陈述。利用一个返回结果为布林值(Boolean)的表达式作为循环条件,当这个表达式的返回值为“真”(true)时,则反复执行循环体内的程式码;若表达式的返回值为“假”(false),则不再执行循环体内的代码,继续执行循环体下面的代码。
因为while循环在区块内代码被执行之前,先检查陈述是否成立,因此这种控制流程通常被称为是一种前测试循环(pre-test loop)。相对而言do while循环,是在循环区块执行结束之后,再去检查陈述是否成立,被称为是后测试循环。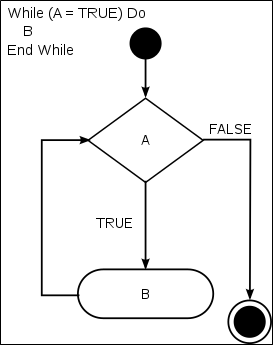
3.1 shell中while语法
while 条件do命令done
3.2 while 使用场景
多用于创建守护进程
【示例1】:while实现web服务器搭建
脚本代码
[root@clsn scripts]# vim web_view.sh#!/bin/bash############################################################## File Name: web_view.sh# Version: V1.0# Author: clsn# Organization: http://blog.znix.top# Created Time : 2017-12-11 10:07:24# Description:#############################################################while truedoecho "ok" | nc -l 81done
客户端进行访问测试
[root@clsn html]# curl 10.0.0.180:81ok
服务端显示结果:
[root@clsn scripts]# sh web_view.shGET / HTTP/1.1User-Agent: curl/7.29.0Host: 10.0.0.180:81Accept: */*
【示例2】:while创建定时任务
脚本内容:
#!/bin/bashwhile truedouptimesleep 0.6done
脚本执行结果
[root@clsn while]# sh while1.sh15:01:52 up 2 days, 6:02, 3 users, load average: 0.00, 0.01, 0.0515:01:53 up 2 days, 6:02, 3 users, load average: 0.00, 0.01, 0.0515:01:53 up 2 days, 6:02, 3 users, load average: 0.00, 0.01, 0.0515:01:54 up 2 days, 6:02, 3 users, load average: 0.00, 0.01, 0.0515:01:55 up 2 days, 6:02, 3 users, load average: 0.00, 0.01, 0.0515:01:55 up 2 days, 6:02, 3 users, load average: 0.00, 0.01, 0.05
说明:
sleep 与 usleep
sleep 单位 秒 sleep 1 休息1秒
usleep 单位 微秒 usleep 1000000 休息1s
1微秒等于百万分之一秒(10的负6次方秒)
时间测试
[root@clsn while]# time sleep 0.1real 0m0.102suser 0m0.001ssys 0m0.000s
3.3 while 作用
补充定时任务功能,执行小于1秒的定时任务
循环执行某些操作,例如水果菜单
http://www.cnblogs.com/clsn/p/8006210.html (1.3.6)
示例1:使用while循环实现水果菜单的重复使用
脚本内容
View Code 使用while循环实现水果菜单的重复使用
脚本执行过程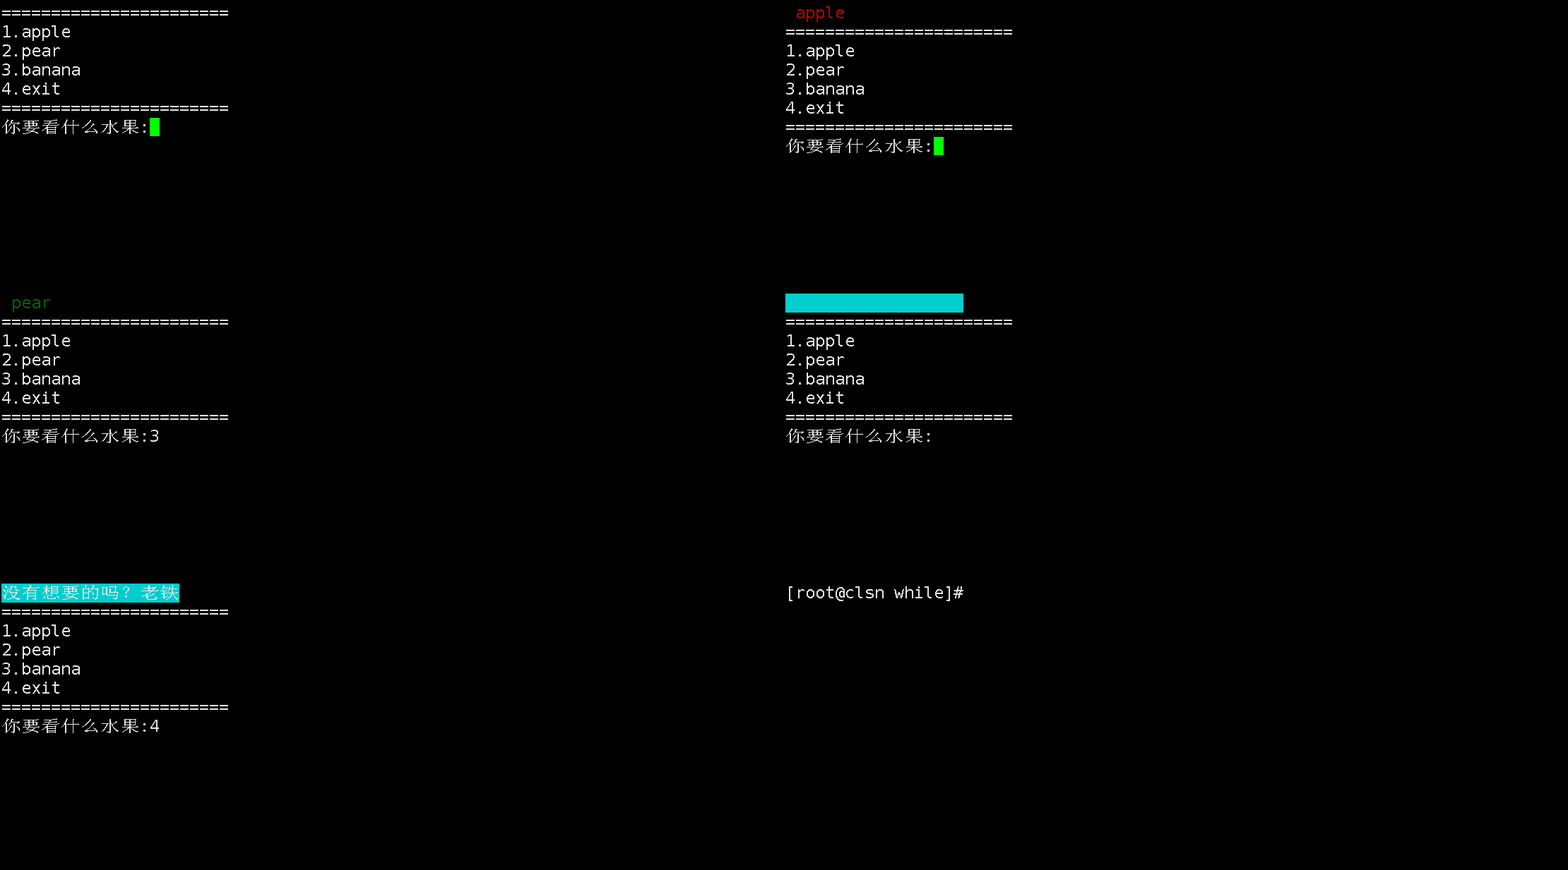
示例2:计算1-100的和
方法一 (bc命令实现)
echo `seq -s + 1 100`|bc
方法二(while循环方法)
[root@clsn while]# cat jishan.sh#!/bin/bash############################################################## File Name: jishan.sh# Version: V1.0# Author: clsn# Organization: http://blog.znix.top# Created Time : 2017-12-09 15:18:44# Description:#############################################################i=1while [ "$i" -le 100 ]do((b=b+i))((i++))doneecho $b
示例3:实现类似手机通讯计费功能
脚本内容:
[root@clsn scripts]# cat while/shouji.sh#!/bin/bash############################################################## File Name: shouji.sh# Version: V1.0# Author: clsn# Organization: http://blog.znix.top# Created Time : 2017-12-09 15:56:09# Description:#############################################################sum=1000i=15while [ $sum -ge 15 ]docat<<EOF=================1.发短信2.查余额3.账户充值4.退出=================EOFread -p "你要做什么呢?" Somecase "$Some" in1)sum=$((sum-i))read -p "请输入发送短信的内容:"read -p "请输入收信人:"sleep 0.3echo "发送成功."echo "您当前余额为$sum";;2)echo "您当前余额为$sum";;3)read -p "请输入你要充值的金额:" ChongZhisum=$((sum+ChongZhi))echo "充值成功,当前余额为$sum";;4)exit;;*)echo "输入有误!"exit 2esacdoneecho "余额不足,请及时充值!"
4、获取取文件中的行,单词和字符
4.1 迭代获取文件中的每一行
方法一
while read line;doecho $line;done < file.txt
方法二
cat file.txt|while read linedoecho $linedone
方法三
exec < file.txtwhile read line;doecho line;done
4.2 迭代获取每一个单词
for word in $line;doecho $word;done
4.3 迭代获取每一个字符
word=participatefor ((i=0;i<${#word};i++))doecho ${word:1:1};done
4.4 同时获取取文件中的行,单词和字符脚本
脚本内容
#!/bin/bashn=1while read idoecho "第${n}行 $i"m=1for x in $idoecho "第${m}个单词 $x"echo $x|grep -o .((m++))done((n++))done < $1
脚本执行结果:
[root@clsn scripts]# sh lunxun.sh /etc/hosts第1行 127.0.0.1 localhost localhost.localdomain localhost4 localhost4.localdomain4第1个单词 127.0.0.1127.0.0.1第2个单词 localhostlocalhost第3个单词 localhost.localdomainlocalhost.localdomain第4个单词 localhost4localhost4第5个单词 localhost4.localdomain4localhost4.localdomain4第2行 ::1 localhost localhost.localdomain localhost6 localhost6.localdomain6第1个单词 ::1::1第2个单词 localhostlocalhost第3个单词 localhost.localdomainlocalhost.localdomain第4个单词 localhost6localhost6第5个单词 localhost6.localdomain6localhost6.localdomain6第3行 10.0.0.1 mirrors.aliyuncs.com mirrors.aliyun.com第1个单词 10.0.0.110.0.0.1第2个单词 mirrors.aliyuncs.commirrors.aliyuncs.com第3个单词 mirrors.aliyun.commirrors.aliyun.com第4行 10.0.0.180 clsn第1个单词 10.0.0.18010.0.0.180第2个单词 clsnclsn
4.5 eval 命令用法
[root@clsn ~]# clsn=6[root@clsn ~]# echo {1..$clsn}{1..6}[root@clsn ~]# eval echo {1..$clsn}1 2 3 4 5 6
eval 命令的说明
[root@clsn ~]# help evaleval: eval [参数 ...]将参数作为 shell 命令执行。将 ARGs 合成一个字符串,用结果作为 shell 的输入,并且执行得到的命令。退出状态:以命令的状态退出,或者在命令为空的情况下返回成功。
5、break continue exit return
条件与循环控制及程序返回值命令表
| 命令 | 说明 |
|---|---|
| break n | 如果省略n,则表示跳出整个循环,n表示跳出循环的层数 |
| continue n | 如果省略n,则表示跳过本次循环,忽略本次循环的剩余代码,进人循环的下一次循环。 n表示退到第n层继续循环 |
| exit n | 退出当前Shell程序,n为上一次程序执行的状态返回值。n也可以省略,在下一个Shell里可通过”$?”接收exit n的n值 |
| return n | 用于在函数里作为函数的返回值,以判断函数执行是否正确。在下一个Shell里可通过”$?”接收exit n的n值 |
简单来说即:
break 跳出循环 continue 跳出本次循环 exit 退出脚本 return 与 exit 相同,在函数中使用
5.1 break命令说明
[root@clsn scripts]# help breakbreak: break [n]退出 for、while、或 until 循环退出一个 FOR、WHILE 或 UNTIL 循环。如果指定了N,则打破N重循环退出状态:退出状态为0除非 N 不大于或等于 1。
测试脚本内容
#!/bin/bashfor i in {1..5}doif [ $i -eq 3 ]thenbreakfiecho $idoneecho "ok"
脚本执行结果
[root@clsn scripts]# sh break.sh12ok
5.2 continue命令说明
[root@clsn scripts]# help continuecontinue: continue [n]继续 for、while、或 until 循环。继续当前 FOR、WHILE 或 UNTIL 循环的下一步。如果指定了 N, 则继续当前的第 N 重循环。退出状态:退出状态为 0 除非 N 不大于或等于1。
测试脚本内容
脚本执行结果
[root@clsn scripts]# sh continue.sh1245ok
5.3 exit命令说明
[root@clsn scripts]# help exitexit: exit [n]退出shell。以状态 N 退出 shell。 如果 N 被省略,则退出状态为最后一个执行的命令的退出状态。
测试脚本内容
#!/bin/bashfor i in {1..5}doif [ $i -eq 3 ]thenexitfiecho $idoneecho "ok"
脚本执行结果
[root@clsn scripts]# sh exit.sh12
5.4 return命令说明
[root@clsn tuichu]# help returnreturn: return [n]从一个 shell 函数返回。使一个函数或者被引用的脚本以指定的返回值 N 退出。如果 N 被省略,则返回状态就是函数或脚本中的最后一个执行的命令的状态。退出状态:返回 N,或者如果 shell 不在执行一个函数或引用脚本时,失败。
6、shell中的数组
6.1 为什么会产生Shell数组
通常在开发Shell脚本时,定义变量采用的形式为“a=l;b=2;C=3”,可如果有多个 变量呢?这时再逐个地定义就会很费劲,并且要是有多个不确定的变量内容,也会难以 进行变量定义,此外,快速读取不同变量的值也是一件很痛苦的事情,于是数组就诞生 了,它就是为了解决上述问题而出现的。
6.2 什么是Shell数组
Shell的数组就是一个元素集合,它把有限个元素(变量或字符内容)用一个名字来 命名,然后用编号对它们进行区分。这个名字就称为数组名,用于区分不同内容的编 号就称为数组下标。组成数组的各个元素(变量)称为数组的元素,有时也称为下标变量。
6.3 数组中的增删改查
数组的定义
# 定义数组[root@clsn scripts]# stu=(001 002 003)# 打印数组[root@clsn scripts]# echo ${stu[@]}001 002 003# 显示数组长度[root@clsn scripts]# echo ${#stu}3
查: 遍历数组的内容
# 打印数组内容(通过数组下标或索引)[root@clsn scripts]# echo ${stu[0]}001[root@clsn scripts]# echo ${stu[1]}002[root@clsn scripts]# echo ${stu[2]}003[root@clsn scripts]# echo ${stu[3]}# 遍历数组方法一[root@clsn scripts]# for i in ${stu[@]};do echo $i ;done001002003# 方法二[root@clsn scripts]# array=(1 2 3 4 5)[root@clsn scripts]# for i in `eval echo {1..${#array[@]}}`;do echo ${array[i-1]};done12345
增:数组添加
[root@clsn scripts]# stu[3]=004[root@clsn scripts]# echo ${stu[@]}001 002 003 004
改:数组修改
[root@clsn scripts]# stu[2]=000[root@clsn scripts]# echo ${stu[@]}001 002 000 004
删:数组删除
[root@clsn scripts]# unset stu[2][root@clsn scripts]# echo ${#stu[@]}3[root@clsn scripts]# echo ${stu[@]}001 002 004
6.4 将命令的结果赋值给数组
dir=(`ls`)dir=($(ls))
命令定义数组
[root@clsn scripts]# COM=(`ls`)[root@clsn scripts]# echo ${COM[@]}bianliang.sh case cfb.sh chanshu.sh check check_url.shclsn.sh clsn_test.sh daojishi.sh ddos_check.sh echo.sh for for2 fruits.shfunction fz.sh html jingdutiao.sh jishuanqi2.sh jishuanqi.sh lamp.sh lnmp.shmemcache_check.sh menu.sh nginx.sh panduan panduan1 play quanju.sh rsync_check.shrsyncd system6 tuichu web_check.sh web_view.sh while xiugaizhuji.sh yhk.sh yunshuan.shzhuajiu.sh
6.1 数组定义格式
[root@clsn scripts]# a=(1 2 3 )[root@clsn scripts]# b=(1> 2> 3> 4> )[root@clsn scripts]# echo ${a[@]}1 2 3[root@clsn scripts]# echo ${b[@]}1 2 3 4
6.2 数组的本质就是一个变量,只是这个变量存了多个值
在shell 常用的功能是查
array=(valuel value2 value3 …)
打印数组格式
${array[@]} 所有元素${#array[@]} 数组长度${array[i]} 单个元素,i是下标
6.3 【练习题】批量检查多个网站地址是否正常
要求:
1、使用shell数组方法实现,检测策略尽量模拟用户访问。
2、每10秒钟做一次所有的检测,无法访问的输出报警。
3、待检测的地址如下
http://www.cnblogs.com/clsn/
http://blog.znix.top
http://blog.nmtui.com
http://10.0.0.7
脚本内容:
[root@clsn scripts]# cat check_url.sh#!/bin/bash############################################################## File Name: check_url.sh# Version: V1.3# Author: clsn# Organization: http://blog.znix.top# Created Time : 2017-12-12 10:44:39# Description:#############################################################url=(http://www.cnblogs.com/clsn/http://blog.znix.tophttp://blog.nmtui.comhttp://10.0.0.7)while truedofor i in ${url[@]}do#curl $i &>/dev/nulla=$(curl -I -w "%{http_code}\n" -o /dev/null -s $i)if [ $a -ne 200 ]thenecho "$url 异常"fidonesleep 10done
7、Shell 函数
shell一个非常重要的特性是它可作为一种编程语言来使用。因为shell是一个解释器,所以它不能对为它编写的程序进行编译,而是在每次从磁盘加载这些程序时对它们进行解释。而程序的加载和解释都是非常耗时的。
针对此问题,许多shell(如BourneAgainShell)都包含shell函数,shell把这些函数放在内存中,这样每次需要执行它们时就不必再从磁盘读入。shell还以一种内部格式来存放这些函数,这样就不必耗费大量的时间来解释它们。
函数的作用就是把程序里多次调用相同代码的部分定义成一份,然后起个名字,所有的调用都 只用这名字就可以了,修改代码时,只需要改变函数体内的代码即可。
7.1 使用函数的优势
- 把相同的程序段定义成函数,可以减少代码量。
- 增加程序的可读、易读性
- 实现程序功能的模块化
7.2 定义函数
```shell function clsn(){ echo “http://blog.znix.top“ }
znix(){ echo “http://www.znix.top “ }
**说明:**<br /> 1、可以带function clsn() 定义,也可以直接clsn() 定义,不带任何参数。<br /> 2、参数返回,可以显示加:return 返回,如果不加,将以最后一条命令运行结果,作为返回值。 return后跟数值n(0-255)<br /> 3、执行函数就是将函数名放到定义的函数之后即可<br />将函数加载到当前窗口执行:```shell[root@clsn function]# . fun1.sh[root@clsn function]# znznew znix[root@clsn function]# znixtest[root@clsn function]# clsnhttp://blog.znix.top
7.3 引用函数
脚本内容
[root@clsn function]# cat fun2.sh#!/bin/bash############################################################## File Name: fun2.sh# Version: V1.0# Author: clsn# Organization: http://blog.znix.top# Created Time : 2017-12-11 19:25:56# Description:#############################################################Fun_File=/server/scripts/function/fun1.sh[ -f $Fun_File ] && . $Fun_Fileclsn
脚本执行结果
[root@clsn function]# sh fun2.shhttp://blog.znix.top
7.4 函数传参
脚本内容:
[root@clsn function]# cat fun3.sh#!/bin/bash############################################################## File Name: fun3.sh# Version: V1.0# Author: clsn# Organization: http://blog.znix.top# Created Time : 2017-12-12 09:38:48# Description:#############################################################function clsn(){echo "Hi "}CLSN(){echo "Hello "echo $0echo $1echo $2}clsnCLSN xi xi
脚本执行结果
[root@clsn function]# sh fun3.shHiHellofun3.shxixi
7.5 $0 永远的脚本名称
function clsn(){echo "http://blog.znix.top $1 $2"echo $0}znix(){echo "test"}clsn $1 $2
执行结果
[root@clsn function]# sh fun1.shhttp://blog.znix.topfun1.sh
7.6 函数中return的用法
脚本内容:
[root@clsn function]# cat fun3.sh#!/bin/bash############################################################## File Name: fun3.sh# Version: V1.0# Author: clsn# Organization: http://blog.znix.top# Created Time : 2017-12-12 09:38:48# Description:#############################################################function clsn(){echo "Hi "}CLSN(){echo "Hello "echo $0echo $1echo $2return 4echo "xxixiixxiix"}clsnCLSN xi xiecho $?
脚本执行结果
return命令说明:
[root@clsn function]# help returnreturn: return [n]从一个 shell 函数返回。使一个函数或者被引用的脚本以指定的返回值 N 退出。如果 N 被省略,则返回状态就是函数或脚本中的最后一个执行的命令的状态。退出状态:返回 N,或者如果 shell 不在执行一个函数或引用脚本时,失败。
7.7 自定义常用函数库
#!/bin/bash############################################################## File Name: /server/scripts/userfun.sh# Version: V1.0# Author: clsn# Organization: http://blog.znix.top# Created Time : 2017-12-12 10:40:04# Description:############################################################## 脚本初始化function scripts_init(){prog=`basename $0 .sh`LockFile=/var/lock/subsys/${prog}.lock # 使用锁文件LogFile=/var/log/${prog}.log # 脚本记录日志PidFile=/var/run/${prog}.pid # 记录进程号,可以管理脚本[ -f $LockFile ] && echo "There $LockFile is exist!!" && exit 1 ||touch $LockFile[ ! -f $LogFile ] && touch $LogFile[ -f $PidFile ] && echo "There $PidFile is exist!!" && exit 2|| echo $$ > $PidFile}# 记录日志function writelog(){Date=$(date "+%F_%T")ShellName=`basename $0`Info=$1echo "$Date : ${ShellName} : ${Info}" >> ${LogFile}}# 脚本退出扫尾function closeout(){[ -f $LockFile ] && rm -f $LockFile[ -f $PidFile ]&& rm -f $PidFile}# 判断输入是整数function int_judge(){fun_a=$1expr $fun_a + 1 &>/dev/nullRETVAL=$?return $RETVAL}# 判断输入非空function input_judge(){RETVAL=0fun_a=$1[ ${#fun_a} -eq 0 ]&& RETVAL=1return $RETVAL}
basename命令
取出文件名称
[root@clsn function]# basename /server/scripts/zhuajiu.shzhuajiu.sh[root@clsn function]# basename /server/scripts/zhuajiu.sh .shzhuajiu
$$ 参数
取出脚本运行时的pid, 脚本运行的当前进程ID号
[root@clsn function]# echo $$37208[root@clsn function]# ps -ef |grep 37208root 37208 37206 0 08:39 pts/0 00:00:00 -bashroot 38578 37208 1 10:33 pts/0 00:00:00 ps -efroot 38579 37208 0 10:33 pts/0 00:00:00 grep --color=auto 37208
引用自定义函数库示例:
[root@clsn function]# head -22 fun3.sh#!/bin/bash############################################################## File Name: fun3.sh# Version: V1.0# Author: clsn# Organization: http://blog.znix.top# Created Time : 2017-12-12 09:38:48# Description:#############################################################. /server/scripts/userfun.shscripts_initi=1while ((i<=10))douptime((i++))sleep 1donecloseout
8、shell脚本的调试
8.1 脚本调试技巧
调试技巧1:使用dos2unix处理脚本
从windows编辑的脚本到Linux下需要使用这个命令dos2unix windows.sh
调试技巧2:使用echo命令调试
在变量读取或修改的前后加入echo $变量,也可在后面使用exit退出脚本,这样可以不用注释后面的代码
调试技巧3:sh -x 脚本 ==》全局调试
sh -x scripts.sh
调试技巧4:局部调试
set -x要调试的脚本内容set +x
8.2 Shell调试技巧小结
①要记得首先用dos2unix对脚本格式化。
②直接执行脚本根据报错来调试,有时报错不准确。
③sh -x调试整个脚本,显示执行过程。
④set -x和set +x调试部分脚本(在脚本中设置)
⑤echo输出变量及相关内容,然后紧跟着exit退出,不执行后面程序的方式,一步步跟踪脚本,对于逻辑错误比较好用。
写法: echo $var;exit
⑥最关键的是语法熟练、编码习惯、编程思想,将错误扼杀在萌芽之中,减轻调试负担,提高效率。
9、shell编程练习题
9.1 【练习题1】shell实现抓阄程序
需要使用shell编写一个抓阄的程序:
要求:
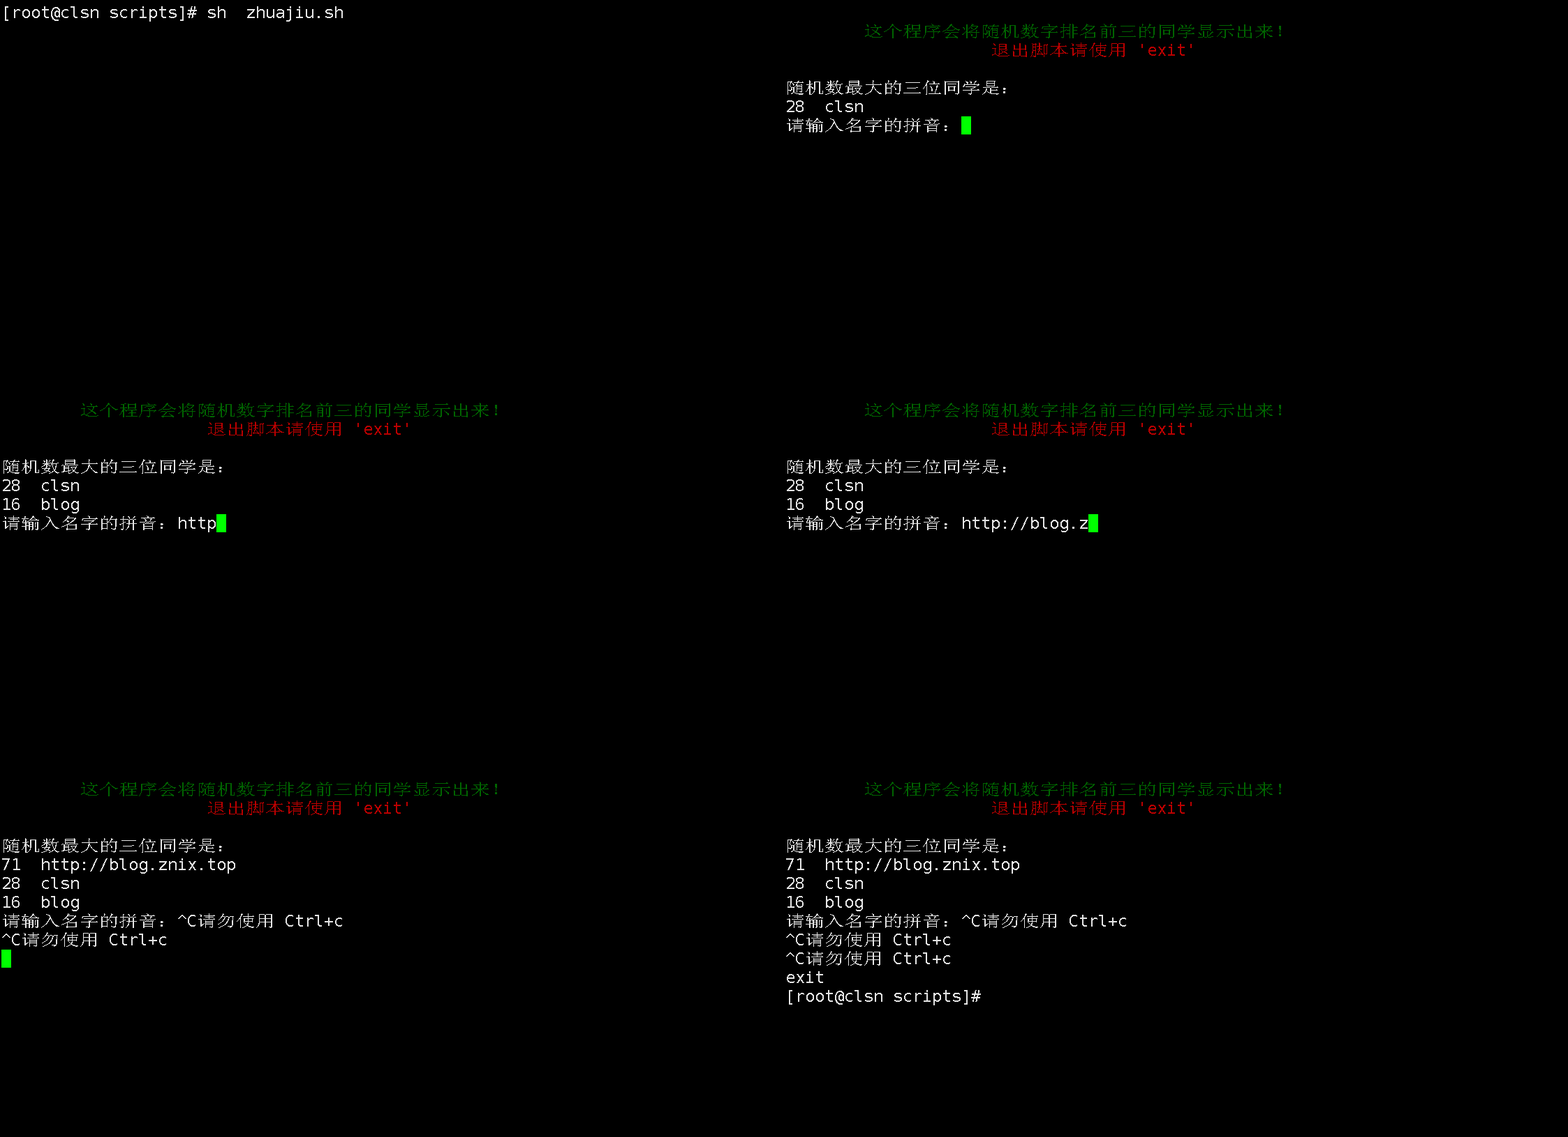
1、执行脚本后,输入英文名字全拼,产生随机数01-99之间的数字,数字越大评分就去高,前面已经抓到的数字,下次不能在出现相同数字。
2、第一个输入名字后,屏幕输出信息,并将名字和数字记录到文件里,程序不能退出继续等待别人输入。
脚本内容:
[root@clsn scripts]# cat zhuajiu.sh#!/bin/bash############################################################## File Name: zhuajiu.sh# Version: V1.0# Author: clsn# Organization: http://blog.znix.top# Created Time : 2017-12-10 15:21:27# Description:#############################################################Randow_Temp=/tmp/randow.testname_Out_File1=/tmp/name_Out_File1.testname_Out_File2=/tmp/name_Out_File2.test>$name_Out_File1>$name_Out_File2>$Randow_Temptrap 'echo "请勿使用 Ctrl+c"' 2Randow() {sum=`echo $RANDOM |cut -c-2`grep $sum $Randow_Tempif [ $? -eq 0 ];thenRandowelseecho $sum >>$Randow_Tempdaxiao=$sumfi}Print() {read -p "请输入名字的拼音:" NameRandowecho $Name $daxiao >>$name_Out_File}while truedoclearecho ""echo -e "\033[32m 这个程序会将随机数字排名前三的同学显示出来!\033[0m"echo -e "\033[31m 退出脚本请使用 'exit' \033[0m"echo ""head -4 $name_Out_File2read -p "请输入名字的拼音:" "Name"if [ "$Name" == exit ]thenexitfiRandowecho $daxiao $Name >>$name_Out_File1echo "随机数最大的三位同学是:" >$name_Out_File2sort -k1 -r $name_Out_File1 |column -t >>$name_Out_File2cleardone
9.2 【练习题2】输出9x9 乘法表
脚本内容:
[root@clsn scripts]# cat cfb.sh#!/bin/bash############################################################## File Name: cfb.sh# Version: V1.0# Author: clsn# Organization: http://blog.znix.top# Created Time : 2017-12-11 15:40:03# Description:#############################################################for a in `seq 1 9`dofor b in `seq 1 9`doif [ $a -ge $b ]thenecho -en "$a x $b = $(expr $a \* $b) "fidoneecho " "done
执行结果
[root@clsn scripts]# sh cfb.sh1 x 1 = 12 x 1 = 2 2 x 2 = 43 x 1 = 3 3 x 2 = 6 3 x 3 = 94 x 1 = 4 4 x 2 = 8 4 x 3 = 12 4 x 4 = 165 x 1 = 5 5 x 2 = 10 5 x 3 = 15 5 x 4 = 20 5 x 5 = 256 x 1 = 6 6 x 2 = 12 6 x 3 = 18 6 x 4 = 24 6 x 5 = 30 6 x 6 = 367 x 1 = 7 7 x 2 = 14 7 x 3 = 21 7 x 4 = 28 7 x 5 = 35 7 x 6 = 42 7 x 7 = 498 x 1 = 8 8 x 2 = 16 8 x 3 = 24 8 x 4 = 32 8 x 5 = 40 8 x 6 = 48 8 x 7 = 56 8 x 8 = 649 x 1 = 9 9 x 2 = 18 9 x 3 = 27 9 x 4 = 36 9 x 5 = 45 9 x 6 = 54 9 x 7 = 63 9 x 8 = 72 9 x 9 = 81
9.3 【练习题3】解决dDOS攻击生产案例
写一个Shell脚本解决DOS攻击生产案例。
请根据web日志或者或者网络连接数,监控当某个IP并发连接数或者短时内PV达到100(读者根据实际情况设定),即调用防火墙命令封掉对应的IP。防火墙命令为:iptables-I INPUT -s IP地址 -j DROP。
练习使用日志下载地址:https://files.cnblogs.com/files/clsn/access-web-log.zip
脚本内容:
[root@clsn while]# cat ddos_check.sh#!/bin/bash############################################################## File Name: ddos_check.sh# Version: V1.0# Author: clsn# Organization: http://blog.znix.top# Created Time : 2017-12-10 12:34:15# Description:#############################################################Info_File=/tmp/ddos_check.log#从连接数获取#netstat -lant|awk -F "[ :]+" '/180:80/{clsn[$6]++}END{for(pol in clsn)print pol,clsn[pol]}' >$Info_File# 从日志获取awk '{hotel[$1]++}END{for(pol in hotel)print pol,hotel[pol]}' access.log|sort -nk2 -r >$Info_Filewhile read linedoIp_Add=`echo $line |awk '{print $1}'`Access=`echo $line |awk '{print $2}'`if [ $Access -ge 10000 ]then#echo $Ip_Addiptables -I INPUT -s $Ip_Add -j DROPfidone <$Info_File
脚本执行结果:
[root@clsn while]# iptables -LChain INPUT (policy ACCEPT)target prot opt source destinationDROP all -- 112.64.171.98 anywhereDROP all -- 58.220.223.62 anywhereChain FORWARD (policy ACCEPT)target prot opt source destinationChain OUTPUT (policy ACCEPT)target prot opt source destination
其他方法进行日志分析
elk日志分析
http://blog.oldboyedu.com/elk/
nginx-WAF
http://blog.oldboyedu.com/nginx-waf/
9.4 【练习题4】开发脚本入侵检测与报警案例(入侵检测系统)
监控web站点目录(/var/html/www)下所有文件是否被恶意篡改(文件内容被改了),如果有就打印改动的文件名(发邮件),定时任务每3分钟执行一次。
IDS是英文“Intrusion Detection Systems”的缩写,中文意思是“入侵检测系统”。
脚本内容
第一个里程碑:生成md5验证文件
文件的校验文件
find /var/html/www/* -type f |xargs md5sum >/tmp/check/web_file_check.md5sum
目录的校验文件
tree /var/html/www/ -d >/tmp/check/web_dir_check.txtmd5sum /tmp/check/web_dir_check.txtmd5sum /tmp/check/web_dir_check.txt >/tmp/check/web_dir_check.md5sum
脚本内容
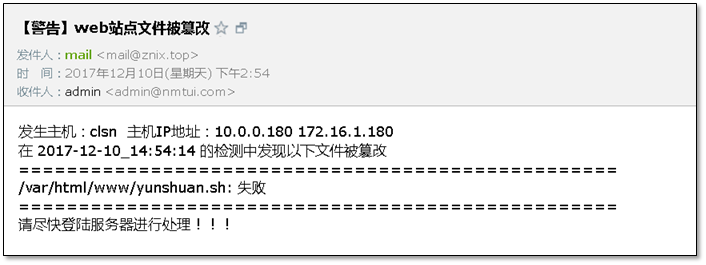
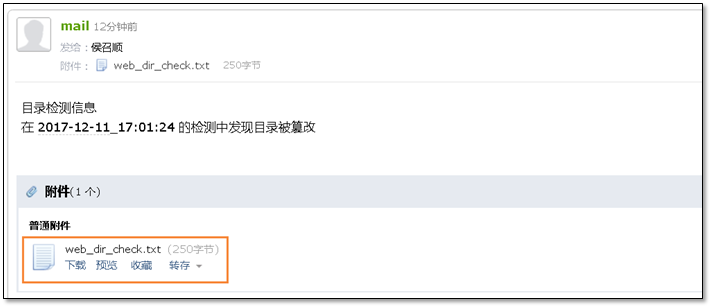
[root@clsn check]# cat web_file_check.sh#!/bin/bash############################################################## File Name: web_file_check.sh# Version: V1.0# Author: clsn# Organization: http://blog.znix.top# Created Time : 2017-12-10 14:15:34# Description:#############################################################Url1=http://10.0.0.1/web_file_check.md5sumUrl2=http://10.0.0.1/web_dir_check.md5sumDir=/tmp/check/Web_Dir=/var/html/www/Check_File1=/tmp/check/web_file_check.md5sumCheck_File2=/tmp/check/web_dir_check.md5sumCheck_Dir=/tmp/check/web_dir_check.txtCheck_Out=/tmp/check/check_out.md5sumMail_info=/tmp/check/mail.txtDate=`date +%F_%T`Host_Name=`hostname`Host_IP=`hostname -I`Email_Addr=995701749@qq.com[ -d $Dir ] || mkdir -p $Dirif [ ! -f $Check_File1 ]thencd $Dir &&\wget $Url1elif [ ! -f $Check_File2 ]thencd $Dir &&\wget $Url2fimd5sum -c $Check_File1 >$Check_Out 2>/dev/nullBack_num1=$?tree -d $Web_Dir >$Check_Dirmd5sum -c $Check_File2 &>/dev/nullBack_num2=$?if [ $Back_num1 -ne 0 ]thenecho "发生主机:$Host_Name 主机IP地址:$Host_IP" > $Mail_infoecho "在 $Date 的检测中发现以下文件被篡改" >>$Mail_infoecho "==================================================" >>$Mail_infoegrep -i "失败|failed" $Check_Out >>$Mail_infoecho "==================================================" >>$Mail_infoecho "请尽快登陆服务器进行处理!!!" >>$Mail_infomail -s "【警告】web站点文件被篡改" -a $Check_File1 $Email_Addr <$Mail_infofiif [ $Back_num2 -ne 0 ]thenecho "目录检测信息" >$Mail_infoecho "在 $Date 的检测中发现目录被篡改" >>$Mail_infomail -s "【警告】web站点目录被篡改" -a $Check_Dir $Email_Addr<$Check_Dirfi
9.5 【练习题5】单词及字母去重排序案例
用shell处理以下内容
1、按单词出现频率降序排序!
2、按字母出现频率降序排序!
the squid project provides a number ofresources to assist users design implement and support squid installations.Please browse the documentation and support sections for more infomation byoldboy training
脚本内容:
[root@clsn play]# cat abc.sh#!/bin/bash############################################################## File Name: abc.sh# Version: V1.0# Author: clsn# Organization: http://blog.znix.top# Created Time : 2017-12-11 17:23:19# Description:#############################################################a="the squid project provides a number ofresources to assist users design implement and support squid installations.Please browse the documentation and support sections for more infomation byoldboy training"echo "按单词出现频率降序排序!"for i in $adoecho $idone|\sort |uniq -c|sort -nk1 -recho "按字母出现频率降序排序!"echo $a |grep -o "[a-z]" |sort|uniq -c |sort -nk1 -r
9.6 【练习题6】编写正(或长)方形图形案例
请用shell或Python编写一个正(或长)方形,接收用户输入的数字。
shell脚本内容
[root@clsn play]# cat zhengfangxing.sh#!/bin/bash############################################################## File Name: zhengfangxing.sh# Version: V1.0# Author: clsn# Organization: http://blog.znix.top# Created Time : 2017-12-11 17:33:33# Description:#############################################################trap "echo 输入exit退出" 2while truedoread -p "你想看多大的正方形:" a[ "$a" == "exit" ] && exitexpr 1 + $a &>/dev/null[ $? -ne 0 ] && echo "请输入一个数字!" && exit 2b="■ "d=$(for i in `eval echo {1..$a}`;do echo -n $b; echo -n " ";done)for i in `eval echo {1..$a}`doecho "$d"donedone
脚本执行效果
[root@clsn play]# sh zhengfangxing.sh 4■ ■ ■ ■■ ■ ■ ■■ ■ ■ ■■ ■ ■ ■[root@clsn play]# sh zhengfangxing.sh 3■ ■ ■■ ■ ■■ ■ ■
10、各种语句小结
- while循环的特长是执行守护进程以及我们希望循环不退出持续执行,用于频率小于1分钟循环处理(crond),其他的while循环几乎都可以被for循环替代。
- case语句可以被if语句替换,一般在系统启动脚本传入少量固定规则字符串用case语句,其他普通判断多用if。
- 一句话,if,for语句最常用,其次while(守护进程),case(服务启动脚本)。
11、附录
11.1 格式化文本—对齐文本
```shell [root@clsn scripts]# column —help
用法: column [选项] [文件 …]
选项: -c, —columns <宽度> 输出宽度(字符数) -t, —table 创建表格 -s, —separator <字符串> 可用的表格分隔符 -o, —output-separator <字符串> 表格输出列分隔符,默认为两个空格 -x, —fillrows 先填充行,再填充列
-h, —help 显示此帮助并退出 -V, —version 输出版本信息并退出
更多信息请参阅 column(1)。
<a name="ncy8u"></a>## 11.2 服务器被挂马怎么办?1. 将被挂马服务器上,原有重要数据备份下来<br />1. 仔细筛查数据,确保其中都是正常文件<br />1. 重新安装服务器操作系统,并针对性的加强安全防护。<br />切记,服务器中木马后必须重新安装操作系统。<a name="ztIhg"></a>## 11.3 怎么通过进程找到程序通过进程找到pid号码```shell[root@clsn proc]# ps -ef |grep sshdroot 1294 1 0 09:18 ? 00:00:00 /usr/sbin/sshd -D
通过pid找到在proc目录下的临时文件夹
[root@clsn proc]# cd /proc/1294[root@clsn 1294]#
查看其中的exe文件,即可发现程序文件的路径
[root@clsn 1294]# ll exelrwxrwxrwx 1 root root 0 12月 11 09:18 exe -> /usr/sbin/sshd
11.4 screen程序 防止脚本执行中断
用操作,更多详情参照 http://www.cnblogs.com/clsn/p/8022625.html
ctrl +a +d 退出当前终端,返回加载screen前的shell命令状态screen -ls 可看screen会话screen -r id 指定进入哪个screen会话
screen进程原理
[root@clsn ~]# ps -ef |grep pingroot 30170 30153 0 11:57 pts/5 00:00:00 ping 10.0.0.254root 30172 30078 0 11:58 pts/0 00:00:00 grep --color=auto ping[root@clsn ~]# ps -ef |grep 30170root 30170 30153 0 11:57 pts/5 00:00:00 ping 10.0.0.254root 30174 30078 0 11:59 pts/0 00:00:00 grep --color=auto 30170[root@clsn ~]# ps -ef |grep 30153root 30153 30119 0 11:57 pts/5 00:00:00 /bin/bashroot 30170 30153 0 11:57 pts/5 00:00:00 ping 10.0.0.254root 30176 30078 0 11:59 pts/0 00:00:00 grep --color=auto 30153[root@clsn ~]# ps -ef |grep 30119root 30119 1 0 11:56 ? 00:00:00 SCREENroot 30120 30119 0 11:56 pts/4 00:00:00 /bin/bashroot 30153 30119 0 11:57 pts/5 00:00:00 /bin/bashroot 30178 30078 0 11:59 pts/0 00:00:00 grep --color=auto 30119
11.5 shell中实现倒计时效果
脚本内容
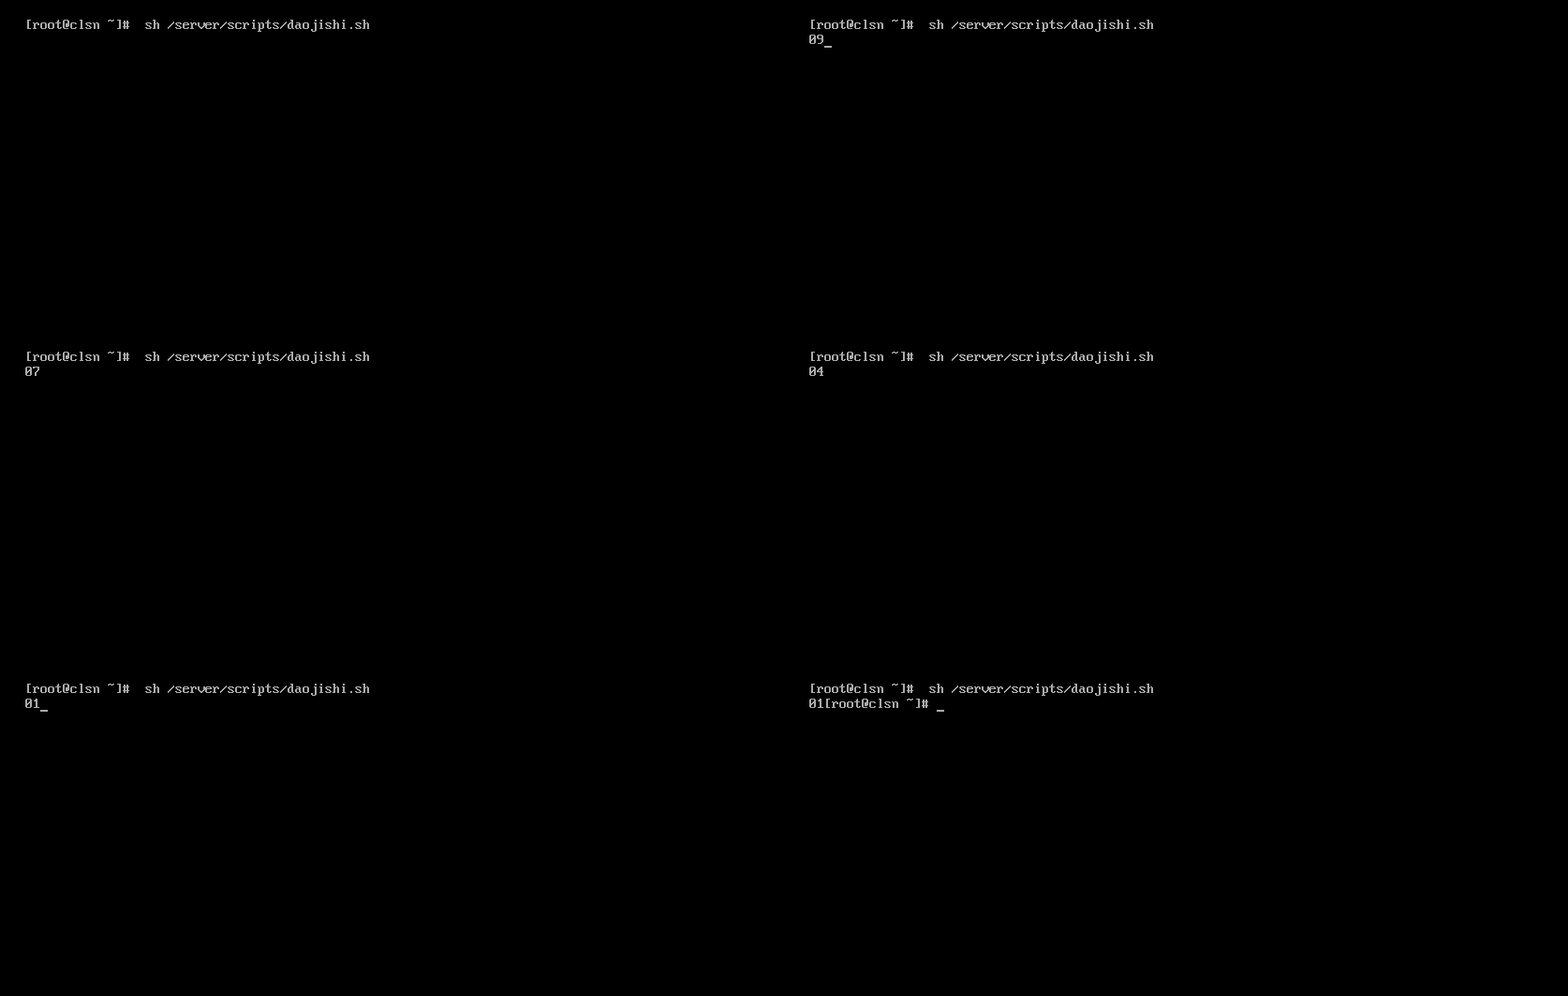
[root@clsn scripts]# cat daojishi.sh#!/bin/bash############################################################## File Name: daojishi.sh# Version: V1.0# Author: clsn# Organization: http://blog.znix.top# Created Time : 2017-12-12 08:49:11# Description:#############################################################for i in `seq -w 10 -1 1`doecho -ne "\b\b$i";sleep 1;done
12、linux中的信号
12.1 Linux系统的重要信号及说明
| 信号 | 说明 |
|---|---|
| HUP(l) | 挂起,通常因终端掉线或用户退出而引发 |
| INT(2) | 中断,通常因按下Ctrl+c组合键而引发 |
| QUIT(3) | 退出,通常因按下Ctrl+\组合键而引发 |
| ABRT(6) | 中止,通常因某些严重的执行错误而引发 |
| ALRM(14) | 报警,通常用来处理超时 |
| TERM(15) | 终止,通常在系统关机时发送 |
| TSTP(20) | 停止进程的运行,但该信号可以被处理和忽略,通常因按下Ctrl+z组合键而引发 |
使用trap控制信号通常需要忽略的信号包括HUP、INT、QUIT、TSTP、TERM等,对应的信号编号分别为1、2、3、20、15。Shell脚本中既可以用数字来代表信号,也可以使用信号的名字来代表信号
12.2使用trap控制信号
trap命令用于指定在接收到信号后将要采取的行动,信号的相关说明前面已经提到 过。trap命令的一种常见用途是在脚本程序被中断时完成清理工作,或者屏蔽用户非法 使用的某些信号。在使用信号名时需要省略SIG前缀。可以在命令提示符下输人命令 trap -1来查看信号的编号及其关联的名称。
trap命令的参数分为两部分,前一部分是接收到指定信号时将要采取的行动,后一部分是要处理的信号名。
trap命令的使用语法如下:
trap command signal
signal是指接收到的信号,command是指接收到该信号应采取的行动。也就是:
trap ‘命令;命令’ 信号编号或trap ‘命令;命令’ 信号名
[root@clsn ~]# trap 'echo clsn' 2[root@clsn ~]# ^Cclsn
13、参考文档
http://blog.csdn.net/zhangna20151015/article/details/50293987 https://zh.wikipedia.org/wiki/For迴圈#傳統的for迴圈_for-loops
https://zh.wikipedia.org/wiki/While迴圈
https://www.cnblogs.com/kerrycode/p/6537175.html (生产随机数)
http://blog.51cto.com/lidao/1936495 (不循环,批量创建用户)
