1、关于版本控制
1.1 本地版本控制
本地版本控制系统 许多人习惯用复制整个项目目录的方式来保存不同的版本,或许还会改名加上备份时间以示区别。这么做唯一的 好处就是简单,但是特别容易犯错。有时候会混淆所在的工作目录,一不小心会写错文件或者覆盖意想外的文件。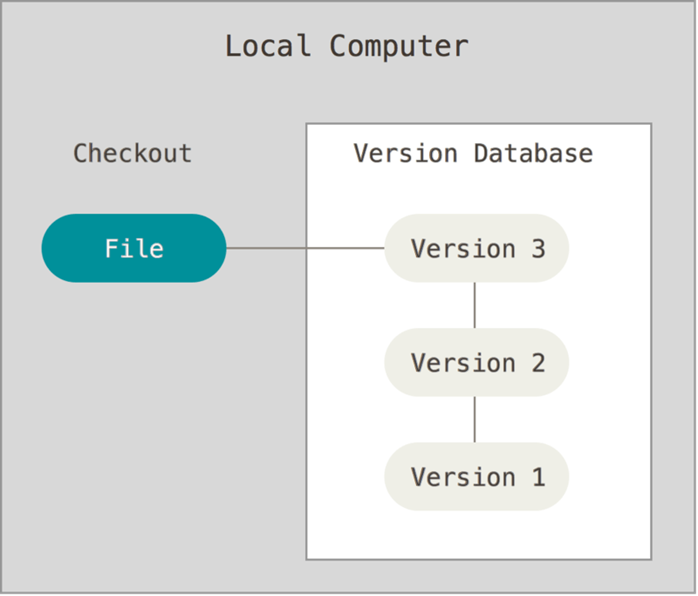
1.2 集中化的版本控制系统
如何让在不同系统上的开发者协同工作?于是,集中化的版本控制系统(Centralized Version Control Systems,简称 CVCS)应运而生。这类系统,诸如 CVS、Subversion 以及Perforce 等,都有一个单一的集中管理的服务器,保存所有文件的修订版本,而协同工作的人们都通过客户端连到这台服务器,取出最新的文件或者提交更新。多年以来,这已成为版本控制系统的标准做法。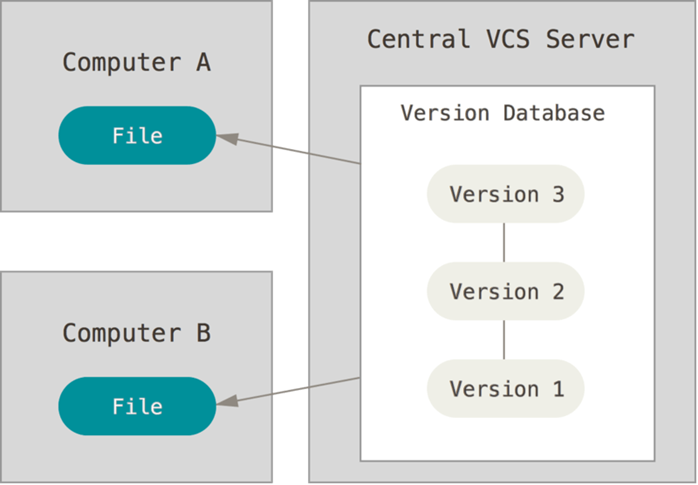
1.3 分布式版本控制系统
在这类系统中,像Git、Mercurial、Bazaar 以及 Darcs 等,客户端并不只提取最新版本的文件快照,而是把代码仓库完整地镜像下来。这么一来,任何一处协同工作用的服务器发生故障,事后都可以用任何一个镜像出来的本地仓库恢复。因为每一次的克隆操作,实际上都是一次对代码仓库的完整备份。<br />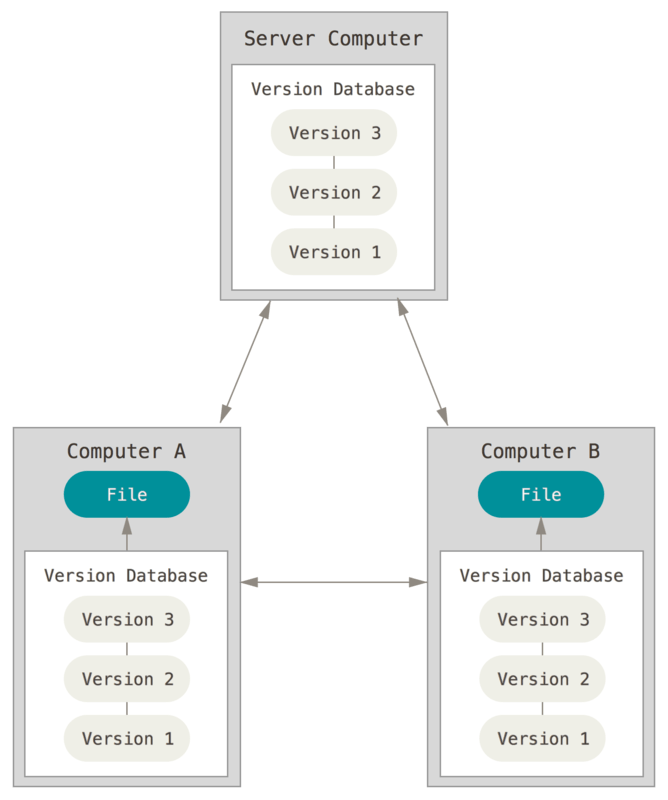
2、Git简介

官网:https://git-scm.com
git是一个分布式版本控制软件,最初由林纳斯·托瓦兹(Linus Torvalds)创作,于2005年以GPL发布。最初目的是为更好地管理Linux内核开发而设计。
Git 官方中文手册 https://git-scm.com/book/zh/v2
2.1 Git历史
自2002年开始,林纳斯·托瓦兹决定使用BitKeeper作为Linux内核主要的版本控制系统用以维护代码。因为BitKeeper为专有软件,这个决定在社区中长期遭受质疑。在Linux社区中,特别是理查德·斯托曼与自由软件基金会的成员,主张应该使用开放源代码的软件来作为Linux核心的版本控制系统。林纳斯·托瓦兹曾考虑过采用现成软件作为版本控制系统(例如Monotone),但这些软件都存在一些问题,特别是性能不佳。现成的方案,如CVS的架构,受到林纳斯·托瓦兹的批评。
2005年,安德鲁·垂鸠写了一个简单程序,可以连接BitKeeper的存储库,BitKeeper著作权拥有者拉里·麦沃伊认为安德鲁·垂鸠对BitKeeper内部使用的协议进行逆向工程,决定收回无偿使用BitKeeper的授权。Linux内核开发团队与BitMover公司进行蹉商,但无法解决他们之间的歧见。林纳斯·托瓦兹决定自行开发版本控制系统替代BitKeeper,以十天的时间,编写出第一个git版本
3、安装git
3.1 环境说明
[root@gitlab ~]# rpm -qa centos-releasecentos-release-7-4.1708.el7.centos.x86_64[root@gitlab ~]# uname -aLinux gitlab 3.10.0-693.el7.x86_64 #1 SMP Tue Aug 22 21:09:27 UTC 2017 x86_64 x86_64 x86_64 GNU/Linux[root@gitlab ~]# getenforceDisabled[root@gitlab ~]# systemctl status firewalld.service● firewalld.service - firewalld - dynamic firewall daemonLoaded: loaded (/usr/lib/systemd/system/firewalld.service; disabled; vendor preset: enabled)Active: inactive (dead)Docs: man:firewalld(1)
本文使用的linux系统均为该系统
# 本文使用的windows系统为 Microsoft Windows [版本 10.0.15063]
3.2 Yum安装Git
centos 自带git
[root@gitlab ~]# rpm -qa gitgit-1.8.3.1-11.el7.x86_64
安装方法
yum install git -y
3.3 编译安装
编译安装可以安装较新版本的git
Git下载地址: https://github.com/git/git/releases
# 安装依赖关系yum install curl-devel expat-devel gettext-devel openssl-devel zlib-devel# 编译安装tar -zxf git-2.0.0.tar.gzcd git-2.0.0make configure./configure --prefix=/usrmakemake install
4、初次运行 Git 前的配置
4.1 配置git
命令集
git config --global user.name "clsn" #配置git使用用户git config --global user.email "admin@znix.top" #配置git使用邮箱git config --global color.ui true #语法高亮git config --list # 查看全局配置
配置过程
[root@gitlab ~]# git config --global user.name "clsn" #配置git使用用户[root@gitlab ~]# git config --global user.email "admin@znix.top" #配置git使用邮箱[root@gitlab ~]# git config --global color.ui true #语法高亮[root@gitlab ~]# git config --list # 查看全局配置user.name=clsnuser.email=admin@znix.topcolor.ui=true
生成的配置文件
[root@gitlab ~]# cat .gitconfig[user]name = clsnemail = admin@znix.top[color]ui = true
4.2 获取帮助
使用Git时需要获取帮助,有三种方法可以找到Git命令的使用手册:
git help <verb>git <verb> --helpman git-<verb>
例如,要想获得配置命令的手册,执行
git help config
5、获取 Git 仓库(初始化仓库)
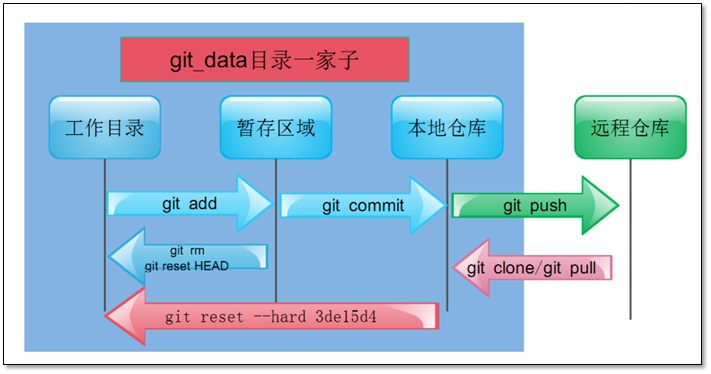
# 创建目录mkdir git_data# 进入目录cd git_data/# 初始化git init# 查看工作区状态git status
操作过程
[root@gitlab ~]# mkdir git_data[root@gitlab ~]# cd git_data/[root@gitlab git_data]# git init初始化空的 Git 版本库于 /root/git_data/.git/[root@gitlab git_data]# git status# 位于分支 master## 初始提交#无文件要提交(创建/拷贝文件并使用 "git add" 建立跟踪)
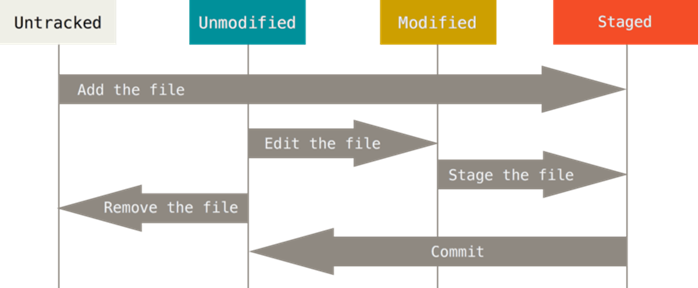
6、Git命令常规操作
常用命令说明
| 命令 | 命令说明 |
|---|---|
| add | 添加文件内容至索引 |
| bisect | 通过二分查找定位引入 bug 的变更 |
| branch | 列出、创建或删除分支 |
| checkout | 检出一个分支或路径到工作区 |
| clone | 克隆一个版本库到一个新目录 |
| commit | 记录变更到版本库 |
| diff | 显示提交之间、提交和工作区之间等的差异 |
| fetch | 从另外一个版本库下载对象和引用 |
| grep | 输出和模式匹配的行 |
| init | 创建一个空的 |
| Git | 版本库或重新初始化一个已存在的版本库 |
| log | 显示提交日志 |
| merge | 合并两个或更多开发历史 |
| mv | 移动或重命名一个文件、目录或符号链接 |
| pull | 获取并合并另外的版本库或一个本地分支 |
| push | 更新远程引用和相关的对象 |
| rebase | 本地提交转移至更新后的上游分支中 |
| reset | 重置当前HEAD到指定状态 |
| rm | 从工作区和索引中删除文件 |
| show | 显示各种类型的对象 |
| status | 显示工作区状态 |
| tag | 创建、列出、删除或校验一个GPG签名的 tag 对象 |
6.1 创建文件
[root@gitlab git_data]# touch README[root@gitlab git_data]# git status# 位于分支 master## 初始提交## 未跟踪的文件:# (使用 "git add <file>..." 以包含要提交的内容)## README提交为空,但是存在尚未跟踪的文件(使用 "git add" 建立跟踪)
添加文件跟踪
[root@gitlab git_data]# git add ./*[root@gitlab git_data]# git status# 位于分支 master## 初始提交## 要提交的变更:# (使用 "git rm --cached <file>..." 撤出暂存区)## 新文件: README#
文件会添加到.git的隐藏目录
[root@gitlab git_data]# tree .git/.git/├── branches├── config├── description├── HEAD├── hooks│ ├── applypatch-msg.sample│ ├── commit-msg.sample│ ├── post-update.sample│ ├── pre-applypatch.sample│ ├── pre-commit.sample│ ├── prepare-commit-msg.sample│ ├── pre-push.sample│ ├── pre-rebase.sample│ └── update.sample├── index├── info│ └── exclude├── objects│ ├── e6│ │ └── 9de29bb2d1d6434b8b29ae775ad8c2e48c5391│ ├── info│ └── pack└── refs├── heads└── tags
由工作区提交到本地仓库
[root@gitlab git_data]# git commit -m 'first commit'[master(根提交) bb963eb] first commit1 file changed, 0 insertions(+), 0 deletions(-)create mode 100644 README
查看git的状态
[root@gitlab git_data]# git status# 位于分支 master无文件要提交,干净的工作区
提交后的git目录状态
[root@gitlab git_data]# tree .git/.git/├── branches├── COMMIT_EDITMSG├── config├── description├── HEAD├── hooks│ ├── applypatch-msg.sample│ ├── commit-msg.sample│ ├── post-update.sample│ ├── pre-applypatch.sample│ ├── pre-commit.sample│ ├── prepare-commit-msg.sample│ ├── pre-push.sample│ ├── pre-rebase.sample│ └── update.sample├── index├── info│ └── exclude├── logs│ ├── HEAD│ └── refs│ └── heads│ └── master├── objects│ ├── 54│ │ └── 3b9bebdc6bd5c4b22136034a95dd097a57d3dd│ ├── bb│ │ └── 963eb32ad93a72d9ce93e4bb55105087f1227d│ ├── e6│ │ └── 9de29bb2d1d6434b8b29ae775ad8c2e48c5391│ ├── info│ └── pack└── refs├── heads│ └── master└── tags
6.2 添加新文件
git add * 添加到暂存区域git commit 提交git仓库 -m 后面接上注释信息,内容关于本次提交的说明,方便自己或他人查看
修改或删除原有文件
常规方法
git add *git commit
简便方法
git commit -a -m "注释信息"
-a 表示直接提交
Tell the command to automatically stage files that have been modified and deleted, but new files you have not told Git about arenot affected.
6.3 删除git内的文件
命令说明:
• 没有添加到暂存区的数据直接rm删除即可。
• 已经添加到暂存区数据:
git rm --cached database#→将文件从git暂存区域的追踪列表移除(并不会删除当前工作目录内的数据文件)git rm -f database#→将文件数据从git暂存区和工作目录一起删除
命令实践:
# 创建新文件[root@gitlab git_data]# touch 123[root@gitlab git_data]# git status# 位于分支 master# 未跟踪的文件:# (使用 "git add <file>..." 以包含要提交的内容)## 123提交为空,但是存在尚未跟踪的文件(使用 "git add" 建立跟踪)
将文件添加到暂存区域
[root@gitlab git_data]# git add 123[root@gitlab git_data]# git status# 位于分支 master# 要提交的变更:# (使用 "git reset HEAD <file>..." 撤出暂存区)## 新文件: 123
删除文件
[root@gitlab git_data]# rm 123 -f[root@gitlab git_data]# ls[root@gitlab git_data]# git status# 位于分支 master# 要提交的变更:# (使用 "git reset HEAD <file>..." 撤出暂存区)## 新文件: 123## 尚未暂存以备提交的变更:# (使用 "git add/rm <file>..." 更新要提交的内容)# (使用 "git checkout -- <file>..." 丢弃工作区的改动)## 删除: 123#
[root@gitlab git_data]# git reset HEAD ./*[root@gitlab git_data]# git status# 位于分支 master无文件要提交,干净的工作区
6.4 重命名暂存区数据
• 没有添加到暂存区的数据直接mv/rename改名即可。
• 已经添加到暂存区数据:
git mv README NOTICE
6.5 查看历史记录
• git log #→查看提交历史记录
• git log -2 #→查看最近几条记录
• git log -p -1 #→-p显示每次提交的内容差异,例如仅查看最近一次差异
• git log —stat -2 #→—stat简要显示数据增改行数,这样能够看到提交中修改过的内容,对文件添加或移动的行数,并在最后列出所有增减行的概要信息
• git log —pretty=oneline #→—pretty根据不同的格式展示提交的历史信息
• git log —pretty=fuller -2 #→以更详细的模式输出提交的历史记录
• git log —pretty=fomat:”%h %cn” #→查看当前所有提交记录的简短SHA-1哈希字串与提交着的姓名。
使用format参数来指定具体的输出格式
| 格式 | 说明 |
|---|---|
| %s | 提交说明。 |
| %cd | 提交日期。 |
| %an | 作者的名字。 |
| %cn | 提交者的姓名。 |
| %ce | 提交者的电子邮件。 |
| %H | 提交对象的完整SHA-1哈希字串。 |
| %h | 提交对象的简短SHA-1哈希字串。 |
| %T | 树对象的完整SHA-1哈希字串。 |
| %t | 树对象的简短SHA-1哈希字串。 |
| %P | 父对象的完整SHA-1哈希字串。 |
| %p | 父对象的简短SHA-1哈希字串。 |
| %ad | 作者的修订时间。 |
命令实践
[root@gitlab git_data]# git logcommit a409fc46f792228a8119705e9cc97c2a013534abAuthor: clsn <admin@znix.top>Date: Wed Nov 29 11:44:14 2017 +0800testcommit bb963eb32ad93a72d9ce93e4bb55105087f1227dAuthor: clsn <admin@znix.top>Date: Wed Nov 29 10:57:02 2017 +0800first commit
6.6 还原历史数据
Git服务程序中有一个叫做HEAD的版本指针,当用户申请还原数据时,其实就是将HEAD指针指向到某个特定的提交版本,但是因为Git是分布式版本控制系统,为了避免历史记录冲突,故使用了SHA-1计算出十六进制的哈希字串来区分每个提交版本,另外默认的HEAD版本指针会指向到最近的一次提交版本记录,而上一个提交版本会叫HEAD^,上上一个版本则会叫做HEAD^^,当然一般会用HEAD~5来表示往上数第五个提交版本。
git reset —hard hash
git reset —hard HEAD^ #→还原历史提交版本上一次
git reset —hard 3de15d4 #→找到历史还原点的SHA-1值后,就可以还原(值不写全,系统会自动匹配)
测试命令
[root@gitlab git_data]# git logcommit a409fc46f792228a8119705e9cc97c2a013534abAuthor: clsn <13835544305@163.com>Date: Wed Nov 29 11:44:14 2017 +0800testcommit bb963eb32ad93a72d9ce93e4bb55105087f1227dAuthor: clsn <13835544305@163.com>Date: Wed Nov 29 10:57:02 2017 +0800first commit
还原数据
[root@gitlab git_data]# git reset --hard bb963HEAD 现在位于 bb963eb first commit# 查看数据[root@gitlab git_data]# lsREADME
6.7 还原未来数据
什么是未来数据?就是你还原到历史数据了,但是你后悔了,想撤销更改,但是git log已经找不到这个版本了。
git reflog #→查看未来历史更新点
测试命令
[root@gitlab git_data]# git reflogbb963eb HEAD@{0}: reset: moving to bb963a409fc4 HEAD@{1}: reset: moving to a409fc4bb963eb HEAD@{2}: reset: moving to bb963a409fc4 HEAD@{3}: commit: testbb963eb HEAD@{4}: commit (initial): first commit[root@gitlab git_data]#
6.8 标签使用
前面回滚使用的是一串字符串,又长又难记。
git tag v1.0 #→当前提交内容打一个标签(方便快速回滚),每次提交都可以打个tag。
git tag #→查看当前所有的标签
git show v1.0 #→查看当前1.0版本的详细信息
git tag v1.2 -m “version 1.2 release is test” #→创建带有说明的标签,-a指定标签名字,-m指定说明文字
git tag -d v1.0 #→我们为同一个提交版本设置了两次标签,删除之前的v1.0
测试命令
[root@gitlab git_data]# git reset --hard 0bdf2e7HEAD is now at 0bdf2e7 modified README file[root@gitlab git_data]# git reset --hard V1.0HEAD is now at a66370a add test dir[root@gitlab git_data]# git tag v20171129[root@gitlab git_data]# git tagv20171129
6.9 对比数据
git diff可以对比当前文件与仓库已保存文件的区别,知道了对README作了什么修改<br />后,再把它提交到仓库就放⼼多了。
git diff README
7、分支结构
在实际的项目开发中,尽量保证master分支稳定,仅用于发布新版本,平时不要随便直接修改里面的数据文件。
那在哪干活呢?干活都在dev分支上。每个人从dev分支创建自己个人分支,开发完合并到dev分支,最后dev分支合并到master分支。所以团队的合作分支看起来会像下图那样。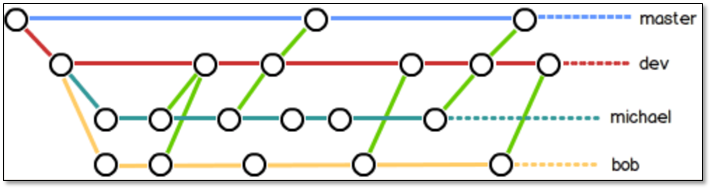
7.1 分支切换
[root@gitlab git_data]# git branch linux[root@gitlab git_data]# git branchlinux* master[root@gitlab git_data]# git checkout linux切换到分支 'linux'[root@gitlab git_data]# git branch* linuxmaster
在linux分支进行修改
[root@gitlab git_data]# cat README[root@gitlab git_data]# echo "2017年11月30日" >> README[root@gitlab git_data]# git add .[root@gitlab git_data]# git commit -m "2017年11月30日09点10分"[linux 5a6c037] 2017年11月30日09点10分1 file changed, 1 insertion(+)[root@gitlab git_data]# git status# 位于分支 linux无文件要提交,干净的工作区
回到master分支
[root@gitlab git_data]# git checkout master切换到分支 'master'[root@gitlab git_data]# cat README[root@gitlab git_data]# git log -1commit 7015bc7b316cc95e2dfe6c53e06e3900b2edf427Author: clsn <admin@znix.top>Date: Wed Nov 29 19:30:57 2017 +0800123
合并代码
[root@gitlab git_data]# git merge linux更新 7015bc7..5a6c037Fast-forwardREADME | 1 +1 file changed, 1 insertion(+)[root@gitlab git_data]# git status# 位于分支 master无文件要提交,干净的工作区[root@gitlab git_data]# cat README2017年11月30日
7.2 合并失败解决
模拟冲突,在文件的同一行做不同修改
在master 分支进行修改
[root@gitlab git_data]# cat README2017年11月30日[root@gitlab git_data]# echo "clsn in master">> README[root@gitlab git_data]# git commit -a -m "clsn 2017年11月30日 09点20分 "[master 7ab71d4] clsn 2017年11月30日 09点20分1 file changed, 1 insertion(+)
切换到linux分支
[root@gitlab git_data]# git checkout linux切换到分支 'linux'[root@gitlab git_data]# cat README2017年11月30日[root@gitlab git_data]# echo "clsn in linux" >> README[root@gitlab git_data]# git commit -a -m "2017年11月30日 03"[linux 20f1a13] 2017年11月30日 031 file changed, 1 insertion(+)
回到master分区,进行合并,出现冲突
[root@gitlab git_data]# git checkout master切换到分支 'master'[root@gitlab git_data]# git merge linux自动合并 README冲突(内容):合并冲突于 README自动合并失败,修正冲突然后提交修正的结果。
解决冲突
[root@gitlab git_data]# vim README2017年11月30日clsn in masterclsn in linux
手工解决冲突
[root@gitlab git_data]# git commit -a -m "2017年11月30日 03"[master b6a097f] 2017年11月30日 03
7.3 删除分支
因为之前已经合并了linux分支,所以现在看到它在列表中。 在这个列表中分支名字前没有 * 号的分支通常可以使用 git branch -d 删除掉;你已经将它们的工作整合到了另一个分支,所以并不会失去任何东西。
查看所有包含未合并工作的分支,可以运行 git branch —no-merged:
git branch --no-mergedtesting
这里显示了其他分支。 因为它包含了还未合并的工作,尝试使用 git branch -d命令删除它时会失败:
git branch -d testingerror: The branch 'testing' is not fully merged.If you are sure you want to delete it, run 'git branch -D testing'.
如果真的想要删除分支并丢掉那些工作,如同帮助信息里所指出的,可以使用 -D 选项强制删除它。
8、windwos上Git的使用
windows 上git软件网站 https://git-for-windows.github.io
软件下载地址:https://github.com/git-for-windows/git/releases/download/v2.15.1.windows.2/Git-2.15.1.2-64-bit.exe
8.1 软件使用
创建新的仓库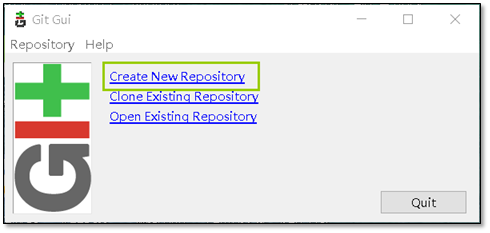
定义仓库的路径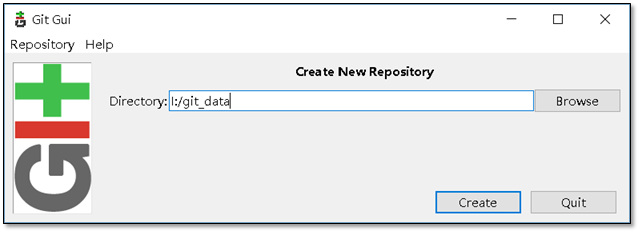
添加用户信息(在 git bash中)
default@Hzs-Desktop MINGW64 /i/git_data (master)$ git config --global user.email "admin@znix.top"default@Hzs-Desktop MINGW64 /i/git_data (master)$ git config --global user.name "clsn"
在git Gui 中添加用户信息,添加一次就可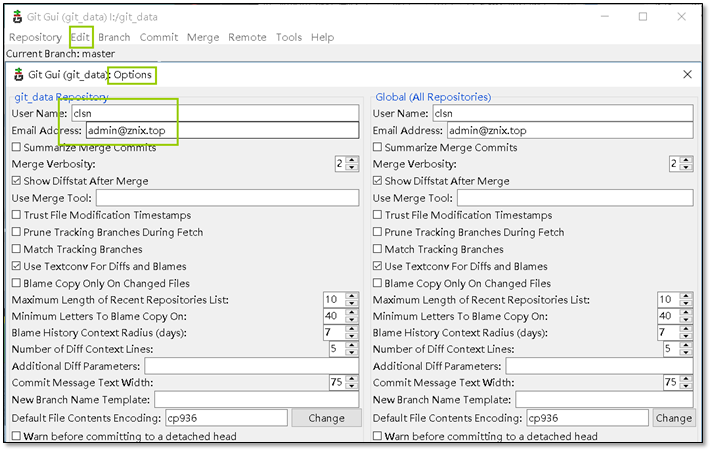
在页面中将数据配置好即可使用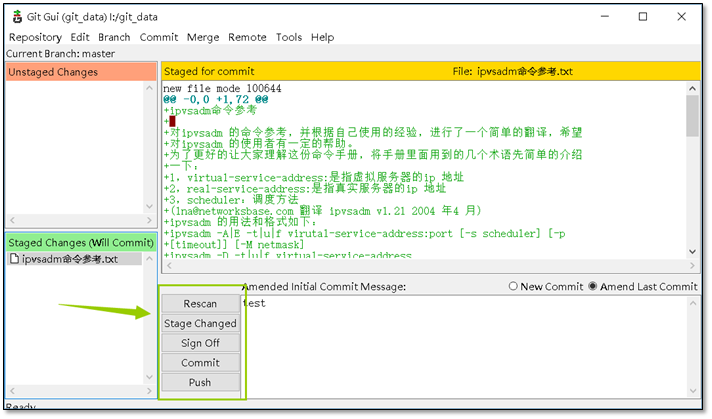
查看历史数据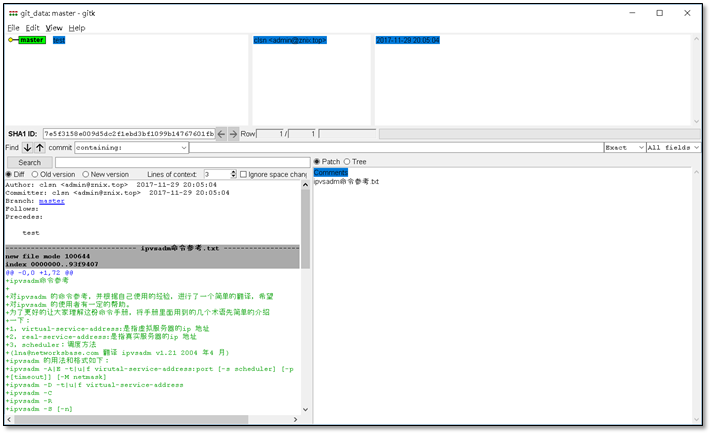
9、gitlab的使用
前面我们已经知道Git人人都是中心,那他们怎么交互数据呢?
• 使用GitHub或者码云等公共代码仓库
• 使用GitLab私有仓库
9.1 安装配置gitlab
官方安装文档 https://about.gitlab.com/installation/
国内软件镜像站 https://mirrors.tuna.tsinghua.edu.cn/gitlab-ce/yum/
安装
[root@gitlab ~]# yum localinstall gitlab-ce-9.1.4-ce.0.el7.x86_64.rpm
初始化
[root@gitlab ~]# gitlab-ctl reconfigure
状态
[root@gitlab ~]# gitlab-ctl statusrun: gitaly: (pid 4491) 48s; run: log: (pid 4087) 279srun: gitlab-monitor: (pid 4539) 44s; run: log: (pid 4251) 207srun: gitlab-workhorse: (pid 4501) 47s; run: log: (pid 4099) 273srun: logrotate: (pid 4125) 265s; run: log: (pid 4124) 265srun: nginx: (pid 4112) 271s; run: log: (pid 4111) 271srun: node-exporter: (pid 4175) 243s; run: log: (pid 4174) 243srun: postgres-exporter: (pid 4528) 45s; run: log: (pid 4223) 219srun: postgresql: (pid 3933) 343s; run: log: (pid 3932) 343srun: prometheus: (pid 4514) 46s; run: log: (pid 4156) 259srun: redis: (pid 3876) 355s; run: log: (pid 3875) 355srun: redis-exporter: (pid 4186) 237s; run: log: (pid 4185) 237srun: sidekiq: (pid 4078) 281s; run: log: (pid 4077) 281srun: unicorn: (pid 4047) 287s; run: log: (pid 4046) 287s
检查端口
[root@gitlab ~]# netstat -lntup|grep 80tcp 0 0 127.0.0.1:8080 0.0.0.0:* LISTEN 4073/unicorn mastertcp 0 0 0.0.0.0:80 0.0.0.0:* LISTEN 4112/nginx: mastertcp 0 0 0.0.0.0:8060 0.0.0.0:* LISTEN 4112/nginx: master
9.2 使用浏览器访问,进行web界面操作
第一次访问,创建密码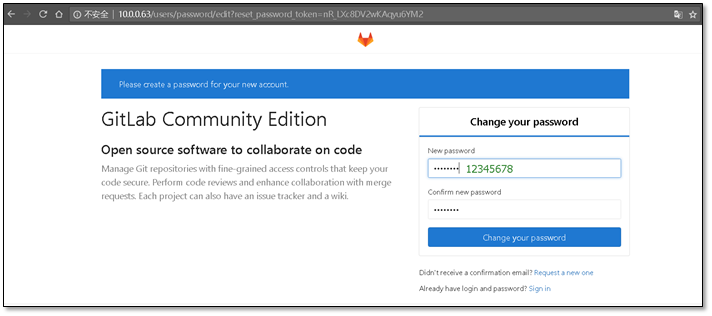
进行登陆,用户名为root,密码为12345678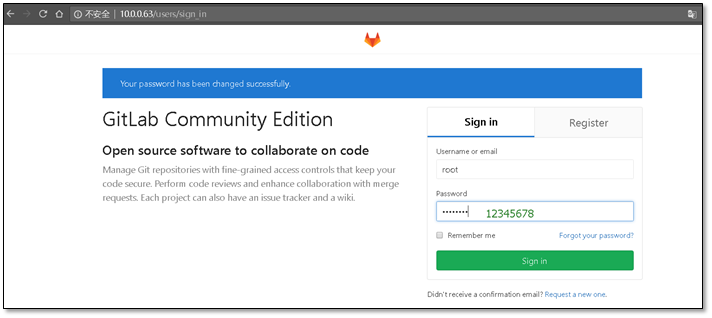
创建一个新的项目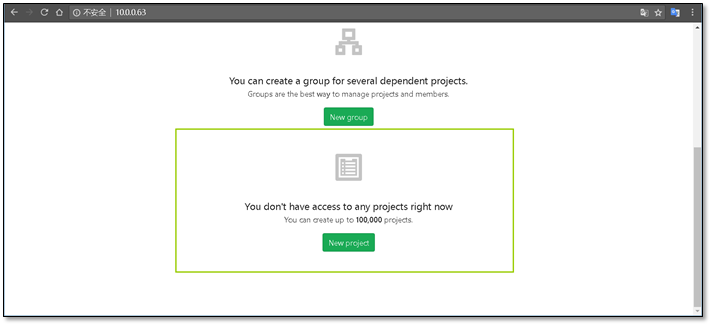
定义项目的名称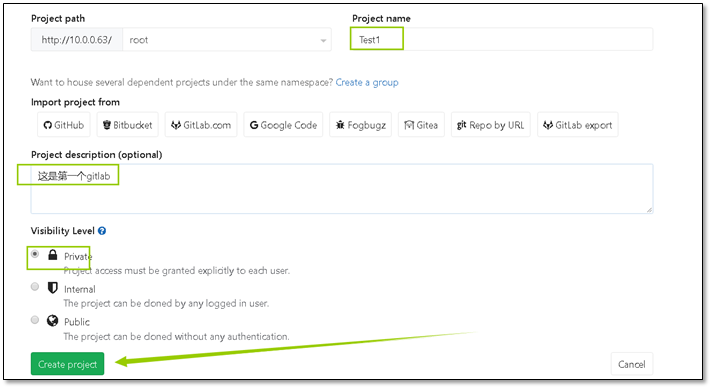
创建完成后会提示没有添加ssh密钥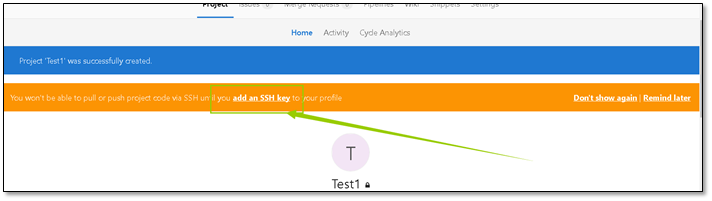
在服务器上创建ssh密钥 使用ssh-ketgen 命令
[root@gitlab ~]# ssh-keygenGenerating public/private rsa key pair.Enter file in which to save the key (/root/.ssh/id_rsa):Created directory '/root/.ssh'.Enter passphrase (empty for no passphrase):Enter same passphrase again:Your identification has been saved in /root/.ssh/id_rsa.Your public key has been saved in /root/.ssh/id_rsa.pub.The key fingerprint is:SHA256:n/V2kCiwwm2UfBsnQLm17eXUCBiBByyPbefmz5oQvfU root@gitlabThe key's randomart image is:+---[RSA 2048]----+| o++o+ || ..+o+ . || ==++o.. o || ..o==o=..+..|| o.So+.++o || o oo*.o.. || .o+ E .|| ..o . . || ooo |+----[SHA256]-----+
[root@gitlab .ssh]# cat id_rsa.pubssh-rsa AAAAB3NzaC1yc2EAAAADAQABAAABAQDSVdBypha/ALMmvIiZGXxYGz7FJ5TC+hYWo7QGBJ+J6JVinp9yH851fwxln5TWGBrtEousoVHXTTJfFRy8LV+Ho7OfaksYt+5TPxEjf5XX53Z3ZX70PYH3DQFmgzl0QpWw1PYIjrD7kBeLhUg+R/ZePS+HzPvbRCb6gOlkdx46vX4Olr7YbAO5lzAarhaZcE2Q702kPXGeuZbR7KcwVhtoiueyHwyj94bccMfKq7qSskXGbpWuCwcaKQ6uqGap1rP5Viqqv0xeO7Vq0dIZ/YnPL2vPDUvNa36nHosiZGkn4thpPh63KjXaFIfKOuPemLzvDZY0A+88P8gwmAYiPoxp root@gitlab
将密钥添加到web界面的用户中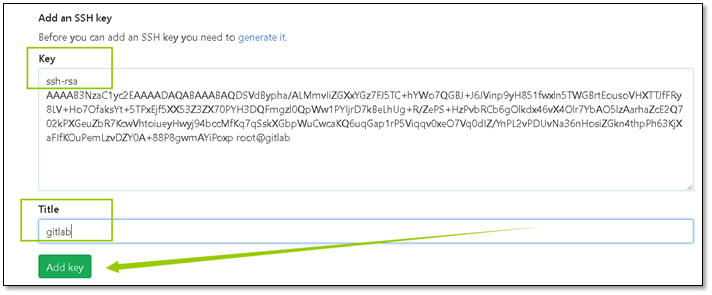
gitlab自带的命令集
Command line instructionsGit global setupgit config --global user.name "Administrator"git config --global user.email "admin@example.com"Create a new repositorygit clone git@gitlab.example.com:root/clsn.gitcd clsntouch README.mdgit add README.mdgit commit -m "add README"git push -u origin masterExisting foldercd existing_foldergit initgit remote add origin git@gitlab.example.com:root/clsn.gitgit add .git commit -m "Initial commit"git push -u origin masterExisting Git repositorycd existing_repogit remote rename origin old-origingit remote add origin git@gitlab.example.com:root/clsn.gitgit push -u origin --allgit push -u origin --tags
创建行的git仓库
[root@gitlab ~]# git clone git@gitlab:root/Test1.git正克隆到 'Test1'...The authenticity of host 'gitlab (10.0.0.63)' can't be established.ECDSA key fingerprint is SHA256:yOrzs0W+R//s8VDEN9nko6r6wW+8gwJl3Ut7ac0i5SY.ECDSA key fingerprint is MD5:21:33:dd:4d:01:00:eb:71:a4:4e:2d:2b:bf:37:48:ed.Are you sure you want to continue connecting (yes/no)? yesWarning: Permanently added 'gitlab' (ECDSA) to the list of known hosts.warning: 您似乎克隆了一个空版本库。
创建文件并推到远端git仓库
[root@gitlab Test1]# echo "clsn" >> clsn[root@gitlab Test1]# git push -u origin master分支 master 设置为跟踪来自 origin 的远程分支 master。Everything up-to-date
推送完成后能够在web界面中查看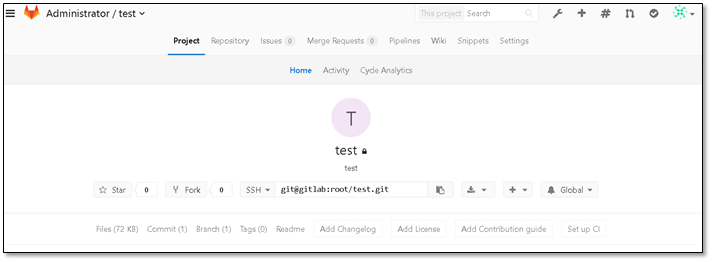
> # md 语法的使用方法
10、GitHub托管服务
Github顾名思义是一个Git版本库的托管服务,是目前全球最大的软件仓库,拥有上百万的开发者用户,也是软件开发和寻找资源的最佳途径,Github不仅可以托管各种Git版本仓库,还拥有了更美观的Web界面,您的代码文件可以被任何人克隆,使得开发者为开源项贡献代码变得更加容易,当然也可以付费购买私有库,这样高性价比的私有库真的是帮助到了很多团队和企业。
10.1 注册GitHub
浏览器访问github官网 : https://github.com/ ,点击Sign up 进行注册
填写个人信息,进行注册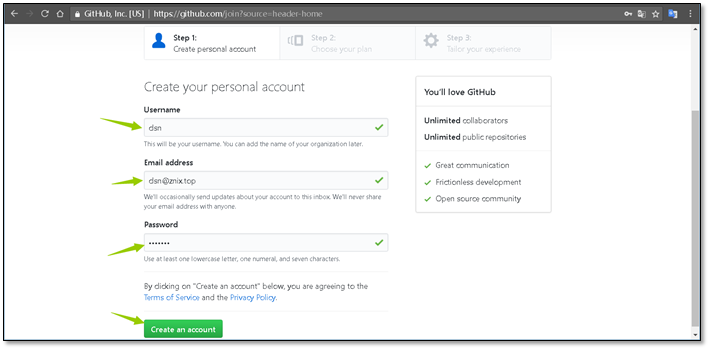
选择仓库类型,默认免费,点击底下Continue注册
描述一下你自己,当然,这一步可以跳过
用户创建完成,可以创建新的项目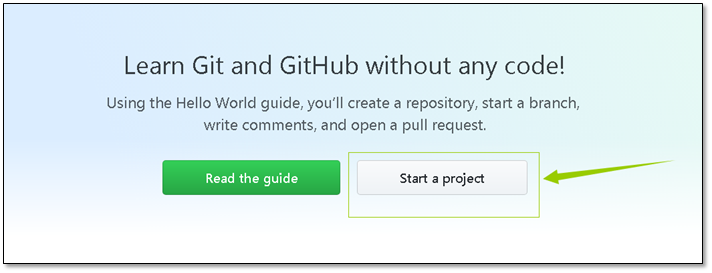
注意:创建新的项目之前要现验证邮箱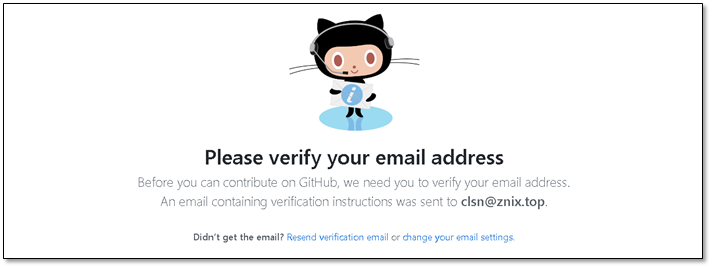
10.2 添加密钥
在github上添加一个新的ssh密钥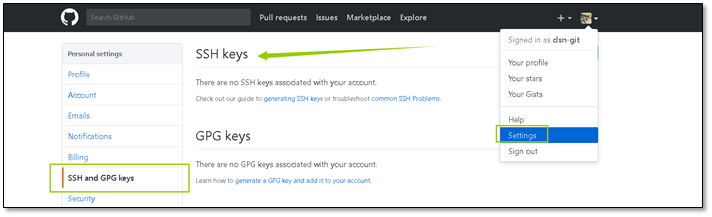
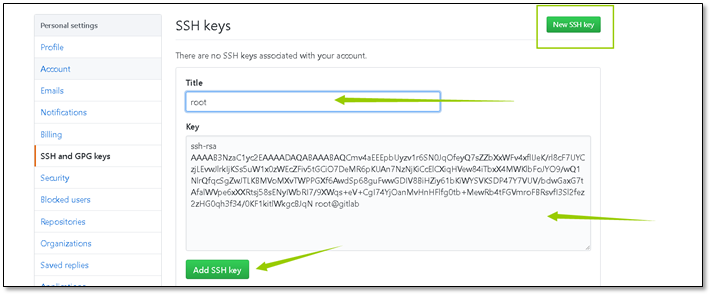
获取主机(linux)上的密钥
[root@gitlab ~]# ssh-keygenGenerating public/private rsa key pair.Enter file in which to save the key (/root/.ssh/id_rsa):Created directory '/root/.ssh'.Enter passphrase (empty for no passphrase):Enter same passphrase again:Your identification has been saved in /root/.ssh/id_rsa.Your public key has been saved in /root/.ssh/id_rsa.pub.The key fingerprint is:SHA256:n/V2kCiwwm2UfBsnQLm17eXUCBiBByyPbefmz5oQvfU root@gitlabThe key's randomart image is:+---[RSA 2048]----+| o++o+ || ..+o+ . || ==++o.. o || ..o==o=..+..|| o.So+.++o || o oo*.o.. || .o+ E .|| ..o . . || ooo |+----[SHA256]-----+
[root@gitlab ~]# cat .ssh/id_rsa.pubssh-rsa AAAAB3NzaC1yc2EAAAADAQABAAABAQCmv4aEEEpbUyzv1r6SN0JqOfeyQ7sZZbXxWFv4xflIJeK/rl8cF7UYCzjLEvwJlrkIjKSs5uW1x0zWEcZFiv5tGCiO7DeMR6pKUAn7NzNjKiCcElCXiqHVew84iTbxX4MWKlbFoJYO9/wQ1NlrQfqcSgZwJTLKBMVoMXvTWPPGXf6AwdSp68guFwwGDIV8BiHZiy61bKiWYSVKSDP47Y7VUV/bdwGaxG7tAfalWVpe6xXXRtsj58sENyIWbRI7/9XWqs+eV+CgI74YjOanMvHnHFlfg0tb+MewRb4tFGVmroFBRsvfI3Sl2fez2zHG0qh3f34/0KF1kitlWkgcBJqN root@gitlab
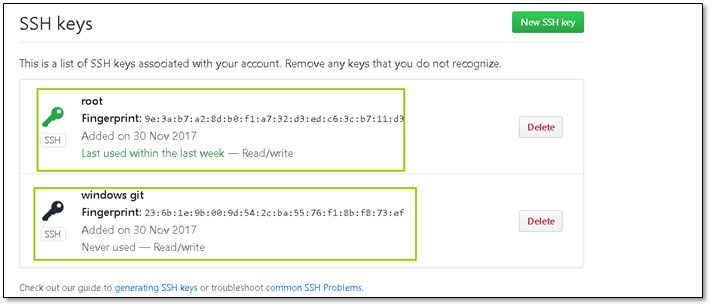
windwos上获得密钥的方法(需要安装git for windows)
default@Hzs-Desktop MINGW64 /i/Desktop$ ssh-keygen.exeGenerating public/private rsa key pair.Enter file in which to save the key (/c/Users/default.DESKTOP-U9D5JP4/.ssh/id_rs a):Created directory '/c/Users/default.DESKTOP-U9D5JP4/.ssh'.Enter passphrase (empty for no passphrase):Enter same passphrase again:Your identification has been saved in /c/Users/default.DESKTOP-U9D5JP4/.ssh/id_r sa.Your public key has been saved in /c/Users/default.DESKTOP-U9D5JP4/.ssh/id_rsa.p ub.The key fingerprint is:SHA256:aqnHq/xNn159jBX4o2L2ZJdtiwu4ietvKRT2fL9igZo default@Hzs-DesktopThe key's randomart image is:+---[RSA 2048]----+| || . || . . || o . .|| . S . o.|| + +.o ..++|| .= +.o=++oo=|| . ooE.+==*.oo.|| +++=*== .=o. |+----[SHA256]-----+default@Hzs-Desktop MINGW64 /i/Desktop$default@Hzs-Desktop MINGW64 /i/Desktop$ cat /c/Users/default.DESKTOP-U9D5JP4/.ssh/id_rsa.pubssh-rsa AAAAB3NzaC1yc2EAAAADAQABAAABAQC15+1oQBzvgzQP3p0Lb9FsTKFfIIws9WxGBVl2B9d2

10.3 创建仓库
准备工作已经完毕,右上角点击创建一个新的仓库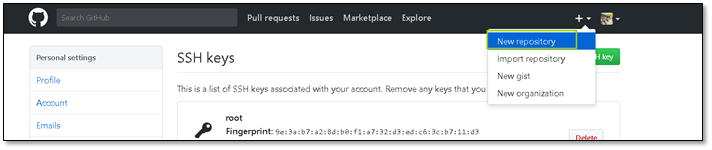
创建仓库,输入个人信息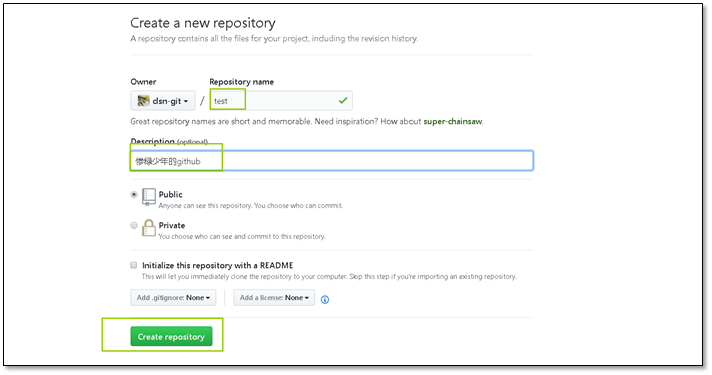
根据上面的提示,创建一个代码仓库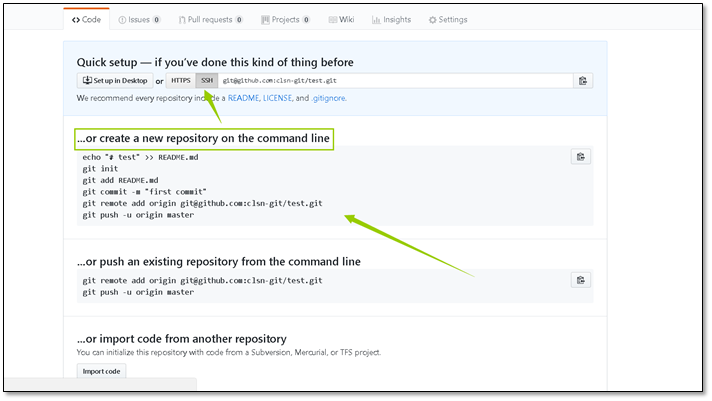
在个人主机上进行推送测试
[root@gitlab ~]# mkdir -p clsn[root@gitlab ~]# cd clsn/[root@gitlab clsn]# echo "# test" >> README.md[root@gitlab clsn]# git init初始化空的 Git 版本库于 /root/clsn/.git/[root@gitlab clsn]# git add README.md[root@gitlab clsn]# git commit -m "first commit"[master(根提交) 089ae47] first commit1 file changed, 1 insertion(+)create mode 100644 README.md[root@gitlab clsn]# git remote add origin git@github.com:clsn-git/test.git[root@gitlab clsn]# git push -u origin masterThe authenticity of host 'github.com (192.30.255.113)' can't be established.RSA key fingerprint is SHA256:nThbg6kXUpJWGl7E1IGOCspRomTxdCARLviKw6E5SY8.RSA key fingerprint is MD5:16:27:ac:a5:76:28:2d:36:63:1b:56:4d:eb:df:a6:48.Are you sure you want to continue connecting (yes/no)? yesWarning: Permanently added 'github.com,192.30.255.113' (RSA) to the list of known hosts.Counting objects: 3, done.Writing objects: 100% (3/3), 212 bytes | 0 bytes/s, done.Total 3 (delta 0), reused 0 (delta 0)To git@github.com:clsn-git/test.git* [new branch] master -> master分支 master 设置为跟踪来自 origin 的远程分支 master。
推送完成,刷新界面就可以发现,推送上去的README.md文件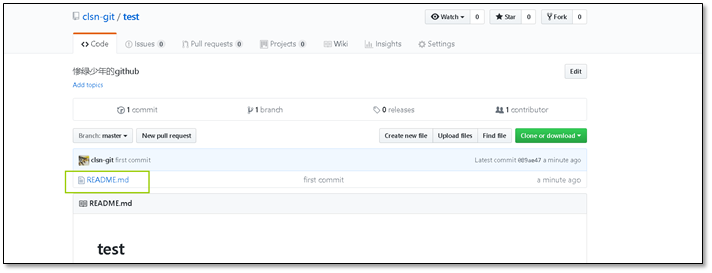
创建新文件,进行拉取测试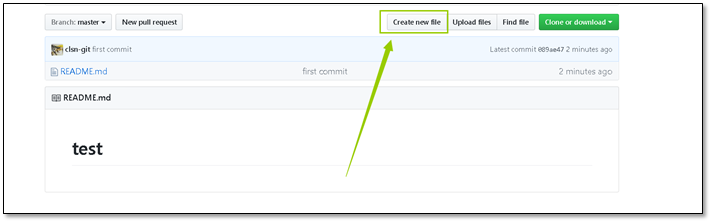
创建好后点击下面的commit即可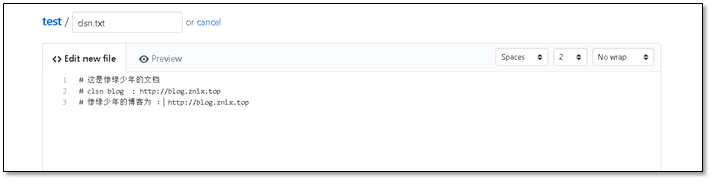
github添加成功,进行拉取测试
10.4 拉取文件测试
查看目录内容
[root@gitlab clsn]# lsREADME.md
进行拉取
[root@gitlab clsn]# git pullremote: Counting objects: 3, done.remote: Compressing objects: 100% (3/3), done.Unpacking objects: 100% (3/3), done.remote: Total 3 (delta 0), reused 0 (delta 0), pack-reused 0来自 github.com:clsn-git/test089ae47..a16be65 master -> origin/master更新 089ae47..a16be65Fast-forwardclsn.txt | 3 +++1 file changed, 3 insertions(+)create mode 100644 clsn.txt
检查文件
[root@gitlab clsn]# lsclsn.txt README.md[root@gitlab clsn]# cat clsn.txt# 这是惨绿少年的文档# clsn blog : http://blog.znix.top# 惨绿少年的博客为 : http://blog.znix.top
11、JetBrains PyCharm 使用github
PyCharm 下载: http://www.jetbrains.com/pycharm/download/#section=windows
11.1 PyCharm 上github设置
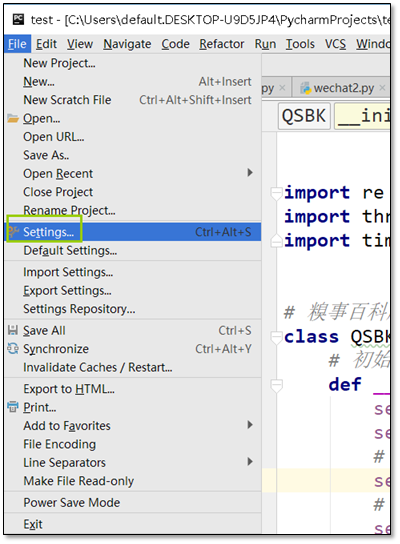
选择github进行连接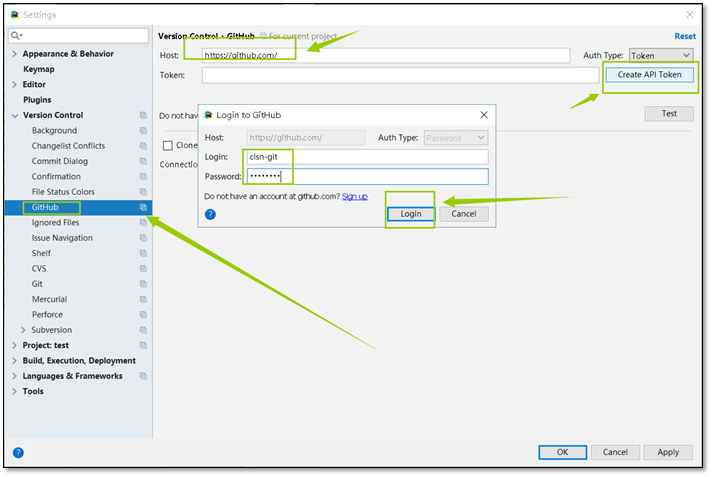
用户密码准确后会生产token
然后点击ok即可
11.2 推送代码
现确保有之前安装的windwos端git,测试路径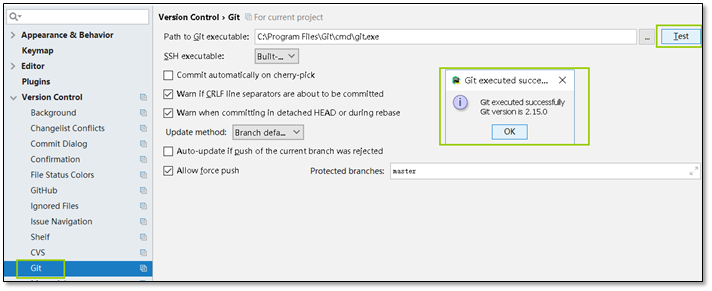
共享代码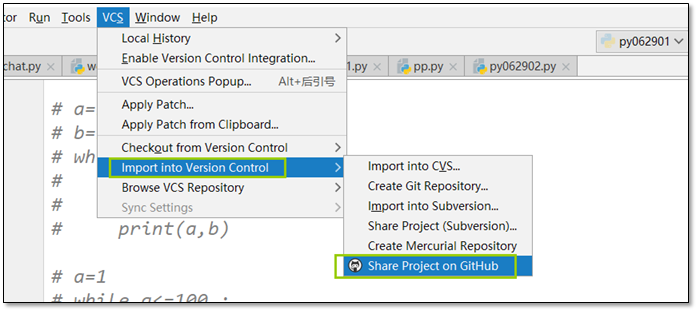
输入信息,进行共享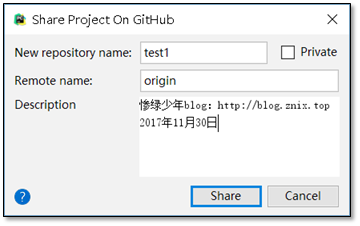
代码发布成功 https://github.com/clsn-git/test1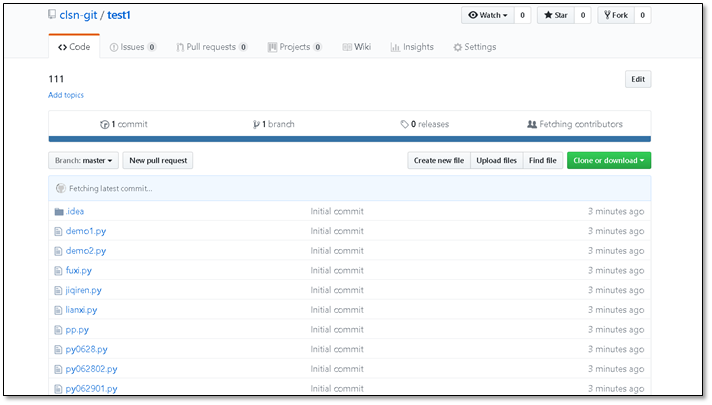
至此pycharm使用github就完成了
12、pycharm使用gitlab
使用pycharm是的vcs,现在git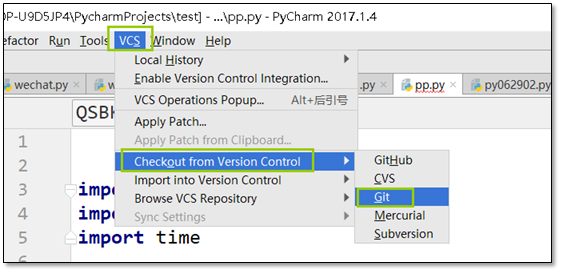
输入gitlab地址
然后输入用户名及密码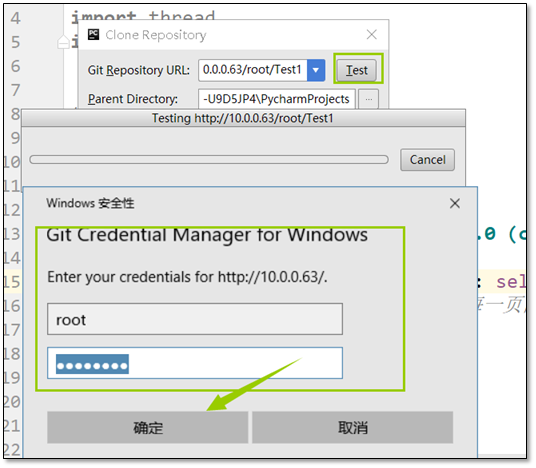
添加一些注释信息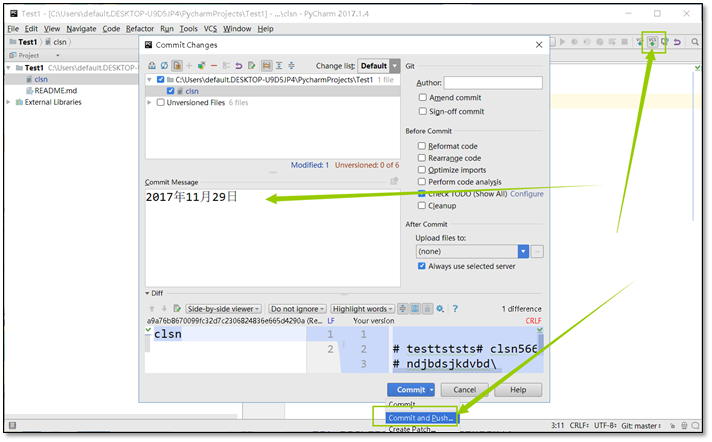
在gitlab的界面中就能查看到长传的代码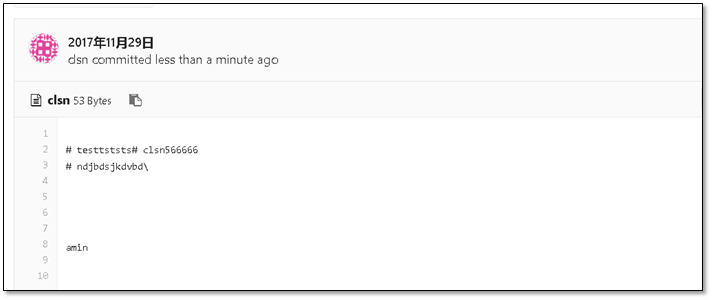
至此pycharm使用gitlab就结束了
13、参考文档
https://backlog.com/git-tutorial/cn/ 猴子都能懂的GIT
https://git-scm.com/book/zh/v2 Pro Git书籍

若有收获,就点个赞吧
0 人点赞
