import torch
from torch.autograd import Variable
保存和加载模型
# 保存和加载整个模型torch.save(model_object, 'path/model.pkl')model = torch.load('path/model.pkl')# 仅保存和加载模型参数(推荐使用)torch.save(model_object.state_dict(), 'path/params.pkl')model_object.load_state_dict(torch.load('path/params.pkl'))
建立需要优化的参数
b1 = Variable(torch.randn(m, n), requires_grad=True)
乘法
h1 = x.mm(w1).add(b1) 或者 h1 = torch.add(torch.mm(x, w1), b1)
梯度清零
w1.grad.data.zero_()
基本程序实例
创建常量tensor
torch.empty(size)返回形状为size的空tensor
torch.zeros(size)全部是0的tensor
torch.zeros_like(input)返回跟input的tensor一个size的全零tensor
torch.ones(size)全部是1的tensor
torch.ones_like(input)返回跟input的tensor一个size的全一tensor
torch.arange(start=0, end, step=1)返回一个从start到end的序列,可以只输入一个end参数,就跟python的range()一样了。实际上PyTorch也有range(),但是这个要被废掉了,替换成arange了
torch.full(size, fill_value)这个有时候比较方便,把fill_value这个数字变成size形状的张量
随机初始化
torch.rand(size) [0,1)内的均匀分布随机数
torch.rand_like(input)返回跟input的tensor一样size的0-1随机数
torch.randn(size)返回标准正太分布N(0,1)的随机数
torch.normal(mean, std, out=None)正态分布。这里注意,mean和std都是tensor,返回的形状由mean和std的形状决定,一般要求两者形状一样。如果,mean缺失,则默认为均值0,如果std缺失,则默认标准差为1.
切片、合并、变形、抽取操作
torch.cat(seq, dim=0, out=None),把一堆tensor丢进去,按照dim指定的维度拼接、堆叠在一起
In [70]: x = torch.tensor([[1,2,3]])In [71]: xOut[71]: tensor([[1, 2, 3]])#按第0维度堆叠,对于矩阵,相当于“竖着”堆In [72]: print(torch.cat((x,x,x),0))tensor([[1, 2, 3],[1, 2, 3],[1, 2, 3]])#按第1维度堆叠,对于矩阵,相当于“横着”拼In [73]: print(torch.cat((x,x,x),1))tensor([[1, 2, 3, 1, 2, 3, 1, 2, 3]]).
torch.chunk(tensor, chunks, dim=0)把tensor切成块,数量由chunks指定
In [74]: a = torch.arange(10)In [75]: aOut[75]: tensor([0, 1, 2, 3, 4, 5, 6, 7, 8, 9])In [76]: torch.chunk(a,4)Out[76]: (tensor([0, 1, 2]), tensor([3, 4, 5]), tensor([6, 7, 8]), tensor([9]))
切块还有torch.split(tensor, split_size_or_sections, dim=0)具体区别大家自行查阅文档
按index选择:torch.index_select(input, dim, index, out=None)
按mask选择:torch.masked_select(input, mask, out=None)
经常会使用的“压扁”函数:torch.squeeze(input),压缩成1维。注意,压缩后的tensor和原来的tensor共享地址
改变形状:torch.reshape(input, shape)以及tensor.view(shape).前者是把tensor作为函数的输入,后者是任何tensor的函数。实际上,二者的返回值,都只是让我们从另一种视角看某个tensor,所以不会改变本来的形状,除非你把结果又赋值给原来的tensor。下面给一个例子对比二者的用法:
In [82]: aOut[82]: tensor([0, 1, 2, 3, 4, 5, 6, 7, 8, 9])# 单纯的调用view函数:In [83]: a.view(2,5)Out[83]:tensor([[0, 1, 2, 3, 4],[5, 6, 7, 8, 9]])# a的形状并不会变化In [84]: print(a)tensor([0, 1, 2, 3, 4, 5, 6, 7, 8, 9])# 试试reshape函数:In [86]: torch.reshape(a,[5,2])Out[86]:tensor([[0, 1],[2, 3],[4, 5],[6, 7],[8, 9]])# a的形状依然不会变化:In [87]: aOut[87]: tensor([0, 1, 2, 3, 4, 5, 6, 7, 8, 9])
要想让a的形状变化,比如把结果赋值给a,比如a = a.view(2,5)
还有好多有意思的操作,自己去发掘吧:
https://pytorch.org/docs/stable/torch.html#indexing-slicing-joining-mutating-ops
基本数学操作
加法直接加:x+y
或者用torch.add(x,y).
实际上,.add()可以接受三个参数:torch.add(input, value, out=None)
out怎么用呢?一般,如果直接torch.add(x,y),那么x,y本身都不会变化的。但是如果设置out=x,那么x就变变成加和后的值。
特别的,若想进行in-place操作,就比方说y加上x,y的值就改变了,就可以用y.add(x)这样y就直接被改变了。Torch里面所有带”“的操作,都是in-place的。例如x.copy_(y)
乘法:
torch.dot(a,b) # 向量点乘torch.mul(a,b) # 对应点相乘,不求和torch.mm(a,b) # 矩阵相乘
除法:torch.div(input, other, out=None)用input除以other
指数:torch.pow(input, exponent, out=None)
开根号:torch.sqrt(input, out=None)
四舍五入到整数:torch.round(input, out=None)
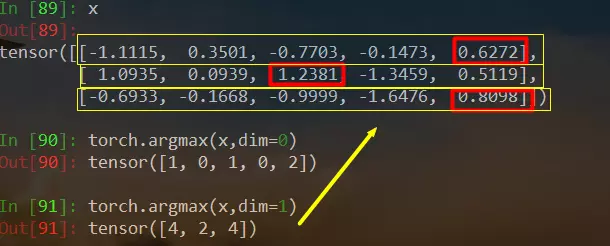
argmax函数:torch.argmax(input, dim=None, keepdim=False)返回指定维度最大值的序号,dim给定的定义是:the demention to reduce.也就是把dim这个维度的,变成这个维度的最大值的index。例如:
gmoid函数:torch.sigmoid(input, out=None)
tanh函数:torch.tanh(input, out=None)
torch.abs(input, out=None)取绝对值
torch.ceil(input, out=None)向上取整,等于向下取整+1
torch.clamp(input, min, max, out=None)刀削函数,把输入数据规范在min-max区间,超过范围的用min、max代替
太多了,基本上,numpy里面有的数学函数这里都有,能想到的的基本都有。所以更详细的内容,还是去查看文档吧哈哈:
https://pytorch.org/docs/stable/torch.html#math-operations
三、Torch Tensor与Numpy、列表的互相转换
torch tensor转数值
item函数
Tensor—>Numpy
直接用.numpy()即可。但是注意,转换后,numpy的变量和原来的tensor会共用底层内存地址,所以如果原来的tensor改变了,numpy变量也会随之改变。参见下面的例子:
In [11]: a = torch.ones(2,4)In [12]: aOut[12]:tensor([[1., 1., 1., 1.],[1., 1., 1., 1.]])In [13]: b = a.numpy()In [14]: bOut[14]:array([[1., 1., 1., 1.],[1., 1., 1., 1.]], dtype=float32)In [15]: a.add_(1)Out[15]:tensor([[2., 2., 2., 2.],[2., 2., 2., 2.]])In [16]: bOut[16]:array([[2., 2., 2., 2.],[2., 2., 2., 2.]], dtype=float32)
Numpy—>Tensor
用torch.from_numpy()来转换。参见下面例子:
import numpy as npa = np.ones(5)b = torch.from_numpy(a)np.add(a, 1, out=a)print(a)print(b)
输出:
[2. 2. 2. 2. 2.]tensor([2., 2., 2., 2., 2.], dtype=torch.float64)
同样,两者会共用内存地址。

若有收获,就点个赞吧
0 人点赞
