1. ArrayList 简介
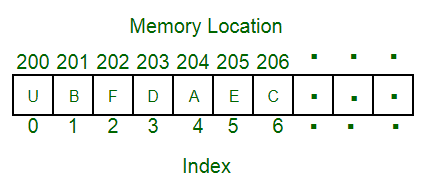
ArrayList 是一个数组队列,动态数组(动态扩容); 允许添加null元素;大致长下面这个样子
1.1 实现细节
public class ArrayList<E> extends AbstractList<E>implements List<E>, RandomAccess, Cloneable, java.io.Serializable
1.1.1 实现和继承关系
- 继承 抽象类AbstractList,实现了List;List是一个数组队列,提供了相关的添加,删除,修改,遍历等功能;
- 实现 RandomAccess接口,即提供了随机访问功能;RandmoAccess 是 java 中用来被 List 实现,为 List 提供快速访问功能的。在 ArrayList 中,我们即可以通过元素的序号快速获取元素对象;这就是快速随机访问。
- 实现 Cloneable接口,即覆盖了clone()方法,能被克隆;
- 实现 java.io.Serializable 接口,支持序列化,能通过序列化去传输;
1.1.2 底层实现
transient Object[] elementData; // non-private to simplify nested class access
- 实质上是 Object数组 构成;
1.1.2.1 transient关键字
- 为何会有transient关键字,何时会用到它?
一个类的有些属性需要序列化,而其他属性不需要被序列化,打个比方,如果一个用户有一些敏感信息(如密码,银行卡号等),为了安全起见,不希望在网络操作(主要涉及到序列化操作,本地序列化缓存也适用)中被传输,这些信息对应的变量就可以加上transient关键字。换句话说,这个字段的生命周期仅存于调用者的内存中而不会写到磁盘里持久化。
- transient 关键字使用总结
1.1.2.2 构造器
- 空构造器
- 默认初始化容量:10
/*** Default initial capacity.*/private static final int DEFAULT_CAPACITY = 10;
/*** Constructs an empty list with an initial capacity of ten.*/public ArrayList() {this.elementData = DEFAULTCAPACITY_EMPTY_ELEMENTDATA;}
- 不同之处
JDK 1.7和JDK1.8默认构造器发生了变化,但是默认初始化容量都是10;具体实现,暂不深究;
- int 参数构造器
- 参数为一个int 整数;
/*** 给定一个容量,然后创建相对应大小的Objec[]数组;** Constructs an empty list with the specified initial capacity.** @param initialCapacity the initial capacity of the list* @throws IllegalArgumentException if the specified initial capacity* is negative*/public ArrayList(int initialCapacity) {if (initialCapacity > 0) {this.elementData = new Object[initialCapacity];} else if (initialCapacity == 0) {this.elementData = EMPTY_ELEMENTDATA;} else {throw new IllegalArgumentException("Illegal Capacity: "+initialCapacity);}}
- 集合参数构造器
- 参数为Collection集合下具体实现类;
/*** Constructs a list containing the elements of the specified* collection, in the order they are returned by the collection's* iterator.** @param c the collection whose elements are to be placed into this list* @throws NullPointerException if the specified collection is null*/public ArrayList(Collection<? extends E> c) {elementData = c.toArray();if ((size = elementData.length) != 0) {// c.toArray might (incorrectly) not return Object[] (see 6260652)if (elementData.getClass() != Object[].class)elementData = Arrays.copyOf(elementData, size, Object[].class);} else {// replace with empty array.this.elementData = EMPTY_ELEMENTDATA;}}举栗子说明:LinkedList<Object> linkedList = new LinkedList<>();linkedList.add(1);linkedList.add(2);linkedList.add(3);ArrayList<Object> objects = new ArrayList<>(linkedList);for (Object object : objects) {System.out.println(object);}// 1 2 3
1.1.2.3 扩容机制
- 扩容变化:
- 每次扩容 50% , 亦新容量为旧容量的1.5倍
思考下,什么时候会扩容? 肯定是装不下东西的时候会扩容哦,所以我们从添加元素 方法开始;
[1] add 方法
- add(E e)方法, 默认添加到尾部
[1] add方法添加元素public boolean add(E e) {//在添加元素前调用ensureCapacityInternal方法,进行容量检验,看能否装得下;ensureCapacityInternal(size + 1); // Increments modCount!!elementData[size++] = e;return true;}[2] ensureCapacityInternal检验容量private void ensureCapacityInternal(int minCapacity) {ensureExplicitCapacity(calculateCapacity(elementData, minCapacity));}[3]实质检验方法 ensureExplicitCapacityprivate void ensureExplicitCapacity(int minCapacity) {// modCount 用来记录 ArrayList 结构发生变化的次数,因为每次在进行 add() 和 addAll() 时都需要调用 ensureCapacity(),因此直接在 ensureExplicitCapacity()中对 modCount 进行修改modCount++;// overflow-conscious code// 看下if (minCapacity - elementData.length > 0)grow(minCapacity);}[4]校验完毕之后,进入到扩容grow()方法中/*** Increases the capacity to ensure that it can hold at least the* number of elements specified by the minimum capacity argument.** @param minCapacity the desired minimum capacity*/private void grow(int minCapacity) {// overflow-conscious codeint oldCapacity = elementData.length;// 新容量是旧容量的1.5倍,即扩容 50%;int newCapacity = oldCapacity + (oldCapacity >> 1);if (newCapacity - minCapacity < 0)newCapacity = minCapacity;if (newCapacity - MAX_ARRAY_SIZE > 0)newCapacity = hugeCapacity(minCapacity);// minCapacity is usually close to size, so this is a win:elementData = Arrays.copyOf(elementData, newCapacity);}
- add(int index,E element) 在特定位置插入元素
System.arraycopy(elementData, index, elementData, index + 1,size - index);具体代码不贴入,关键点在于当一个元素被插入后,之后的元素都会被整体后移一个单位长度,会涉及到整体复制,性能消耗大,这也是和LinkedList最本质的区别;ArrayList查询便捷,LinkedList删除便捷;
2. ArrayList高级特性
2.1 线程不安全
ArrayList是不安全的,我们举一个例子说明下://添加元素源码public boolean add(E e) {ensureCapacityInternal(size + 1); // Increments modCount!!elementData[size++] = e;return true;}一个 ArrayList 在添加一个元素的时候,它可能会有两步来完成:1.在elementData[size]的位置上存放此元素;2.增大size的值;其本质上来讲是size++不是一个原子操作导致的线程安全问题;[1]在单线程环境下,如果size=0,添加一个元素后,此元素在位置0,而且size=1;[2]在多线程环境下,比如有两个线程,线程 A 先将元素存放在位置 0。但是此时 CPU 调度线程A暂停,线程 B 得到运行的机会。线程B也向此 ArrayList 添加元素,因为此时 Size 仍然等于 0(注意哦,我们假设的是添加一个元素是要两个步骤哦,而线程A仅仅完成了步骤1),所以线程B也将元素存放在位置0。然后线程A和线程B都继续运行,都增加 Size 的值;
2.1.1 解决方案
- 使用synchronized关键字,锁定临界区;
- 使用 Collections.synchronizedList()
- 使用JUC中的 CopyOnWriteArrayList
具体的使用之后会在多线程模块中具体分析并发容器的数据结构;
2.2 fail-fast问题
2.2.1 简介
fail-fast 机制是java集合(Collection)中的一种错误机制,当多个线程对同一个集合的内容进行操作时,就可能会产生fail-fast事件。例如:当某一个线程A通过iterator去遍历某集合的过程中,若该集合的内容被其他线程所改变了;那么线程A访问集合时,就会抛出ConcurrentModificationException异常,产生fail-fast事件。
2.2.2 fast-fail示例
- 在讲fast-fail例子之前,我们先看下在对List进行遍历时删除会出现什么情况;
import java.util.ArrayList;/*** @author littledream1502@gmail.com* @date 2018/3/16* @desc*/public class Solution {public static void main(String[] args) {ArrayList<Integer> list = new ArrayList<>();list.add(1);list.add(2);list.add(3);list.add(4);for (Integer integer : list) {if (integer == 2) {list.remove(integer);}System.out.println(integer);}}}错误信息:1Exception in thread "main" java.util.ConcurrentModificationException2at java.util.ArrayList$Itr.checkForComodification(ArrayList.java:909)at java.util.ArrayList$Itr.next(ArrayList.java:859)at com.zhangyong.Solution.Solution.main(Solution.java:17)
- 为什么在遍历list的时候删除元素,会报错呢?
第一步:我们看下源代码反编译结果(主要观看foreach到底是什么)import java.util.ArrayList;import java.util.Iterator;public class Solution {public Solution() {}public static void main(String[] args) {ArrayList<Integer> list = new ArrayList();list.add(1);list.add(2);list.add(3);list.add(4);Integer integer;for(Iterator var2 = list.iterator(); var2.hasNext(); System.out.println(integer)) {integer = (Integer)var2.next();if (integer == 2) {list.remove(integer);}}}}通过反编译结果,我们发现foreach本质上就是迭代器遍历集合元素,因此我们必须出发点是从迭代器的角度去看,[1]需要了解的基础知识,首先看下list中一个很重要的标志//表示该 list 被修改的次数(一般在add ,remove的时候都会修改这个值)protected transient int modCount = 0;public E remove(int index) {rangeCheck(index);//修改modCount值;!!!!代表修改list一次;modCount++;E oldValue = elementData(index);int numMoved = size - index - 1;if (numMoved > 0)System.arraycopy(elementData, index+1, elementData, index,numMoved);elementData[--size] = null; // clear to let GC do its workreturn oldValue;}[2]Iterator迭代器原理分析:// 返回List对应迭代器。实际上,是返回的是一个 Itr 对象。public Iterator<E> iterator() {return new Itr();}// Itr是Iterator(迭代器)的实现类private class Itr implements Iterator<E> {//代表下一个要访问的元素下标;int cursor = 0;//代表上一个要访问的元素下标;int lastRet = -1;// 修改数的记录值。// 每次新建Itr()对象时,都会保存新建该对象时对应的modCount;// 以后每次遍历List中的元素的时候,都会比较expectedModCount和modCount是否相等;// 若不相等,则抛出ConcurrentModificationException异常,产生fail-fast事件;int expectedModCount = modCount;public boolean hasNext() {return cursor != size();}// 迭代器的next()方法获取下一个元素;public E next() {// 获取下一个元素之前,都会判断“新建Itr对象时保存的modCount”和“当前的modCount”是否相等;// 若不相等,则抛出ConcurrentModificationException异常,产生fail-fast事件;checkForComodification();try {E next = get(cursor);lastRet = cursor++;return next;} catch (IndexOutOfBoundsException e) {checkForComodification();throw new NoSuchElementException();}}//迭代器的删除;public void remove() {if (lastRet < 0)throw new IllegalStateException();checkForComodification();try {ArrayList.this.remove(lastRet);cursor = lastRet;lastRet = -1;expectedModCount = modCount;} catch (IndexOutOfBoundsException ex) {throw new ConcurrentModificationException();}}//检查modCount和expectedModCount的值是否相同;//如果不同,则直接抛出对应异常;final void checkForComodification() {if (modCount != expectedModCount)throw new ConcurrentModificationException();}}从中,我们可以发现在调用迭代器的 next() 和 remove()时,都会执行 checkForComodification()。若 “modCount 不等于 expectedModCount”,则会抛出ConcurrentModificationException异常;[3]总结该过程: 在使用迭代器遍历元素集合的时候,每次调用next()方法都会去检查modCount和expectedModCount的值是否相同,如果在遍历的同时使用list的remove()方法去删除元素,则会修改modCount的值,此时两者就不同,迭代器遍历下一个元素的时候就会检查出modCount和expectedModCount两值不同,从而抛出异常;
2.2.3 fail-fast原理
其实从上一小节我们就能总结出fail-fast的原理所在,本质上就是modCount和expectedModCount在同一时刻出现了不同的情况,那么下面看下哪些方法会修改他们的值;
- ArrayList中的具体实现
[1] add方法:public boolean add(E e) {// 修改modCountensureCapacityInternal(size + 1); // Increments modCount!!elementData[size++] = e;return true;}private void ensureCapacityInternal(int minCapacity) {ensureExplicitCapacity(calculateCapacity(elementData, minCapacity));}private void ensureExplicitCapacity(int minCapacity) {modCount++;// overflow-conscious codeif (minCapacity - elementData.length > 0)grow(minCapacity);}[2]remove方法public E remove(int index) {rangeCheck(index);modCount++;E oldValue = elementData(index);int numMoved = size - index - 1;if (numMoved > 0)System.arraycopy(elementData, index+1, elementData, index,numMoved);elementData[--size] = null; // clear to let GC do its workreturn oldValue;}总结:从中,我们发现:无论是add()、remove(),还是clear(),只要涉及到修改集合中的元素个数时,都会改变modCount的值。接下来,我们再系统的梳理一下fail-fast是怎么产生的。步骤如下:(01) 新建了一个ArrayList,名称为arrayList。(02) 向arrayList中添加内容。(03) 新建一个“线程a”,并在“线程a”中通过Iterator反复的读取arrayList的值。(04) 新建一个“线程b”,在“线程b”中删除arrayList中的一个“节点A”。(05) 这时,就会产生有趣的事件了。在某一时刻,“线程a”创建了arrayList的Iterator。此时“节点A”仍然存在于arrayList中,创建arrayList时,expectedModCount = modCount(假设它们此时的值为N)。在“线程a”在遍历arrayList过程中的某一时刻,“线程b”执行了,并且“线程b”删除了arrayList中的“节点A”。“线程b”执行remove()进行删除操作时,在remove()中执行了“modCount++”,此时modCount变成了N+1!“线程a”接着遍历,当它执行到next()函数时,调用checkForComodification()比较“expectedModCount”和“modCount”的大小;而“expectedModCount=N”,“modCount=N+1”,这样,便抛出ConcurrentModificationException异常,产生fail-fast事件。[总结]至此,我们就完全了解了fail-fast是如何产生的!即,当多个线程对同一个集合进行操作的时候,某线程访问集合的过程中,该集合的内容被其他线程所改变(即其它线程通过add、remove、clear等方法,改变了modCount的值);这时,就会抛出ConcurrentModificationException异常,产生fail-fast事件。
2.3 Iterator原理分析
Iterator是迭代器接口,实现了基本的遍历方法,hasNext(),next(),remove();
- ArrayList中Iterator的具体实现:
具体实现类为Itr();通过观察上一小节中的源代码,我们发现Itr的三个主要函数:[1] hasNext()实现比较简单,如果下一个元素的下标等于集合的大小 , 就证明到最后了.public boolean hasNext() {return cursor != size;}[2] next()方法中首先判断expectedModCount和modCount是否相等.然后对cursor进行判断,看是否超过集合大小和数组长度.然后将cursor赋值给lastRet,并返回下标为lastRet的元素.最后将cursor自增1.开始时,cursor=0,lasrRet=-1;每调用一次next方法,cursor和lastRet都会自增1;public E next() {checkForComodification();int i = cursor;if (i >= size)throw new NoSuchElementException();Object[] elementData = ArrayList.this.elementData;if (i >= elementData.length)throw new ConcurrentModificationException();cursor = i + 1;return (E) elementData[lastRet = i];}[3] remove()方法首先会判断lastRet的值是否小于0,然后再检查expectedModCount和modCount是否相等.接下来是关键,直接调用ArrayList的remove方法删除下标为lastRet的元素.然后将lastRet赋值给cursor,将lastRet重新赋值为-1,并将modCount重新赋值给expectedModCount;public void remove() {if (lastRet < 0)throw new IllegalStateException();checkForComodification();try {ArrayList.this.remove(lastRet);cursor = lastRet;lastRet = -1;1//让两值相同;expectedModCount = modCount;} catch (IndexOutOfBoundsException ex) {throw new ConcurrentModificationException();}}
- 分析 Itr 操作:
下面分析Itr的操作:开始时cursor指向下标为0的元素,lastRet指向下标为-1的元素,也就是null.每调用一次next,cursor和lastRet就分别会自增1.当next返回"C",cursor和lastRet分别为3和2;


此时调用remove,调用ArrayList的remove方法将目标元素删除;会将DE两个元素直接向前移动一位,最后一位置空,并且modCount会自增1.
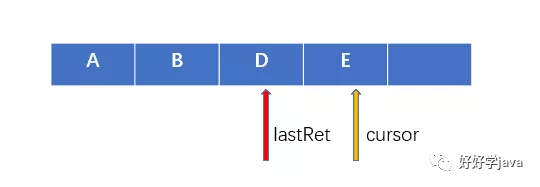
此时cursor=3,size=4,没有到数组尾部,循环继续。来到next方法,因为上一步的remove方法对modCount做了修改,致使expectedModCount与modCount不相等,这就是ConcurrentModificationException异常的原因所在。
- 异常的解决
选择调用iterator.remove()方法,因为在该方法中增加了expectedModCount=modCount操作.public class Solution {public static void main(String[] args) {ArrayList<Integer> list = new ArrayList<>();list.add(1);list.add(2);list.add(3);list.add(4);Iterator<Integer> iterator = list.iterator();while (iterator.hasNext()) {Integer next = iterator.next();if (next == 3) {iterator.remove();}}for (Integer integer : list) {System.out.println(integer);}}}//1 2 4

若有收获,就点个赞吧
0 人点赞
