一、依赖注入的方式
- Setter 注入
- 构造器注入
- 工厂方法注入
- 接口注入 (基本不用)
二、构造器注入讲解
2.1 标签的使用讲解
- 使用的标签:constructor-arg
- 标签出现的位置:bean标签的内部
- 标签中的属性
1. type:用于指定要注入的数据的数据类型,该数据类型可以是构造函数中某个或某些参数的类型
2. index: 用于指定要注入的数据给构造函数中指定索引位置的参数赋值,索引的位置也是从 0 开始
3. name:用于指定构造函数中指定名称的参数赋值
以上三个标签用于指定给构造函数中哪个参数赋值
5. value: 用于给基本类型和 String类型的数据
6. ref:用于指定其它的 bean 类型数据,它指的就是 spring IOC 核心容器中出现过的 bean 对象
2.2 构造函数依赖注入的优缺点
- 优势:
在获取 bean 对象时,注入数据是必须的操作,否则对象无法创建成功 - 弊端:
改变了bean 对象的实例化方式,使我们在创建对象时,如果用不到,也必须创建
2.3 使用构造函数完成依赖注入的实例
注意:后面的修改全部都是基于此类的修改
- 编写 bean.xml 配置文件
- 编写一个 AccountService 接口,后面的三种方法都要实现该接口
- 编写 AccountServiceImpl 实现该接口,并且记住该类的名称和位置
- 编写一个 Client 类,用来测试该接口中的方法
bean.xml 配置
<?xml version="1.0" encoding="UTF-8"?><beans xmlns="http://www.springframework.org/schema/beans"xmlns:xsi="http://www.w3.org/2001/XMLSchema-instance"xmlns:p="http://www.springframework.org/schema/p"xmlns:context="http://www.springframework.org/schema/context"xsi:schemaLocation="http://www.springframework.org/schema/beanshttp://www.springframework.org/schema/beans/spring-beans.xsdhttp://www.springframework.org/schema/contexthttps://www.springframework.org/schema/context/spring-context.xsd"><!-- 使用构造函数注入使用的标签:constructor-arg标签出现的位置:bean标签的内部标签中的属性type:用于指定要注入的数据的数据类型,该数据类型可以是构造函数中某个或某些参数的类型index: 用于指定要注入的数据给构造函数中指定索引位置的参数赋值,索引的位置也是从 0 开始name:用于指定构造函数中指定名称的参数赋值============== 以上三个用于指定给构造函数中哪个参数赋值 ============value: 用于给基本类型和 String类型的数据ref:用于指定其它的 bean 类型数据,它指的就是 spring IOC 核心容器中出现过的 bean 对象优势:在获取 bean 对象时,注入数据是必须的操作,否则对象无法创建成功弊端:改变了bean 对象的实例化方式,使我们在创建对象时,如果用不到,也必须创建--><!-- 对象使用 Ref 引入 --><bean id="c1" class="cn.gorit.entity.Clazz" p:clazzName="通信" p:grand="大三"/><!-- 方式1 根据 下标对应的 构造方法的参数一次注入 --><bean id="p1" class="cn.gorit.entity.Person"><constructor-arg index="0" value="cccc"></constructor-arg><constructor-arg index="1" value="女"></constructor-arg><constructor-arg index="2" ref="c1"></constructor-arg><constructor-arg index="3" value="18"></constructor-arg></bean><!-- 方式2, 使用 value 进行注入,进行构造传入 --><bean id="p2" class="cn.gorit.entity.Person"><constructor-arg value="cccc"></constructor-arg><constructor-arg value="女"></constructor-arg><constructor-arg ref="c1"></constructor-arg><constructor-arg value="18"></constructor-arg></bean><!-- 根据name 指定要注入的构造函数的参数 --><bean id="p3" class="cn.gorit.entity.Person"><constructor-arg name="name" value="cccc"></constructor-arg><constructor-arg name="gender" value="女"></constructor-arg><constructor-arg name="clazz" ref="c1"></constructor-arg><constructor-arg name="age" value="18"></constructor-arg></bean></beans>
Person 实体类的编写
package cn.gorit.entity;

import org.springframework.beans.factory.annotation.Autowired;
import org.springframework.beans.factory.annotation.Value;
import org.springframework.stereotype.Component;

public class Person {

    private String name;
    private String gender;
    private Clazz clazz;
    private Integer age;

    public Person(String name, String gender, Clazz clazz, Integer age) {
        System.out.println("有参的构造方法执行了");
        this.name = name;
        this.gender = gender;
        this.clazz = clazz;
        this.age = age;
    }

    public Person() {
        System.out.println("无参的构造方法执行了");
    }

    public void introduce () {
        System.out.println("大家好,我叫"+name + ",性别:"+gender + ",年龄: "+age);
        System.out.println("今年:"+clazz.getGrand() + clazz.getClazzName());
    }

    // getter 和 setter 省略,因为我们用的是 构造方法进行注入
}
Clazz 实体类编写
package cn.gorit.entity;

import org.springframework.beans.factory.annotation.Value;
import org.springframework.stereotype.Component;

public class Clazz {
    private String ClazzName;
    private String Grand;

    public Clazz(String clazzName, String grand) {
        ClazzName = clazzName;
        Grand = grand;
    }

    public Clazz() {
    }

    // getter 和 setter 省略

    @Override
    public String toString() {
        return "Clazz{" +
                "ClazzName='" + ClazzName + '\'' +
                ", Grand='" + Grand + '\'' +
                '}';
    }
}
App 类编写
package cn.gorit.main;

import cn.gorit.entity.Person;
import org.springframework.context.ApplicationContext;
import org.springframework.context.support.ClassPathXmlApplicationContext;

public class App {
    public static void main(String[] args) {
        // 获取框架生产的 bean
        ApplicationContext ac = new ClassPathXmlApplicationContext("applicationContext.xml");
        Person p = (Person) ac.getBean("p2"); // 这里选择 p1 p2 p3 都是一样的
        p.introduce();
    }
}
运行结果:
我们没有使用 传统的方式,接用 Spring 框架完成了 bean 的实例化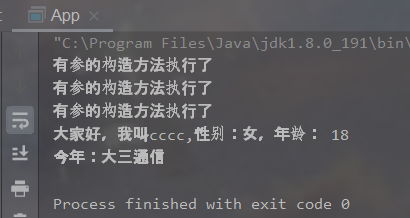
三、Setter 注入讲解
3.1 标签使用讲解
- setter 方法注入
- 涉及的标签:property
- 出现的位置:bean 标签的内部
- 标签的属性:
- name:用于指定注入时所用的 set 方法名称
- value: 用于给基本类型和 String类型的数据
- ref:用于指定其它的 bean 类型数据,它指的就是 spring IOC 核心容器中出现过的 bean 对象
3.2 set 注入的优缺点
- 优势:
- 创建对象时没有明确的限制,可以直接使用默认构造函数
- 弊端:
- 如果某个成员必须有值,则获取对象可能 set 方法没有执行
3.3 set 注入示例
编写 bean.xml
<?xml version="1.0" encoding="UTF-8"?>
<beans xmlns="http://www.springframework.org/schema/beans"
xmlns:xsi="http://www.w3.org/2001/XMLSchema-instance"
xmlns:p="http://www.springframework.org/schema/p"
xsi:schemaLocation="http://www.springframework.org/schema/beans
http://www.springframework.org/schema/beans/spring-beans.xsd>
<!-- 对象使用 Ref 引入 -->
<bean id="c1" class="cn.gorit.entity.Clazz" p:clazzName="通信" p:grand="大三"/>
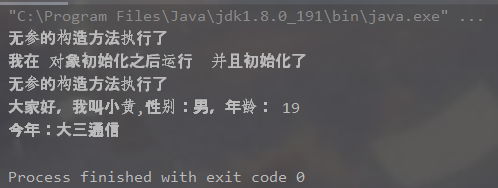
<bean id="person" class="cn.gorit.entity.Person" init-method="init" destroy-method="destory">
<property name="name" value="小黄"></property>
<property name="gender" value=""></property>
<property name="age" value="18"></property>
<property name="clazz" ref="c1"></property>
</bean>
<!--使用 p 标签快速注入 -->
<bean id="person1" class="cn.gorit.entity.Person" p:name="小黄" p:gender="男" p:age="19" p:clazz-ref="c1"/>
</beans>
这里也用到了 Person 和 Clazz 实体类
编写 App
package cn.gorit.main;

import cn.gorit.entity.Person;
import org.springframework.context.ApplicationContext;
import org.springframework.context.support.ClassPathXmlApplicationContext;

public class App {
    public static void main(String[] args) {
        // 获取框架生产的 bean
        ApplicationContext ac = new ClassPathXmlApplicationContext("bean.xml");
        Person p = (Person) ac.getBean("person1");
        p.introduce();
    }
}
四、工厂方法注入
工厂方法只需要一个 xml 即可完成配置,不过一般不会用这个,所以不做详细介绍
构建一个名为 DemoFactor 的工具类
package cn.gorit.entity;

import org.springframework.beans.factory.FactoryBean;

public class DemoFactory implements FactoryBean {

    private Boolean isStudent;

    public Boolean getStudent() {
        return isStudent;
    }

    public void setStudent(Boolean student) {
        isStudent = student;
    }

    // 在外面根据 isStudent 的 bool 值类型,选择加载对应的对象
    public Object getObject() throws Exception {
        if (isStudent) {
            return  new Person();
        } else {
            return new Clazz();
        }
    }

    public Class<?> getObjectType() {
        return null;
    }

    public boolean isSingleton() {
        return false;
    }
}
工厂的 xml 配置
        <!--    工厂 bean(小作坊,大部分出现在系统加载类中, 开发用不到):目的不是为了拿到当前的对象,而是为了生成某一些对象-->
    <bean id="stu" class="cn.gorit.entity.DemoFactory" p:student="true"></bean>
App 编写
package cn.gorit.main;

import cn.gorit.entity.Person;
import org.springframework.context.ApplicationContext;
import org.springframework.context.support.ClassPathXmlApplicationContext;

public class App {
    public static void main(String[] args) {
        // 获取框架生产的 bean
        ApplicationContext ac = new ClassPathXmlApplicationContext("applicationContext.xml");
        Person p = (Person) ac.getBean("stu");
        p.introduce();
    }
}
五、使用注解注入 (推荐)
注解的方式注入也是最简单的,我们只需要在 bean.xml 文件中加入一行扫描 xml 内容即可
<?xml version="1.0" encoding="UTF-8"?>
<beans xmlns="http://www.springframework.org/schema/beans"
       xmlns:xsi="http://www.w3.org/2001/XMLSchema-instance"
       xmlns:context="http://www.springframework.org/schema/context"
       xsi:schemaLocation="http://www.springframework.org/schema/beans
       http://www.springframework.org/schema/beans/spring-beans.xsd
       http://www.springframework.org/schema/context
       https://www.springframework.org/schema/context/spring-context.xsd">

            <!--    开启扫描注解,可以指定要扫描的包  -->
        <context:component-scan base-package="cn.gorit"></context:component-scan>
</beans>
Person 实体类
package cn.gorit.entity;
import org.springframework.beans.factory.annotation.Autowired;
import org.springframework.beans.factory.annotation.Value;
import org.springframework.stereotype.Component;
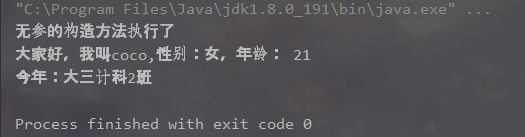
@Component("stu")
public class Person {
@Value("coco")
private String name;
@Value("女")
private String gender;
@Autowired
private Clazz clazz;
@Value("21")
private Integer age;
public Person(String name, String gender, Clazz clazz, Integer age) {
System.out.println("有参的构造方法执行了");
this.name = name;
this.gender = gender;
this.clazz = clazz;
this.age = age;
}
public Clazz getClazz() {
return clazz;
}
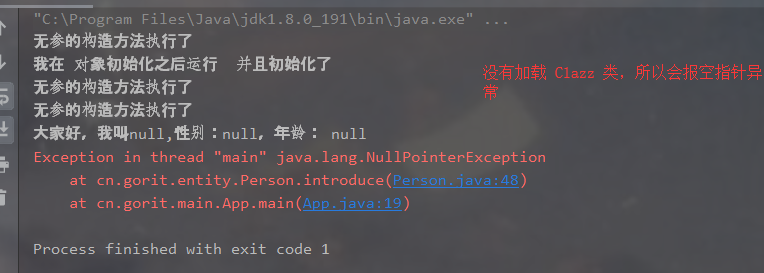
public void init () {
System.out.println("我在 对象初始化之后运行 并且初始化了");
}
public void destory () {
System.out.println("我被 gc 回收了~");
}
public void setClazz(Clazz clazz) {
this.clazz = clazz;
}
public Person() {
System.out.println("无参的构造方法执行了");
}
public void introduce () {
System.out.println("大家好,我叫"+name + ",性别:"+gender + ",年龄: "+age);
System.out.println("今年:"+clazz.getGrand() + clazz.getClazzName());
}
public String getName() {
return name;
}
public void setName(String name) {
this.name = name;
}
public String getGender() {
return gender;
}
public void setGender(String gender) {
this.gender = gender;
}
public Integer getAge() {
return age;
}
public void setAge(Integer age) {
this.age = age;
}
}
Clazz 实体类
package cn.gorit.entity;

import org.springframework.beans.factory.annotation.Value;
import org.springframework.stereotype.Component;

@Component
public class Clazz {
    @Value("计科2班")
    private String ClazzName;
    @Value("大三")
    private String Grand;

    public Clazz(String clazzName, String grand) {
        ClazzName = clazzName;
        Grand = grand;
    }

    public Clazz() {
    }

    public String getClazzName() {
        return ClazzName;
    }

    public void setClazzName(String clazzName) {
        ClazzName = clazzName;
    }

    public String getGrand() {
        return Grand;
    }

    public void setGrand(String grand) {
        Grand = grand;
    }

    @Override
    public String toString() {
        return "Clazz{" +
                "ClazzName='" + ClazzName + '\'' +
                ", Grand='" + Grand + '\'' +
                '}';
    }
}
编写 app ,这时候我们发现没有 bean 的id ,那该怎么办呢?其实 我们可以在 component 注解中加入参数即可解决,我加的参数是 stu
package cn.gorit.main;

import cn.gorit.entity.Person;
import org.springframework.context.ApplicationContext;
import org.springframework.context.support.ClassPathXmlApplicationContext;

public class App {
    public static void main(String[] args) {
        // 获取框架生产的 bean
        ApplicationContext ac = new ClassPathXmlApplicationContext("applicationContext.xml");
        Person p = (Person) ac.getBean("stu");
        p.introduce();
    }
}
六、什么是 Spring 依赖注入?
6.1 依赖注入的基本解释
- 依赖注入:
- Dependency Injection
- IoC 的作用:
- 降低程序键的耦合(依赖关系)
- 依赖关系的管理:
- JavaBean (Java 对象(以后都交给 spring 来维护,管理
- 在当前类需要用到其他类的对象,由Spring来为我们提供,我们只需要在配置文件中说明
- 依赖关系的维护:就称为依赖注入
6.2 依赖注入的数据
- 能注入的数据,有三类
- 基本数据类型和 string
- 其他 bean 类型(在配置文件中或者注解配置过的 bean,当要引用自定义 bean 的时候,要通过 ref 关键字实现)
- 复杂类型、集合类型 (csdn 博客有整理,这个很少用)
6.3 依赖注入的三种方式
- 构造方法注入
- 使用 set 方法注入
- 使用注解 (推荐)

若有收获,就点个赞吧
0 人点赞
