一、Spring 框架的介绍
我们先来看一看 官网上的介绍:
Spring makes programming Java quicker, easier, and safer for everybody. Spring’s focus on speed, simplicity, and productivity has made it the world’s most popular Java framework.
看不懂没关系,Spring 简而言之,是专注于 Java EE 快速开发的一个框架,它会使我们编写出来的 Java 程序 更快,更容易,更安全
1.1 Spring特点及体系结构
以下为 Spring 的体系结构图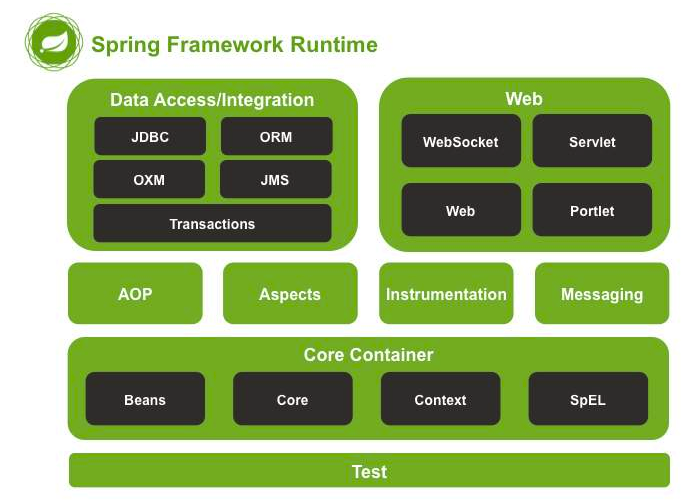
- Spring 框架按功能划分可以分为 7个主要模块,一个测试模块
- Spring 框架包含了 MVC 中的三层
1.2 Spring 的核心容器
核心容器由如下4个部分组成
- Spring-beans:提供 BeanFactory,工厂模式的微妙实现,它移除了编码式单例的需要,并且可以把配置和依赖从实际编码逻辑中解耦。
- Spring-core:提供了框架的核心功能,包括 IoC 和 依赖注入功能
- Spring-Context:Spring上下文是一个配置文件,向Spring框架提供上下文信息。Spring上下文包括企业服务,如JNDI、EJB、电子邮件、国际化、校验和调度功能
- Spring-SpEL:模块提供了强大的表达式语言,用于在运行时查询和操作对象图。它是JSP2.1规范中定义的统一表达式语言的扩展,支持set和get属性值、属性赋值、方法调用、访问数组集合及索引的内容、逻辑算术运算、命名变量、通过名字从Spring IoC容器检索对象,还支持列表的投影、选择以及聚合等。
Spring 完整的依赖关系如下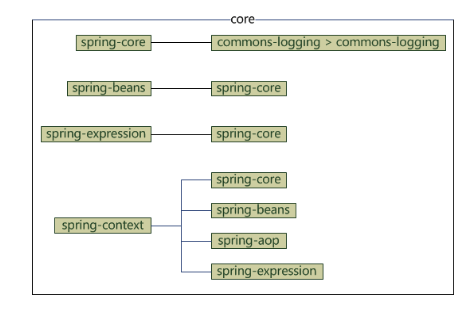
部分内容参考
W3Cschool
二、理解 Spring IoC
- 控制反转 (Inversion of Control)简称 IoC
- DI 依赖注入
- IoC 是 Spring 容器的内核,AOP,声明事物等功能都是在此基础上发展而来的
2.1 理解 IoC 容器
即通过容器来控制业务对象之间的依赖关系,而非传统实现中,由代码直接控制,也就是我们常说的把对象交给 Spring IoC 容器来管理,从而实现解耦的目的
2.2 获取 IoC 容器
我们需要在 类路径下创建一个名为 bean.xml 的配置文件,这样做的作用是把 对象的创建 交给 spring 来管理。
我们可以通过 ApplicationContext 类实现获取 IoC 容器,它有三个实现类
- ClassPathXMLApplicationContext:它可以加载类路径下的配置文件,要求配置文件必须在类路径下,不在的话,加载不了。(指的是 classpath: 下的目录,如果我们的项目是使用 maven 构建的,那么就在 resource 目录下
- FileSystemXmlApplicationContext:它可以加载磁盘任意路径下的配置文件(必须有访问权限)
- AnnotationConfigApplicationContext:它是用于读取注解 拆解 容器的
2.3 单例 ? 多例?
Spring 容器的实现类有两类,分别是:
- ApplicationContext:单例 (立即加载工厂)
- 它在构建核心容器时,创建对象采用的策略是利用加载的方式,也就是说,只要一读取完配置文件马上就创建配置文件中的配置对象
- 优点:启动时立即加载所有配置的 javabean 对象,如果出现问题,启动的时候就会预知
- 它在构建核心容器时,创建对象采用的策略是利用加载的方式,也就是说,只要一读取完配置文件马上就创建配置文件中的配置对象
- BeanFactory: 多例 (延迟加载 lazy)
- 它在构建核心容器时:创建对象采取的策略是采用 延迟加载 的方式。也就是说,什么时候根据 id 获取对象了,什么时候才真正的创建对象
三、Hello Spring
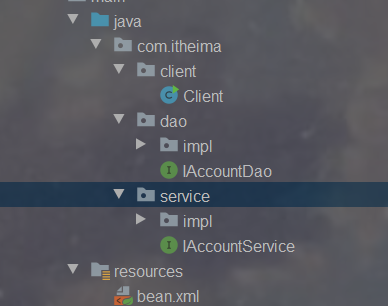
我们以一个银行存钱的例子为例,来编写我们的第一个 Spring 应用程序,我的项目结构如下:
3.1 使用 Maven 构建一个 Spring 项目
引入 坐标依赖,目前 Spring 已经更新到了 5.3.0 版本,但是新版本可能会出现一些难以预知的 小 bug,所以我采用老一点的 5.2.3 RELEASE 版本
<dependency><groupId>org.springframework</groupId><artifactId>spring-context</artifactId><version>5.2.3.RELEASE</version></dependency>
3.2 编写业务层方法
编写存储账户的一个接口
package com.itheima.service;

public interface IAccountService {
    void saveAccount();
}
接口的实现类
package com.itheima.service.impl;

import com.itheima.service.IAccountService;
import com.itheima.dao.IAccountDao;
import com.itheima.dao.impl.IAccountDaoImpl;

/**
 * 账户业务层的实现类
 * */
public class IAccountServceImpl implements IAccountService {
    // 采用 new 创建对象
    private IAccountDao accountDao = new IAccountDaoImpl();

    public IAccountServceImpl() {
        System.out.println("对象创建了");
    }

    public void saveAccount() {
        int i =1;
        accountDao.saveAccount(); // 执行存钱的方法,模拟 持久层
        System.out.println(i);
        i++;
    }
}
3.3 编写持久层方法
编写持久层接口
package com.itheima.dao;

/**
 * 账户持久层接口
 * */
public interface IAccountDao {
    /**
     * 模拟保存账户
     * */
    void saveAccount();
}
package com.itheima.dao.impl;

import com.itheima.dao.IAccountDao;

/**
 * 账户持久层的实现类
 * */
public class IAccountDaoImpl implements IAccountDao {
    /**
     * 模拟保存账户
     */
    public void saveAccount() {
       System.out.println("保存了账户");
    }
}
3.4 编写 Spring IoC 配置文件
beans.xml
<?xml version="1.0" encoding="utf-8" ?>
<!-- Spring 的约束,我们下面用到什么,就要在这里添加对应的约束 -->
<beans xmlns="http://www.springframework.org/schema/beans"
       xmlns:xsi="http://www.w3.org/2001/XMLSchema-instance"
       xmlns:context="http://www.springframework.org/schema/context"
       xsi:schemaLocation="http://www.springframework.org/schema/beans
       http://www.springframework.org/schema/beans/spring-beans.xsd
       http://www.springframework.org/schema/context
       http://www.springframework.org/schema/context/spring-context.xsd
       ">

    <!-- 把对象创建交给 spring 来管理,在外面全部通过 id 来找到 Spring 创建的 Bean   -->
    <bean id="accountService" class="com.itheima.service.impl.IAccountServceImpl"/>

    <bean id="accountDao" class="com.itheima.dao.impl.IAccountDaoImpl"/>
</beans>
3.5 编写一个客户类,用于模拟存钱的操作
package com.itheima.client;
import com.itheima.dao.IAccountDao;
import com.itheima.service.IAccountService;
import org.springframework.context.ApplicationContext;
import org.springframework.context.support.ClassPathXmlApplicationContext;
import org.springframework.context.support.FileSystemXmlApplicationContext;
/**
* 模拟一个表现层,用于调用业务层
* */
public class Client {
public static void main(String[] args) {
// 使用 mvc 三层架构,编写 (耦合性过高)
// IAccountService as = new IAccountServceImpl();
// 1. 获取核心容器对象,有两种方式,第一种方式是加载类路径下的文件
ApplicationContext ac = new ClassPathXmlApplicationContext("bean.xml");
// 这里填写配置文件,在你本机上的物理地址
//ApplicationContext ac = new FileSystemXmlApplicationContext("xxx");
// 2. 根据 id 获取 Bean 对象 (两种方式)
IAccountService as = (IAccountService) ac.getBean("accountService");
// IAccountDao dao = ac.getBean("accountDao", IAccountDao.class);
// 3. 调用业务层的方法,实现客户存钱的操作
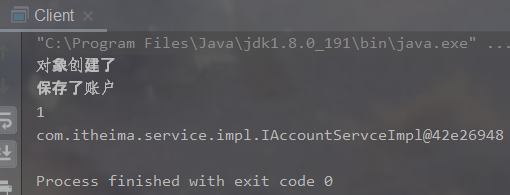
as.saveAccount();
System.out.println(as);
// dao.saveAccount();
// System.out.println(dao);
}
}
四、注解专题
4.1 第一个注解程序
代码如下:
<!--ApplicationSpring.xml-->
<?xml version="1.0" encoding="utf-8" ?>
<beans xmlns="http://www.springframework.org/schema/beans"
       xmlns:xsi="http://www.w3.org/2001/XMLSchema-instance"
       xmlns:context="http://www.springframework.org/schema/context"
       xsi:schemaLocation="http://www.springframework.org/schema/beans
       http://www.springframework.org/schema/beans/spring-beans.xsd
       http://www.springframework.org/schema/context
       http://www.springframework.org/schema/context/spring-context.xsd
       ">

        <!-- 开启注解扫描   -->
        <context:component-scan base-package="com"/>
</beans>
//实体类
import org.springframework.beans.factory.annotation.Value;
import org.springframework.stereotype.Component;
import org.springframework.beans.factory.annotation.Autowired;
import org.springframework.context.annotation.ComponentScan;
import org.springframework.context.annotation.Configuration;

//配置类
@Configuration
//扫描本类此包下的bean
@ComponentScan
public class Config {
}


//将此类交给Spring容器管理
@Component
public class Clazz {
    private String clazz;

    public String getClazz() {
        return clazz;
    }

    @Value("来自Clazz类,班级1")
    public void setClazz(String clazz) {
        this.clazz = clazz;
    }

    @Override
    public String toString() {
        return "Clazz{" +
                "clazz='" + clazz + '\'' +
                '}';
    }
}


@Component("s")
public class Student {
    private String name;
    private int age;

    //将Clazz类注入到此类,无需再new
    @Autowired
    private Clazz clazz;

    public String getName() {
        return name;
    }

    @Value("aa")
    public void setName(String name) {
        this.name = name;
    }

    public int getAge() {
        return age;
    }
    @Value("1")
    public void setAge(int age) {
        this.age = age;
    }
        public Student(String name, int age,Clazz clazz) {
        this.name = name;
        this.age = age;
        this.clazz = clazz;
    }

    public Student() {

    }

    @Override
    public String toString() {
        return "Student{" +
                "name='" + name + '\'' +
                ", age=" + age +
                '}'+clazz.getClazz();
    }
4.2 测试代码
import org.springframework.context.ApplicationContext;
import org.springframework.context.annotation.AnnotationConfigApplicationContext;

@SuppressWarnings("all")
public class Try {
    public static void main(String[] args) {
        //用注解可以不写xml配置文件
        ApplicationContext ctx = new AnnotationConfigApplicationContext(Config.class);
        Student student = (Student) ctx.getBean("s");//Component("s")里的s
        System.out.println(student.toString());
    }
}
//--------------------------------------------------------------------------------------------------------------------------------

/**
* student{name:aa,age:1} 来自clazz类,班级1
*/
由此可见,注解的方式,大大简化了开发,没有了大量的代码,看起来更加简洁。
4.3 注解方式的AOP开发
import org.aspectj.lang.ProceedingJoinPoint;
import org.aspectj.lang.annotation.*;
import org.springframework.stereotype.Component;


@EnableAspectJAutoProxy//开启切面自动代理
@Configuration
@ComponentScan
public class ConfigAspect {
}

@Component
public class Performance {
    public void perform(){
        System.out.println("```start perform```");
    }
}

// 定义切面
@Aspect
public class Audience {
    //前置注解
    @Before("execution(* com.second.Performance.*())")
    public void silenceCellPhones(){
        System.out.println("silence Cell Phones-----前");
    }
    //返回注解
    @AfterReturning("execution(* com.second.Performance.*())")
    public void applause(){
        System.out.println("CLAP CLAP CLAP!!!-----返回");
    }
    //后置注解
    @After("execution(* com.second.Performance.*())")
    public void goBye() {
        System.out.println("Bye Bye-----后");
    }
    //异常注解
    @AfterThrowing("execution(* com.second.Performance.*())")
    public void demandRefund(){
        System.out.println("Demanding a refund-----异常");
    }
    //环绕注解
    @Around("execution(* com.second.Performance.*())")
    public void watchPerformance(ProceedingJoinPoint joinPoint){    //jp就相当于 通知
        try {
            System.out.println("环绕前");
            joinPoint.proceed();
            System.out.println("环绕返回");
        } catch (Throwable throwable) {
            System.out.println("环绕异常");
        }finally {
            System.out.println("环绕后");
        }
    }
}
4.2 AOP测试
import org.springframework.context.ApplicationContext;
import org.springframework.context.annotation.AnnotationConfigApplicationContext;

@SuppressWarnings("all")
public class Try {
    public static void main(String[] args) {
        //用注解可以不写xml配置文件
        ApplicationContext ctx = new AnnotationConfigApplicationContext(ConfigAspect.class);
        Performance p = (Performance) ctx.getBean(Performance.class);
        System.out.println(p.perform());
    }
}

若有收获,就点个赞吧
0 人点赞
