作者:Gorit
时间:2020年10月12日21:01:17
项目:SpringBoot + aop + guava
参考代码:
一、导入 maven 坐标依赖
<dependency><groupId>org.springframework.boot</groupId><artifactId>spring-boot-starter-web</artifactId></dependency><dependency><groupId>org.springframework.boot</groupId><artifactId>spring-boot-starter-aop</artifactId></dependency><!-- 谷歌提供的增强 JDK 的方法 --><dependency><groupId>com.google.guava</groupId><artifactId>guava</artifactId><version>21.0</version></dependency>
二、项目核心代码
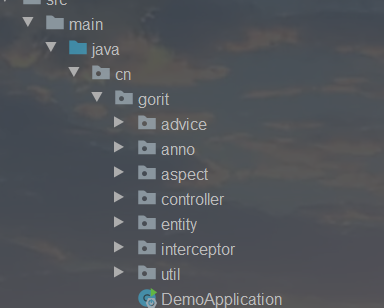
项目包结构
2.1 新建 LocalLock 注解
package cn.gorit.anno;import java.lang.annotation.*;/*** @Classname LocalLock* @Description 防止重复提交的注解* @Date 2020/10/11 10:23* @Created by CodingGorit* @Version 1.0*/@Target(ElementType.METHOD)@Retention(RetentionPolicy.RUNTIME)@Documented@Inheritedpublic @interface LocalLock {String key() default "";/*** TODO 由于用的 guava 暂时就忽略该属性吧 集成 redis 需要用到* 默认时间5秒*/int expire() default 5 * 1000;}
2.2 配置拦截 + AOP
package cn.gorit.interceptor;import cn.gorit.anno.LocalLock;import com.google.common.cache.Cache;import com.google.common.cache.CacheBuilder;import org.aspectj.lang.ProceedingJoinPoint;import org.aspectj.lang.annotation.Around;import org.aspectj.lang.annotation.Aspect;import org.aspectj.lang.reflect.MethodSignature;import org.springframework.context.annotation.Configuration;import org.springframework.util.StringUtils;import java.lang.reflect.Method;import java.util.concurrent.TimeUnit;/*** @Classname LockMethodInterceptor* @Description TODO* @Date 2020/10/12 19:50* @Created by CodingGorit* @Version 1.0*/@Aspect@Configurationpublic class LockMethodInterceptor {// 构建缓存对象,设置过期时间private static final Cache<String, Object> CACHES = CacheBuilder.newBuilder()// 最大缓存 100 个.maximumSize(1000)// 设置写缓存后 5 秒钟过期.expireAfterWrite(5, TimeUnit.SECONDS).build();// 在 interceptor() 上采用 环绕通知,以及指定 @annotation 所有带 LocalLock 注解都将被切面处理@Around("execution(public * *(..)) && @annotation(cn.gorit.anno.LocalLock)")public Object interceptor(ProceedingJoinPoint pjp) {MethodSignature signature = (MethodSignature) pjp.getSignature();Method method = signature.getMethod();LocalLock localLock = method.getAnnotation(LocalLock.class);String key = getKey(localLock.key(), pjp.getArgs());if (!StringUtils.isEmpty(key)) {if (CACHES.getIfPresent(key) != null) {throw new RuntimeException("请勿重复请求");}// 如果是第一次请求,就将 key 当前对象压入缓存中CACHES.put(key, key);}try {return pjp.proceed();} catch (Throwable throwable) {// 这里我使用到了全局异常处理,所以控制台不会直接报错throw new RuntimeException("服务器异常");} finally {// TODO 为了演示效果,这里就不调用 CACHES.invalidate(key); 代码了}}/*** key 的生成策略,如果想灵活可以写成接口与实现类的方式(TODO 后续讲解)** @param keyExpress 表达式* @param args 参数* @return 生成的key*/private String getKey(String keyExpress, Object[] args) {for (int i = 0; i < args.length; i++) {keyExpress = keyExpress.replace("arg[" + i + "]", args[i].toString());}return keyExpress;}}
2.3 控制层
package cn.gorit.controller;

import cn.gorit.anno.LocalLock;
import cn.gorit.entity.Result;
import cn.gorit.entity.User;
import org.springframework.web.bind.annotation.PathVariable;
import org.springframework.web.bind.annotation.RequestMapping;
import org.springframework.web.bind.annotation.RequestMethod;
import org.springframework.web.bind.annotation.RestController;

import java.util.ArrayList;
import java.util.List;

/**
 * @Classname FirstController
 * @Description TODO
 * @Date 2020/10/6 18:20
 * @Created by CodingGorit
 * @Version 1.0
 */

// 这里模拟增删改查,就不用数据库了
@RestController
public class FirstController {

    static List<User> list = new ArrayList<>();
    {
        // 初始化数据,没有用到数据库,所有数据都是模拟的
        list.add(new User(1,"牛二",13));
        list.add(new User(2,"张三",14));
        list.add(new User(3,"王五",15));
    }
    /**
     * 查询所有的用户
     * @return
     */
    @RequestMapping(value = "/user",method = RequestMethod.GET)
    public Result queryAllUsers() {
        // Result 也是自定义的一个实体类
        return new Result<>(200,"查询成功",list);
    }

    /**
     * 根据 ID 查询用户
     */
    @RequestMapping(value = "/user/{id}",method = RequestMethod.GET)
    public Result queryUserById(@PathVariable("id") Integer id) {
        return new Result<>(200,"查询成功",list.get(id-1));
    }

    /**
     * 添加用户,返回添加的结果
     */
    @LocalLock(key = "user:arg[0]")
    @RequestMapping(value = "/user",method = RequestMethod.POST)
    public Result addUser(User user) {
        list.add(user);
        return new Result<>(200,"添加成功",list);
    }

    /**
     * 修改用户要用到 PUT 和 DELETE 方法,这里就不测试了
     */
}
2.4 前端页面
<!DOCTYPE html>
<html lang="en">
<head>
    <meta charset="UTF-8">
    <title>Title</title>
</head>
<body>
    <h3>查询所有用户</h3>
    <a href="/user">查询所有用户</a>
    <br>

    <h3>根据 ID 查询用户</h3>
<!--    <form action="/user/"-->
    请输入用户ID:<input type="text" id="id" placeholder="请输入用户的 ID">
    <button id="btn-search" onclick="search()">查询</button>

    <h3>添加用户</h3>
    <form action="/user" method="post">
        用户 id:<input type="text" name="id"><br>
        用户名称:<input type="text" name="name"><br>
        用户年龄:<input type="text" name="age"><br>
        <input type="submit" value="添加">
    </form>

    <script type="text/javascript">
        function search() {
            let userId = document.getElementById("id").value;
            console.log(userId)
            window.location.href = 'http://localhost:8080/user/'+ parseInt(userId)
        }
    </script>
</body>
</html>
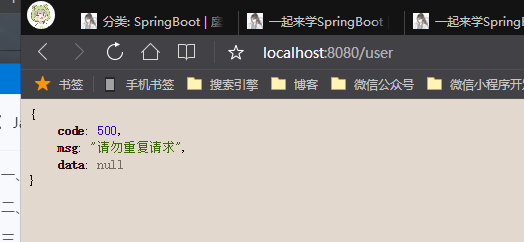
2.5 测试
在 5s 内重复提交就会提醒对应的信息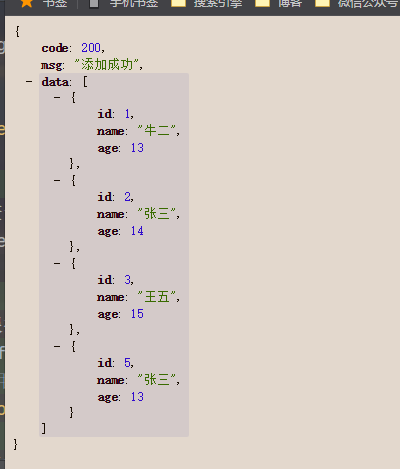

若有收获,就点个赞吧
0 人点赞
