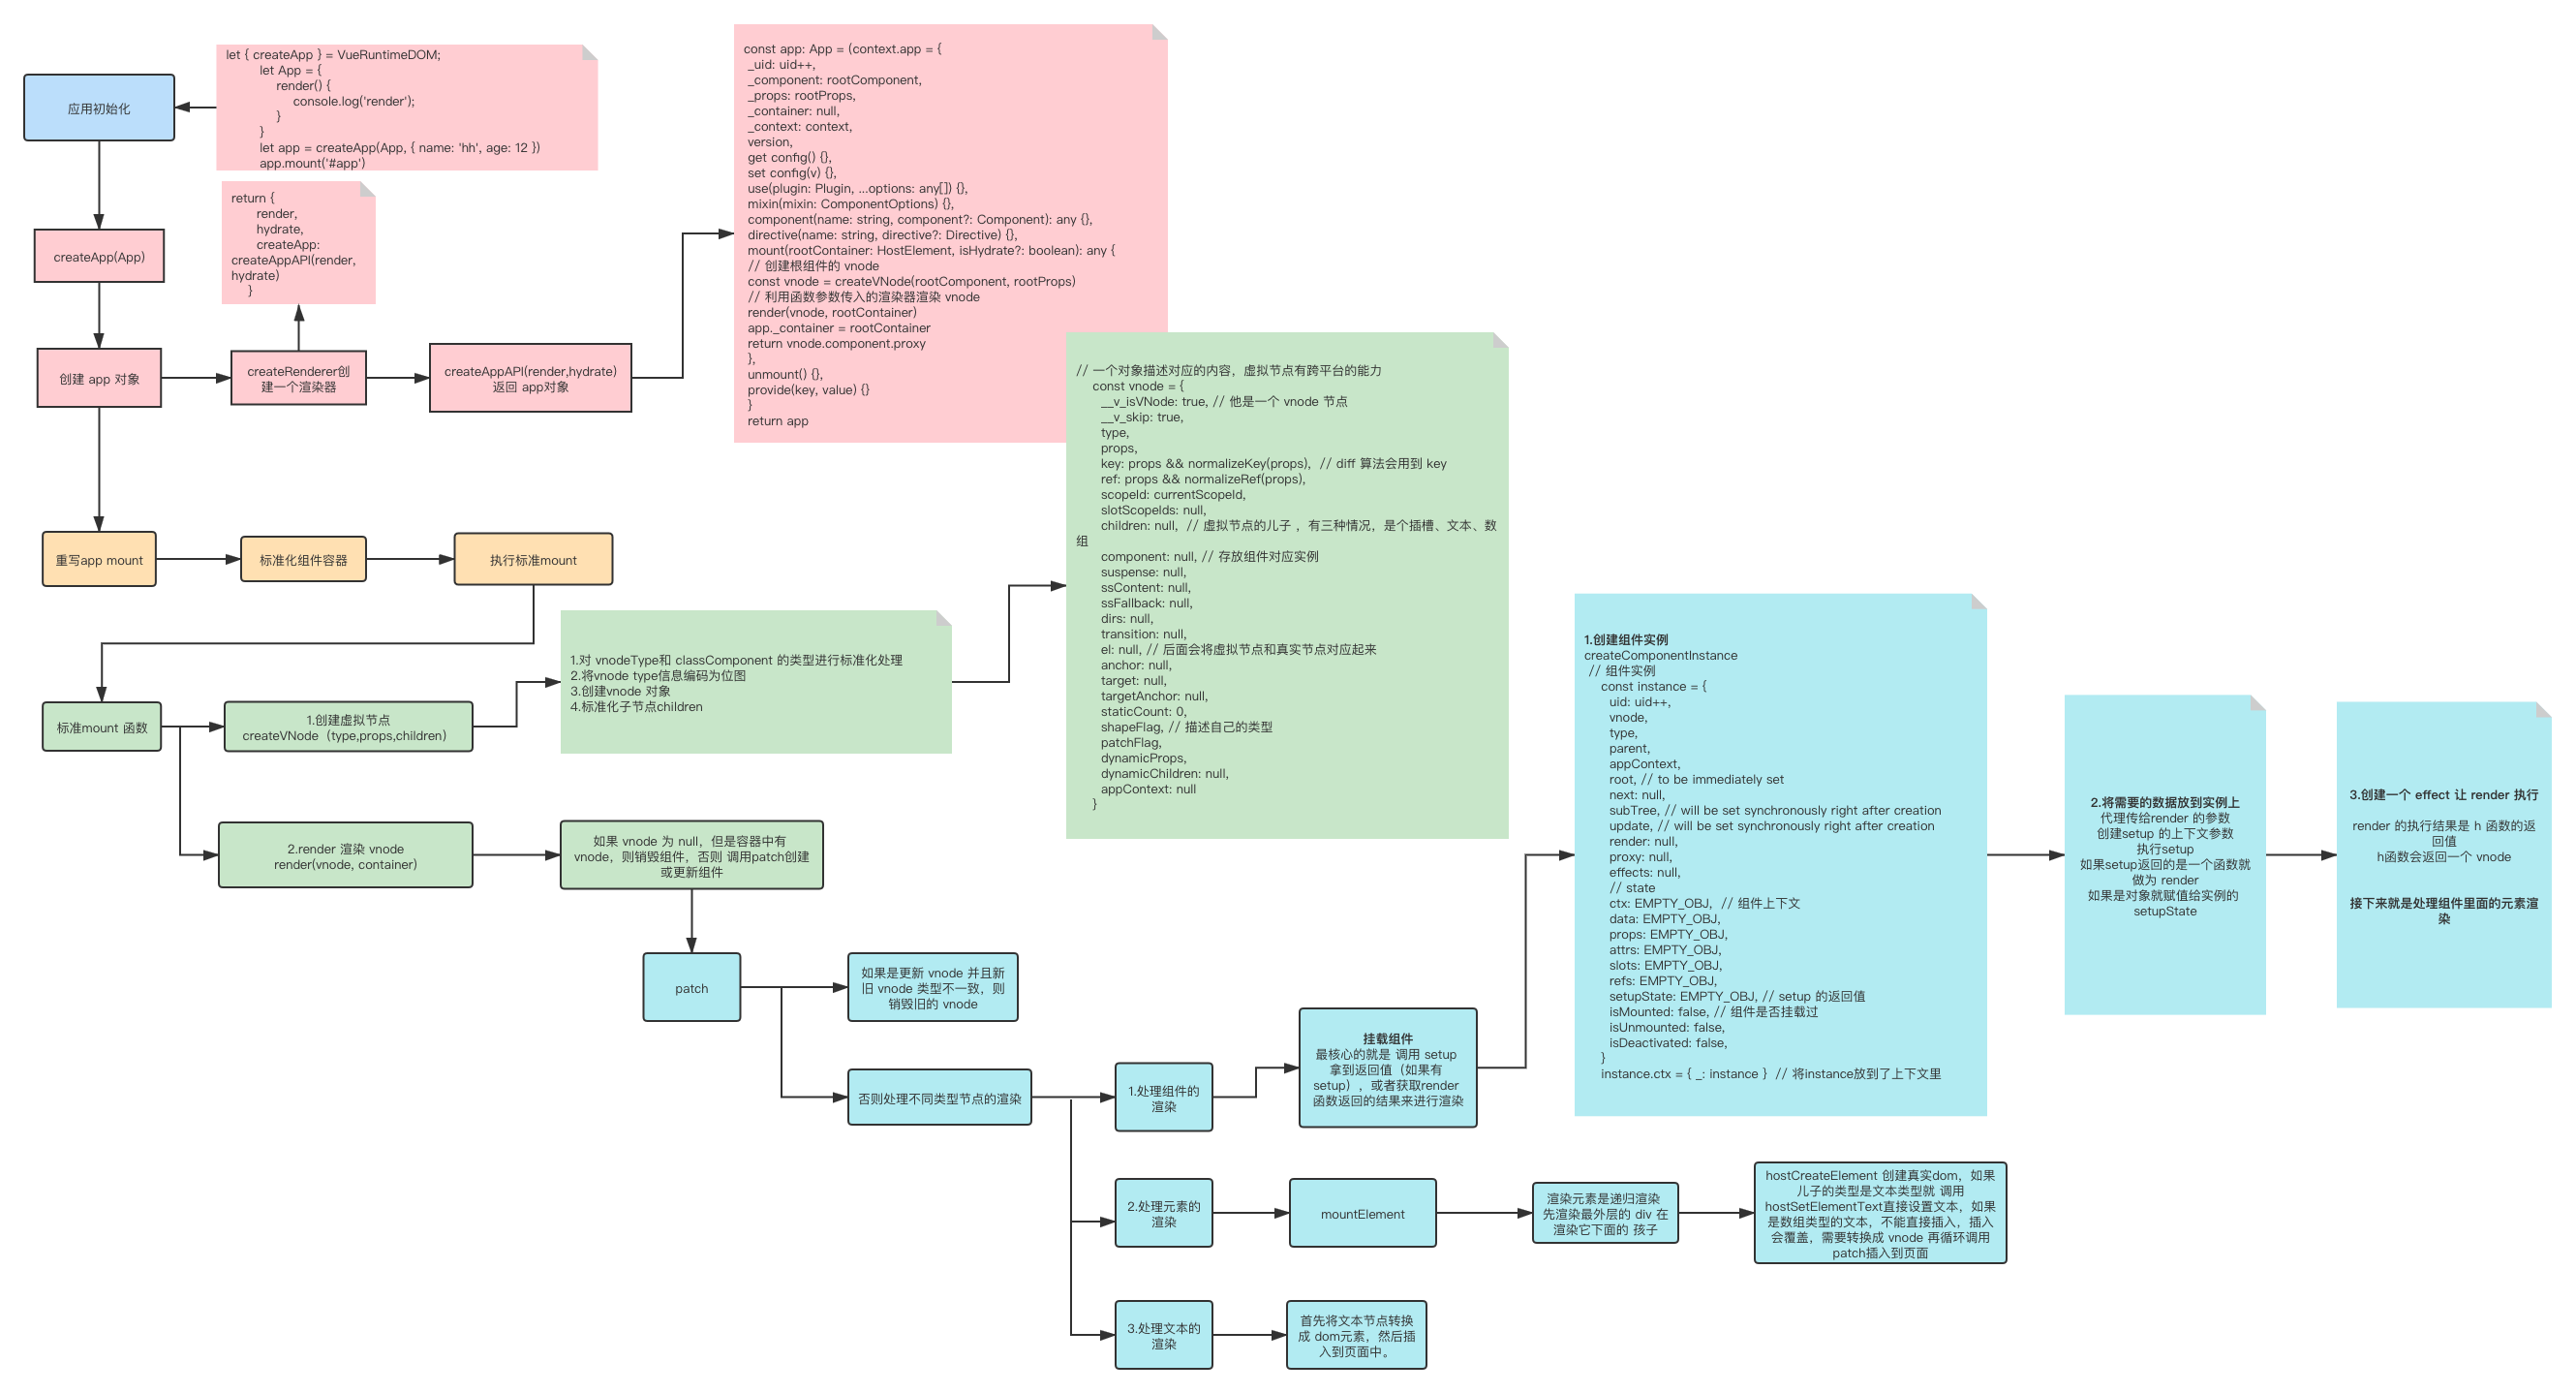
核心是将组件变成 vnode -> 再将 vnode 变成真实 dom -> 插入到页面上
应用初始化
<body><div id="app"></div><script>let { createApp } = VueRuntimeDOM;let App = {render() {console.log('render');}}let app = createApp(App, { name: 'hh', age: 12 })app.mount('#app')</script></body>
调用createApp 会返回一个app对象,有个mount 方法
createApp 简化版源码
ackages/runtime-dom/src/index.ts
// packages/runtime-dom/src/index.ts// 定义渲染器let renderer;// 创建一个渲染器function ensureRenderer() {return renderer || (renderer = createRenderer(rendererOptions))}export const createApp = ((...args) => {// 创建 app 对象const app = ensureRenderer().createApp(...args)const { mount } = app// 重写 mount方法app.mount = (containerOrSelector) => {// 拿到容器元素const container = normalizeContainer(containerOrSelector)if (!container) return// 挂载之前清空容器container.innerHTML = ''// 调用原始 mount方法mount(container);//将组建渲染成dom元素进行挂载,这是 runtime-core 要做的事情}return app})
调app.mount 方法首先要清空容器里面的东西。
createApp 方法中主要做了两件事:
- 创建 app 对象
- 重写 app.mount 方法
创建 app 对象
// packages/runtime-core/src/renderer.ts// 创建渲染器export function createRenderer(options) {return baseCreateRenderer(options)}// 创建不同平台渲染器的函数,在其内部都会调用 baseCreateRendererfunction baseCreateRenderer(options, createHydrationFns) {// 一系列内部函数const render = (vnode, container) => {// 组件渲染的核心逻辑}// 返回渲染器对象return {render,hydrate,createApp: createAppAPI(render, hydrate)}}
可以看出渲染器最终由 baseCreateRenderer 函数生成,是一个包含 render 和createApp 函数的 JS 对象。其中 createApp 函数是由 createAppAPI 函数返回的。那 createAPI 接收的参数有哪些呢?为了寻求答案,我们需要看一下 createAppAPI 做了什么事情。
packages/runtime-core/src/apiCreateApp.ts
export function createAppAPI(render, hydrate){// 渲染方法return function createApp(rootComponent, rootProps = null) {const context = createAppContext()const installedPlugins = new Set()let isMounted = falseconst app = {mount(rootContainer,isHydrate,isSVG) {// 根据组建创建虚拟节点const vnode = createVNode(rootComponent,rootProps)vnode.appContext = context// 将虚拟节点和容器获取到后调用render方法渲染render(vnode, rootContainer)}}}}
createAppAPI 创建了createApp 方法,并根据传入的 根组件和根组件属性生成了 虚拟dom,并用传入的 render 方法渲染虚拟dom。
重写app.mount 方法
// packages/runtime-dom/src/index.tsconst { mount } = appapp.mount = (containerOrSelector): any => {// 1. 标准化容器(将传入的 DOM 对象或者节点选择器统一为 DOM 对象)const container = normalizeContainer(containerOrSelector)if (!container) returnconst component = app._component// 2. 标准化组件(如果根组件不是函数,并且没有 render 函数和 template 模板,则把根组件 innerHTML 作为 template)if (!isFunction(component) && !component.render && !component.template) {component.template = container.innerHTML}// 3. 挂载前清空容器的内容container.innerHTML = ''// 4. 执行渲染器创建 app 对象时定义的 mount 方法(在后文中称之为「标准 mount 函数」)来渲染根组件const proxy = mount(container)return proxy}
浏览器平台 app.mount 方法重写主要做了 4 件事情:
- 标准化容器
- 标准化组件
- 挂载前清空容器的内容
- 执行标准 mount 函数渲染组件
此时可能会有人思考一个问题:为什么要重写app.mount 呢?答案是因为 Vue.js 需要支持跨平台渲染。
支持跨平台渲染的思路:不同的平台具有不同的渲染器,不同的渲染器中会调用标准的 baseCreateRenderer 来保证核心(标准)的渲染流程是一致的。
以浏览器端和服务端渲染的代码实现为例: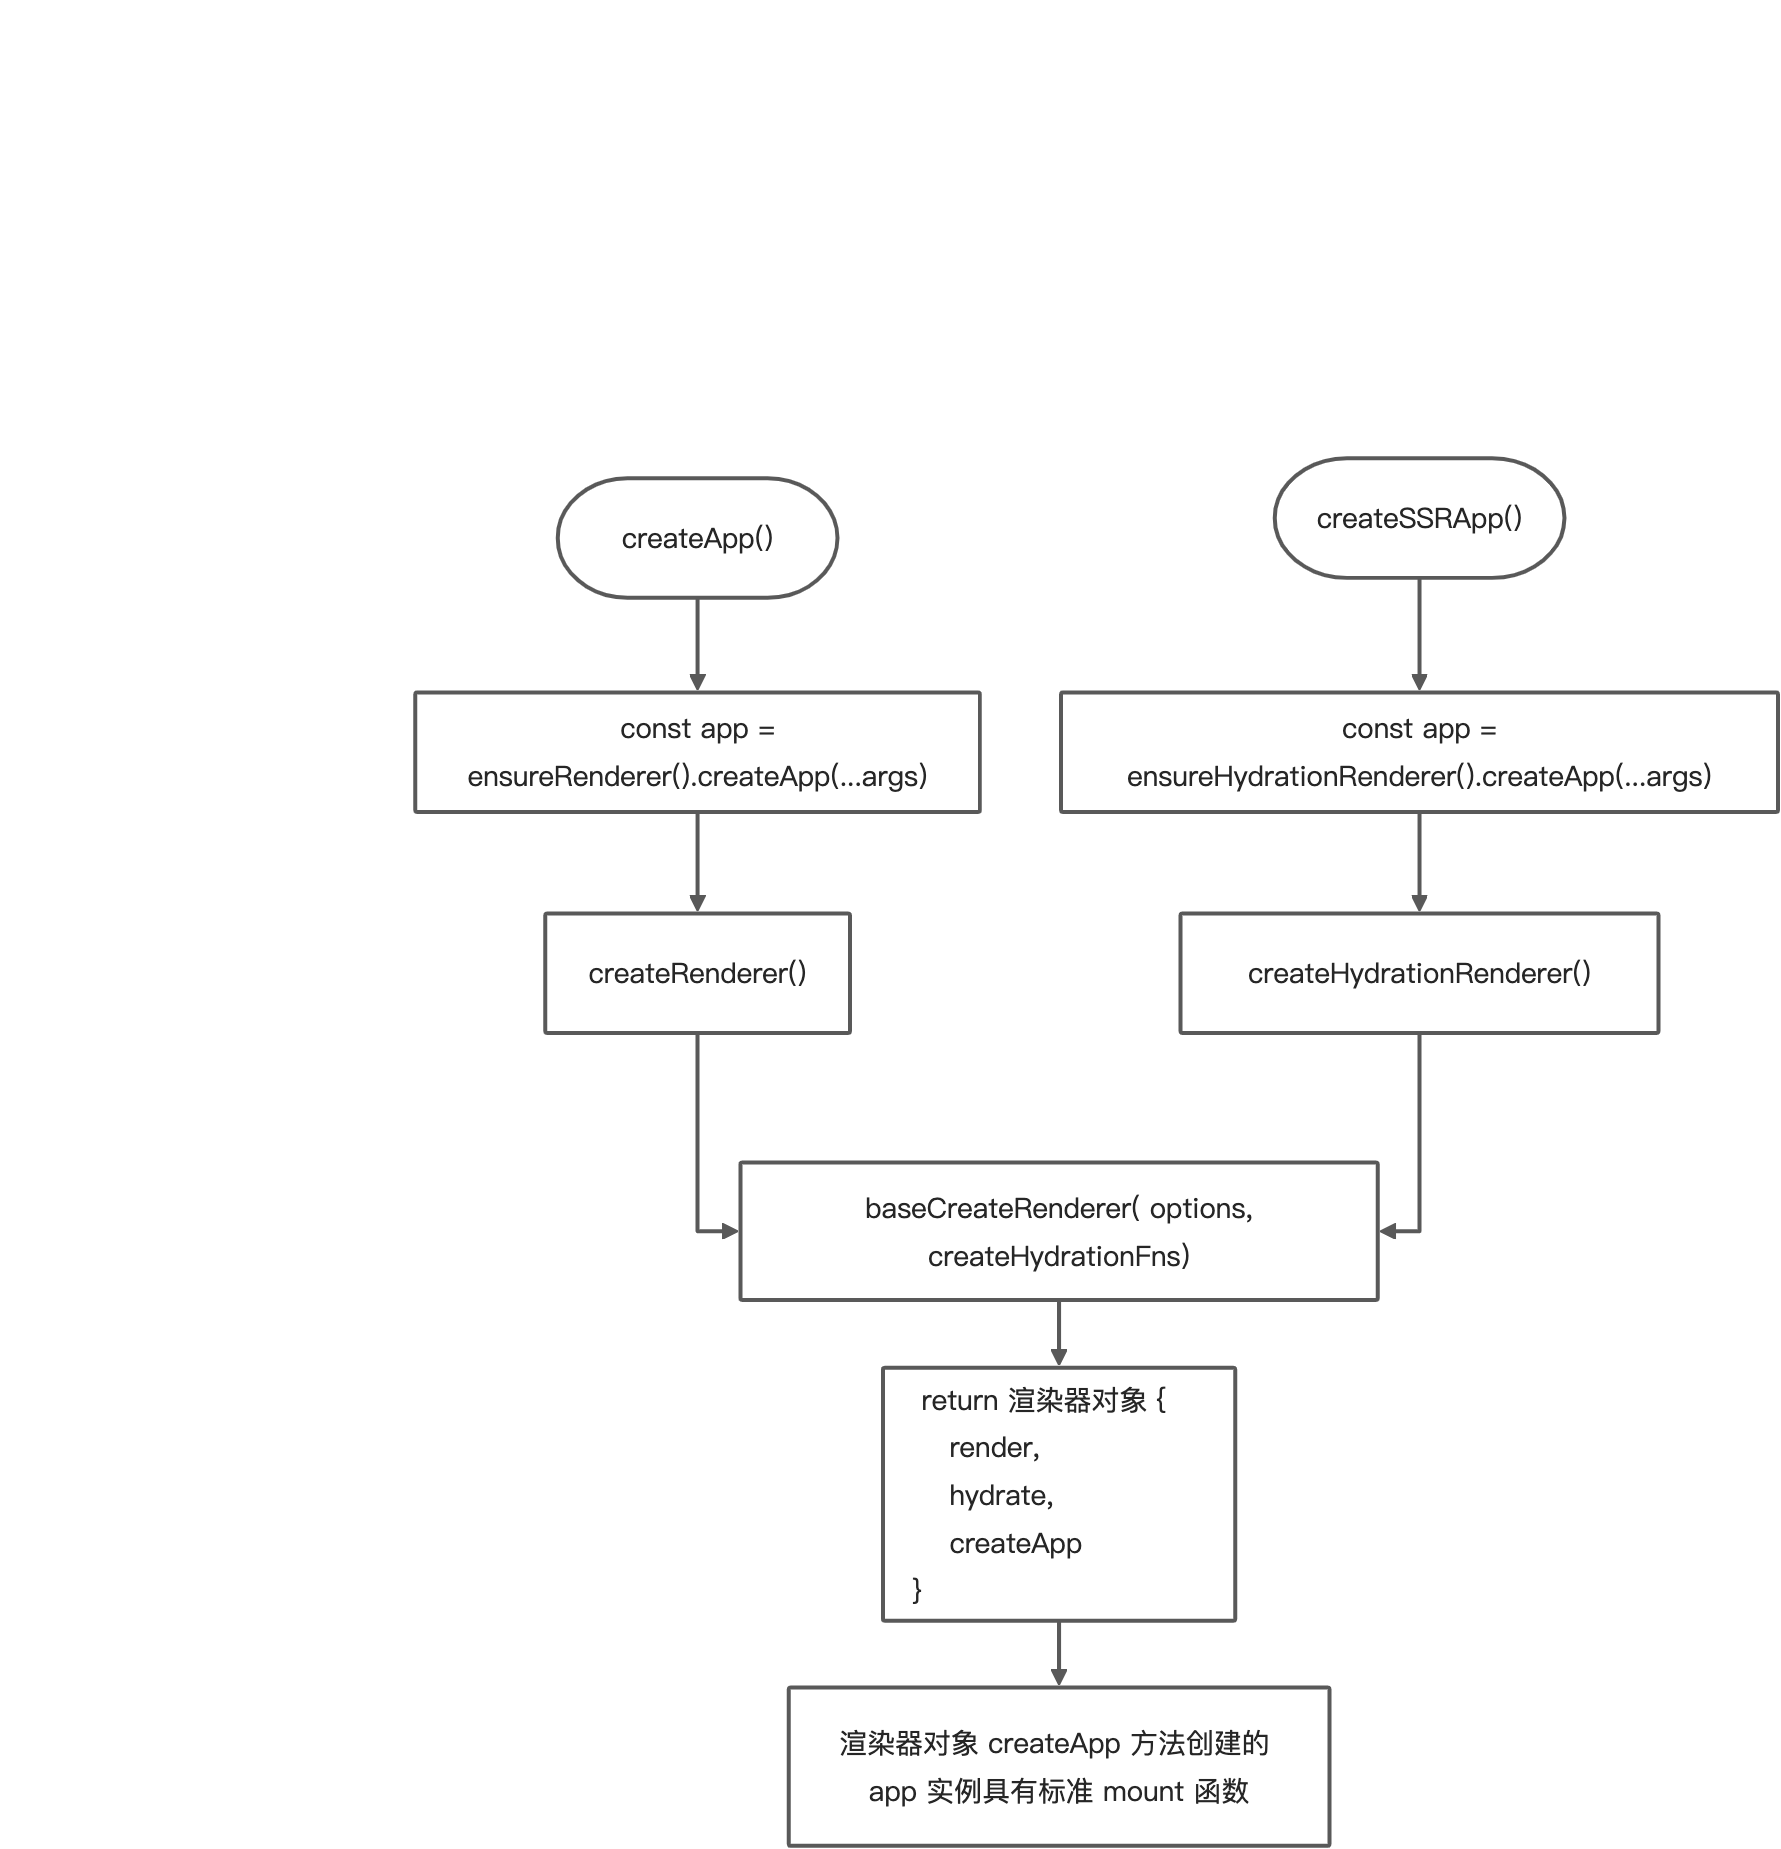
标准 mount 方法
// packages/runtime-core/src/apiCreateApp.ts// createAppAPI 函数内部返回的 createApp 函数中定义了 app 对象,mount 函数是 app 对象的方法之一mount(rootContainer, isHydrate) {// 1. 创建根组件的 vnodeconst vnode = createVNode(rootComponent, rootProps)// 2. 利用函数参数传入的渲染器渲染 vnoderender(vnode, rootContainer)app._container = rootContainerreturn vnode.component.proxy},
1.创建 vnode
packages/runtime-core/src/vnode.ts
function _createVNode(type,props = null,children = null,patchFlag = 0,dynamicProps = null,isBlockNode = false) {// 根据type 来区分是组件还是普通元素// 将 vnode 类型信息编码为位图const shapeFlag = isString(type)? ShapeFlags.ELEMENT // 是个字符串 就认为他是个元素: __FEATURE_SUSPENSE__ && isSuspense(type)? ShapeFlags.SUSPENSE: isTeleport(type)? ShapeFlags.TELEPORT: isObject(type) // 是对象就是个组件? ShapeFlags.STATEFUL_COMPONENT // 带有状态的组件: isFunction(type) // 是函数就是函数式组件? ShapeFlags.FUNCTIONAL_COMPONENT: 0 // 其他情况就啥也不是// 一个对象描述对应的内容,虚拟节点有跨平台的能力const vnode = {__v_isVNode: true, // 他是一个 vnode 节点__v_skip: true,type,props,key: props && normalizeKey(props), // diff 算法会用到 keyref: props && normalizeRef(props),scopeId: currentScopeId,slotScopeIds: null,children: null, // 虚拟节点的儿子 ,有三种情况,是个插槽、文本、数组component: null, // 存放组件对应实例suspense: null,ssContent: null,ssFallback: null,dirs: null,transition: null,el: null, // 后面会将虚拟节点和真实节点对应起来anchor: null,target: null,targetAnchor: null,staticCount: 0,shapeFlag, // 描述自己的类型patchFlag,dynamicProps,dynamicChildren: null,appContext: null}// 标准化儿子normalizeChildren(vnode, children)return vnode}export function normalizeChildren(vnode, children) {let type = 0const { shapeFlag } = vnode// 如果儿子没有 不处理if (children == null) {children = null} else if (isArray(children)) { // 儿子是数组type = ShapeFlags.ARRAY_CHILDREN // 更新类型}else {type = ShapeFlags.TEXT_CHILDREN}vnode.children = childrenvnode.shapeFlag |= type // 标识出自己的类型和儿子的类型}
createVNode 做了 4 件事:
- 对 VNodeTypes 或 ClassComponent 类型的 type 进行各种标准化处理
- 将 vnode 类型信息编码为位图
- 创建 vnode 对象
- 标准化子节点 children
创建好vnode 之后就是 渲染 vnode 了
2.render 渲染 vnode
渲染 vnode 就是用 渲染器返回的 render 方法进行的。将一个虚拟节点挂载到真实 dom 上
return {render,hydrate,createApp: createAppAPI(render, hydrate)}
// 根据不同的 虚拟dom 节点 创建对应的真实元素const render = (vnode, container) => {if (vnode == null) {// 如果 vnode 为 null,但是容器中有 vnode,则销毁组件if (container._vnode) {unmount(container._vnode, null, null, true)}} else {// 创建或更新组件 初次渲染 老的 vnode 没有patch(container._vnode || null, vnode, container)}// packages/runtime-core/src/scheduler.tsflushPostFlushCbs()// 缓存 vnode 节点(标识该 vnode 已经完成渲染)container._vnode = vnode}
render 做的事情是:如果传入的 vnode 为空,则销毁组件,否则就创建或者更新组件。
patch
核心是判断虚拟节点的类型,然后根据不同的类型 处理,渲染组件、渲染元素、渲染文本等
const patch = (n1, // 老的虚拟节点n2, // 新的虚拟节点container,anchor = null,parentComponent = null,parentSuspense = null,isSVG = false,slotScopeIds = null,optimized = false) => {// 1. 如果是更新 vnode 并且新旧 vnode 类型不一致,则销毁旧的 vnodeif (n1 && !isSameVNodeType(n1, n2)) {anchor = getNextHostNode(n1)unmount(n1, parentComponent, parentSuspense, true)n1 = null}const { type, ref, shapeFlag } = n2// 2. 处理不同类型节点的渲染switch (type) {case Text:processText(n1, n2, container, anchor)breakcase Comment:processCommentNode(n1, n2, container, anchor)breakcase Static:if (n1 == null) {mountStaticNode(n2, container, anchor, isSVG)} else if (__DEV__) {patchStaticNode(n1, n2, container, isSVG)}breakcase Fragment:processFragment(n1,n2,container,anchor,parentComponent,parentSuspense,isSVG,slotScopeIds,optimized)breakdefault:// 元素if (shapeFlag & ShapeFlags.ELEMENT) {processElement(n1,n2,container,anchor,parentComponent,parentSuspense,isSVG,slotScopeIds,optimized)} else if (shapeFlag & ShapeFlags.COMPONENT) { // 组件processComponent( // 处理组件n1,n2,container,anchor,parentComponent,parentSuspense,isSVG,slotScopeIds,optimized)}}}
patch 函数做了 2 件事情:
- 如果是更新 vnode 并且新旧 vnode 类型不一致,则销毁旧的 vnode
- 处理不同类型节点的渲染
在 patch 函数的多个参数中,我们优先关注前 3 个参数:
- n1 表示旧的 vnode,当 n1 为 null 的时候,表示是一次新建(挂载)的过程
- n2 表示新的 vnode 节点,后续会根据这个 vnode 类型执行不同的处理逻辑
- container 表示 DOM 容器,也就是 vnode 渲染生成 DOM 后,会挂载到 container 下面
1.处理组件的渲染
processComponent
// packages/runtime-core/src/renderer.tsconst processComponent = (n1: VNode | null,n2: VNode,container: RendererElement,anchor: RendererNode | null,parentComponent: ComponentInternalInstance | null,parentSuspense: SuspenseBoundary | null,isSVG: boolean,slotScopeIds: string[] | null,optimized: boolean) => {n2.slotScopeIds = slotScopeIdsif (n1 == null) { // 组件没有上一次的虚拟节点就是 初始化流程if (n2.shapeFlag & ShapeFlags.COMPONENT_KEPT_ALIVE) {;(parentComponent!.ctx as KeepAliveContext).activate(n2,container,anchor,isSVG,optimized)} else { // 组件更新流程mountComponent( // 挂载组件n2,container,anchor,parentComponent,parentSuspense,isSVG,optimized)}} else {updateComponent(n1, n2, optimized)}}
核心 mountComponent
// packages/runtime-core/src/renderer.ts/*** let { createApp } = VueRuntimeDOM;let App = {setup(props,context){return},render(proxy) {console.log('render');}}let app = createApp(App, { name: 'hh', age: 12 })app.mount('#app')* 挂载组件 最核心的就是 调用 setup 拿到返回值(如果有 setup),或者获取render 函数返回的结果来进行渲染* 1.创建组件实例* 2.将需要的数据解析到实例上* 3.创建一个 effect 让render 函数执行*/const mountComponent = (initialVNode,container,anchor,parentComponent,parentSuspense,isSVG,optimized) => {// 2.x compat may pre-creaate the component instance before actually// mountingconst compatMountInstance =__COMPAT__ && initialVNode.isCompatRoot && initialVNode.component// 1.根据vnode创建一个组件实例挂载到当前vnode 的component 属性上const instance =compatMountInstance ||(initialVNode.component = createComponentInstance(initialVNode,parentComponent,parentSuspense))// 2.需要的数据解析到实例上setupComponent(instance)// 3.创建一个 effect 让 render 函数执行setupRenderEffect(instance,initialVNode,container,anchor,parentSuspense,isSVG,optimized)}
做了三件事:
- 1.创建组件实例
- 2.将需要的数据解析到实例上
- 3.创建一个 effect 让 render 函数执行,当属性更新了组件会重新渲染
- 4.拿到render方法返回的结果(即 h 函数的返回结果,也是一个 vnode),再次走渲染流程(调用patch)
1.创建组件实例
1.createComponentInstance
// packages/runtime-core/src/components.tsexport function createComponentInstance(vnode,parent,suspense) {const type = vnode.type// inherit parent app context - or - if root, adopt from root vnodeconst appContext =(parent ? parent.appContext : vnode.appContext) || emptyAppContext// 组件实例const instance = {uid: uid++,vnode,type,parent,appContext,root, // to be immediately setnext: null,subTree, // will be set synchronously right after creationupdate, // will be set synchronously right after creationrender: null,proxy: null,exposed: null,exposeProxy: null,withProxy: null,effects: null,provides: parent ? parent.provides : Object.create(appContext.provides),accessCache,renderCache: [],// local resovled assetscomponents: null,directives: null,// resolved props and emits optionspropsOptions: normalizePropsOptions(type, appContext),emitsOptions: normalizeEmitsOptions(type, appContext),// emitemit: null, // to be set immediatelyemitted: null,// props default valuepropsDefaults: EMPTY_OBJ,// inheritAttrsinheritAttrs: type.inheritAttrs,// statectx: EMPTY_OBJ, // 组件上下文data: EMPTY_OBJ,props: EMPTY_OBJ,attrs: EMPTY_OBJ,slots: EMPTY_OBJ,refs: EMPTY_OBJ,setupState: EMPTY_OBJ, // setup 的返回值setupContext: null,// suspense relatedsuspense,suspenseId: suspense ? suspense.pendingId : 0,asyncDep: null,asyncResolved: false,// lifecycle hooks// not using enums here because it results in computed propertiesisMounted: false, // 组件是否挂载过isUnmounted: false,isDeactivated: false,bc: null,c: null,bm: null,m: null,bu: null,u: null,um: null,bum: null,da: null,a: null,rtg: null,rtc: null,ec: null,sp: null}instance.ctx = { _: instance } // 将instance放到了上下文里instance.root = parent ? parent.root : instanceinstance.emit = emit.bind(null, instance)return instance}
将 instance 赋值给他的 ctx 属性,之后访问的时候通过 instance.ctx._, 而不用通过 instance.data 、instance.props ….
2.setupComponent将需要的数据解析到实例上
// packages/runtime-core/src/components.tsexport function setupComponent(instance,isSSR = false) {isInSSRComponentSetup = isSSRconst { props, children } = instance.vnode // 拿出虚拟节点的 props、children// 当前组件是不是有状态的组件,函数组件const isStateful = instance.vnode.shapeFlag & ShapeFlags.STATEFUL_COMPONENT// 根据props 解析出 props 和 attrs,将其放到 instance 上initProps(instance, props, isStateful, isSSR) // instance.props = propsinitSlots(instance, children) // 插槽的解析 instance.children = children// 获取 setup 的返回值 调用当前实例的setup方法,用setup的返回值填充setupState 和对应的render方法const setupResult = isStateful? setupStatefulComponent(instance, isSSR): undefinedisInSSRComponentSetup = falsereturn setupResult}
setupStatefulComponent
// packages/runtime-core/src/components.ts// 调用setupfunction setupStatefulComponent(instance,isSSR) {// 拿到组件const Component = instance.typeinstance.accessCache = Object.create(null)// 1. 1.代理 传递给 render 函数的参数 代理了之后就不用通过 instance.props, instance.data,intance.attrs这样访问了instance.proxy = markRaw(new Proxy(instance.ctx, PublicInstanceProxyHandlers))// 2. 拿到组件的 setup方法const { setup } = Componentif (setup) {// 创建 setup 的上下文参数 setup(instance.props, setupContext)const setupContext = (instance.setupContext =setup.length > 1 ? createSetupContext(instance) : null)currentInstance = instance// 执行setupconst setupResult = setup(instance.props, setupContext)handleSetupResult(setupResult)// 开发时会使用这些属性Component.render(instance.proxy)}else { // 没有setup 调用finishComponentSetupfinishComponentSetup(instance, isSSR)}}// 创建开发时需要用到的 props 和 contextfunction createSetupContext(instance) {const expose = exposed => {instance.exposed = exposed || {}}// 开发时使用的四个参数 setup(props, context)return {attrs: instance.attrs,slots: instance.slots,emit: instance.emit,expose}}
setupStatefulComponent 做了三件事:
- 代理 传递给 render 函数的参数
- 拿到组件的 setup方法,创建 setup 的上下文参数 setup(instance.props, setupContext)
- 如果 setup 存在就执行setup,如果setup 不存在就调用 组件的 render 方法
1.代理
// packages/runtime-core/src/components.tsexport const PublicInstanceProxyHandlers = {get({ _: instance }, key) {const {ctx,setupState,data,props,accessCache,type,appContext} = instanceif (hasOwn(setupState, key)) {return setupState[key]}else if (hasOwn(setupState, key)) {return setupState[key]} else if (hasOwn(data, key)) {return data[key]}},set({ _: instance },key,value) {const { data, setupState, ctx } = instanceif (hasOwn(setupState, key)) {setupState[key] = value} else if (hasOwn(data, key)) {data[key] = value} else if (hasOwn(instance.props, key)) {__DEV__ &&warn(`Attempting to mutate prop "${key}". Props are readonly.`,instance)return false}if (key[0] === '$' && key.slice(1) in instance) {__DEV__ &&warn(`Attempting to mutate public property "${key}". ` +`Properties starting with $ are reserved and readonly.`,instance)return false} else {if (__DEV__ && key in instance.appContext.config.globalProperties) {Object.defineProperty(ctx, key, {enumerable: true,configurable: true,value})} else {ctx[key] = value}}return true}}
取值的时候走 get,赋值的时候走set
props:{a: 1}data: {c: 3}setupState: {b: 2}let { createApp } = VueRuntimeDOM;let App = {setup(props,context){return},render(proxy) {console.log(proxy.a, proxy.b, proxy.c); // 1, 2, 3}}
2.创建 setup 的上下文参数
// packages/runtime-core/src/components.tsexport function createSetupContext(instance) {const expose = exposed => {instance.exposed = exposed || {}}return { // 开发时使用的四个参数attrs: instance.attrs,slots: instance.slots,emit: instance.emit,expose}}
这几个参数是开发时会用到的参数 setup(props, context)
3.如果没有setup就调用finishComponentSetup获取render 函数。
// packages/runtime-core/src/components.tsexport function finishComponentSetup(instance,isSSR,skipOptions) {const Component = instance.type// template / render function normalizationif (__NODE_JS__ && isSSR) {instance.render = (instance.render ||Component.render ||NOOP)} else if (!instance.render) { // 如果没 render 就编译 template// could be set from setup()if (compile && !Component.render) {const template =(__COMPAT__ &&instance.vnode.props &&instance.vnode.props['inline-template']) ||Component.templateif (template) {if (__DEV__) {startMeasure(instance, `compile`)}const { isCustomElement, compilerOptions } = instance.appContext.configconst {delimiters,compilerOptions: componentCompilerOptions} = Componentconst finalCompilerOptions = extend(extend({isCustomElement,delimiters},compilerOptions),componentCompilerOptions)if (__COMPAT__) {// pass runtime compat config into the compilerfinalCompilerOptions.compatConfig = Object.create(globalCompatConfig)if (Component.compatConfig) {extend(finalCompilerOptions.compatConfig, Component.compatConfig)}}Component.render = compile(template, finalCompilerOptions)if (__DEV__) {endMeasure(instance, `compile`)}}}// 将生成的 render 函数 挂载到实例上instance.render = (Component.render || NOOP)}}
这个方法会取组件上的 render 函数,如果没有render就对 template 模板进行编译,生成 render 函数,然后放在实例上
4.如果有 setup 就处理setup 的返回值
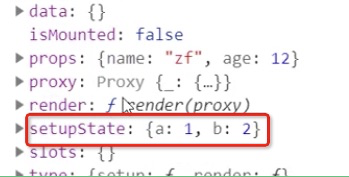
// packages/runtime-core/src/components.tsexport function handleSetupResult(instance,setupResult,isSSR) {if (isFunction(setupResult)) { // 如果结果是函数,就作为组件的 renderif (__NODE_JS__ && (instance.type).__ssrInlineRender) {instance.ssrRender = setupResult} else {instance.render = setupResult}} else if (isObject(setupResult)) { // 如果是对象 就赋值给 setupStateinstance.setupState = setupResult}finishComponentSetup(instance, isSSR)}
如果setup 的返回值是一个 函数就直接作为组件的 render ,如果是对象就赋值给实例的 setupState,
如果既有 render 函数,setup又返回了 函数就会优先使用 返回值作为 render 函数。
let { createApp } = VueRuntimeDOM;let App = {setup(props,context){return (proxy) => {console.log('setup render')}},render(proxy) {console.log(proxy.a, proxy.b, proxy.c);console.log('component render')}}
let { createApp } = VueRuntimeDOM;let App = {setup(props,context){// return (proxy) => {// console.log('setup render')// }return {a: 1,b: 2,}},render(proxy) {console.log(proxy.a, proxy.b, proxy.c);console.log('component render')}}
3.创建一个 effect 让 render 执行 (组件的渲染流程)
因为是组件,所以在 render 执行的时候会创建组件的子树 vnode,然后递归调用patch渲染。
setup(props,context){return (proxy) => {return h('div', {}, 'hello world')}}
// packages/runtime-core/src/redenerer.ts// 创建一个 effect 让 render 执行const setupRenderEffect = (instance,initialVNode,container,anchor,parentSuspense,isSVG,optimized) => {// create reactive effect for renderinginstance.update = effect(function componentEffect() {// 没有被挂载就是初次渲染if (!instance.isMounted) {let proxyToUse = instance.proxy;// 执行render 他的返回值是 h 函数的执行结果, 就是组件的渲染内容/*** setup(props,context){* return (proxy) => {* return h('div', {}, 'hello world')* }* }*/let subTree = instance.subTree = instance.render.call(proxyToUse,proxyToUse);// 用render 函数的返回值 继续渲染子树patch(null,subTree,container,anchor,instance,parentSuspense,isSVG)instance.isMounted = true}
执行render 的时候会返回h 函数的执行结果,这个结果就是组件要渲染内容的vnode,最后调用 patch 函数将这个 vnode渲染到页面。这时渲染走的是元素的渲染逻辑。
/*** h('div', {a: 1}) 有属性没儿子* h('div', {}, 'children') // 儿子是字符串* h('div',{}, h('span')) // 儿子是个对象* h('div', h('span')) 不写属性* h('div', [h('span'), h('span')])* h('div', null, h('span'), h('span'))* h('div', null, 'a', 'b', 'c')* @param type* @param propsOrChildren* @param children* @returns*/export function h(type, propsOrChildren, children) {const l = arguments.lengthif (l === 2) { // 类型+ 属性 或者 类型+childrenif (isObject(propsOrChildren) && !isArray(propsOrChildren)) {// single vnode without propsif (isVNode(propsOrChildren)) {return createVNode(type, null, [propsOrChildren]) // 孩子}// props without childrenreturn createVNode(type, propsOrChildren) // 属性} else {// omit props 如果第二个参数不是对象一定是孩子return createVNode(type, null, propsOrChildren)}} else {if (l > 3) {// 除了前两个 后面都是孩子children = Array.prototype.slice.call(arguments, 2)} else if (l === 3 && isVNode(children)) {children = [children]}return createVNode(type, propsOrChildren, children)}}
h 函数可能的写法有好几种,都考虑到了,最终都是通过 createVNode 生成 虚拟节点。
4.拿到render方法返回的结果(即 h 函数的返回结果,也是一个 vnode),再次走渲染流程(调用patch)
看下面。
2.处理元素的渲染
上面组件的渲染处理完就该处理组件下面的元素了。
// 处理元素的渲染const processElement = (n1,n2,container,anchor,parentComponent,parentSuspense,isSVG,slotScopeIds,optimized) => {isSVG = isSVG || (n2.type) === 'svg'// 初次渲染if (n1 == null) {mountElement(n2,container,anchor,parentComponent,parentSuspense,isSVG,slotScopeIds,optimized)} else {// 更新}
初次渲染
// 渲染元素是递归渲染 先渲染最外层的 div 在渲染它下面的 孩子const mountElement = (vnode,container,anchor,parentComponent,parentSuspense,isSVG,slotScopeIds,optimized) => {let ellet vnodeHookconst { type, props, shapeFlag, transition, patchFlag, dirs } = vnodeif (!__DEV__ &&vnode.el &&hostCloneNode !== undefined &&patchFlag === PatchFlags.HOISTED) {el = vnode.el = hostCloneNode(vnode.el)} else {// 创建真实 dom 并赋值给 vnode.elel = vnode.el = hostCreateElement(vnode.type,isSVG,props && props.is,props)// 判断有儿子的类型 是文本类型if (shapeFlag & ShapeFlags.TEXT_CHILDREN) {hostSetElementText(el, vnode.children)} else if (shapeFlag & ShapeFlags.ARRAY_CHILDREN) {// 如果是数组 h('div',{}, ['hello', 'leah']) 不能直接插入,插入会覆盖,需要转换成 vnode 再循环调用patch插入到页面mountChildren(vnode.children,el, // 挂载容器null,parentComponent,parentSuspense,isSVG && type !== 'foreignObject',slotScopeIds,optimized || !!vnode.dynamicChildren)}// props 如果有属性就处理属性 {style:{color: 'red'}}if (props) {for (const key in props) {if (!isReservedProp(key)) {hostPatchProp(el,key,null,props[key],isSVG,vnode.children,parentComponent,parentSuspense,unmountChildren)}}}}// 插入到容器中hostInsert(el, container, anchor)}
我们可以看到创建元素dom 的时候调用了 hostCreateElement ,设置文本节点调用了 hostSetElementText,还有设置属性的方法 hostPatchProp,这些方法是从 baseCreateRenderer 函数入参 options 中解析出来的方法:
// packages/runtime-core/src/renderer.tsconst {insert: hostInsert,remove: hostRemove,patchProp: hostPatchProp,forcePatchProp: hostForcePatchProp,createElement: hostCreateElement,createText: hostCreateText,createComment: hostCreateComment,setText: hostSetText,setElementText: hostSetElementText,parentNode: hostParentNode,nextSibling: hostNextSibling,setScopeId: hostSetScopeId = NOOP,cloneNode: hostCloneNode,insertStaticContent: hostInsertStaticContent} = options
上面的options对应如下:
// packages/runtime-dom/src/nodeOps.tsexport const nodeOps: Omit<RendererOptions<Node, Element>, 'patchProp'> = {/*** 元素插入* @param child 要插入的元素* @param parent 插到哪个里面去* @param anchor 当前参照物 如果为空,则相当于 appendChild*/insert: (child, parent, anchor) => {parent.insertBefore(child, anchor || null)},/*** 元素删除* 通过儿子找到父亲删除* @param child*/remove: child => {const parent = child.parentNodeif (parent) {parent.removeChild(child)}},/*** 元素增加* 创建节点,不同平台创建元素的方式不同* @param tag* @param isSVG* @param is* @param props* @returns*/createElement: (tag, isSVG, is, props): Element => {const el = isSVG? doc.createElementNS(svgNS, tag): doc.createElement(tag, is ? { is } : undefined)if (tag === 'select' && props && props.multiple != null) {;(el as HTMLSelectElement).setAttribute('multiple', props.multiple)}return el},/*** 元素查找* @param selector* @returns*/querySelector: selector => doc.querySelector(selector),/*** 给元素设置文本* @param el* @param text*/setElementText: (el, text) => {el.textContent = text},/*** 文本操作* 创建文本* @param text* @returns*/createText: text => doc.createTextNode(text),createComment: text => doc.createComment(text),/*** 给节点设置文本* @param node* @param text*/setText: (node, text) => {node.nodeValue = text},/*** 获取父节点* @param node* @returns*/parentNode: node => node.parentNode as Element | null,nextSibling: node => node.nextSibling,setScopeId(el, id) {el.setAttribute(id, '')},cloneNode(el) {const cloned = el.cloneNode(true)// #3072// - in `patchDOMProp`, we store the actual value in the `el._value` property.// - normally, elements using `:value` bindings will not be hoisted, but if// the bound value is a constant, e.g. `:value="true"` - they do get// hoisted.// - in production, hoisted nodes are cloned when subsequent inserts, but// cloneNode() does not copy the custom property we attached.// - This may need to account for other custom DOM properties we attach to// elements in addition to `_value` in the future.if (`_value` in el) {;(cloned as any)._value = (el as any)._value}return cloned},// __UNSAFE__// Reason: insertAdjacentHTML.// Static content here can only come from compiled templates.// As long as the user only uses trusted templates, this is safe.insertStaticContent(content, parent, anchor, isSVG, cached) {if (cached) {let [cachedFirst, cachedLast] = cachedlet first, lastwhile (true) {let node = cachedFirst.cloneNode(true)if (!first) first = nodeparent.insertBefore(node, anchor)if (cachedFirst === cachedLast) {last = nodebreak}cachedFirst = cachedFirst.nextSibling!}return [first, last] as any}// <parent> before | first ... last | anchor </parent>const before = anchor ? anchor.previousSibling : parent.lastChildif (anchor) {let insertionPointlet usingTempInsertionPoint = falseif (anchor instanceof Element) {insertionPoint = anchor} else {// insertAdjacentHTML only works for elements but the anchor is not an// element...usingTempInsertionPoint = trueinsertionPoint = isSVG? doc.createElementNS(svgNS, 'g'): doc.createElement('div')parent.insertBefore(insertionPoint, anchor)}insertionPoint.insertAdjacentHTML('beforebegin', content)if (usingTempInsertionPoint) {parent.removeChild(insertionPoint)}} else {parent.insertAdjacentHTML('beforeend', content)}return [// firstbefore ? before.nextSibling : parent.firstChild,// lastanchor ? anchor.previousSibling : parent.lastChild]}}packages/runtime-dom/src/patchProp.tsexport const patchProp: DOMRendererOptions['patchProp'] = (el, // 元素key, // 属性prevValue, // 前一个值nextValue,isSVG = false,prevChildren,parentComponent,parentSuspense,unmountChildren) => {switch (key) {// specialcase 'class':patchClass(el, nextValue, isSVG) // 那最新的属性覆盖掉旧的breakcase 'style': // {style:{color: 'red'}} -> {style:{background: 'red'}} 删掉之前的patchStyle(el, prevValue, nextValue)breakdefault:// 如果不是事件 才是属性if (isOn(key)) { // 如果是 以 on 开头的就是事件,onClick,onChange// ignore v-model listenersif (!isModelListener(key)) {patchEvent(el, key, prevValue, nextValue, parentComponent) // 添加、删除、修改}} else if (shouldSetAsProp(el, key, nextValue, isSVG)) {patchDOMProp(el,key,nextValue,prevChildren,parentComponent,parentSuspense,unmountChildren)} else {// special case for <input v-model type="checkbox"> with// :true-value & :false-value// store value as dom properties since non-string values will be// stringified.if (key === 'true-value') {;(el as any)._trueValue = nextValue} else if (key === 'false-value') {;(el as any)._falseValue = nextValue}patchAttr(el, key, nextValue, isSVG, parentComponent)}break}}
可以看到这些方法就是最终调用 document 上的方法将 vnode 转换成 真实 DOM渲染到页面上的。
渲染元素是递归渲染 先渲染最外层的 div 在渲染它下面的 孩子.
通过 document.createElement 创建真实dom元素,并赋值给 vnode.el , 然后判断儿子的类型是不是文本,如果是文本 直接给元素设置文本 el.textContent = text ,如果是数组类型的文本,不能直接插入到页面,那样插入会覆盖,需要遍历将文本转换成 vnode 再调用patch插入到页面。代码如下:
// 将文本创建成 虚拟节点const mountChildren = (children,container,anchor,parentComponent,parentSuspense,isSVG,slotScopeIds,optimized,start = 0) => {for (let i = start; i < children.length; i++) {const child = (children[i] = optimized? cloneIfMounted(children[i]): normalizeVNode(children[i]))// 渲染文本patch(null,child,container,anchor,parentComponent,parentSuspense,isSVG,slotScopeIds,optimized)}}// 将儿子转成 vnode 然后调用 patch渲染export function normalizeVNode(child) {if (child == null || typeof child === 'boolean') {// empty placeholderreturn createVNode(Comment)} else if (isArray(child)) {// fragmentreturn createVNode(Fragment, // typenull, // propschild.slice() // children)} else if (typeof child === 'object') {// 是 object 直接返回return cloneIfMounted(child)} else {// 字符串 或者 numbersreturn createVNode(Text, null, String(child))}}
文本转换成了vnode之后就需要将 文本类型的 vnode 插入到页面中,我们来看一下是如何处理文本节点的渲染
3.处理文本节点的渲染
以新建文本 DOM 节点为例,此时 n1 为 null,n2 类型为 Text,所以会走分支逻辑:processText(n1, n2, container, anchor)。processText 内部会去调用 hostCreateText 和 hostSetText。
const processText: ProcessTextOrCommentFn = (n1, n2, container, anchor) => {// 如果老的vnode 不存在就是第一次创建if (n1 == null) {hostInsert((n2.el = hostCreateText(n2.children as string)),container,anchor)} else {const el = (n2.el = n1.el!)if (n2.children !== n1.children) {hostSetText(el, n2.children as string)}}}
hostCreateText 和 hostSetText 也是从 baseCreateRenderer 函数入参 options 中解析出来的方法。
首先将文本节点转换成 dom元素,然后插入到页面中。
组件渲染流程图
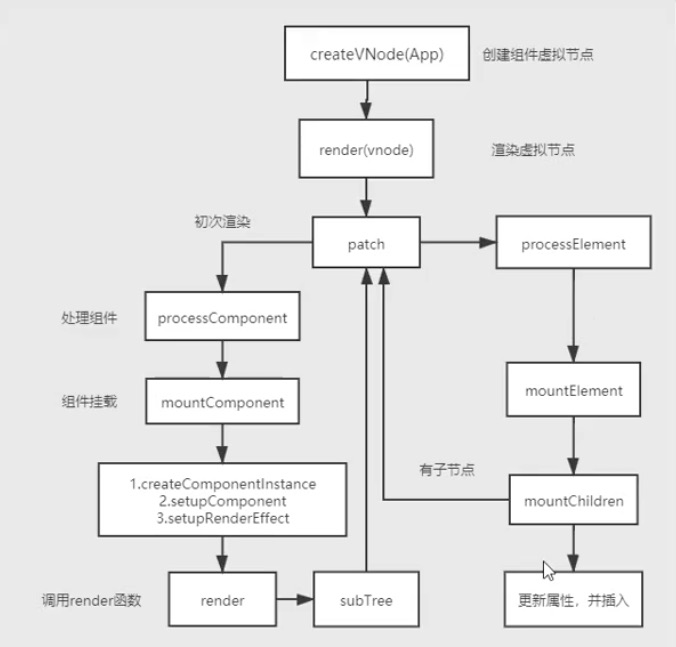
首先处理组件的挂载,走 processComponent ,根据传入的参数,如果有 n1 就是组件更新,走 updateComponent,如果没有n1 就是组件初次渲染,走 mountComponent。
mountComponent 第一步创建组件实例instance,第二步给组件实例增添属性,第三步设置渲染副作用函数effect,这样当组件更新之后也能重新渲染,调用组件的render 方法,拿到 render 函数返回的子树虚拟节点subTree,继续走 patch 渲染子树。判断这个子树是元素还是组件,如果是元素就走 processElement,如果是组件就走 processComponent。

若有收获,就点个赞吧
0 人点赞
