1、组件的作用
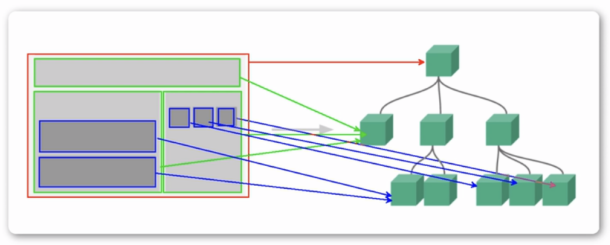
通常一个项目会以一棵嵌套的组件树的形式来组织,这样可以极大的模块化管理和实现代码重用,如下:
2、创建一个自定义组件
如下创建一个自定义组件MyCustomComponent.vue:
<template><div><span>这是我的自定义组件</span></div></template><script>export default{name:"MyCustomComponent",}</script>
3、组件的加载
如下在App.vue中导入并在template中引用展示即可。
<template><img alt="Vue logo" src="./assets/logo.png"><MyComponent/></template><script>import MyComponent from './components/MyCustomComponent.vue'export default {name: 'App',components: {MyComponent}}</script><style>#app {font-family: Avenir, Helvetica, Arial, sans-serif;-webkit-font-smoothing: antialiased;-moz-osx-font-smoothing: grayscale;text-align: center;color: #2c3e50;margin-top: 60px;}</style>
4、组件间通讯之props传递数据
props的作用是用于父vue组件向子vue组件传递数据的,比如由App.vue向MyCustomComponent.vue组件传递数据。
props类型:
props:{title:String,likes:Number,flag:Boolean,students:Array,person:Object,callback:Function}
MyCustomComponent.vue文件:
<template><div><p>这是我的自定义组件</p><p>由app.vue向MyCustomComponent子组件传递数据</p><p>父级组件传递过来的数据:{{title}}</p></div></template><script>export default {name: "MyCustomComponent",props: {title: {type: String,default: ""}}}</script><style scoped></style>
App.vue文件:
<template><img alt="Vue logo" src="./assets/logo.png"><MyComponent :title="tmp"/></template><script>import MyComponent from './components/MyCustomComponent.vue'export default {name: 'App',data(){return {tmp:'这个是由父级组件传递过来的数据'}},components: {MyComponent}}</script><style>#app {font-family: Avenir, Helvetica, Arial, sans-serif;-webkit-font-smoothing: antialiased;-moz-osx-font-smoothing: grayscale;text-align: center;color: #2c3e50;margin-top: 60px;}</style>
5、组件间通讯之自定义方法$emit传递数据
自定义方法的作用主要是由子组件向父级组件传递数据
MyCustomComponent.vue文件:
<template><div><p>这是我的自定义组件</p><p>由app.vue向MyCustomComponent子组件传递数据</p><p>父级组件传递过来的数据:{{ title }}</p><button @click="btnClick(hi)">点击传递数据给父级组件</button></div></template><script>export default {name: "MyCustomComponent",data() {return {hi: '这个由子组件传递过来的数据'}},props: {title: {type: String,default: ""}},methods: {btnClick() {// 参数1,在父级组件中是通过这个名称进行参数获取的// 参数2,你要传递的数据内容this.$emit("onCustomComponentData", this.hi);}}}</script><style scoped></style>
app.vue文件:
<template><img alt="Vue logo" src="./assets/logo.png"><MyComponent :title="tmp" @onCustomComponentData="getChildData" /><h3>子级组件传递过来的数据:{{ customComponentData }}</h3></template><script>import MyComponent from './components/MyCustomComponent.vue'export default {name: 'App',data() {return {tmp: '标题',customComponentData: ''}},components: {MyComponent},methods: {getChildData(data) {this.customComponentData = data;}}}</script><style>#app {font-family: Avenir, Helvetica, Arial, sans-serif;-webkit-font-smoothing: antialiased;-moz-osx-font-smoothing: grayscale;text-align: center;color: #2c3e50;margin-top: 60px;}</style>


