创建了两个 EventLoopGroup 对象
EventLoopGroup bossGroup = new NioEventLoopGroup(1);EventLoopGroup workerGroup = new NioEventLoopGroup()
1.这两个对象是Netty的核心,可以说,整个Netty的运作都是依赖于他们的。bossGroup用于接收TCP请求,他会将请求交给workerGroup,workerGroup会获取真正的连接,然后和连接进行通信,比如读写解码编码等操作
2.EventLoopGroup是事件循环组(或线程组) ,含有多个EventLoop,可以注册channel,用于在事件循环中去进行选择(和选择器相关)
3.new NioEventLoopGroup(1); 这 个 1 表 示 bossGroup 事 件 组 有 1 个 线 程你可以 指定, 如果 newNioEventLoopGroup() 会含有默认个线程 cpu 核数*2, 即可以充分的利用多核的优势
4.然后添加了一个channel,参数为Class对象,引导类将通过这个Class对象反射创建ChannelFactory,然后添加了一些TCP参数 [说明:Channel 的创建在 bind 方法,可以 Debug 下 bind ,会找到 channel = channelFactory.newChannel();
5.再添加了一个服务器专属日志处理器 handler
6.再添加一个SocketChannel的handler
7.然后绑定端口并阻塞至连接成功
8.最后main线程阻塞等待关闭
9.finally块中的代码将在服务器关闭时优雅关闭所有资源
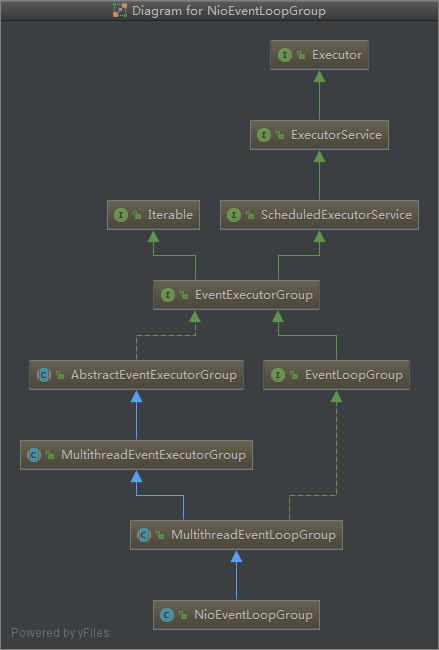
分析EventLoopGroup

说明:
顶层接口是Executor是JDK中的类可知EventLoopGroup支持执行一个异步任务,接下来是ScheduledExecutorService看名字可知子类将支持任务的调度执行,接下来我们继续跟进EventLoopGroup的构造方法,它最终调用到MultithreadEventLoopGroup
抽象类 MultithreadEventExecutorGroup 的构造器方法 MultithreadEventExecutorGroup 才是
NioEventLoopGroup 真正的构造方法,这里可以看成是一个模板方法,使用了设计模式的模板模式
1.如果executor是null,创建一个默认的ThreadPerTaskExecutor,使用Netty默认的线程工厂
2.根据传入的线程数(CPU核数*2)创建一个单例线程池数组
3.循环填充数组中的元素,如果有异常,则关闭所有的单例线程池
4.根据线程选择工厂创建一个线程选择器
5.为每个单例线程池添加一个关闭监听器
6.将所有的单例线程池添加到一个HashSet中
ServerBootstrap 创建和构造过程
ServerBootstrap 是个空构造,但是有默认的成员变量
分析ServerBootstrap基本使用
ServerBootstrap b = new ServerBootstrap();b.group(bossGroup, workerGroup).channel(NioServerSocketChannel.class).option(ChannelOption.SO_BACKLOG, 100).handler(new LoggingHandler(LogLevel.INFO)).childHandler(new ChannelInitializer<SocketChannel>() {@Overridepublic void initChannel(SocketChannel ch) throws Exception {ChannelPipeline p = ch.pipeline();if (sslCtx != null) {p.addLast(sslCtx.newHandler(ch.alloc()));}p.addLast(new LoggingHandler(LogLevel.INFO));//p.addLast(new EchoServerHandler());}});
说明:
1.链式调用:group方法,将boss和worker传入,boss赋值给parentGroup属性,worker赋值给childGroup属性
2.channel方法传入NioServerChannel 的Class对象,会根据这个Class创建channel对象
3.option方法传入TCP参数,放在一个LinkedHashMap中
4.handler方法传入一个handler中,这个handler只属于ServerSocketChannel而不是SocketChannel
5.childHandler 传入一个handler,这个handler将会在每个客户端连接的时候调用,供SocketChannel使用
绑定端口分析
1.服务器就是在bind方法中完成启动的
2.bind方法代码,追踪到创建了一个端口对象,并做了一些空判断,核心代码为doBind
public ChannelFuture bind(SocketAddress localAddress) {validate();if (localAddress == null) {throw new NullPointerException("localAddress");}return doBind(localAddress);}
3.doBind源码分析——核心两个方法—-initAndRegister和doBind0
private ChannelFuture doBind(final SocketAddress localAddress) {final ChannelFuture regFuture = initAndRegister();final Channel channel = regFuture.channel();if (regFuture.cause() != null) {return regFuture;}if (regFuture.isDone()) {// At this point we know that the registration was complete and successful.ChannelPromise promise = channel.newPromise();***************************************1111111111111111111执行doBind0111111111111111111111111111doBind0(regFuture, channel, localAddress, promise);return promise;} else {// Registration future is almost always fulfilled already, but just in case it's not.final PendingRegistrationPromise promise = new PendingRegistrationPromise(channel);regFuture.addListener(new ChannelFutureListener() {@Overridepublic void operationComplete(ChannelFuture future) throws Exception {Throwable cause = future.cause();if (cause != null) {// Registration on the EventLoop failed so fail the ChannelPromise directly to not cause an// IllegalStateException once we try to access the EventLoop of the Channel.promise.setFailure(cause);} else {// Registration was successful, so set the correct executor to use.// See https://github.com/netty/netty/issues/2586promise.registered();doBind0(regFuture, channel, localAddress, promise);}}});return promise;}}
4.分析说明initAndRegister
final ChannelFuture initAndRegister() {Channel channel = null;try {********** 一 *******************channel = channelFactory.newChannel();********** 二 *******************init(channel);} catch (Throwable t) {if (channel != null) {channel.unsafe().closeForcibly();return new DefaultChannelPromise(channel, GlobalEventExecutor.INSTANCE).setFailure(t);}return new DefaultChannelPromise(new FailedChannel(), GlobalEventExecutor.INSTANCE).setFailure(t);}ChannelFuture regFuture = config().group().register(channel);if (regFuture.cause() != null) {if (channel.isRegistered()) {channel.close();} else {channel.unsafe().closeForcibly();}}return regFuture;}
上述代码标记处说明:
一:
channelFactory.newChannel() 方 法 的 作 用 通 过 ServerBootstrap 的 通 道 工 厂 反 射 创 建 一 个
NioServerSocketChannel, 具体追踪源码可以得到下面结论:
(1) 通过 NIO 的 SelectorProvider 的 openServerSocketChannel 方法得到 JDK 的 channel。目
的是让 Netty 包装 JDK 的 channel。
(2) 创建了一个唯一的 ChannelId,创建了一个 NioMessageUnsafe,用于操作消息,创建了一
个 DefaultChannelPipeline 管道,是个双向链表结构,用于过滤所有的进出的消息。
(3) 创建了一个 NioServerSocketChannelConfig 对象,用于对外展示一些配置
二:
(1) init 方法,这是个抽象方法(AbstractBootstrap 类的),由 ServerBootstrap 实现(可以追一下源码 //setChannelOptions(channel, options, logger);)
(2) 设置 NioServerSocketChannel 的 TCP 属性。
(3) 由于 LinkedHashMap 是非线程安全的,使用同步进行处理。
(4) 对 NioServerSocketChannel 的 ChannelPipeline 添加 ChannelInitializer 处理器。
(5) 可以看出, init 的方法的核心作用在和 ChannelPipeline 相关。
(6) 从 NioServerSocketChannel 的初始化过程中,我们知道,pipeline 是一个双向链表,并
且,他本身就初始化了 head 和 tail,这里调用了他的 addLast 方法,也就是将整个 handler 插入到 tail 的
前面,因为 tail 永远会在后面,需要做一些系统的固定工作。
总结:
1.基本说明:initAndRegister()初始化NioServerSocketChannel通道并注册各个handler,返回一个future
2.通过 ServerBootstarp 的通道工厂反射创建一个NioServerSocketChannel
3.init 初始化这个 NioServerSocketChannel
4.config().group().reguster(channel) 通过 ServerBootstrap的bossGroup 注册NioServerSocketChannel
5.最后返回这个异步执行的占位符 即 regFuture
init方法 会调用addLast
说明:
1.addLast方法,在DefaultChannelPipeline类中
2.addLast方法就是pipeline方法的核心
3.检查该handler是否符合标准
4.创 建 一 个 AbstractChannelHandlerContext 对 象 , 这 里 说 一 下 , ChannelHandlerContext 对 象 是ChannelHandler 和 ChannelPipeline 之间的关联,每当有 ChannelHandler 添加到 Pipeline 中时,都会创建Context。Context 的主要功能是管理他所关联的 Handler 和同一个 Pipeline 中的其他 Handler 之间的交互。
5.将Context添加到链表中,也就是追加到tail节点前面
6.最后,同步或者异步或者晚点异步调用callHandlerAdded() 方法
5.dobind0
1.该方法的参数为 initAndRegister 的future,NioServerSocketChannel,端口地址,NioServerSockertChannel的promise
2.接下来一直向下调用,直到调用到最终的doBind方法,执行成功后会执行通道的fireChannelActive方法,告诉所有的handler,端口绑定成功了
3.最终doBind就会追踪到NioServerSocketChannel的doBind,说明Netty底层使用的是Nio
4.执行完后,就会执行最后一步,safeSetSuccess(promise),告诉 promise 任务成功了,其可以执行监听器的方法了,至此,整个启动过程结束
5.再向下执行一次,就会回到NioEventLoop类的一个循环代码,进行无限循环,监听
Netty启动过程梳理
1.创建两个EventLoopGroup线程池数组,数组默认大小为CPU*2,方便chooser选择线程池时提高性能
2.BootStarp 将boss设置为 group属性,将worker设置为childer属性
3.通过bind方法启动,内部重要方法为initAndRegister和dobind方法
4.initAndRegister方法会反射创建 NioServerSocketChannel 及其相关的NIO对象,pipeline,unsafe,同时也为pipeline初始了head和tail节点
5.register方法成功后调用dobind方法中的dobind0方法,该方法会调用 NioServerSocketChannel的doBind方法对JDK的channel和端口进行绑定,完成Netty服务器的所有启动,并开始监听连接事件

