1 温故而知新
温故而知新,我们来简单回顾一下上篇的内容,上一篇我们分析了SpringBoot外部配置属性值是如何被绑定到XxxProperties类属性上的相关源码,现将外部属性绑定的重要步骤总结如下:
- 首先是
@EnableConfigurationProperties注解import了EnableConfigurationPropertiesImportSelector后置处理器; EnableConfigurationPropertiesImportSelector后置处理器又向Spring容器中注册了ConfigurationPropertiesBeanRegistrar和ConfigurationPropertiesBindingPostProcessorRegistrar这两个bean;- 其中
ConfigurationPropertiesBeanRegistrar向Spring容器中注册了XxxProperties类型的bean;ConfigurationPropertiesBindingPostProcessorRegistrar向Spring容器中注册了ConfigurationBeanFactoryMetadata和ConfigurationPropertiesBindingPostProcessor两个后置处理器; ConfigurationBeanFactoryMetadata后置处理器在初始化beanfactory时将@Bean注解的元数据存储起来,以便在后续的外部配置属性绑定的相关逻辑中使用;ConfigurationPropertiesBindingPostProcessor后置处理器将外部配置属性值绑定到XxxProperties类属性的逻辑委托给ConfigurationPropertiesBinder对象,然后ConfigurationPropertiesBinder对象又最终将属性绑定的逻辑委托给Binder对象来完成。
可见,重要的是上面的第5步。
2 引言
我们都知道,SpringBoot内置了各种Starter起步依赖,我们使用非常方便,大大减轻了我们的开发工作。有了Starter起步依赖,我们不用去考虑这个项目需要什么库,这个库的groupId和artifactId是什么?更不用担心引入这个版本的库后会不会跟其他依赖有没有冲突。
举个栗子:现在我们想开发一个web项目,那么只要引入
spring-boot-starter-web这个起步依赖就可以了,不用考虑要引入哪些版本的哪些依赖了。像以前我们还要考虑引入哪些依赖库,比如要引入spring-web和spring-webmvc依赖等;此外,还要考虑引入这些库的哪些版本才不会跟其他库冲突等问题。
那么我们今天暂时不分析SpringBoot自动配置的源码,由于起步依赖跟自动配置的关系是如影随形的关系,因此本篇先站在maven项目构建的角度来宏观分析下我们平时使用的SpringBoot内置的各种**Starter**是怎样构建的?
3 Maven传递依赖的optional标签
在分析SpringBoot内置的各种Starter构建原理前,我们先来认识下Maven的optional标签,因为这个标签起到至关重要的作用。 Maven的optional标签表示可选依赖即不可传递的意思,下面直接举个栗子来说明。
比如有A,B和C三个库,C依赖B,B依赖A。下面看下这三个库的pom.xml文件:
// A的pom.xml<?xml version="1.0" encoding="UTF-8"?><project xmlns="http://maven.apache.org/POM/4.0.0"xmlns:xsi="http://www.w3.org/2001/XMLSchema-instance"xsi:schemaLocation="http://maven.apache.org/POM/4.0.0 http://maven.apache.org/xsd/maven-4.0.0.xsd"><groupId>com.ymbj</groupId><artifactId>A</artifactId><version>1.0-SNAPSHOT</version></project>复制代码<?xml version="1.0" encoding="UTF-8"?><project xmlns="http://maven.apache.org/POM/4.0.0"xmlns:xsi="http://www.w3.org/2001/XMLSchema-instance"xsi:schemaLocation="http://maven.apache.org/POM/4.0.0 http://maven.apache.org/xsd/maven-4.0.0.xsd"><groupId>com.ymbj</groupId><artifactId>B</artifactId><version>1.0-SNAPSHOT</version><!--注意是可选依赖--><dependencies><dependency><groupId>com.ymbj</groupId><artifactId>A</artifactId><version>1.0-SNAPSHOT</version><optional>true</optional></dependency></dependencies></project>复制代码<?xml version="1.0" encoding="UTF-8"?><project xmlns="http://maven.apache.org/POM/4.0.0"xmlns:xsi="http://www.w3.org/2001/XMLSchema-instance"xsi:schemaLocation="http://maven.apache.org/POM/4.0.0 http://maven.apache.org/xsd/maven-4.0.0.xsd"><groupId>com.ymbj</groupId><artifactId>C</artifactId><version>1.0-SNAPSHOT</version><dependencies><dependency><groupId>com.ymbj</groupId><artifactId>B</artifactId><version>1.0-SNAPSHOT</version></dependency></dependencies></project>
上面三个A,B和C库的pom.xml可知,B库依赖A库,然后C库又依赖了B库,那么请想一下,Maven打包构建**C**库后,**A**库有没有被引进来?
答案肯定是没有,因为B库引入A库依赖时使用了<optional>true</optional>,即将Maven的optional标签值设为了true,此时C库再引入B库依赖时,A库是不会被引入到C库的。
同时跟Maven传递依赖有关的还有一个exclusions标签,这个表示将某个库的某个子依赖排除掉,这里不再详述。
4 SpringBoot内置的各种Starter是怎样构建的?
我们现在来探究SpringBoot内置的各种Starter到底是怎样构建的呢?
还记得如何分析SpringBoot源码模块及结构?这篇文章分析的SpringBoot内部的模块之间的关系吗?先来回顾一下SpringBoot源码内部模块图:
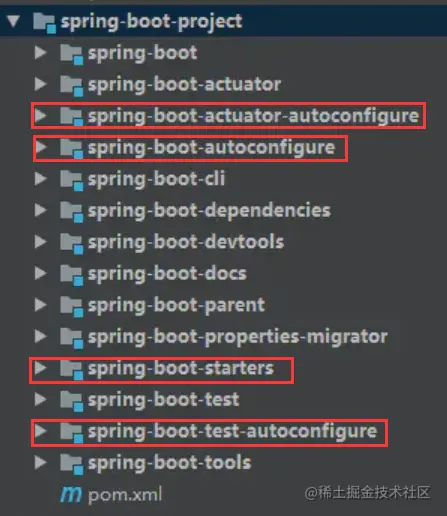
图1
我们都知道,SpringBoot的Starter的构建的原理实质就是自动配置,因此由图1可以看到SpringBoot源码项目内部跟Starter及其自动配置有关的模块有四个:spring-boot-starters,spring-boot-actuator-autoconfigure,spring-boot-autoconfigure和spring-boot-test-autoconfigure。 每个模块的作用请看如何分析SpringBoot源码模块及结构?这篇文章,这里不再赘述。
那么,spring-boot-starters模块跟后面三个自动配置有关的模块xxx-autoconfigure模块的关系是怎样的呢?
此时我们先来看看spring-boot-starters模块里面的结构是怎样的?
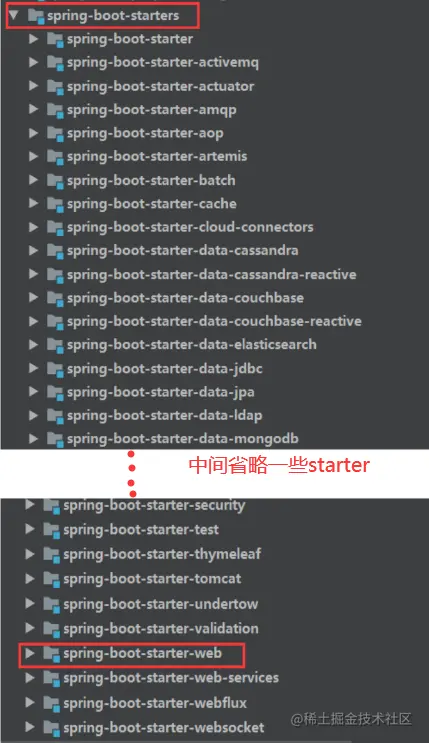
图2
由图2可以看到spring-boot-starters模块包含了SpringBoot内置的各种starter:spring-boot-starter-xxx。由于SpringBoot内置的各种starter太多,以我们常用的spring-boot-starter-web起步依赖来探究好了。
我们首先看下spring-boot-starter-web模块内部结构:

图3
可以看到spring-boot-starter-web模块里面只有.flattened-pom.xml和pom.xml文件,而没有任何代码!有点出乎我们意料。我们都知道若要用到SpringBoot的web功能时引入spring-boot-starter-web起步依赖即可,而现在spring-boot-starter-web模块里面没有一行代码,那么spring-boot-starter-web究竟是如何构建的呢?会不会跟图1所示的spring-boot-autoconfigure自动配置模块有关?
此时我们就需要看下spring-boot-starter-web模块的pom.xml文件内容:
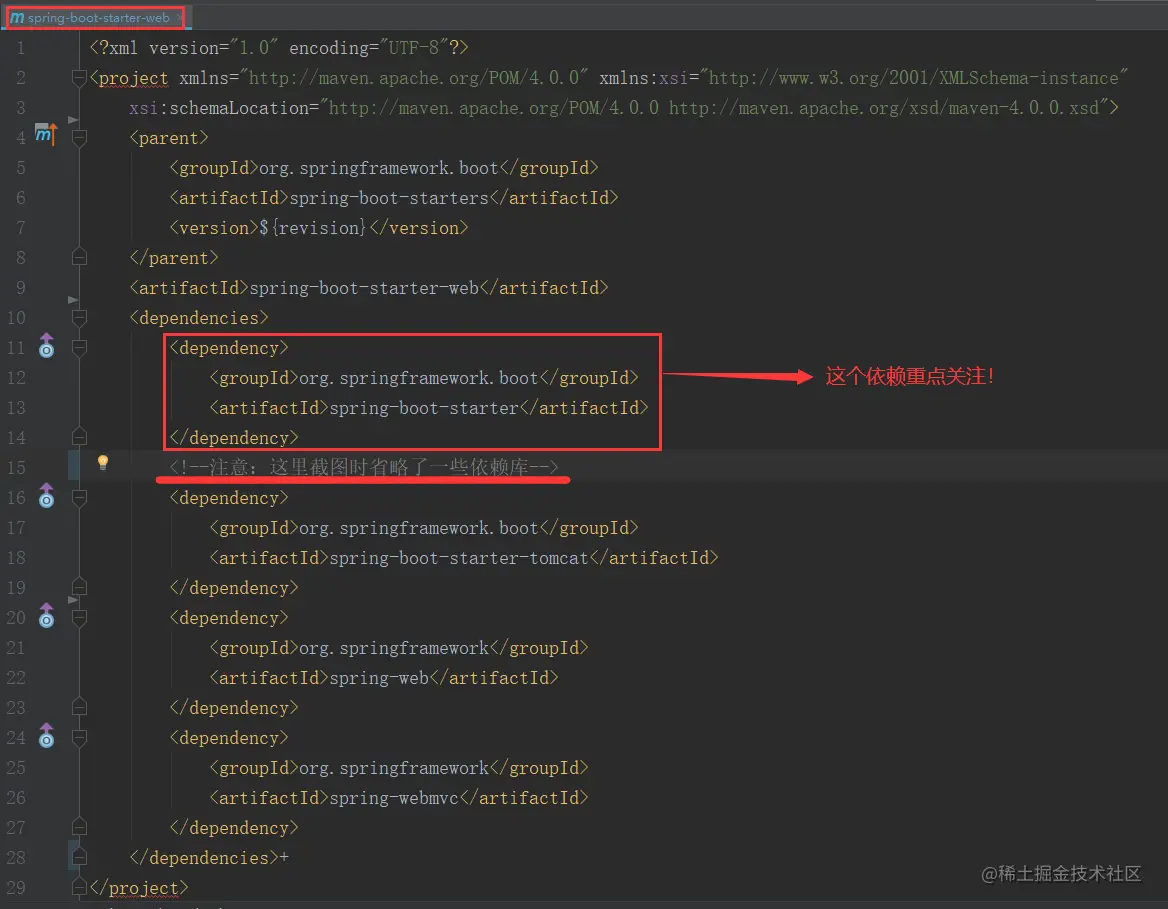
图4
由图4可以看到,spring-boot-starter-web模块依赖了spring-boot-starter,spring-boot-starter-tomcat,spring-web和spring-webmvc等模块,居然没有依赖spring-boot-autoconfigure自动配置模块!
由于spring-boot-starter-web模块肯定跟spring-boot-autoconfigure自动配置模块有关,所以spring-boot-starter-web模块肯定是间接依赖了spring-boot-autoconfigure自动配置模块。
图4标有标注”重点关注”的spring-boot-starter模块是绝大部分spring-boot-starter-xxx模块依赖的基础模块,是核心的Starter,包括了自动配置,日志和YAML支持。我们此时来关注下spring-boot-starter的pom.xml文件,也许其依赖了了spring-boot-autoconfigure自动配置模块。
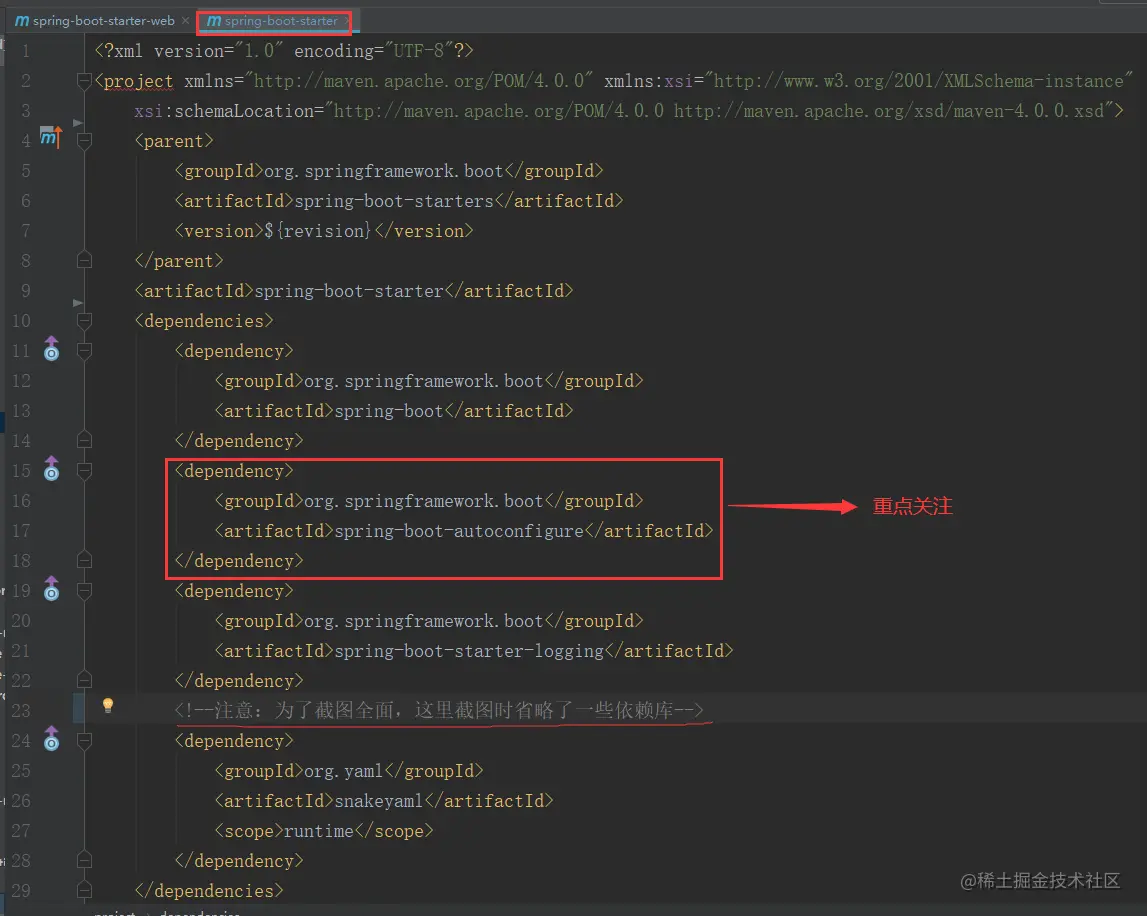
图5
由图5可以看到,我们前面的猜想没有错,正是**spring-boot-starter**模块依赖了**spring-boot-autoconfigure**自动配置模块!*因此,到了这里我们就可以得出结论了:**_spring-boot-starter-web_**模块没有一行代码,但是其通过**_spring-boot-starter_**模块*间接依赖了spring-boot-autoconfigure自动配置模块,从而实现了其起步依赖的功能。
此时我们再来看下spring-boot-autoconfigure自动配置模块的内部包结构:
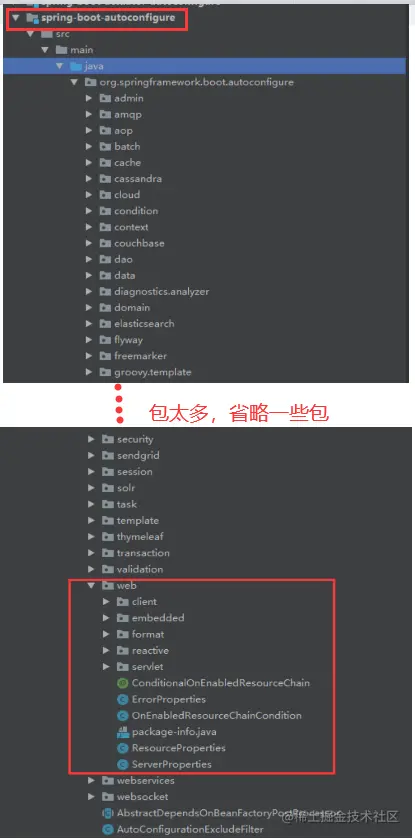
图6
由图6红框处,我们可以知道spring-boot-starter-web起步依赖的自动配置功能原来是由spring-boot-autoconfigure模块的web包下的类实现的。
到了这里spring-boot-starter-web起步依赖的构建基本原理我们就搞清楚了,但是还有一个特别重要的关键点我们还没Get到。这个关键点跟Maven的optional标签有的作用有关。
为了Get到这个点,我们先来思考一个问题:平时我们开发web项目为什么引入了spring-boot-starter-web这个起步依赖后,spring-boot-autoconfigure模块的web相关的自动配置类就会起自动起作用呢?
我们应该知道,某个自动配置类起作用往往是由于classpath中存在某个类,这里以DispatcherServletAutoConfiguration这个自动配置类为切入点去Get这个点好了。 先看下DispatcherServletAutoConfiguration能够自动配置的条件是啥?

图7
由图7所示,DispatcherServletAutoConfiguration能够自动配置的条件之一是@ConditionalOnClass(DispatcherServlet.class),即只有classpath中存在DispatcherServlet.class这个类,那么DispatcherServletAutoConfiguration自动配置相关逻辑才能起作用。
而DispatcherServlet这个类是在spring-webmvc这个依赖库中的,如下图所示:
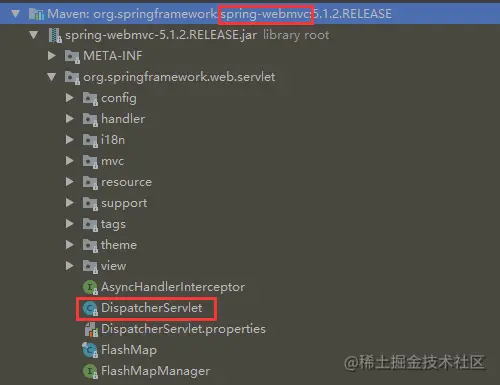
图8
此时我们再看下spring-boot-autoconfigure模块的pom.xml文件引入spring-webmvc这个依赖的情况:

图9
由图9所示,spring-boot-autoconfigure模块引入的spring-webmvc这个依赖时optional被设置为true,原来是可选依赖。即spring-webmvc这个依赖库只会被导入到spring-boot-autoconfigure模块中,而不会被导入到间接依赖spring-boot-autoconfigure模块的spring-boot-starter-web这个起步依赖中。
此时,我们再来看看spring-boot-starter-web的pom.xml文件的依赖情况:
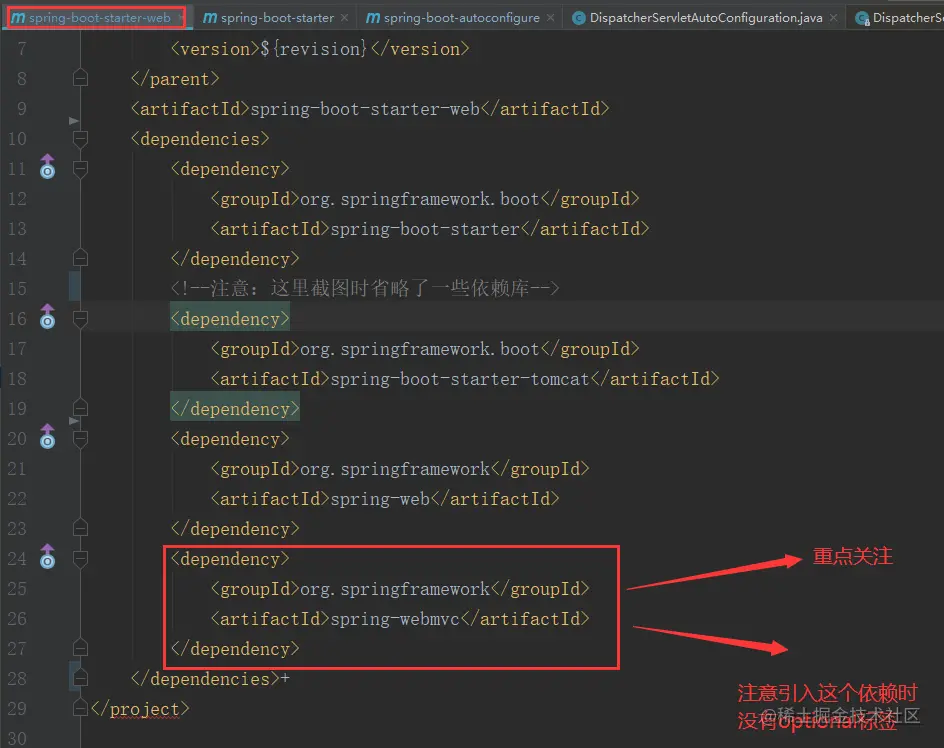
图10
由图10所示,spring-boot-starter-web起步依赖显式引入了spring-webmvc这个依赖库,即引入spring-webmvc 时没有optional这个标签,又因为DispatcherServlet这个类是在spring-webmvc这个依赖库中的,从而classpath中存在DispatcherServlet这个类,因此DispatcherServletAutoConfiguration这个自动配置类就生效了。当然,web相关的其他自动配置类生效也是这个原理。
至此,我们也明白了spring-boot-autoconfigure模块为什么要把引入的spring-webmvc这个依赖作为可选依赖了,其目的就是为了在spring-boot-starter-web起步依赖中能显式引入spring-webmvc这个依赖(这个起决定性作用),从而我们开发web项目只要引入了spring-boot-starter-web起步依赖,那么web相关的自动配置类就生效,从而可以开箱即用这个就是spring-boot-starter-web这个起步依赖的构建原理了。
前面提到的spring-boot-starter-actuator,spring-boot-starter-test及其他内置的spring-boot-starter-xxx的起步依赖的构建原理也是如此,只不过spring-boot-starter-actuator依赖的是spring-boot-actuator-autoconfigure,spring-boot-starter-test依赖的是spring-boot-test-autoconfigure模块罢了,这里不再详述。
思考:
spring-boot-actuator-autoconfigure的pom.xml文件引入了20多个可选依赖,而为什么spring-boot-starter-actuator起步依赖只引入了micrometer-core这个依赖呢?
5 模仿SpringBoot包结构自定义一个Starter
前面分析了SpringBoot内置的各种Starter的构建原理,理论联系实践,那么如果能够动手实践一下自定义Starter那就更好了。
下面提供一个自定义Starter的一个简单Demo,这个Demo完全模仿SpringBoot内置Starter的内部包结构来编写,对于进一步了解SpringBoot内置的各种Starter的构建原理很有帮助。
下面是这个Demo的github地址,推荐给有兴趣的小伙伴们。 模仿springboot内部结构自定义Starter。此外,如何自定义一个Starter,可以参考下Mybatis的spring-boot-starter是如何编写的。
6 小结
好了,SpringBoot内置的各种Starter的构建原理分析就到此结束了,现将关键点总结下:
spring-boot-starter-xxx起步依赖没有一行代码,而是直接或间接依赖了xxx-autoconfigure模块,而xxx-autoconfigure模块承担了spring-boot-starter-xxx起步依赖自动配置的实现;xxx-autoconfigure自动配置模块引入了一些可选依赖,这些可选依赖不会被传递到spring-boot-starter-xxx起步依赖中,这是起步依赖构建的关键点;spring-boot-starter-xxx起步依赖显式引入了一些对自动配置起作用的可选依赖;- 经过前面3步的准备,我们项目只要引入了某个起步依赖后,就可以开箱即用了,而不用手动去创建一些
bean等。

