初始化 Channel
Channel 接口是 Netty 对网络操作抽象类。通过 Channel 我们可以进行 I/O 操作。
一旦客户端成功连接服务端,就会新建一个 Channel 同该用户端进行绑定,示例代码如下:
// 通过 Bootstrap 的 connect 方法连接到服务端public Channel doConnect(InetSocketAddress inetSocketAddress) {CompletableFuture<Channel> completableFuture = new CompletableFuture<>();bootstrap.connect(inetSocketAddress).addListener((ChannelFutureListener) future -> {if (future.isSuccess()) {completableFuture.complete(future.channel());} else {throw new IllegalStateException();}});return completableFuture.get();}
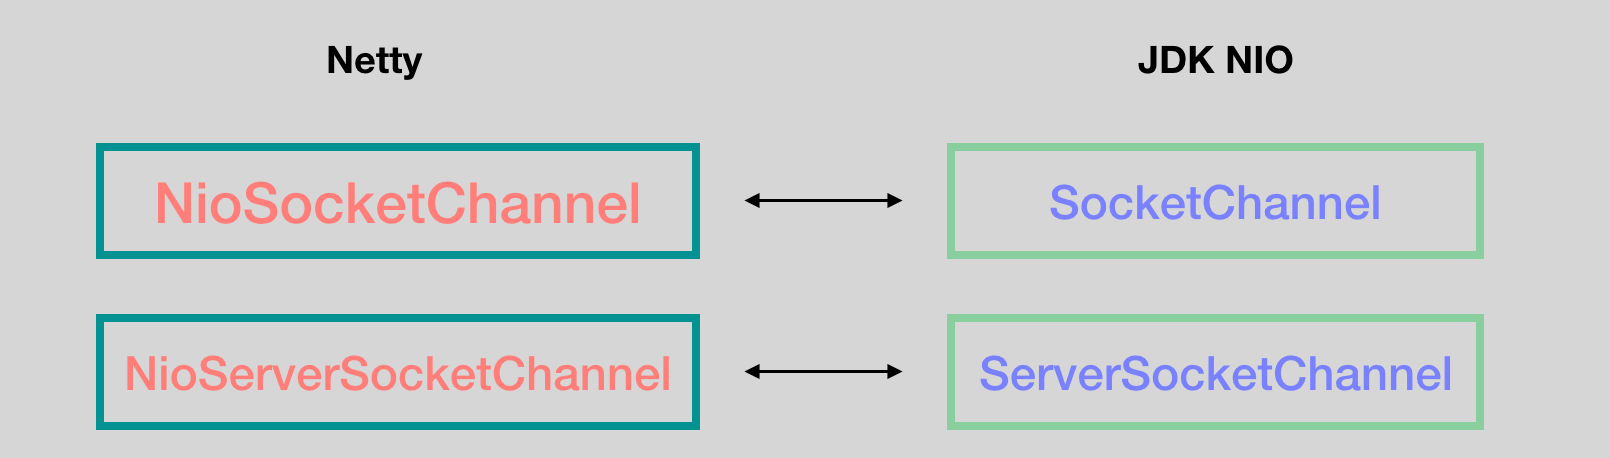
比较常用的Channel接口实现类是 :
NioServerSocketChannel(服务端)NioSocketChannel(客户端)
这两个 Channel 可以和 BIO 编程模型中的ServerSocket以及Socket两个概念对应上。
这节我们来看看 NioSocketChannel 是怎么和 JDK 底层的 SocketChannel 联系在一起的,它们是一对一的关系。NioServerSocketChannel 和 ServerSocketChannel 同理,也是一对一的关系。
在 Bootstrap(客户端) 和 ServerBootstrap(服务端) 的启动过程中都会调用 channel(…) 方法:
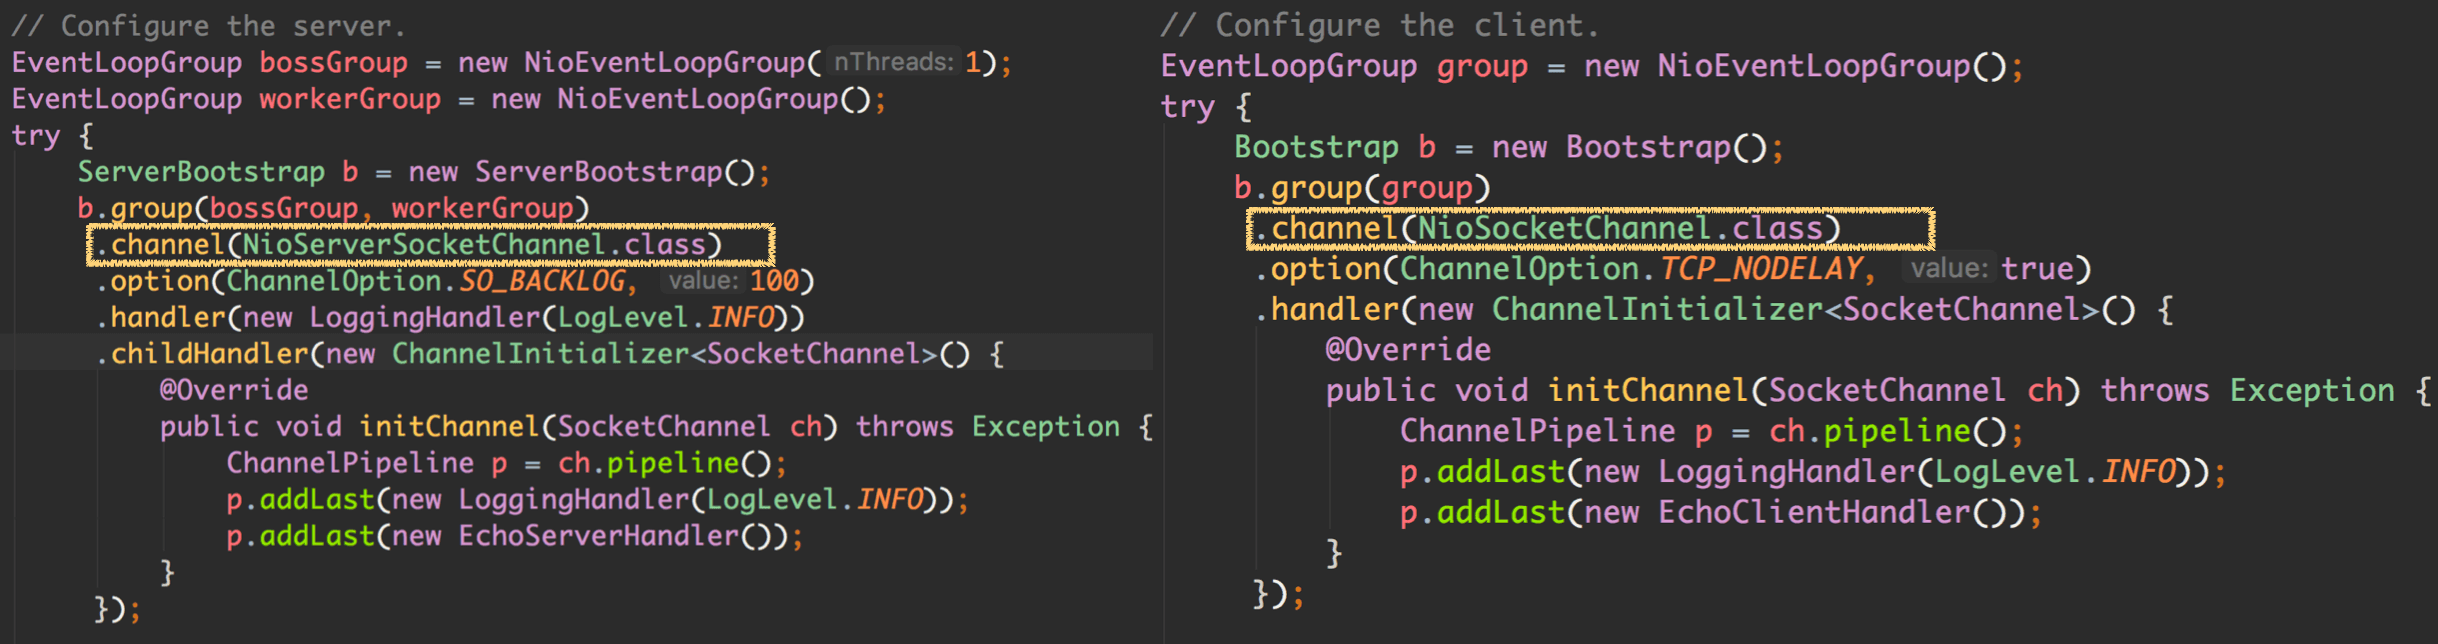
下面,我们来看 channel(…) 方法的源码:
// AbstractBootstrappublic B channel(Class<? extends C> channelClass) {if (channelClass == null) {throw new NullPointerException("channelClass");}return channelFactory(new ReflectiveChannelFactory<C>(channelClass));}
我们可以看到,这个方法只是设置了 channelFactory 为 ReflectiveChannelFactory 的一个实例,然后我们看下这里的 ReflectiveChannelFactory 到底是什么:
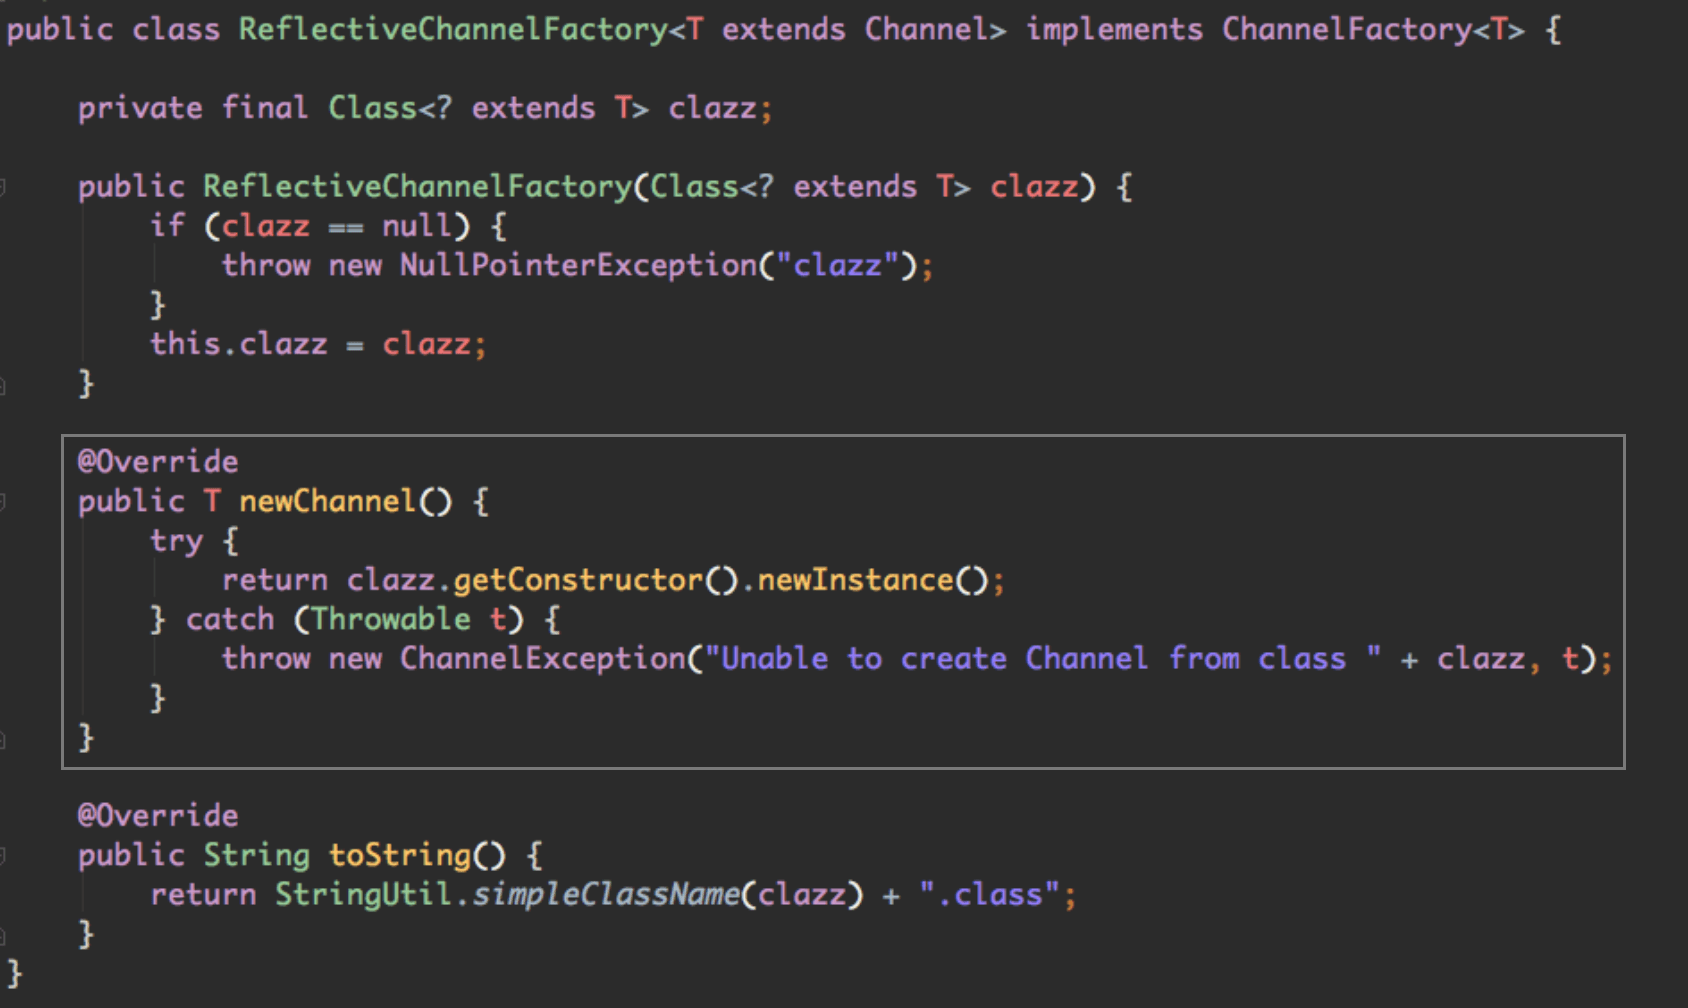
**newChannel()** 方法是 ChannelFactory 接口中的唯一方法,工厂模式 大家都很熟悉。我们可以看到,ReflectiveChannelFactory#newChannel() 方法中使用了反射调用 Channel 的无参构造方法来创建 Channel,我们只要知道,ChannelFactory 的 newChannel() 方法什么时候会被调用就可以了。
- 对于
NioSocketChannel,由于它充当客户端的功能,它的创建时机在connect(…)的时候; - 对于
NioServerSocketChannel来说,它充当服务端功能,它的创建时机在绑定端口bind(…)的时候。
接下来,我们来简单追踪下充当客户端的 Bootstrap 中 NioSocketChannel 的创建过程,看看 NioSocketChannel 是怎么和 JDK 中的 SocketChannel 关联在一起的:
// Bootstrappublic ChannelFuture connect(String inetHost, int inetPort) {return connect(InetSocketAddress.createUnresolved(inetHost, inetPort));}
然后再往里看,到这个方法:
public ChannelFuture connect(SocketAddress remoteAddress) {if (remoteAddress == null) {throw new NullPointerException("remoteAddress");// validate 只是校验一下各个参数是不是正确设置了validate();return doResolveAndConnect(remoteAddress, config.localAddress());}
继续:
// 再往里就到这里了private ChannelFuture doResolveAndConnect(final SocketAddress remoteAddress, final SocketAddress localAddress) {// 我们要说的部分在这里final ChannelFuture regFuture = initAndRegister();final Channel channel = regFuture.channel();......}
然后,我们看 initAndRegister() 方法:
final ChannelFuture initAndRegister() {Channel channel = null;try {// 前面我们说过,这里会进行 Channel 的实例化channel = channelFactory.newChannel();init(channel);} catch (Throwable t) {...}...return regFuture;}
我们找到了 channel = channelFactory.newChannel() 这行代码,根据前面说的,这里会调用相应 Channel 的无参构造方法。
然后我们就可以去看 NioSocketChannel 的构造方法了:
public NioSocketChannel() {// SelectorProvider 实例用于创建 JDK 的 SocketChannel 实例this(DEFAULT_SELECTOR_PROVIDER);}public NioSocketChannel(SelectorProvider provider) {// 看这里,newSocket(provider) 方法会创建 JDK 的 SocketChannelthis(newSocket(provider));}
我们可以看到,在调用 newSocket(provider) 的时候,会创建 JDK NIO 的一个 SocketChannel 实例:
private static SocketChannel newSocket(SelectorProvider provider) {try {// 创建 SocketChannel 实例return provider.openSocketChannel();} catch (IOException e) {throw new ChannelException("Failed to open a socket.", e);}}
NioServerSocketChannel 同理,也非常简单,从 ServerBootstrap#bind(...) 方法一路点进去就清楚了。
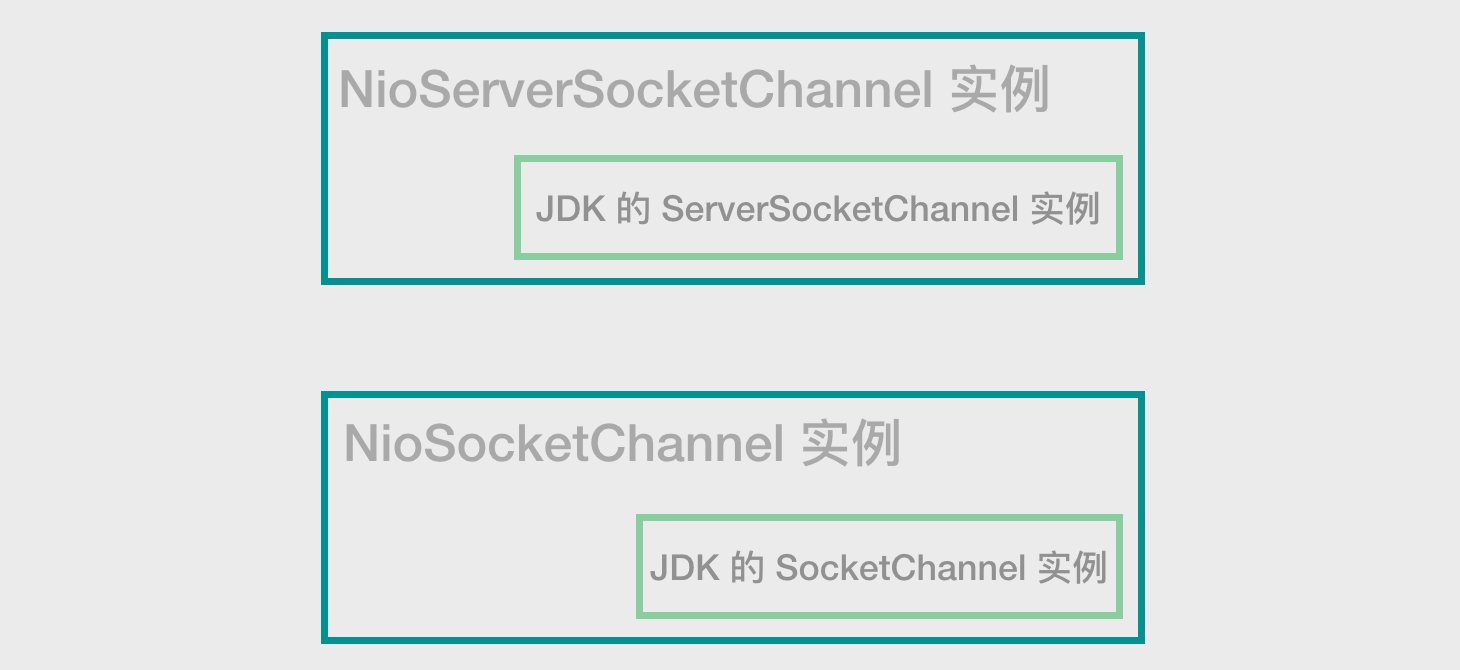
所以我们知道了,NioSocketChannel 在实例化过程中,会先实例化 JDK 底层的 SocketChannel,NioServerSocketChannel 也一样,会先实例化 ServerSocketChannel 实例:
说到这里,我们顺便再继续往里看一下 NioSocketChannel 的构造方法:
public NioSocketChannel(SelectorProvider provider) {this(newSocket(provider));}
刚才我们看到这里,newSocket(provider) 创建了底层的 SocketChannel 实例,我们继续往下看构造方法:
public NioSocketChannel(Channel parent, SocketChannel socket) {super(parent, socket);config = new NioSocketChannelConfig(this, socket.socket());}
上面有两行代码,第二行代码很简单,实例化了内部的 NioSocketChannelConfig 实例,它用于保存 channel 的配置信息,这里没有我们现在需要关心的内容,直接跳过。
第一行调用父类构造器,除了设置属性外,还设置了 SocketChannel 的非阻塞模式:
protected AbstractNioByteChannel(Channel parent, SelectableChannel ch) {// 毫无疑问,客户端关心的是 OP_READ 事件,等待读取服务端返回数据super(parent, ch, SelectionKey.OP_READ);}// 然后是到这里protected AbstractNioChannel(Channel parent, SelectableChannel ch, int readInterestOp) {super(parent);this.ch = ch;// 我们看到这里只是保存了 SelectionKey.OP_READ 这个信息,在后面的时候会用到this.readInterestOp = readInterestOp;try {// ******设置 channel 的非阻塞模式******ch.configureBlocking(false);} catch (IOException e) {......}}
NioServerSocketChannel 的构造方法类似,也设置了非阻塞,然后设置服务端关心的 SelectionKey.OP_ACCEPT 事件:
public NioServerSocketChannel(ServerSocketChannel channel) {// 对于服务端来说,关心的是 SelectionKey.OP_ACCEPT 事件,等待客户端连接super(null, channel, SelectionKey.OP_ACCEPT);config = new NioServerSocketChannelConfig(this, javaChannel().socket());}
这节关于 Channel 的内容我们先介绍这么多,主要就是实例化了 JDK 层的 SocketChannel 或 ServerSocketChannel,然后设置了非阻塞模式,我们后面再继续深入下去。
Channel 的 register 操作
经过前面的铺垫,我们已经具备一定的基础了,我们开始来把前面学到的内容揉在一起。这节,我们会介绍 register 操作,这一步其实是非常关键的,对于我们源码分析非常重要。
我们从 EchoClient 中的 connect() 方法出发,或者 EchoServer 的 bind(port) 方法出发,都会走到 initAndRegister() 这个方法:
final ChannelFuture initAndRegister() {Channel channel = null;try {// 1channel = channelFactory.newChannel();// 2 对于 Bootstrap 和 ServerBootstrap,这里面有些不一样init(channel);} catch (Throwable t) {...}// 3 我们这里要说的是这行ChannelFuture regFuture = config().group().register(channel);if (regFuture.cause() != null) {if (channel.isRegistered()) {channel.close();} else {channel.unsafe().closeForcibly();}}return regFuture;}
initAndRegister() 这个方法我们已经接触过两次了,前面介绍了:
Channel的实例化,实例化过程中,会执行Channel内部Unsafe和Pipeline的实例化;init(channel)方法中,会往pipeline中添加handler(pipeline此时是head+channelnitializer+tail)。
我们终于要揭秘
ChannelInitializer中的initChannel方法了~~~
现在,我们继续往下走,看看第 3 步 **register** :
ChannelFuture regFuture = config().group().register(channel);
我们说了,
register这一步是非常关键的,它发生在channel实例化以后,大家回忆一下当前channel中的一些情况:实例化了 JDK 底层的
Channel,设置了非阻塞,实例化了Unsafe,实例化了Pipeline,同时往pipeline中添加了head、tail以及一个ChannelInitializer实例。
上面的 config().group() 方法会返回前面实例化的 NioEventLoopGroup 的实例,然后调用其 register(channel) 方法:
io.netty.channel.MultithreadEventLoopGroup
@Overridepublic ChannelFuture register(Channel channel) {return next().register(channel);}
next() 方法很简单,就是选择线程池中的一个线程(还记得 chooserFactory 吗?),也就是选择一个 NioEventLoop 实例,这个时候我们就进入到 NioEventLoop 了。
NioEventLoop 的 register(channel) 方法实现在它的父类 **SingleThreadEventLoop** 中:
@Overridepublic ChannelFuture register(Channel channel) {return register(new DefaultChannelPromise(channel, this));}
上面的代码实例化了一个 Promise,将当前 channel 带了进去:
@Overridepublic ChannelFuture register(final ChannelPromise promise) {ObjectUtil.checkNotNull(promise, "promise");// promise 关联了 channel,channel 持有 Unsafe 实例,register 操作就封装在 Unsafe 中promise.channel().unsafe().register(this, promise);return promise;}
拿到 channel 中关联的 Unsafe 实例,然后调用它的 register 方法:
我们说过,
Unsafe专门用来封装底层实现,当然这里也没那么“底层”
io.netty.channel.AbstractChannel#AbstractUnsafe
@Overridepublic final void register(EventLoop eventLoop, final ChannelPromise promise) {...// 将这个 eventLoop 实例设置给这个 channel,从此这个 channel 就是有 eventLoop 的了// 我觉得这一步其实挺关键的,因为后续该 channel 中的所有异步操作,都要提交给这个 eventLoop 来执行AbstractChannel.this.eventLoop = eventLoop;// 如果发起 register 动作的线程就是 eventLoop 实例中的线程,那么直接调用 register0(promise)// 对于我们来说,它不会进入到这个分支,// 之所以有这个分支,是因为我们是可以 unregister,然后再 register 的,后面再仔细看if (eventLoop.inEventLoop()) {register0(promise);} else {try {// 否则,提交任务给 eventLoop,eventLoop 中的线程会负责调用 register0(promise)eventLoop.execute(new Runnable() {@Overridepublic void run() {register0(promise);}});} catch (Throwable t) {...}}}
到这里,我们要明白,
NioEventLoop中是还没有实例化Thread实例的。
这几步涉及到了好几个类:NioEventLoop、Promise、Channel、Unsafe 等,大家要仔细理清楚它们的关系。
对于我们前面过来的 register 操作,其实提交到 eventLoop 以后,就直接返回 promise 实例了,剩下的 register0 是异步操作,它由 NioEventLoop 实例来完成。
Channel实例一旦register到了NioEventLoopGroup实例中的某个NioEventLoop实例,那么后续该Channel的所有操作,都是由该NioEventLoop实例来完成的。这个也非常简单,因为
Selector实例是在NioEventLoop实例中的,Channel实例一旦注册到某个Selector实例中,当然也只能在这个实例中处理 NIO 事件。
我们来看 register0(promise) 方法,我们知道,这个 register 任务进入到了 NioEventLoop 的 taskQueue 中,然后会启动 NioEventLoop 中的线程,该线程会轮询这个 taskQueue,然后执行这个 register 任务。
注意,此时执行该方法的是 eventLoop 中的线程:
io.netty.channel.AbstractChannel#register0
private void register0(ChannelPromise promise) {try {...boolean firstRegistration = neverRegistered;// *** 进行 JDK 底层的操作:Channel 注册到 Selector 上 ***doRegister();neverRegistered = false;registered = true;// 到这里,就算是 registered 了// 这一步也很关键,因为这涉及到了 ChannelInitializer 的 init(channel)// 我们之前说过,init 方法会将 ChannelInitializer 内部添加的 handlers 添加到 pipeline 中pipeline.invokeHandlerAddedIfNeeded();// 设置当前 promise 的状态为 success// 因为当前 register 方法是在 eventLoop 中的线程中执行的,需要通知提交 register 操作的线程safeSetSuccess(promise);// 当前的 register 操作已经成功,该事件应该被 pipeline 上// 所有关心 register 事件的 handler 感知到,往 pipeline 中扔一个事件pipeline.fireChannelRegistered();// 这里 active 指的是 channel 已经打开if (isActive()) {// 如果该 channel 是第一次执行 register,那么 fire ChannelActive 事件if (firstRegistration) {pipeline.fireChannelActive();} else if (config().isAutoRead()) {// 该 channel 之前已经 register 过了,// 这里让该 channel 立马去监听通道中的 OP_READ 事件beginRead();}}} catch (Throwable t) {...}}
我们先说掉上面的 doRegister() 方法,然后再说 pipeline。
@Overrideprotected void doRegister() throws Exception {boolean selected = false;for (;;) {try {// 附 JDK 中 Channel 的 register 方法:// public final SelectionKey register(Selector sel, int ops, Object att) {...}selectionKey = javaChannel().register(eventLoop().unwrappedSelector(), 0, this);return;} catch (CancelledKeyException e) {...}}}
我们可以看到,这里做了 JDK 底层的 register 操作,将 SocketChannel(或 ServerSocketChannel) 注册到 Selector 中,并且可以看到,这里的监听集合设置为了 0,也就是什么都不监听。
当然,也就意味着,后续一定有某个地方会需要修改这个
selectionKey的监听集合,不然啥都干不了
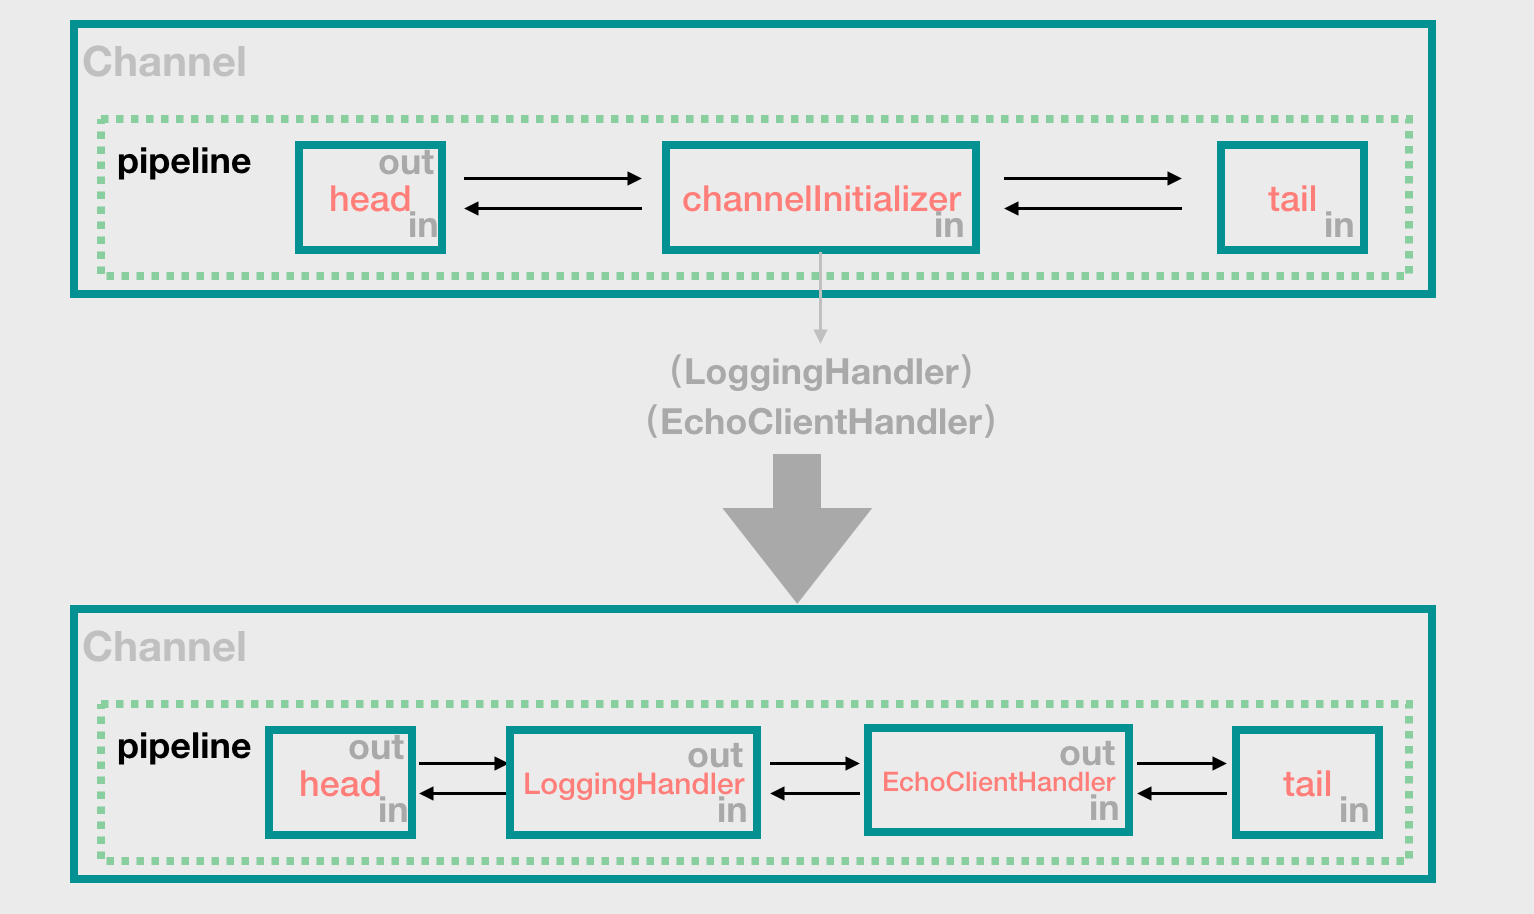
我们重点来说说 **pipeline** 操作,我们之前在介绍 NioSocketChannel 的 pipeline 的时候介绍到,我们的 pipeline 现在长这个样子:

现在,我们将看到这里会把
LoggingHandler和EchoClientHandler添加到pipeline。
我们继续看代码,register 成功以后,执行了以下操作:
pipeline.invokeHandlerAddedIfNeeded();
大家可以跟踪一下,这一步会执行到 pipeline 中 ChannelInitializer 实例的 handlerAdded 方法,在这里会执行它的 init(context) 方法:
@Overridepublic void handlerAdded(ChannelHandlerContext ctx) throws Exception {if (ctx.channel().isRegistered()) {initChannel(ctx);}}
然后我们看下 initChannel(ctx),这里终于来了我们之前介绍过的 init(channel) 方法:
private boolean initChannel(ChannelHandlerContext ctx) throws Exception {if (initMap.putIfAbsent(ctx, Boolean.TRUE) == null) { // Guard against re-entrance.try {// 1. 将把我们自定义的 handlers 添加到 pipeline 中initChannel((C) ctx.channel());} catch (Throwable cause) {...} finally {// 2. 将 ChannelInitializer 实例从 pipeline 中删除remove(ctx);}return true;}return false;}
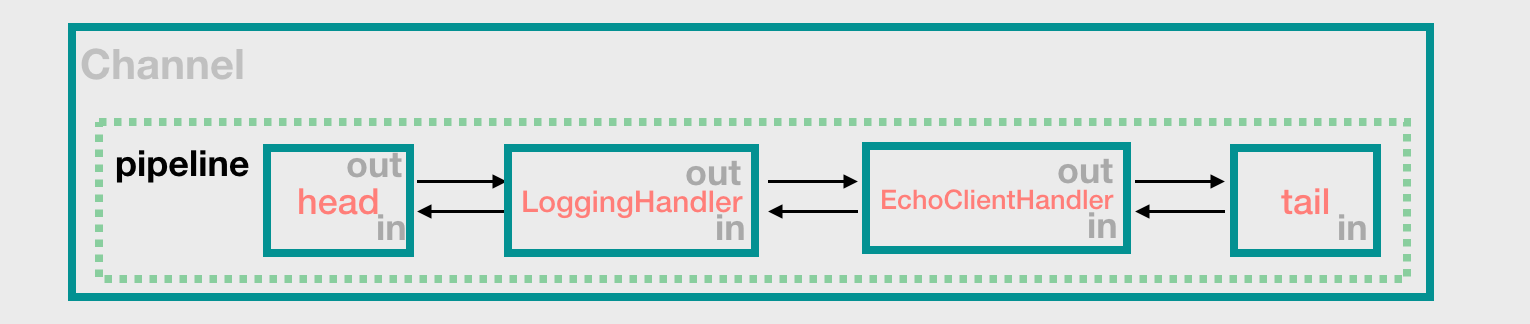
我们前面也说过,ChannelInitializer 的 init(channel) 被执行以后,那么其内部添加的 handlers 会进入到 pipeline 中,然后上面的 finally 块中将 ChannelInitializer 的实例从 pipeline 中删除,那么此时 pipeline 就算建立起来了,如下图:
其实这里还有个问题,如果我们在 ChannelInitializer 中添加的是一个 ChannelInitializer 实例呢?大家可以考虑下这个情况。
pipeline 建立了以后,然后我们继续往下走,会执行到这一句:
pipeline.fireChannelRegistered();
我们只要摸清楚了 fireChannelRegistered() 方法,以后碰到其他像 fireChannelActive()、fireXxx() 等就知道怎么回事了,它们都是类似的。我们来看看这句代码会发生什么:
io.netty.channel.DefaultChannelPipeline#fireChannelRegistered
@Overridepublic final ChannelPipeline fireChannelRegistered() {// 注意这里的传参是 headAbstractChannelHandlerContext.invokeChannelRegistered(head);return this;}
也就是说,我们往 pipeline 中扔了一个 **channelRegistered** 事件,这里的 register 属于 Inbound 事件,pipeline 接下来要做的就是执行 pipeline 中的 Inbound 类型的 handlers 中的 channelRegistered() 方法。
从上面的代码,我们可以看出,往 pipeline 中扔出 channelRegistered 事件以后,第一个处理的 handler 是 **head**。
接下来,我们还是跟着代码走,此时我们来到了 pipeline 的第一个节点 **head** 的处理中:
io.netty.channel.AbstractChannelHandlerContext#invokeChannelRegistered
// next 此时是 headstatic void invokeChannelRegistered(final AbstractChannelHandlerContext next) {EventExecutor executor = next.executor();// 执行 head 的 invokeChannelRegistered()if (executor.inEventLoop()) {next.invokeChannelRegistered();} else {executor.execute(new Runnable() {@Overridepublic void run() {next.invokeChannelRegistered();}});}}
也就是说,这里会先执行 head.invokeChannelRegistered() 方法,而且是放到 NioEventLoop 中的 taskQueue 中执行的:
io.netty.channel.AbstractChannelHandlerContext#invokeChannelRegistered
private void invokeChannelRegistered() {if (invokeHandler()) {try {// handler() 方法此时会返回 head((ChannelInboundHandler) handler()).channelRegistered(this);} catch (Throwable t) {notifyHandlerException(t);}} else {fireChannelRegistered();}}
我们去看 head 的 channelRegistered 方法。
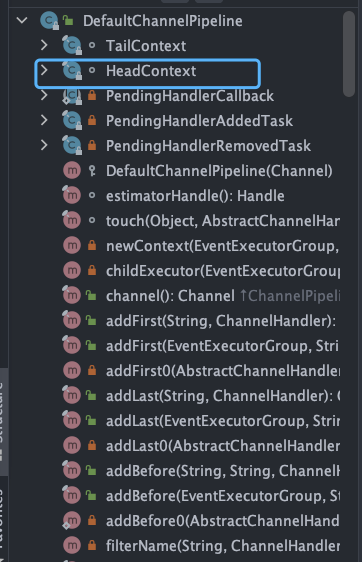
HeadContext 是 DefaultChannelPipeline 的内部类:
io.netty.channel.DefaultChannelPipeline.HeadContext#channelRegistered
@Overridepublic void channelRegistered(ChannelHandlerContext ctx) throws Exception {// 1. 这一步是 head 对于 channelRegistered 事件的处理。没有我们要关心的invokeHandlerAddedIfNeeded();// 2. 向后传播 Inbound 事件ctx.fireChannelRegistered();}
然后 head 会执行 fireChannelRegister() 方法:
io.netty.channel.AbstractChannelHandlerContext#fireChannelRegistered
@Overridepublic ChannelHandlerContext fireChannelRegistered() {// 这里很关键// findContextInbound() 方法会沿着 pipeline 找到下一个 Inbound 类型的 handlerinvokeChannelRegistered(findContextInbound());return this;}
注意:
pipeline.fireChannelRegistered()是将channelRegistered事件抛到pipeline中,pipeline中的handlers准备处理该事件。而context.fireChannelRegistered()是一个handler处理完了以后,向后传播给下一个handler。它们两个的方法名字是一样的,但是来自于不同的类。
findContextInbound() 将找到下一个 Inbound 类型的 handler,然后又是重复上面的几个方法。
我觉得上面这块代码没必要太纠结,总之就是从
head中开始,依次往下寻找所有Inbound handler,执行其channelRegistered(ctx)操作。
说了这么多,我们的 register 操作算是真正完成了。
下面,我们回到 initAndRegister 这个方法:
final ChannelFuture initAndRegister() {Channel channel = null;try {channel = channelFactory.newChannel();init(channel);} catch (Throwable t) {...}// 我们上面说完了这行ChannelFuture regFuture = config().group().register(channel);// 如果在 register 的过程中,发生了错误if (regFuture.cause() != null) {if (channel.isRegistered()) {channel.close();} else {channel.unsafe().closeForcibly();}}// 源码中说得很清楚,如果到这里,说明后续可以进行 connect() 或 bind() 了,因为两种情况:// 1. 如果 register 动作是在 eventLoop 中发起的,那么到这里的时候,register 一定已经完成// 2. 如果 register 任务已经提交到 eventLoop 中,也就是进到了 eventLoop 中的 taskQueue 中,// 由于后续的 connect 或 bind 也会进入到同一个 eventLoop 的 queue 中,所以一定是会先 register 成功,才会执行 connect 或 bindreturn regFuture;}
我们要知道,不管是服务端的 NioServerSocketChannel 还是客户端的 NioSocketChannel,在 bind 或 connect 时,都会先进入 initAndRegister 这个方法,所以我们上面说的那些,对于两者都是通用的。
大家要记住,register 操作是非常重要的,要知道这一步大概做了哪些事情,register 操作以后,将进入到 bind 或 connect 操作中。
connect 过程和 bind 过程分析
上面我们介绍的 register 操作非常关键,它建立起来了很多的东西,它是 Netty 中 NioSocketChannel 和 NioServerSocketChannel 开始工作的起点。
这一节,我们来说说 register 之后的 connect 操作和 bind 操作。这节非常简单。
connect 过程分析
对于客户端 NioSocketChannel 来说,前面 register 完成以后,就要开始 connect 了,这一步将连接到服务端。
private ChannelFuture doResolveAndConnect(final SocketAddress remoteAddress, final SocketAddress localAddress) {// 这里完成了 register 操作final ChannelFuture regFuture = initAndRegister();final Channel channel = regFuture.channel();// 这里我们不去纠结 register 操作是否 isDone()if (regFuture.isDone()) {if (!regFuture.isSuccess()) {return regFuture;}// 看这里return doResolveAndConnect0(channel, remoteAddress, localAddress, channel.newPromise());} else {....}}
这里大家自己一路点进去,我就不浪费篇幅了。最后,我们会来到 AbstractChannel 的 connect 方法:
@Overridepublic ChannelFuture connect(SocketAddress remoteAddress, ChannelPromise promise) {return pipeline.connect(remoteAddress, promise);}
我们看到,connect 操作是交给 pipeline 来执行的。进入 pipeline 中,我们会发现,connect 这种 Outbound 类型的操作,是从 pipeline 的 tail 开始的:
前面我们介绍的
register操作是 Inbound 的,是从head开始的
@Overridepublic final ChannelFuture connect(SocketAddress remoteAddress, ChannelPromise promise) {return tail.connect(remoteAddress, promise);}
接下来就是 pipeline 的操作了,从 tail 开始,执行 pipeline 上的 Outbound 类型的 handlers 的 connect(...) 方法,那么真正的底层的 connect 的操作发生在哪里呢?还记得我们的 pipeline 的图吗?
从 tail 开始往前找 out 类型的 handlers,每经过一个 handler,都执行里面的 connect() 方法,最后会到 head 中,因为 head 也是 Outbound 类型的,我们需要的 connect 操作就在 head 中,它会负责调用 unsafe 中提供的 connect 方法:
// HeadContextpublic void connect(ChannelHandlerContext ctx,SocketAddress remoteAddress, SocketAddress localAddress,ChannelPromise promise) throws Exception {unsafe.connect(remoteAddress, localAddress, promise);}
接下来,我们来看一看 connect 在 unsafe 类中所谓的底层操作:
// AbstractNioChannel.AbstractNioUnsafe@Overridepublic final void connect(final SocketAddress remoteAddress, final SocketAddress localAddress, final ChannelPromise promise) {......boolean wasActive = isActive();// 大家自己点进去看 doConnect 方法// 这一步会做 JDK 底层的 SocketChannel connect,然后设置 interestOps 为 SelectionKey.OP_CONNECT// 返回值代表是否已经连接成功if (doConnect(remoteAddress, localAddress)) {// 处理连接成功的情况fulfillConnectPromise(promise, wasActive);} else {connectPromise = promise;requestedRemoteAddress = remoteAddress;// 下面这块代码,在处理连接超时的情况,代码很简单// 这里用到了 NioEventLoop 的定时任务的功能,这个我们之前一直都没有介绍过,因为我觉得也不太重要int connectTimeoutMillis = config().getConnectTimeoutMillis();if (connectTimeoutMillis > 0) {connectTimeoutFuture = eventLoop().schedule(new Runnable() {@Overridepublic void run() {ChannelPromise connectPromise = AbstractNioChannel.this.connectPromise;ConnectTimeoutException cause =new ConnectTimeoutException("connection timed out: " + remoteAddress);if (connectPromise != null && connectPromise.tryFailure(cause)) {close(voidPromise());}}}, connectTimeoutMillis, TimeUnit.MILLISECONDS);}promise.addListener(new ChannelFutureListener() {@Overridepublic void operationComplete(ChannelFuture future) throws Exception {if (future.isCancelled()) {if (connectTimeoutFuture != null) {connectTimeoutFuture.cancel(false);}connectPromise = null;close(voidPromise());}}});}} catch (Throwable t) {promise.tryFailure(annotateConnectException(t, remoteAddress));closeIfClosed();}}
如果上面的 doConnect 方法返回 false,那么后续是怎么处理的呢?
在上一节介绍的 register 操作中,channel 已经 register 到了 selector 上,只不过将 interestOps 设置为了 0,也就是什么都不监听。
而在上面的 doConnect 方法中,我们看到它在调用底层的 connect 方法后,会设置 interestOps 为 SelectionKey.OP_CONNECT。
剩下的就是 NioEventLoop 的事情了,还记得 NioEventLoop 的 run() 方法吗?也就是说这里的 connect 成功以后,这个 TCP 连接就建立起来了,后续的操作会在 NioEventLoop.run() 方法中被 processSelectedKeys() 方法处理掉。
bind 过程分析
说完 connect 过程,我们再来简单看下 bind 过程:
private ChannelFuture doBind(final SocketAddress localAddress) {// **前面说的 initAndRegister**final ChannelFuture regFuture = initAndRegister();final Channel channel = regFuture.channel();if (regFuture.cause() != null) {return regFuture;}if (regFuture.isDone()) {// register 动作已经完成,那么执行 bind 操作ChannelPromise promise = channel.newPromise();doBind0(regFuture, channel, localAddress, promise);return promise;} else {......}}
然后一直往里看,会看到,bind 操作也是要由 pipeline 来完成的:
io.netty.channel.AbstractChannel#bind
@Overridepublic ChannelFuture bind(SocketAddress localAddress, ChannelPromise promise) {return pipeline.bind(localAddress, promise);}
bind 操作和 connect 一样,都是 Outbound 类型的,所以都是 tail 开始:
@Overridepublic final ChannelFuture bind(SocketAddress localAddress, ChannelPromise promise) {return tail.bind(localAddress, promise);}
最后的 bind 操作又到了 head 中,由 head 来调用 unsafe 提供的 bind 方法:
@Overridepublic void bind(ChannelHandlerContext ctx, SocketAddress localAddress, ChannelPromise promise)throws Exception {unsafe.bind(localAddress, promise);}
感兴趣的读者自己去看一下 unsafe 中的 bind 方法,非常简单,bind 操作也不是什么异步方法,我们就介绍到这里了。

若有收获,就点个赞吧
0 人点赞
