<!DOCTYPE html><html lang="en"><head><meta charset="UTF-8"><title>Title</title></head><body><button id="btn">click</button><script src="./index.js"></script></body></html>
const oBtn = document.getElementById('btn');oBtn.addEventListener('click', ()=>{console.log('1');Promise.resolve('m1').then((str)=>{console.log(str);})},false);oBtn.addEventListener('click',()=>{console.log('2');Promise.resolve('m2').then((str)=>{console.log(str);})},false);oBtn.click();
分析
宏任务中,事件处理函数就是回调,也是把addEventListener cb添加到宏任务队列
宏任务中,事件处理函数->回调
事件绑定addEventListener里面的回调函数cb不会直接运行,等事件触发才能运行,与setTimeout cb类似,都是得一定条件之后才能运行oBtn.click();相当于点击事件触发了,也可以理解成点击事件触发时执行的是oBtn.click();
上面理解是错的,因为点击与执行,结果不一样
const oBtn = document.getElementById('btn');//addEvent1oBtn.addEventListener('click', () => {console.log('1');//m1promisePromise.resolve('m1').then((str) => {console.log(str);})}, false);//addEvent2oBtn.addEventListener('click', () => {console.log('2');//m2promisePromise.resolve('m2').then((str) => {console.log(str);})}, false);//函数执行oBtn.click();
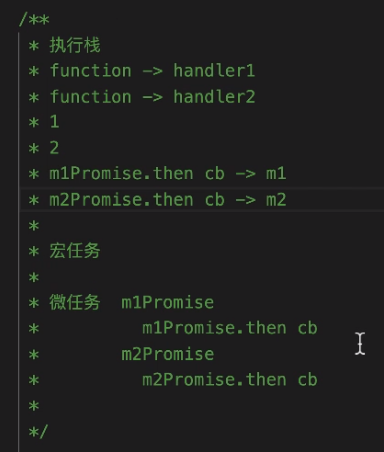
执行栈
script
1
2
m1promise.then cb 3th->m1
m2promise.then cb 4th->m2
宏任务
addEvent1
addEvent1 cb 1th
addEvent2
addEvent2 cb 2th
微任务
m1promise
m1promise.then cb 3th
m2promise
m2promise.then cb 4th
time 7m06s
相当于以下代码,oBtn.click();调用相当于执行了两个函数
const handler1 = function(){console.log(1);Promise.resolve('m1').then((str)=>{console.log(str);})}const handler2 = function(){console.log('2');Promise.resolve('m2').then((str)=>{console.log(str);})}handler1();handler2();
点击按钮
time 9m42s
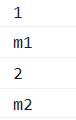
点击按钮与oBtn.click()运行不一样,点击按钮是addEvent1执行,m1promise cb进入微任务队列,之后清空微任务,再增加宏任务addEvent2 cb在宏任务队列中
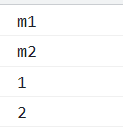
也可以理解成,先走宏任务队列,增加宏任务addEvent1 cb,addEvent2 cb,宏任务队列有了两个宏任务,之后把addEvent1 cb推入js执行栈执行,把m1promise cb加入微任务栈,清空微任务栈,再执行宏任务,把剩下的addEvent2 cb推入js执行栈
const oBtn = document.getElementById('btn');//addEvent1oBtn.addEventListener('click', () => {console.log('1');//m1promisePromise.resolve('m1').then((str) => {console.log(str);})}, false);//addEvent2oBtn.addEventListener('click', () => {console.log('2');//m2promisePromise.resolve('m2').then((str) => {console.log(str);})}, false);//函数执行//oBtn.click();
执行栈
script
addEvent1 cb 1th->1
m1promise.then cb 2th->m1
addEvent2 cb 3th->2
m2promise.then cb 4th->m2
宏任务
addEvent1
addEvent1 cb 1th
addEvent2
addEvent2 cb 3th
微任务
m1promise
m1promise.then cb 2th
m2promise
m2promise.then cb 4th
变形1
time 15m11s
const oBtn = document.getElementById('btn');//addEventoBtn.addEventListener('click', () => {setTimeout(() => {console.log('1');}, 0);//promisePromise.resolve('m1').then((str) => {console.log(str);})}, false);//addEventoBtn.addEventListener('click', () => {setTimeout(() => {console.log('2');}, 0)//promisePromise.resolve('m2').then((str) => {console.log(str);})}, false);//函数执行// oBtn.click();

time 20m38s
函数执行与上面结果一样
const oBtn = document.getElementById('btn');//addEventoBtn.addEventListener('click', () => {//setTimeoutsetTimeout(() => {console.log('1');}, 0);//promisePromise.resolve('m1').then((str) => {console.log(str);})}, false);//addEventoBtn.addEventListener('click', () => {//setTimeoutsetTimeout(() => {console.log('2');}, 0)//promisePromise.resolve('m2').then((str) => {console.log(str);})}, false);//函数执行oBtn.click();
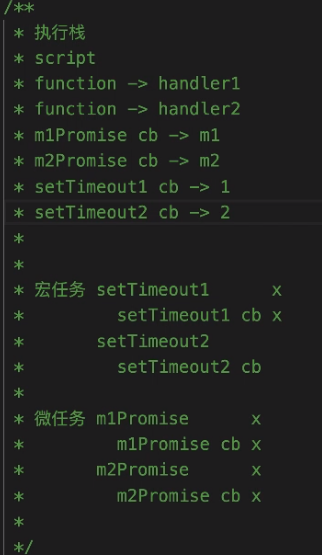
分析
通过意思一样、类似,更容易看懂,更容易分析的代码分析
const handler1 = function(){//setTimeoutsetTimeout(() => {console.log('1');}, 0);//promisePromise.resolve('m1').then((str) => {console.log(str);})}const handler2 = function(){//setTimeoutsetTimeout(() => {console.log('2');}, 0)//promisePromise.resolve('m2').then((str) => {console.log(str);})}handler1();handler2();

若有收获,就点个赞吧
0 人点赞
