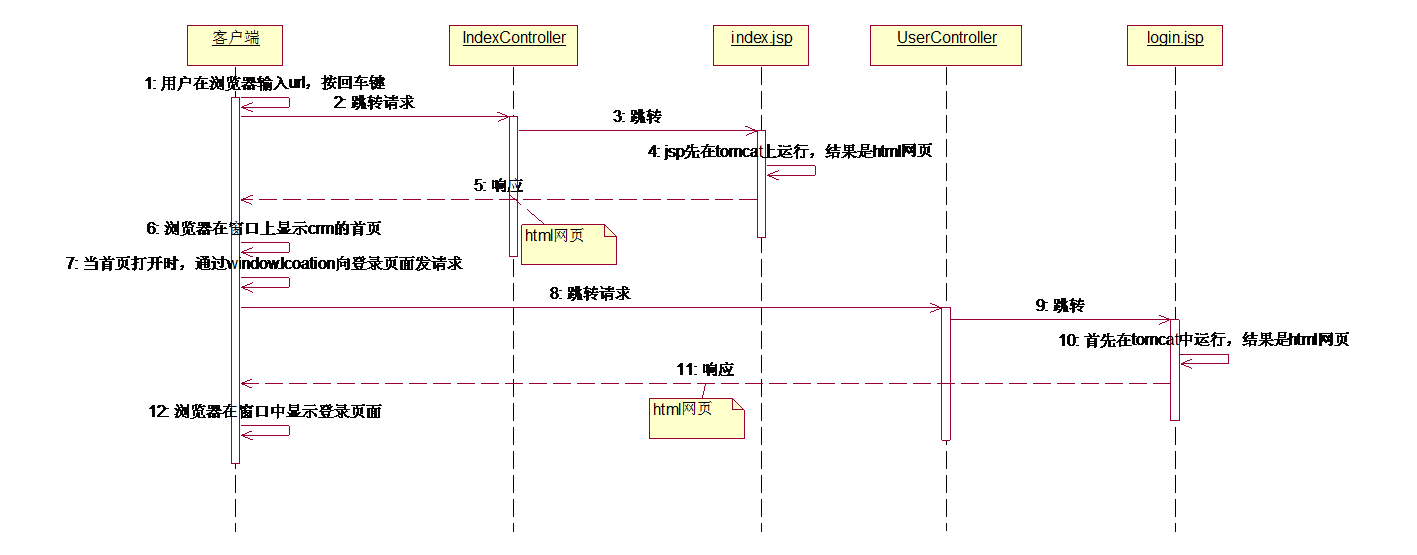
完成1-6步骤
添加包,IndexController
与Controller注解配合,添加包扫描,由spring帮我们创建对象
<!--添加包扫描--><context:component-scan base-package="com.bjpowernode.crm.web.controller"></context:component-scan>
添加IndexController类中的方法
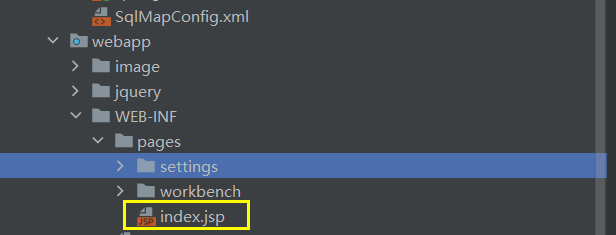
@Controllerpublic class IndexController {//为什么用public? 因为springmvc核心控制器调用// 他与这个类不在同一个包(也没有继承关系) 所以是public//@RequestMapping("http://127.0.0.1:8080/crm/") 前面的这些必须省去,从项目的/开始@RequestMapping("/")public String index(){// return "/WEB-INF/pages/index.jsp";return "index";}}
注意把HTML改为JSP时候,一定要设置成UTF-8的编码
<%@page contentType="text/html;charset=UTF-8" %>
<%@ page contentType="text/html;charset=UTF-8" %><html><head><meta charset="UTF-8"></head><body><script type="text/javascript">document.location.href = "settings/qx/user/login.html";</script></body></html>

完成7-12步
<script type="text/javascript">document.location.href = "settings/qx/user/toLogin.do";</script>//注意这个是不加/的
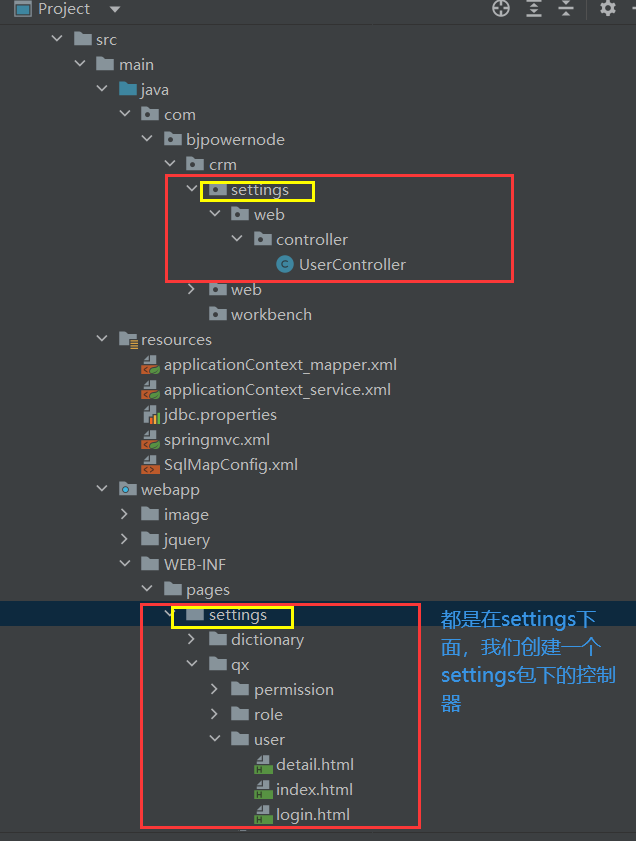
@Controllerpublic class UserController {//url要和controller方法处理完请求之后,响应信息返回的页面的资源目录保持一致@RequestMapping("/settings/qx/user/toLogin.do")public String toLogin(){//请求转发到登录页面return "settings/qx/user/login";}}
<!--添加包扫描--><context:component-scan base-package="com.bjpowernode.crm.settings.web.controller"></context:component-scan>
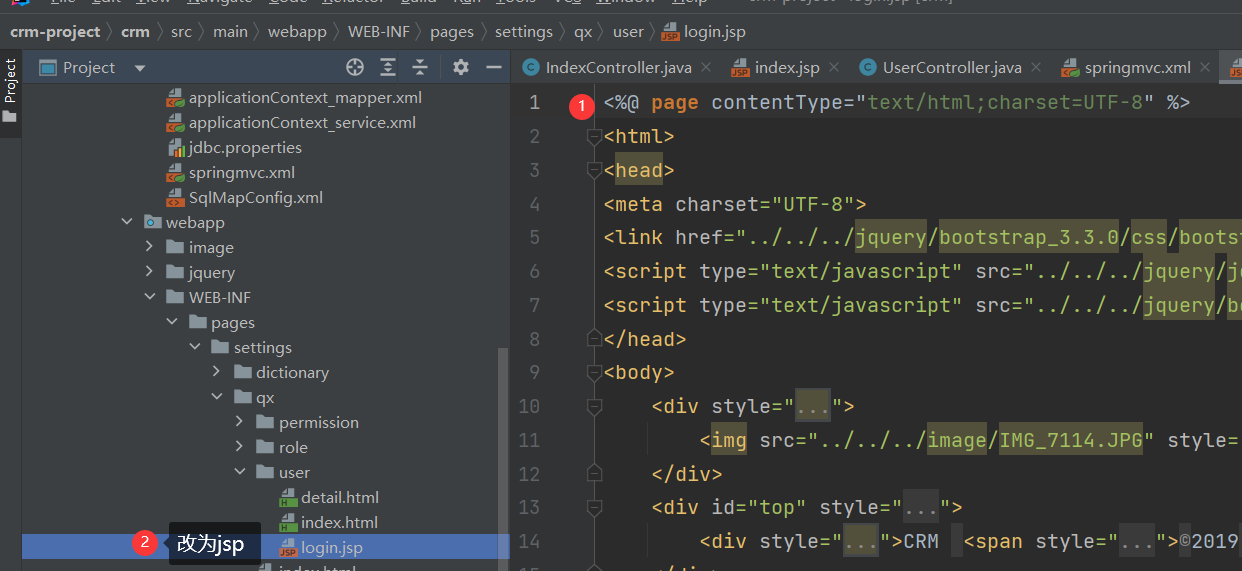
<%@ page contentType="text/html;charset=UTF-8" %><%String basePath=request.getScheme()+"://"+request.getServerName()+":"+request.getServerPort()+request.getContextPath()+"/";%><html><head>// <base href="http://127.0.0.1:8080/crm/"><base href="<%=basePath%>"><meta charset="UTF-8"><link href="jquery/bootstrap_3.3.0/css/bootstrap.min.css" type="text/css" rel="stylesheet" /><script type="text/javascript" src="jquery/jquery-1.11.1-min.js"></script><script type="text/javascript" src="jquery/bootstrap_3.3.0/js/bootstrap.min.js"></script></head><body><div style="position: absolute; top: 0px; left: 0px; width: 60%;"><img src="image/IMG_7114.JPG" style="width: 100%; height: 90%; position: relative; top: 50px;"></div><div id="top" style="height: 50px; background-color: #3C3C3C; width: 100%;"><div style="position: absolute; top: 5px; left: 0px; font-size: 30px; font-weight: 400; color: white; font-family: 'times new roman'">CRM <span style="font-size: 12px;">©2019 动力节点</span></div></div><div style="position: absolute; top: 120px; right: 100px;width:450px;height:400px;border:1px solid #D5D5D5"><div style="position: absolute; top: 0px; right: 60px;"><div class="page-header"><h1>登录</h1></div><form action="workbench/index.html" class="form-horizontal" role="form"><div class="form-group form-group-lg"><div style="width: 350px;"><input class="form-control" type="text" placeholder="用户名"></div><div style="width: 350px; position: relative;top: 20px;"><input class="form-control" type="password" placeholder="密码"></div><div class="checkbox" style="position: relative;top: 30px; left: 10px;"><label><input type="checkbox"> 十天内免登录</label> <span id="msg"></span></div><button type="submit" class="btn btn-primary btn-lg btn-block" style="width: 350px; position: relative;top: 45px;">登录</button></div></form></div></div></body></html>
注意
如果图片加载不出来,在springmvc中添加这个注解
<mvc:default-servlet-handler /><!--静态资源释放-->

若有收获,就点个赞吧
0 人点赞
