一、实现线程三种方式
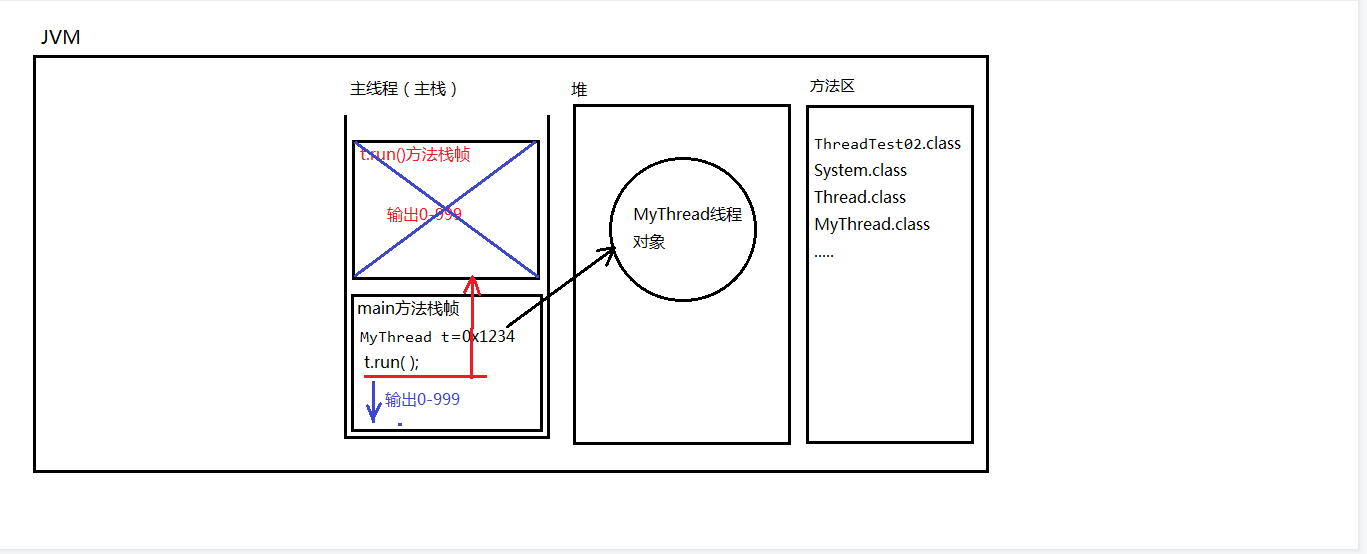
一、未开启线程并发
public class MyThread {public static void main(String[] args) {BranchThread t=new BranchThread();t.run();for(int i=0;i<=100;i++){System.out.println("主线程"+i);}}}class BranchThread extends Thread{public void run(){for(int i=0;i<=1000;i++){System.out.println("分支线程------------->"+i);}}}
1: 自上而下的顺序2:先输出分支线程1-1000,输出完之后再输出主线程1-100
一、第一种方式
实现线程的第一种方式:
编写一个类,直接继承java.lang.Thread,重写run方法。
public class MyThread {public static void main(String[] args) {BranchThread t=new BranchThread();//start()方法的作用是:启动一个分支线程,在JVM中开辟一个新的栈空间,这段代码任务完成之后,瞬间就结束了。t.start();for(int i=0;i<=1000;i++){System.out.println("主线程"+i);}}}class BranchThread extends Thread{public void run(){for(int i=0;i<=1000;i++){System.out.println("分支线程------------->"+i);}}}
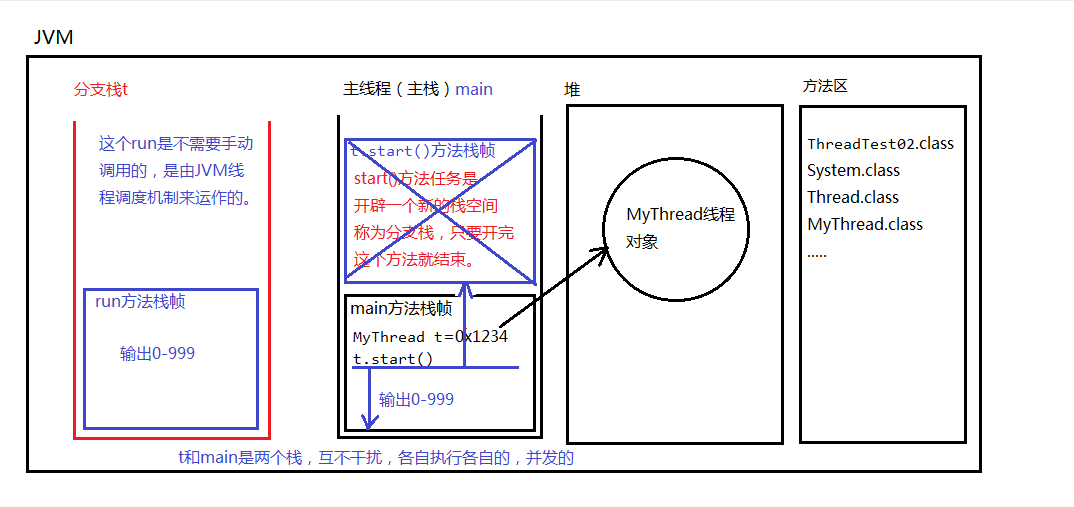
"C:\Program Files\Java\jdk-15.0.1\bin\java.exe" "-javaagent:C:\Program Files\JetBrains\IntelliJ IDEA 2020.3.1\lib\idea_rt.jar=64875:C:\Program Files\JetBrains\IntelliJ IDEA 2020.3.1\bin" -Dfile.encoding=UTF-8 -classpath C:\Users\cao\IdeaProjects\untitled3\out\production\untitled Thread.ThreadTest02分支线程--------->0主线程0分支线程--------->1主线程1分支线程--------->2分支线程--------->3主线程2分支线程--------->4主线程3分支线程--------->5主线程4分支线程--------->6主线程5分支线程--------->7主线程6分支线程--------->8主线程7分支线程--------->9主线程8分支线程--------->10主线程9分支线程--------->11主线程10分支线程--------->12主线程11主线程12分支线程--------->13主线程13分支线程--------->14主线程14分支线程--------->15
二、第二种方式
实现线程的第二种方式,编写一个类实现java.lang.Runnable接口。
public class MyThread {public static void main(String[] args) {/*** 创建一个可运行的对象* BranchThread r= new BranchThread();* 将可运行的对象封装成一个线程对象* Thread t=new Thread(r)*/Thread t = new Thread(new BranchThread());//合并代码t.start();for(int i=0;i<=100;i++){System.out.println("主线程"+i);}}}class BranchThread implements Runnable{public void run(){for(int i=0;i<=100;i++){System.out.println("分支线程------------->"+i);}}}
采用匿名内部类的方式【第二种变形】
public class MyThread {public static void main(String[] args) {//创建线程对象,采用匿名内部类方式。Thread t = new Thread(new Runnable() {@Overridepublic void run() {for (int i = 0; i <= 100; i++) {System.out.println("t线程----->" + i);}}});t.start();for (int i = 0; i <= 100; i++) {System.out.println("main线程----->" + i);}}}
三、第三种方式
实现线程的第三种方式:
实现Callable接口
这种方式的优点:可以获取到线程的执行结果。
这种方式的缺点:效率比较低,在获取t线程执行结果的时候,当前线程受阻塞,效率较低。
import java.util.concurrent.Callable;import java.util.concurrent.FutureTask; // JUC包下的,属于java的并发包,老JDK中没有这个包。新特性。public class MyThread {public static void main(String[] args) throws Exception {// 第一步:创建一个“未来任务类”对象。// 参数非常重要,需要给一个Callable接口实现类对象。FutureTask task = new FutureTask(new Callable() {@Overridepublic Object call() throws Exception { // call()方法就相当于run方法。只不过这个有返回值// 线程执行一个任务,执行之后可能会有一个执行结果// 模拟执行System.out.println("call method begin");Thread.sleep(1000 * 10);System.out.println("call method end!");int a = 100;int b = 200;return a + b; //自动装箱(300结果变成Integer)}});// 创建线程对象Thread t = new Thread(task);// 启动线程t.start();// 这里是main方法,这是在主线程中。// 在主线程中,怎么获取t线程的返回结果?// get()方法的执行会导致“当前线程阻塞”Object obj = task.get();System.out.println("线程执行结果:" + obj);// main方法这里的程序要想执行必须等待get()方法的结束// 而get()方法可能需要很久。因为get()方法是为了拿另一个线程的执行结果// 另一个线程执行是需要时间的。System.out.println("hello world!");}}
call method begin/*等待sleep */call method end!/*等待另一个线程结束拿到300*/线程执行结果:300hello world!
二、线程的生命周期

三、线程的三个基本方法
public class MyThread {public static void main(String[] args) {MyThread2 t = new MyThread2();//获取线程名字System.out.println(t.getName()); //默认值为 Thread-0//修改线程名字t.setName("曹1");System.out.println(t.getName());//曹1//获取当前线程对象?Thread y =Thread.currentThread();System.out.println(y.getName());//maint.start();}}class MyThread2 extends Thread{public void run(){//获取当前线程对象,t.start();谁启动就是谁Thread y1= Thread.currentThread();System.out.println(y1.getName());//曹1}}
四、Thread.sleep()
关于Thread.sleep()方法的一个面试题;
1、静态方法:Thread.sleep(1000);
2、参数是毫秒
3、作用:让当前线程进入休眠,进入“阻塞状态”,放弃占有CPU时间片,让给其它线程使用。
这行代码出现在A线程中,A线程就会进入休眠。
这行代码出现在B线程中,B线程就会进入休眠。
4、Thread.sleep()方法,可以做到这种效果:
间隔特定的时间,去执行一段特定的代码,每隔多久执行一次
public class MyThread {public static void main(String[] args) {//创建一个线程对象,一个多态Thread t =new MyThread3();t.setName("t");t.start();try {//问题:这行代码会让线程t进入休眠状态吗?t.sleep(1000*3);//在执行的时候还是会转成:Thread.sleep(1000*5) 这是静态方法//这行代码的作用是:让当前线程进入休眠,也就是说main进入休眠.//这样代码出现在main方法中,main线程睡眠。} catch (InterruptedException e) {e.printStackTrace();}//3秒之后执行到这里System.out.println("hello word");}}class MyThread3 extends Thread{public void run(){for(int i =0;i<10000;i++){System.out.println(Thread.currentThread().getName()+"------>"+i);}}}
4.1合理终止一个线程
public class MyThread {public static void main(String[] args) {MyThread4 r =new MyThread4();Thread t =new Thread(r);t.setName("t");t.start();//模拟5秒try {Thread.sleep(5000);} catch (InterruptedException e) {e.printStackTrace();}//终止线程//你想要什么时候终止t的执行,那么你可以把标记修改为false,就结束了。r.run=false;}}class MyThread4 implements Runnable{//打一个布尔标记boolean run=true;public void run(){for(int i =0;i<10;i++){if(run){System.out.println(Thread.currentThread().getName()+"--->"+i);try {Thread.sleep(1000);} catch (InterruptedException e) {e.printStackTrace();}}else {//return就结束了,你在结束之前还有什么没保存的。在这里可以保存//终止当前线程return;}}}}
t--->0t--->1t--->2t--->3t--->4
五 、线程安全问题
1: 什么时候数据在多线程并发的环境下会存在安全问题呢? 三个条件: 条件1:多线程并发。 条件2:有共享数据。 条件3:共享数据有修改的行为。
满足以上3个条件之后,就会存在线程安全问题。
synchronized有三种写法:第一种:同步代码块灵活synchronized(线程共享对象){同步代码块;}第二种:在实例方法上使用synchronized表示共享对象一定是this并且同步代码块是整个方法体。第三种:在静态方法上使用synchronized表示找类锁。类锁永远只有1把。就算创建了100个对象,那类锁也只有一把。对象锁:1个对象1把锁,100个对象100把锁。类锁:100个对象,也可能只是1把类锁。
synchronized () 括号中中写什么?
那要看你想让哪些线程同步。
假设t1、t2、t3、t4、t5,有5个线程,
你只希望t1 t2 t3排队,t4 t5不需要排队。怎么办?
你一定要在()中写一个t1 t2 t3共享的对象。而这个
对象对于t4 t5来说不是共享的。
下面模拟两个人取同一个账户
package ThreadSafe;public class Account {private String actno;private double balance;public Account() {}public Account(String actno, double balance) {this.actno = actno;this.balance = balance;}public String getActno() {return actno;}public void setActno(String actno) {this.actno = actno;}public double getBalance() {return balance;}public void setBalance(double balance) {this.balance = balance;}//取款的方法 第一种方式public void withdraw(double money) {synchronized (this) {//取款之前户余额double before = this.getBalance();//取款之后的余额double after = before - money;try {Thread.sleep(1000);} catch (InterruptedException e) {e.printStackTrace();}//更新余额this.setBalance(after);}}}/* 第二种方式public synchronized void withdraw(double money){double before = this.getBalance(); // 10000double after = before - money;try {Thread.sleep(1000);} catch (InterruptedException e) {e.printStackTrace();}this.setBalance(after);}} */
package ThreadSafe;public class AccountThread extends Thread {// 两个线程必须共享同一个账户对象。private Account act;// 通过构造方法传递过来账户对象public AccountThread(Account act) {this.act = act;}public void run(){// run方法的执行表示取款操作。// 假设取款5000double money = 5000;// 取款// 多线程并发执行这个方法。act.withdraw(money);//第三种方式/* synchronized (act) { // 这种方式也可以,只不过扩大了同步的范围,效率更低了。act.withdraw(money);}*/System.out.println(Thread.currentThread().getName() + "对"+act.getActno()+"取款"+money+"成功,余额" + act.getBalance());}}
package ThreadSafe;public class Test {public static void main(String[] args) {// 创建账户对象(只创建1个)Account act = new Account("act-001", 10000);// 创建两个线程Thread t1 = new AccountThread(act);Thread t2 = new AccountThread(act);// 设置namet1.setName("t1");t2.setName("t2");// 启动线程取款t1.start();t2.start();}}
六、死锁
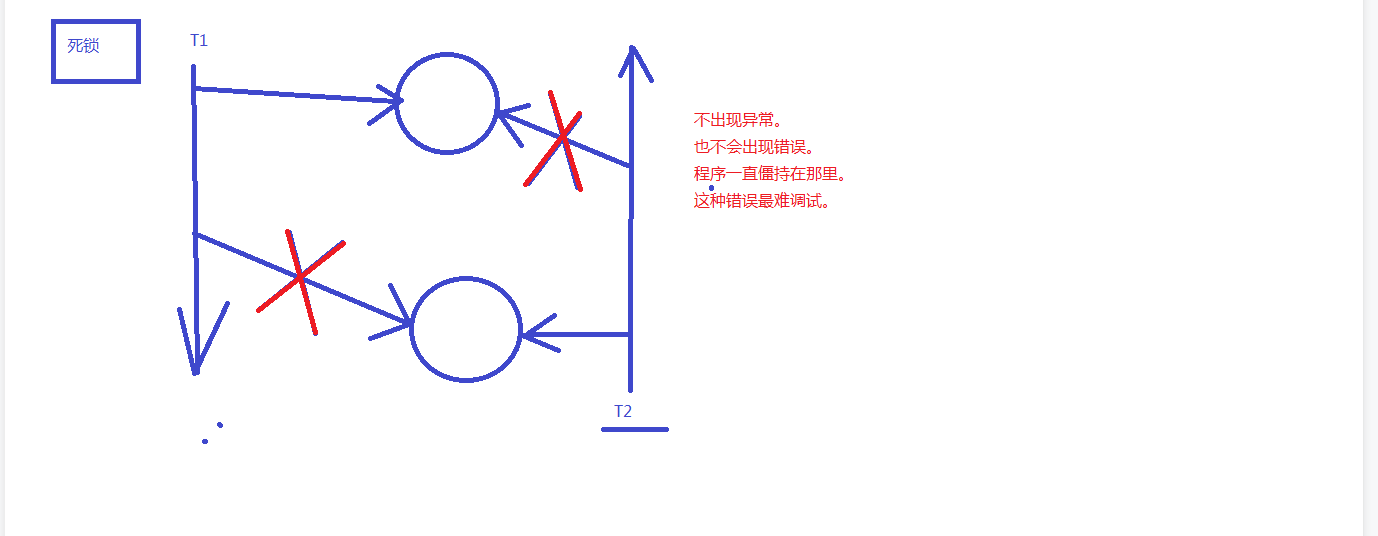
死锁package com.bjpowernode.java.deadlock;/*死锁代码要会写。一般面试官要求你会写。只有会写的,才会在以后的开发中注意这个事儿。因为死锁很难调试。*/public class DeadLock {public static void main(String[] args) {Object o1 = new Object();Object o2 = new Object();// t1和t2两个线程共享o1,o2Thread t1 = new MyThread1(o1,o2);Thread t2 = new MyThread2(o1,o2);t1.start();t2.start();}}class MyThread1 extends Thread{Object o1;Object o2;public MyThread1(Object o1,Object o2){this.o1 = o1;this.o2 = o2;}public void run(){synchronized (o1){try {Thread.sleep(1000);} catch (InterruptedException e) {e.printStackTrace();}synchronized (o2){}}}}class MyThread2 extends Thread {Object o1;Object o2;public MyThread2(Object o1,Object o2){this.o1 = o1;this.o2 = o2;}public void run(){synchronized (o2){try {Thread.sleep(1000);} catch (InterruptedException e) {e.printStackTrace();}synchronized (o1){}}}}
七、守护线程
public class ThreadTest14 {public static void main(String[] args) {Thread t = new BakDataThread();t.setName("备份数据线程");//启动线程之前,将线程设置为守护线程t.setDaemon(true);//守护线程t.start();//主线程,主线是用户线程for(int i=0;i<10;i++){System.out.println(Thread.currentThread().getName()+"--->"+i);try {Thread.sleep(1000);} catch (InterruptedException e) {e.printStackTrace();}}}}class BakDataThread extends Thread{public void run(){int i=0;//即使是死循环,但由于该线程是守护线程,当用户线程结束,守护线程自动停止。while (true){System.out.println(Thread.currentThread().getName()+"--->"+(++i));try {Thread.sleep(1000);} catch (InterruptedException e) {e.printStackTrace();}}}}
7.1实现定时器
package com.bjpowernode.java.thread;import java.text.SimpleDateFormat;import java.util.Date;import java.util.Timer;import java.util.TimerTask;/*使用定时器指定定时任务。*/public class TimerTest {public static void main(String[] args) throws Exception {// 创建定时器对象Timer timer = new Timer();//Timer timer = new Timer(true); //守护线程的方式// 指定定时任务//timer.schedule(定时任务, 第一次执行时间, 间隔多久执行一次);SimpleDateFormat sdf = new SimpleDateFormat("yyyy-MM-dd HH:mm:ss");Date firstTime = sdf.parse("2020-03-14 09:34:30");//timer.schedule(new LogTimerTask() , firstTime, 1000 * 10);// 每年执行一次。//timer.schedule(new LogTimerTask() , firstTime, 1000 * 60 * 60 * 24 * 365);//匿名内部类方式timer.schedule(new TimerTask(){@Overridepublic void run() {// code....}} , firstTime, 1000 * 10);}}// 编写一个定时任务类// 假设这是一个记录日志的定时任务class LogTimerTask extends TimerTask {@Overridepublic void run() {// 编写你需要执行的任务就行了。SimpleDateFormat sdf = new SimpleDateFormat("yyyy-MM-dd HH:mm:ss");String strTime = sdf.format(new Date());System.out.println(strTime + ":成功完成了一次数据备份!");}
八、wait和notify方法
注意:wait和notify方法不是线程对象的方法,是java中任何一个java对象都有的方法,因为这两个方式是Object类中自带的。
Object o = new Object();o.wait();
2.wait()方法的作用:o.wait()让正在o对象上活动的线程t进入等待状态,并且释放掉t线程之前占有的o对象的锁。
3、notify方法作用:o.notify()让正在o对象上等待的线程唤醒,只是通知,不会释放o对象上之前占有的锁。
4.notifyAll()方法这个方法是唤醒o对象上处于等待的所有线程。
下面模拟生产者与消费者
public class Box {//定义一个成员变量,表示第x瓶奶private int milk;//定义一个成员变量,表示奶箱的状态private boolean state=false;//提供储存和获取牛奶的操作public synchronized void put( int milk){//如果有牛奶,等待消费if(state){try {//当前线程进入等待状态,并且释放Producer之前占有的Box锁wait();} catch (InterruptedException e) {throw new RuntimeException(e);}}//如果没有牛奶,就生产牛奶this.milk=milk;System.out.println("送奶工将第"+this.milk+"瓶奶放入奶箱");//生产完成之后,修改奶箱状态state=true;//唤醒其他等待的线程notifyAll();}public synchronized void get(){//如果没有牛奶,等待生产if(!state){try {//当前线程进入等待状态,并且释放Customer之前占有的Box锁。wait();} catch (InterruptedException e) {throw new RuntimeException(e);}}//如果有牛奶,就消费牛奶System.out.println("用户拿到第"+this.milk+"瓶奶");//消费完毕之后,修改奶箱状态state=false;//唤醒其他等待的线程notifyAll();}}
public class Producer implements Runnable{private Box b;public Producer(Box b){this.b=b;}@Overridepublic void run() {for(int i=1;i<=5;i++){b.put(i);}}}
public class Customer implements Runnable {private Box b;public Customer(Box b) {this.b=b;}@Overridepublic void run() {while (true){b.get();}}}
public class BoxDemo {public static void main(String[] args) {//创建奶箱对象,这是共享数据区域Box b =new Box();//创建生产者对象,把奶箱对象作为构造方法参数传递,因为在这个类中要调用储存牛奶的操作Producer p =new Producer(b);//创建消费者对象,把奶箱对象作为构造方法参数传递,因为在这个类中要调用获取牛奶的操作Customer c =new Customer(b);//创建两个线程对象,分别把生产者对象和消费者对象作为构造方法参数传递Thread t1= new Thread(p);Thread t2= new Thread(c);//启动线程t1.start();t2.start();}}

若有收获,就点个赞吧
0 人点赞
