数学类
1.random
public class Test5 {public static void main(String[] args) {Random random = new Random();int i1=random.nextInt(100);System.out.println(i1);byte[] bytes = new byte[5];random.nextBytes(bytes);System.out.println(Arrays.toString(bytes));}}
61 [43, 66, 2, 113, 114]
2.BigInteger类
构造方法
public BigInteger(int num, Random rnd) //获取随机大整数,范围:[0 ~ 2的num次方-1]public BigInteger(String val) //获取指定的大整数public BigInteger(String val, int radix) //获取指定进制的大整数下面这个不是构造,而是一个静态方法获取BigInteger对象public static BigInteger valueOf(long val) //静态方法获取BigInteger的对象,内部有优化
构造方法小结:
- 如果BigInteger表示的数字没有超出long的范围,可以用静态方法获取。
- 如果BigInteger表示的超出long的范围,可以用构造方法获取。
- 对象一旦创建,BigInteger内部记录的值不能发生改变。
- 只要进行计算都会产生一个新的BigInteger对象
常见成员方法
BigDecimal类中使用最多的还是提供的进行四则运算的方法,如下:
public BigInteger add(BigInteger val) //加法public BigInteger subtract(BigInteger val) //减法public BigInteger multiply(BigInteger val) //乘法public BigInteger divide(BigInteger val) //除法public BigInteger[] divideAndRemainder(BigInteger val) //除法,获取商和余数public boolean equals(Object x) //比较是否相同public BigInteger pow(int exponent) //次幂、次方public BigInteger max/min(BigInteger val) //返回较大值/较小值public int intValue(BigInteger val) //转为int类型整数,超出范围数据有误
package com.itheima.a06bigintegerdemo;import java.math.BigInteger;public class BigIntegerDemo1 {public static void main(String[] args) {/*public BigInteger(int num, Random rnd) 获取随机大整数,范围:[0~ 2的num次方-11public BigInteger(String val) 获取指定的大整数public BigInteger(String val, int radix) 获取指定进制的大整数public static BigInteger valueOf(long val) 静态方法获取BigInteger的对象,内部有优化细节:对象一旦创建里面的数据不能发生改变。*///1.获取一个随机的大整数/* Random r=new Random();for (int i = 1; i < 100; i++) {BigInteger bd1 = new BigInteger(4,r);System.out.println(bd1);//[@ ~ 15]}}*///2.获取一个指定的大整数,可以超出long的取值范围//细节:字符串中必须是整数,否则会报错/* BigInteger bd2 = new BigInteger("1.1");System.out.println(bd2);*//*BigInteger bd3 = new BigInteger("abc");System.out.println(bd3);*///3.获取指定进制的大整数//细节://1.字符串中的数字必须是整数//2.字符串中的数字必须要跟进制吻合。//比如二进制中,那么只能写0和1,写其他的就报错。BigInteger bd4 = new BigInteger("123", 2);System.out.println(bd4);//4.静态方法获取BigInteger的对象,内部有优化//细节://1.能表示范围比较小,只能在long的取值范围之内,如果超出long的范围就不行了。//2.在内部对常用的数字: -16 ~ 16 进行了优化。// 提前把-16~16 先创建好BigInteger的对象,如果多次获取不会重新创建新的。BigInteger bd5 = BigInteger.valueOf(16);BigInteger bd6 = BigInteger.valueOf(16);System.out.println(bd5 == bd6);//trueBigInteger bd7 = BigInteger.valueOf(17);BigInteger bd8 = BigInteger.valueOf(17);System.out.println(bd7 == bd8);//false//5.对象一旦创建内部的数据不能发生改变BigInteger bd9 =BigInteger.valueOf(1);BigInteger bd10 =BigInteger.valueOf(2);//此时,不会修改参与计算的BigInteger对象中的借,而是产生了一个新的BigInteger对象记录BigInteger result=bd9.add(bd10);System.out.println(result);//3}}
package com.itheima.a06bigintegerdemo;import java.math.BigInteger;public class BigIntegerDemo2 {public static void main(String[] args) {/*public BigInteger add(BigInteger val) 加法public BigInteger subtract(BigInteger val) 减法public BigInteger multiply(BigInteger val) 乘法public BigInteger divide(BigInteger val) 除法,获取商public BigInteger[] divideAndRemainder(BigInteger val) 除法,获取商和余数public boolean equals(Object x) 比较是否相同public BigInteger pow(int exponent) 次幂public BigInteger max/min(BigInteger val) 返回较大值/较小值public int intValue(BigInteger val) 转为int类型整数,超出范围数据有误*///1.创建两个BigInteger对象BigInteger bd1 = BigInteger.valueOf(10);BigInteger bd2 = BigInteger.valueOf(5);//2.加法BigInteger bd3 = bd1.add(bd2);System.out.println(bd3);//3.除法,获取商和余数BigInteger[] arr = bd1.divideAndRemainder(bd2);System.out.println(arr[0]);System.out.println(arr[1]);//4.比较是否相同boolean result = bd1.equals(bd2);System.out.println(result);//5.次幂BigInteger bd4 = bd1.pow(2);System.out.println(bd4);//6.maxBigInteger bd5 = bd1.max(bd2);//7.转为int类型整数,超出范围数据有误/* BigInteger bd6 = BigInteger.valueOf(2147483647L);int i = bd6.intValue();System.out.println(i);*/BigInteger bd6 = BigInteger.valueOf(200);double v = bd6.doubleValue();System.out.println(v);//200.0}}
底层存储方式:
对于计算机而言,其实是没有数据类型的概念的,都是0101010101,数据类型是编程语言自己规定的,所以在实际存储的时候,先把具体的数字变成二进制,每32个bit为一组,存储在数组中。
数组中最多能存储元素个数:21亿多
数组中每一位能表示的数字:42亿多
理论上,BigInteger能表示的最大数字为:42亿的21亿次方。
但是还没到这个数字,电脑的内存就会撑爆,所以一般认为BigInteger是无限的。
存储方式如图所示: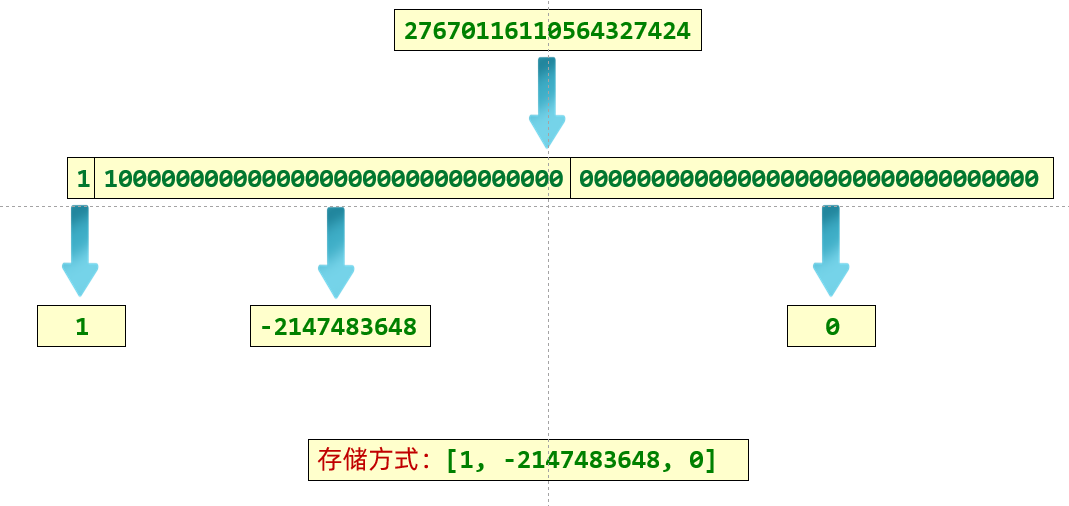
3.BigDecimal类
引入
public class BigDecimalDemo01 {public static void main(String[] args) {System.out.println(0.09 + 0.01);}}
这段代码比较简单,就是计算0.09和0.01之和,并且将其结果在控制台进行输出。那么按照我们的想法在控制台输出的结果应该为0.1。那么实际的运行结果是什么呢?我们来运行一下程序,控制台的输出
结果如下所示:
0.09999999999999999
这样的结果其实就是一个丢失精度的结果。为什么会产生精度丢失呢?
在使用float或者double类型的数据在进行数学运算的时候,很有可能会产生精度丢失问题。我们都知道计算机底层在进行运算的时候,使用的都是二进制数据; 当我们在程序中写了一个十进制数据 ,在
进行运算的时候,计算机会将这个十进制数据转换成二进制数据,然后再进行运算,计算完毕以后计算机会把运算的结果再转换成十进制数据给我们展示; 如果我们使用的是整数类型的数据进行计算,那
么在把十进制数据转换成二进制数据的时候不会存在精度问题; 如果我们的数据是一个浮点类型的数据,有的时候计算机并不会将这个数据完全转换成一个二进制数据,而是将这个将其转换成一个无限的
趋近于这个十进数的二进制数据; 这样使用一个不太准确的数据进行运算的时候, 最终就会造成精度丢失;为了提高精度,Java就给我们提供了BigDecimal供我们进行数据运算。
构造方法
要用BigDecimal类,那么就需要首先学习一下如何去创建BigDecimal的对象。通过查看API文档,我们可以发现Jdk中针对BigDecimal类提供了很多的构造方法,但是最常用的构造方法是: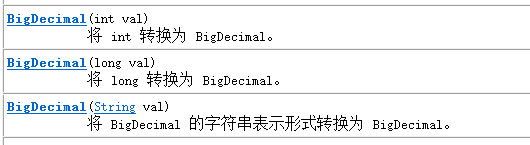
public class BigDecimalDemo2 {public static void main(String[] args) {/*构造方法获取BigDecimal对象public BigDecimal(double val) public BigDecimal(string val)静态方法获取BigDecimal对象public static BigDecimal valuef(double val)*///1.通过传递double类型的小数来创建对象//细节://这种方式有可能是不精确的,所以不建议使用BigDecimal bd1 = new BigDecimal(0.01);BigDecimal bd2 = new BigDecimal(0.09);System.out.println(bd1);System.out.println(bd2);//通过传递字符串表示的小数来创建对象BigDecimal bd3 = new BigDecimal("0.01");BigDecimal bd4 = new BigDecimal("0.09");BigDecimal bd5 = bd3.add(bd4);System.out.println(bd3);System.out.println(bd4);System.out.println(bd5);//3.通过静态方法获取对象//细节://1.如果要表示的数字不大,没有超出double的取值范围,建议使用静态方法//2.如果要表示的数字比较大,超出了double的取值范围,建议使用构造方法//3.如果我们传递的是0~10之间的整数,包含0,包含10,那么方法会返回已经创建好的对象,不会重新newBigDecimal bd6 = BigDecimal.valueOf(10.0);BigDecimal bd7 = BigDecimal.valueOf(10.0);System.out.println(bd6 == bd7);}}
了解完常见的构造方法以后,我们接下来就重点介绍一下常见的成员方法。
常见成员方法
BigDecimal类中使用最多的还是提供的进行四则运算的方法,如下:
public BigDecimal add(BigDecimal value) // 加法运算public BigDecimal subtract(BigDecimal value) // 减法运算public BigDecimal multiply(BigDecimal value) // 乘法运算public BigDecimal divide(BigDecimal value) // 触发运算
接下来我们就来通过一些案例演示一下这些成员方法的使用。
案例1:演示基本的四则运算
代码如下所示:
public class BigDecimalDemo01 {public static void main(String[] args) {// 创建两个BigDecimal对象BigDecimal b1 = new BigDecimal("0.3") ;BigDecimal b2 = new BigDecimal("4") ;// 调用方法进行b1和b2的四则运算,并将其运算结果在控制台进行输出System.out.println(b1.add(b2)); // 进行加法运算System.out.println(b1.subtract(b2)); // 进行减法运算System.out.println(b1.multiply(b2)); // 进行乘法运算System.out.println(b1.divide(b2)); // 进行除法运算}}
运行程序进行测试,控制台输出结果如下:
4.3-3.71.20.075
此时我们可以看到使用BigDecimal类来完成浮点数的计算不会存在损失精度的问题。
案例2:演示除法的特殊情况
如果使用BigDecimal类型的数据进行除法运算的时候,得到的结果是一个无限循环小数,那么就会报错:ArithmeticException。 如下代码所示:
public class BigDecimalDemo02 {public static void main(String[] args) {// 创建两个BigDecimal对象BigDecimal b1 = new BigDecimal("1") ;BigDecimal b2 = new BigDecimal("3") ;// 调用方法进行b1和b2的除法运算,并且将计算结果在控制台进行输出System.out.println(b1.divide(b2));}}
运行程序进行测试,控制台输出结果如下所示:
Exception in thread "main" java.lang.ArithmeticException: Non-terminating decimal expansion; no exact representable decimal result.at java.base/java.math.BigDecimal.divide(BigDecimal.java:1716)at com.itheima.api.bigdecimal.demo02.BigDecimalDemo02.main(BigDecimalDemo02.java:14)
针对这个问题怎么解决,此时我们就需要使用到BigDecimal类中另外一个divide方法,如下所示:
BigDecimal divide(BigDecimal divisor, int scale, int roundingMode)
上述divide方法参数说明:
divisor: 除数对应的BigDecimal对象;scale: 精确的位数;roundingMode: 取舍模式;取舍模式被封装到了RoundingMode这个枚举类中(关于枚举我们后期再做重点讲解),在这个枚举类中定义了很多种取舍方式。最常见的取舍方式有如下几个:UP(直接进1) , FLOOR(直接删除) , HALF_UP(4舍五入),我们可以通过如下格式直接访问这些取舍模式:枚举类名.变量名
接下来我们就来演示一下这些取舍模式,代码如下所示:
public class BigDecimalDemo02 {public static void main(String[] args) {// 调用方法method_03() ;}// 演示取舍模式HALF_UPpublic static void method_03() {// 创建两个BigDecimal对象BigDecimal b1 = new BigDecimal("0.3") ;BigDecimal b2 = new BigDecimal("4") ;// 调用方法进行b1和b2的除法运算,并且将计算结果在控制台进行输出System.out.println(b1.divide(b2 , 2 , RoundingMode.HALF_UP));}// 演示取舍模式FLOORpublic static void method_02() {// 创建两个BigDecimal对象BigDecimal b1 = new BigDecimal("1") ;BigDecimal b2 = new BigDecimal("3") ;// 调用方法进行b1和b2的除法运算,并且将计算结果在控制台进行输出System.out.println(b1.divide(b2 , 2 , RoundingMode.FLOOR));}// 演示取舍模式UPpublic static void method_01() {// 创建两个BigDecimal对象BigDecimal b1 = new BigDecimal("1") ;BigDecimal b2 = new BigDecimal("3") ;// 调用方法进行b1和b2的除法运算,并且将计算结果在控制台进行输出System.out.println(b1.divide(b2 , 2 , RoundingMode.UP));}}
结:后期在进行两个数的除法运算的时候,我们常常使用的是可以设置取舍模式的divide方法。
底层存储方式:
把数据看成字符串,遍历得到里面的每一个字符,把这些字符在ASCII码表上的值,都存储到数组中。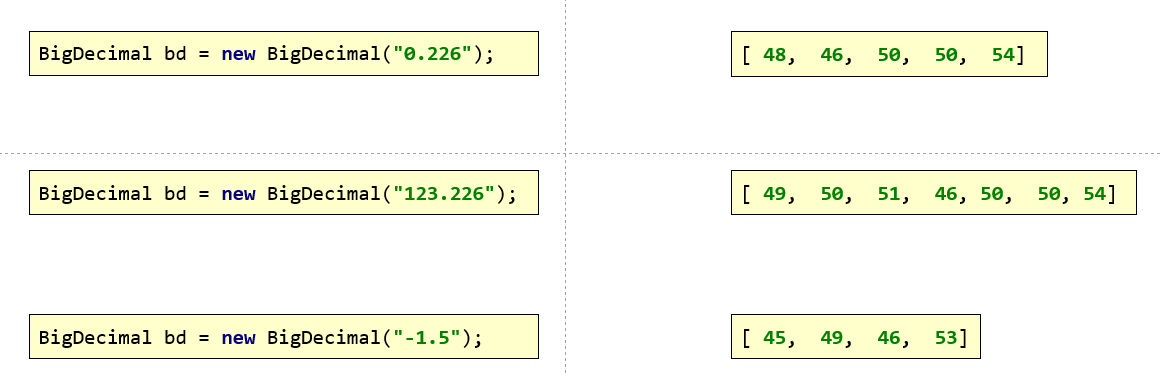
4.Math
public class Test5 {public static void main(String[] args) {System.out.println(Math.abs(-50));//绝对值 50System.out.println(Math.ceil(3.01)); // 向上取整4.0System.out.println(Math.floor(3.99)); //向下取整 3.0System.out.println(Math.round(3.554)); // 四舍五入4System.out.println(Math.sqrt(64.0)); // 平方根8. 0System.out.println(Math.max(56, 78)); //两者之间较大的78System.out.println(Math.min(56, 78)); //两者之间较小的56System.out.println(Math.random()); // 随机数System.out.println(Math.pow(2, 10)); //幂 1024.0}}
System类
常见方法
public static long currentTimeMillis() // 获取当前时间所对应的毫秒值(当前时间为0时区所对应的时间即就是英国格林尼治天文台旧址所在位置)public static void exit(int status) // 终止当前正在运行的Java虚拟机,0表示正常退出,非零表示异常退出public static native void arraycopy(Object src, int srcPos, Object dest, int destPos, int length); // 进行数值元素copy
案例1:演示currentTimeMillis方法
public class SystemDemo01 {public static void main(String[] args) {// 获取当前时间所对应的毫秒值long millis = System.currentTimeMillis();// 输出结果System.out.println("当前时间所对应的毫秒值为:" + millis);}}//当前时间所对应的毫秒值为:1576050298343
获取到当前时间的毫秒值的意义:我们常常来需要统计某一段代码的执行时间。此时我们就可以在执行这段代码之前获取一次时间,在执行完毕以后再次获取一次系统时间,然后计算两个时间的差值,
这个差值就是这段代码执行完毕以后所需要的时间。如下代码所示:
public class SystemDemo2 {public static void main(String[] args) {//判断1~100000之间有多少个质数long start = System.currentTimeMillis();for (int i = 1; i <= 100000; i++) {boolean flag = isPrime2(i);if (flag) {System.out.println(i);}}long end = System.currentTimeMillis();//获取程序运行的总时间System.out.println(end - start); //方式一:1514 毫秒 方式二:71毫秒}//以前判断是否为质数的方式public static boolean isPrime1(int number) {for (int i = 2; i < number; i++) {if (number % i == 0) {return false;}}return true;}//改进之后判断是否为质数的方式(效率高)public static boolean isPrime2(int number) {for (int i = 2; i <= Math.sqrt(number); i++) {if (number % i == 0) {return false;}}return true;}}
例2:演示exit方法
public class SystemDemo01 {public static void main(String[] args) {// 输出System.out.println("程序开始执行了.....");// 终止JVMSystem.exit(0);// 输出System.out.println("程序终止了..........");}}//程序开始执行了.....
此时可以看到在控制台只输出了”程序开始了…”,由于JVM终止了,因此输出”程序终止了…”这段代码没有被执行。
案例3:演示arraycopy方法
方法参数说明:
// src: 源数组// srcPos: 源数值的开始位置// dest: 目标数组// destPos: 目标数组开始位置// length: 要复制的元素个数public static native void arraycopy(Object src, int srcPos, Object dest, int destPos, int length);
public class SystemDemo01 {public static void main(String[] args) {// 定义源数组int[] srcArray = {23 , 45 , 67 , 89 , 14 , 56 } ;// 定义目标数组int[] desArray = new int[10] ;// 进行数组元素的copy: 把srcArray数组中从0索引开始的3个元素,从desArray数组中的1索引开始复制过去System.arraycopy(srcArray , 0 , desArray , 1 , 3);// 遍历目标数组for(int x = 0 ; x < desArray.length ; x++) {if(x != desArray.length - 1) {System.out.print(desArray[x] + ", ");}else {System.out.println(desArray[x]);}}}}//0, 23, 45, 67, 0, 0, 0, 0, 0, 0
通过控制台输出结果我们可以看到,数组元素的确进行复制了。
使用这个方法我们也可以完成数组元素的删除操作,如下所示:
public class SystemDemo02 {public static void main(String[] args) {// 定义一个数组int[] srcArray = {23 , 45 , 67 , 89 , 14 , 56 } ;// 删除数组中第3个元素(67):要删除67这个元素,我们只需要将67后面的其他元素依次向前进行移动即可System.arraycopy(srcArray , 3 , srcArray , 2 , 3);// 遍历srcArray数组for(int x = 0 ; x < srcArray.length ; x++) {if(x != desArray.length - 1) {System.out.print(srcArray[x] + ", ");}else {System.out.println(srcArray[x]);}}}}//23, 45, 89, 14, 56, 56
通过控制台输出结果我们可以看到此时多出了一个56元素,此时我们只需要将最后一个位置设置为0即可。如下所示:
public class SystemDemo02 {public static void main(String[] args) {// 定义一个数组int[] srcArray = {23 , 45 , 67 , 89 , 14 , 56 } ;// 删除数组中第3个元素(67):要删除67这个元素,我们只需要将67后面的其他元素依次向前进行移动即可System.arraycopy(srcArray , 3 , srcArray , 2 , 3);// 将最后一个位置的元素设置为0srcArray[srcArray.length - 1] = 0 ;// 遍历srcArray数组for(int x = 0 ; x < srcArray.length ; x++) {if(x != srcArray.length - 1 ) {System.out.print(srcArray[x] + ", ");}else {System.out.println(srcArray[x]);}}}}//23, 45, 89, 14, 56, 0
此时我们可以看到元素”67”已经被删除掉了。67后面的其他元素依次向前进行移动了一位。
arraycopy方法底层细节:
1.如果数据源数组和目的地数组都是基本数据类型,那么两者的类型必须保持一致,否则会报错
2.在拷贝的时候需要考虑数组的长度,如果超出范围也会报错
3.如果数据源数组和目的地数组都是引用数据类型,那么子类类型可以赋值给父类类型
代码示例:
public class SystemDemo3 {public static void main(String[] args) {//public static void arraycopy(数据源数组,起始索引,目的地数组,起始索引,拷贝个数) 数组拷贝//细节://1.如果数据源数组和目的地数组都是基本数据类型,那么两者的类型必须保持一致,否则会报错//2.在拷贝的时候需要考虑数组的长度,如果超出范围也会报错//3.如果数据源数组和目的地数组都是引用数据类型,那么子类类型可以赋值给父类类型Student s1 = new Student("zhangsan", 23);Student s2 = new Student("lisi", 24);Student s3 = new Student("wangwu", 25);Student[] arr1 = {s1, s2, s3};Person[] arr2 = new Person[3];//把arr1中对象的地址值赋值给arr2中System.arraycopy(arr1, 0, arr2, 0, 3);//遍历数组arr2for (int i = 0; i < arr2.length; i++) {Student stu = (Student) arr2[i];System.out.println(stu.getName() + "," + stu.getAge());}}}class Person {private String name;private int age;public Person() {}public Person(String name, int age) {this.name = name;this.age = age;}/*** 获取** @return name*/public String getName() {return name;}/*** 设置** @param name*/public void setName(String name) {this.name = name;}/*** 获取** @return age*/public int getAge() {return age;}/*** 设置** @param age*/public void setAge(int age) {this.age = age;}public String toString() {return "Person{name = " + name + ", age = " + age + "}";}}class Student extends Person {public Student() {}public Student(String name, int age) {super(name, age);}}
Runtime
常见方法介绍
public static Runtime getRuntime() //当前系统的运行环境对象public void exit(int status) //停止虚拟机public int availableProcessors() //获得CPU的线程数public long maxMemory() //JVM能从系统中获取总内存大小(单位byte)public long totalMemory() //JVM已经从系统中获取总内存大小(单位byte)public long freeMemory() //JVM剩余内存大小(单位byte)public Process exec(String command) //运行cmd命令
public class RunTimeDemo1 {public static void main(String[] args) throws IOException {/*public static Runtime getRuntime() 当前系统的运行环境对象public void exit(int status) 停止虚拟机public int availableProcessors() 获得CPU的线程数public long maxMemory() JVM能从系统中获取总内存大小(单位byte)public long totalMemory() JVM已经从系统中获取总内存大小(单位byte)public long freeMemory() JVM剩余内存大小(单位byte)public Process exec(string command) 运行cmd命令*///1.获取Runtime的对象//Runtime r1 =Runtime.getRuntime();//2.exit 停止虚拟机//Runtime.getRuntime().exit(0);//System.out.println("看看我执行了吗?");//3.获得CPU的线程数System.out.println(Runtime.getRuntime().availableProcessors());//8//4.总内存大小,单位byte字节System.out.println(Runtime.getRuntime().maxMemory() / 1024 / 1024);//4064//5.已经获取的总内存大小,单位byte字节System.out.println(Runtime.getRuntime().totalMemory() / 1024 / 1024);//254//6.剩余内存大小System.out.println(Runtime.getRuntime().freeMemory() / 1024 / 1024);//251//7.运行cmd命令//shutdown :关机//加上参数才能执行//-s :默认在1分钟之后关机//-s -t 指定时间 : 指定关机时间//-a :取消关机操作//-r: 关机并重启Runtime.getRuntime().exec("shutdown -s -t 3600");}}
恶搞好基友
需求:
界面上方按钮默认隐藏
界面中间有一个提示文本和三个按钮
当你的好基友点击中间三个按钮的时候就在N秒之后关机,不同的按钮N的值不一样
任意一个按钮被点击之后,上方了按钮出现。当点击上方按钮之后取消关机任务
public class Test {public static void main(String[] args) {new MyJframe();}}
public class MyJframe extends JFrame implements ActionListener {JButton yesBut = new JButton("帅爆了");JButton midBut = new JButton("一般般吧");JButton noBut = new JButton("不帅,有点磕碜");JButton dadBut = new JButton("饶了我吧!");//决定了上方的按钮是否展示boolean flag = false;public MyJframe() {initJFrame();initView();//显示this.setVisible(true);}private void initView() {this.getContentPane().removeAll();if (flag) {//展示按钮dadBut.setBounds(50, 20, 100, 30);dadBut.addActionListener(this);this.getContentPane().add(dadBut);}JLabel text = new JLabel("你觉得自己帅吗?");text.setFont(new Font("微软雅黑", 0, 30));text.setBounds(120, 150, 300, 50);yesBut.setBounds(200, 250, 100, 30);midBut.setBounds(200, 325, 100, 30);noBut.setBounds(160, 400, 180, 30);yesBut.addActionListener(this);midBut.addActionListener(this);noBut.addActionListener(this);this.getContentPane().add(text);this.getContentPane().add(yesBut);this.getContentPane().add(midBut);this.getContentPane().add(noBut);this.getContentPane().repaint();}private void initJFrame() {//设置宽高this.setSize(500, 600);//设置标题this.setTitle("恶搞好基友");//设置关闭模式this.setDefaultCloseOperation(3);//置顶this.setAlwaysOnTop(true);//居中this.setLocationRelativeTo(null);//取消内部默认布局this.setLayout(null);}@Overridepublic void actionPerformed(ActionEvent e) {Object obj = e.getSource();if (obj == yesBut) {//给好基友一个弹框showJDialog("xxx,你太自信了,给你一点小惩罚");try {Runtime.getRuntime().exec("shutdown -s -t 3600");} catch (IOException ioException) {ioException.printStackTrace();}flag = true;initView();} else if (obj == midBut) {System.out.println("你的好基友点击了一般般吧");//给好基友一个弹框showJDialog("xxx,你还是太自信了,也要给你一点小惩罚");try {Runtime.getRuntime().exec("shutdown -s -t 7200");} catch (IOException ioException) {ioException.printStackTrace();}flag = true;initView();} else if (obj == noBut) {System.out.println("你的好基友点击了不帅");//给好基友一个弹框showJDialog("xxx,你还是有一点自知之明的,也要给你一点小惩罚");try {Runtime.getRuntime().exec("shutdown -s -t 1800");} catch (IOException ioException) {ioException.printStackTrace();}flag = true;initView();} else if (obj == dadBut) {//给好基友一个弹框showJDialog("xxx,这次就饶了你~");try {Runtime.getRuntime().exec("shutdown -a");} catch (IOException ioException) {ioException.printStackTrace();}}}public void showJDialog(String content) {//创建一个弹框对象JDialog jDialog = new JDialog();//给弹框设置大小jDialog.setSize(200, 150);//让弹框置顶jDialog.setAlwaysOnTop(true);//让弹框居中jDialog.setLocationRelativeTo(null);//弹框不关闭永远无法操作下面的界面jDialog.setModal(true);//创建Jlabel对象管理文字并添加到弹框当中JLabel warning = new JLabel(content);warning.setBounds(0, 0, 200, 150);jDialog.getContentPane().add(warning);//让弹框展示出来jDialog.setVisible(true);}}
Object
概述
public native int hashCode()//native方法,用于返回对象的哈希码,主要使用在哈希表中,比如JDK中的HashMap。public boolean equals(Object obj)//用于比较2个对象的内存地址是否相等,String类对该方法进行了重写用户比较字符串的值是否相等。protected native Object clone() throws CloneNotSupportedException/*naitive方法,用于创建并返回当前对象的一份拷贝。一般情况下,对于任何对象 x,表达式 x.clone() != x 为true,x.clone().getClass() == x.getClass() 为true。Object本身没有实现Cloneable接口,所以不重写clone方法并且进行调用的话会发生CloneNotSupportedException异常。*/public String toString()//返回类的名字@实例的哈希码的16进制的字符串。建议Object所有的子类都重写这个方法。public final native Class<?> getClass()//native方法,用于返回当前运行时对象的Class对象,使用了final关键字修饰,故不允许子类重写。protected void finalize() throws Throwable {}//实例被垃圾回收器回收的时候触发的操作public final native void notify()/*native方法,并且不能重写。唤醒一个在此对象监视器上等待的线程(监视器相当于就是锁的概念)。如果有多个线程在等待只会任意唤醒一个 */public final native void notifyAll()/*native方法,并且不能重写。跟notify一样,唯一的区别就是会唤醒在此对象监视器上等待的所有线程,而不是一个线程*/public final native void wait(long timeout) throws InterruptedException//native方法,并且不能重写。暂停线程的执行。//注意:sleep方法没有释放锁,而wait方法释放了锁 。timeout是等待时间public final void wait(long timeout, int nanos) throws InterruptedException//多了nanos参数,这个参数表示额外时间(以毫微秒为单位,范围是 0-999999)。//所以超时的时间还需要加上nanos毫秒。public final void wait() throws InterruptedException//跟之前的2个wait方法一样,只不过该方法一直等待,没有超时时间这个概念
==和equals()方法有什么区别
== 解读
对于基本类型和引⽤类型 == 的作⽤效果是不同的,如下所示:
基本类型:⽐较的是值是否相同;
引⽤类型:⽐较的是引⽤是否相同;
代码示例:
String x = "string";String y = "string";String z = new String("string");System.out.println(x==y); // trueSystem.out.println(x==z); // falseSystem.out.println(x.equals(y)); // trueSystem.out.println(x.equals(z)); // true
代码解读:因为 x 和 y 指向的是同⼀个引⽤,所以 == 也是 true,⽽ new String()⽅法则重写开辟了内存空 间,所以 == 结果为 false,⽽ equals ⽐较的⼀直是值,所以结果都为 true。
equals 解读
public class equals {public static void main(String[] args) {/* equals方法的源代码:public boolean euqals(Object obj){return(this==obj);*/MyTime m1 = new MyTime(2008,8,8);MyTime m2 = new MyTime(2008,8,8);//重写equals方法之前System.out.println(m1==m2);//falseSystem.out.println(m1.equals(m2));//false//重写equals方法之后System.out.println(m1.equals(m2));//true}}class MyTime{int year;int month;int day;public MyTime() {}public MyTime(int year, int month, int day) {this.year = year;this.month = month;this.day = day;}public boolean equals(Object obj){if(obj==null||!(obj instanceof MyTime)){return false;}if(this==obj){return true;}MyTime t =(MyTime)obj;return this.year==t.year&&this.month==t.month&&this.day==t.day;}}
总结 :== 对于基本类型来说是值⽐较,对于引⽤类型来说是⽐较的是引⽤;⽽ equals 默认情况下是引⽤ ⽐较,只是很多类重写了 equals ⽅法,⽐如 String、Integer 等把它变成了值⽐较,所以⼀般情况下 equals ⽐较的是值是否相等。
HashCode()
概述
hashCode() 返回哈希值,而 equals() 是用来判断两个对象是否等价。等价的两个对象散列值一定相同,但是散列值相同的两个对象不一定等价,这是因为计算哈希值具有随机性,两个值不同的对象可能计算出相同的哈希值。
在覆盖 equals() 方法时应当总是覆盖 hashCode() 方法,保证等价的两个对象哈希值也相等。
为什么要有 hashCode
我们以“HashSet 如何检查重复”为例子来说明为什么要有 hashCode:
对象加入HashSet,先计算该对象的hashcode值,与其他已经加入的对象的hashcode作比较,如果没有相同的hashcode,hashset会假设该对象没有重复出现。如果有重复的hashcode,调用equals()方法进行比较,如果对象相同,就不会让其加入,如果对象不同,会被散列到其他位置。
这样我们就大大减少了 equals 的次数,相应就大大提高了执行速度。
toString方法
1:源代码是这样的
public String toString() {return getClass().getName() + "@" + Integer.toHexString(hashCode());}
2:以后所有的子类都重写toString方法。
3:重写就是把Object类的toString方法给覆盖了。
4:输出引用的时候会自动调用toStirng方法。【println底层调用了toString方法】
public class toString {public static void main(String[] args) {// 重写toString之前MyTime m1 = new MyTime(1970,1,1);System.out.println(m1); //MyTime@4554617c// 重写toString之后MyTime m2 = new MyTime(1970,1,1);System.out.println(m2);//1970/1/1日}}class MyTime{int year;int month;int day;public MyTime(){}public MyTime(int year, int month, int day) {this.year = year;this.month = month;this.day = day;}@Overridepublic String toString() {return this.year+"/"+this.month+"/"+this.day+"日";}}
Clone()
1. cloneable
clone() 是 Object 的 protected 方法,它不是 public,一个类不显式去重写 clone(),其它类就不能直接去调用该类实例的 clone() 方法。
public class CloneExample {private int a;private int b;}
CloneExample e1 = new CloneExample();// CloneExample e2 = e1.clone(); // 'clone()' has protected access in 'java.lang.Object'
重写 clone() 得到以下实现:
public class CloneExample {private int a;private int b;@Overridepublic CloneExample clone() throws CloneNotSupportedException {return (CloneExample)super.clone();}}
CloneExample e1 = new CloneExample();try {CloneExample e2 = e1.clone();} catch (CloneNotSupportedException e) {e.printStackTrace();}
java.lang.CloneNotSupportedException: CloneExample
以上抛出了 CloneNotSupportedException,这是因为 CloneExample 没有实现 Cloneable 接口。
应该注意的是,clone() 方法并不是 Cloneable 接口的方法,而是 Object 的一个 protected 方法。Cloneable 接口只是规定,如果一个类没有实现 Cloneable 接口又调用了 clone() 方法,就会抛出 CloneNotSupportedException。
public class CloneExample implements Cloneable {private int a;private int b;@Overridepublic Object clone() throws CloneNotSupportedException {return super.clone();}}
2. 浅拷贝
拷贝对象和原始对象的引用类型引用同一个对象。
public class ShallowCloneExample implements Cloneable {private int[] arr;public ShallowCloneExample() {arr = new int[10];for (int i = 0; i < arr.length; i++) {arr[i] = i;}}public void set(int index, int value) {arr[index] = value;}public int get(int index) {return arr[index];}@Overrideprotected ShallowCloneExample clone() throws CloneNotSupportedException {return (ShallowCloneExample) super.clone();}}
ShallowCloneExample e1 = new ShallowCloneExample();ShallowCloneExample e2 = null;try {e2 = e1.clone();} catch (CloneNotSupportedException e) {e.printStackTrace();}e1.set(2, 222);System.out.println(e2.get(2)); // 222
3. 深拷贝
拷贝对象和原始对象的引用类型引用不同对象。
public class DeepCloneExample implements Cloneable {private int[] arr;public DeepCloneExample() {arr = new int[10];for (int i = 0; i < arr.length; i++) {arr[i] = i;}}public void set(int index, int value) {arr[index] = value;}public int get(int index) {return arr[index];}@Overrideprotected DeepCloneExample clone() throws CloneNotSupportedException {DeepCloneExample result = (DeepCloneExample) super.clone();result.arr = new int[arr.length];for (int i = 0; i < arr.length; i++) {result.arr[i] = arr[i];}return result;}}
DeepCloneExample e1 = new DeepCloneExample();DeepCloneExample e2 = null;try {e2 = e1.clone();} catch (CloneNotSupportedException e) {e.printStackTrace();}e1.set(2, 222);System.out.println(e2.get(2)); // 2
4. clone() 的替代方案
使用 clone() 方法来拷贝一个对象即复杂又有风险,它会抛出异常,并且还需要类型转换。Effective Java 书上讲到,最好不要去使用 clone(),可以使用拷贝构造函数或者拷贝工厂来拷贝一个对象。
public class CloneConstructorExample {private int[] arr;public CloneConstructorExample() {arr = new int[10];for (int i = 0; i < arr.length; i++) {arr[i] = i;}}public CloneConstructorExample(CloneConstructorExample original) {arr = new int[original.arr.length];for (int i = 0; i < original.arr.length; i++) {arr[i] = original.arr[i];}}public void set(int index, int value) {arr[index] = value;}public int get(int index) {return arr[index];}}
CloneConstructorExample e1 = new CloneConstructorExample();CloneConstructorExample e2 = new CloneConstructorExample(e1);e1.set(2, 222);System.out.println(e2.get(2)); // 2

若有收获,就点个赞吧
0 人点赞
