随着SpringBoot的流行,基于注解式开发的热潮逐渐覆盖了基于XML纯配置的开发,而作为Spring中最核心的bean当然也能够使用注解的方式进行表示。所以本篇就来详细的讨论一下作为Spring中的Bean到底都有哪些用法。
@Bean 基础声明
Spring的@Bean注解用于告诉方法,产生一个Bean对象,然后这个Bean对象交给Spring管理。产生这个Bean对象的方法Spring只会调用一次,随后这个Spring将会将这个Bean对象放在自己的IOC容器中。
SpringIOC 容器管理一个或者多个bean,这些bean都需要在@Configuration注解下进行创建,在一个方法上使用@Bean注解就表明这个方法需要交给Spring进行管理。
快速搭建一个maven项目并配置好所需要的Spring 依赖
<dependency><groupId>org.springframework</groupId><artifactId>spring-context</artifactId><version>4.3.13.RELEASE</version></dependency><dependency><groupId>org.springframework</groupId><artifactId>spring-beans</artifactId><version>4.3.13.RELEASE</version></dependency><dependency><groupId>org.springframework</groupId><artifactId>spring-core</artifactId><version>4.3.13.RELEASE</version></dependency><dependency><groupId>org.springframework</groupId><artifactId>spring-web</artifactId><version>4.3.13.RELEASE</version></dependency>
在src根目录下创建一个AppConfig的配置类,这个配置类也就是管理一个或多个bean 的配置类,并在其内部声明一个myBean的bean,并创建其对应的实体类
@Configurationpublic class AppConfig {// 使用@Bean 注解表明myBean需要交给Spring进行管理// 未指定bean 的名称,默认采用的是 "方法名" + "首字母小写"的配置方式@Beanpublic MyBean myBean(){return new MyBean();}}public class MyBean {public MyBean(){System.out.println("MyBean Initializing");}}
在对应的test文件夹下创建一个测试类SpringBeanApplicationTests,测试上述代码的正确性
public class SpringBeanApplicationTests {public static void main(String[] args) {ApplicationContext context = new AnnotationConfigApplicationContext(AppConfig.class);context.getBean("myBean");}}
输出 : MyBean Initializing
随着SpringBoot的流行,我们现在更多采用基于注解式的配置从而替换掉了基于XML的配置,所以本篇文章我们主要探讨基于注解的@Bean以及和其他注解的使用。
@Bean 基本构成及其使用
在简单介绍了一下如何声明一个Bean组件,并将其交给Spring进行管理之后,下面我们来介绍一下Spring 的基本构成
@Target({ElementType.METHOD, ElementType.ANNOTATION_TYPE})@Retention(RetentionPolicy.RUNTIME)@Documentedpublic @interface Bean {@AliasFor("name")String[] value() default {};@AliasFor("value")String[] name() default {};Autowire autowire() default Autowire.NO;String initMethod() default "";String destroyMethod() default AbstractBeanDefinition.INFER_METHOD;}
@Bean不仅可以作用在方法上,也可以作用在注解类型上,在运行时提供注册。
value: name属性的别名,在不需要其他属性时使用,也就是说value 就是默认值
name: 此bean 的名称,或多个名称,主要的bean的名称加别名。如果未指定,则bean的名称是带注解方法的名称。如果指定了,方法的名称就会忽略,如果没有其他属性声明的话,bean的名称和别名可能通过value属性配置
autowire : 此注解的方法表示自动装配的类型,返回一个Autowire类型的枚举,我们来看一下Autowire枚举类型的概念
// 枚举确定自动装配状态:即,bean是否应该使用setter注入由Spring容器自动注入其依赖项。// 这是Spring DI的核心概念public enum Autowire {// 常量,表示根本没有自动装配。NO(AutowireCapableBeanFactory.AUTOWIRE_NO),// 常量,通过名称进行自动装配BY_NAME(AutowireCapableBeanFactory.AUTOWIRE_BY_NAME),// 常量,通过类型进行自动装配BY_TYPE(AutowireCapableBeanFactory.AUTOWIRE_BY_TYPE);private final int value;Autowire(int value) {this.value = value;}public int value() {return this.value;}public boolean isAutowire() {return (this == BY_NAME || this == BY_TYPE);}}
autowire的默认值为No,默认表示不通过自动装配。
initMethod: 这个可选择的方法在bean实例化的时候调用,InitializationBean接口允许bean在合适的时机通过设置注解的初始化属性从而调用初始化方法,InitializationBean 接口有一个定义好的初始化方法
void afterPropertiesSet() throws Exception;
Spring不推荐使用InitializationBean 来调用其初始化方法,因为它不必要地将代码耦合到Spring。Spring推荐使用
@PostConstruct注解或者为POJO类指定其初始化方法这两种方式来完成初始化。
不推荐使用:
public class InitBean implements InitializingBean {public void afterPropertiesSet() {}}
destroyMethod: 方法的可选择名称在调用bean示例在关闭上下文的时候,例如JDBC的close()方法,或者SqlSession的close()方法。DisposableBean 接口的实现允许在bean销毁的时候进行回调调用,DisposableBean 接口之后一个单个的方法
void destroy() throws Exception;
Spring不推荐使用DisposableBean 的方式来初始化其方法,因为它会将不必要的代码耦合到Spring。作为替代性的建议,Spring 推荐使用
@PreDestory注解或者为@Bean注解提供 destroyMethod 属性,
不推荐使用:
public class DestroyBean {public void cleanup() {}}推荐使用:public class MyBean {public MyBean(){System.out.println("MyBean Initializing");}public void init(){System.out.println("Bean 初始化方法被调用");}public void destroy(){System.out.println("Bean 销毁方法被调用");}}@Configurationpublic class AppConfig {// @Bean@Bean(initMethod = "init", destroyMethod = "destroy")public MyBean myBean(){return new MyBean();}}
修改一下测试类,测试其初始化方法和销毁方法在何时会被调用
public class SpringBeanApplicationTests {public static void main(String[] args) {// ------------------------------ 测试一 ------------------------------ApplicationContext context = new AnnotationConfigApplicationContext(AppConfig.class);// context.getBean("myBean");// 变体context.getBean("myBean");((AnnotationConfigApplicationContext) context).destroy();// ((AnnotationConfigApplicationContext) context).close();}}
初始化方法在得到Bean的实例的时候就会被调用,销毁方法在容器销毁或者容器关闭的时候会被调用。
@Bean 注解与其他注解产生的火花
在上面的一个小节中我们了解到了@Bean注解的几个属性,但是对于@Bean注解的功能来讲这有点太看不起bean了,@Bean另外一个重要的功能是能够和其他注解产生化学反应,如果你还不了解这些注解的话,那么请继续往下读,你会有收获的
这一节我们主要探讨@profile,@scope,@lazy,@depends-on @primary等注解
@Profile 注解
@Profile的作用是把一些meta-data进行分类,分成Active和InActive这两种状态,然后你可以选择在active 和在Inactive这两种状态下配置bean,在Inactive状态通常的注解有一个!操作符,通常写为:@Profile(“!p”),这里的p是Profile的名字。
三种设置方式:
- 可以通过ConfigurableEnvironment.setActiveProfiles()以编程的方式激活
- 可以通过AbstractEnvironment.ACTIVE_PROFILES_PROPERTY_NAME (spring.profiles.active )属性设置为
JVM属性 - 作为环境变量,或作为web.xml 应用程序的Servlet 上下文参数。也可以通过@ActiveProfiles 注解在集成测试中以声明方式激活配置文件。
作用域
- 作为类级别的注释在任意类或者直接与@Component 进行关联,包括@Configuration 类
- 作为原注解,可以自定义注解
- 作为方法的注解作用在任何方法
注意:
如果一个配置类使用了Profile 标签或者@Profile 作用在任何类中都必须进行启用才会生效,如果@Profile({“p1”,”!p2”}) 标识两个属性,那么p1 是启用状态 而p2 是非启用状态的。
现有一个POJO类为Subject学科类,里面有两个属性,一个是like(理科)属性,一个是wenke(文科)属性,分别有两个配置类,一个是AppConfigWithActiveProfile ,一个是AppConfigWithInactiveProfile,当系统环境是 “like”的时候就注册 AppConfigWithActiveProfile ,如果是 “wenke”,就注册 AppConfigWithInactiveProfile,来看一下这个需求如何实现
Subject.java
// 学科public class Subject {// 理科private String like;// 文科private String wenke;get and set ...@Overridepublic String toString() {return "Subject{" +"like='" + like + '\'' +", wenke='" + wenke + '\'' +'}';}}
AppConfigWithActiveProfile.java 注册Profile 为like 的时候
@Profile("like")@Configurationpublic class AppConfigWithActiveProfile {@Beanpublic Subject subject(){Subject subject = new Subject();subject.setLike("物理");return subject;}}
AppConfigWithInactiveProfile.java 注册Profile 为wenke 的时候
@Profile("wenke")@Configurationpublic class AppConfigWithInactiveProfile {@Beanpublic Subject subject(){Subject subject = new Subject();subject.setWenke("历史");return subject;}}
修改一下对应的测试类,设置系统环境,当Profile 为like 和 wenke 的时候分别注册各自对应的属性
// ------------------------------ 测试 profile ------------------------------AnnotationConfigApplicationContext context = new AnnotationConfigApplicationContext();// 激活 like 的profilecontext.getEnvironment().setActiveProfiles("like");context.register(AppConfigWithActiveProfile.class,AppConfigWithInactiveProfile.class);context.refresh();Subject subject = (Subject) context.getBean("subject");System.out.println("subject = " + subject);
把context.getEnvironment().setActiveProfiles(“wenke”) 设置为wenke,观察其对应的输出内容发生了变化,这就是@Profile的作用,有一层可选择性注册的意味。
@Scope 注解
在Spring中对于bean的默认处理都是单例的,我们通过上下文容器.getBean方法拿到bean容器,并对其进行实例化,这个实例化的过程其实只进行一次,即多次getBean 获取的对象都是同一个对象,也就相当于这个bean的实例在IOC容器中是public的,对于所有的bean请求来讲都可以共享此bean。
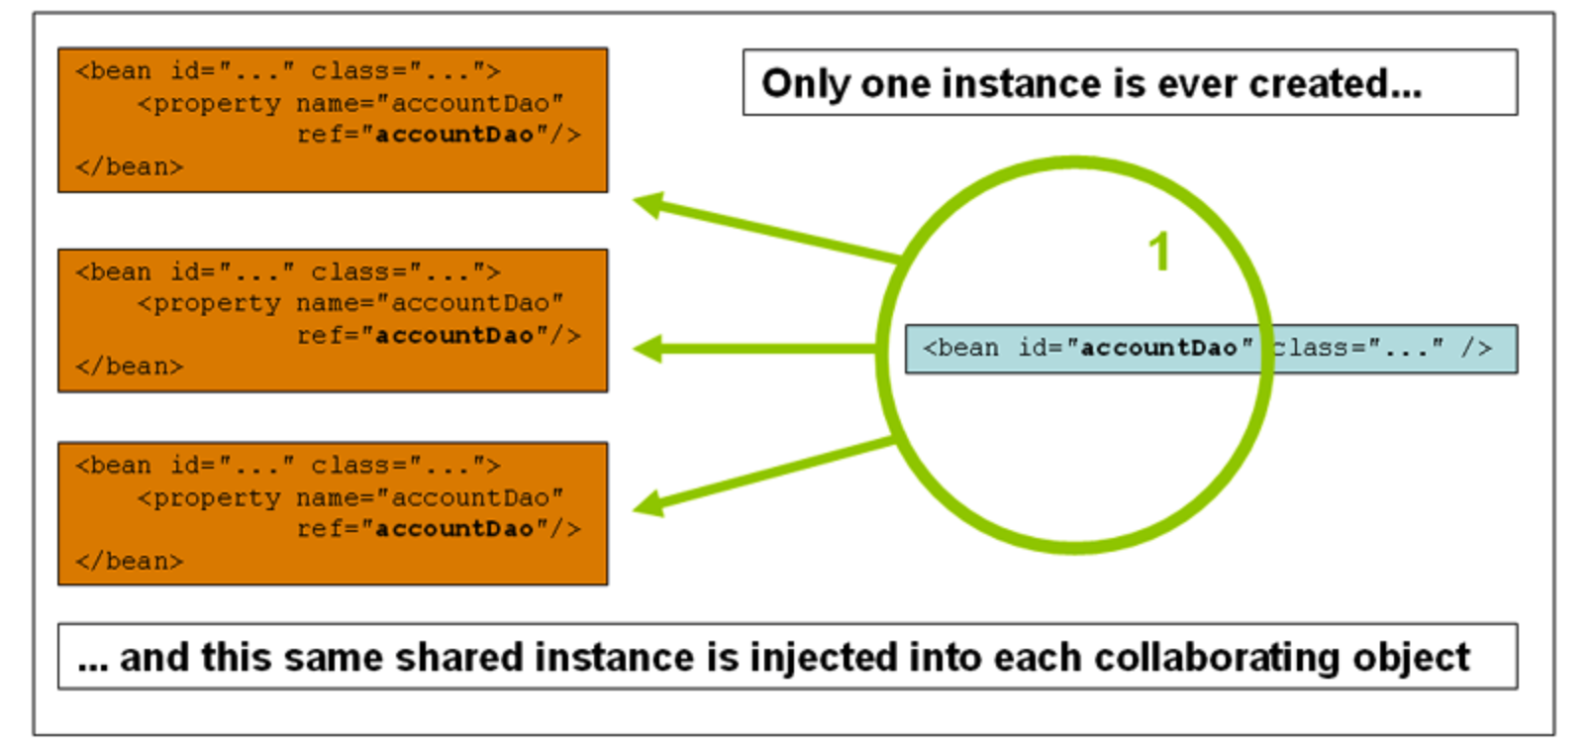
那么假如我不想把这个bean被所有的请求共享或者说每次调用我都想让它生成一个bean实例该怎么处理呢?
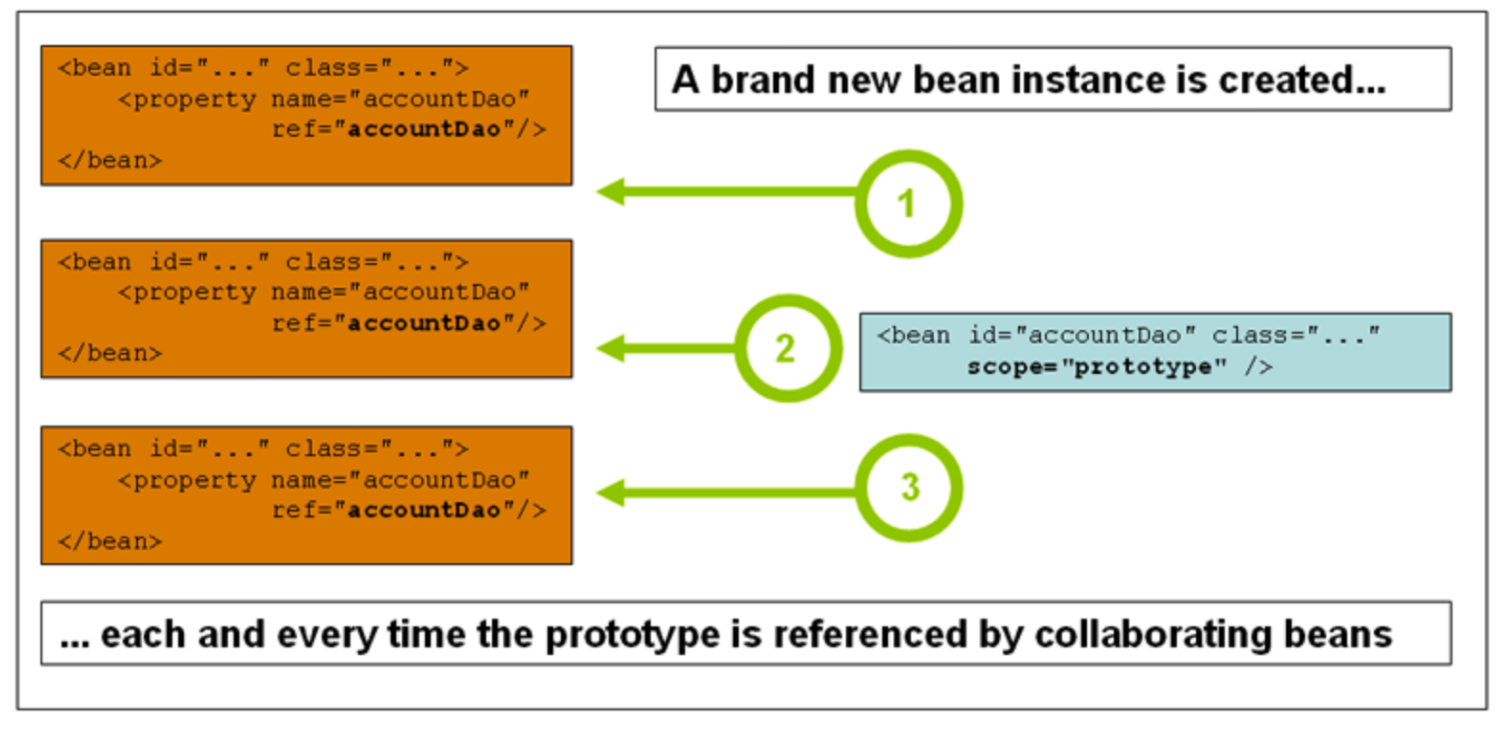
多例Bean
bean的非单例原型范围会使每次发出对该特定bean的请求时都创建新的bean实例,也就是说,bean被注入另一个bean,或者通过对容器的getBean()方法调用来请求它,可以用如下图来表示:
通过一个示例来说明bean的多个实例
新建一个AppConfigWithAliasAndScope配置类,用来定义多例的bean,
@Configurationpublic class AppConfigWithAliasAndScope {/*** 为myBean起两个名字,b1 和 b2* @Scope 默认为 singleton,但是可以指定其作用域* prototype 是多例的,即每一次调用都会生成一个新的实例。*/@Bean({"b1","b2"})@Scope("prototype")public MyBean myBean(){return new MyBean();}}
测试一下多例的情况:
// ------------------------------ 测试scope ------------------------------ApplicationContext context = new AnnotationConfigApplicationContext(AppConfigWithAliasAndScope.class);MyBean myBean = (MyBean) context.getBean("b1");MyBean myBean2 = (MyBean) context.getBean("b2");System.out.println(myBean);System.out.println(myBean2);
其他情况
除了多例的情况下,Spring还为我们定义了其他情况:
| Scope | Descriptionn |
|---|---|
| singleton | 默认单例的bean定义信息,对于每个IOC容器来说都是单例对象 |
| prototype | bean对象的定义为任意数量的对象实例 |
| request | bean对象的定义为一次HTTP请求的生命周期,也就是说,每个HTTP请求都有自己的bean实例,它是在单个bean定义的后面创建的。仅仅在web-aware的上下文中有效 |
| session | bean对象的定义为一次HTTP会话的生命周期。仅仅在web-aware的上下文中有效 |
| application | bean对象的定义范围在ServletContext生命周期内。仅仅在web-aware的上下文中有效 |
| websocket | bean对象的定义为WebSocket的生命周期内。仅仅在web-aware的上下文中有效 |
singleton和prototype 一般都用在普通的Java项目中,而request、session、application、websocket都用于web应用中。
request、session、application、websocket的作用范围
你可以体会到 request、session、application、websocket 的作用范围在当你使用web-aware的ApplicationContext应用程序上下文的时候,比如XmlWebApplicationContext的实现类。如果你使用了像是ClassPathXmlApplicationContext的上下文环境时,就会抛出IllegalStateException因为Spring不认识这个作用范围。
@Lazy 注解
@Lazy : 表明一个bean 是否延迟加载,可以作用在方法上,表示这个方法被延迟加载;可以作用在@Component (或者由@Component 作为原注解) 注释的类上,表明这个类中所有的bean 都被延迟加载。如果没有@Lazy注释,或者@Lazy 被设置为false,那么该bean 就会急切渴望被加载;除了上面两种作用域,@Lazy 还可以作用在@Autowired和@Inject注释的属性上,在这种情况下,它将为该字段创建一个惰性代理,作为使用ObjectFactory或Provider的默认方法。下面来演示一下:
@Lazy@Configuration@ComponentScan(basePackages = "com.spring.configuration.pojo")public class AppConfigWithLazy {@Beanpublic MyBean myBean(){System.out.println("myBean Initialized");return new MyBean();}@Beanpublic MyBean IfLazyInit(){System.out.println("initialized");return new MyBean();}}
- 修改测试类
public class SpringConfigurationApplication {public static void main(String[] args) {AnnotationConfigApplicationContext context = new AnnotationConfigApplicationContext(AppConfigWithLazy.class);// 获取启动过程中的bean 定义的名称for(String str : context.getBeanDefinitionNames()){System.out.println("str = " + str);}}}
输出你会发现没有关于bean的定义信息,但是当把@Lazy 注释拿掉,你会发现输出了关于bean的初始化信息
@DependsOn 注解
指当前bean所依赖的bean。任何指定的bean都能保证在此bean创建之前由IOC容器创建。在bean没有通过属性或构造函数参数显式依赖于另一个bean的情况下很少使用,可能直接使用在任何直接或者间接使用 Component 或者Bean 注解表明的类上。来看一下具体的用法
新建三个Bean,分别是FirstBean、SecondBean、ThirdBean三个普通的bean,新建AppConfigWithDependsOn并配置它们之间的依赖关系
public class FirstBean {@Autowiredprivate SecondBean secondBean;@Autowiredprivate ThirdBean thirdBean;public FirstBean() {System.out.println("FirstBean Initialized via Constuctor");}}public class SecondBean {public SecondBean() {System.out.println("SecondBean Initialized via Constuctor");}}public class ThirdBean {public ThirdBean() {System.out.println("ThirdBean Initialized via Constuctor");}}@Configurationpublic class AppConfigWithDependsOn {@Bean("firstBean")@DependsOn(value = {"secondBean","thirdBean"})public FirstBean firstBean() {return new FirstBean();}@Bean("secondBean")public SecondBean secondBean() {return new SecondBean();}@Bean("thirdBean")public ThirdBean thirdBean() {return new ThirdBean();}}
使用测试类进行测试,如下
// ------------------------------ 测试 DependsOn ------------------------------AnnotationConfigApplicationContext context = new AnnotationConfigApplicationContext(AppConfigWithDependsOn.class);context.getBean(FirstBean.class);context.close();
输出 :
SecondBean Initialized via ConstuctorThirdBean Initialized via ConstuctorFirstBean Initialized via Constuctor
由于firstBean 的创建过程首先需要依赖secondBean 和 thirdBean的创建,所以secondBean 首先被加载其次是thirdBean 最后是firstBean。
如果把@DependsOn 注解加在 AppConfigWithDependsOn 类上则它们的初始化顺序就会变为 firstBean、secondBean、thirdBean
@Primary 注解
指示当多个候选者有资格自动装配依赖项时,应优先考虑bean。此注解在语义上就等同于在Spring XML中定义的bean 元素的primary属性。注意: 除非使用component-scanning进行组件扫描,否则在类级别上使用@Primary不会有作用。如果@Primary 注解定义在XML中,那么@Primary 的注解元注解就会忽略,相反使用
@Primary 的两种使用方式
- 与@Bean 一起使用,定义在方法上,方法级别的注解
- 与@Component 一起使用,定义在类上,类级别的注解
通过一则示例来演示一下:
新建一个AppConfigWithPrimary类,在方法级别上定义@Primary注解
@Configurationpublic class AppConfigWithPrimary {@Beanpublic MyBean myBeanOne(){return new MyBean();}@Bean@Primarypublic MyBean myBeanTwo(){return new MyBean();}}
上面代码定义了两个bean ,其中myBeanTwo 由@Primary 进行标注,表示它首先会进行注册,使用测试类进行测试
// ------------------------------ 测试 Primary ------------------------------AnnotationConfigApplicationContext context = new AnnotationConfigApplicationContext(AppConfigWithPrimary.class);MyBean bean = context.getBean(MyBean.class);System.out.println(bean);
你可以尝试放开@Primary ,使用测试类测试的话会发现出现报错信息,因为你尝试获取的是MyBean.class,而我们代码中定义了两个MyBean 的类型,所以需要@Primary 注解表明哪一个bean需要优先被获取。
文章参考:
spring @Profile的运用示例
https://www.javaguides.net/2018/10/spring-dependson-annotation-example.html

若有收获,就点个赞吧
0 人点赞
