一、基于 xml 配置声明式事务
1、xml配置文件
<?xml version="1.0" encoding="UTF-8"?><beans xmlns="http://www.springframework.org/schema/beans"xmlns:xsi="http://www.w3.org/2001/XMLSchema-instance"xmlns:context="http://www.springframework.org/schema/context"xmlns:tx="http://www.springframework.org/schema/tx" xmlns:aop="http://www.springframework.org/schema/aop"xsi:schemaLocation="http://www.springframework.org/schema/beanshttp://www.springframework.org/schema/beans/spring-beans.xsdhttp://www.springframework.org/schema/contexthttps://www.springframework.org/schema/context/spring-context.xsdhttp://www.springframework.org/schema/txhttps://www.springframework.org/schema/tx/spring-tx.xsd http://www.springframework.org/schema/aop https://www.springframework.org/schema/aop/spring-aop.xsd"><!--从classpath的根路径去加载db.properties文件--><!--<context:property-placeholder location="classpath:db.properties" system-properties-mode="NEVER"/>--><context:property-placeholder location="classpath:db.properties"/><!--配置一个druid的连接池--><bean id="dataSource" class="com.alibaba.druid.pool.DruidDataSource"init-method="init" destroy-method="close"><property name="driverClassName" value="${jdbc.driverClassName}"/><property name="url" value="${jdbc.url}"/><property name="username" value="${jdbc.username}"/><property name="password" value="${jdbc.password}"/><property name="initialSize" value="${jdbc.initialSize}"/></bean><!--配置dao--><bean id = "accountDao" class="com.sunny.dao.impl.AccountDaoImpl"><property name="dataSource" ref="dataSource"/></bean><!--配置service--><bean id="accountService" class="com.sunny.service.impl.AccountServiceImpl"><property name="dao" ref="accountDao"/></bean><!-- ====================================================================== --><!-- 1: 配置JDBC事务管理器 WHAT:做什么增强(这里做事务增强)--><bean id="txManager" class="org.springframework.jdbc.datasource.DataSourceTransactionManager"><property name="dataSource" ref="dataSource"/></bean><!-- 2: 配置事务管理器增强 WHEN--><tx:advice id="txAdvice" transaction-manager="txManager"><tx:attributes><tx:method name="trans"/></tx:attributes></tx:advice><!-- 3: 配置切面 WHERE--><aop:config><aop:pointcut id="txPointcut" expression="execution(* com.sunny.service.*Service.*(..))"/><aop:advisor advice-ref="txAdvice" pointcut-ref="txPointcut"/></aop:config><!-- ====================================================================== --></beans>
测试
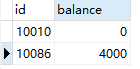
成功!
2、事务方法 tx:method 属性配置
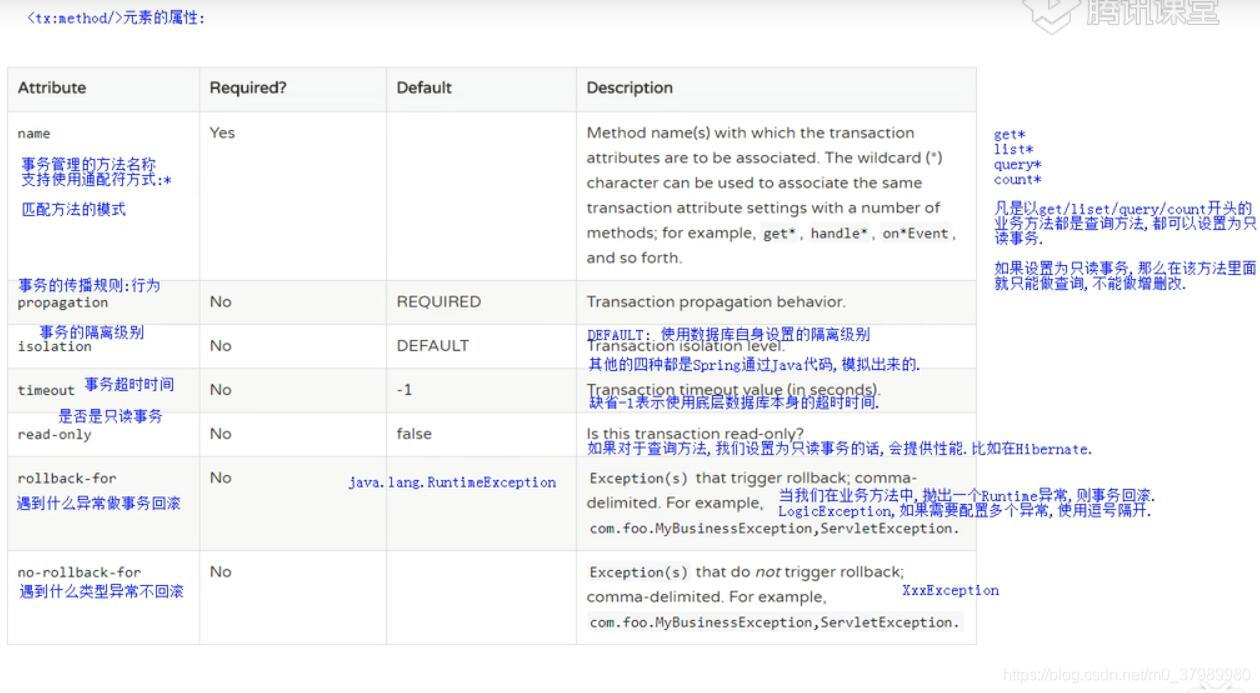
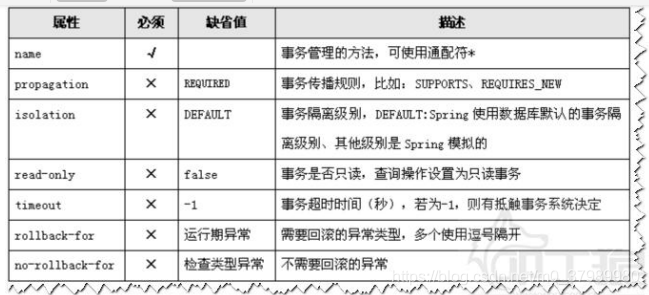
<tx:method/>元素的属性
事务配置
<tx:advice>
通知标签(增强)
- 属性id:自定义唯一表示
- transaction-manager属性:事务管理类,配置事务管理类的id属性值
事务属性配置
<tx:attributes>
子标签
<tx:method>
- 事务方法标签
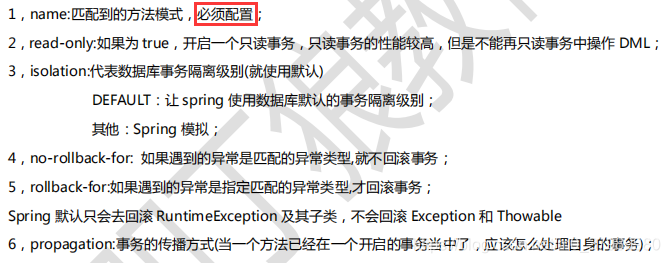
- 属性name:方法名
- 属性read-only:是否只读事务,查询都是只读,其他是非只读
- 属性propagation:事务的传播行为,默认配置REQUIRED或者SUPPORTS
- 属性isolation:事务隔离级别,默认配置DEFAULT
- 属性timeout:事务超时时间,配置-1
- 属性no-rollback-for:遇到什么异常不回滚,配置异常类名,多个类逗号分开
- 属性rollback-for:遇到什么异常回滚
- 以上回滚属性不配置,遇到异常就回滚
aop切面配置
<aop:config>
标签
<aop:advisor>
- 子标签
- 属性advice-ref:引用通知,配置tx:advice标签的属性值
- 属性pointcut:切点配置
3、CRUD通用事务配置
<!--配置一个CRUD的通用事务的配置--><tx:advice id="crudAdvice" transaction-manager="txManager"><tx:attributes><!--service中的查询方法--><tx:method name="get*" read-only="true" propagation="REQUIRED"/><tx:method name="list*" read-only="true" propagation="REQUIRED"/><tx:method name="query*" read-only="true" propagation="REQUIRED"/><!--service中其他方法(非查询)--><tx:method name="*" propagation="REQUIRED"/></tx:attributes></tx:advice>1234567891011
二、基于 注解 配置声明式事务
基于注解配置事务:在Service中,使用 @Transactional注解
@Transactional 注解的属性 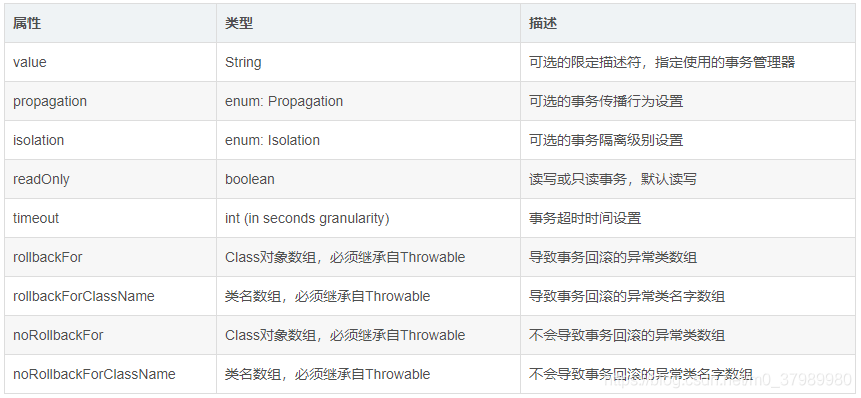
- @Transactional 可以作用于接口、接口方法、类以及类方法上。当作用于类上时,该类中的所有
public方法将都具有该类型的事务属性,同时,我们也可以在方法级别使用该标注来覆盖类级别的定义(比如在查询方法上单独设置@Transactional(readOnly=true)。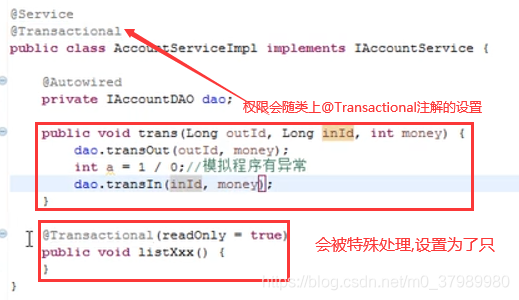
- @Transactional 注解可以作用于接口、
接口方法、类以及类方法上,但是 Spring 建议不要在接口或者接口方法上使用该注解,因为这只有在使用基于接口的代理时它才会生效。另外, @Transactional 注解应该只被应用到 public 方法上,这是由 Spring AOP 的本质决定的。如果你在 protected、private 或者默认可见性的方法上使用 @Transactional 注解,这将被忽略,也不会抛出任何异常。
Java代码
@Repositorypublic class AccountDaoImpl implements AccountDao {private JdbcTemplate jdbcTemplate;@Autowiredpublic void setDataSource(DataSource ds){this.jdbcTemplate = new JdbcTemplate(ds);}public void transOut(Long outId, int money) {String sql = "UPDATE account SET balance = balance - ? WHERE id = ?";jdbcTemplate.update(sql, money, outId);}public void transIn(Long inId, int money) {String sql = "UPDATE account SET balance = balance + ? WHERE id = ?";jdbcTemplate.update(sql, money, inId);}}@Service@Transactionalpublic class AccountServiceImpl implements AccountService {@Autowiredprivate AccountDao dao;public void trans(Long outId, Long inId, int money) {dao.transOut(outId, money);int a = 1 / 0; // 抛出异常dao.transIn(inId, money);}@Transactional(readOnly = true)public void queryAll(){//TODO}}
xml配置: 必须要配置 TX注解解析器!
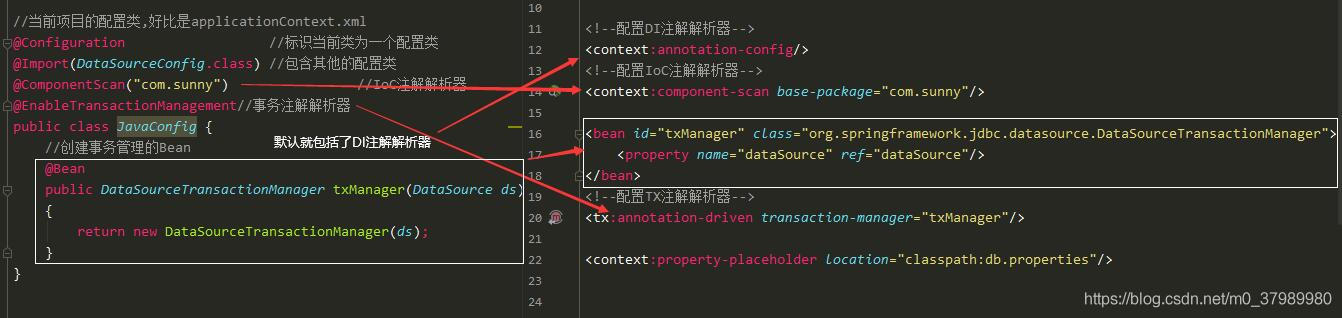
<!--配置DI注解解析器--><context:annotation-config/><!--配置IoC注解解析器--><context:component-scan base-package="com.sunny"/><bean id="txManager" class="org.springframework.jdbc.datasource.DataSourceTransactionManager"><property name="dataSource" ref="dataSource"/></bean><!--配置TX注解解析器--><tx:annotation-driven transaction-manager="txManager"/><context:property-placeholder location="classpath:db.properties"/><!--配置一个druid的连接池--><bean id="dataSource" class="com.alibaba.druid.pool.DruidDataSource"init-method="init" destroy-method="close"><property name="driverClassName" value="${jdbc.driverClassName}"/><property name="url" value="${jdbc.url}"/><property name="username" value="${jdbc.username}"/><property name="password" value="${jdbc.password}"/><property name="initialSize" value="${jdbc.initialSize}"/></bean>
对比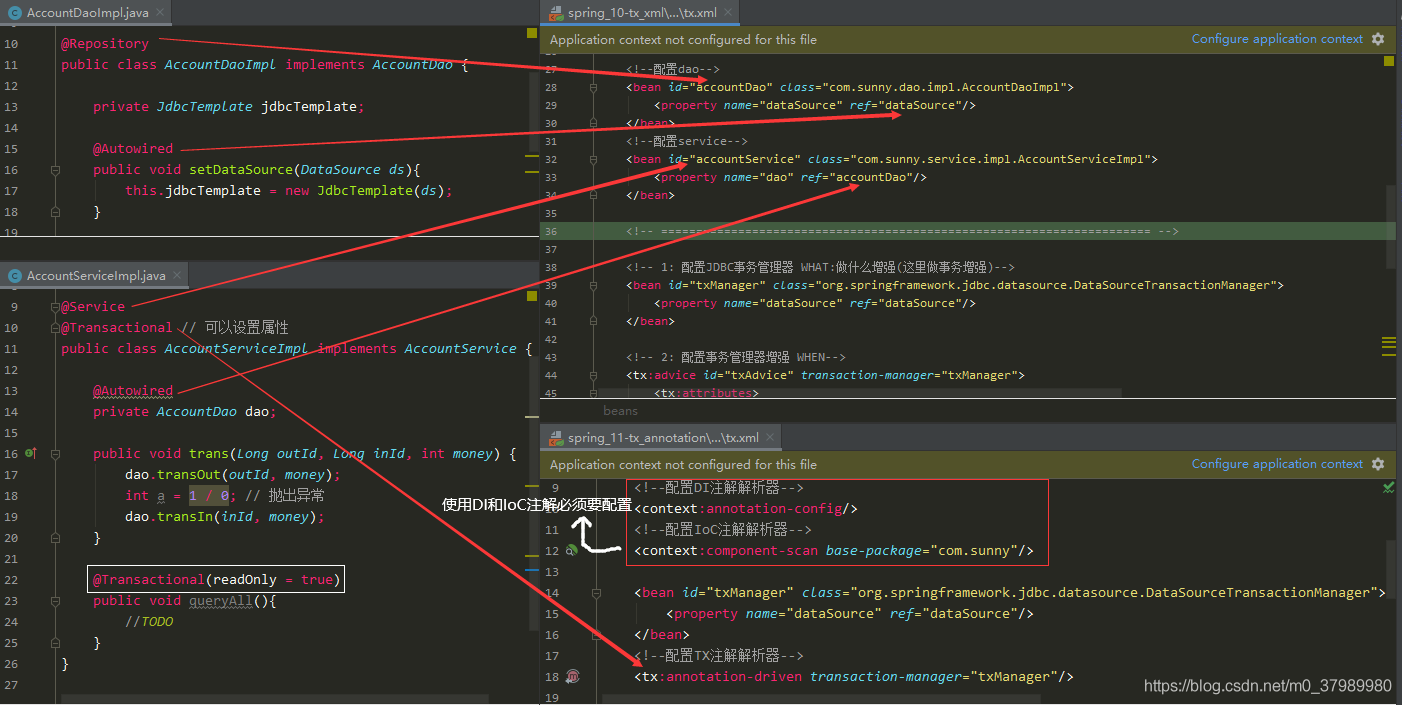
三、基于 纯注解(JavaConfig) 配置声明式事务
- @Configuration标识当前类是Spring的一个配置类
- @ComponentScan替代xml中的
<context:component-scan/> - @Import引入其他配置类,被引入的配置类可以不加@Configuration注解
- @PropertySource:引入外部properties文件,注意加classpath:
- @Value对成员变量赋值
- @Bean将一个方法的返回值对象加入到Spring的容器当中管理
- @Qualifier可以使用在方法上,表明对应的形参引入/注入的对象类型
直接删除xml的配置文件,取而代之的是一个Config类
@Transactional注解,取代tx标签
@EnableTransactionManagement注解,开启事务注解
@Configuration标识当前类为一个配置类, 当前项目的配置类,好比是applicationContext.xml@Import(Xxx.class)在主配置类中包含Xxx的配置类@PropertySource("classpath:db.properties")读取配置文件@Bean("Xxx")相当于<bean id="Xxx" class="">, Bean()中不写参数,默认就是该方法创建的对象; 该对象就被Spring容器所管理了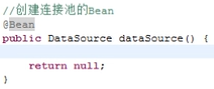
该类是一个配置类,它的作用和bean.xml是一样的spring中的新注解Configuration作用:指定当前类是一个配置类细节:当配置类作为AnnotationConfigApplicationContext对象创建的参数时,该注解可以不写。ComponentScan作用:用于通过注解指定spring在创建容器时要扫描的包属性:value:它和basePackages的作用是一样的,都是用于指定创建容器时要扫描的包。我们使用此注解就等同于在xml中配置了:<context:component-scan base-package="com.sunny"></context:component-scan>Bean作用:用于把当前方法的返回值作为bean对象存入spring的ioc容器中属性:name:用于指定bean的id。当不写时,默认值是当前方法的名称细节:当我们使用注解配置方法时,如果方法有参数,spring框架会去容器中查找有没有可用的bean对象。查找的方式和Autowired注解的作用是一样的Import作用:用于导入其他的配置类属性:value:用于指定其他配置类的字节码。当我们使用Import的注解之后,有Import注解的类就父配置类,而导入的都是子配置类PropertySource作用:用于指定properties文件的位置属性:value:指定文件的名称和路径。关键字:classpath,表示类路径下
Java代码
//@Repository("accountDaoImpl")@Repository // 默认是 accountDaoImpl,相当于类名首字母小写,相当于<bean id="accountDaoImpl" class=""/>public class AccountDaoImpl implements AccountDao {private JdbcTemplate jdbcTemplate;@Autowiredpublic void setDataSource(DataSource ds){this.jdbcTemplate = new JdbcTemplate(ds);}public void transOut(Long outId, int money) {String sql = "UPDATE account SET balance = balance - ? WHERE id = ?";jdbcTemplate.update(sql, money, outId);}public void transIn(Long inId, int money) {String sql = "UPDATE account SET balance = balance + ? WHERE id = ?";jdbcTemplate.update(sql, money, inId);}}@Service@Transactionalpublic class AccountServiceImpl implements AccountService {@Autowiredprivate AccountDao dao;public void trans(Long outId, Long inId, int money) {dao.transOut(outId, money);//int a = 1 / 0; // 抛出异常dao.transIn(inId, money);}}
Java配置类
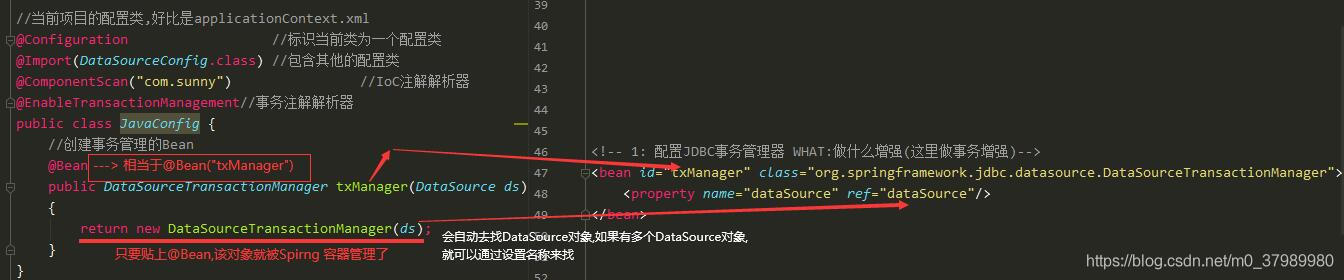
//当前项目的配置类,好比是applicationContext.xml@Configuration //标识当前类为一个配置类@Import(DataSourceConfig.class) //包含其他的配置类@ComponentScan("com.sunny") //IoC注解解析器@EnableTransactionManagement//事务注解解析器public class JavaConfig {//创建事务管理的Bean@Beanpublic DataSourceTransactionManager txManager(DataSource ds) {return new DataSourceTransactionManager(ds);}}// 当前项目的连接池的配置类@Configuration@PropertySource("classpath:db.properties")public class DataSourceConfig {// 将properties的内容注入到这些变量中@Value("${jdbc.driverClassName}")private String driverClassName;@Value("${jdbc.url}")private String url;@Value("${jdbc.username}")private String username;@Value("${jdbc.password}")private String password;@Value("${jdbc.initialSize}")private int initialSize;//创建连接池的Bean@Bean("dataSource")public DataSource dataSource() {DruidDataSource ds = new DruidDataSource();ds.setDriverClassName(driverClassName);ds.setUrl(url);ds.setUsername(username);ds.setPassword(password);ds.setInitialSize(initialSize);return ds;}}
测试类
@RunWith(SpringJUnit4ClassRunner.class)@ContextConfiguration(classes=JavaConfig.class)public class SpringTxTest {@Autowiredprivate AccountService service;@Testpublic void test1(){service.trans(10086L, 10010L, 1000);}}
成功!
使用纯注解和半注解和XML的对比图: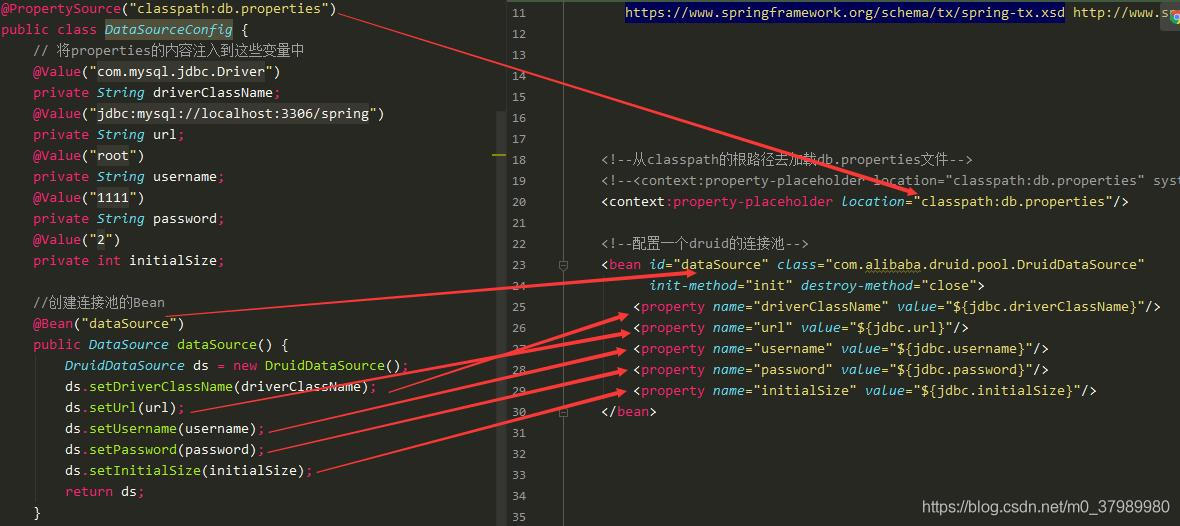
四、选择开发方式


若有收获,就点个赞吧
0 人点赞
