Sentinel限流的神秘面纱
之前我们学习过限流比较主流的三种算法:漏桶,令牌桶,滑动窗口。而Sentinel采用的是最后一种,滑动窗口来实现限流的。
通过对Sentinel基础Api的使用,我们可用发现,从我们定义好限流规则以后,在我们需要进行业务处理之前,都需要调用一下 SphU.entry(resource),具体代码如下:
public static void main(String[] args) {initFlowRules(); //初始化一个规则while(true){Entry entry=null;try{entry= SphU.entry(resource); //它做了什么System.out.println("Hello Word");}catch (BlockException e){//如果被限流了,那么会抛出这个异常e.printStackTrace();}finally {if(entry!=null){entry.exit();// 释放}}}}
代码中我们可能唯一疑惑的,也是最关键的一步是 SphU.entry(resource) , 我们传进去了一个资源,这个资源可用是方法名,可以是接口,那么他具体做了什么呢?让我们来一步步揭开他的神秘面纱:
public static Entry entry(String name) throws BlockException {return Env.sph.entry(name, EntryType.OUT, 1, OBJECTS0);}public class Env {public static final Sph sph = new CtSph();......//省略部分代码}
从 SphU.entry() 方法往下执行会进入到 Sph.entry() ,Sph的默认实现类是 CtSph,而最终会进入CtSph 的entry 方法:
@Overridepublic Entry entry(String name, EntryType type, int count, Object... args) throws BlockException { //封装了一个资源对象StringResourceWrapper resource = new StringResourceWrapper(name, type);return entry(resource, count, args);}
这里的主要步骤是通过我们给定的资源去封装了一个 StringResourceWrapper ,然后传入自己的重载方法,继而调用 entryWithPriority(resourceWrapper, count, false, args):
private Entry entryWithPriority(ResourceWrapper resourceWrapper, int count, boolean prioritized, Object... args)throws BlockException {Context context = ContextUtil.getContext();if (context instanceof NullContext) {// The {@link NullContext} indicates that the amount of context has exceeded the threshold,// so here init the entry only. No rule checking will be done.return new CtEntry(resourceWrapper, null, context);}if (context == null) {// Using default context.使用默认上下文context = InternalContextUtil.internalEnter(Constants.CONTEXT_DEFAULT_NAME);}//全局开关关闭,没有规则检查。// Global switch is close, no rule checking will do.if (!Constants.ON) {return new CtEntry(resourceWrapper, null, context);}// 获取该资源对应的 chainProcessorSlot<Object> chain = lookProcessChain(resourceWrapper);/** Means amount of resources (slot chain) exceeds {@link Constants.MAX_SLOT_CHAIN_SIZE},* so no rule checking will be done.*/if (chain == null) {return new CtEntry(resourceWrapper, null, context);}Entry e = new CtEntry(resourceWrapper, chain, context);try {//执行chain的 entry方法chain.entry(context, resourceWrapper, null, count, prioritized, args);} catch (BlockException e1) {e.exit(count, args);throw e1;} catch (Throwable e1) {// This should not happen, unless there are errors existing in Sentinel internal.RecordLog.info("Sentinel unexpected exception", e1);}return e;}
从上面的代码我们可以知道,该方法中主要是获取到了本资源所对应的资源处理链,从起命名 lookProcessChain 中发现,就是去获取到一条处理链,去执行资源的整合处理,当然,这里处于限流的环境下,那么这个处理链肯定是对于当前环境下请求的流量整合限流相关的处理。可以分为以下几个部分:
- 对参全局配置项做检测,如果不符合要求就直接返回了一个CtEntry对象,不会再进行后面的限流检测,否则进入下面的检测流程。
- 根据包装过的资源对象获取对应的SlotChain
- 执行SlotChain的entry方法,如果SlotChain的entry方法抛出了BlockException,则将该异常继续向上抛出,如果SlotChain的entry方法正常执行了,则最后会将该entry对象返回
- 如果上层方法捕获了BlockException,则说明请求被限流了,否则请求能正常执行
SlotChain 的链路获取
我们重点关注这个 SlotChain 的获取以及相关中药逻辑的执行,我们跟进 lookProcessChain :
ProcessorSlot<Object> lookProcessChain(ResourceWrapper resourceWrapper) {ProcessorSlotChain chain = chainMap.get(resourceWrapper);if (chain == null) {//这里与spring(缓存bean) dubbo(双重检查锁)中如出一辙,采用缓存机制synchronized (LOCK) {chain = chainMap.get(resourceWrapper);if (chain == null) {// Entry size limit. 6000if (chainMap.size() >= Constants.MAX_SLOT_CHAIN_SIZE) {return null;}// 真正构造SlotChain的和新方法chain = SlotChainProvider.newSlotChain(); // 资源 --> 处理链Map<ResourceWrapper, ProcessorSlotChain> newMap = new HashMap<ResourceWrapper, ProcessorSlotChain>(chainMap.size() + 1);newMap.putAll(chainMap);newMap.put(resourceWrapper, chain);chainMap = newMap;}}}return chain;}
这里的代码很清晰可以发现,首先从缓存中获取该处理链,而第一次进来肯定是没有的,所以这里会走 SlotChainProvider 去构造处理链,构造完成后将起放入缓存以备下次使用:
public static ProcessorSlotChain newSlotChain() {if (builder != null) {return builder.build();}resolveSlotChainBuilder();if (builder == null) {RecordLog.warn("[SlotChainProvider] Wrong state when resolving slot chain builder, using default");builder = new DefaultSlotChainBuilder();}return builder.build();}
这个方法进行了多次的校验,确保builder 不为空,然后通过其去构造这个处理链:
public class DefaultSlotChainBuilder implements SlotChainBuilder {@Overridepublic ProcessorSlotChain build() {ProcessorSlotChain chain = new DefaultProcessorSlotChain();chain.addLast(new NodeSelectorSlot());chain.addLast(new ClusterBuilderSlot());chain.addLast(new LogSlot());chain.addLast(new StatisticSlot());chain.addLast(new SystemSlot());chain.addLast(new AuthoritySlot());chain.addLast(new FlowSlot());chain.addLast(new DegradeSlot());return chain;}}
到了这里我们终于发现了这个处理链的组成情况,官网也有对其进行说明,毕竟是Sentinel的限流核心算法的实现腹地,我们看一下官网的介绍:
在 Sentinel 里面,所有的资源都对应一个资源名称(resourceName),每次资源调用都会创建一个 Entry 对象。Entry 可以通过对主流框架的适配自动创建,也可以通过注解的方式或调用 SphU API 显式创建。Entry 创建的时候,同时也会创建一系列功能插槽(slot chain),这些插槽有不同的职责,例如:
NodeSelectorSlot:收集资源的路径,并将这些资源的调用路径,以树状结构存储起来,用于根据调用路径来限流降级;ClusterBuilderSlot:用于存储资源的统计信息以及调用者信息,例如该资源的 RT, QPS, thread count 等等,这些信息将用作为多维度限流,降级的依据;StatisticSlot:用于记录、统计不同纬度的 runtime 指标监控信息;SystemSlot:通过系统的状态,例如 load1 等,来控制总的入口流量;AuthoritySlot:根据配置的黑白名单和调用来源信息,来做黑白名单控制;FlowSlot:用于根据预设的限流规则以及前面 slot 统计的状态,来进行流量控制;DegradeSlot:通过统计信息以及预设的规则,来做熔断降级;
总体的框架如下:
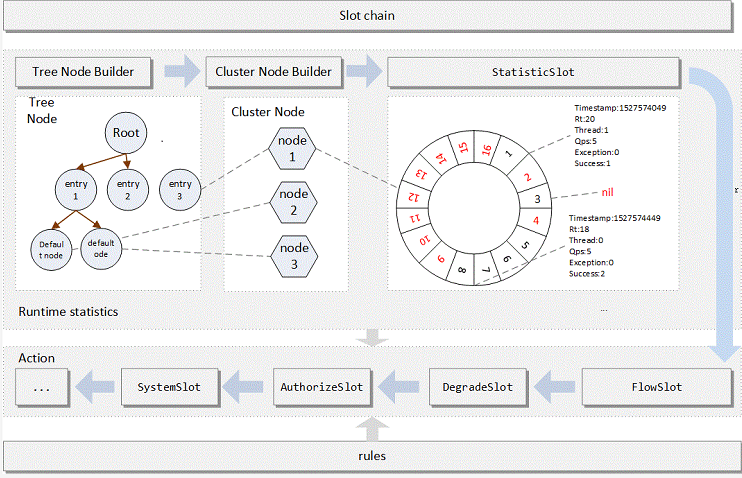
从这个架构图可以发现,整个调用链中最核心的就是 StatisticSlot(用于记录、统计不同纬度的 runtime 指标监控信息) 以及FlowSlot(根据预设的限流规则以及前面 slot 统计的状态,来进行流量控制).
Chain是链条的意思,从build的方法可看出,ProcessorSlotChain是一个链表,里面添加了很多个Slot。具体的实现需要到DefaultProcessorSlotChain中去看。
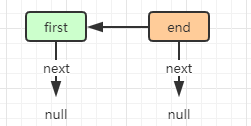
public class DefaultProcessorSlotChain extends ProcessorSlotChain {AbstractLinkedProcessorSlot<?> first = new AbstractLinkedProcessorSlot<Object>() {@Overridepublic void entry(Context context, ResourceWrapper resourceWrapper, Object t, int count, boolean prioritized, Object... args)throws Throwable {super.fireEntry(context, resourceWrapper, t, count, prioritized, args);}@Overridepublic void exit(Context context, ResourceWrapper resourceWrapper, int count, Object... args) {super.fireExit(context, resourceWrapper, count, args);}};AbstractLinkedProcessorSlot<?> end = first;......//省略部分代码}
DefaultProcessorSlotChain中有两个AbstractLinkedProcessorSlot类型的变量:first和end,这就是链表的头结点和尾节点。创建DefaultProcessorSlotChain对象时,首先创建了首节点,然后把首节点赋值给了尾节点,可以用下图表示:
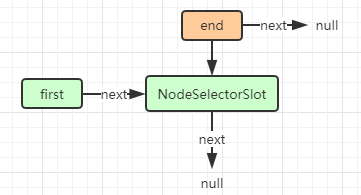
然后通过 chain.addLast(new NodeSelectorSlot()); 添加第一个节点:
public void addLast(AbstractLinkedProcessorSlot<?> protocolProcessor) {end.setNext(protocolProcessor);end = protocolProcessor;}public void setNext(AbstractLinkedProcessorSlot<?> next) {this.next = next;}
执行完添加 addLast 以后的链如下图:
当执行完整个处理链的添加后, SlotChain 如下:
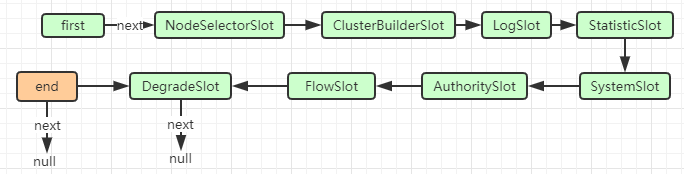
这样就将所有的Slot对象添加到了链表中去了,每一个Slot都是继承自AbstractLinkedProcessorSlot。而AbstractLinkedProcessorSlot是一种责任链的设计,每个对象中都有一个next属性,指向的是另一个AbstractLinkedProcessorSlot对象。其实责任链模式在很多框架中都有,比如Netty中是通过pipeline来实现的,还有Zookeeper中的服务端的请求处理链RequestProcessor等。
SlotChain 的链路执行
lookProcessChain方法获得的ProcessorSlotChain的实例是DefaultProcessorSlotChain,那么执行chain.entry方法,就会执行DefaultProcessorSlotChain.first的entry方法,而DefaultProcessorSlotChain.first的entry方法是这样的:
@Overridepublic void entry(Context context, ResourceWrapper resourceWrapper, Object t, int count, boolean prioritized, Object... args)throws Throwable {super.fireEntry(context, resourceWrapper, t, count, prioritized, args);}
继而调用父类 AbstractLinkedProcessorSlot 的 fireEntry 方法:
@Overridepublic void fireEntry(Context context, ResourceWrapper resourceWrapper, Object obj, int count, boolean prioritized, Object... args)throws Throwable {if (next != null) {next.transformEntry(context, resourceWrapper, obj, count, prioritized, args);}}
从这里可以看到,从fireEntry方法中就开始传递执行entry了,这里会执行当前节点的下一个节点transformEntry方法,上面已经分析过了,transformEntry方法会触发当前节点的entry,也就是说fireEntry方法实际是触发了下一个节点的entry方法。由上面的分析我们可以知道第一个Slot节点是 NodeSelectorSlot。
根据之前官网的介绍,我们着重注意两个 Slot ,就像我们使用的时候一样,我们需要配置规则,那么在Sentinel 中去校验这个规则的是 FlowSlot ,既然是一个做规则匹配的,那么进行匹配的数据是哪里来的呢? 在Sentinel中他提供了一个Slot 来统计这些数据,然后交给FlowSlot进行校验,他就是StatisticSlot。我们首先来看StatisticSlot的entry方法中的实现逻辑:
public void entry(Context context, ResourceWrapper resourceWrapper, DefaultNode node, int count,boolean prioritized, Object... args) throws Throwable {try {// Do some checking. 传播到下一个SlotfireEntry(context, resourceWrapper, node, count, prioritized, args);// 执行到这里表示通过检查,不被限流// Request passed, add thread count and pass count.node.increaseThreadNum();node.addPassRequest(count);if (context.getCurEntry().getOriginNode() != null) {// Add count for origin node.context.getCurEntry().getOriginNode().increaseThreadNum();context.getCurEntry().getOriginNode().addPassRequest(count);}if (resourceWrapper.getEntryType() == EntryType.IN) {// Add count for global inbound entry node for global statistics.Constants.ENTRY_NODE.increaseThreadNum();Constants.ENTRY_NODE.addPassRequest(count);}// Handle pass event with registered entry callback handlers.for (ProcessorSlotEntryCallback<DefaultNode> handler : StatisticSlotCallbackRegistry.getEntryCallbacks()) {handler.onPass(context, resourceWrapper, node, count, args);}} catch (PriorityWaitException ex) { ....省略部分代码 //增加线程统计node.increaseThreadNum();} catch (BlockException e) { ....省略部分代码// Blocked, set block exception to current entry.context.getCurEntry().setError(e);// Add block count.node.increaseBlockQps(count);} catch (Throwable e) {....省略部分代码// This should not happen.node.increaseExceptionQps(count);}}
代码分成了两部分,第一部分是entry方法,该方法首先会触发后续slot的entry方法,即SystemSlot、FlowSlot、DegradeSlot等的规则,如果规则不通过,就会抛出BlockException,则会在node中统计被block的数量。反之会在node中统计通过的请求数和线程数等信息。第二部分是在exit方法中,当退出该Entry入口时,会统计rt的时间,并减少线程数。
我们可以看到 node.addPassRequest() 这段代码是在fireEntry执行之后执行的,这意味着,当前请求通过了sentinel的流控等规则,此时需要将当次请求记录下来,也就是执行 node.addPassRequest()这行代码,我们跟进去看看:
public void addPassRequest(int count) {super.addPassRequest(count);this.clusterNode.addPassRequest(count);}
首先我们知道这里的node是一个 DefaultNode 实例,在第一个NodeSelectorSlot 的entry方法中对资源进行了封装,封装成了一个DefaultNode。
- DefaultNode:保存着某个resource在某个context中的实时指标,每个DefaultNode都指向一个ClusterNode
- ClusterNode:保存着某个resource在所有的context中实时指标的总和,同样的resource会共享同一个ClusterNode,不管他在哪个context中
// SAMPLE_COUNT=2 INTERVAL=1000private transient volatile Metric rollingCounterInSecond = new ArrayMetric(SampleCountProperty.SAMPLE_COUNT,IntervalProperty.INTERVAL);private transient Metric rollingCounterInMinute = new ArrayMetric(60, 60 * 1000, false);public void addPassRequest(int count) {rollingCounterInSecond.addPass(count);rollingCounterInMinute.addPass(count);}
从代码中我们可以看到,增加指标调用 addPass 是通过一个叫 ArrayMetric 的类,现在我们在进入 ArrayMetric 中看一下。具体的代码如下所示:
private final LeapArray<MetricBucket> data;// SAMPLE_COUNT=2 INTERVAL=1000public ArrayMetric(int sampleCount, int intervalInMs) {this.data = new OccupiableBucketLeapArray(sampleCount, intervalInMs);}public void addPass(int count) {WindowWrap<MetricBucket> wrap = data.currentWindow();wrap.value().addPass(count);}
这里终于出现了与滑动窗口有那么点关联的 window了,window不就是窗户嘛,这里通过 data 来获取当前窗口。而这里的窗口大小为 sampleCount=2.我们可以看到,这里是通过 MetricBucket 来保存各项指标,其中维护了一个统计是数组LongAdder[] counters 来保存,而 WindowWrap,我们可以看到每一个 WindowWrap对象由三个部分组成:
public class WindowWrap<T> {// 时间窗口的长度private final long windowLengthInMs;// 时间窗口的开始时间,单位是毫秒private long windowStart;//时间窗口的内容,在 WindowWrap 中是用泛型表示这个值的,但实际上就是 MetricBucket 类private T value;//......省略部分代码}
再看 LeapArray 这个类:
public abstract class LeapArray<T> {// 时间窗口的长度protected int windowLength;// 采样窗口的个数protected int sampleCount;// 以毫秒为单位的时间间隔protected int intervalInMs;// 采样的时间窗口数组protected AtomicReferenceArray<WindowWrap<T>> array;/*** LeapArray对象* @param windowLength 时间窗口的长度,单位:毫秒* @param intervalInSec 统计的间隔,单位:秒*/public LeapArray(int windowLength, int intervalInSec) {this.windowLength = windowLength;// 时间窗口的采样个数,默认为2个采样窗口this.sampleCount = intervalInSec * 1000 / windowLength;this.intervalInMs = intervalInSec * 1000;this.array = new AtomicReferenceArray<WindowWrap<T>>(sampleCount);}}
可以很清晰的看出来在 LeapArray 中创建了一个 AtomicReferenceArray 数组,用来对时间窗口中的统计值进行采样。通过采样的统计值再计算出平均值,就是我们需要的最终的实时指标的值了。可以看到我在上面的代码中通过注释,标明了默认采样的时间窗口的个数是2个,这个值是怎么得到的呢?我们回忆一下 LeapArray 对象创建,是通过在 StatisticNode 中,new了一个 ArrayMetric,然后将参数一路往上传递后创建的:
private transient volatile Metric rollingCounterInSecond = new ArrayMetric(SampleCountProperty.SAMPLE_COUNT,IntervalProperty.INTERVAL);
我们跟进获取当前窗口的方法 data.currentWindow() 中:
@Overridepublic WindowWrap<Window> currentWindow(long time) {.....//省略部分代码int idx = calculateTimeIdx(timeMillis);// Calculate current bucket start time.long windowStart = calculateWindowStart(timeMillis);// time每增加一个windowLength的长度,timeId就会增加1,时间窗口就会往前滑动一个while (true) {// 从采样数组中根据索引获取缓存的时间窗口WindowWrap<Window> old = array.get(idx);// array数组长度不宜过大,否则old很多情况下都命中不了,就会创建很多个WindowWrap对象if (old == null) {// 如果没有获取到,则创建一个新的WindowWrap<Window> window = new WindowWrap<Window>(windowLength, currentWindowStart, new Window());// 通过CAS将新窗口设置到数组中去if (array.compareAndSet(idx, null, window)) {// 如果能设置成功,则将该窗口返回return window;} else {// 否则当前线程让出时间片,等待Thread.yield();}// 如果当前窗口的开始时间与old的开始时间相等,则直接返回old窗口} else if (currentWindowStart == old.windowStart()) {return old;// 如果当前时间窗口的开始时间已经超过了old窗口的开始时间,则放弃old窗口// 并将time设置为新的时间窗口的开始时间,此时窗口向前滑动} else if (currentWindowStart > old.windowStart()) {if (addLock.tryLock()) {try {// if (old is deprecated) then [LOCK] resetTo currentTime.return resetWindowTo(old, currentWindowStart);} finally {addLock.unlock();}} else {Thread.yield();}// 这个条件不可能存在} else if (currentWindowStart < old.windowStart()) {// Cannot go through here.return new WindowWrap<Window>(windowLength, currentWindowStart, new Window());}}}
代码很长,我们逐步将其分解,我们实际可以把他分成以下几步:
- 根据当前时间,算出该时间的timeId,并根据timeId算出当前窗口在采样窗口数组中的索引idx。
- 根据当前时间算出当前窗口的应该对应的开始时间time,以毫秒为单位。
- 根据索引idx,在采样窗口数组中取得一个时间窗口。
- 循环判断直到获取到一个当前时间窗口 old 。
- 如果old为空,则创建一个时间窗口,并将它插入到array的第idx个位置,array上面已经分析过了,是一个 AtomicReferenceArray。
- 如果当前窗口的开始时间time与old的开始时间相等,那么说明old就是当前时间窗口,直接返回old。
- 如果当前窗口的开始时间time大于old的开始时间,则说明old窗口已经过时了,将old的开始时间更新为最新值:time,进入下一次得循环再判断当前窗口的开始时间time与old的开始时间相等的时候返回。
- 如果当前窗口的开始时间time小于old的开始时间,实际上这种情况是不可能存在的,因为time是当前时间,old是过去的一个时间。
另外timeId是会随着时间的增长而增加,当前时间每增长一个windowLength的长度,timeId就加1。但是idx不会增长,只会在0和1之间变换,因为array数组的长度是2,只有两个采样时间窗口。至于为什么默认只有两个采样窗口,个人觉得因为sentinel是比较轻量的框架。时间窗口中保存着很多统计数据,如果时间窗口过多的话,一方面会占用过多内存,另一方面时间窗口过多就意味着时间窗口的长度会变小,如果时间窗口长度变小,就会导致时间窗口过于频繁的滑动。先来看一下其中的第一步及第二步:
private int calculateTimeIdx(/*@Valid*/ long timeMillis) {// time每增加一个windowLength的长度,timeId就会增加1,时间窗口就会往前滑动一个long timeId = timeMillis / windowLengthInMs;// idx被分成[0,arrayLength-1]中的某一个数,作为array数组中的索引return (int)(timeId % array.length());}protected long calculateWindowStart(/*@Valid*/ long timeMillis) {return timeMillis - timeMillis % windowLengthInMs;}
根据当前时间除于 windowLength 得到一个 timeId(相差500ms计算出来的值将是一致的),再用timeId跟取样窗口的长度进行一个取模,那么她一定会落在 0,1两个位置的其中一个。然后根据当前时间算出当前窗口的应该对应的开始时间time。由于刚刚开始的时候 array 是空的,那么她获取到的old应当是null,那么他会创建一个新的实例,我们用图看一下初始化的 LeapArray:
对应上面 currentWindow 方法的 4.1 步骤(假设idx=0):
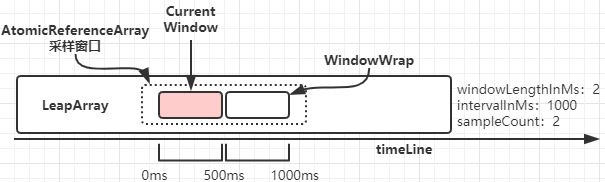
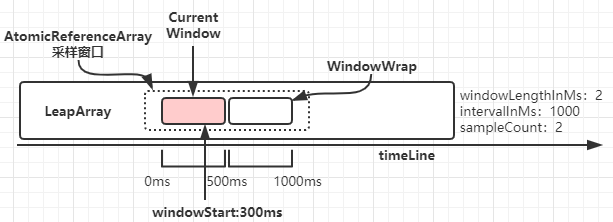
当获取到的是null,那么初始的时候arrays数组中只有一个窗口(可能是第一个(idx=0),也可能是第二个(idx=1)),每个时间窗口的长度是500ms,这就意味着只要当前时间与时间窗口的差值在500ms之内,时间窗口就不会向前滑动。例如,假如当前时间走到300或者500时,当前时间窗口仍然是相同的那个:
对应上面 currentWindow 方法的 4.2 步骤:
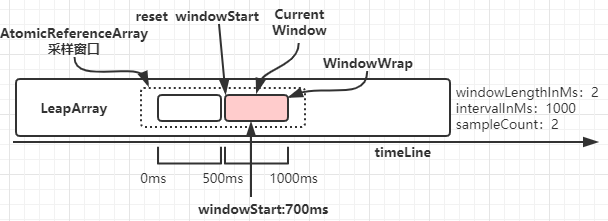
时间继续往前走,当超过500ms时,时间窗口就会向前滑动到下一个,这时就会更新当前窗口的开始时间,时间继续往前走,只要不超过1000ms,则当前窗口不会发生变化,其中代码实现是 resetWindowTo 方法:
protected WindowWrap<MetricBucket> resetWindowTo(WindowWrap<MetricBucket> w, long time) {// Update the start time and reset value.// 重置windowStartw.resetTo(time);MetricBucket borrowBucket = borrowArray.getWindowValue(time);if (borrowBucket != null) {w.value().reset();w.value().addPass((int)borrowBucket.pass());} else {w.value().reset();}return w;}
对应上面 currentWindow 方法的 4.3 步骤:
当时间继续往前走,当前时间超过1000ms时,就会再次进入下一个时间窗口,此时arrays数组中的窗口将会有一个失效,会有另一个新的窗口进行替换:
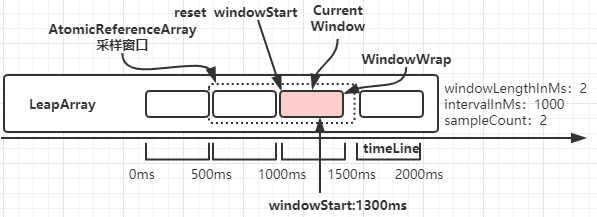
以此类推随着时间的流逝,时间窗口也在发生变化,在当前时间点中进入的请求,会被统计到当前时间对应的时间窗口中,回到addpass 方法中:
public void addPass(int count) {WindowWrap<MetricBucket> wrap = data.currentWindow();wrap.value().addPass(count);}
获取到窗口以后会进入到 wrap.value().addPass(count); QPS的增加。而这里的 wrap.value() 得到的是之前提到的 MetricBucket ,在 Sentinel 中QPS相关数据的统计结果是维护在这个类的 LongAdder[] 中,最终由这个指标来与我们实现设置好的规则进行匹配,查看是否限流,也就是 StatisticSlot
的entry 方法中的 fireEntry(context, resourceWrapper, node, count, prioritized, args); 都要先进入到 FlowSlot的entry方法进行限流过滤:
public void entry(Context context, ResourceWrapper resourceWrapper, DefaultNode node, int count,boolean prioritized, Object... args) throws Throwable {checkFlow(resourceWrapper, context, node, count, prioritized);fireEntry(context, resourceWrapper, node, count, prioritized, args);}
可以看到这里有个很重要的方法 checkFlow ,进去看看:
public void checkFlow(Function<String, Collection<FlowRule>> ruleProvider, ResourceWrapper resource,Context context, DefaultNode node, int count, boolean prioritized) throws BlockException {if (ruleProvider == null || resource == null) {return;}Collection<FlowRule> rules = ruleProvider.apply(resource.getName());if (rules != null) {for (FlowRule rule : rules) {if (!canPassCheck(rule, context, node, count, prioritized)) {throw new FlowException(rule.getLimitApp(), rule);}}}}
到这里一切都应该清晰了,这里拿到了我们设置的 FlowRule 循环匹配资源进行限流过滤。这就是Sentinel 能做到限流的原因。

若有收获,就点个赞吧
0 人点赞
