1. Vue3.0 几个大变化
1. 全部用 ts 重写(响应式、vdom、模板编译等)
2. 性能提升,代码量减少(打包后,也就是不同场景下分的更清晰)
3. Proxy 存在浏览器兼容性问题,且不能 polyfill 。响应式由原来的 Object.defineProperty 改成 Proxy。所以也不能再所有的浏览器上、不能再所有场景下使用。推出一个不用 Proxy 兼容 IE11 和安卓低版本类似于补丁的一个版本
4. Proxy 实现响应式,可以规避 Object.defineProperty 的一些不足。
5. Options API 构建组件,如 data、 methods、 computed 等,改为 Composition API 。
_
2. Vue 3.0 项目初始化
第一步,安装vue-cli:
$ npm install -g @vue/cli
安装后,测试下是否安装成功:
$ vue -V@vue/cli 4.4.1 // @vue/cli ">= 4.2.3"
第二步,初始化 vue 项目:
$ vue create vue-next-test
输入命令后,会出现命令行交互窗口,和 Vue2.x 的一样,我们选 Manually select features:
Vue CLI v4.4.1? Please pick a preset:default (babel, eslint)❯ Manually select features
勾选:Router、Vuex、CSS Pre-processors 和 Linter / Formatter,这些和咱们平常做项目一样:
备注: Vue 3.0 项目目前需要从 Vue 2.0 项目升级而来,所以为了直接升级到 Vue 3.0 全家桶,需要在 Vue 项目创建过程中勾选 Router 和 Vuex。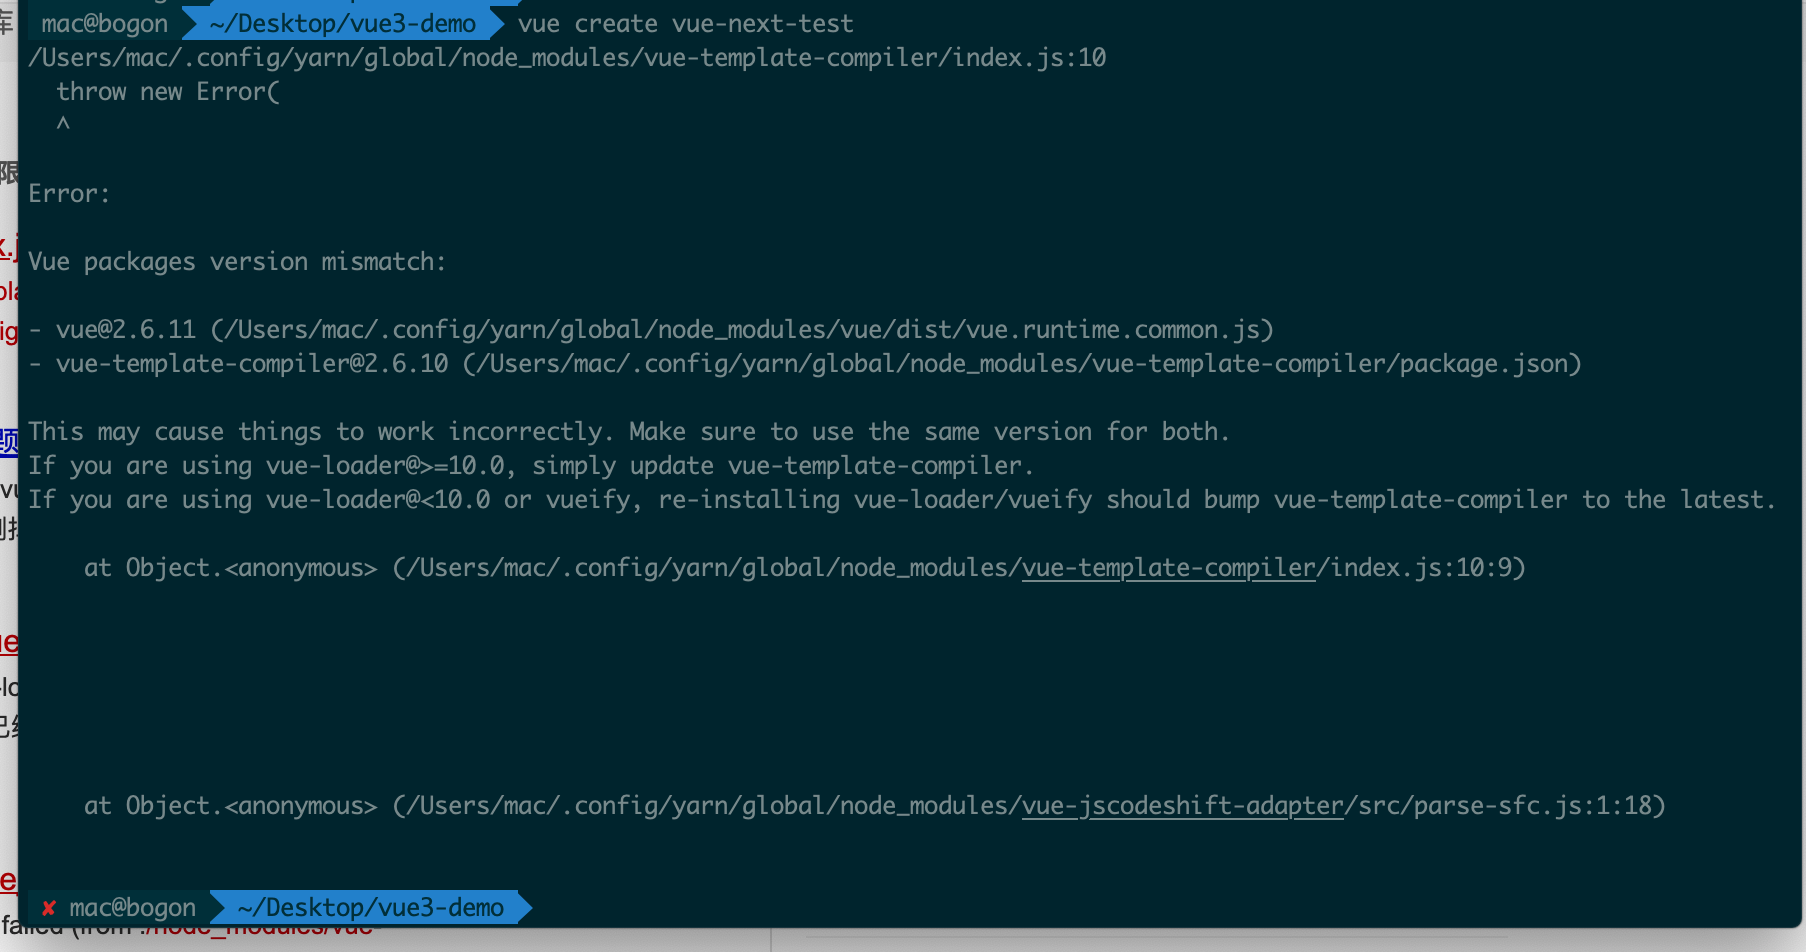
sudo yarn add global vueyarn upgrade vue-template-compiler // 也执行了vue create vue-next-test 报错akryum@akryum-XPS-13-9370:~$ cd .config/yarn/global/akryum@akryum-XPS-13-9370:~/.config/yarn/global$ rm -rf node_modules/akryum@akryum-XPS-13-9370:~/.config/yarn/global$ rm yarn.lockakryum@akryum-XPS-13-9370:~/.config/yarn/global$ yarn
3. 升级项目到 Vue 3.0
cd vue-next-testvue add vue-next
执行上述指令后,会自动安装 vue-cli-plugin-vue-next 插件(查看项目代码),该插件会完成以下操作:
- 安装 Vue 3.0 依赖
- 更新 Vue 3.0 webpack loader 配置,使其能够支持 .vue 文件构建
- 创建 Vue 3.0 的模板代码
- 自动将代码中的 Vue Router 和 Vuex 升级到 4.0 版本,如果未安装则不会升级
- 自动生成 Vue Router 和 Vuex 模板代码
完成上述操作后,项目正式升级到 Vue 3.0,该插件还不能支持typescript。
4. Vue 3.0 基本特性体验
4.1 定义状态ref,响应式reactive,计算属性computed, 监听器watch,生命周期onMounted等
<template><div class="home"><button @click="increment">Count is: {{ state.count }}, double is: {{ state.double }}</button><hr><h1>ref绑定数据状态</h1><div>{{ num }}</div><div> count * 2 = {{doubleCount}} </div><button @click="plus">+</button><button @click="minus">-</button></div></template><script>import { reactive, computed, ref, onMounted } from 'vue'// reactive 几乎等价于 2.x 中现有的 Vue.observable() API,且为了避免与 RxJS 中的 observable 混淆而做了重命名。export default {setup() {const state = reactive({count: 0,double: computed(() => state.count * 2),})function increment() {state.count++}const num = ref(3);const doubleCount = computed(() => num.value * 2)const plus = () => {num.value++}const minus = () => {num.value--}// 这些生命周期注册方法只能用在 setup 钩子中。它会通过内部的全局状态自动找到调用此 setup 钩子的实例。有意如此设计是为了减少将逻辑提取到外部函数时的冲突。onMounted(() => console.log('component mounted!'))return {state,increment,num,doubleCount,plus,minus}},}</script>
备注: 这里的 plus,minus 方法不再需要定义在 methods 中,但注意更新 num 值的时候不能直接使用 count++,而应使用 num.value++。
4.2 获取路由
Vue 3.0 中通过 getCurrentInstance 方法获取当前组件的实例,然后通过 ctx 属性获得当前上下文,ctx.$router 是 Vue Router 实例,里面包含了 currentRoute 可以获取到当前的路由信息
<script>import { getCurrentInstance } from 'vue'export default {setup () {const { ctx } = getCurrentInstance()console.log(ctx.$router.currentRoute.value)}}</script>
4.3 使用 Vuex
第一步,定义 Vuex 状态,修改 src/store/index.js 文件:
// Vuex 的语法和 API 基本没有改变import Vuex from 'vuex'export default Vuex.createStore({state: {test: {a: 1}},mutations: {setTestA(state, value) {state.test.a = value}},actions: {},modules: {}})
第二步,引用 Vuex 状态,在 Test.vue 中,通过计算属性使用 Vuex 状态:
<template><div class="test"><h1>test count: {{count}}</h1><div>count * 2 = {{doubleCount}}</div><div>state from vuex {{a}}</div><button @click="add">add</button></div></template><script>import { ref, computed, watch, getCurrentInstance } from 'vue'export default {setup() {const count = ref(0)const add = () => {count.value++}watch(() => count.value, val => {console.log(`count is ${val}`)})const doubleCount = computed(() => count.value * 2)const { ctx } = getCurrentInstance()console.log(ctx.$router.currentRoute.value)const a = computed(() => ctx.$store.state.test.a)const update = () => {ctx.$store.commit('setTestA', count)}return {count,doubleCount,add,a,update}}}</script>
5. Object.defineProperty 与 Proxy 实现响应式对比
Object.defineProperty的缺点1. 深度监听需要一次性递归(data比较深的话,会有某个时间点卡住一下)性能瓶颈2. 无法监听新增属性/删除属性(需要使用 Vue.set,Vue.delete)3. 无法原生监听数组,需要特殊处理
Proxy响应式demo:https://gitlab.com/Amywill/vue3-demo.git
Proxy 的使用需要搭配Reflect
1. Reflect传的参数和Proxy的一一对应,是一对好搭档。2. Reflect优点:规范化、标准化、函数式3. Reflect将慢慢替代掉Object上的工具函数。Object将只作为数据使用。Reflect 与 Object 对比obj = {a: 10,b: 20,c: 30,d: 40}'a' in obj // trueReflect.has(obj, 'a') // truedelete obj.a // trueReflect.deleteProperty(obj, 'b') // trueObject.getOwnPropertyNames(obj)Reflect.ownKeys(obj)// 什么时候get什么时候递归,是惰性的,get到哪就将哪的对象处理成响应式。这就是Proxy深度监听提升性能的地方。// Object.defineProperty 是一次性递归,耗费性能// Proxy 能监听到新增属性const ownKeys = Reflect.ownKeys(target)if (ownKey.includes(key)) {console.log('已有的key:' key)} else {console.log('新增的key:' key)}
更多关于Relect:https://es6.ruanyifeng.com/#docs/reflect
简书Relect:https://es6.ruanyifeng.com/#docs/reflect
5.1 Proxy 优点
- 深度监听,性能更好。规避Object.defineProperty的问题。
- 可监听 新增/删除 属性
- 可监听数组变化
5.2 Proxy 缺点
Proxy无法兼容所有浏览器,无法polyfill。
6. Todo List
见参考demo
I 参考
参考文档 Vue Composition API:https://composition-api.vuejs.org
demo:https://gitlab.com/Amywill/vue3-demo.git
项目搭建CSDN:https://blog.csdn.net/huang714/article/details/105762040/
vue-next:https://github.com/vuejs/vue-next

若有收获,就点个赞吧
0 人点赞
