第一次尝试写本文,还是去年年底(2019-11-26),后来入职新公司忙的要死,也就鸽了。今天重新梳理,争取弄得清楚一些:带你读 Vuex 源码。2020-05-05 11:54:35
基础使用
Vuex是什么
Vuex 是一个专为 Vue.js 应用程序开发的状态管理模式。 它采用集中式存储管理应用的所有组件的状态,并以相应的规则保证状态以一种可预测的方式发生变化。
- 集中式存储
- 状态以可预测的方式变化,改值得走流程使用提前写好的方法。方便追溯相关方法的调用来观察状态的流转过程。
用法
用法:
- state
- mutations
- actions
- getters
import Vue from 'vue'import Vuex from 'vuex'Vue.use(Vuex)const store = new Vuex.Store({state: {counter: 0},mutations: {add(state) {state.counter++}},actions: {add({commit}) {setTimeout(() => {commit('add')}, 1000);}},getters: {doubleCount(state){return state.count*2}}})new Vue({store})
在页面中:
this.$store.commit('add'); // 同步this.$store.dispatch('add'); // 异步this.$store.state.counter; // state获取this.$store.getters.doubleCounter // getters
其他用法,写了很多都删了,具体看官方文档就好了。

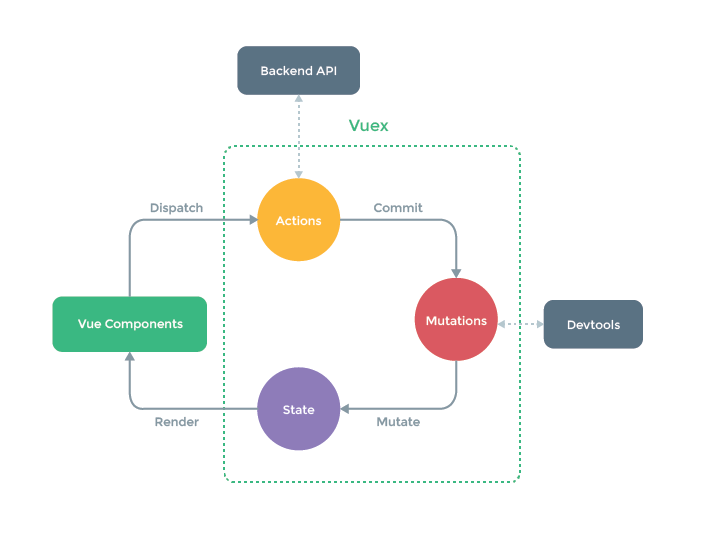
如何阅读这张图片?
- 我们再vue组件中调用 dispatch 使用Action来发起异步请求,得到的结果
- Mutation 只接受同步函数,修改 State
- 状态State的修改会引起组件的渲染render
合理使用vuex
源码基础实现
既然是Vue生态里的插件,使用Vue.use(Vuex),new Vuex.Store({})来初始化插件,源码结构就需要实现 install方法,也需要导出 Store 。当然,因为vuex依赖vue,所以也是使用了 形参。
使用 Vue.mixin 方法,在 beforeCreate 时期混入vue
// step1let Vueclass Store {constructor(options) {}}// vue2里是这样使用的new Vuex.Store({})function install(_Vue) {Vue = _VueVue.mixin({// 筛选 判断 添加this.$storebeforeCreate() {if (this.$options.store) {Vue.prototype.$store = this.$options.store}},})}// 导出 install 和 Storeexport default {install,Store,}
用户会传入 state, mutations, actions, gettter等配置对象。
state
初始化时候会对
store._vm=new Vue({data:{$$state: state},compouted})
所以访问 $store.state 实际上是访问的 this._vm._data.$$state
先来实现 state ,用户可以访问 state,但不能修改。
这里解决响应式,没有使用router中使用的util方法,而是直接使用了 new Vue
依赖promise
// step2class Store{constructor(options){// 保证是响应式的,上次router使用了`Vue.util.defineReactive`// 这里直接使用了 Vue 构造函数来保证数据是响应式的// this._vm = new Vue({$$state=options.state})this.config = new Vue({data: {// state = options.state// 这里用了$$state 一个小技巧,不会挂载,只读,黑科技$$state = option.state}})}get state(){// return this._vm._data.$$statereturn this.config._data.$$state}set state(val){console.error('不能直接修改')}}
mutation
用户调用 this.$store.commit('add')
class Store{constructor(options){// ... 略过// 找到方法集合this._mutations = options.mutationsthis.commit = this.commit.bind(this) // 时刻绑定this}commit(type,payload){// 要找到对应的方法const target = this._mutations[type]// 找不到怎么办if(!target){console.log('没找到')return;}target(this.state,payload)// mutations: {// add(state) {// state.counter++// }// }},}}
action
处理异步,和commit区别不大。
class Store{constructor(options){this._actions = options.actionsthis.dispatch = this.dispatch.bind(this)}dispatch(type, payload) {const entry = this._actions[type]if (!entry) {console.error("未知action类型")return}// 把整个 this 放进去entry(this, payload)// actions: {// add({commit}) {// setTimeout(() => {// commit('add')// }, 1000);// }// }},}}
getter
getter是一个快捷选项,类似 computed
官方在 resetStoreVM 做了说明
class Store{constructor(options){this._xGetter = options.gettersthis.xGetter = this.xGetter.bind(this)}xGetter(type){this.getters = {} // 定义对象const target = this._xGetter[type]}}
class Store {constructor(opitons){this.xGetters(options.getters)}xGetters(types){this.getters={} // 定义了对象,然后遍历Object.keys(types).forEach(key=>{// 利用 define 进行映射Object.defineProperty(this.getters,key,{get:()=>{return types[key](this.state)}})})}}
wrapgetters
插件Plugin
下面这个函数会在每次Mutation 之后调用,这样也就实现了记录的作用。
function actionLogPlugin(store){store.subscribe((mutation,state)=>{})}
如何实现 plugin?就比如大名鼎鼎的 vuex-persistedstate,原理就很简单,
每次 mutation变化都会把 state 存入 localStorage.setItem 里
const myPlugin = store =>{store.subscribe((mutation,state)=>{})}
- 本文部分参考 vue技术揭秘

