1、往期文章
iOS 底层探索文章系列
上一篇中,我们已经分析过了 dyld 与我们的 objc 之间是怎样关联起来的,结合上一篇文章中开头的面试题,那么今天我们继续探索 Runtime 的 map_images 做了哪些操作。
2、map_images 流程分析
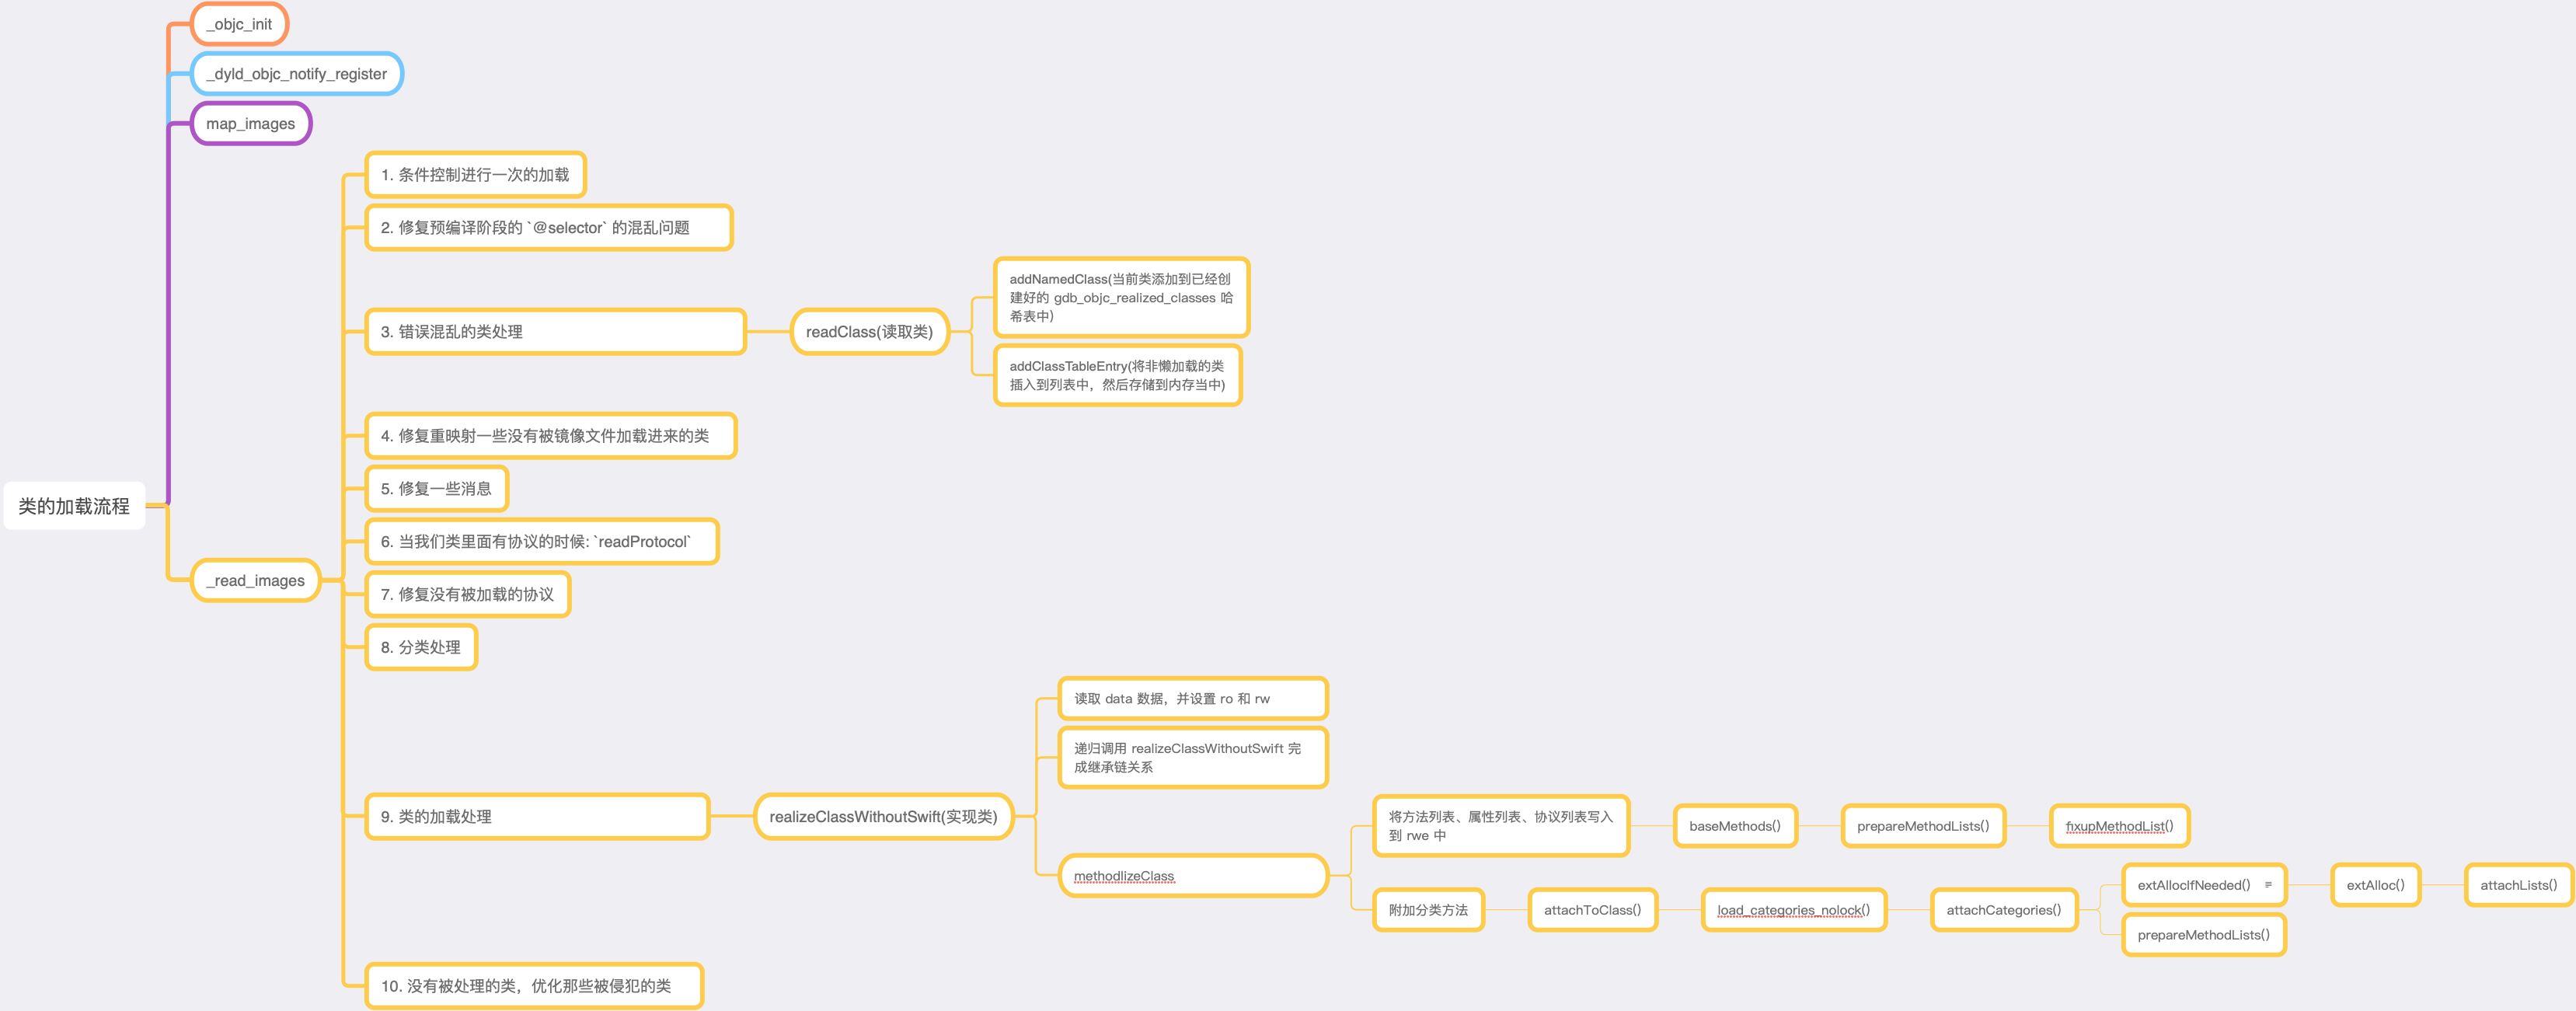
还是从系统库 libSystem 的 Runtime 入口函数 _objc_init 跳转到 map_images
/************************************************************************ map_images* Process the given images which are being mapped in by dyld.* Calls ABI-agnostic code after taking ABI-specific locks.** Locking: write-locks runtimeLock**********************************************************************/voidmap_images(unsigned count, const char * const paths[],const struct mach_header * const mhdrs[]){mutex_locker_t lock(runtimeLock);return map_images_nolock(count, paths, mhdrs);}
2.1 map_images_nolock 分析
进来之后,我们发现直接返回了 map_images_nolock。
从 map_images 函数的注释部分,可以得出: map_images 主要作用就是处理由 dyld 映射的 image(泛指二进制可执行程序)。
继续进入 map_images_nolock 函数的实现部分,代码比较长,我们主要关注类的信息是如何加载的
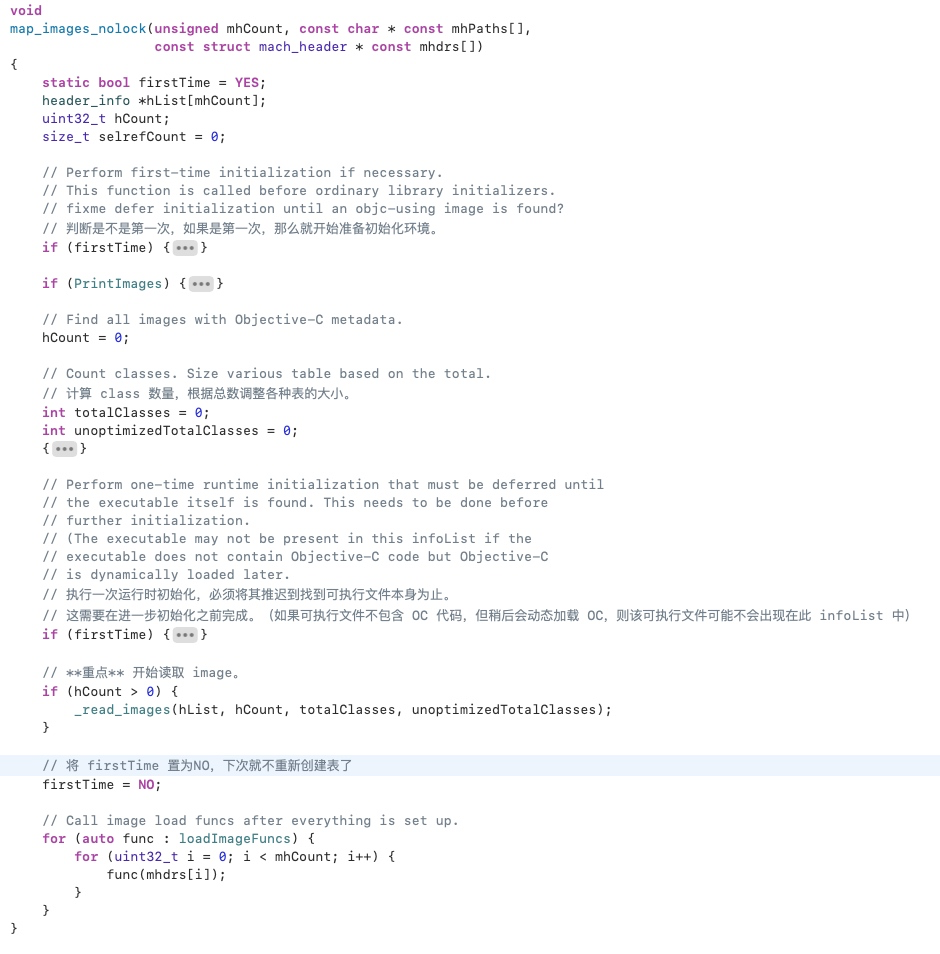
map_images_nolock 流程总结:
- 1. 判断
firstTime,如果为 YES 那么准备执行环境初始化。 - 2. 计算
class数量,然后根据总数调整各种表的大小。 - 3. 判断
firstTime,如果为 YES 则执行各种表的初始化操作。 - 4. 执行
_read_images,对镜像文件进行读取,然后把firstTime置为 NO,下次进入直接执行_read_images。
2.2 _read_images 分析
接下来就是我们的重点部分,分析 _read_images 究竟做了哪些操作
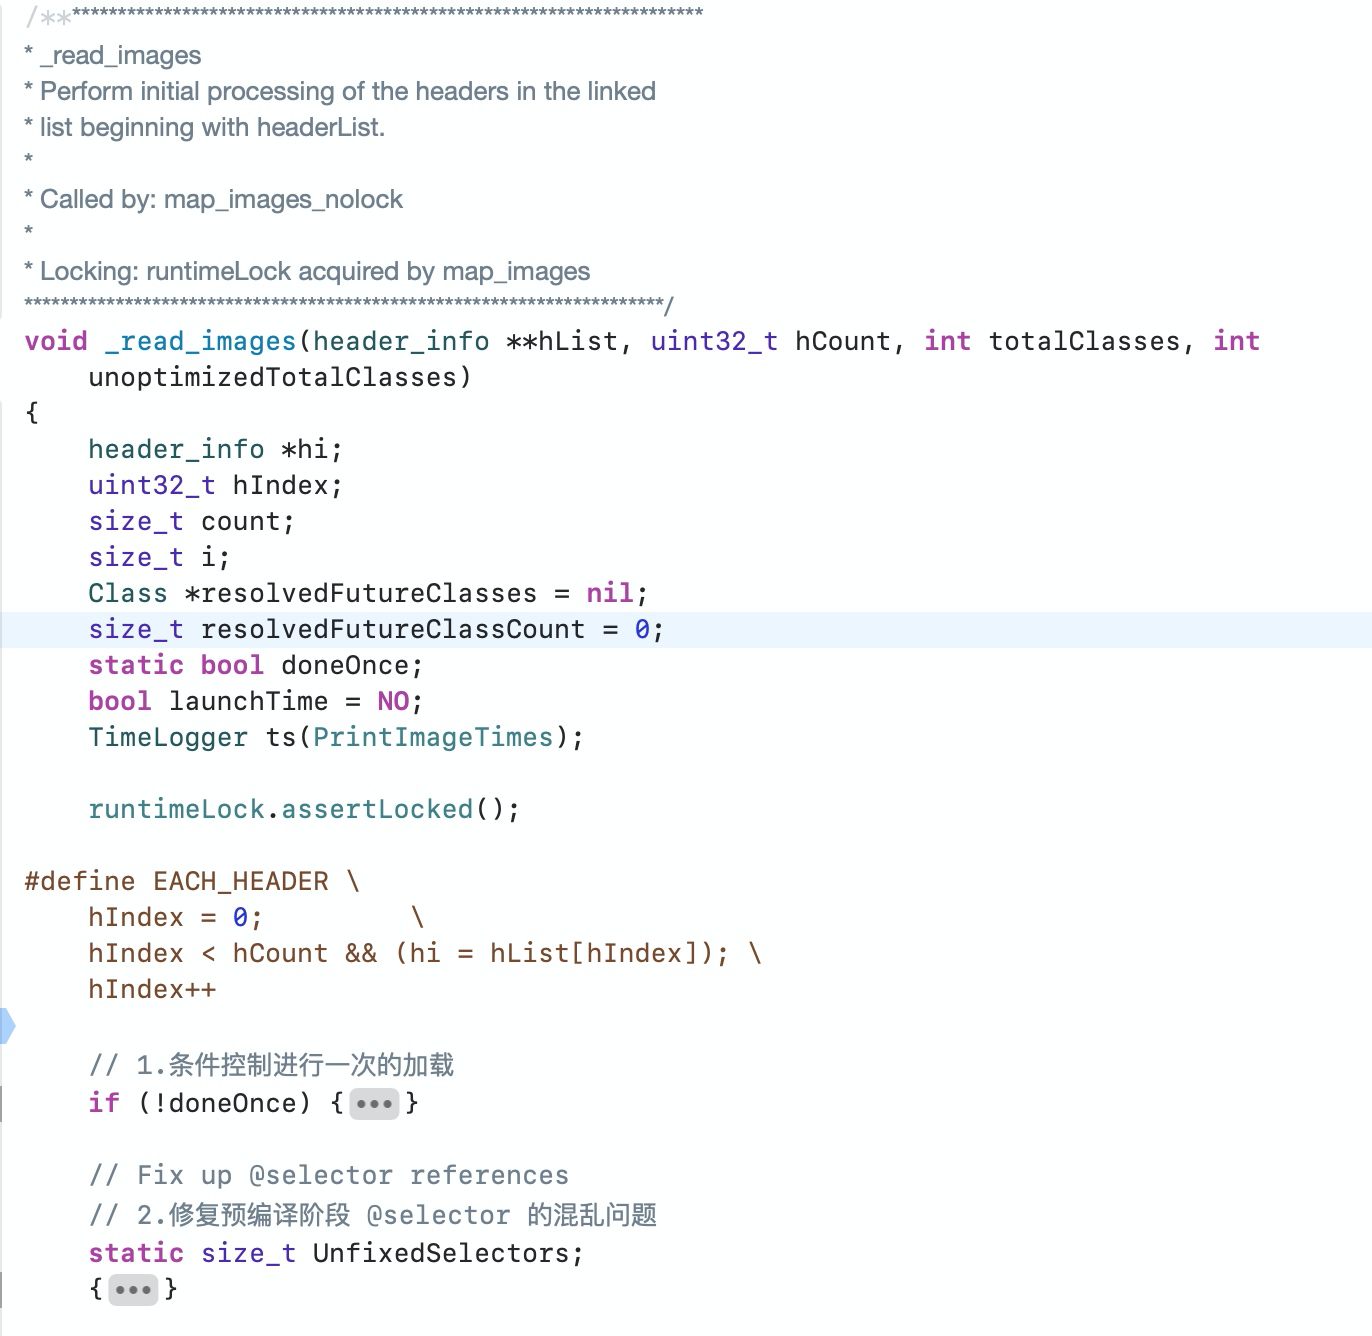
_read_images 流程总结:
- 1. 条件控制进行一次的加载。
- 2. 修复预编译阶段的
@selector的混乱问题。 - 3. 错误混乱的类处理。
- 4. 修复重映射一些没有被镜像文件加载进来的类。
- 5. 修复一些消息。
- 6. 当我们类里面有协议的时候:
readProtocol。 - 7. 修复没有被加载的协议。
- 8. 分类处理。
- 9. 类的加载处理。
- 10. 没有被处理的类,优化那些被侵犯的类。
下面我们对部分步骤的代码进行解读
2.2.1 步骤1. 条件控制进行一次的加载
if (!doneOnce) {// 这个逻辑只执行一次doneOnce = YES;launchTime = YES;// 重置及初始化TaggedPointer环境if (DisableTaggedPointers) {disableTaggedPointers();}initializeTaggedPointerObfuscator();// 创建哈希表 gdb_objc_realized_classesint namedClassesSize =(isPreoptimized() ? unoptimizedTotalClasses : totalClasses) * 4 / 3;gdb_objc_realized_classes =NXCreateMapTable(NXStrValueMapPrototype, namedClassesSize);}
我们到这个表的定义部分,根据注释能查看出这个表大概的作用。
// This is a misnomer: gdb_objc_realized_classes is actually a list of// named classes not in the dyld shared cache, whether realized or not.// gdb_objc_realized_classes 实际上是用于存储不在共享缓存且已命名的类,无论它是否已实现NXMapTable *gdb_objc_realized_classes; // exported for debuggers in objc-gdb.h
- 这里拓展一下这张表的类型:
gdb_objc_realized_classes的类型是NXMapTable。- 可以简单理解
NXMapTable==NSMapTable,也就是对应的我们常用的NSDictionary,并且额外提供了 weak 指针来使用垃圾回收机制。NSDictionary底层实现也是使用了NSMapTable(散列表),(备注:苹果官网并没有这些类的实现,想要查看NSDictionary和NSArray的实现源码可以去 GNUstep官网下载。- 使用
NSMapTable是因为它更强大 NSMapTable 相对于 NSDictionary 的优势。
2.2.2 步骤2. 修复预编译阶段的 @selector 的混乱问题
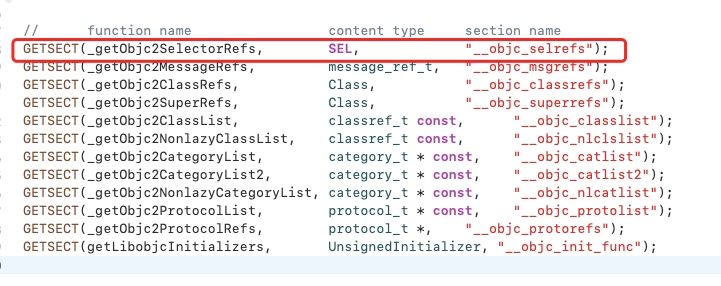
static size_t UnfixedSelectors;{mutex_locker_t lock(selLock);for (EACH_HEADER) {if (hi->hasPreoptimizedSelectors()) continue;bool isBundle = hi->isBundle();// _getObjc2SelectorRefs 是从 mach-o 中的静态段 __objc_selrefs 中遍历列表,然后通过 sel_registerNameNoLock 将 sel 添加到 namedSelectors 中SEL *sels = _getObjc2SelectorRefs(hi, &count);UnfixedSelectors += count;for (i = 0; i < count; i++) {const char *name = sel_cname(sels[i]);// 此处需要注意:sel 并不是一个简单的字符串,而是带地址的字符串SEL sel = sel_registerNameNoLock(name, isBundle);if (sels[i] != sel) {sels[i] = sel;}}}}
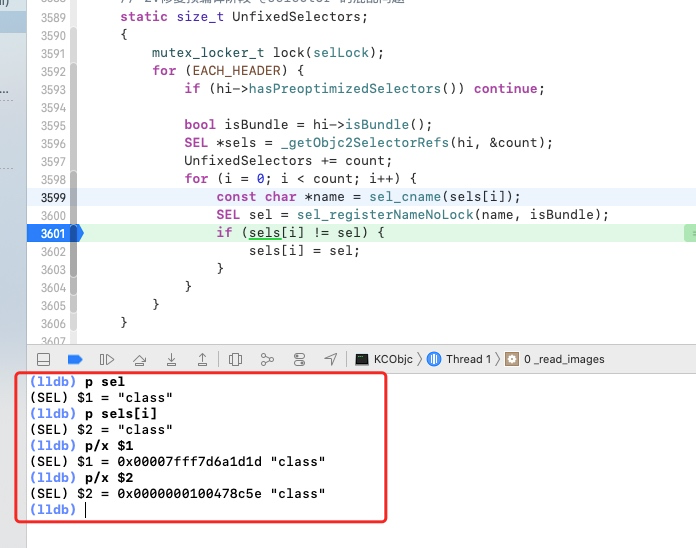
通过控制台打印输出的结果,我们可以看到两个方法的名称相同,但是方法的地址却不相同,主要原因是什么呢?
是因为,我们整个苹果系统中,会有很多系统框架,比如 CoreFoundation、 CoreMedia 等等,当每个框架都有一个相同的方法,比如上图的 class 方法的时候,我们就需要将方法平移到程序的最前面进行执行,例如 CoreFoundation 的 class 方法的 index = 0,而 CoreMedia 的 class 方法 index = 0 + CoreFoundation 的大小。所以我们要将方法进行平移操作。
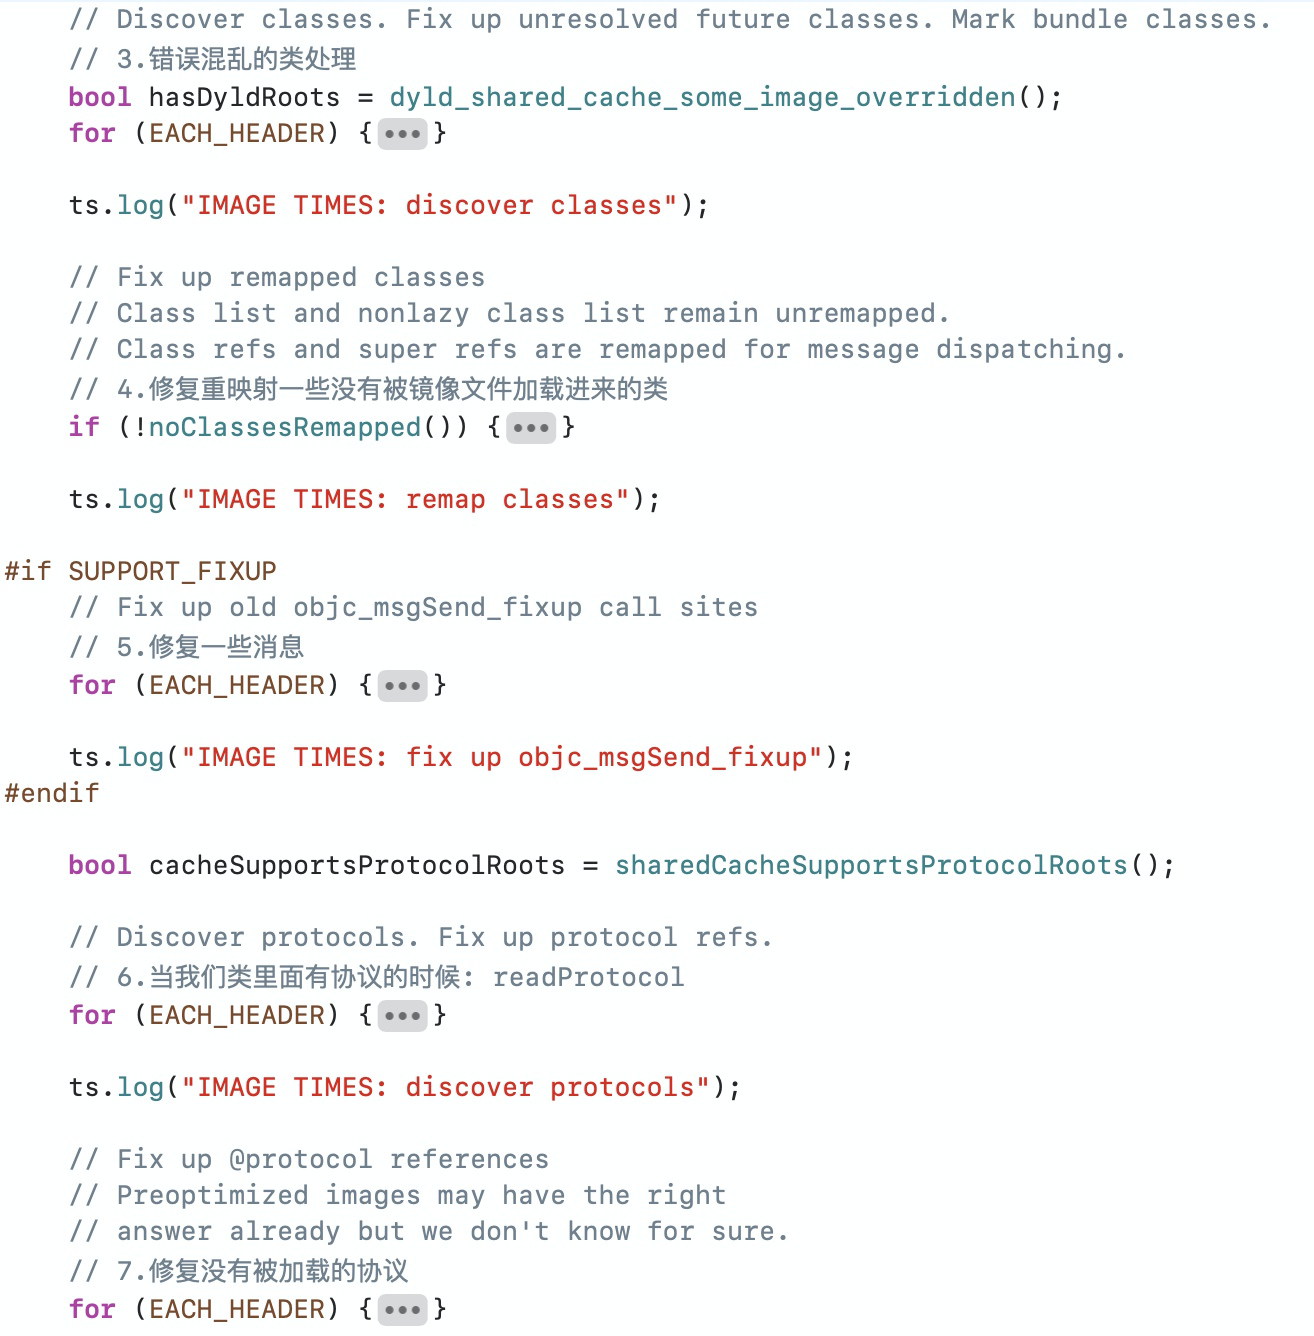
2.2.3 步骤3: 错误混乱的类处理
bool hasDyldRoots = dyld_shared_cache_some_image_overridden();for (EACH_HEADER) {if (! mustReadClasses(hi, hasDyldRoots)) {// Image is sufficiently optimized that we need not call readClass()continue;}// 从 mach-o 的静态段 __objc_classlist 类列表中读取出所有类classref_t const *classlist = _getObjc2ClassList(hi, &count);bool headerIsBundle = hi->isBundle();bool headerIsPreoptimized = hi->hasPreoptimizedClasses();for (i = 0; i < count; i++) {Class cls = (Class)classlist[i];// **重点**Class newCls = readClass(cls, headerIsBundle, headerIsPreoptimized);if (newCls != cls && newCls) {// Class was moved but not deleted. Currently this occurs// only when the new class resolved a future class.// Non-lazily realize the class below.resolvedFutureClasses = (Class *)realloc(resolvedFutureClasses,(resolvedFutureClassCount+1) * sizeof(Class));resolvedFutureClasses[resolvedFutureClassCount++] = newCls;}}}
我们在 readClass 方法调用的前后都下个断点,然后打印输出有什么变化
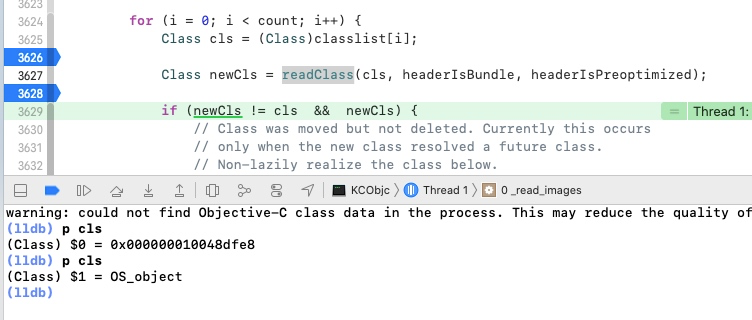
可以看到在 readClass 方法调用之后,对 cls 进行了类名的赋值操作。此时类的信息目前仅存储了地址和名称,我们再进去看一下 readClass 的源码
Class readClass(Class cls, bool headerIsBundle, bool headerIsPreoptimized){const char *mangledName = cls->mangledName();if (headerIsPreoptimized && !replacing) {// class list built in shared cache// fixme strict assert doesn't work because of duplicates// ASSERT(cls == getClass(name));ASSERT(getClassExceptSomeSwift(mangledName));} else {// 添加类名addNamedClass(cls, mangledName, replacing);// 插入哈希表中,即从 mach-o 中把类读取到内存当中addClassTableEntry(cls);}return cls;}
再进去查看 addNamedClass 的源码
static void addNamedClass(Class cls, const char *name, Class replacing = nil){Class old;if ((old = getClassExceptSomeSwift(name)) && old != replacing) {inform_duplicate(name, old, cls);// getMaybeUnrealizedNonMetaClass uses name lookups.// Classes not found by name lookup must be in the// secondary meta->nonmeta table.addNonMetaClass(cls);} else {// 将 name 与 cls 的地址进行映射,并插入到内存当中NXMapInsert(gdb_objc_realized_classes, name, cls);}}
查看 mangledName 方法的源码
const char *mangledName() {// fixme can't assert locks hereASSERT(this);// 这个初始化判断在我们前面分析的 lookuoImp 也有出现过if (isRealized() || isFuture()) {// 如果类已经初始化过,则从 ro 中直接获取 namereturn data()->ro()->name;} else {// 否则从 mach-o 中读取 data 里面的 namereturn ((const class_ro_t *)data())->name;}}
综上可得:readClass 的主要作用就是将 mach-o 的类读取到内存当中,当前的类中仅有两个信息,即地址和名称,data 数据会在步骤九中读取出来并赋值到类中。
2.2.4 步骤4: 修复重映射一些没有被镜像文件加载进来的类
// Fix up remapped classes// Class list and nonlazy class list remain unremapped.// Class refs and super refs are remapped for message dispatching.if (!noClassesRemapped()) {for (EACH_HEADER) {Class *classrefs = _getObjc2ClassRefs(hi, &count);for (i = 0; i < count; i++) {remapClassRef(&classrefs[i]);}// fixme why doesn't test future1 catch the absence of this?classrefs = _getObjc2SuperRefs(hi, &count);for (i = 0; i < count; i++) {remapClassRef(&classrefs[i]);}}}
主要是将未被映射的 class 和 superclass 进行重映射。从注释中可知,被重映射的类都是懒加载类。如果没有在相关的类里面进行相关处理,是不会执行这段代码的。
_getObjc2ClassRefs是从mach-o的静态段__objc_classrefs中获取类的引用_getObjc2SuperRefs是从mach-o的静态段__objc_superrefs中获取父类的引用
2.2.5 步骤5: 修复一些消息
#if SUPPORT_FIXUP// Fix up old objc_msgSend_fixup call sites// 5.修复一些消息for (EACH_HEADER) {message_ref_t *refs = _getObjc2MessageRefs(hi, &count);if (count == 0) continue;if (PrintVtables) {_objc_inform("VTABLES: repairing %zu unsupported vtable dispatch ""call sites in %s", count, hi->fname());}for (i = 0; i < count; i++) {fixupMessageRef(refs+i);}}ts.log("IMAGE TIMES: fix up objc_msgSend_fixup");#endif
主要是通过 _getObjc2MessageRefs 从 mach-o 的静态段 __objc_msgrefs 中获取 message_ref_t,然后通过遍历,从 fixupMessageRef 中将函数指针进行注册,并修复为新的函数指针。
2.2.6 步骤6: 当我们类里面有协议的时候: readProtocol
// Discover protocols. Fix up protocol refs.// 6.当我们类里面有协议的时候: readProtocolfor (EACH_HEADER) {// 遍历所有协议列表,并且将协议列表加载到 protocol 的 NXMapTable 表中。extern objc_class OBJC_CLASS_$_Protocol;Class cls = (Class)&OBJC_CLASS_$_Protocol;ASSERT(cls);// 获取 protocol 的 NXMapTable(哈希表)NXMapTable *protocol_map = protocols();bool isPreoptimized = hi->hasPreoptimizedProtocols();// Skip reading protocols if this is an image from the shared cache// and we support roots// Note, after launch we do need to walk the protocol as the protocol// in the shared cache is marked with isCanonical() and that may not// be true if some non-shared cache binary was chosen as the canonical// definitionif (launchTime && isPreoptimized && cacheSupportsProtocolRoots) {if (PrintProtocols) {_objc_inform("PROTOCOLS: Skipping reading protocols in image: %s",hi->fname());}continue;}bool isBundle = hi->isBundle();// 从 mach-o 的静态段 __objc_protolist 中获取协议列表protocol_t * const *protolist = _getObjc2ProtocolList(hi, &count);// 遍历循环将 protocol 添加到 protocol_map(哈希表) 中for (i = 0; i < count; i++) {readProtocol(protolist[i], cls, protocol_map,isPreoptimized, isBundle);}}
2.2.7 步骤7: 修复没有被加载的协议
// Fix up @protocol references// Preoptimized images may have the right// answer already but we don't know for sure.// 7.修复没有被加载的协议for (EACH_HEADER) {// At launch time, we know preoptimized image refs are pointing at the// shared cache definition of a protocol. We can skip the check on// launch, but have to visit @protocol refs for shared cache images// loaded later.if (launchTime && cacheSupportsProtocolRoots && hi->isPreoptimized())continue;// 从 mach-o 的静态段 __objc_protorefs 中获取 protolistprotocol_t **protolist = _getObjc2ProtocolRefs(hi, &count);// 循环遍历 protolist,对当前协议和协议列表中同一地址的协议进行比较,如果协议不同,则用当前协议进行替换。for (i = 0; i < count; i++) {remapProtocolRef(&protolist[i]);}}
/************************************************************************ remapProtocolRef* Fix up a protocol ref, in case the protocol referenced has been reallocated.* Locking: runtimeLock must be read- or write-locked by the caller**********************************************************************/static size_t UnfixedProtocolReferences;static void remapProtocolRef(protocol_t **protoref){runtimeLock.assertLocked();protocol_t *newproto = remapProtocol((protocol_ref_t)*protoref);if (*protoref != newproto) {*protoref = newproto;UnfixedProtocolReferences++;}}
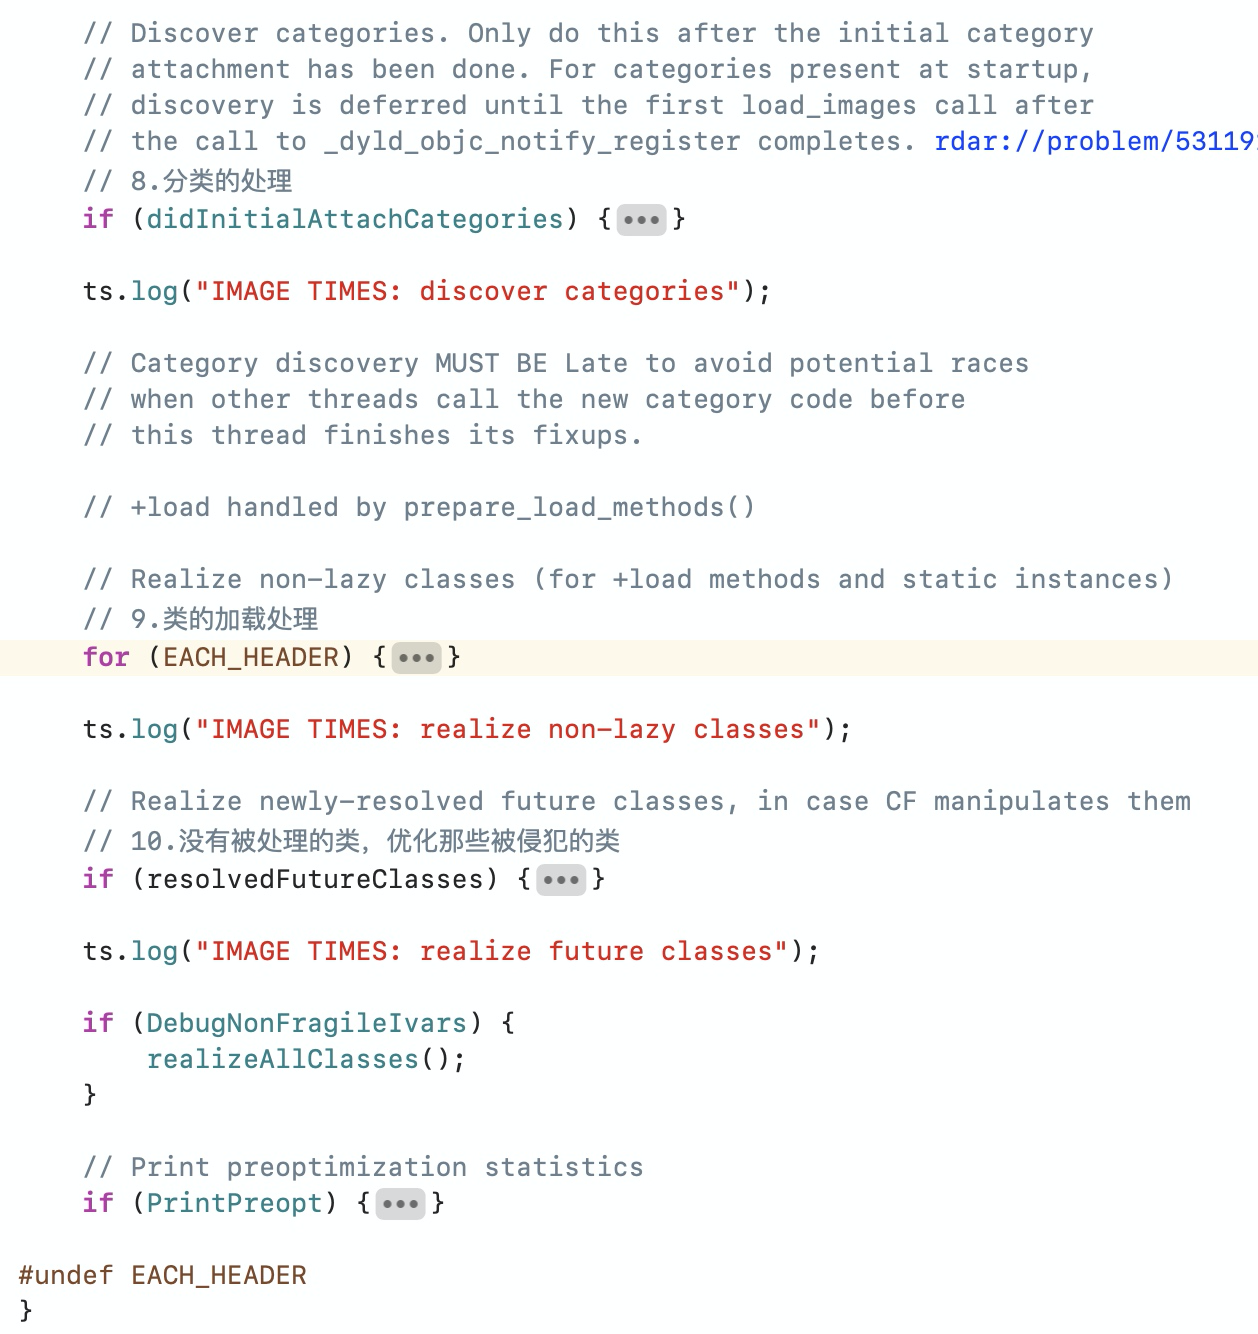
2.2.8 步骤8: 分类处理
// Discover categories. Only do this after the initial category// attachment has been done. For categories present at startup,// discovery is deferred until the first load_images call after// the call to _dyld_objc_notify_register completes. rdar://problem/53119145// 8.分类的处理if (didInitialAttachCategories) {for (EACH_HEADER) {load_categories_nolock(hi);}}
根据注释可知,主要是对分类进行处理,需要在分类初始化并将数据加载到类后才执行,对在运行时才出现的分类,将分类的加载推迟到 _dyld_objc_notify_register 调用完成之后的第一个load_images 调用为止。
2.2.9 步骤9: 类的加载处理
// Realize non-lazy classes (for +load methods and static instances)for (EACH_HEADER) {classref_t const *classlist =_getObjc2NonlazyClassList(hi, &count);for (i = 0; i < count; i++) {Class cls = remapClass(classlist[i]);if (!cls) continue;addClassTableEntry(cls);if (cls->isSwiftStable()) {if (cls->swiftMetadataInitializer()) {_objc_fatal("Swift class %s with a metadata initializer ""is not allowed to be non-lazy",cls->nameForLogging());}// fixme also disallow relocatable classes// We can't disallow all Swift classes because of// classes like Swift.__EmptyArrayStorage}realizeClassWithoutSwift(cls, nil);}}
通过注释,我们可以得知,当前只有 类为非懒加载类 的时候,才会执行。
1. 从 mach-o 的静态段 __objc_nlclslist 中获取非懒加载类表。
2. 通过 addClassTableEntry 将非懒加载的类插入到列表中,然后存储到内存当中,其中如果当前类已经被添加,就不会再次进行添加了。
3. 通过 realizeClassWithoutSwift 实现类的 data 的加载,因为前面我们的类的信息目前仅存储了地址和名称。
接下来研究此步骤中的重点部分 realizeClassWithoutSwift 方法
realizeClassWithoutSwift 方法主要作用是将类的 data 信息加载到内存当中,还有对 ro 和 rw 进行了相关操作。主要有以下几个步骤。
- 1. 读取
data数据,并设置ro、rw。- 读取
data数据,并将其强转为ro,以及初始化rw,然后将ro拷贝一份到rw的ro。 ro表示read only,其在编译期的时候就已经确定了内存,包含了类的名称、方法列表、协议列表、属性列表和成员变量列表的信息。由于它是只读的,确定了之后就不会发生变化,所以属于 干净的内存(Clean Memory)。rw表示read Write,由于OC的动态性,所以可能会在运行时动态往类中添加属性、方法和协议。rwe表示read Write ext,在2020的WWDC上,这部视频 Objective-C运行时的进步 对 内存优化 做了进一步的改进。其中说到rw中只有 10% 左右的类真正更改了它们的方法、属性等,所以新增加了rwe,即是类的额外信息,rw和rwe都属于 脏内存(dirty memory)。
- 读取
// fixme verify class is not in an un-dlopened part of the shared cache?// 读取 cls 的 data,并将其强转为 ro,以及初始化 rw,然后将 ro 拷贝一份到 rw 的 ro。// 读取类结构的 bits 属性。auto ro = (const class_ro_t *)cls->data();// 判断是否是元类auto isMeta = ro->flags & RO_META;if (ro->flags & RO_FUTURE) {// This was a future class. rw data is already allocated.rw = cls->data();ro = cls->data()->ro();ASSERT(!isMeta);cls->changeInfo(RW_REALIZED|RW_REALIZING, RW_FUTURE);} else {// Normal class. Allocate writeable class data.// 创建 rwrw = objc::zalloc<class_rw_t>();// rw 赋值 rorw->set_ro(ro);rw->flags = RW_REALIZED|RW_REALIZING|isMeta;// 将 rw 赋值给 cls 的 datacls->setData(rw);}
- 2. 递归调用
realizeClassWithoutSwift完成类的继承链关系。- 递归调用
realizeClassWithoutSwift,设置父类和元类的data信息加载到内存当中。 - 分别将父类和元类赋值给
class的superclass和classIsa。
- 递归调用
// Realize superclass and metaclass, if they aren't already.// This needs to be done after RW_REALIZED is set above, for root classes.// This needs to be done after class index is chosen, for root metaclasses.// This assumes that none of those classes have Swift contents,// or that Swift's initializers have already been called.// fixme that assumption will be wrong if we add support// for ObjC subclasses of Swift classes.// 递归调用 `realizeClassWithoutSwift`,设置父类和元类的 `data` 信息加载到内存当中。// 当 isa 找到根元类之后,因为根元类的 isa 是指向自己的,不会返回 nil 从而导致无限递归,在 remapClass 中对类在表中进行查找的操作,如果表中已有该类,则返回一个空值;如果没有则返回当前类,这样保证了类只加载一次并结束递归supercls = realizeClassWithoutSwift(remapClass(cls->superclass), nil);metacls = realizeClassWithoutSwift(remapClass(cls->ISA()), nil);// Update superclass and metaclass in case of remapping// 分别将父类和元类赋值给 `class` 的 `superclass` 和 `classIsa`。cls->superclass = supercls;cls->initClassIsa(metacls);// Connect this class to its superclass's subclass lists// 注意:class 是双向链接结构,即父类可以找到子类,子类可以找到父类if (supercls) {// 将 cls 作为 supercls 的子类添加。addSubclass(supercls, cls);} else {// 将 cls 添加为新的已实现的根类。addRootClass(cls);}
- 3. 调用
methodizeClass方法,读取方法列表(包括分类)、协议列表、属性列表,然后赋值给rw,最后返回cls。
// Attach categories - 附加分类methodizeClass(cls, previously);return cls;
2.2.10 步骤10: 没有被处理的类,优化那些被侵犯的类
// Realize newly-resolved future classes, in case CF manipulates them// 10.实现没有被处理的类,优化那些被侵犯的类if (resolvedFutureClasses) {for (i = 0; i < resolvedFutureClassCount; i++) {Class cls = resolvedFutureClasses[i];if (cls->isSwiftStable()) {_objc_fatal("Swift class is not allowed to be future");}realizeClassWithoutSwift(cls, nil);cls->setInstancesRequireRawIsaRecursively(false/*inherited*/);}free(resolvedFutureClasses);}
主要是实现没有被处理的类,优化那些被侵犯的类。
2.3 methodizeClass 分析
/************************************************************************ methodizeClass* Fixes up cls's method list, protocol list, and property list.* Attaches any outstanding categories.* Locking: runtimeLock must be held by the caller**********************************************************************/static void methodizeClass(Class cls, Class previously){runtimeLock.assertLocked();bool isMeta = cls->isMetaClass();auto rw = cls->data();auto ro = rw->ro();auto rwe = rw->ext();// Install methods and properties that the class implements itself.// 将方法列表、属性列表和协议列表赋值到 rwe// 获取 ro 的 方法列表method_list_t *list = ro->baseMethods();if (list) {// 对方法列表进行排序操作prepareMethodLists(cls, &list, 1, YES, isBundleClass(cls));// 把方法赋值给 rwe 的 methodif (rwe) rwe->methods.attachLists(&list, 1);}// 获取 ro 的 属性列表property_list_t *proplist = ro->baseProperties;if (rwe && proplist) {// 把属性赋值给 rwe 的 propertiesrwe->properties.attachLists(&proplist, 1);}// 获取 ro 的 协议列表protocol_list_t *protolist = ro->baseProtocols;if (rwe && protolist) {// 把协议赋值给 rwe 的 protocolsrwe->protocols.attachLists(&protolist, 1);}// Root classes get bonus method implementations if they don't have// them already. These apply before category replacements.if (cls->isRootMetaclass()) {// root metaclassaddMethod(cls, @selector(initialize), (IMP)&objc_noop_imp, "", NO);}// Attach categories.// 附加分类方法if (previously) {if (isMeta) {objc::unattachedCategories.attachToClass(cls, previously,ATTACH_METACLASS);} else {// When a class relocates, categories with class methods// may be registered on the class itself rather than on// the metaclass. Tell attachToClass to look for those.objc::unattachedCategories.attachToClass(cls, previously,ATTACH_CLASS_AND_METACLASS);}}objc::unattachedCategories.attachToClass(cls, cls,isMeta ? ATTACH_METACLASS : ATTACH_CLASS);}
以上代码,可以分为
- 将方法列表、属性列表和协议列表赋值给
rwe。 - 附加分类方法。
2.3.1 rwe 的获取
class_rw_ext_t *ext() const {return get_ro_or_rwe().dyn_cast<class_rw_ext_t *>();}
在上面的源码中我们可以看到 ext() 方法调用了 get_ro_or_rwe() 获取 ro 或者 rwe()。
2.3.2 rwe 的逻辑
以 方法列表 加入到 rwe 的逻辑为例,主要有以下步骤
1. 获取 ro 的 baseMethods;
2. 通过 prepareMethodLists 方法进行排序;
3. 通过 attachLists 插入。
2.3.2.1 方法如何排序
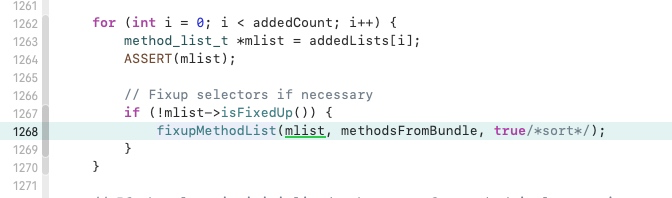
查看 prepareMethodLists 的源码,发现内部是通过调用 fixupMethodList 来进行排序的
static voidprepareMethodLists(Class cls, method_list_t **addedLists, int addedCount,bool baseMethods, bool methodsFromBundle){for (int i = 0; i < addedCount; i++) {method_list_t *mlist = addedLists[i];ASSERT(mlist);// Fixup selectors if necessaryif (!mlist->isFixedUp()) {// 重点部分fixupMethodList(mlist, methodsFromBundle, true/*sort*/);}}}
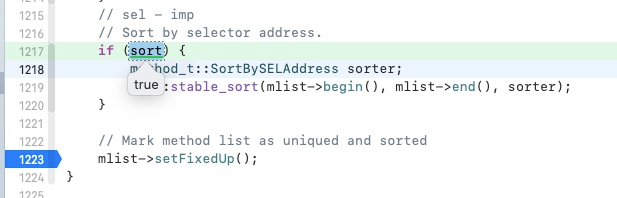
查看 fixupMethodList 的源码,发现内部是根据 SortBySELAddress,即根据 sel 的地址进行排序的。
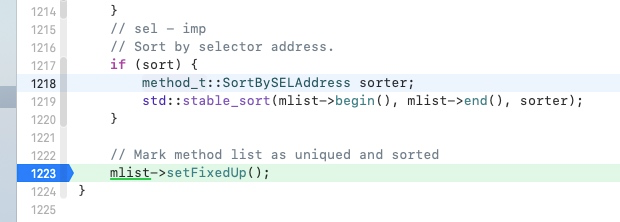
static voidfixupMethodList(method_list_t *mlist, bool bundleCopy, bool sort){runtimeLock.assertLocked();ASSERT(!mlist->isFixedUp());// fixme lock less in attachMethodLists ?// dyld3 may have already uniqued, but not sorted, the listif (!mlist->isUniqued()) {mutex_locker_t lock(selLock);// Unique selectors in list.for (auto& meth : *mlist) {const char *name = sel_cname(meth.name);meth.name = sel_registerNameNoLock(name, bundleCopy);}}// Sort by selector address.// 根据 `sel` 的地址进行排序if (sort) {method_t::SortBySELAddress sorter;std::stable_sort(mlist->begin(), mlist->end(), sorter);}// Mark method list as uniqued and sortedmlist->setFixedUp();}
2.3.2.2 验证方法排序
我们接下来通过断点调试来进行验证
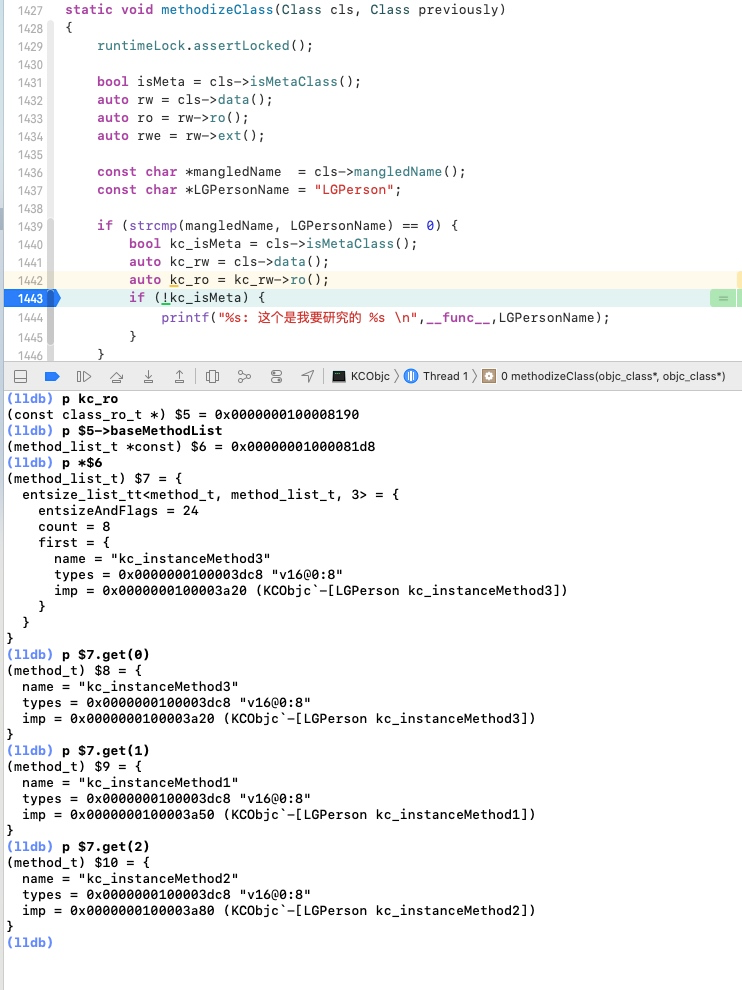
我们先打印出上面 baseMethodList 的值之后,进入 prepareMethodLists 方法。然后执行到 fixupMethodList。
然后我们在 sort 排序之后,再下一个断点
然后我们输出 mlist
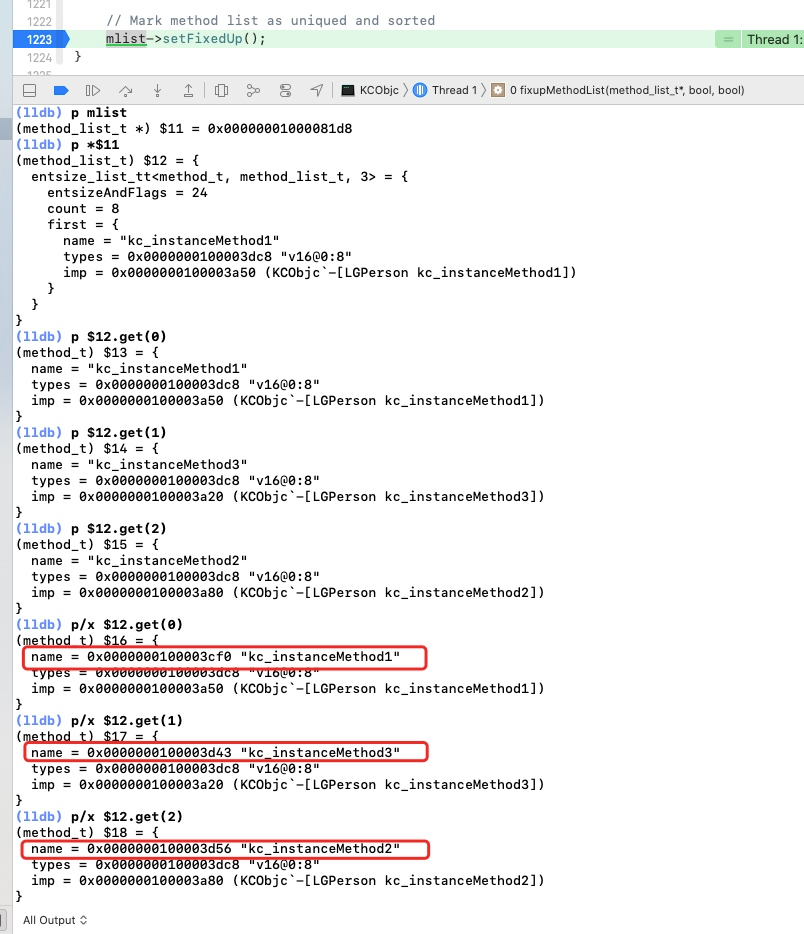
根据我们方法排序前后的对比,可以得到 methodizeClass 实现了 类的方法的序列化。
2.3.3 attachToClass 方法
主要是将分类添加到主类中
void attachToClass(Class cls, Class previously, int flags){runtimeLock.assertLocked();ASSERT((flags & ATTACH_CLASS) ||(flags & ATTACH_METACLASS) ||(flags & ATTACH_CLASS_AND_METACLASS));auto &map = get();// 找到一个分类就进来一次,防止混乱auto it = map.find(previously);// 注意:当主类没有实现 load 方法的时候,分类实现了 load 方法,那么会迫使主类进行加载,所以会进入 if 判断里面if (it != map.end()) {category_list &list = it->second;// 判断是否元类if (flags & ATTACH_CLASS_AND_METACLASS) {int otherFlags = flags & ~ATTACH_CLASS_AND_METACLASS;// 附加实例方法attachCategories(cls, list.array(), list.count(), otherFlags | ATTACH_CLASS);// 附加类方法attachCategories(cls->ISA(), list.array(), list.count(), otherFlags | ATTACH_METACLASS);} else {// 附加实例方法attachCategories(cls, list.array(), list.count(), flags);}map.erase(it);}}
2.3.4 attachCategories 方法
主要是准备分类的数据
// Attach method lists and properties and protocols from categories to a class.// Assumes the categories in cats are all loaded and sorted by load order,// oldest categories first.static voidattachCategories(Class cls, const locstamped_category_t *cats_list, uint32_t cats_count,int flags){if (slowpath(PrintReplacedMethods)) {printReplacements(cls, cats_list, cats_count);}if (slowpath(PrintConnecting)) {_objc_inform("CLASS: attaching %d categories to%s class '%s'%s",cats_count, (flags & ATTACH_EXISTING) ? " existing" : "",cls->nameForLogging(), (flags & ATTACH_METACLASS) ? " (meta)" : "");}/** Only a few classes have more than 64 categories during launch.* This uses a little stack, and avoids malloc.** Categories must be added in the proper order, which is back* to front. To do that with the chunking, we iterate cats_list* from front to back, build up the local buffers backwards,* and call attachLists on the chunks. attachLists prepends the* lists, so the final result is in the expected order.*/constexpr uint32_t ATTACH_BUFSIZ = 64;method_list_t *mlists[ATTACH_BUFSIZ];property_list_t *proplists[ATTACH_BUFSIZ];protocol_list_t *protolists[ATTACH_BUFSIZ];uint32_t mcount = 0;uint32_t propcount = 0;uint32_t protocount = 0;bool fromBundle = NO;bool isMeta = (flags & ATTACH_METACLASS);// 初始化 rwe,因为要往主类添加方法、属性和协议auto rwe = cls->data()->extAllocIfNeeded();// mlists -> 二维数组for (uint32_t i = 0; i < cats_count; i++) {auto& entry = cats_list[i];method_list_t *mlist = entry.cat->methodsForMeta(isMeta);if (mlist) {// 当前 mcount = 0,ATTACH_BUFSIZ= 64,所以不会进入 if 里面if (mcount == ATTACH_BUFSIZ) {prepareMethodLists(cls, mlists, mcount, NO, fromBundle);rwe->methods.attachLists(mlists, mcount);mcount = 0;}// 倒序插入mlists[ATTACH_BUFSIZ - ++mcount] = mlist;fromBundle |= entry.hi->isBundle();}property_list_t *proplist =entry.cat->propertiesForMeta(isMeta, entry.hi);if (proplist) {if (propcount == ATTACH_BUFSIZ) {rwe->properties.attachLists(proplists, propcount);propcount = 0;}proplists[ATTACH_BUFSIZ - ++propcount] = proplist;}protocol_list_t *protolist = entry.cat->protocolsForMeta(isMeta);if (protolist) {if (protocount == ATTACH_BUFSIZ) {rwe->protocols.attachLists(protolists, protocount);protocount = 0;}protolists[ATTACH_BUFSIZ - ++protocount] = protolist;}}if (mcount > 0) {// 排序prepareMethodLists(cls, mlists + ATTACH_BUFSIZ - mcount, mcount, NO, fromBundle);// 进行内存平移操作rwe->methods.attachLists(mlists + ATTACH_BUFSIZ - mcount, mcount);if (flags & ATTACH_EXISTING) flushCaches(cls);}rwe->properties.attachLists(proplists + ATTACH_BUFSIZ - propcount, propcount);rwe->protocols.attachLists(protolists + ATTACH_BUFSIZ - protocount, protocount);}
2.3.4.1 extAllocIfNeeded 方法
class_rw_ext_t *extAllocIfNeeded() {auto v = get_ro_or_rwe();// 判断 rwe 是否存在if (fastpath(v.is<class_rw_ext_t *>())) {// 如果存在,则直接返回 rwereturn v.get<class_rw_ext_t *>();} else {// 不存在,则进行开辟return extAlloc(v.get<const class_ro_t *>());}}
2.3.4.1 extAlloc 方法
class_rw_ext_t *class_rw_t::extAlloc(const class_ro_t *ro, bool deepCopy){runtimeLock.assertLocked();// 初始化 rweauto rwe = objc::zalloc<class_rw_ext_t>();rwe->version = (ro->flags & RO_META) ? 7 : 0;method_list_t *list = ro->baseMethods();if (list) {if (deepCopy) list = list->duplicate();rwe->methods.attachLists(&list, 1);}// See comments in objc_duplicateClass// property lists and protocol lists historically// have not been deep-copied//// This is probably wrong and ought to be fixed some dayproperty_list_t *proplist = ro->baseProperties;if (proplist) {rwe->properties.attachLists(&proplist, 1);}protocol_list_t *protolist = ro->baseProtocols;if (protolist) {rwe->protocols.attachLists(&protolist, 1);}set_ro_or_rwe(rwe, ro);return rwe;}
2.3.5 attachLists 方法
void attachLists(List* const * addedLists, uint32_t addedCount) {if (addedCount == 0) return;if (hasArray()) {// many lists -> many lists// 获取数组中旧 lists 的大小uint32_t oldCount = array()->count;// 计算新的容量大小 = 旧数据大小 + 新数据大小uint32_t newCount = oldCount + addedCount;// 根据新的容量大小,开辟一个数组,类型是 array_t,通过 array() 获取setArray((array_t *)realloc(array(), array_t::byteSize(newCount)));// 设置数组的大小array()->count = newCount;// 旧的数据从 addedCount 数组下标开始存放旧的 lists,大小 = 旧数据大小 * 单个旧 list 大小memmove(array()->lists + addedCount, array()->lists,oldCount * sizeof(array()->lists[0]));// 新数据从数组 首位置开始存储,存放新的lists,大小 = 新数据大小 * 单个list大小memcpy(array()->lists, addedLists,addedCount * sizeof(array()->lists[0]));}else if (!list && addedCount == 1) {// 0 lists -> 1 list// 将 list 加入 mlists 的第一个元素,此时的 list 是一个一维数组list = addedLists[0];}else {// 新的 list 就是分类,来自LRU的算法思维,即最近最少使用算法// 获取旧的listList* oldList = list;uint32_t oldCount = oldList ? 1 : 0;// 计算容量和 = 旧list个数 + 新lists的个数uint32_t newCount = oldCount + addedCount;// 开辟一个容量和大小的集合,类型是 array_t,即创建一个数组,放到 array 中,通过 array() 获取setArray((array_t *)malloc(array_t::byteSize(newCount)));// 设置数组的大小array()->count = newCount;// 判断old是否存在,如果存在,就将旧的 list 放入到数组的末尾if (oldList) array()->lists[addedCount] = oldList;// memcpy(起始位置,放什么,放多大) 内存平移,从数组起始位置存入新的list//其中 array()->lists 表示首位元素位置memcpy(array()->lists, addedLists,addedCount * sizeof(array()->lists[0]));}}
从上可知,插入表可分为以下三种情况
- 1. 多对多: 如果当前调用
attachLists的list_array_tt二维数组中有多个一维数组。- 1.1 先计算数组中旧
list的大小 - 1.2 计算新的容量大小 = 旧数据大小 + 新数据大小
- 1.3 根据新的容量大小,开辟一个数组,类型是
array_t,通过array()获取 - 1.4 设置数组大小
- 1.5 旧的数据从
addedCount数组下标开始 存放旧的lists,大小 = 旧数据大小 * 单个旧list大小,即指针偏移 - 1.6 新数据从数组首位置开始存储,存放新的
lists,大小 = 新数据大小 * 单个list大小,可以理解越晚加进来的越在前面,越在前面,调用时则优先调用
- 1.1 先计算数组中旧
- 2. 零对一: 如果当前调用
attachLists的list_array_tt二维数组为空且新增大小为1。- 2.1 直接赋值给
addedList的第一个list
- 2.1 直接赋值给
- 3. 一对多: 如果当前调用
attachLists的list_array_tt二维数组只有一个一维数组。- 3.1 获取旧的list
- 3.2 计算容量和 = 旧list个数 + 新lists的个数
- 3.3 开辟一个容量和大小的集合,类型是
array_t,即创建一个数组,放到array中,通过array()获取 - 3.4 设置数组的大小
- 3.5 判断
old是否存在,如果old是存在的,那么就将旧的list放入到数组的末尾 - 3.6 memcpy(起始位置,放什么,放多大) 内存平移,从数组起始位置存入新的list
在第三种情况中,
list指的就是我们的分类,所以这就是为什么我们经常碰到的 子类实现父类方法会把父类方法覆盖、分类实现主类方法会把主类方法覆盖的原因了。 这个操作来自于 LRU缓存算法思维,即最近最少使用算法,因为如果子类或者分类覆盖了实现方法的话,那么大概率是因为这个方法是使用频率和价值更高的,要 优先调用。 如果对于 LRU缓存算法 不怎么了解的同学,可以参考 缓存淘汰算法 LRU 和 LFU
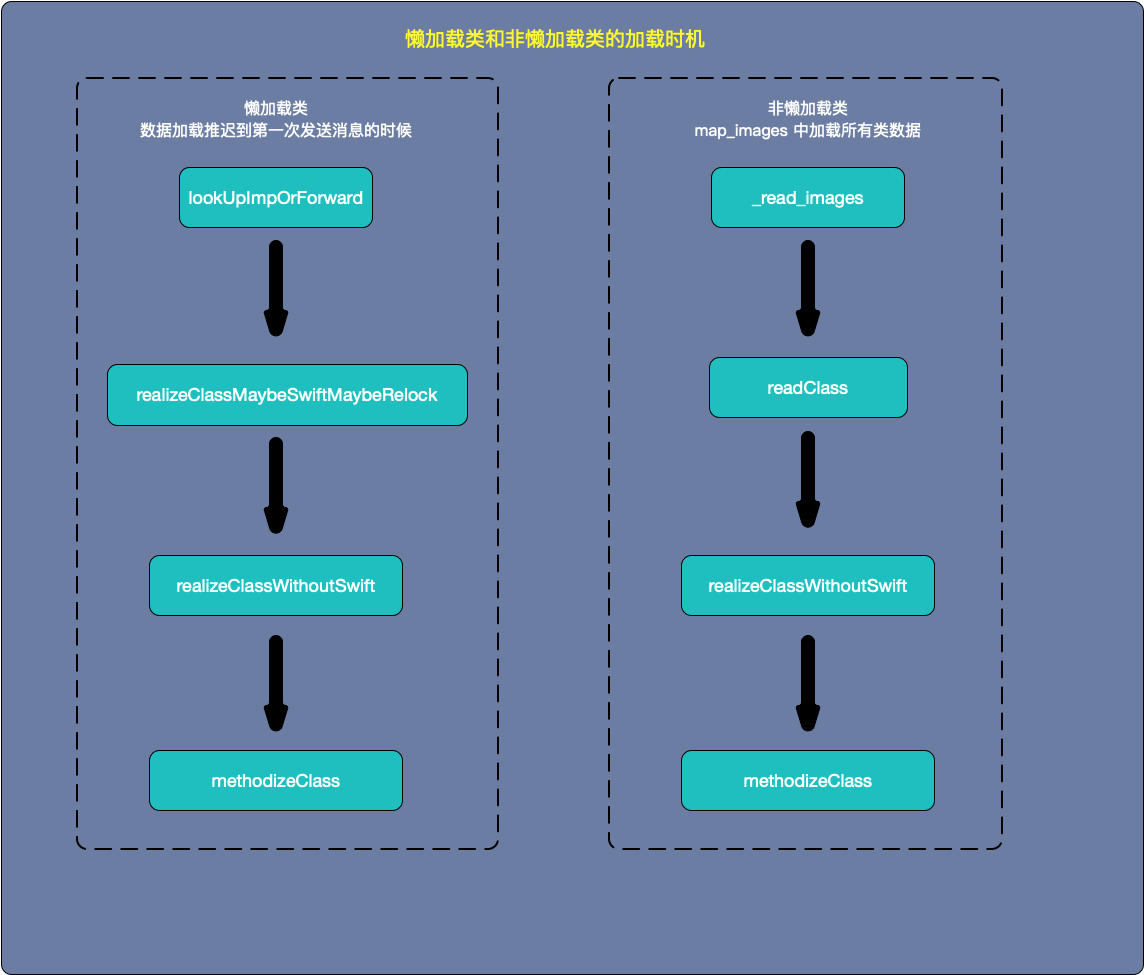
3、懒加载类和非懒加载类的数据加载时机
4、总结
readClass主要是读取类,即此时的类仅有地址和名称,还没有data数据。addNamedClass方法当前类添加到已经创建好的 gdb_objc_realized_classes 哈希表中addClassTableEntry将非懒加载的类插入到列表中,然后存储到内存当中,其中如果当前类已经被添加,就不会再次进行添加了
realizeClassWithoutSwift主要是实现类,即将类的data数据读取到内存中。methodizeClass方法中实现类的方法、属性、协议的序列化attachCategories方法中实现类以及分类的数据加载

若有收获,就点个赞吧
0 人点赞
