- 1、往期文章
- 2、前言
- 3、初识
dyld - 4、
dyld加载流程分析- 4.1
start函数分析 - 4.2
_dyld_start分析 - 4.3
dyldbootstrap::start分析 - 4.4
rebaseDyld()分析 - 4.5
dyld::_main分析 - 4.6
initializeMainExecutable分析 - 4.7
runInitializers分析 - 4.8
processInitializers实现 - 4.9
recursiveInitialization实现 - 4.10
notifySingle分析 - 4.11
registerObjCNotifiers实现 - 4.12
_dyld_objc_notify_register分析 - 4.13
libdispatch_init分析 - 4.14
_os_object_init分析 - 4.15
_objc_init分析 - 4.16
doInitialization分析 - 4.17 主程序
main入口
- 4.1
- 5、
dyld加载流程图 - 6、总结
1、往期文章
iOS 底层探索文章系列
2、前言
在我们平时的开发过程中,我们经历过无数次的 Command + B/R 的过程,但很少人会关注这个过程中 Xcode 帮我们做了哪些事情。
事实上,这个过程主要被分解为以下四个步骤,分别为 预处理(Prepressing)、编译(Compilation)、汇编(Assembly) 和 链接(Linking) ———— 摘自 《程序员的自我修养—链接、装载与库》
- 预处理(Prepressing): 处理代码中的 # 开头的预编译指令,比如删除#define并展开宏定义,将#include包含的文件插入到该指令位置等。
- 编译(Compilation): 对预编译处理过的文件进行词法分析、语法分析和语义分析,并进行源代码优化,然后生成汇编代码。
- 汇编(Assembly): 通过汇编器将汇编代码转换为机器可以执行的指令,并生成目标文件.o文件。
- 链接(Linking): 将目标文件链接成可执行文件。这一过程中,链接器将不同的目标文件链接起来,因为不同的目标文件之间可能有相互引用的变量或调用的函数,如我们经常调用
Foundation框架和UIKit框架中的方法和变量,但是这些框架跟我们的代码并不在一个目标文件中,这就需要链接器将它们与我们自己的代码链接起来。
在Mac OS中,就是由 dyld 来完成链接加载程序的操作。
所以了解 dyld 的加载流程可以帮我们更系统的了解 iOS 应用的本质。 无论是在底层研究方向还是在逆向方向,dyld 都是必不可少的领域。对流程梳理清楚可以帮助我们更好地了解一些基础原理。
以下是 Mac OS/iOS系统架构图
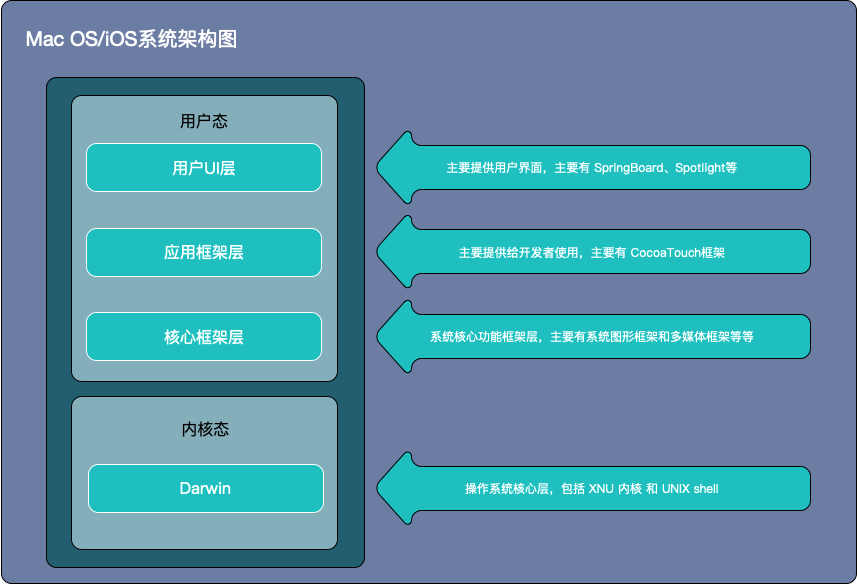
注意:
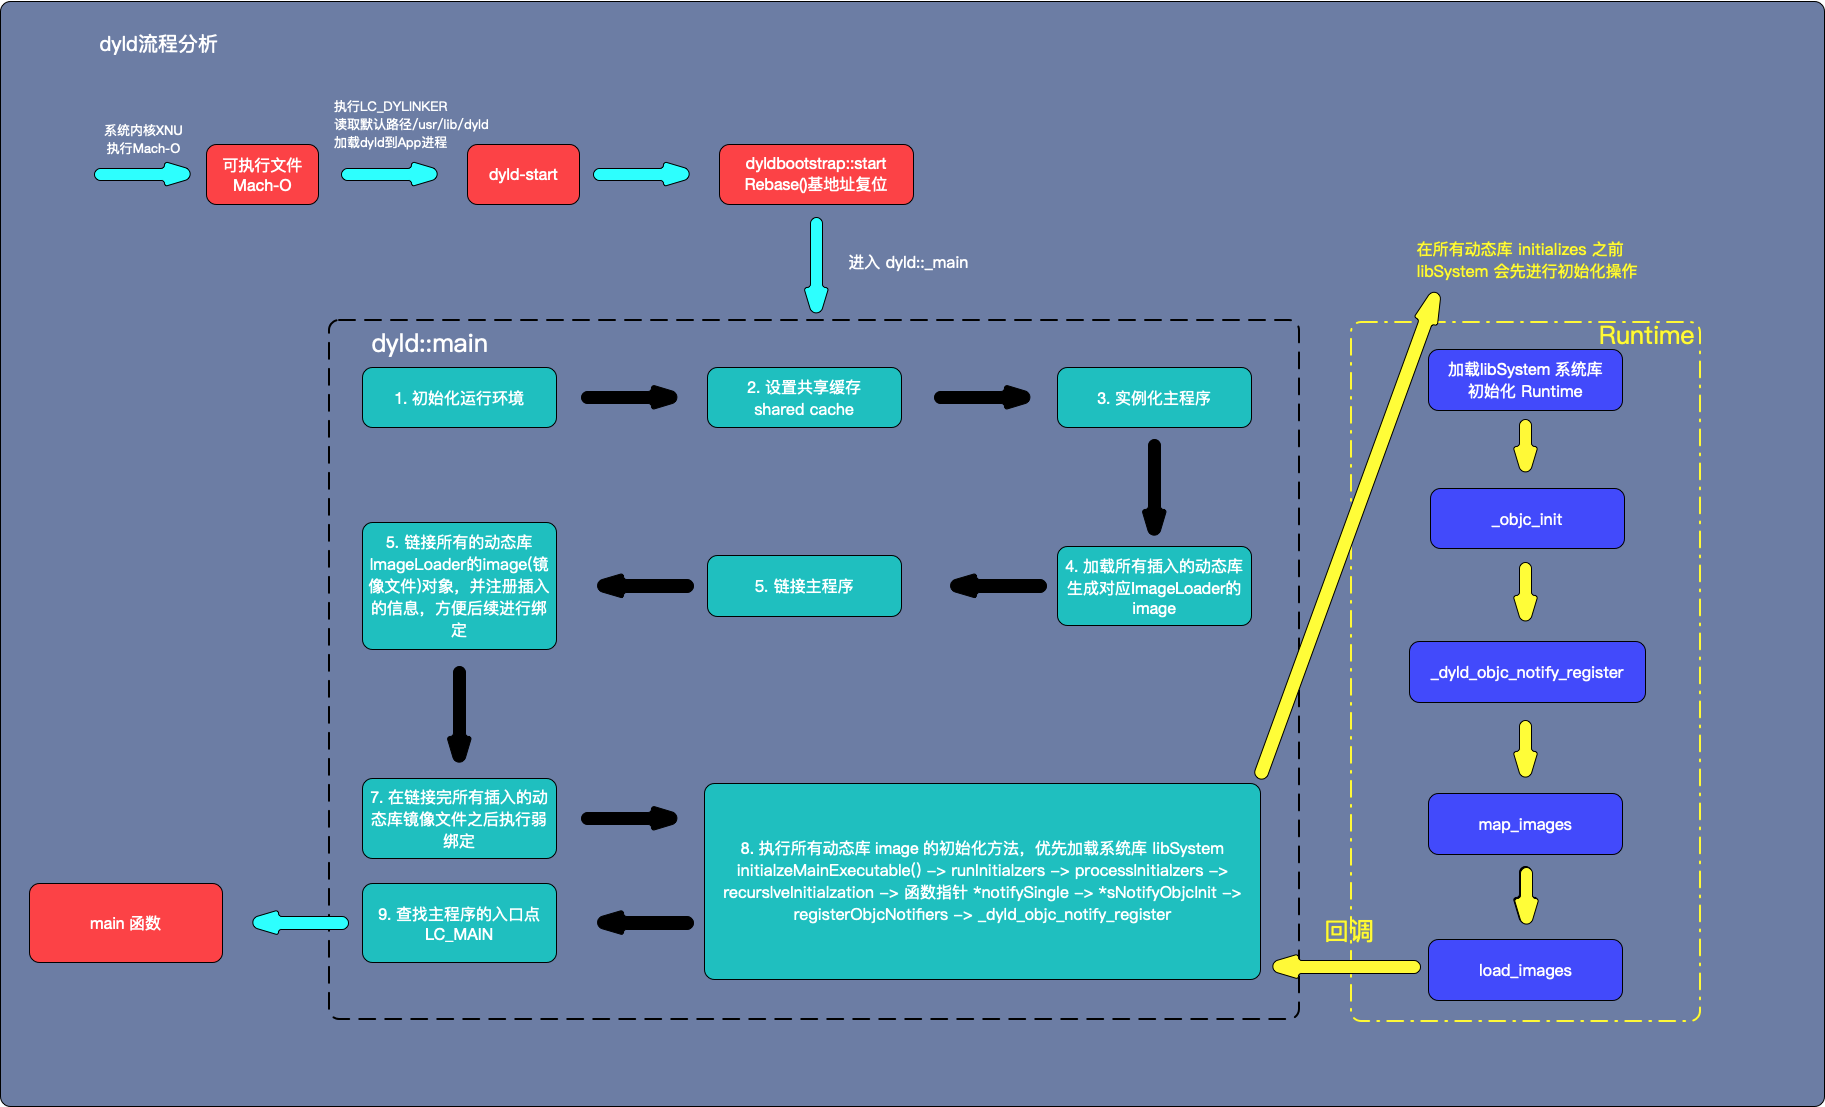
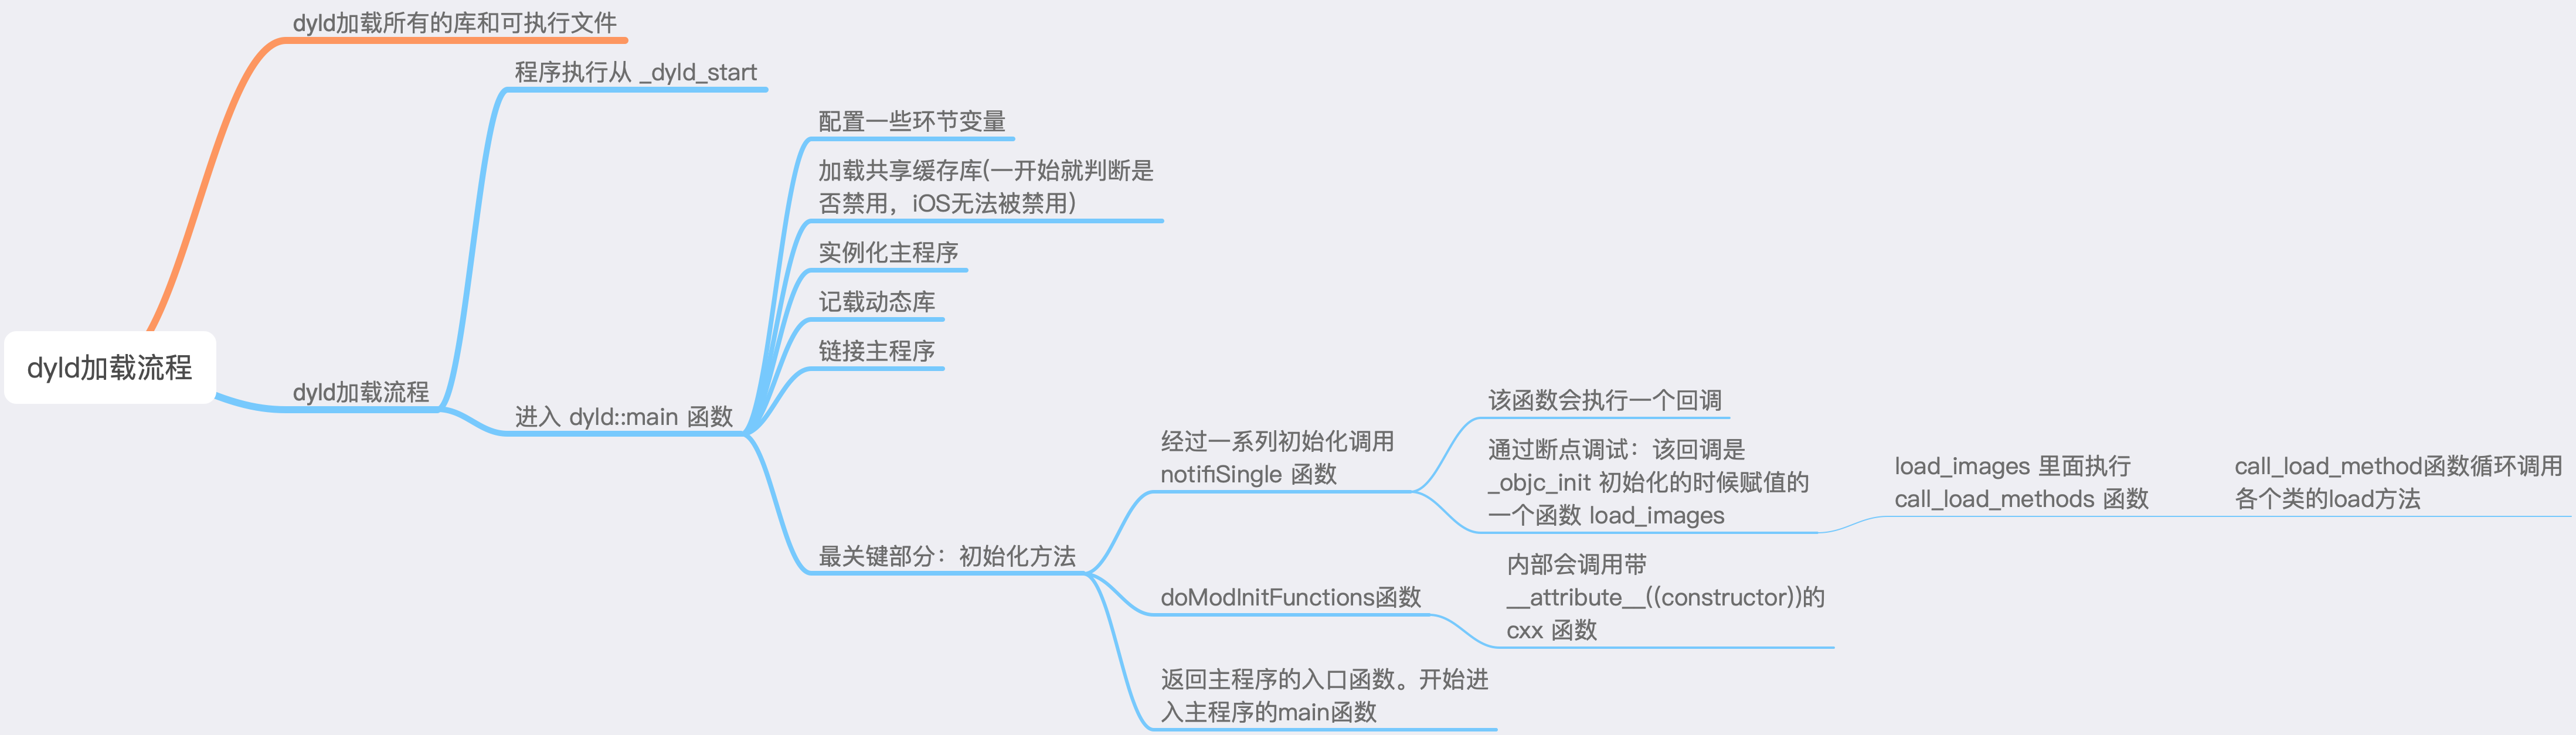
dyld运行在用户态的进程。也就是APP启动过程从系统内核XNU到内核把控制权交给了dyld,这个过程完成了 内核态到用户态的切换。
本文将对整个加载流程进行梳理分析,但并不会特别细,毕竟整个流程太多,需要提点的都会有所介绍。
在开始本文之前,大家可以先了解一下什么是 Mach-O 文件。
3、初识 dyld
3.1 什么是 dyld ?
简单来说 dyld(The dynamic link editor) 就是苹果的 动态链接器,负责程序的链接及加载工作,是苹果操作系统的 重要组成部分。dyld 是开源的,我们可以在苹果的开源网站 OpenSource 上找到其源码。
3.2 dyld 启动时机及位置
动态链接器 dyld 是内核执行内核命令 LC_LOAD_DYLINKER 加载命令时启动的,默认使用 /usr/lib/dyld 文件作为动态链接器。
注意:
LC_MAIN指的就是程序main函数加载地址,LC_LOAD_DYLIB指向的都是程序依赖库加载信息,举个例子LC_LOAD_DYLIB(AFNetworking)指的就是AFNetworking依赖库的加载地址。
3.3 dyld 与系统内核的关系
dyld 是一个用户态进程,不属于内核的一部分,单独由苹果维护,并且代码已经开源。也就是说 dyld 可以理解成一个可插入的组件,可以用第三方进行替换。
3.4 共享缓存
由于 iOS 系统中 UIKit、CoreFoundation 等系统库,每个应用都会通过 dyld 加载在内存中,因为为了节省空间和加快程序启动时间,苹果将这些系统库放在了一个地方,动态库共享缓存区(dyld shared cache)。(Mac OS中也是如此)
因为,类似 NSLog 的函数实现地址,并不会也不可能会在我们自己工程的 Mach-O 文件中,那么我们的工程如果想要调用 NSLog 方法,如果能找到其真实的函数实现地址呢?
其流程如下:
- 在工程编译时,所产生的
Mach-O可执行文件中会预留一段空间,这个空间其实就是符号表,存放在_DATA数据段中(因为_DATA段在运行时是可读可写的)**
- 编译时: 工程中所有引用了共享缓存区中的系统库方法,其指向的地址设置成符号地址。(例如工程中有一个
NSLog,那么编译时就会在Mach-O中创建一个NSLog的符号,工程中的NSLog就指向这个符号)**
- 运行时: 当
dyld将应用进程加载到内存中时,根据load commands中列出的需要加载哪些库文件,去做绑定的操作(以NSLog为例,dyld就会去找到Foundation中NSLog的真实地址写到_DATA段的符号表中NSLog的符号上面)
这个过程被称为 PIC 技术 (Position Independent Code) 。
4、dyld 加载流程分析
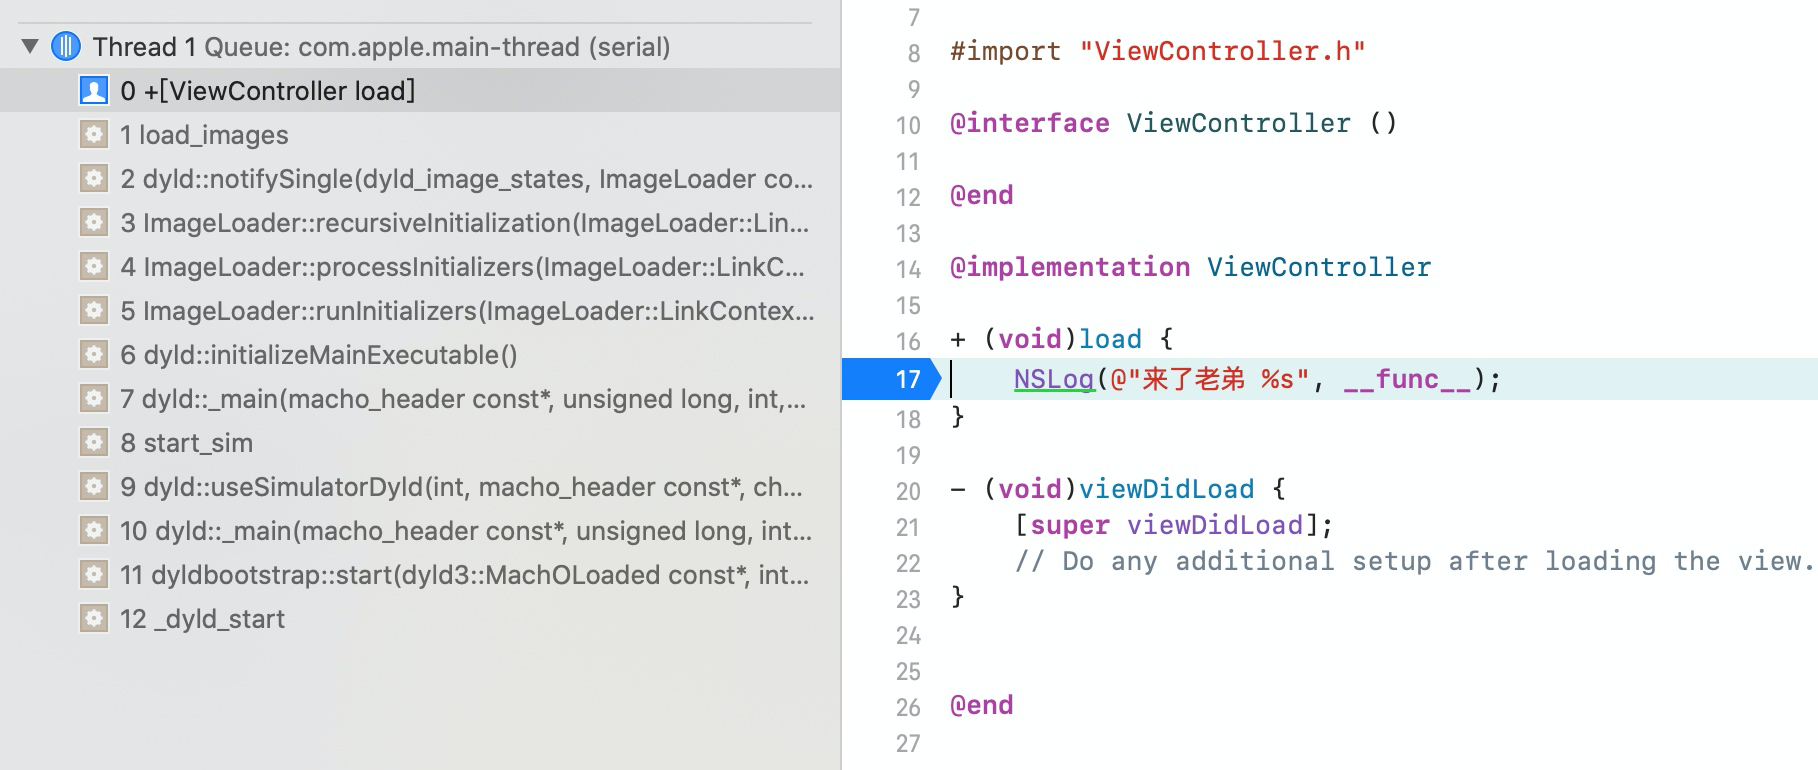
我们首先创建一个空的 iOS 工程,并在 ViewController 类里面添加 load 方法,打上断点之后,运行程序,然后查看函数调用栈。
4.1 start 函数分析
我们先通过函数调用栈来到入口 _dyld_start 处,可以看到汇编代码如下

在上图的第 11 行处,汇编指令 callq 就是调用函数的指令,这个函数也是我们 APP 开始的地方。
当我们打开一个应用的时候,系统内核会开启一个进程,然后由 dyld 开始加载这个可执行文件。
4.2 _dyld_start 分析
根据这个线索,我们在 dyld 的源码搜索 _dyld_start 函数,可以在 dyldStartup.s 文件中找到入口,分析之后可以发现这个文件中按照不同架构分别作了逻辑处理,比如 i386、x86_64、arm、arm64。
下面对 __dyld_start 汇编源码作了部分精简
#if __arm64__.text.align 2.globl __dyld_start__dyld_start:mov x28, spand sp, x28, #~15 // force 16-byte alignment of stack// 省略部分代码......// call dyldbootstrap::start(app_mh, argc, argv, dyld_mh, &startGlue)bl __ZN13dyldbootstrap5startEPKN5dyld311MachOLoadedEiPPKcS3_Pmmov x16,x0 // save entry point address in x16
找到关键指令 bl 跳转函数,根据注释,我们可以得到这里会跳转调用 dyld 的引导程序 dyldbootstrap::start。
4.3 dyldbootstrap::start 分析
dyldbootstrap::start 就是指 dyldbootstrap 这个命名空间作用域里的 start 函数。
我们在 dyld 的源码里搜索 dyldbootstrap,然后找到 start 函数。
uintptr_t start(const dyld3::MachOLoaded* appsMachHeader, int argc, const char* argv[],const dyld3::MachOLoaded* dyldsMachHeader, uintptr_t* startGlue){// Emit kdebug tracepoint to indicate dyld bootstrap has started <rdar://46878536>dyld3::kdebug_trace_dyld_marker(DBG_DYLD_TIMING_BOOTSTRAP_START, 0, 0, 0, 0);// if kernel had to slide dyld, we need to fix up load sensitive locations// we have to do this before using any global variablesrebaseDyld(dyldsMachHeader);// kernel sets up env pointer to be just past end of agv arrayconst char** envp = &argv[argc+1];// kernel sets up apple pointer to be just past end of envp arrayconst char** apple = envp;while(*apple != NULL) { ++apple; }++apple;// set up random value for stack canary__guard_setup(apple);#if DYLD_INITIALIZER_SUPPORT// run all C++ initializers inside dyldrunDyldInitializers(argc, argv, envp, apple);#endif// now that we are done bootstrapping dyld, call dyld's mainuintptr_t appsSlide = appsMachHeader->getSlide();return dyld::_main((macho_header*)appsMachHeader, appsSlide, argc, argv, envp, apple, startGlue);}
const dyld3::MachOLoaded* appsMachHeader这个参数是Mach-O的header。关于这个header,在 Mach-O 文件 这里有对Mach-O 文件结构里有详细说明。
接下来,我们分析一下这个函数做了什么
- 首先调用
rebaseDyld()dyld重定位; - 然后调用
__guard_setup栈溢出保护; - 最后调用
dyld::_main进入dyld的_main函数
为什么要
rebaseDyld()重定位 这里要提到两种苹果用来保证应用安全的技术:ASLR和Code Sign。 ASLR: 是 Address Space Layout Randomization(地址空间布局随机化) 的简称。App在被启动的时候,程序会被映射到逻辑地址空间,这个逻辑地址空间有一个起始地址,ASLR技术让这个起始地址是随机的。这个地址如果是固定的,攻击者很容易就用起始地址+函数偏移地址找到对应的函数地址。 Code Sign: 是苹果代码加密签名机制,但是在Code Sign操作的时候,加密的哈希不是针对整个文件,而是针对每一个Page的。这个就保证了dyld在加载的时候,可以对每个page进行独立的验证。
正是因为 ASLR 使得地址随机化,导致起始地址不固定,以及 Code Sign,导致不能直接修改 Image。所以需要 rebase 来处理符号引用问题,Rebase 的时候只需要通过增加对应偏移量就行了。Rebase 主要的作用就是修正内部(指向当前 Mach-O 文件)的指针指向,也就是基地址复位功能。
4.4 rebaseDyld() 分析
//// On disk, all pointers in dyld's DATA segment are chained together.// They need to be fixed up to be real pointers to run.//static void rebaseDyld(const dyld3::MachOLoaded* dyldMH){// walk all fixups chains and rebase dyld// 遍历所有固定的 chains 然后 rebase dyldconst dyld3::MachOAnalyzer* ma = (dyld3::MachOAnalyzer*)dyldMH;assert(ma->hasChainedFixups());uintptr_t slide = (long)ma; // all fixup chain based images have a base address of zero, so slide == load address// 所有基于修正链的映像的基地址为零,因此slide == 加载地址__block Diagnostics diag;ma->withChainStarts(diag, 0, ^(const dyld_chained_starts_in_image* starts) {ma->fixupAllChainedFixups(diag, starts, slide, dyld3::Array<const void*>(), nullptr);});diag.assertNoError();// now that rebasing done, initialize mach/syscall layermach_init();// <rdar://47805386> mark __DATA_CONST segment in dyld as read-only (once fixups are done)ma->forEachSegment(^(const dyld3::MachOFile::SegmentInfo& info, bool& stop) {if ( info.readOnlyData ) {::mprotect(((uint8_t*)(dyldMH))+info.vmAddr, (size_t)info.vmSize, VM_PROT_READ);}});}
4.5 dyld::_main 分析
在 dyld2.cpp 文件中找到 dyld::_main() 的实现部分,大概有六七百行代码,这里把代码做一些精简
uintptr_t_main(const macho_header* mainExecutableMH, uintptr_t mainExecutableSlide,int argc, const char* argv[], const char* envp[], const char* apple[],uintptr_t* startGlue){// 第1步:初始化程序运行环境// 初始化运行环境配置以及拿到Mach-O头文件 (macho_header里面包含整个Mach-O文件信息其中包括所有链入的动态库信息)uint8_t mainExecutableCDHashBuffer[20];const uint8_t* mainExecutableCDHash = nullptr;if ( hexToBytes(_simple_getenv(apple, "executable_cdhash"), 40, mainExecutableCDHashBuffer) )mainExecutableCDHash = mainExecutableCDHashBuffer;notifyKernelAboutImage(mainExecutableMH, _simple_getenv(apple, "executable_file"));uintptr_t result = 0;// 获取主程序的macho_header结构以及主程序的slide偏移值sMainExecutableMachHeader = mainExecutableMH;sMainExecutableSlide = mainExecutableSlide;......CRSetCrashLogMessage("dyld: launch started");// 设置上下文信息setContext(mainExecutableMH, argc, argv, envp, apple);// 获取主程序路径// Pickup the pointer to the exec path.sExecPath = _simple_getenv(apple, "executable_path");if (!sExecPath) sExecPath = apple[0];if ( sExecPath[0] != '/' ) {// have relative path, use cwd to make absolutechar cwdbuff[MAXPATHLEN];if ( getcwd(cwdbuff, MAXPATHLEN) != NULL ) {// maybe use static buffer to avoid calling malloc so early...char* s = new char[strlen(cwdbuff) + strlen(sExecPath) + 2];strcpy(s, cwdbuff);strcat(s, "/");strcat(s, sExecPath);sExecPath = s;}}// 获取进程名称// Remember short name of process for later loggingsExecShortName = ::strrchr(sExecPath, '/');if ( sExecShortName != NULL )++sExecShortName;elsesExecShortName = sExecPath;// 配置进程受限模式configureProcessRestrictions(mainExecutableMH, envp);// 检测环境变量checkEnvironmentVariables(envp);defaultUninitializedFallbackPaths(envp);// 判断是否设置了sEnv.DYLD_PRINT_OPTS以及sEnv.DYLD_PRINT_ENV,分别打印argv参数和envp环境变量if ( sEnv.DYLD_PRINT_OPTS )printOptions(argv);if ( sEnv.DYLD_PRINT_ENV )printEnvironmentVariables(envp);// 获取当前程序架构getHostInfo(mainExecutableMH, mainExecutableSlide);// load shared cache// 第2步、加载共享缓存 shared cache// 检查共享缓存是否开启,iOS必须开启!!!!!!checkSharedRegionDisable((dyld3::MachOLoaded*)mainExecutableMH, mainExecutableSlide);if ( gLinkContext.sharedRegionMode != ImageLoader::kDontUseSharedRegion ) {#if TARGET_OS_SIMULATORif ( sSharedCacheOverrideDir)mapSharedCache();#elsemapSharedCache();#endif}......try {// add dyld itself to UUID listaddDyldImageToUUIDList();// 第3步:实例化主程序,并赋值给ImageLoader::LinkContextsMainExecutable = instantiateFromLoadedImage(mainExecutableMH, mainExecutableSlide, sExecPath);gLinkContext.mainExecutable = sMainExecutable;gLinkContext.mainExecutableCodeSigned = hasCodeSignatureLoadCommand(mainExecutableMH);......#if SUPPORT_VERSIONED_PATHScheckVersionedPaths();#endif// dyld_all_image_infos image list does not contain dyld// add it as dyldPath field in dyld_all_image_infos// for simulator, dyld_sim is in image list, need host dyld added#if TARGET_OS_SIMULATOR// get path of host dyld from table of syscall vectors in host dyldvoid* addressInDyld = gSyscallHelpers;#else// get path of dyld itselfvoid* addressInDyld = (void*)&__dso_handle;#endifchar dyldPathBuffer[MAXPATHLEN+1];int len = proc_regionfilename(getpid(), (uint64_t)(long)addressInDyld, dyldPathBuffer, MAXPATHLEN);if ( len > 0 ) {dyldPathBuffer[len] = '\0'; // proc_regionfilename() does not zero terminate returned stringif ( strcmp(dyldPathBuffer, gProcessInfo->dyldPath) != 0 )gProcessInfo->dyldPath = strdup(dyldPathBuffer);}// 第4步 加载插入的动态库// load any inserted librariesif ( sEnv.DYLD_INSERT_LIBRARIES != NULL ) {for (const char* const* lib = sEnv.DYLD_INSERT_LIBRARIES; *lib != NULL; ++lib)loadInsertedDylib(*lib);}// record count of inserted libraries so that a flat search will look at// inserted libraries, then main, then others.sInsertedDylibCount = sAllImages.size()-1;// link main executable//第5步:链接主程序++++++++++++++gLinkContext.linkingMainExecutable = true;#if SUPPORT_ACCELERATE_TABLESif ( mainExcutableAlreadyRebased ) {// previous link() on main executable has already adjusted its internal pointers for ASLR// work around that by rebasing by inverse amountsMainExecutable->rebase(gLinkContext, -mainExecutableSlide);}#endiflink(sMainExecutable, sEnv.DYLD_BIND_AT_LAUNCH, true, ImageLoader::RPathChain(NULL, NULL), -1);sMainExecutable->setNeverUnloadRecursive();if ( sMainExecutable->forceFlat() ) {gLinkContext.bindFlat = true;gLinkContext.prebindUsage = ImageLoader::kUseNoPrebinding;}// 第6步、链接插入的动态库// link any inserted libraries// do this after linking main executable so that any dylibs pulled in by inserted// dylibs (e.g. libSystem) will not be in front of dylibs the program usesif ( sInsertedDylibCount > 0 ) {for(unsigned int i=0; i < sInsertedDylibCount; ++i) {ImageLoader* image = sAllImages[i+1];link(image, sEnv.DYLD_BIND_AT_LAUNCH, true, ImageLoader::RPathChain(NULL, NULL), -1);image->setNeverUnloadRecursive();}// only INSERTED libraries can interpose// register interposing info after all inserted libraries are bound so chaining worksfor(unsigned int i=0; i < sInsertedDylibCount; ++i) {ImageLoader* image = sAllImages[i+1];image->registerInterposing(gLinkContext);}}// <rdar://problem/19315404> dyld should support interposition even without DYLD_INSERT_LIBRARIESfor (long i=sInsertedDylibCount+1; i < sAllImages.size(); ++i) {ImageLoader* image = sAllImages[i];if ( image->inSharedCache() )continue;image->registerInterposing(gLinkContext);}......// apply interposing to initial set of imagesfor(int i=0; i < sImageRoots.size(); ++i) {sImageRoots[i]->applyInterposing(gLinkContext);}ImageLoader::applyInterposingToDyldCache(gLinkContext);// Bind and notify for the main executable now that interposing has been registereduint64_t bindMainExecutableStartTime = mach_absolute_time();sMainExecutable->recursiveBindWithAccounting(gLinkContext, sEnv.DYLD_BIND_AT_LAUNCH, true);uint64_t bindMainExecutableEndTime = mach_absolute_time();ImageLoaderMachO::fgTotalBindTime += bindMainExecutableEndTime - bindMainExecutableStartTime;gLinkContext.notifyBatch(dyld_image_state_bound, false);// Bind and notify for the inserted images now interposing has been registeredif ( sInsertedDylibCount > 0 ) {for(unsigned int i=0; i < sInsertedDylibCount; ++i) {ImageLoader* image = sAllImages[i+1];image->recursiveBind(gLinkContext, sEnv.DYLD_BIND_AT_LAUNCH, true);}}// 第7步、在链接所有插入的image后,执行弱绑定// <rdar://problem/12186933> do weak binding only after all inserted images linkedsMainExecutable->weakBind(gLinkContext);gLinkContext.linkingMainExecutable = false;sMainExecutable->recursiveMakeDataReadOnly(gLinkContext);CRSetCrashLogMessage("dyld: launch, running initializers");#if SUPPORT_OLD_CRT_INITIALIZATION// Old way is to run initializers via a callback from crt1.oif ( ! gRunInitializersOldWay )initializeMainExecutable();#else// 第8步:执行所有的初始化方法// run all initializersinitializeMainExecutable();#endif// notify any montoring proccesses that this process is about to enter main()notifyMonitoringDyldMain();if (dyld3::kdebug_trace_dyld_enabled(DBG_DYLD_TIMING_LAUNCH_EXECUTABLE)) {dyld3::kdebug_trace_dyld_duration_end(launchTraceID, DBG_DYLD_TIMING_LAUNCH_EXECUTABLE, 0, 0, 2);}ARIADNEDBG_CODE(220, 1);#if __MAC_OS_X_VERSION_MIN_REQUIREDif ( gLinkContext.driverKit ) {result = (uintptr_t)sEntryOveride;if ( result == 0 )halt("no entry point registered");*startGlue = (uintptr_t)gLibSystemHelpers->startGlueToCallExit;}else#endif{// 第9步:查找主程序的入口点并返回// find entry point for main executableresult = (uintptr_t)sMainExecutable->getEntryFromLC_MAIN();if ( result != 0 ) {// main executable uses LC_MAIN, we need to use helper in libdyld to call into main()if ( (gLibSystemHelpers != NULL) && (gLibSystemHelpers->version >= 9) )*startGlue = (uintptr_t)gLibSystemHelpers->startGlueToCallExit;elsehalt("libdyld.dylib support not present for LC_MAIN");}else {// main executable uses LC_UNIXTHREAD, dyld needs to let "start" in program set up for main()result = (uintptr_t)sMainExecutable->getEntryFromLC_UNIXTHREAD();*startGlue = 0;}}#if __has_feature(ptrauth_calls)// start() calls the result pointer as a function pointer so we need to sign it.result = (uintptr_t)__builtin_ptrauth_sign_unauthenticated((void*)result, 0, 0);#endif}catch(const char* message) {syncAllImages();halt(message);}catch(...) {dyld::log("dyld: launch failed\n");}......return result;}
以下总结一下 dyld::_main 主要做了什么
- 1. 主程序运行环境初始化及配置,拿到
Mach-O头文件 (macho_header里面包含整个Mach-O文件信息其中包括所有链入的动态库信息); - 2. 加载共享缓存
shared cache; - 3. 实例化主程序,并赋值给
ImageLoader::LinkContext; - 4. 加载所有插入的动态库,将可执行文件以及相应的依赖库与插入库加载进内存生成对应的
ImageLoader类的image(镜像文件)对象; - 5. 链接主程序(必须先链接主程序后才能插入);
- 6. 链接所有的动态库
ImageLoader的image(镜像文件)对象,并注册插入的信息,方便后续进行绑定; - 7. 在链接完所有插入的动态库镜像文件之后执行弱绑定;
- 8. 执行所有动态库
image的初始化方法initializeMainExecutable; - 9. 查找主程序的入口点
LC_MAIN并返回result结果,结束整个_dyld_start流程,进入我们App的main()函数。
接下来我们分析第 8 步,initializeMainExecutable()。
4.6 initializeMainExecutable 分析
在 dyld 源码中搜索 initializeMainExecutable 的实现
void initializeMainExecutable(){// record that we've reached this stepgLinkContext.startedInitializingMainExecutable = true;// run initialzers for any inserted dylibs// 对每一个插入进来的 dylib 调用 runInitializers 方法进行初始化ImageLoader::InitializerTimingList initializerTimes[allImagesCount()];initializerTimes[0].count = 0;const size_t rootCount = sImageRoots.size();if ( rootCount > 1 ) {for(size_t i=1; i < rootCount; ++i) {sImageRoots[i]->runInitializers(gLinkContext, initializerTimes[0]);}}// run initializers for main executable and everything it brings up// 对主程序调用 runInitializers 方法初始化sMainExecutable->runInitializers(gLinkContext, initializerTimes[0]);// register cxa_atexit() handler to run static terminators in all loaded images when this process exits// 注册 cxa_atexit() 回调以在此进程退出时在所有加载的图像中运行静态终止符if ( gLibSystemHelpers != NULL )(*gLibSystemHelpers->cxa_atexit)(&runAllStaticTerminators, NULL, NULL);// dump info if requestedif ( sEnv.DYLD_PRINT_STATISTICS )ImageLoader::printStatistics((unsigned int)allImagesCount(), initializerTimes[0]);if ( sEnv.DYLD_PRINT_STATISTICS_DETAILS )ImageLoaderMachO::printStatisticsDetails((unsigned int)allImagesCount(), initializerTimes[0]);}
以上函数主要做了两件事
- 1. 对每一个插入进来的
dylib调用runInitializers方法进行初始化; - 2. 对主程序调用
runInitializers方法初始化。
注意,这两步都涉及到了关键的函数
runInitializers(),我们进入它的源码探究一下。
4.7 runInitializers 分析
进入源码之后,发现内部调用了 processInitializers,继续进入,发现 processInitializers 内部又调用了 recursiveInitialization。
void ImageLoader::runInitializers(const LinkContext& context, InitializerTimingList& timingInfo){uint64_t t1 = mach_absolute_time();mach_port_t thisThread = mach_thread_self();ImageLoader::UninitedUpwards up;up.count = 1;up.imagesAndPaths[0] = { this, this->getPath() };// 调用 processInitializersprocessInitializers(context, thisThread, timingInfo, up);context.notifyBatch(dyld_image_state_initialized, false);mach_port_deallocate(mach_task_self(), thisThread);uint64_t t2 = mach_absolute_time();fgTotalInitTime += (t2 - t1);}
4.8 processInitializers 实现
void ImageLoader::processInitializers(const LinkContext& context, mach_port_t thisThread,InitializerTimingList& timingInfo, ImageLoader::UninitedUpwards& images){uint32_t maxImageCount = context.imageCount()+2;ImageLoader::UninitedUpwards upsBuffer[maxImageCount];ImageLoader::UninitedUpwards& ups = upsBuffer[0];ups.count = 0;// Calling recursive init on all images in images list, building a new list of// uninitialized upward dependencies.for (uintptr_t i=0; i < images.count; ++i) {// 调用 recursiveInitializationimages.imagesAndPaths[i].first->recursiveInitialization(context, thisThread, images.imagesAndPaths[i].second, timingInfo, ups);}// If any upward dependencies remain, init them.if ( ups.count > 0 )processInitializers(context, thisThread, timingInfo, ups);}
4.9 recursiveInitialization 实现
void ImageLoader::recursiveInitialization(const LinkContext& context, mach_port_t this_thread, const char* pathToInitialize,InitializerTimingList& timingInfo, UninitedUpwards& uninitUps){recursive_lock lock_info(this_thread);recursiveSpinLock(lock_info);if ( fState < dyld_image_state_dependents_initialized-1 ) {uint8_t oldState = fState;// break cyclesfState = dyld_image_state_dependents_initialized-1;try {// initialize lower level libraries firstfor(unsigned int i=0; i < libraryCount(); ++i) {ImageLoader* dependentImage = libImage(i);if ( dependentImage != NULL ) {// don't try to initialize stuff "above" me yetif ( libIsUpward(i) ) {uninitUps.imagesAndPaths[uninitUps.count] = { dependentImage, libPath(i) };uninitUps.count++;}else if ( dependentImage->fDepth >= fDepth ) {dependentImage->recursiveInitialization(context, this_thread, libPath(i), timingInfo, uninitUps);}}}// record termination orderif ( this->needsTermination() )context.terminationRecorder(this);// let objc know we are about to initialize this imageuint64_t t1 = mach_absolute_time();fState = dyld_image_state_dependents_initialized;oldState = fState;// 关键代码 begin ************context.notifySingle(dyld_image_state_dependents_initialized, this, &timingInfo);// initialize this imagebool hasInitializers = this->doInitialization(context);// let anyone know we finished initializing this imagefState = dyld_image_state_initialized;oldState = fState;context.notifySingle(dyld_image_state_initialized, this, NULL);// 关键代码 end ************if ( hasInitializers ) {uint64_t t2 = mach_absolute_time();timingInfo.addTime(this->getShortName(), t2-t1);}}catch (const char* msg) {// this image is not initializedfState = oldState;recursiveSpinUnLock();throw;}}recursiveSpinUnLock();}
然后在 recursiveInitialization 的实现中发现关键代码 notifySingle
context.notifySingle(dyld_image_state_dependents_initialized, this, &timingInfo);
继续深入,在 dyld2.cpp 文件中找到实现
4.10 notifySingle 分析
static void notifySingle(dyld_image_states state, const ImageLoader* image, ImageLoader::InitializerTimingList* timingInfo){// 省略部分代码......if ( (state == dyld_image_state_dependents_initialized) && (sNotifyObjCInit != NULL) && image->notifyObjC() ) {uint64_t t0 = mach_absolute_time();dyld3::ScopedTimer timer(DBG_DYLD_TIMING_OBJC_INIT, (uint64_t)image->machHeader(), 0, 0);(*sNotifyObjCInit)(image->getRealPath(), image->machHeader());uint64_t t1 = mach_absolute_time();uint64_t t2 = mach_absolute_time();uint64_t timeInObjC = t1-t0;uint64_t emptyTime = (t2-t1)*100;if ( (timeInObjC > emptyTime) && (timingInfo != NULL) ) {timingInfo->addTime(image->getShortName(), timeInObjC);}}// 省略部分代码......}
我们在这段代码里面找到一个关键的函数指针 *sNotifyObjCInit,我们看看这个指针是用来干嘛用的,在当前文件下,搜索找到 sNotifyObjCInit 赋值的地方。
4.11 registerObjCNotifiers 实现
void registerObjCNotifiers(_dyld_objc_notify_mapped mapped, _dyld_objc_notify_init init, _dyld_objc_notify_unmapped unmapped){// record functions to callsNotifyObjCMapped = mapped;sNotifyObjCInit = init;sNotifyObjCUnmapped = unmapped;// 省略部分代码......}
我们继续全局搜索看看 registerObjCNotifiers 这个方法会被谁调用,找到调用的地方 _dyld_objc_notify_register 函数
4.12 _dyld_objc_notify_register 分析
void _dyld_objc_notify_register(_dyld_objc_notify_mapped mapped,_dyld_objc_notify_init init,_dyld_objc_notify_unmapped unmapped){dyld::registerObjCNotifiers(mapped, init, unmapped);}
继续搜索,发现找不到 _dyld_objc_notify_register 方法的调用者,那么问题来了,_dyld_objc_notify_register 在啥时候调用了呢?
接下来我们在我们新创建的工程里面,打个符号断点
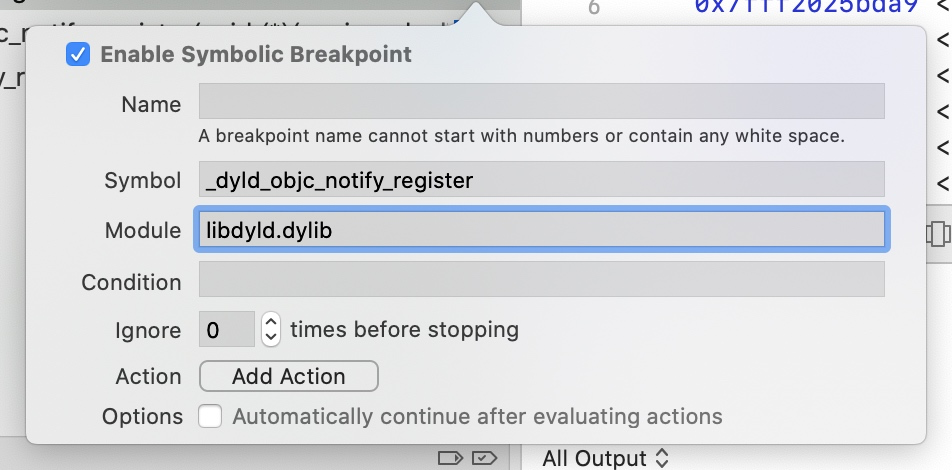
我们把程序运行起来
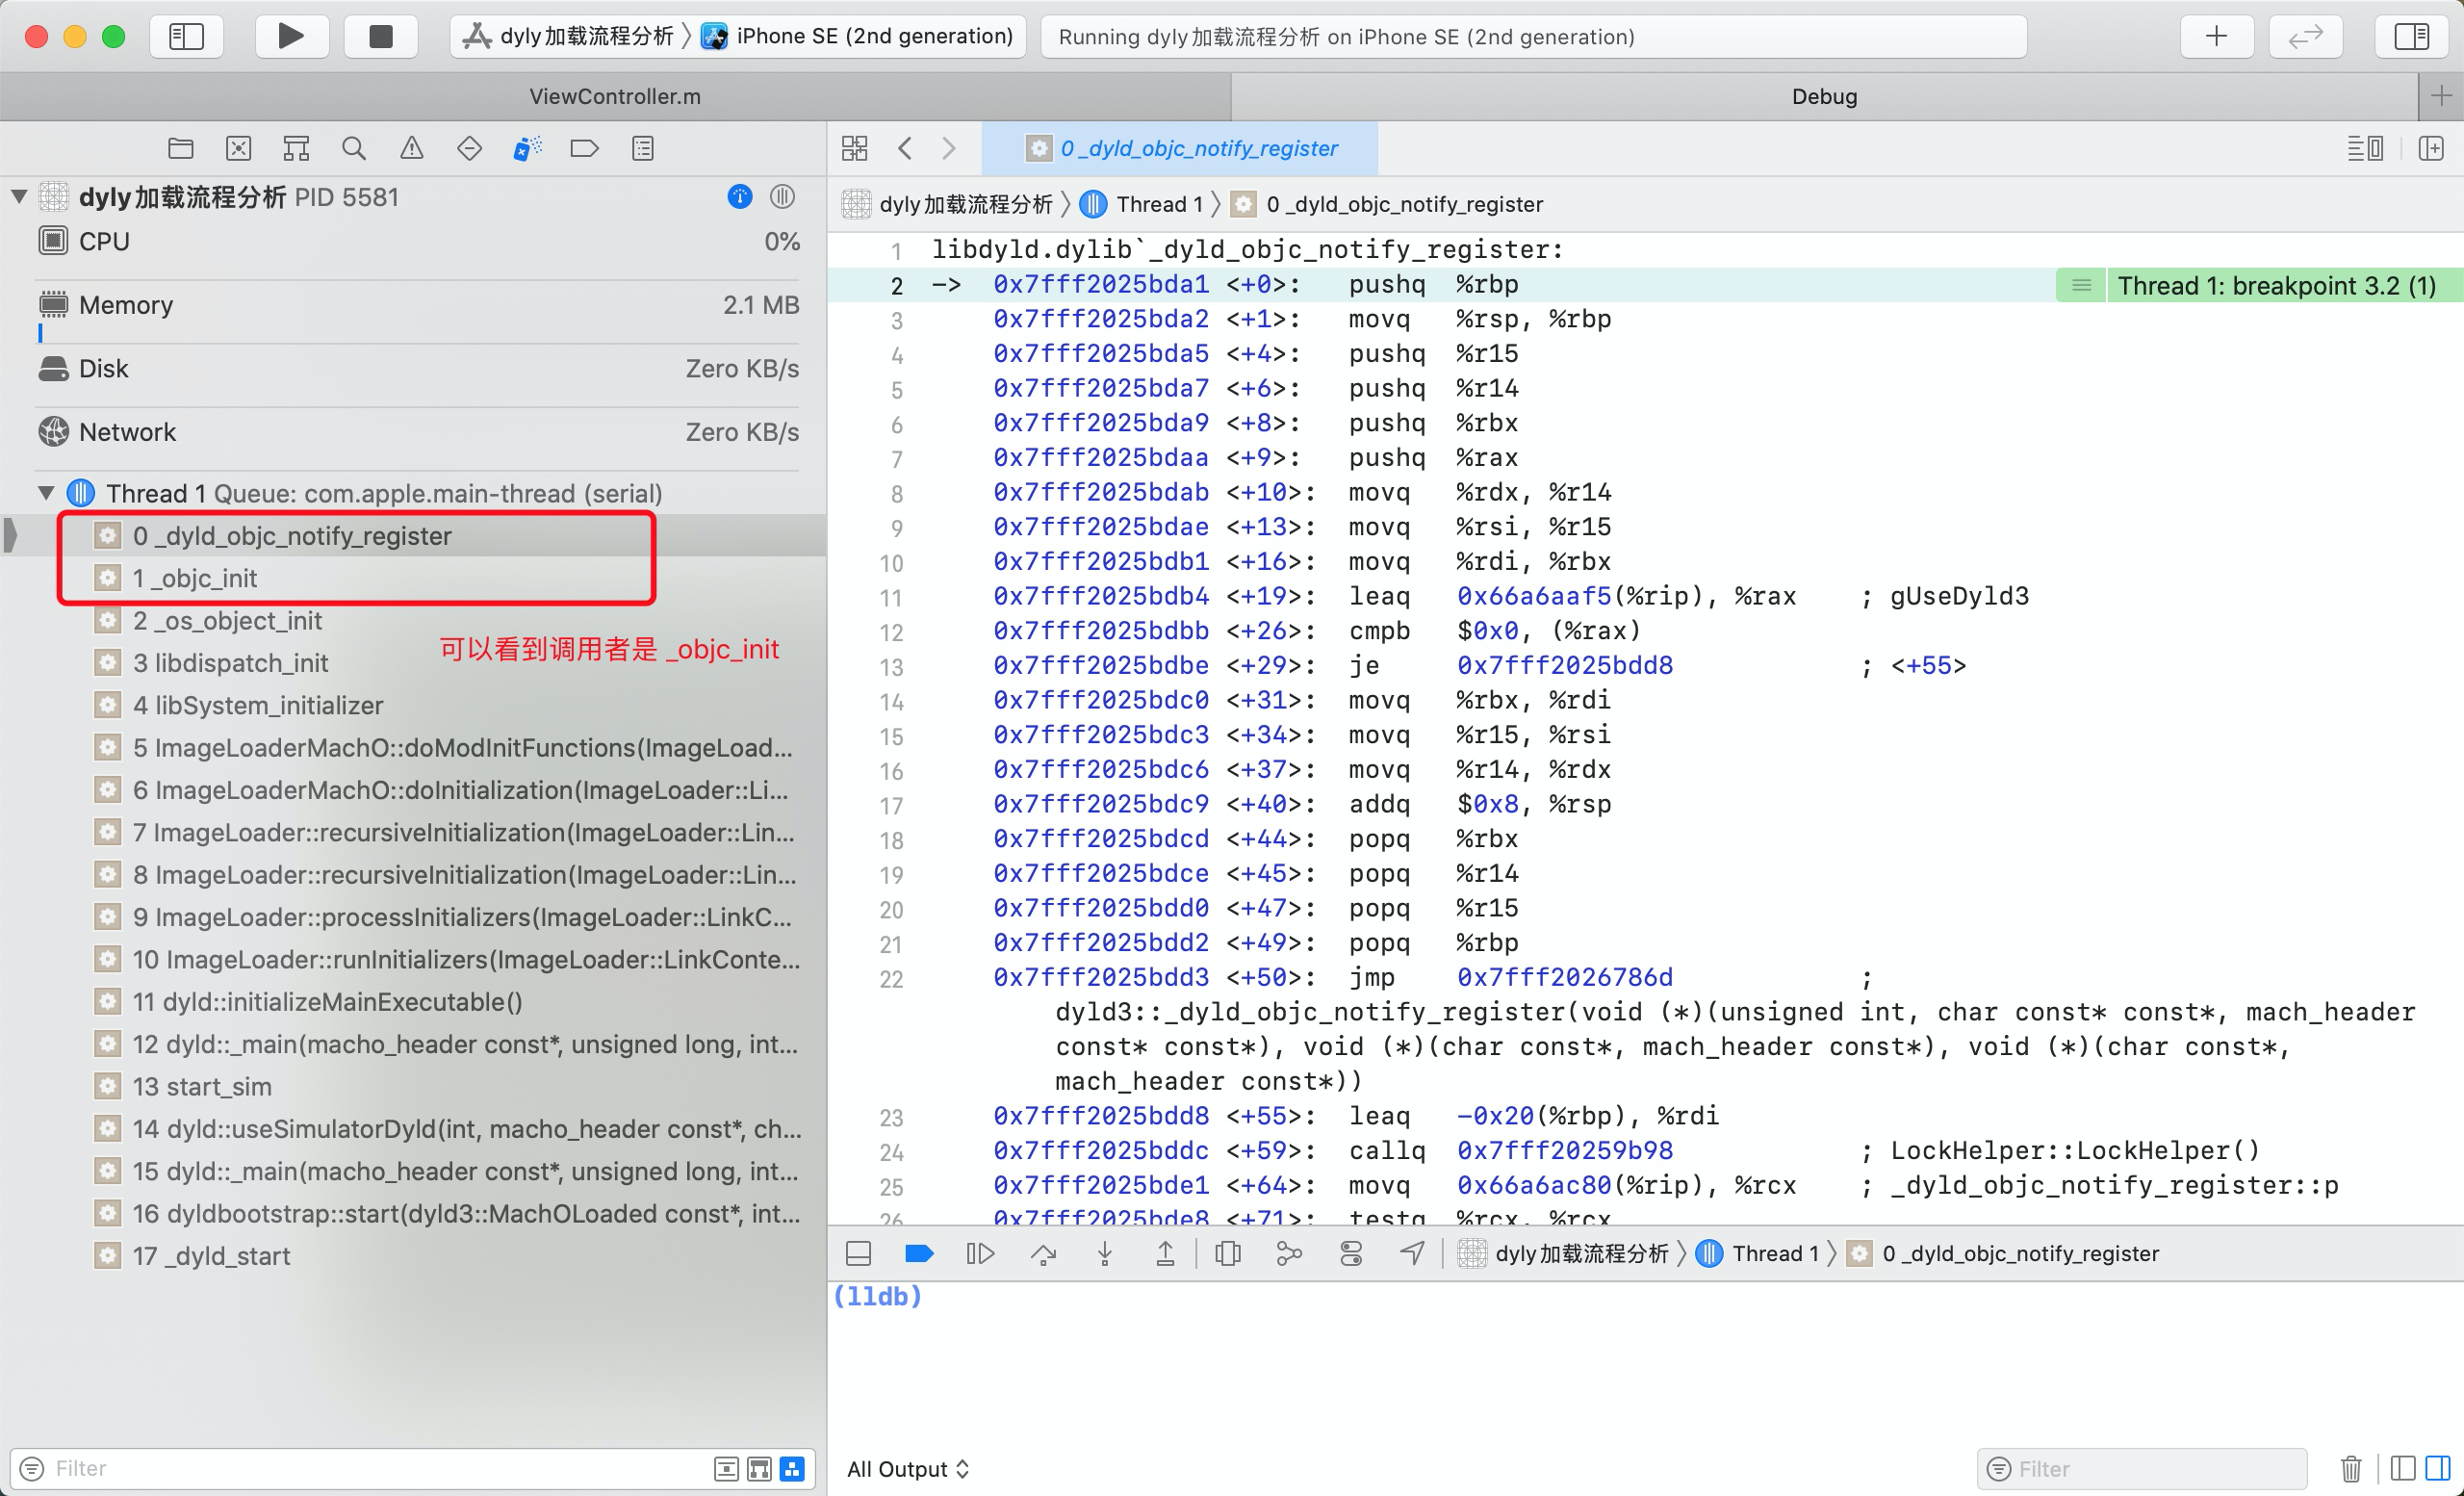
首先根据调用堆栈信息,我们可以看到 _dyld_objc_notify_register 是被 _objc_init 调用的。而 _objc_init 函数正是我们前面探究的 Runtime 的入口函数。
4.13 libdispatch_init 分析
我们看到在调用函数栈在调用 _objc_init 之前,还调用了 libdispatch_init 和 _os_object_init
libdispatch_init 属于 libdispatch 系统库,已经开源,我们下载下来 libdispatch-1173.40.5 版本源码下载地址。
然后搜索 libdispatch_init 的函数实现
voidlibdispatch_init(void){// 省略部分代码......_dispatch_hw_config_init();_dispatch_time_init();_dispatch_vtable_init();_os_object_init();_voucher_init();_dispatch_introspection_init();}
我们在上面代码中找到了我们关键要查看的代码 _os_object_init(),我们跟踪进去看看。
4.14 _os_object_init 分析
void_os_object_init(void){_objc_init();Block_callbacks_RR callbacks = {sizeof(Block_callbacks_RR),(void (*)(const void *))&objc_retain,(void (*)(const void *))&objc_release,(void (*)(const void *))&_os_objc_destructInstance};_Block_use_RR2(&callbacks);#if DISPATCH_COCOA_COMPATconst char *v = getenv("OBJC_DEBUG_MISSING_POOLS");if (v) _os_object_debug_missing_pools = _dispatch_parse_bool(v);v = getenv("DISPATCH_DEBUG_MISSING_POOLS");if (v) _os_object_debug_missing_pools = _dispatch_parse_bool(v);v = getenv("LIBDISPATCH_DEBUG_MISSING_POOLS");if (v) _os_object_debug_missing_pools = _dispatch_parse_bool(v);#endif}
我们看到里面调用了 _objc_init(),这就证明了从 _os_object_init 跳转到 _objc_init,然后进行 Runtime 的初始化操作,我们继续下面 _objc_init 的分析。
4.15 _objc_init 分析
打开 Objc 源码,搜索 _objc_init,看一下实现的源码部分
void _objc_init(void){static bool initialized = false;if (initialized) return;initialized = true;// fixme defer initialization until an objc-using image is found?environ_init();tls_init();static_init();runtime_init();exception_init();cache_init();_imp_implementationWithBlock_init();// 注册回调函数_dyld_objc_notify_register(&map_images, load_images, unmap_image);#if __OBJC2__didCallDyldNotifyRegister = true;#endif}
然后我们在函数内部找到了 _dyld_objc_notify_register(),我们看一下这个函数的注释部分
/************************************************************************ _objc_init* Bootstrap initialization. Registers our image notifier with dyld.* Called by libSystem BEFORE library initialization time* 引导程序初始化。用 dyld 注册我们的 image 通知程序。* 在库初始化之前由 libSystem 调用**********************************************************************/
注释的意思就是说这个函数 _objc_init 的调用时机是在其他动态库加载之前由 libSystem 系统库先调用的。
那么到这里就很明确了,其实在 dyld::_main 主程序的第 8 步,初始化所有动态库及主程序的时候之前,就先注册了 load_images 的回调,之后在 Runtime 调用 load_images 加载完所有 load 方法之后,就会回调到 dyld::_main 的 initializeMainExecutable() 内部执行回调。
4.16 doInitialization 分析
在 dyld 来到 doInitialization 时
bool ImageLoaderMachO::doInitialization(const LinkContext& context){CRSetCrashLogMessage2(this->getPath());// mach-o has -init and static initializersdoImageInit(context);doModInitFunctions(context);CRSetCrashLogMessage2(NULL);return (fHasDashInit || fHasInitializers);}
在 doModInitFunctions 中,会调用 c++ 的构造方法。
我们在 ViewController 的 load 方法,然后在 main 文件中增加一个 cxx 函数
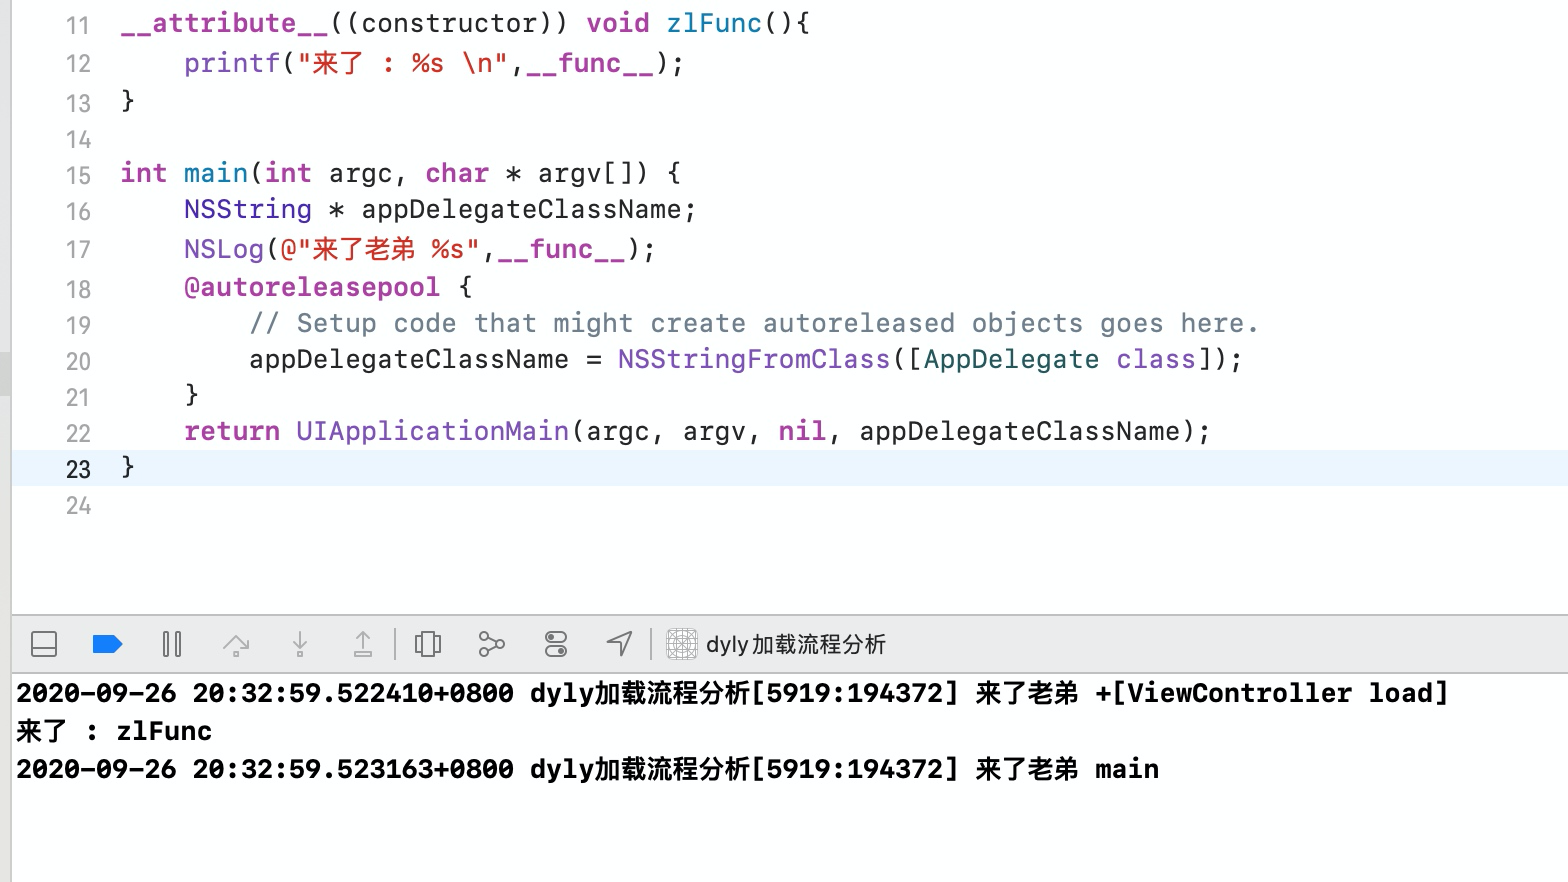
看控制台输出,我们可以得出一个结论
load -> Cxx -> main
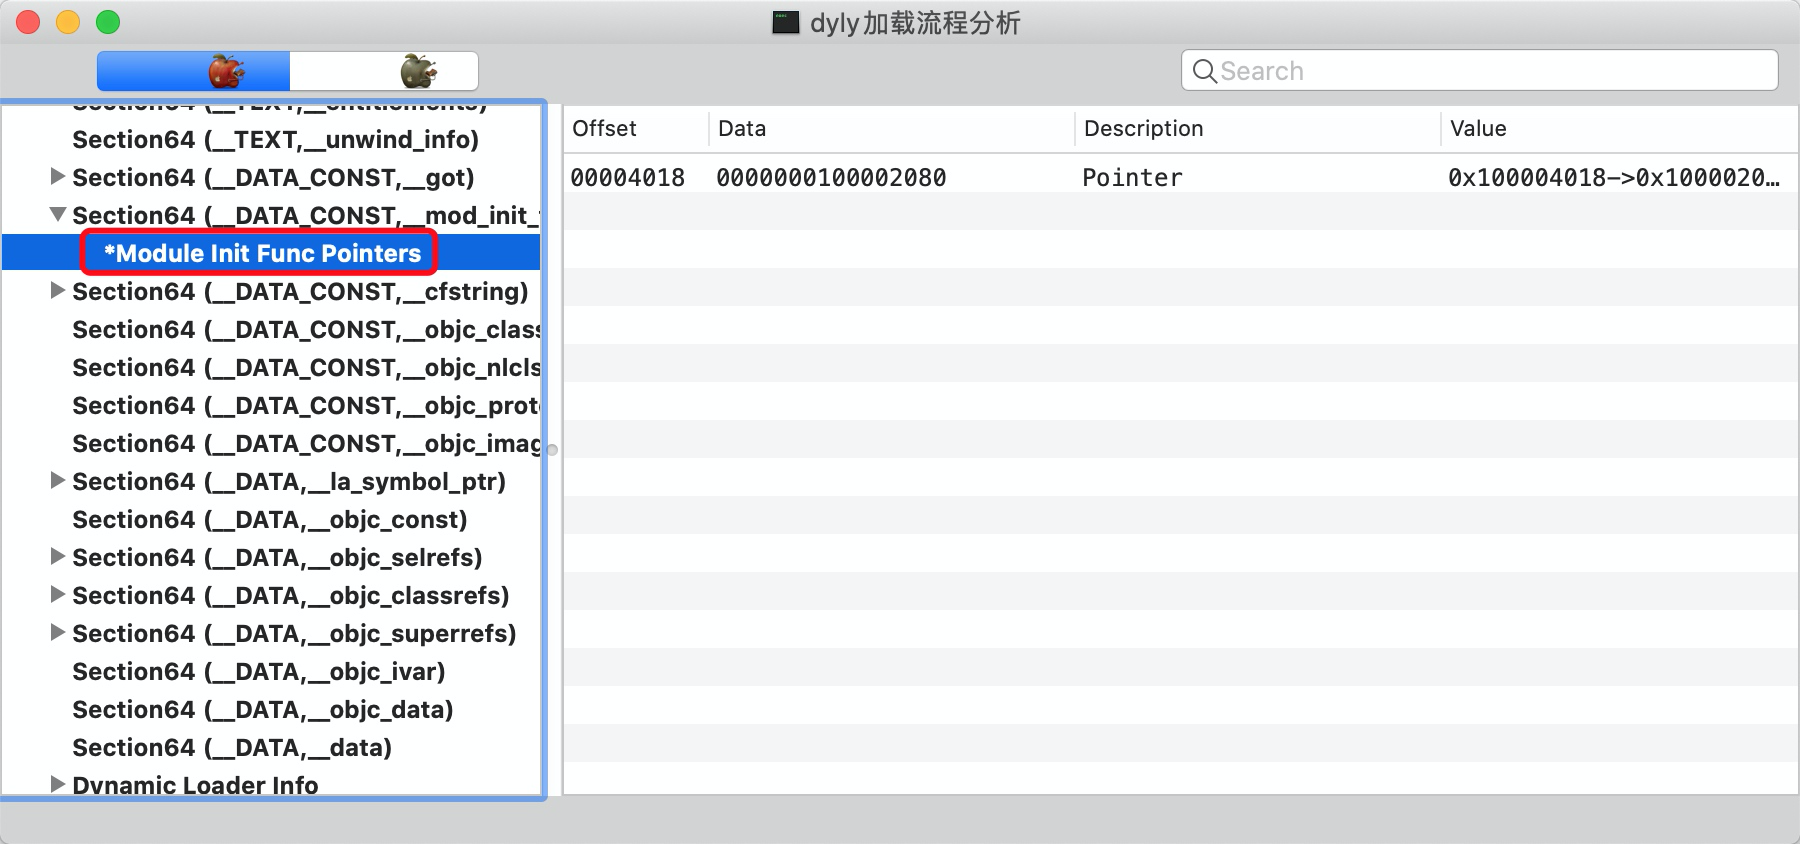
这种 c++ 构造方法存储在 __DATA 段, __mod_init_func 节中。
4.17 主程序 main 入口
// find entry point for main executableresult = (uintptr_t)sMainExecutable->getEntryFromLC_MAIN();
找到真正 main 函数入口并返回。
5、dyld 加载流程图
6、总结

若有收获,就点个赞吧
0 人点赞
