前言 大家都经常使用 IDEA 进行开发,肯定会使用一些 IDEA 插件,我之前也写过两个插件,不过已经很久没有更新了,就让它先放着吧! 那小伙伴你是否想亲手写一个插件,或者你是否有一些插件的想法,但是找不到插件。那就自己实现一个吧!
创建项目
使用 Gradle 创建
写插件,先从创建项目开始:File -> New -> Project...
- 这里使用 Gradle,其中 Java 已经默认选中,咱们再额外选择 IntelliJ Platform Plugin。
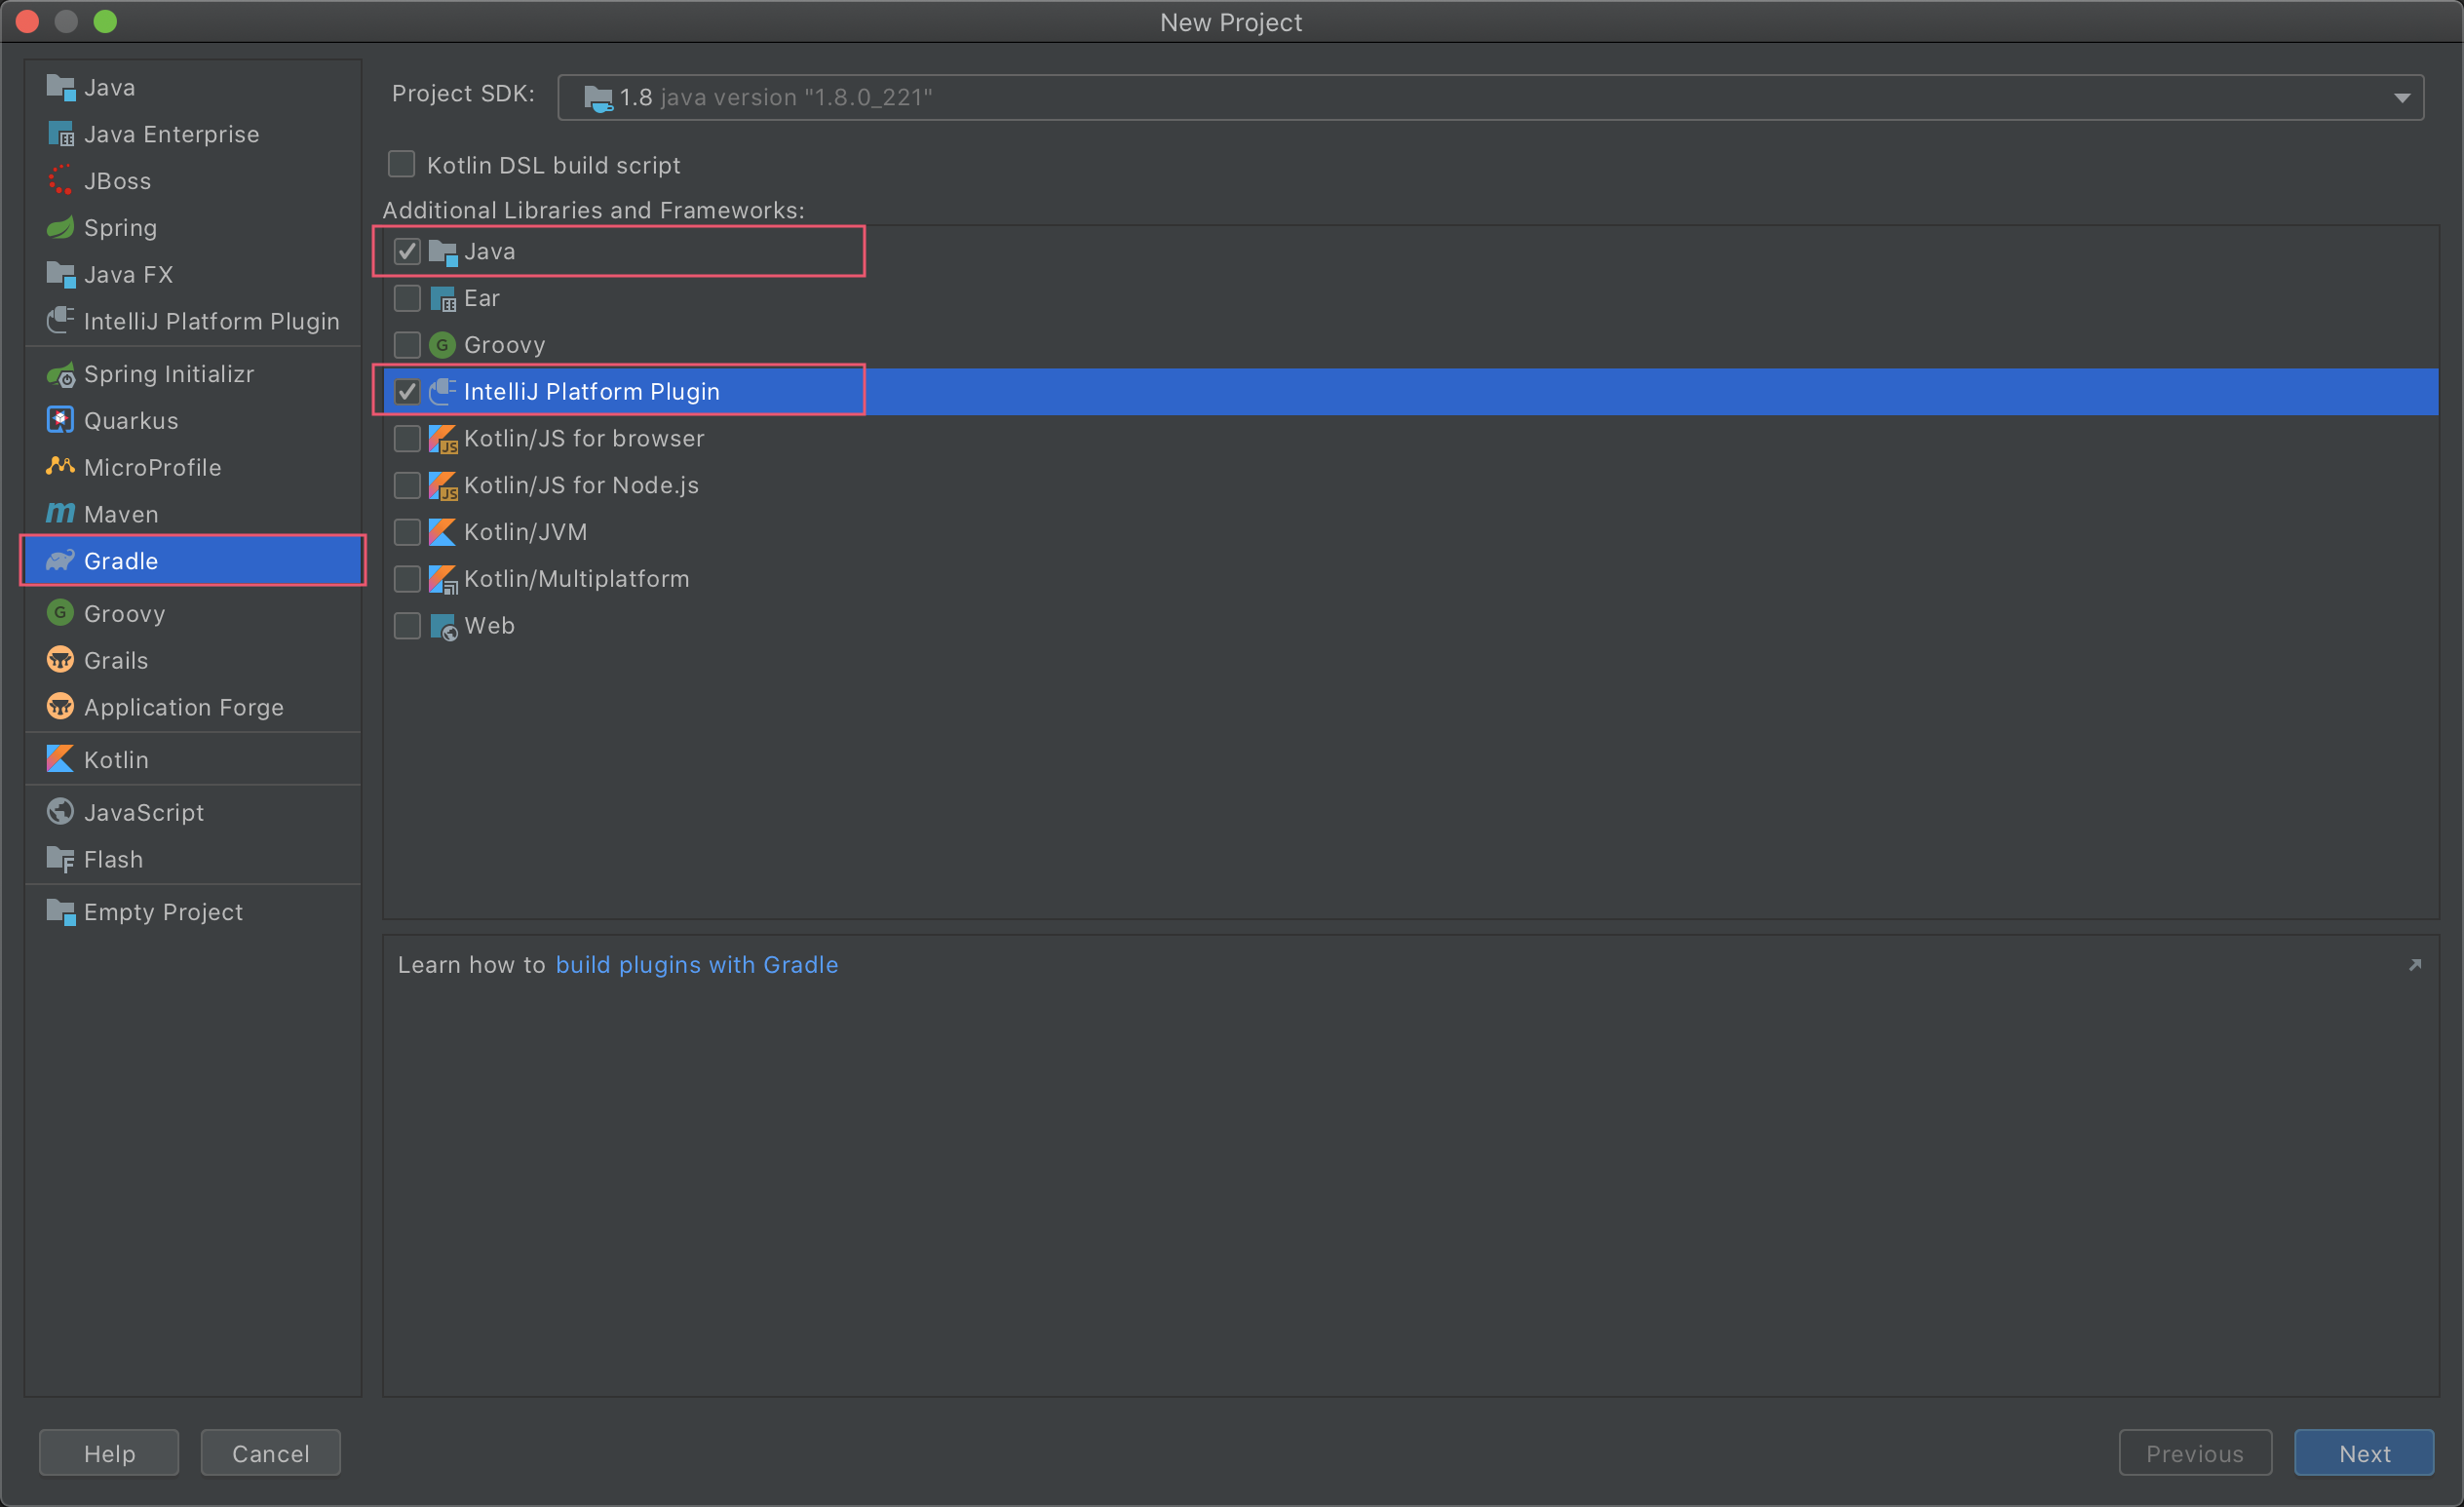
- 点击 Next ,然后填写项目名称,路径等选项。

- 项目结构

build.gradle 为项目配置文件。
resources/META-INF/plugin.xml 为插件配置文件。
使用 GitHub 模版
- 访问 https://github.com/JetBrains/intellij-platform-plugin-template
- 点击 Use this template 创建模版。

- Clone 项目到自己本地。
注:模版生成的项目是使用的 Kotlin,所以这里使用的第一种方式创建。
开始开发
修改 build.gradle 配置文件
原内容如下:
修改后:
plugins {id 'java'id 'org.jetbrains.intellij' version '0.4.15'}group 'com.liuzhihang.toolkit'version '1.0.2'sourceCompatibility = 1.8repositories {mavenLocal()maven { url "https://maven.aliyun.com/repository/public" }mavenCentral()jcenter()}dependencies {testCompile group: 'junit', name: 'junit', version: '4.12'}// See https://github.com/JetBrains/gradle-intellij-plugin/intellij {version '2019.1.1'pluginName 'Copy as Json'updateSinceUntilBuild falsesameSinceUntilBuild false}patchPluginXml {pluginDescription(file(descriptionFile).text)changeNotes(file(changesFile).text)}
- 修改 repositories 使用阿里云
- 修改 patchPluginXml 使用外置文件
在根目录下创建 parts 路径,并创建 changeNotes.html、pluginDescription.html
修改 resources/META-INF/plugin.xml 插件信息
原内容如下:

修改后:<idea-plugin><id>com.liuzhihang.toolkit.copyasjson</id><name>Copy as Json</name><vendor email="liuzhihangs@qq.com" url="https://liuzhihang.com">Liu ZhiHang</vendor><description><![CDATA[ Description will be added by gradle build]]></description><!-- please see http://www.jetbrains.org/intellij/sdk/docs/basics/getting_started/plugin_compatibility.htmlon how to target different products --><depends>com.intellij.modules.java</depends><idea-version since-build="181.00"/><extensions defaultExtensionNs="com.intellij"><!-- Add your extensions here --></extensions><actions></actions></idea-plugin>
plugin.xml 说明:https://jetbrains.org/intellij/sdk/docs/basics/plugin_structure/plugin_configuration_file.html
创建 Action
先在 main 下 创建 java 目录,及包路径。
New->Plugin DevKit->Action
- 设置 Action 的 id 、Class Name 、 description 、 group 及快捷键等

- 这时候会发现在 plugin.xml 也插入了 action。
到这里已经结构完全创建完毕了,下面将演示插件 copy-as-json 的内部逻辑。当然这块也可以直接跳过,阅读源码即可。<actions><action id="Toolkit.Json.CopyAsJsonAction" class="com.liuzhihang.toolkit.action.CopyAsJsonAction"text="CopyAsJsonAction" description="Copy As Json"><add-to-group group-id="EditorTabsGroup" anchor="first"/><keyboard-shortcut keymap="$default" first-keystroke="shift meta J"/></action></actions>
源码地址:文末相关资料或公众号发送 copy-as-json 获取。
插件效果:将 JavaBean 复制为 Json 字符串。
开发笔记
首先需要知道一些常用的 API,常用 API 可以阅读官方文档或者关注公众号后面会推送,这里仅介绍一些在这里用到的。
- 打开 CopyAsJsonAction
该类继承并需要实现 actionPerformed 方法。在 actionPerformed 方法中可以通过以下三个方法获取到项目相关信息:
// 获取项目Project project = e.getData(PlatformDataKeys.PROJECT);// 获取Psi文件PsiFile psiFile = e.getData(CommonDataKeys.PSI_FILE);// 获取当前编辑的文件Editor editor = e.getData(CommonDataKeys.EDITOR);
获取到当前编辑的文件
@Nullablepublic static PsiClass getTargetClass(@NotNull Editor editor, @NotNull PsiFile file) {int offset = editor.getCaretModel().getOffset();PsiElement element = file.findElementAt(offset);if (element != null) {// 当前类PsiClass target = PsiTreeUtil.getParentOfType(element, PsiClass.class);return target instanceof SyntheticElement ? null : target;}return null;}
从当前编辑的文件里面获取到字段
将当前编辑的 JavaBean 中的字段提取,并转换为 Map。
Map<String, Object> fieldsMap = getFields(selectedClass);
getFields 方法篇幅较长,请参考源码。
- 将字段转化成 Json 字符串,并格式化
使用 Gson 将 Map 转换为 Json 字符串,并格式化。其中格式化自定义了缩进。
见代码:com.liuzhihang.toolkit.utils.GsonFormatUtil
Gson gson = new GsonBuilder().create();String json = GsonFormatUtil.gsonFormat(gson, fieldsMap);// 使用自定义缩进格式 String json = new GsonBuilder().setPrettyPrinting().create().toJson(fieldsMap);StringSelection selection = new StringSelection(json);
将 Json 字符串拷贝到剪贴板
StringSelection selection = new StringSelection(json);Clipboard clipboard = Toolkit.getDefaultToolkit().getSystemClipboard();clipboard.setContents(selection, selection);
发出提示 success
String message = "Convert " + selectedClass.getName() + " to JSON success, copied to clipboard.";Notification success = NOTIFICATION_GROUP.createNotification(message, NotificationType.INFORMATION);Notifications.Bus.notify(success, project);
测试运行
右侧
Gradle->选择 intellij->点击 runlde
打包
右侧
Gradle-> 选择intellij->点击 buildPlugin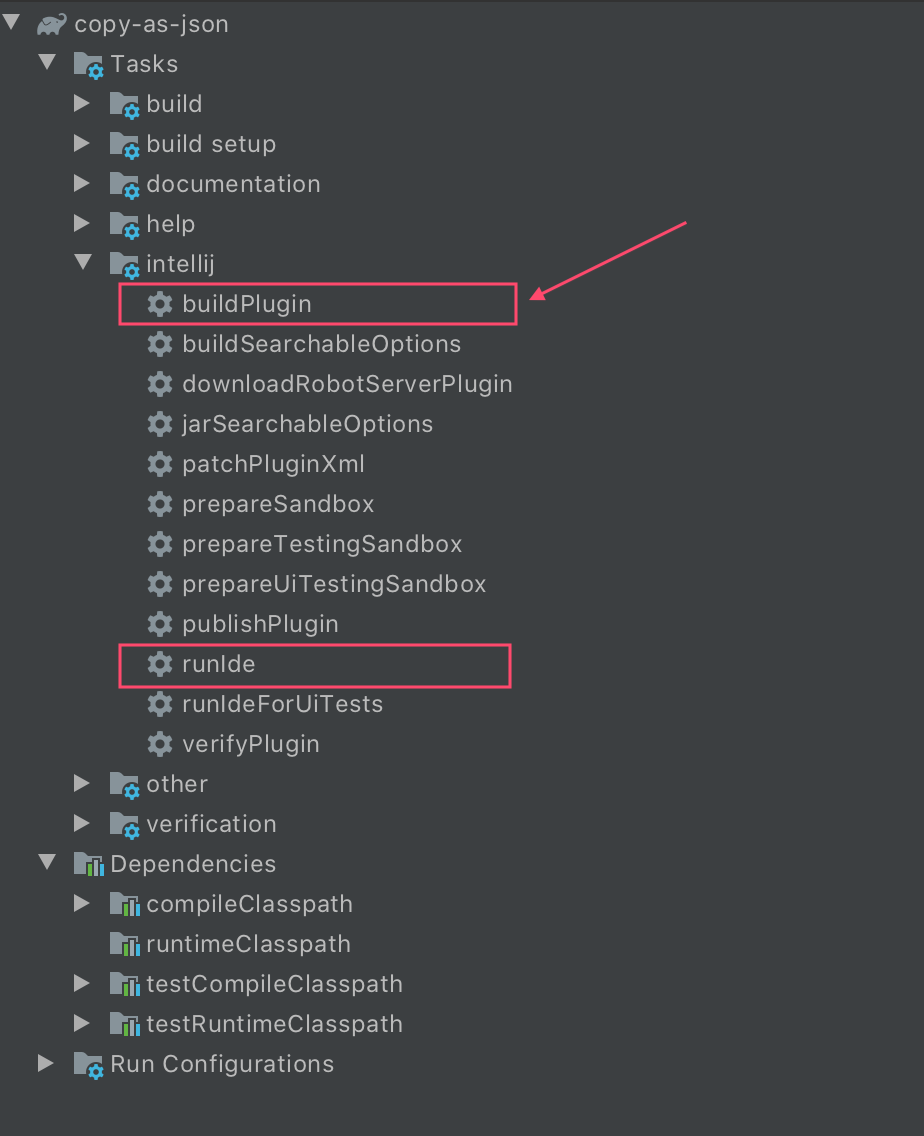
此时在项目路径下会生成插件,把这个插件包发给小兄弟安装使用就行了。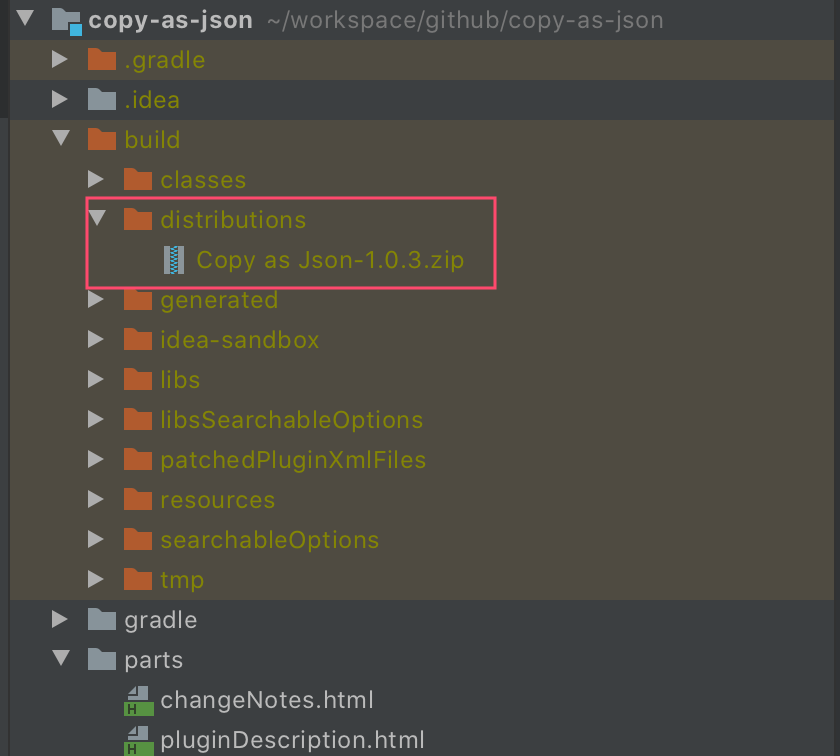
上传到 IDEA 插件库
访问 https://plugins.jetbrains.com/ 创建账号,将插件包上传到仓库即可。当然也有其他的方式,这块就没有研究了。
总结
通过上面的方式已经简单开发一个插件了,要问这个插件有什么用?
其实就是在写文档,或者接口调用的时候,直接将 Java Bean 复制为 Json 串,省过一个一个敲,然后手写 Json 了。
相关资料
[1] IntelliJ Platform SDK DevGuide:https://jetbrains.org/intellij/sdk/docs/intro/intellij_platform.html
[2] JetBrains Plugins Repository:https://plugins.jetbrains.com/
[3] Toolkit: https://github.com/liuzhihang/toolkit
[4] copy-as-json:https://github.com/liuzhihang/copy-as-json
[5] copy-as-json 插件地址:https://plugins.jetbrains.com/plugin/13606-copy-as-json

若有收获,就点个赞吧
0 人点赞
