数据切分-解决数据库性能瓶颈
海量数据的存储与访问瓶颈解决方案-数据切分
存储在一台数据库上的数据,分散到多台数据库中,从而达到降低单台数据库负载的效果
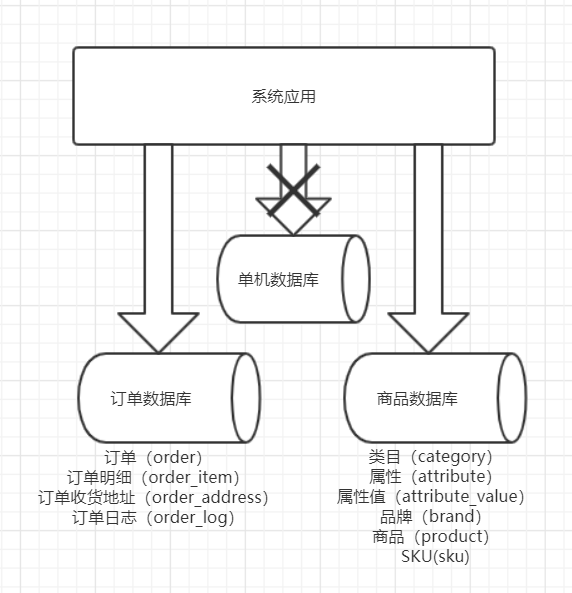
垂直切分
按照业务去切分
每种业务一个数据库
不同业务之间,禁止跨库join联查
按照不同的表或Schema切分到不同的数据库中

优点
- 拆分后业务清晰,拆分规则明确
- 系统之间容易扩展和整合
- 数据维护简单
缺点
- 部分业务表无法join,只能通过接口调用,提升了系统的复杂度
- 跨库事务难以处理
- 垂直切分后,某些业务数据过于庞大,仍然存在单体性能瓶颈
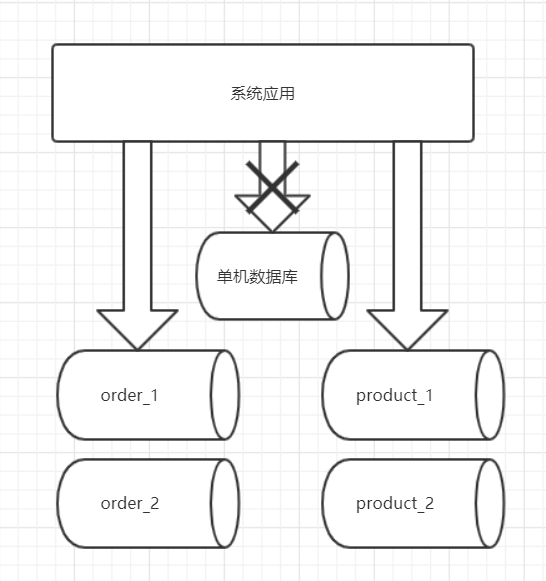
水平切分
将一个表中的数据,根据某种规则拆分到不同的数据库中

水平拆分的典型的几种分片规则
- 用户id求模
- 按照日期去拆分数据
- 按照其他字段求模,去拆分数据
优点
- 解决了单库大数据、高并发的性能瓶颈
- 拆分规则封装好,对应用端几乎透明,开发人员无需关心拆分细节
- 提高了系统的稳定性和负载能力
缺点
- 拆分规则很难抽象
- 分片事务一致性难以解决
- 二次扩展时,数据迁移、维护难度大。比如:开始我们按照用户id对2求模,但是随着业务的增长,2台数据库难以支撑,还是继续拆分成4个数据库,那么这时就需要做数据迁移了
世界上的万物没有完美的,有利就有弊,就像数据切分一样。无论是垂直切分,还是水平切分,它们解决了海量数据的存储和访问性能问题,但也随之而来的带来了很多新问题,它们的共同缺点有:
- 分布式的事务问题
- 跨库join问题
- 多数据源的管理问题
读写分离
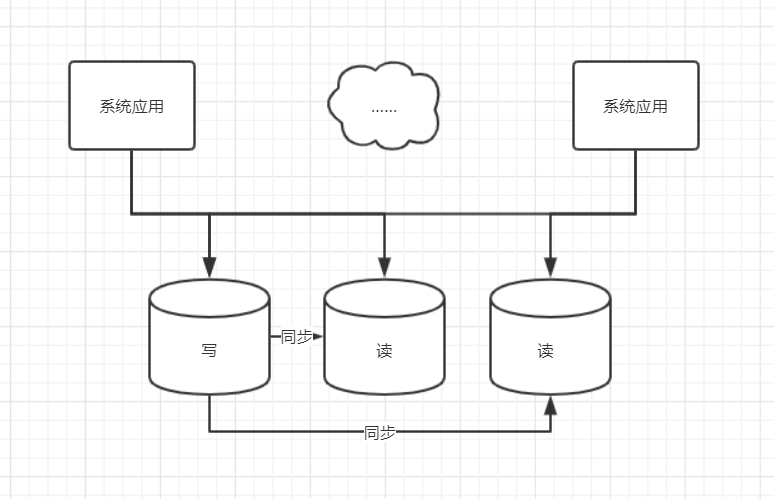
数据库承载压力大,主要是由读请求造成的,那么我们是不是可以把读操作和写操作分开,让所有读的请求落到专门负责读的数据库上,所有写的操作落到专门负责写的数据库上,写库的数据同步到读库上,这样保证所有的数据修改都可以在读取时,从读库获得,系统的架构如图所示:

读写分离弊端
- 同步挂掉,或者同步延迟比较大时,写库和读库的数据不一致,这个数据的不一致
如何正确使用读写分离
- 一些对数据实时性要求不高的业务场景,可以考虑使用读写分离
- 对数据实时性要求比较高的场景,比如订单支付状态,还是不建议采用读写分离的,或者你在写程序时,老老实实的从写库去读取数据
MyCat-中间层代理

什么是MyCat
- MyCat是一个数据库的中间件,介于应用与数据库之间,是进行数据处理和交互的中间服务。
MyCat应用场景
- 单纯的读写分离,此时配置最为简单,支持读写分离,主从切换;
- 分库分表,对于超过1000w的表进行分片,最大支持1000亿的数据;
- 多租户应用,每个应用一个数据库,应用只连接MyCat,程序本身不需要改造;
- 代替HBase,分析大数据
MyCat中基本概念
逻辑库(Schema)
- 可以理解为系统先做了垂直切分,被分为了3个库,用户库,订单库,商品库,而这3个库就被称为逻辑库
- 逻辑表(table)
* 分片节点(dataNode)
- 数据被切分后,一张大表被分到不同的分片数据库上面,每个分片表所在的数据库就叫做分片节点
- 节点主机(dataHost)
- 分片规则(rule)
全局序列号(sequence)
MyCat中分库分表、读写分离的配置
server.xml配置
配置MyCat的用户名、密码、权限、Schema等
如同给Mysql新建用户一样
客户端连接MyCat与连接MySql无异

schema.xml配置
配置dataHost(节点主机),包括读host、写host
- 一个dataHost可以配置多个writeHost
- 一个writeHost可以配置多个readHost
balance:读请求负载均衡类型
- 0:不开启读写分离
- 1:第一个writeHost不参与
- 2:读写均匀分配
- 3:读落在readHost上
writeType写请求类型
- 0:落在第一个writeHost写库上,官方推荐
- 1:随机
配置dataNode(数据节点),指定到具体的数据库

配置schema,表名、数据节点、分片规则等
- name要和server.xml里面name对应
- checkSQLschema:是否去掉sql中的Schema
- sqlMaxLimit:select默认的limit值,仅对分片表有效
- table:定义表
- name:定义逻辑表的声明
- dataNode:定义逻辑表的数据节点
- rule:定义分片表的分片规则,必须与rule.xml中的tableRule对应
- ruleRequired:是否绑定分片规则,如果为true,没有绑定分片规则,程序报错
MyCat分片规则
枚举分片

取模

MyCat-全局表
- type:global为全局表(所有节点主机都保存数据),不指定则为分片表
<table name="province" dataNode="dn131,dn132" type="global"/>
- type:global为全局表(所有节点主机都保存数据),不指定则为分片表
MyCat-子表
childTable标签,定义分片子表
- name属性:子表名称
- joinKey属性:标志子表中的列,用于与父表做关联
- parentKey属性,标志父表中的列,与joinKey对应
- primaryKey属性:子表主键,同table标签
- needAddLimit属性:同table标签
MyCat的HA-原理

MyCat的HA-Haproxy
MyCat的HA-keepalived
MyCat技术落地
对订单表进行分片,以及订单表的子表订单商品表、订单状态表
server.xml
- 配置用户的schemas
<user name="root" defaultAccount="true"><property name="password">root</property><property name="schemas">foodie-shop-dev</property></user><user name="user"><property name="password">user</property><property name="schemas">foodie-shop-dev</property><property name="readOnly">true</property></user>
- 配置用户的schemas
schema.xml
<?xml version="1.0"?><!DOCTYPE mycat:schema SYSTEM "schema.dtd"><mycat:schema xmlns:mycat="http://io.mycat/"><schema name="foodie-shop-dev" checkSQLschema="false" sqlMaxLimit="100" dataNode="dn131"><!-- auto sharding by id (long)<table name="user" dataNode="dn131,dn132" rule="mod-long" /><table name="province" dataNode="dn131,dn132" type="global"/><table name="o_order" autoIncrement="true" primaryKey="id" dataNode="dn131,dn132" rule="mod-long"><childTable name="order_item" joinKey="order_id" parentKey="id"/></table>--><!-- <table name="oc_call" primaryKey="ID" dataNode="dn1$0-743" rule="latest-month-calldate"/> --><table name="orders" dataNode="dn131,dn132" rule="sharding-by-murmur"><childTable name="order_items" joinKey="order_id" parentKey="id"/><childTable name="order_status" joinKey="order_id" parentKey="id" /></table></schema><dataNode name="dn131" dataHost="db131" database="foodie-shop-dev" /><dataNode name="dn132" dataHost="db132" database="foodie-shop-dev" /><dataHost name="db131" maxCon="1000" minCon="10" balance="0"writeType="0" dbType="mysql" dbDriver="native" switchType="1" slaveThreshold="100"><heartbeat>select user()</heartbeat><writeHost host="M1" url="192.168.73.131:3306" user="imooc"password="Imooc@123456"></writeHost></dataHost><dataHost name="db132" maxCon="1000" minCon="10" balance="0"writeType="0" dbType="mysql" dbDriver="native" switchType="1" slaveThreshold="100"><heartbeat>select user()</heartbeat><writeHost host="M1" url="192.168.73.132:3306" user="imooc"password="Imooc@123456"></writeHost></dataHost></mycat:schema>
订单表分片规则rule.xml
根据用户id(userId)进行分片,同一个用户的所有订单落在同一个分片上
分片规则采用一致性hash


代码修改
数据库连接改为MyCat客户端连接地址

先创建订单,金额设置为0
// 先创建订单,金额先设置为0newOrder.setTotalAmount(0);newOrder.setRealPayAmount(0);// 根据userId进行分片,不允许更新newOrder.setUserId(null);ordersMapper.insert(newOrder);
-
在创建OrderItem
// OrderItem会和订单表落在同一个分片orderItemsMapper.insert(subOrderItem);
-
在更新订单,userId设置为null
// OrderItem创建完成后,在更新Order的金额newOrder.setTotalAmount(totalAmount);newOrder.setRealPayAmount(realPayAmount);// 根据userId进行分片,更新时不允许修改userIdnewOrder.setUserId(null);ordersMapper.updateByPrimaryKeySelective(newOrder);
Sharding-Jdbc客户端模式
官网地址:https://shardingsphere.apache.org/document/current/cn/quick-start/sharding-jdbc-quick-start/

Sharding-Jdbc简介
开源的分布式的关系型数据库的中间件
目前已经进入了Apache孵化器
客户端代理模式
定位为轻量级的java框架,以jar包提供服务
可以理解为增强版的Jdbc驱动
提供4种配置方式
- Java API
- Yaml
- Spring Boot
- Spring命名空间
与MyCat区别
- MyCat是服务端代理,Sharding-Jdbc是客户端代理
- MyCat不支持同一个库内的水平切分,Sharding-Jdbc支持
- MyCat读写分离时可以配置从主库读,Sharding-jdbc只能从从库读
- MyCat子表可以指定分片字段,Sharding-Jdc子表不可以指定分片字段

Sharding-Jdbc分库分表、读写分离配置
spring方式
- pom
<dependency><groupId>org.apache.shardingsphere</groupId><artifactId>sharding-jdbc-spring-namespace</artifactId><version>4.0.0-RC2</version></dependency>
- pom
-
sharding-jdbc.xml
<?xml version="1.0" encoding="UTF-8"?><beans xmlns="http://www.springframework.org/schema/beans"xmlns:xsi="http://www.w3.org/2001/XMLSchema-instance"xmlns:p="http://www.springframework.org/schema/p"xmlns:context="http://www.springframework.org/schema/context"xmlns:tx="http://www.springframework.org/schema/tx"xmlns:sharding="http://shardingsphere.apache.org/schema/shardingsphere/sharding"xmlns:master-slave="http://shardingsphere.apache.org/schema/shardingsphere/masterslave"xmlns:bean="http://www.springframework.org/schema/util"xsi:schemaLocation="http://www.springframework.org/schema/beanshttp://www.springframework.org/schema/beans/spring-beans.xsdhttp://shardingsphere.apache.org/schema/shardingsphere/shardinghttp://shardingsphere.apache.org/schema/shardingsphere/sharding/sharding.xsdhttp://shardingsphere.apache.org/schema/shardingsphere/masterslavehttp://shardingsphere.apache.org/schema/shardingsphere/masterslave/master-slave.xsdhttp://www.springframework.org/schema/contexthttp://www.springframework.org/schema/context/spring-context.xsdhttp://www.springframework.org/schema/txhttp://www.springframework.org/schema/tx/spring-tx.xsd http://www.springframework.org/schema/util https://www.springframework.org/schema/util/spring-util.xsd"><!-- 数据源配置 这个配置了3个 ds0、slave0、ms1 --><!-- 主数据源 --><bean id="ds0" class="com.zaxxer.hikari.HikariDataSource" destroy-method="close"><property name="driverClassName" value="com.mysql.cj.jdbc.Driver"/><property name="username" value="root"/><property name="password" value="123456"/><property name="jdbcUrl"value="jdbc:mysql://192.168.73.131/sharding_order?serverTimezone=Asia/Shanghai&useSSL=false"/></bean><!-- 从数据源 --><bean id="slave0" class="com.zaxxer.hikari.HikariDataSource" destroy-method="close"><property name="driverClassName" value="com.mysql.cj.jdbc.Driver"/><property name="username" value="root"/><property name="password" value="123456"/><property name="jdbcUrl"value="jdbc:mysql://192.168.73.130/sharding_order?serverTimezone=Asia/Shanghai&useSSL=false"/></bean><bean id="ms1" class="com.zaxxer.hikari.HikariDataSource" destroy-method="close"><property name="driverClassName" value="com.mysql.cj.jdbc.Driver"/><property name="username" value="root"/><property name="password" value="123456"/><property name="jdbcUrl"value="jdbc:mysql://192.168.73.132/shard_order?serverTimezone=Asia/Shanghai&useSSL=false"/></bean><!-- 主从策略 --><master-slave:load-balance-algorithm id="msStrategy" type="RANDOM"/><sharding:data-source id="sharding-data-source"><sharding:sharding-rule data-source-names="ds0,slave0,ms1"><!-- 读写分离配置 --><sharding:master-slave-rules><sharding:master-slave-rule id="ms0" master-data-source-name="ds0" slave-data-source-names="slave0"strategy-ref="msStrategy"/></sharding:master-slave-rules><!-- 表分片规则 --><sharding:table-rules><sharding:table-rule logic-table="t_order" actual-data-nodes="ms$->{0..1}.t_order_$->{1..2}"database-strategy-ref="databaseStrategy" table-strategy-ref="standard"key-generator-ref="snowflake"/></sharding:table-rules><!-- 广播表 --><sharding:broadcast-table-rules><sharding:broadcast-table-rule table="area"/></sharding:broadcast-table-rules><!-- 绑定子表 不能指定分片字段 --><sharding:binding-table-rules><sharding:binding-table-rule logic-tables="t_order,t_order_item"/></sharding:binding-table-rules></sharding:sharding-rule></sharding:data-source><sharding:key-generator id="snowflake" column="order_id" type="SNOWFLAKE" props-ref="snow"/><bean:properties id="snow"><prop key="worker.id">678</prop><prop key="max.tolerate.time.difference.milliseconds">10</prop></bean:properties><!-- 数据库分片策略 根据用户id 取模--><sharding:inline-strategy id="databaseStrategy" sharding-column="user_id"algorithm-expression="ms$->{user_id % 2}"/><bean id="myShard" class="com.yy.shardingjdbcdemo.sharding.MySharding"/><sharding:standard-strategy id="standard" sharding-column="order_id" precise-algorithm-ref="myShard"/><!-- 表分片策略 根据order-id取模 --><sharding:inline-strategy id="tableStrategy" sharding-column="order_id"algorithm-expression="t_order_$->{order_id % 2 +1}"/><bean class="org.mybatis.spring.SqlSessionFactoryBean"><property name="dataSource" ref="sharding-data-source"/><property name="mapperLocations" value="classpath*:/mybatis/*.xml"/></bean></beans>
-
启动类
@SpringBootApplication@ImportResource("classpath*:sharding-jdbc.xml")@MapperScan("com.yy.shardingjdbcdemo.dao")public class ShardingJdbcDemoApplication {public static void main(String[] args) {SpringApplication.run(ShardingJdbcDemoApplication.class, args);}}
sping boot方式
- pom
<dependency><groupId>org.apache.shardingsphere</groupId><artifactId>sharding-jdbc-spring-boot-starter</artifactId><version>4.0.0-RC2</version></dependency>
- pom
-
application.properties
spring.shardingsphere.datasource.names=ds0,ms1,slave0spring.shardingsphere.datasource.ds0.type=com.zaxxer.hikari.HikariDataSourcespring.shardingsphere.datasource.ds0.driver-class-name=com.mysql.cj.jdbc.Driverspring.shardingsphere.datasource.ds0.jdbcUrl=jdbc:mysql://192.168.73.131:3306/sharding_orderspring.shardingsphere.datasource.ds0.username=imoocspring.shardingsphere.datasource.ds0.password=Imooc@123456spring.shardingsphere.datasource.slave0.type=com.zaxxer.hikari.HikariDataSourcespring.shardingsphere.datasource.slave0.driver-class-name=com.mysql.cj.jdbc.Driverspring.shardingsphere.datasource.slave0.jdbcUrl=jdbc:mysql://192.168.73.130:3306/sharding_orderspring.shardingsphere.datasource.slave0.username=imoocspring.shardingsphere.datasource.slave0.password=Imooc@123456spring.shardingsphere.datasource.ms1.type=com.zaxxer.hikari.HikariDataSourcespring.shardingsphere.datasource.ms1.driver-class-name=com.mysql.cj.jdbc.Driverspring.shardingsphere.datasource.ms1.jdbcUrl=jdbc:mysql://192.168.73.132:3306/shard_orderspring.shardingsphere.datasource.ms1.username=imoocspring.shardingsphere.datasource.ms1.password=Imooc@123456spring.shardingsphere.sharding.master-slave-rules.ms0.master-data-source-name=ds0spring.shardingsphere.sharding.master-slave-rules.ms0.slave-data-source-names=slave0spring.shardingsphere.sharding.master-slave-rules.ms0.load-balance-algorithm-type=RANDOMspring.shardingsphere.sharding.tables.t_order.actual-data-nodes=ms$->{0..1}.t_order_$->{1..2}spring.shardingsphere.sharding.tables.t_order.database-strategy.inline.sharding-column=user_idspring.shardingsphere.sharding.tables.t_order.database-strategy.inline.algorithm-expression=ms$->{user_id % 2}spring.shardingsphere.sharding.tables.t_order.table-strategy.standard.sharding-column=order_idspring.shardingsphere.sharding.tables.t_order.table-strategy.standard.precise-algorithm-class-name=com.example.shardingjdbcdemo.sharding.MyShardingspring.shardingsphere.sharding.tables.t_order.key-generator.column=order_idspring.shardingsphere.sharding.tables.t_order.key-generator.type=SNOWFLAKEspring.shardingsphere.sharding.tables.t_order.key-generator.props.worker.id=345spring.shardingsphere.sharding.tables.t_order.key-generator.props.max.tolerate.time.difference.milliseconds=10#广播表spring.shardingsphere.sharding.broadcast-tables=areamybatis.mapper-locations=/mybatis/*.xmllogging.pattern.dateformat=HH:mm:ss
-
启动类
@SpringBootApplication//@ImportResource("classpath*:sharding-jdbc.xml")@MapperScan("com.yy.shardingjdbcdemo.dao")public class ShardingJdbcDemoApplication {public static void main(String[] args) {SpringApplication.run(ShardingJdbcDemoApplication.class, args);}}
log-bin=imooc_mysqlserver-id=1
主配置log-bin,指定文件的名字
主配置server-id,MySQL实例中全局唯一,并且大于0,默认为1
编辑MySQL从上的/etc/my.cnf
server-id=2
- 从配置server-id,与主不能重复
- 在MySQL主上创建用于备份账号
mysql> CREATE USER 'repl'@'%' IDENTIFIED BY 'password';mysql> GRANT REPLICATION SLAVE ON *.* TO 'repl'@'%';
- 在MySQL主上创建用于备份账号
- MySQL主上加锁,阻止所有的写入操作
mysql> FLUSH TABLES WITH READ LOCK;
- MySQL主上,查看bin-log的文件名和位置
mysql > SHOW MASTER STATUS;
- MySQL主上dump所有数据
mysqldump --all-databases --master-data > dbdump.db -uroot -p
- MySQL主进行解锁,解锁后,主上可以写入数据
mysql> UNLOCK TABLES;
- MySQL从上导入之前dump的数据
mysql < aa.db -uroot -p
- MySQL从上配置主从连接信息
mysql> CHANGE MASTER TO-> MASTER_HOST='master_host_name',-> MASTER_PORT=port_num-> MASTER_USER='replication_user_name',-> MASTER_PASSWORD='replication_password',-> MASTER_LOG_FILE='recorded_log_file_name',-> MASTER_LOG_POS=recorded_log_position;
- master_host_name : MySQL主的地址
- port_num : MySQL主的端口(数字型)
- replication_user_name : 备份账户的用户名
- replication_password : 备份账户的密码
- recorded_log_file_name :bin-log的文件名
- recorded_log_position : bin-log的位置(数字型)
- bin-log的文件名和位置 是 步骤5中的show master status 得到的。
- MySQL从上开启同步
mysql> START SLAVE;
- MySQL从上开启同步
- 查看MySQL从的状态
show slave status;

