医院设置管理
需求
医院设置主要是用来保存开通医院的一些基本信息,每个医院一条信息,保存了医院编号(平台分配,全局唯一)和接口调用相关的签名key等信息,是整个流程的第一步,只有开通了医院设置信息,才可以上传医院相关信息。我们所开发的功能就是基于单表的一个CRUD、锁定/解锁和发送签名信息这些基本功能。
表结构

hosname:医院名称
hoscode:医院编号(平台分配,全局唯一,api接口必填信息)
api_url:医院回调的基础url(如:预约下单,我们要调用该地址去医院下单)
sign_key:双方api接口调用的签名key,有平台生成
contacts_name:医院联系人姓名
contacts_phone:医院联系人手机
status:状态(锁定/解锁)
搭建环境
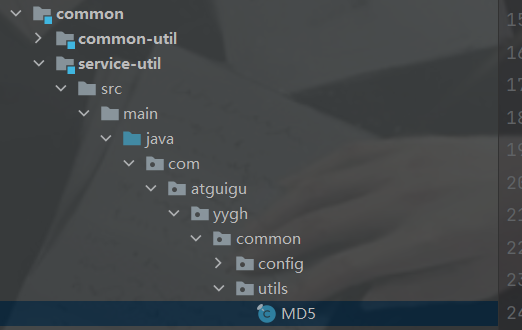
service-hosp模块依赖service模块,为普通maven工程,打包方式为jar
注意的是:在service二级模块,为了编译xml文件,需要配置打包mapper中的xml文件和MP配置xml位置(谷粒学院有详细解释)
<resources>
    <resource>
        <directory>src/main/java</directory>
        <includes>
            <include>**/*.yml</include>
            <include>**/*.properties</include>
            <include>**/*.xml</include>
        </includes>
        <filtering>false</filtering>
    </resource>
    <resource>
        <directory>src/main/resources</directory>
        <includes> <include>**/*.yml</include>
            <include>**/*.properties</include>
            <include>**/*.xml</include>
        </includes>
        <filtering>false</filtering>
    </resource>
</resources>
实体类:
由于实体类继承了BaseEntity实体,继承了一些相同的字段,例如创建时间,修改时间,逻辑删除等等
@Data
@ApiModel(description = "医院设置")
@TableName("hospital_set")
public class HospitalSet extends BaseEntity {

    private static final long serialVersionUID = 1L;

    @ApiModelProperty(value = "医院名称")
    @TableField("hosname")
    private String hosname;

    @ApiModelProperty(value = "医院编号")
    @TableField("hoscode")
    private String hoscode;

    @ApiModelProperty(value = "api基础路径")
    @TableField("api_url")
    private String apiUrl;

    @ApiModelProperty(value = "签名秘钥")
    @TableField("sign_key")
    private String signKey;

    @ApiModelProperty(value = "联系人姓名")
    @TableField("contacts_name")
    private String contactsName;

    @ApiModelProperty(value = "联系人手机")
    @TableField("contacts_phone")
    private String contactsPhone;

    @ApiModelProperty(value = "状态")
    @TableField("status")
    private Integer status;

}
后端
配置文件
数据源的配置,MP的日志和xml映射的配置(防止不打包xml)
server:
  port: 8201             # 服务端口
spring:
  application:
    name: service-hosp    # 微服务名称
  profiles:
    active: dev          # 设置为开发环境
  datasource: # 配置数据源
    driver-class-name: com.mysql.cj.jdbc.Driver
    url: jdbc:mysql://localhost:3306/yygh_hosp?characterEncoding=utf-8&serverTimezone=GMT%2B8
    username: root
    password: root
    #返回json的全局时间格式
    jackson:
      date-format: yyyy-MM-dd HH:mm:ss
      time-zone: GMT+8
mybatis-plus: # mybatis-plus日志
  configuration:
    log-impl: org.apache.ibatis.logging.stdout.StdOutImpl
  mapper-locations: classpath:com/atguigu/hosp/yygh/mapper/xml/*.xml
扫描mapper接口

controller层
此时没有网关容易配置跨域,注意使用@CrossOrigin防止跨域(跨域的三个原因:协议不对,ip地址不对,端口号不对)
由于Mybatis-plus过于强大(太爽了),导致后端增删查改很简洁!!!MP自动封装了很多单表操作,所以可以直接调用。
controller层接收请求即可,所有业务处理放在了service层。
@Api(tags = "医院设置管理")
@RestController
@RequestMapping("/admin/hosp/hospitalSet")
@CrossOrigin
public class HospitalSetController {

    @Autowired
    private HospitalSetService hospitalSetService;

    // 查询所有医院设置
    @GetMapping("findAll")
    public Result findAll() {
        List<HospitalSet> list = hospitalSetService.list();
        return Result.ok(list);
    }

    // 根据id逻辑删除医院设置
    @DeleteMapping("deleteById/{id}")
    public Result deleteById(@PathVariable("id") Long id) {
        boolean flag = hospitalSetService.removeById(id);
        if (!flag) return Result.fail();
        return Result.ok();
    }

    // 条件查询带分页
    @PostMapping("findPageHospSet/{current}/{limit}")
    public Result findPageHospSet(
            @PathVariable("current") Long current,
            @PathVariable("limit") Long limit,
            @RequestBody(required = false) HospitalQueryVo hospitalQueryVo
    ) {
        Page<HospitalSet> hospitalSetPage = hospitalSetService.selectByCondition(current, limit, hospitalQueryVo);
        return Result.ok(hospitalSetPage);
    }

    // 添加医院设置
    @PostMapping("saveHospitalSet")
    public Result saveHospitalSet(@RequestBody HospitalSet hospitalSet) {
        boolean flag = hospitalSetService.insert(hospitalSet);
        return flag ? Result.ok() : Result.fail();
    }

    // 根据id获取医院设置
    @GetMapping("getHospSet/{id}")
    public Result getHospSet(@PathVariable("id") Long id) {
        HospitalSet hospitalSet = hospitalSetService.getById(id);
        return Result.ok(hospitalSet);
    }

    // 修改医院设置
    @PutMapping("updateHospitalSet")
    public Result updateHospitalSet(@RequestBody HospitalSet hospitalSet) {
        boolean flag = hospitalSetService.updateById(hospitalSet);
        return flag ? Result.ok() : Result.fail();
    }

    // 批量删除医院设置
    @DeleteMapping("batchRemove")
    public Result batchRemoveHospitalSet(@RequestBody List<Long> idList) {
        boolean flag = hospitalSetService.removeByIds(idList);
        return flag ? Result.ok() : Result.fail();
    }

    // 医院的设置和解锁
    @PutMapping("lockHospitalSet/{id}/{status}")
    public Result lockHospitalSet(@PathVariable("id") Long id, @PathVariable("status") Integer status) {
        boolean flag = hospitalSetService.lockHospitalSet(id, status);
        return flag ? Result.ok() : Result.fail();
    }

    // 发送签名秘钥
    @PutMapping("sendKey/{id}")
    public Result lockHospitalSet(@PathVariable Long id) {
        HospitalSet hospitalSet = hospitalSetService.getById(id);
        String signKey = hospitalSet.getSignKey();
        String hoscode = hospitalSet.getHoscode();
        //TODO 发送短信
        return Result.ok();
    }
}
分页条件查询时的VO对象,还需要注意 @RequestBody(required = false) 此时需要设置为false,因为条件可以为空
@Data
@ApiModel(description = "Hospital")
public class HospitalQueryVo implements Serializable {

    private static final long serialVersionUID = 1L;

    @ApiModelProperty(value = "医院编号")
    private String hoscode;

    @ApiModelProperty(value = "医院名称")
    private String hosname;

    @ApiModelProperty(value = "医院类型")
    private String hostype;

    @ApiModelProperty(value = "省code")
    private String provinceCode;

    @ApiModelProperty(value = "市code")
    private String cityCode;

    @ApiModelProperty(value = "区code")
    private String districtCode;

    @ApiModelProperty(value = "状态")
    private Integer status;
}
Service层
只需要编写添加,更新状态,分页查询即可
接口
public interface HospitalSetService extends IService<HospitalSet> {
 Page<HospitalSet> selectByCondition(Long current, Long limit, HospitalQueryVo hospitalQueryVo);

 boolean insert(HospitalSet hospitalSet);

 boolean lockHospitalSet(Long id, Integer status);
}
实现类
@Service
public class HospitalSetServiceImpl extends ServiceImpl<HospitalSetMapper, HospitalSet> implements HospitalSetService {

 @Autowired
 private HospitalSetMapper hospitalSetMapper;

 @Override
 public Page<HospitalSet> selectByCondition(Long current, Long limit, HospitalQueryVo hospitalQueryVo) {
     Page<HospitalSet> page = new Page<>(current, limit);
     QueryWrapper<HospitalSet> wrapper = new QueryWrapper<>();

     if (hospitalQueryVo != null) {
         // 封装条件
         String hosCode = hospitalQueryVo.getHoscode();
         String hosName = hospitalQueryVo.getHosname();
         if (!StringUtils.isEmpty(hosName)) wrapper.like("hosname", hosName);
         if (!StringUtils.isEmpty(hosCode)) wrapper.eq("hoscode", hosCode);
     }

     Page<HospitalSet> hospitalSetPage = baseMapper.selectPage(page, wrapper);
     return hospitalSetPage;
 }

 @Override
 public boolean insert(HospitalSet hospitalSet) {
     // 设置状态为可用
     hospitalSet.setStatus(1);
     // 签名密匙
     Random random = new Random();
     hospitalSet.setSignKey(MD5.encrypt(System.currentTimeMillis() + "" + random.nextInt(1000)));
     int count = hospitalSetMapper.insert(hospitalSet);
     return count > 0 ? true : false;
 }

 @Override
 public boolean lockHospitalSet(Long id, Integer status) {
     // 先获取信息
     HospitalSet hospitalSet = hospitalSetMapper.selectById(id);

     int flag = 0;
     if (hospitalSet != null) {
         // 设置状态
         hospitalSet.setStatus(status);

         flag = hospitalSetMapper.updateById(hospitalSet);
     }

     return flag > 0 ? true : false;
 }
}
注意分页查询需要配置插件
// 分页插件
@Bean
public PaginationInterceptor paginationInterceptor() {
 return new PaginationInterceptor();
}
使用MD5加密需要导入MD5类
public final class MD5 {

    public static String encrypt(String strSrc) {
        try {
            char hexChars[] = { '0', '1', '2', '3', '4', '5', '6', '7', '8',
                    '9', 'a', 'b', 'c', 'd', 'e', 'f' };
            byte[] bytes = strSrc.getBytes();
            MessageDigest md = MessageDigest.getInstance("MD5");
            md.update(bytes);
            bytes = md.digest();
            int j = bytes.length;
            char[] chars = new char[j * 2];
            int k = 0;
            for (int i = 0; i < bytes.length; i++) {
                byte b = bytes[i];
                chars[k++] = hexChars[b >>> 4 & 0xf];
                chars[k++] = hexChars[b & 0xf];
            }
            return new String(chars);
        } catch (NoSuchAlgorithmException e) {
            e.printStackTrace();
            throw new RuntimeException("MD5加密出错!!+" + e);
        }
    }


}
前端
开发流程图

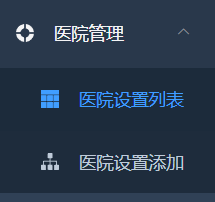
设置路由

{
  path: '/hosp',
  component: Layout,
  redirect: '/example/table',
  name: '医院设置管理',
  meta: {title: '医院管理', icon: 'example'},
  children: [
    {
      path: 'list',
      name: '医院设置列表',
      component: () => import('@/views/hosp/hospitalSet/list'),
      meta: {title: '医院设置列表', icon: 'table'}
    },
    {
      path: 'form',
      name: '医院设置添加',
      component: () => import('@/views/hosp/hospitalSet/form'),
      meta: {title: '医院设置添加', icon: 'tree'}
    }
  ]
},
api调用后端接口

参数和方法和后端对应即可,注意data表示的是以json格式传到后端,后端使用@RequestBody接收即可
import request from "@/utils/request";

const api_name = '/admin/hosp/hospitalSet'

export default {
  // 分页条件查询
  getHospSetPageList(current, limit, searchObj) {
    return request({
      url: `${api_name}/findPageHospSet/${current}/${limit}`,
      method: 'post',
      data: searchObj
    })
  },
  // 根据id删除
  deleteHospSetById(id) {
    return request({
      url: `${api_name}/deleteById/${id}`,
      method: 'delete'
    })
  },
  // 批量删除
  deleteHospSetBatch(idList) {
    return request({
      url: `${api_name}/batchRemove`,
      method: 'delete',
      data: idList
    })
  },
  // 修改锁定和不锁定状态
  updateLockStatus(id, status) {
    return request({
      url: `${api_name}/lockHospitalSet/${id}/${status}`,
      method: 'put'
    })
  },
  // 保存医院信息
  saveHospSet(hospSet) {
    return request({
      url: `${api_name}/saveHospitalSet`,
      method: 'post',
      data: hospSet
    })
  },
  // 根据id查询医院信息
  getHospById(id) {
    return request({
      url: `${api_name}/getHospSet/${id}`,
      method: 'get'
    })
  },
  // 修改医院信息
  updateHospById(hospSet) {
    return request({
      url: `${api_name}/updateHospitalSet`,
      method: 'put',
      data: hospSet
    })
  }
}
列表显示页面
<template>
  <div class="app-container">
    <el-form :inline="true" class="demo-form-inline">
      <el-form-item>
        <el-input v-model="searchObj.hosname" placeholder="医院名称"/>
      </el-form-item>
      <el-form-item>
        <el-input v-model="searchObj.hoscode" placeholder="医院编号"/>
      </el-form-item>
      <el-button type="primary" icon="el-icon-search" @click="getHospList()">查询</el-button>
    </el-form>

    <!-- banner列表 -->
    <!--工具条-->
    <div>
      <el-button type="danger" size="mini" @click="removeHospSetBatch()">批量删除</el-button>
    </div>
    <el-table
      :data="list" stripe style="width:100%" @selection-change="handleSelectionChange">

      <el-table-column
        type="selection" width="55"/>

      <el-table-column type="index" width="50"/>
      <el-table-column prop="hosname" label="医院名称"/>
      <el-table-column prop="hoscode" label="医院编号"/>
      <el-table-column prop="apiUrl" label="api基础路径" width="200"/>
      <el-table-column prop="contactsName" label="联系人姓名"/>
      <el-table-column prop="contactsPhone" label="联系人手机"/>
      <el-table-column label="状态" width="80">
        <template slot-scope="scope">
          {{ scope.row.status === 1 ? '可用' : '不可用' }}
        </template>
      </el-table-column>
      <el-table-column label="操作" width="280" align="center">
        <template slot-scope="scope">
          <el-button type="danger" size="mini"
                     icon="el-icon-delete" @click="removeDataById(scope.row.id)"></el-button>
          <el-button v-if="scope.row.status==1" type="primary" size="mini"
                     icon="el-icon-delete" @click="lockHostSet(scope.row.id,0)">锁定
          </el-button>
          <el-button v-if="scope.row.status==0" type="danger" size="mini"
                     icon="el-icon-delete" @click="lockHostSet(scope.row.id,1)">解锁
          </el-button>
          <router-link :to="'/hosp/edit/'+scope.row.id">
            <el-button type="primary" size="mini" icon="el-icon-edit"></el-button>
          </router-link>
        </template>
      </el-table-column>
    </el-table>

    <!--分页-->
    <el-pagination
      :current-page="page"
      :page-size="limit"
      :total="total"
      style="padding:30px;text-align:center;"
      layout="total,prev,pager,next,jumper"
      @current-change="getHospList"
    />
  </div>

</template>
方法调用
定义初始值
<script>
import hospitalSetApi from '@/api/hosp/hospitalSet.js';

export default {
  data() {
    return {
      current: 1,// 当前页
      limit: 3,  // 每页显示记录数
      searchObj: {},// 条件封装对象
      list: [],  // 每页数据集合
      total: 0,   // 总记录数
      page: 0,
      multipleSelection: [] // 批量选择中选择的记录列表
    }
  },
  created() {
    this.getHospList();
  },
  methods: {
    // 定义方法
  }
}
</script>
分页方法,传入page页数调用接口,注意返回数据时使用的时response.data(框架已经封装了一层data)
getHospList(page = 1) {
      this.current = page;  // 跳转查询的页数
      hospitalSetApi.getHospSetPageList(this.current, this.limit, this.searchObj)
        .then((response) => {
          // 返回数据
          this.total = response.data.total;
          this.list = response.data.records;
        })
        .catch((error) => {
          this.$message({
            type: "error",
            message: "数据显示失败",
          });
        })
删除和修改状态方法(调用api即可)
removeDataById(id) {
  this.$confirm('此操作将永久删除医院是设置信息,是否继续?', '提示', {
    confirmButtonText: '确定',
    cancelButtonText: '取消',
    type: 'warning'
  }).then(() => { //确定执行then方法
    hospitalSetApi.deleteHospSetById(id)
      .then((response) => {
        //提示
        this.$message({
          type: 'success',
          message: '删除成功!'
        })
        // 刷新页面
        this.getHospList(1);
      })
      .catch((error) => {
        this.$message({
          type: "error",
          message: "删除失败",
        });
      })
  })
},
// 锁定转台的更新
lockHostSet(id, status) {
  hospitalSetApi.updateLockStatus(id, status)
    .then((response) => {
      this.$message({
        type: "success",
        message: "更新成功",
      });
      // 刷新页面
      this.getHospList(this.current);
    })
    .catch((error) => {
      this.$message({
        type: "error",
        message: "更新失败",
      });
    })
}
批量删除方法
表格复选框选中时触发
// 当表格复选框选项发生变化的时候触发
handleSelectionChange(selection) {
this.multipleSelection = selection;
},
批量删除也是调用接口,只不过需要判断传入的参数是否为空,不为空则将复选的所有id值遍历赋值到一个list中作为参数
removeHospSetBatch() {
if (this.multipleSelection == "") {
 this.$message({
   type: "error",
   message: "请选择医院",
 });
} else {
 this.$confirm('此操作将永久删除医院是设置信息,是否继续?', '提示', {
   confirmButtonText: '确定',
   cancelButtonText: '取消',
   type: 'warning'
 }).then(() => { //确定执行then方法
   var idList = [];

   // 遍历每个数组得到id值,放入List中
   for (let i = 0; i < this.multipleSelection.length; i++) {
     var obj = this.multipleSelection[i];
     var id = obj.id;
     idList.push(id);
   }

   // 调用接口批量删除
   hospitalSetApi.deleteHospSetBatch(idList)
     .then((response) => {
       // 提示
       this.$message({
         type: 'success',
         message: '删除成功!'
       });
       // 刷新页面
       this.getHospList(1);
     })
     .catch((error) => {
       this.$message({
         type: "error",
         message: "删除失败",
       });
     })
 })
}
},
新增修改显示页面
设置隐藏路由(hidden: true)用于编辑操作
{
   path: 'edit/:id',
   name: '医院设置编辑',
   component: () => import('@/views/hosp/hospitalSet/form'),
   meta: {title: '医院设置编辑', noCache: true},
   hidden: true
 }
form页面
双向绑定,可以直接获取对象<template> <div class="app-container"> <el-form label-width="120px"> <el-form-item label="医院名称"> <el-input v-model="hospitalSet.hosname"/> </el-form-item> <el-form-item label="医院编号"> <el-input v-model="hospitalSet.hoscode"/> </el-form-item> <el-form-item label="api基础路径"> <el-input v-model="hospitalSet.apiUrl"/> </el-form-item> <el-form-item label="联系人姓名"> <el-input v-model="hospitalSet.contactsName"/> </el-form-item> <el-form-item label="联系人手机"> <el-input v-model="hospitalSet.contactsPhone"/> </el-form-item> <el-form-item> <el-button type="primary" @click="saveOrUpdate">保存</el-button> </el-form-item> </el-form> </div> </template>
方法调用
- 如果路径有id,则是更新,需要根据id回显信息
```javascript- 点击保存按钮后,需要判断对象中是更新还是新增,可以通过此时的对象id值判断,如果id存在,那么则是列表显示页面传过来的id,此时为更新,否则为新增 ```javascript saveOrUpdate() { // 有id为更新 if (this.hospitalSet.id != null) { this.updateHospital(); }else { // 无id为新增 this.saveHospital(); } },- 新增和更新方法
思路一致:先判断对象是否为空,不为空调用方法,成功后清空数据路由跳转即可(vue提供的方法)// 更新医院设置 updateHospital() { // 不为空则添加 if (Object.keys(this.hospitalSet) != 0) { hospitalSetApi.updateHospById(this.hospitalSet) .then((response) => { this.$message({ type: "success", message: "更新成功", }); this.hospitalSet = {}; // 清空数据 this.$router.push({path: '/hosp/list'}); }) .catch((error) => { this.$message({ type: "error", message: "更新失败", }); }) } else { this.$message({ type: "error", message: "请填写医院信息", }); } }, // 新增医院设置 saveHospital() { // 不为空则添加 if (Object.keys(this.hospitalSet) != 0) { hospitalSetApi.saveHospSet(this.hospitalSet) .then((response) => { this.$message({ type: "success", message: "添加成功", }); this.hospitalSet = {}; // 清空数据 this.$router.push({path: '/hosp/list'}); }) .catch((error) => { this.$message({ type: "error", message: "添加失败", }); }) } else { this.$message({ type: "error", message: "请填写医院信息", }); } },
组件重用问题
问题:在更新页面后点击新增,此时用于更新的回显信息会在新增页面上,vue-router导航切换 时,如果两个路由都渲染同个组件,
组件的生命周期方法(created或者mounted)不会再被调用, 组件会被重用,显示上一个路由渲染出来的自建。
解决方案:可以简单的在 router-view上加上一个唯一的key,来保证路由切换时都会重新触发生命周期方法,确保组件被重新初始化。
修改 src/views/layout/components/AppMain.vue 文件如下:
<router-view:key="key"></router-view>开启根据时间计算key值方法
computed: { key() { returnthis.$route.name !== undefined? this.$route.name + +newDate(): this.$route + +newDate() } } - 新增和更新方法

若有收获,就点个赞吧
0 人点赞
