Spring与SpringBoot
1、Spring能做什么
1.1、Spring的能力

1.2、Spring的生态
https://spring.io/projects/spring-boot
覆盖了:
web开发
数据访问
安全控制
分布式
消息服务
移动开发
批处理
……
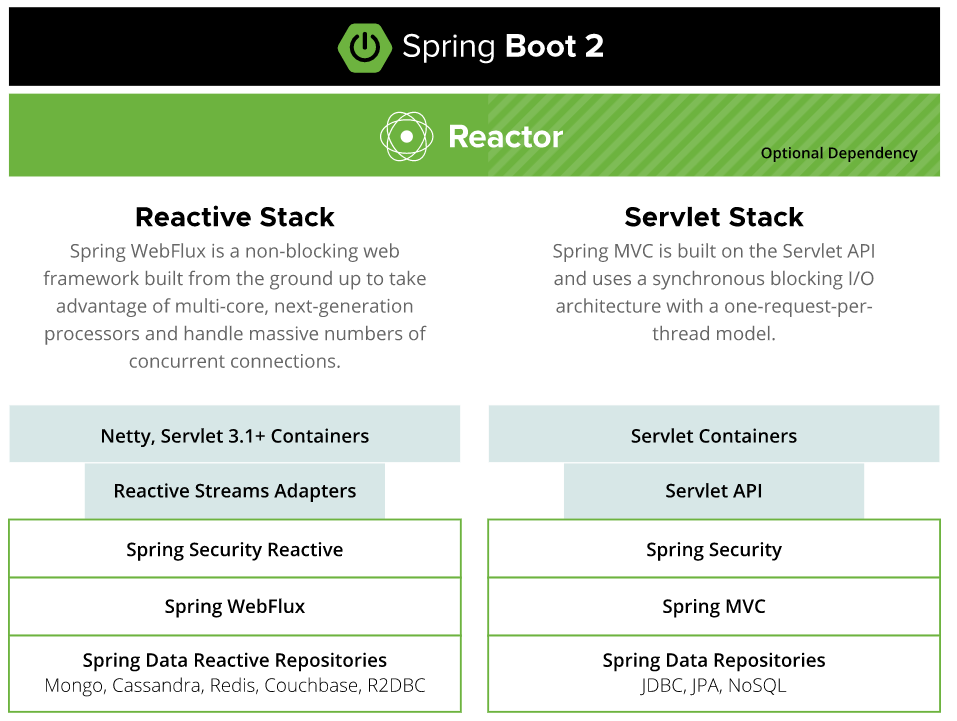
1.3、Spring5重大升级
1.3.1、响应式编程
1.3.2、内部源码设计
基于Java8的一些新特性,如:接口默认实现。重新设计源码架构。
2、为什么用SpringBoot
Spring Boot makes it easy to create stand-alone, production-grade Spring based Applications that you can “just run”.
能快速创建出生产级别的Spring应用
2.1、SpringBoot优点
- Create stand-alone Spring applications
- 创建独立Spring应用
- Embed Tomcat, Jetty or Undertow directly (no need to deploy WAR files)
- 内嵌web服务器
- Provide opinionated ‘starter’ dependencies to simplify your build configuration
- 自动starter依赖,简化构建配置
- Automatically configure Spring and 3rd party libraries whenever possible
- 自动配置Spring以及第三方功能
- Provide production-ready features such as metrics, health checks, and externalized configuration
- 提供生产级别的监控、健康检查及外部化配置
- Absolutely no code generation and no requirement for XML configuration
- 无代码生成、无需编写XML
SpringBoot是整合Spring技术栈的一站式框架
SpringBoot是简化Spring技术栈的快速开发脚手架
2.2、SpringBoot缺点
- 人称版本帝,迭代快,需要时刻关注变化
- 封装太深,内部原理复杂,不容易精通
3、时代背景
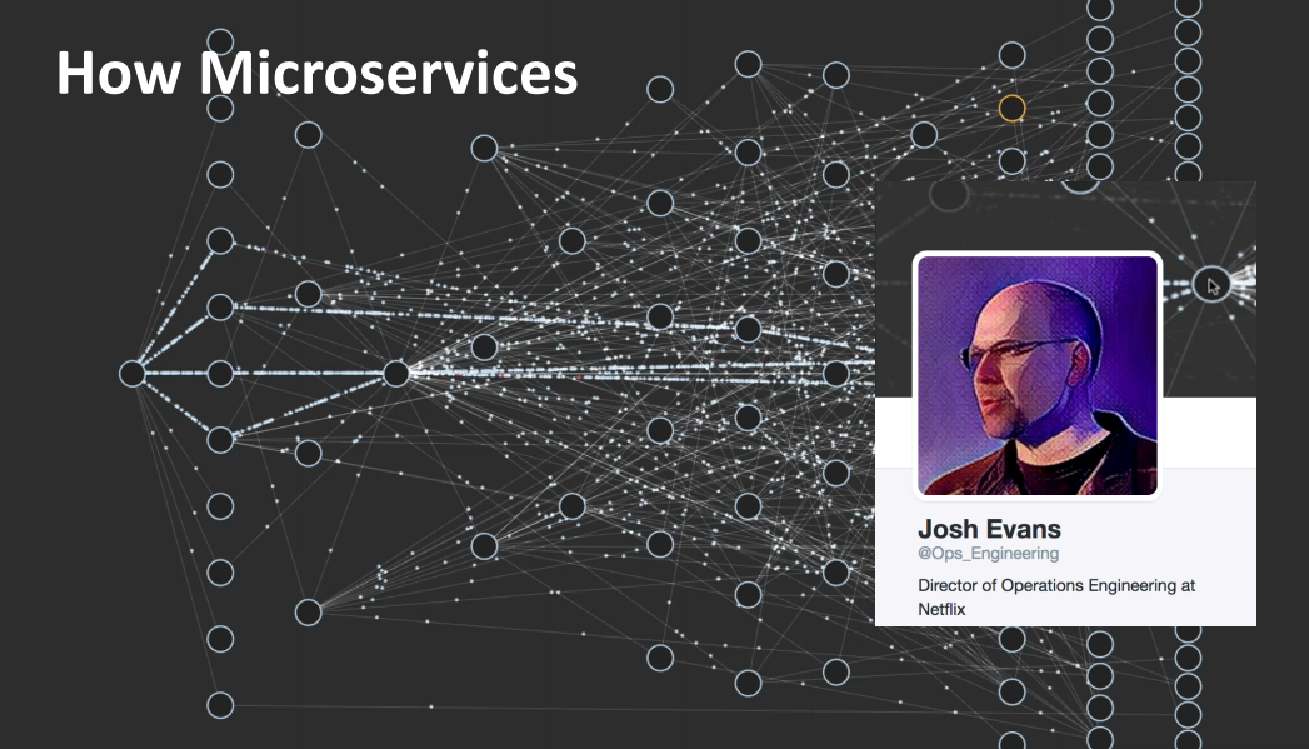
3.1、微服务
James Lewis and Martin Fowler (2014) 提出微服务完整概念。https://martinfowler.com/microservices/
In short, the microservice architectural style is an approach to developing a single application as a suite of small services, each running in its own process and communicating with lightweight mechanisms, often an HTTP resource API. These services are built around business capabilities and independently deployable by fully automated deployment machinery. There is a bare minimum of centralized management of these services, which may be written in different programming languages and use different data storage technologies.— James Lewis and Martin Fowler (2014)
- 微服务是一种架构风格
- 一个应用拆分为一组小型服务
- 每个服务运行在自己的进程内,也就是可独立部署和升级
- 服务之间使用轻量级HTTP交互
- 服务围绕业务功能拆分
- 可以由全自动部署机制独立部署
- 去中心化,服务自治。服务可以使用不同的语言、不同的存储技术
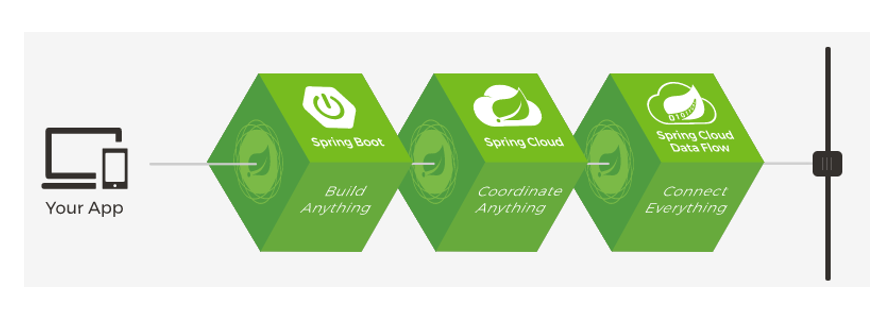
3.2、分布式
分布式的困难
- 远程调用
- 服务发现
- 负载均衡
- 服务容错
- 配置管理
- 服务监控
- 链路追踪
- 日志管理
- 任务调度
- ……
分布式的解决
- SpringBoot + SpringCloud
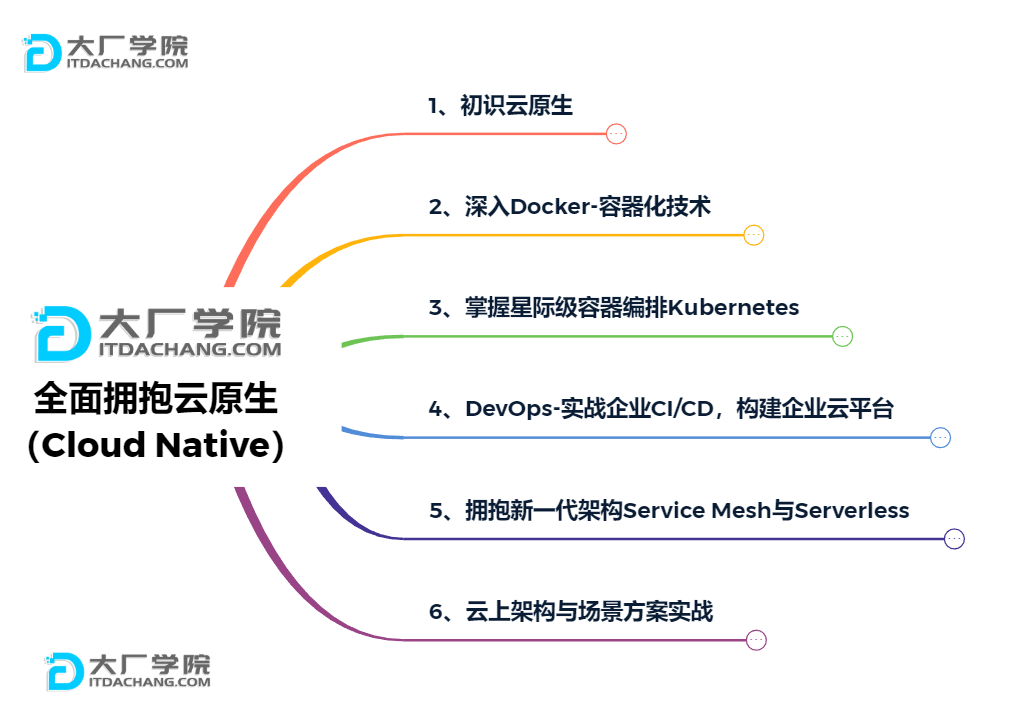
3.3、云原生
原生应用如何上云。 Cloud Native
上云的困难
- 服务自愈
- 弹性伸缩
- 服务隔离
- 自动化部署
- 灰度发布
- 流量治理
- ……
上云的解决
4、如何学习SpringBoot
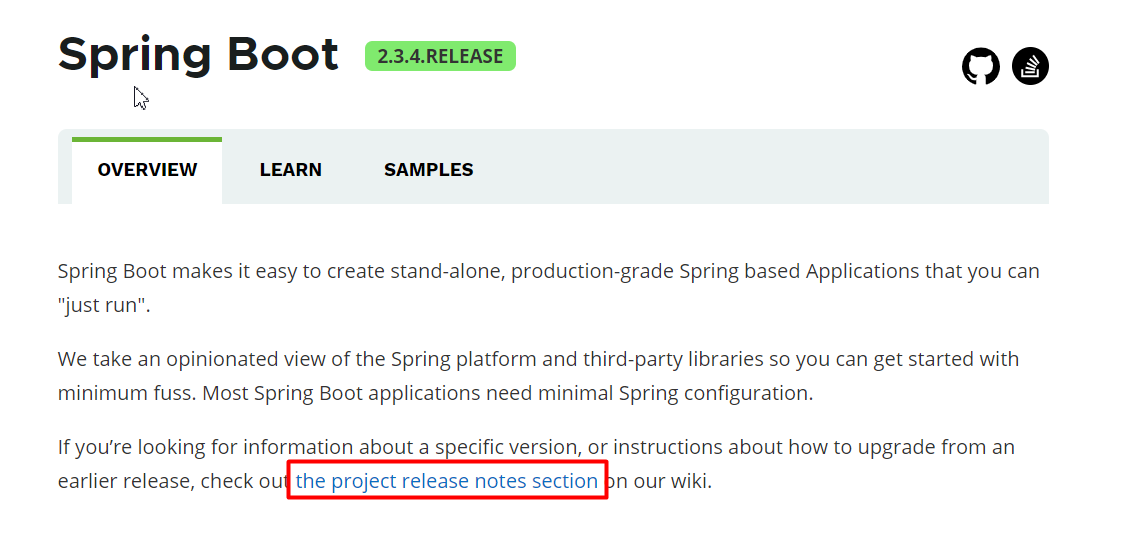
4.1、官网文档架构
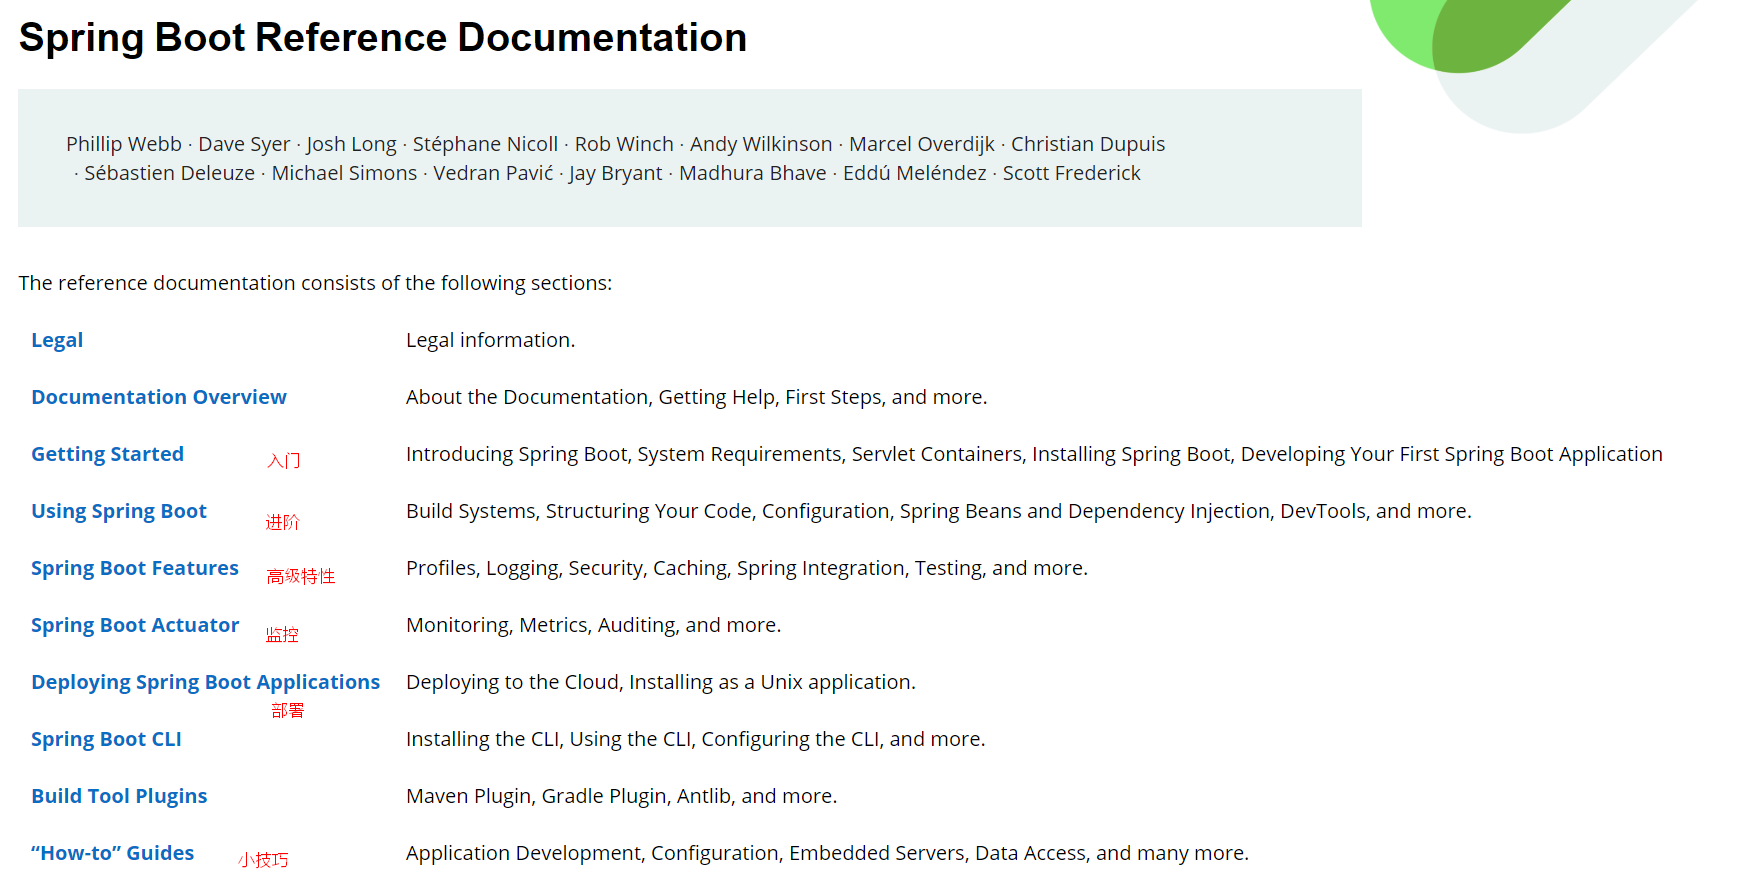

查看版本新特性;
https://github.com/spring-projects/spring-boot/wiki#release-notes
SpringBoot2入门
1、系统要求
- Java 8 & 兼容java14 .
- Maven 3.3+
- idea 2019.1.2
1.1、maven设置
<mirrors><mirror><id>nexus-aliyun</id><mirrorOf>central</mirrorOf><name>Nexus aliyun</name><url>http://maven.aliyun.com/nexus/content/groups/public</url></mirror></mirrors><profiles><profile><id>jdk-1.8</id><activation><activeByDefault>true</activeByDefault><jdk>1.8</jdk></activation><properties><maven.compiler.source>1.8</maven.compiler.source><maven.compiler.target>1.8</maven.compiler.target><maven.compiler.compilerVersion>1.8</maven.compiler.compilerVersion></properties></profile></profiles>
2、HelloWorld
需求:浏览发送/hello请求,响应 Hello,Spring Boot 2
2.1、创建maven工程
…
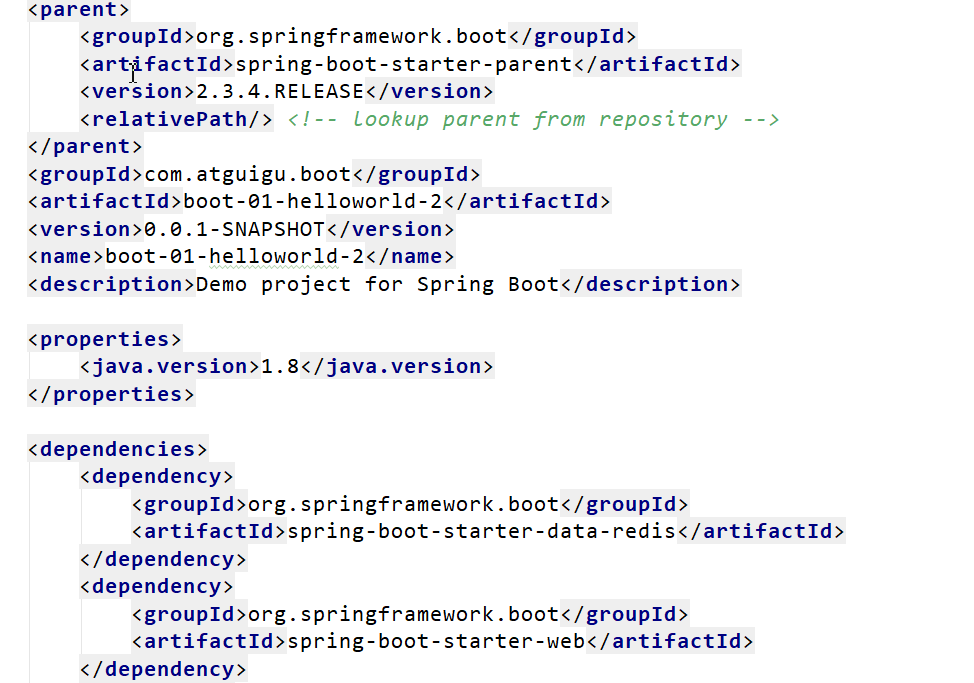
2.2、引入依赖
<parent><groupId>org.springframework.boot</groupId><artifactId>spring-boot-starter-parent</artifactId><version>2.3.4.RELEASE</version></parent><dependencies><dependency><groupId>org.springframework.boot</groupId><artifactId>spring-boot-starter-web</artifactId></dependency></dependencies>
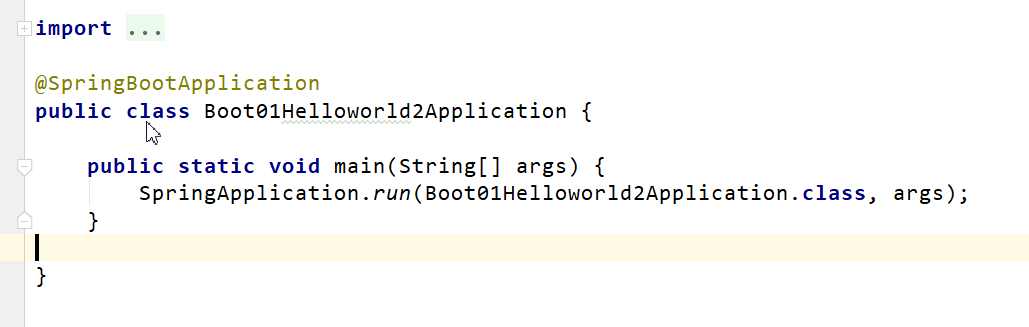
2.3、创建主程序
/*** 主程序类* @SpringBootApplication:这是一个SpringBoot应用*/@SpringBootApplicationpublic class MainApplication {public static void main(String[] args) {SpringApplication.run(MainApplication.class,args);}}
2.4、编写业务
@RestControllerpublic class HelloController {@RequestMapping("/hello")public String handle01(){return "Hello, Spring Boot 2!";}}
2.5、测试
直接运行main方法
2.6、简化配置
application.properties
server.port=8888
2.7、简化部署
<build><plugins><plugin><groupId>org.springframework.boot</groupId><artifactId>spring-boot-maven-plugin</artifactId></plugin></plugins></build>
把项目打成jar包,直接在目标服务器执行即可。
注意点:
- 取消掉cmd的快速编辑模式
自动配置原理
1、SpringBoot特点
1.1、依赖管理
- 父项目做依赖管理
依赖管理<parent><groupId>org.springframework.boot</groupId><artifactId>spring-boot-starter-parent</artifactId><version>2.3.4.RELEASE</version></parent>他的父项目<parent><groupId>org.springframework.boot</groupId><artifactId>spring-boot-dependencies</artifactId><version>2.3.4.RELEASE</version></parent>几乎声明了所有开发中常用的依赖的版本号,自动版本仲裁机制
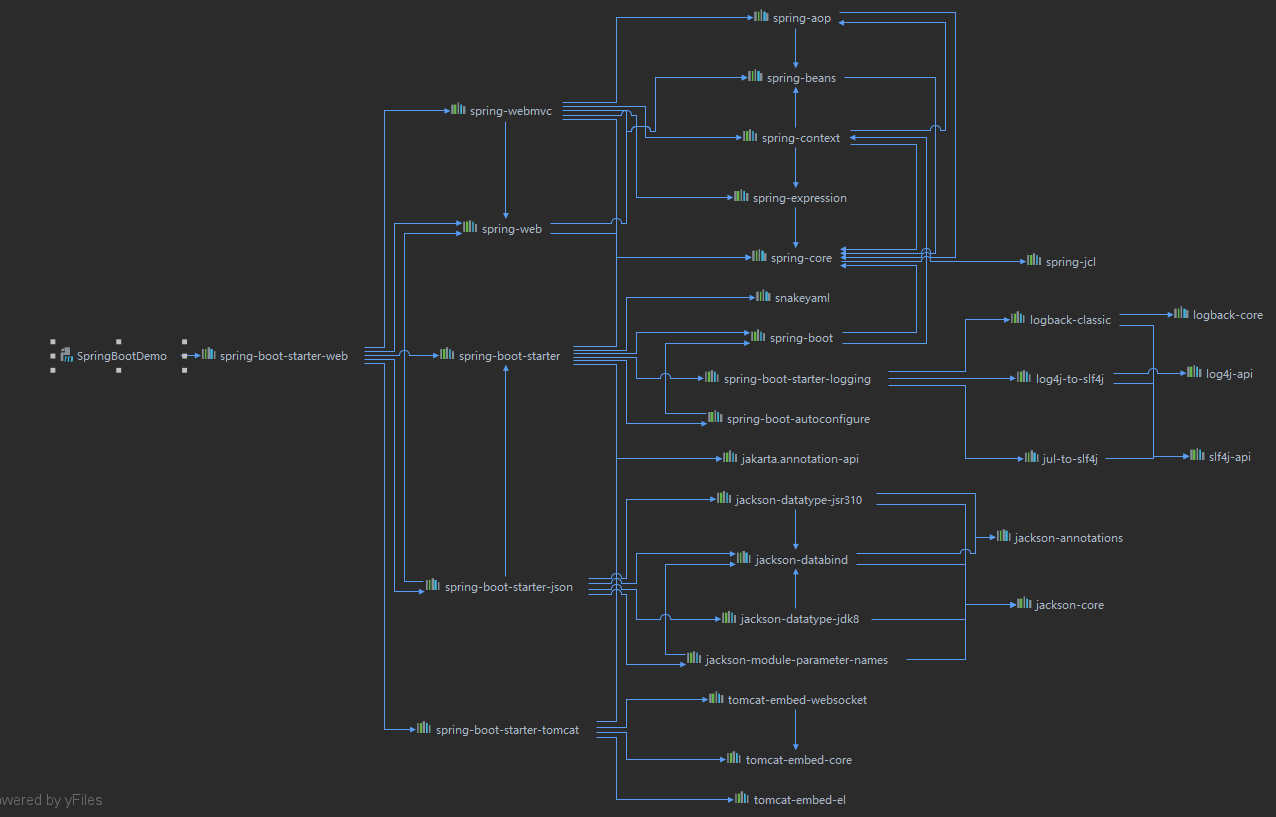
- 开发导入starter场景启动器
1、见到很多 spring-boot-starter- : 就某种场景
2、只要引入starter,这个场景的所有常规需要的依赖我们都自动引入
3、SpringBoot所有支持的场景
https://docs.spring.io/spring-boot/docs/current/reference/html/using-spring-boot.html#using-boot-starter
4、见到的 -spring-boot-starter: 第三方为我们提供的简化开发的场景启动器。
5、*所有场景启动器最底层的依赖org.springframework.boot
<dependency><groupId>org.springframework.boot</groupId><artifactId>spring-boot-starter</artifactId><version>2.3.4.RELEASE</version><scope>compile</scope></dependency>
场景依赖例图:
- 无需关注版本号,自动版本仲裁
1、引入依赖默认都可以不写版本
2、引入非版本仲裁的jar,要写版本号 - 可以修改默认版本号
1、查看spring-boot-dependencies里面规定当前依赖的版本 用的 key。
2、在当前项目里面重写配置
<properties><mysql.version>5.1.43</mysql.version></properties>
1.2、自动配置
- 自动配好Tomcat
- 引入Tomcat依赖。
- 配置Tomcat
<dependency><groupId>org.springframework.boot</groupId><artifactId>spring-boot-starter-tomcat</artifactId><version>2.3.4.RELEASE</version><scope>compile</scope></dependency>
- 自动配好SpringMVC
- 引入SpringMVC全套组件
- 自动配好SpringMVC常用组件(功能)
- 自动配好Web常见功能,如:字符编码问题
- SpringBoot帮我们配置好了所有web开发的常见场景
- 默认的包结构
- 主程序所在包及其下面的所有子包里面的组件都会被默认扫描进来
- 无需以前的包扫描配置
- 想要改变扫描路径
- @SpringBootApplication(scanBasePackages=“com.atguigu”)
- 想要改变扫描路径
- 或者@ComponentScan 指定扫描路径
@SpringBootApplication等同于@SpringBootConfiguration@EnableAutoConfiguration@ComponentScan("com.atguigu.boot")
- 各种配置拥有默认值
- 默认配置最终都是映射到某个类上,如:MultipartProperties
- 配置文件的值最终会绑定每个类上,这个类会在容器中创建对象
- 按需加载所有自动配置项
- 非常多的starter
- 引入了哪些场景这个场景的自动配置才会开启
- SpringBoot所有的自动配置功能都在 spring-boot-autoconfigure 包里面
- ……
2、容器功能
2.1、组件添加
1、@Configuration
- 基本使用
- Full模式与Lite模式
- 示例
- 最佳实战
- 配置 类组件之间无依赖关系用Lite模式加速容器启动过程,减少判断
- 配置类组件之间有依赖关系,方法会被调用得到之前单实例组件,用Full模式
- bean类:
- ```java package boot.bean;
public class User { private String userName; private int age; private Pet pet;
public User() {}public User(String userName, int age, Pet pet) {this.userName = userName;this.age = age;this.pet = pet;}public Pet getPet() {return pet;}public void setPet(Pet pet) {this.pet = pet;}public String getUserName() {return userName;}public void setUserName(String userName) {this.userName = userName;}public int getAge() {return age;}public void setAge(int age) {this.age = age;}@Overridepublic String toString() {return "User{" +"userName='" + userName + '\'' +", age=" + age +", pet=" + pet +'}';}
}
-```javapackage boot.bean;public class Pet {private String petName;public Pet(String petName) {this.petName = petName;}public Pet() {}public String getPetName() {return petName;}public void setPetName(String petName) {this.petName = petName;}@Overridepublic String toString() {return "Pet{" +"petName='" + petName + '\'' +'}';}}
- 配置实例:
```java Configuration使用示例 /**
- 1、配置类里面使用@Bean标注在方法上给容器注册组件,默认也是单实例的
- 2、配置类本身也是组件
- 3、proxyBeanMethods:代理bean的方法
- Full(proxyBeanMethods = true)、【保证每个@Bean方法被调用多少次返回的组件都是单实例的】
- Lite(proxyBeanMethods = false)【每个@Bean方法被调用多少次返回的组件都是新创建的】
- 组件依赖必须使用Full模式默认。其他默认是否Lite模式 / @Configuration(proxyBeanMethods = false) //告诉SpringBoot这是一个配置类 == 配置文件 public class MyConfig {
/**
- Full:外部无论对配置类中的这个组件注册方法调用多少次获取的都是之前注册容器中的单实例对象
- @return */ @Bean //给容器中添加组件。以方法名作为组件的id。返回类型就是组件类型。返回的值,就是组件在容器中的实例 public User user01(){ User zhangsan = new User(“zhangsan”, 18); //user组件依赖了Pet组件 zhangsan.setPet(tomcatPet()); return zhangsan; }
@Bean(“tom”)//定义个组件的id,而不是方法名 public Pet tomcatPet(){ return new Pet(“tomcat”); } }
##########################@Configuration测试代码如下
@SpringBootApplication public class MainApplication {
public static void main(String[] args) { //1、返回我们IOC容器 ConfigurableApplicationContext run = SpringApplication.run(MainApplication.class, args);
//2、查看容器里面的组件 String[] names = run.getBeanDefinitionNames(); for (String name : names) {
System.out.println(name);
}
//3、从容器中获取组件
Pet tom01 = run.getBean(“tom”, Pet.class);
Pet tom02 = run.getBean(“tom”, Pet.class);
System.out.println(“组件:”+(tom01 == tom02));
//4、com.atguigu.boot.config.MyConfig$$EnhancerBySpringCGLIB$$51f1e1ca@1654a892MyConfig bean = run.getBean(MyConfig.class);System.out.println(bean);//如果@Configuration(proxyBeanMethods = true)代理对象调用方法。SpringBoot总会检查这个组件是否在容器中有。//保持组件单实例User user = bean.user01();User user1 = bean.user01();System.out.println(user == user1);User user01 = run.getBean("user01", User.class);Pet tom = run.getBean("tom", Pet.class);System.out.println("用户的宠物:"+(user01.getPet() == tom));}
}
<a name="2e4b1886"></a>#### 2、@Bean、@Component、@Controller、@Service、[@Repository ](/Repository )- spring已经讲过<a name="d01d2eda"></a>#### 3、@ComponentScan、[@Import ](/Import )- import用法: <br />验证注入的组件: <br />结果可知:boot.bean.User,newUser import创建的是全类名的组件```java/** @Import({User.class, DBHelper.class})* 给容器中自动创建出这两个类型的组件、默认组件的名字就是全类名*/@Import({User.class, DBHelper.class})@Configuration(proxyBeanMethods = false) //告诉SpringBoot这是一个配置类 == 配置文件public class MyConfig {}
//获取import导入组件的beanString[] users = run.getBeanNamesForType(User.class);for (String s : users) {System.out.println(s);}
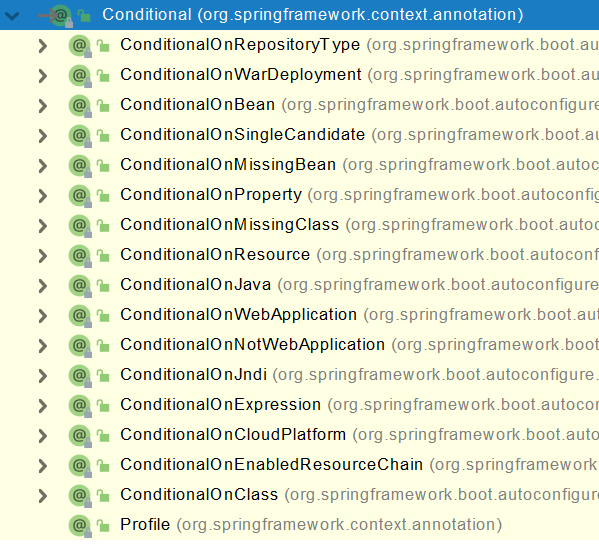
4、@Conditional
- 条件装配:满足Conditional指定的条件,则进行组件注入
=====================测试条件装配==========================@Configuration(proxyBeanMethods = false) //告诉SpringBoot这是一个配置类 == 配置文件//@ConditionalOnBean(name = "tom")@ConditionalOnMissingBean(name = "tom")public class MyConfig {/*** Full:外部无论对配置类中的这个组件注册方法调用多少次获取的都是之前注册容器中的单实例对象* @return*/@Bean //给容器中添加组件。以方法名作为组件的id。返回类型就是组件类型。返回的值,就是组件在容器中的实例// @ConditionalOnMissingBean(name="tom")public User user01(){User zhangsan = new User("zhangsan", 18);//user组件依赖了Pet组件zhangsan.setPet(tomcatPet());return zhangsan;}@Bean("tom22")public Pet tomcatPet(){return new Pet("tomcat");}}public static void main(String[] args) {//1、返回我们IOC容器ConfigurableApplicationContext run = SpringApplication.run(MainApplication.class, args);//2、查看容器里面的组件String[] names = run.getBeanDefinitionNames();for (String name : names) {System.out.println(name);}boolean tom = run.containsBean("tom");System.out.println("容器中Tom组件:"+tom);boolean user01 = run.containsBean("user01");System.out.println("容器中user01组件:"+user01);boolean tom22 = run.containsBean("tom22");System.out.println("容器中tom22组件:"+tom22);}
2.2、原生配置文件引入
@ImportResource
可以引入配置文件,将配置文件组件自动注入IOC
======================beans.xml=========================<?xml version="1.0" encoding="UTF-8"?><beans xmlns="http://www.springframework.org/schema/beans"xmlns:xsi="http://www.w3.org/2001/XMLSchema-instance"xmlns:context="http://www.springframework.org/schema/context"xsi:schemaLocation="http://www.springframework.org/schema/beans http://www.springframework.org/schema/beans/spring-beans.xsd http://www.springframework.org/schema/context https://www.springframework.org/schema/context/spring-context.xsd"><bean id="haha" class="com.atguigu.boot.bean.User"><property name="name" value="zhangsan"></property><property name="age" value="18"></property></bean><bean id="hehe" class="com.atguigu.boot.bean.Pet"><property name="name" value="tomcat"></property></bean></beans>
```java @ImportResource(“classpath:beans.xml”) public class MyConfig {}
======================测试================= boolean haha = run.containsBean(“haha”); boolean hehe = run.containsBean(“hehe”); System.out.println(“haha:”+haha);//true System.out.println(“hehe:”+hehe);//true
<a name="0da8b5a2"></a>#### 2.3、配置绑定- 如何使用Java读取到properties文件中的内容,并且把它封装到JavaBean中,以供随时使用;```javapublic class getProperties {public static void main(String[] args) throws FileNotFoundException, IOException {Properties pps = new Properties();pps.load(new FileInputStream("a.properties"));Enumeration enum1 = pps.propertyNames();//得到配置文件的名字while(enum1.hasMoreElements()) {String strKey = (String) enum1.nextElement();String strValue = pps.getProperty(strKey);System.out.println(strKey + "=" + strValue);//封装到JavaBean。}}}
springboot提供更简洁的注解方式
@ConfigurationProperties使用(@Component + @ConfigurationProperties)
配置文件:
mycar.brand=BMWmycar.price=1000000
Car类:
```java package boot.bean;
import org.springframework.boot.context.properties.ConfigurationProperties; import org.springframework.stereotype.Component;
/**
只有在容器中的组件,才会拥有SpringBoot提供的强大功能 */ @Component @ConfigurationProperties(prefix = “mycar”) public class Car { private String brand; public Integer price;
public Car(String brand, Integer price) {
this.brand = brand;this.price = price;
}
public Car() { }
public String getBrand() {
return brand;
}
public void setBrand(String brand) {
this.brand = brand;
}
public Integer getPrice() {
return price;
}
public void setPrice(Integer price) {
this.price = price;
}
@Override public String toString() {
return "Car{" +"brand='" + brand + '\'' +", price=" + price +'}';
} }
- 在控制器类中可以自动获取```java@RestControllerpublic class FirstController {@AutowiredCar car;@RequestMapping("/car")public Car car(){return car;}}
- @ConfigurationProperties使用(@EnableConfigurationProperties + @ConfigurationProperties)
- 需要在配置类加入注解(在为第三方包的对象,无法使用@Component时可以使用)
@EnableConfigurationProperties(Car.class)public class MyConfig {
- 需要在配置类加入注解(在为第三方包的对象,无法使用@Component时可以使用)
3、自动配置原理入门
3.1、引导加载自动配置类
@SpringBootConfiguration@EnableAutoConfiguration@ComponentScan(excludeFilters = { @Filter(type = FilterType.CUSTOM, classes = TypeExcludeFilter.class),@Filter(type = FilterType.CUSTOM, classes = AutoConfigurationExcludeFilter.class) })public @interface SpringBootApplication{}======================
1、@SpringBootConfiguration
@Configuration。代表当前是一个配置类
2、@ComponentScan
指定扫描哪些,Spring注解;
3、@EnableAutoConfiguration
@AutoConfigurationPackage@Import(AutoConfigurationImportSelector.class)public @interface EnableAutoConfiguration {}
1、@AutoConfigurationPackage
自动配置包?指定了默认的包规则
@Import(AutoConfigurationPackages.Registrar.class) //给容器中导入一个组件public @interface AutoConfigurationPackage {}//利用Registrar给容器中导入一系列组件//将指定的一个包下的所有组件导入进来?MainApplication 所在包下。
2、@Import(AutoConfigurationImportSelector.class)
1、利用getAutoConfigurationEntry(annotationMetadata);给容器中批量导入一些组件2、调用List<String> configurations = getCandidateConfigurations(annotationMetadata, attributes)获取到所有需要导入到容器中的配置类3、利用工厂加载 Map<String, List<String>> loadSpringFactories(@Nullable ClassLoader classLoader);得到所有的组件4、从META-INF/spring.factories位置来加载一个文件。默认扫描我们当前系统里面所有META-INF/spring.factories位置的文件spring-boot-autoconfigure-2.3.4.RELEASE.jar包里面也有META-INF/spring.factories
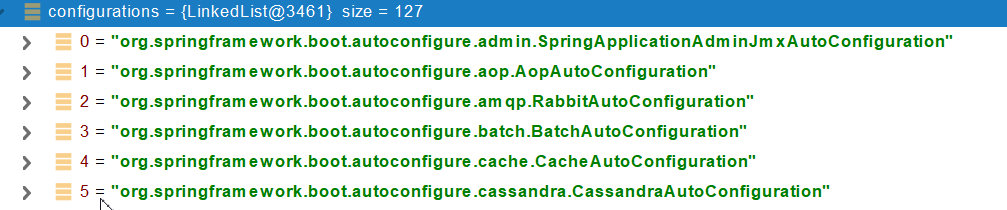
文件里面写死了spring-boot一启动就要给容器中加载的所有配置类spring-boot-autoconfigure-2.3.4.RELEASE.jar/META-INF/spring.factories# Auto Configureorg.springframework.boot.autoconfigure.EnableAutoConfiguration=\org.springframework.boot.autoconfigure.admin.SpringApplicationAdminJmxAutoConfiguration,\org.springframework.boot.autoconfigure.aop.AopAutoConfiguration,\org.springframework.boot.autoconfigure.amqp.RabbitAutoConfiguration,\org.springframework.boot.autoconfigure.batch.BatchAutoConfiguration,\org.springframework.boot.autoconfigure.cache.CacheAutoConfiguration,\org.springframework.boot.autoconfigure.cassandra.CassandraAutoConfiguration,\org.springframework.boot.autoconfigure.context.ConfigurationPropertiesAutoConfiguration,\org.springframework.boot.autoconfigure.context.LifecycleAutoConfiguration,\org.springframework.boot.autoconfigure.context.MessageSourceAutoConfiguration,\org.springframework.boot.autoconfigure.context.PropertyPlaceholderAutoConfiguration,\org.springframework.boot.autoconfigure.couchbase.CouchbaseAutoConfiguration,\org.springframework.boot.autoconfigure.dao.PersistenceExceptionTranslationAutoConfiguration,\org.springframework.boot.autoconfigure.data.cassandra.CassandraDataAutoConfiguration,\org.springframework.boot.autoconfigure.data.cassandra.CassandraReactiveDataAutoConfiguration,\org.springframework.boot.autoconfigure.data.cassandra.CassandraReactiveRepositoriesAutoConfiguration,\org.springframework.boot.autoconfigure.data.cassandra.CassandraRepositoriesAutoConfiguration,\org.springframework.boot.autoconfigure.data.couchbase.CouchbaseDataAutoConfiguration,\org.springframework.boot.autoconfigure.data.couchbase.CouchbaseReactiveDataAutoConfiguration,\org.springframework.boot.autoconfigure.data.couchbase.CouchbaseReactiveRepositoriesAutoConfiguration,\org.springframework.boot.autoconfigure.data.couchbase.CouchbaseRepositoriesAutoConfiguration,\org.springframework.boot.autoconfigure.data.elasticsearch.ElasticsearchDataAutoConfiguration,\org.springframework.boot.autoconfigure.data.elasticsearch.ElasticsearchRepositoriesAutoConfiguration,\org.springframework.boot.autoconfigure.data.elasticsearch.ReactiveElasticsearchRepositoriesAutoConfiguration,\org.springframework.boot.autoconfigure.data.elasticsearch.ReactiveElasticsearchRestClientAutoConfiguration,\org.springframework.boot.autoconfigure.data.jdbc.JdbcRepositoriesAutoConfiguration,\org.springframework.boot.autoconfigure.data.jpa.JpaRepositoriesAutoConfiguration,\org.springframework.boot.autoconfigure.data.ldap.LdapRepositoriesAutoConfiguration,\org.springframework.boot.autoconfigure.data.mongo.MongoDataAutoConfiguration,\org.springframework.boot.autoconfigure.data.mongo.MongoReactiveDataAutoConfiguration,\org.springframework.boot.autoconfigure.data.mongo.MongoReactiveRepositoriesAutoConfiguration,\org.springframework.boot.autoconfigure.data.mongo.MongoRepositoriesAutoConfiguration,\org.springframework.boot.autoconfigure.data.neo4j.Neo4jDataAutoConfiguration,\org.springframework.boot.autoconfigure.data.neo4j.Neo4jRepositoriesAutoConfiguration,\org.springframework.boot.autoconfigure.data.solr.SolrRepositoriesAutoConfiguration,\org.springframework.boot.autoconfigure.data.r2dbc.R2dbcDataAutoConfiguration,\org.springframework.boot.autoconfigure.data.r2dbc.R2dbcRepositoriesAutoConfiguration,\org.springframework.boot.autoconfigure.data.r2dbc.R2dbcTransactionManagerAutoConfiguration,\org.springframework.boot.autoconfigure.data.redis.RedisAutoConfiguration,\org.springframework.boot.autoconfigure.data.redis.RedisReactiveAutoConfiguration,\org.springframework.boot.autoconfigure.data.redis.RedisRepositoriesAutoConfiguration,\org.springframework.boot.autoconfigure.data.rest.RepositoryRestMvcAutoConfiguration,\org.springframework.boot.autoconfigure.data.web.SpringDataWebAutoConfiguration,\org.springframework.boot.autoconfigure.elasticsearch.ElasticsearchRestClientAutoConfiguration,\org.springframework.boot.autoconfigure.flyway.FlywayAutoConfiguration,\org.springframework.boot.autoconfigure.freemarker.FreeMarkerAutoConfiguration,\org.springframework.boot.autoconfigure.groovy.template.GroovyTemplateAutoConfiguration,\org.springframework.boot.autoconfigure.gson.GsonAutoConfiguration,\org.springframework.boot.autoconfigure.h2.H2ConsoleAutoConfiguration,\org.springframework.boot.autoconfigure.hateoas.HypermediaAutoConfiguration,\org.springframework.boot.autoconfigure.hazelcast.HazelcastAutoConfiguration,\org.springframework.boot.autoconfigure.hazelcast.HazelcastJpaDependencyAutoConfiguration,\org.springframework.boot.autoconfigure.http.HttpMessageConvertersAutoConfiguration,\org.springframework.boot.autoconfigure.http.codec.CodecsAutoConfiguration,\org.springframework.boot.autoconfigure.influx.InfluxDbAutoConfiguration,\org.springframework.boot.autoconfigure.info.ProjectInfoAutoConfiguration,\org.springframework.boot.autoconfigure.integration.IntegrationAutoConfiguration,\org.springframework.boot.autoconfigure.jackson.JacksonAutoConfiguration,\org.springframework.boot.autoconfigure.jdbc.DataSourceAutoConfiguration,\org.springframework.boot.autoconfigure.jdbc.JdbcTemplateAutoConfiguration,\org.springframework.boot.autoconfigure.jdbc.JndiDataSourceAutoConfiguration,\org.springframework.boot.autoconfigure.jdbc.XADataSourceAutoConfiguration,\org.springframework.boot.autoconfigure.jdbc.DataSourceTransactionManagerAutoConfiguration,\org.springframework.boot.autoconfigure.jms.JmsAutoConfiguration,\org.springframework.boot.autoconfigure.jmx.JmxAutoConfiguration,\org.springframework.boot.autoconfigure.jms.JndiConnectionFactoryAutoConfiguration,\org.springframework.boot.autoconfigure.jms.activemq.ActiveMQAutoConfiguration,\org.springframework.boot.autoconfigure.jms.artemis.ArtemisAutoConfiguration,\org.springframework.boot.autoconfigure.jersey.JerseyAutoConfiguration,\org.springframework.boot.autoconfigure.jooq.JooqAutoConfiguration,\org.springframework.boot.autoconfigure.jsonb.JsonbAutoConfiguration,\org.springframework.boot.autoconfigure.kafka.KafkaAutoConfiguration,\org.springframework.boot.autoconfigure.availability.ApplicationAvailabilityAutoConfiguration,\org.springframework.boot.autoconfigure.ldap.embedded.EmbeddedLdapAutoConfiguration,\org.springframework.boot.autoconfigure.ldap.LdapAutoConfiguration,\org.springframework.boot.autoconfigure.liquibase.LiquibaseAutoConfiguration,\org.springframework.boot.autoconfigure.mail.MailSenderAutoConfiguration,\org.springframework.boot.autoconfigure.mail.MailSenderValidatorAutoConfiguration,\org.springframework.boot.autoconfigure.mongo.embedded.EmbeddedMongoAutoConfiguration,\org.springframework.boot.autoconfigure.mongo.MongoAutoConfiguration,\org.springframework.boot.autoconfigure.mongo.MongoReactiveAutoConfiguration,\org.springframework.boot.autoconfigure.mustache.MustacheAutoConfiguration,\org.springframework.boot.autoconfigure.orm.jpa.HibernateJpaAutoConfiguration,\org.springframework.boot.autoconfigure.quartz.QuartzAutoConfiguration,\org.springframework.boot.autoconfigure.r2dbc.R2dbcAutoConfiguration,\org.springframework.boot.autoconfigure.rsocket.RSocketMessagingAutoConfiguration,\org.springframework.boot.autoconfigure.rsocket.RSocketRequesterAutoConfiguration,\org.springframework.boot.autoconfigure.rsocket.RSocketServerAutoConfiguration,\org.springframework.boot.autoconfigure.rsocket.RSocketStrategiesAutoConfiguration,\org.springframework.boot.autoconfigure.security.servlet.SecurityAutoConfiguration,\org.springframework.boot.autoconfigure.security.servlet.UserDetailsServiceAutoConfiguration,\org.springframework.boot.autoconfigure.security.servlet.SecurityFilterAutoConfiguration,\org.springframework.boot.autoconfigure.security.reactive.ReactiveSecurityAutoConfiguration,\org.springframework.boot.autoconfigure.security.reactive.ReactiveUserDetailsServiceAutoConfiguration,\org.springframework.boot.autoconfigure.security.rsocket.RSocketSecurityAutoConfiguration,\org.springframework.boot.autoconfigure.security.saml2.Saml2RelyingPartyAutoConfiguration,\org.springframework.boot.autoconfigure.sendgrid.SendGridAutoConfiguration,\org.springframework.boot.autoconfigure.session.SessionAutoConfiguration,\org.springframework.boot.autoconfigure.security.oauth2.client.servlet.OAuth2ClientAutoConfiguration,\org.springframework.boot.autoconfigure.security.oauth2.client.reactive.ReactiveOAuth2ClientAutoConfiguration,\org.springframework.boot.autoconfigure.security.oauth2.resource.servlet.OAuth2ResourceServerAutoConfiguration,\org.springframework.boot.autoconfigure.security.oauth2.resource.reactive.ReactiveOAuth2ResourceServerAutoConfiguration,\org.springframework.boot.autoconfigure.solr.SolrAutoConfiguration,\org.springframework.boot.autoconfigure.task.TaskExecutionAutoConfiguration,\org.springframework.boot.autoconfigure.task.TaskSchedulingAutoConfiguration,\org.springframework.boot.autoconfigure.thymeleaf.ThymeleafAutoConfiguration,\org.springframework.boot.autoconfigure.transaction.TransactionAutoConfiguration,\org.springframework.boot.autoconfigure.transaction.jta.JtaAutoConfiguration,\org.springframework.boot.autoconfigure.validation.ValidationAutoConfiguration,\org.springframework.boot.autoconfigure.web.client.RestTemplateAutoConfiguration,\org.springframework.boot.autoconfigure.web.embedded.EmbeddedWebServerFactoryCustomizerAutoConfiguration,\org.springframework.boot.autoconfigure.web.reactive.HttpHandlerAutoConfiguration,\org.springframework.boot.autoconfigure.web.reactive.ReactiveWebServerFactoryAutoConfiguration,\org.springframework.boot.autoconfigure.web.reactive.WebFluxAutoConfiguration,\org.springframework.boot.autoconfigure.web.reactive.error.ErrorWebFluxAutoConfiguration,\org.springframework.boot.autoconfigure.web.reactive.function.client.ClientHttpConnectorAutoConfiguration,\org.springframework.boot.autoconfigure.web.reactive.function.client.WebClientAutoConfiguration,\org.springframework.boot.autoconfigure.web.servlet.DispatcherServletAutoConfiguration,\org.springframework.boot.autoconfigure.web.servlet.ServletWebServerFactoryAutoConfiguration,\org.springframework.boot.autoconfigure.web.servlet.error.ErrorMvcAutoConfiguration,\org.springframework.boot.autoconfigure.web.servlet.HttpEncodingAutoConfiguration,\org.springframework.boot.autoconfigure.web.servlet.MultipartAutoConfiguration,\org.springframework.boot.autoconfigure.web.servlet.WebMvcAutoConfiguration,\org.springframework.boot.autoconfigure.websocket.reactive.WebSocketReactiveAutoConfiguration,\org.springframework.boot.autoconfigure.websocket.servlet.WebSocketServletAutoConfiguration,\org.springframework.boot.autoconfigure.websocket.servlet.WebSocketMessagingAutoConfiguration,\org.springframework.boot.autoconfigure.webservices.WebServicesAutoConfiguration,\org.springframework.boot.autoconfigure.webservices.client.WebServiceTemplateAutoConfiguration
3.2、按需开启自动配置项
- 虽然我们127个场景的所有自动配置启动的时候默认全部加载。xxxxAutoConfiguration
按照条件装配规则(@Conditional),最终会按需配置。
3.3、修改默认配置
- 解析web一些配置:
@Configuration(proxyBeanMethods = false)@Conditional({DispatcherServletAutoConfiguration.DefaultDispatcherServletCondition.class})//包含此类的组件则实行下面的方法@ConditionalOnClass({ServletRegistration.class})//1.将配置文件与组件绑定2.在注入到配置文件@EnableConfigurationProperties({WebMvcProperties.class})protected static class DispatcherServletConfiguration {protected DispatcherServletConfiguration() {}@Bean(name = {"dispatcherServlet"})//不用在手动的配置DispatcherServlet,springboot会new一个,并返回public DispatcherServlet dispatcherServlet(WebMvcProperties webMvcProperties) {DispatcherServlet dispatcherServlet = new DispatcherServlet();dispatcherServlet.setDispatchOptionsRequest(webMvcProperties.isDispatchOptionsRequest());dispatcherServlet.setDispatchTraceRequest(webMvcProperties.isDispatchTraceRequest());dispatcherServlet.setThrowExceptionIfNoHandlerFound(webMvcProperties.isThrowExceptionIfNoHandlerFound());dispatcherServlet.setPublishEvents(webMvcProperties.isPublishRequestHandledEvents());dispatcherServlet.setEnableLoggingRequestDetails(webMvcProperties.isLogRequestDetails());return dispatcherServlet;}
@Bean@ConditionalOnBean(MultipartResolver.class) //容器中有这个类型组件@ConditionalOnMissingBean(name = DispatcherServlet.MULTIPART_RESOLVER_BEAN_NAME) //容器中没有这个名字 multipartResolver 的组件,SpringBoot会才会自动配置,如果自己@Bean一个multipartResolver组件,就不会配置public MultipartResolver multipartResolver(MultipartResolver resolver) {//给@Bean标注的方法传入了对象参数,这个参数的值就会从容器中找。//SpringMVC multipartResolver。防止有些用户配置的文件上传解析器不符合规范// Detect if the user has created a MultipartResolver but named it incorrectlyreturn resolver;}给容器中加入了文件上传解析器;
- SpringBoot默认会在底层配好所有的组件。但是如果用户自己配置了以用户的优先
@Bean//不包含CharacterEncodingFilter会执行方法,自动创建@ConditionalOnMissingBeanpublic CharacterEncodingFilter characterEncodingFilter() {CharacterEncodingFilter filter = new OrderedCharacterEncodingFilter();filter.setEncoding(this.properties.getCharset().name());filter.setForceRequestEncoding(this.properties.shouldForce(org.springframework.boot.web.servlet.server.Encoding.Type.REQUEST));filter.setForceResponseEncoding(this.properties.shouldForce(org.springframework.boot.web.servlet.server.Encoding.Type.RESPONSE));return filter;}
@Bean@ConditionalOnMissingBeanpublic CharacterEncodingFilter characterEncodingFilter() {}
总结:
- SpringBoot先加载所有的自动配置类 xxxxxAutoConfiguration
- 每个自动配置类按照条件进行生效,默认都会绑定配置文件指定的值。xxxxProperties里面拿。xxxProperties和配置文件进行了绑定
- 生效的配置类就会给容器中装配很多组件
- 只要容器中有这些组件,相当于这些功能就有了
- 定制化配置
- 用户直接自己@Bean替换底层的组件
- 用户去看这个组件是获取的配置文件什么值就去修改。
xxxxxAutoConfiguration —-> 组件 —-> xxxxProperties里面拿值 ——> application.properties
3.4、最佳实践
- 引入场景依赖
- 查看自动配置了哪些(选做)
- 自己分析,引入场景对应的自动配置一般都生效了
- 配置文件中debug=true开启自动配置报告。Negative(不生效)\Positive(生效)
- 是否需要修改
- 参照文档修改配置项
- 自定义加入或者替换组件
- @Bean、@Component。。。
- 自定义器 XXXXXCustomizer;
- ……
4、开发小技巧
4.1、Lombok
简化JavaBean开发
idea中搜索安装lombok插件<dependency><groupId>org.projectlombok</groupId><artifactId>lombok</artifactId></dependency>
```java ===============================简化JavaBean开发=================================== @NoArgsConstructor //@AllArgsConstructor @Data @ToString @EqualsAndHashCode public class User {
private String name; private Integer age;
private Pet pet;
public User(String name,Integer age){
this.name = name;this.age = age;
}
}
================================简化日志开发=================================== @Slf4j @RestController public class HelloController { @RequestMapping(“/hello”) public String handle01(@RequestParam(“name”) String name){
log.info("请求进来了....");return "Hello, Spring Boot 2!"+"你好:"+name;}
}
<a name="1c2f70d9"></a>### 4.2、dev-tools```xml<dependency><groupId>org.springframework.boot</groupId><artifactId>spring-boot-devtools</artifactId><optional>true</optional></dependency>
项目或者页面修改以后:Ctrl+F9;
4.3、Spring Initailizr(项目初始化向导)
0、选择我们需要的开发场景
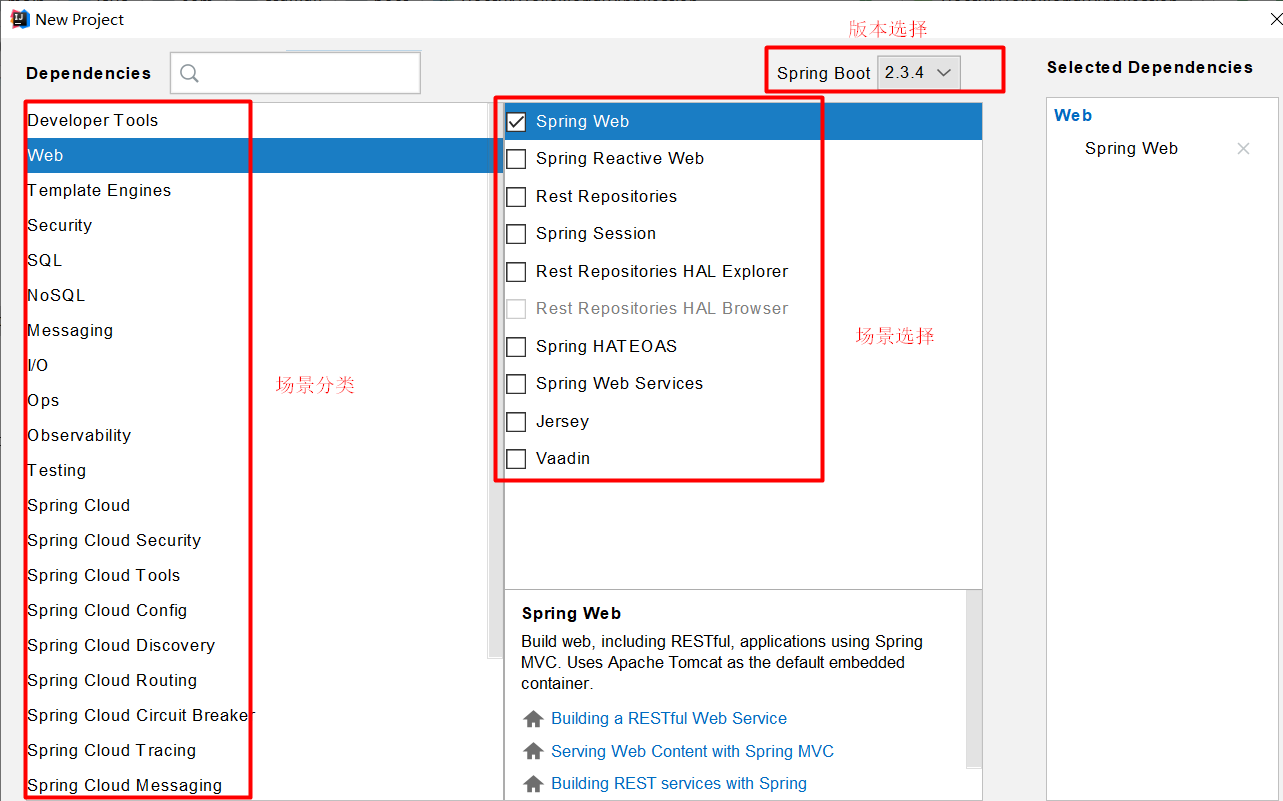
1、自动依赖引入
2、自动创建项目结构
3、自动编写好主配置类
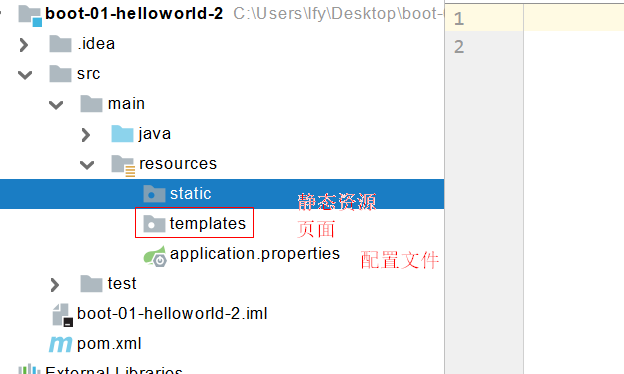
配置文件
1、文件类型
1.1、properties
同以前的properties用法
1.2、yaml
1.2.1、简介
YAML 是 “YAML Ain’t Markup Language”(YAML 不是一种标记语言)的递归缩写。在开发的这种语言时,YAML 的意思其实是:”Yet Another Markup Language”(仍是一种标记语言)。
非常适合用来做以数据为中心的配置文件
1.2.2、基本语法
- key: value;kv之间有空格
- 大小写敏感
- 使用缩进表示层级关系
- 缩进不允许使用tab,只允许空格
- 缩进的空格数不重要,只要相同层级的元素左对齐即可
- ‘#’表示注释
- 字符串无需加引号,如果要加,’’与””表示字符串内容 会被 转义/不转义
1.2.3、数据类型
- 字面量:单个的、不可再分的值。date、boolean、string、number、null
k: v
- 对象:键值对的集合。map、hash、set、object
行内写法: k: {k1:v1,k2:v2,k3:v3}#或k:k1: v1k2: v2k3: v3
- 数组:一组按次序排列的值。array、list、queue
行内写法: k: [v1,v2,v3]#或者k:- v1- v2- v3
1.2.4、示例
@Datapublic class Person {private String userName;private Boolean boss;private Date birth;private Integer age;private Pet pet;private String[] interests;private List<String> animal;private Map<String, Object> score;private Set<Double> salarys;private Map<String, List<Pet>> allPets;}@Datapublic class Pet {private String name;private Double weight;}
# yaml表示以上对象person:#单引号会将 \n 作为字符串输出 双引号会将\n作为换行输出#双引号不会转义,单引号会转义userName: zhangsanboss: falsebirth: 2019/12/12 20:12:33age: 18pet:name: tomcatweight: 23.4interests: [篮球,游泳]animal:- jerry- marioscore:english:first: 30second: 40third: 50math: [131,140,148]chinese: {first: 128,second: 136}salarys: [3999,4999.98,5999.99]allPets:sick:- {name: tom}- {name: jerry,weight: 47}health: [{name: mario,weight: 47}]
注意:使用yml时报

导入依赖:(编写时有提示)
<dependency><groupId>org.springframework.boot</groupId><artifactId>spring-boot-configuration-processor</artifactId><optional>true</optional></dependency>
2、配置提示
自定义的类和配置文件绑定一般没有提示。
<dependency><groupId>org.springframework.boot</groupId><artifactId>spring-boot-configuration-processor</artifactId><optional>true</optional></dependency><build><plugins><plugin><groupId>org.springframework.boot</groupId><artifactId>spring-boot-maven-plugin</artifactId><configuration><excludes><exclude><groupId>org.springframework.boot</groupId><artifactId>spring-boot-configuration-processor</artifactId></exclude></excludes></configuration></plugin></plugins></build>
Web开发
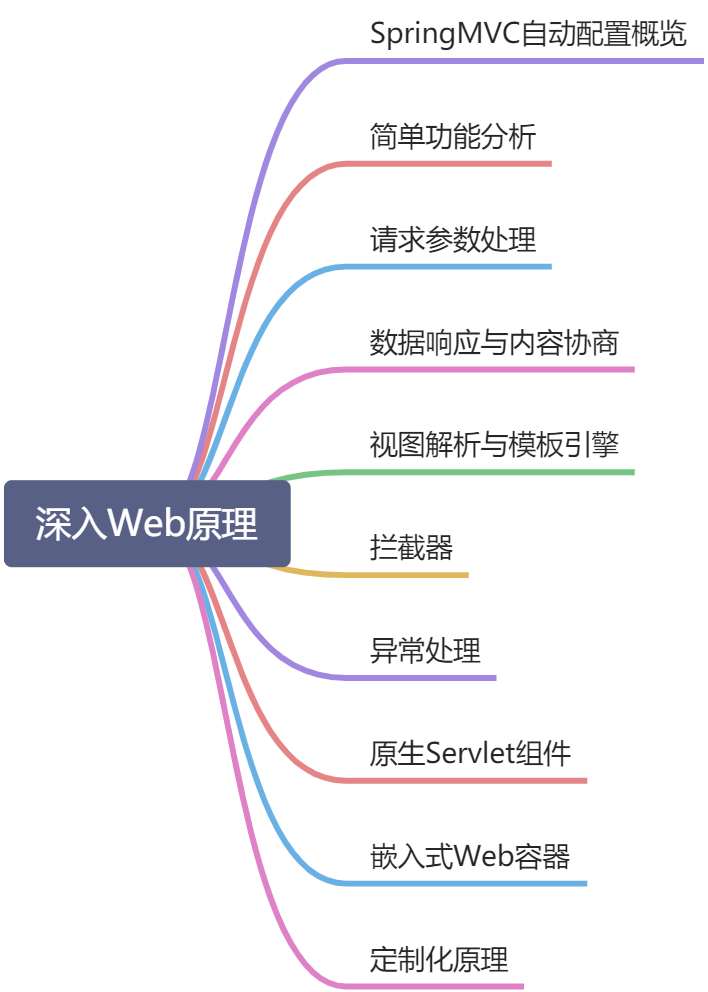
1、SpringMVC自动配置概览
Spring Boot provides auto-configuration for Spring MVC that works well with most applications.(大多场景我们都无需自定义配置)
The auto-configuration adds the following features on top of Spring’s defaults:
- Inclusion of
ContentNegotiatingViewResolverandBeanNameViewResolverbeans. - 内容协商视图解析器和BeanName视图解析器
- Support for serving static resources, including support for WebJars (covered later in this document)).
- 静态资源(包括webjars)
- Automatic registration of
Converter,GenericConverter, andFormatterbeans. - 自动注册
Converter,GenericConverter,Formatter
- 自动注册
- Support for
HttpMessageConverters(covered later in this document). - 支持
HttpMessageConverters(后来我们配合内容协商理解原理)
- 支持
- Automatic registration of
MessageCodesResolver(covered later in this document). - 自动注册
MessageCodesResolver(国际化用)
- 自动注册
- Static
index.htmlsupport. - 静态index.html 页支持
- Custom
Faviconsupport (covered later in this document). - 自定义
Favicon
- 自定义
- Automatic use of a
ConfigurableWebBindingInitializerbean (covered later in this document). - 自动使用
ConfigurableWebBindingInitializer,(DataBinder负责将请求数据绑定到JavaBean上)
- 自动使用
If you want to keep those Spring Boot MVC customizations and make more MVC customizations (interceptors, formatters, view controllers, and other features), you can add your own @Configuration class of type WebMvcConfigurer but without @EnableWebMvc.
不用@EnableWebMvc注解。使用 **@Configuration** + **WebMvcConfigurer** 自定义规则
If you want to provide custom instances of RequestMappingHandlerMapping, RequestMappingHandlerAdapter, or ExceptionHandlerExceptionResolver, and still keep the Spring Boot MVC customizations, you can declare a bean of type WebMvcRegistrations and use it to provide custom instances of those components.
声明 **WebMvcRegistrations** 改变默认底层组件
If you want to take complete control of Spring MVC, you can add your own @Configuration annotated with @EnableWebMvc, or alternatively add your own @Configuration-annotated DelegatingWebMvcConfiguration as described in the Javadoc of @EnableWebMvc.
使用 **@EnableWebMvc+@Configuration+DelegatingWebMvcConfiguration 全面接管SpringMVC**
2、简单功能分析
2.1、静态资源访问
1、静态资源目录
只要静态资源放在类路径下: called /static (or /public or /resources or /META-INF/resources
访问 : 当前项目根路径/ + 静态资源名
原理: 静态映射/**。
请求进来,先去找Controller看能不能处理。不能处理的所有请求又都交给静态资源处理器。静态资源也找不到则响应404页面
改变默认的静态资源路径
spring:mvc:static-path-pattern: /res/**web:resources:static-locations: [classpath:/haha/] //classpath后面没空格
2、静态资源访问前缀
默认无前缀
spring:mvc:static-path-pattern: /res/**
当前项目 + static-path-pattern + 静态资源名 = 静态资源文件夹下找
3、webjar
自动映射 /webjars/**
<dependency><groupId>org.webjars</groupId><artifactId>jquery</artifactId><version>3.5.1</version></dependency>
访问地址:http://localhost:8080/webjars/jquery/3.5.1/jquery.js 后面地址要按照依赖里面的包路径
2.2、欢迎页支持
- 静态资源路径下 index.html
- 可以配置静态资源路径
- 但是不可以配置静态资源的访问前缀。否则导致 index.html不能被默认访问
spring:# mvc:# static-path-pattern: /res/** 这个会导致welcome page功能失效resources:static-locations: [classpath:/haha/]
- controller能处理/index
2.3、自定义 Favicon
favicon.ico 放在静态资源目录下即可。
spring:# mvc:# static-path-pattern: /res/** 这个会导致 Favicon 功能失效
2.4、静态资源配置原理
- SpringBoot启动默认加载 xxxAutoConfiguration 类(自动配置类)
- SpringMVC功能的自动配置类 WebMvcAutoConfiguration,生效
@Configuration(proxyBeanMethods = false)@ConditionalOnWebApplication(type = Type.SERVLET)@ConditionalOnClass({ Servlet.class, DispatcherServlet.class, WebMvcConfigurer.class })@ConditionalOnMissingBean(WebMvcConfigurationSupport.class)@AutoConfigureOrder(Ordered.HIGHEST_PRECEDENCE + 10)@AutoConfigureAfter({ DispatcherServletAutoConfiguration.class, TaskExecutionAutoConfiguration.class,ValidationAutoConfiguration.class })public class WebMvcAutoConfiguration {}
- 给容器中配了什么。
@Configuration(proxyBeanMethods = false)@Import(EnableWebMvcConfiguration.class)@EnableConfigurationProperties({ WebMvcProperties.class, ResourceProperties.class })@Order(0)public static class WebMvcAutoConfigurationAdapter implements WebMvcConfigurer {}
- 配置文件的相关属性和xxx进行了绑定。WebMvcProperties==spring.mvc、ResourceProperties==spring.resources
1、配置类只有一个有参构造器
//有参构造器所有参数的值都会从容器中确定//ResourceProperties resourceProperties;获取和spring.resources绑定的所有的值的对象//WebMvcProperties mvcProperties 获取和spring.mvc绑定的所有的值的对象//ListableBeanFactory beanFactory Spring的beanFactory//HttpMessageConverters 找到所有的HttpMessageConverters//ResourceHandlerRegistrationCustomizer 找到 资源处理器的自定义器。=========//DispatcherServletPath//ServletRegistrationBean 给应用注册Servlet、Filter....public WebMvcAutoConfigurationAdapter(ResourceProperties resourceProperties, WebMvcProperties mvcProperties,ListableBeanFactory beanFactory, ObjectProvider<HttpMessageConverters> messageConvertersProvider,ObjectProvider<ResourceHandlerRegistrationCustomizer> resourceHandlerRegistrationCustomizerProvider,ObjectProvider<DispatcherServletPath> dispatcherServletPath,ObjectProvider<ServletRegistrationBean<?>> servletRegistrations) {this.resourceProperties = resourceProperties;this.mvcProperties = mvcProperties;this.beanFactory = beanFactory;this.messageConvertersProvider = messageConvertersProvider;this.resourceHandlerRegistrationCustomizer = resourceHandlerRegistrationCustomizerProvider.getIfAvailable();this.dispatcherServletPath = dispatcherServletPath;this.servletRegistrations = servletRegistrations;}
2、资源处理的默认规则
@Overridepublic void addResourceHandlers(ResourceHandlerRegistry registry) {if (!this.resourceProperties.isAddMappings()) {logger.debug("Default resource handling disabled");return;}Duration cachePeriod = this.resourceProperties.getCache().getPeriod();CacheControl cacheControl = this.resourceProperties.getCache().getCachecontrol().toHttpCacheControl();//webjars的规则if (!registry.hasMappingForPattern("/webjars/**")) {customizeResourceHandlerRegistration(registry.addResourceHandler("/webjars/**").addResourceLocations("classpath:/META-INF/resources/webjars/").setCachePeriod(getSeconds(cachePeriod)).setCacheControl(cacheControl));}//String staticPathPattern = this.mvcProperties.getStaticPathPattern();if (!registry.hasMappingForPattern(staticPathPattern)) {customizeResourceHandlerRegistration(registry.addResourceHandler(staticPathPattern).addResourceLocations(getResourceLocations(this.resourceProperties.getStaticLocations())).setCachePeriod(getSeconds(cachePeriod)).setCacheControl(cacheControl));}}spring:# mvc:# static-path-pattern: /res/**resources:add-mappings: false 禁用所有静态资源规则@ConfigurationProperties(prefix = "spring.resources", ignoreUnknownFields = false)public class ResourceProperties {private static final String[] CLASSPATH_RESOURCE_LOCATIONS = { "classpath:/META-INF/resources/","classpath:/resources/", "classpath:/static/", "classpath:/public/" };/*** Locations of static resources. Defaults to classpath:[/META-INF/resources/,* /resources/, /static/, /public/].*/private String[] staticLocations = CLASSPATH_RESOURCE_LOCATIONS;
3、欢迎页的处理规则
HandlerMapping:处理器映射。保存了每一个Handler能处理哪些请求。@Beanpublic WelcomePageHandlerMapping welcomePageHandlerMapping(ApplicationContext applicationContext,FormattingConversionService mvcConversionService, ResourceUrlProvider mvcResourceUrlProvider) {WelcomePageHandlerMapping welcomePageHandlerMapping = new WelcomePageHandlerMapping(new TemplateAvailabilityProviders(applicationContext), applicationContext, getWelcomePage(),this.mvcProperties.getStaticPathPattern());welcomePageHandlerMapping.setInterceptors(getInterceptors(mvcConversionService, mvcResourceUrlProvider));welcomePageHandlerMapping.setCorsConfigurations(getCorsConfigurations());return welcomePageHandlerMapping;}WelcomePageHandlerMapping(TemplateAvailabilityProviders templateAvailabilityProviders,ApplicationContext applicationContext, Optional<Resource> welcomePage, String staticPathPattern) {if (welcomePage.isPresent() && "/**".equals(staticPathPattern)) {//要用欢迎页功能,必须是/**logger.info("Adding welcome page: " + welcomePage.get());setRootViewName("forward:index.html");}else if (welcomeTemplateExists(templateAvailabilityProviders, applicationContext)) {// 调用Controller /indexlogger.info("Adding welcome page template: index");setRootViewName("index");}}
4、favicon
- 浏览器会发送/favicon.ioc请求获取到图标,整个session期间不再获取
3、请求参数处理
请求映射
1、rest使用与原理
- @xxxMapping;
- Rest风格支持(使用HTTP请求方式动词来表示对资源的操作)
- 以前:*/getUser 获取用户 /deleteUser 删除用户 /editUser 修改用户 /saveUser 保存用户
- 现在: /user GET-获取用户 DELETE-删除用户 PUT-修改用户 POST-保存用户
- 核心Filter;HiddenHttpMethodFilter
- 用法: 表单method=post,隐藏域 _method=put
- SpringBoot中手动开启
- 扩展:如何把_method 这个名字换成我们自己喜欢的。
- 测试:
```java @RequestMapping(value = “/user”,method = RequestMethod.GET) public String getUser(){
return "GET-张三";
}
@RequestMapping(value = “/user”,method = RequestMethod.POST) public String saveUser(){
return "POST-张三";
}
@RequestMapping(value = "/user",method = RequestMethod.PUT)public String putUser(){return "PUT-张三";}@RequestMapping(value = "/user",method = RequestMethod.DELETE)public String deleteUser(){return "DELETE-张三";}@Bean@ConditionalOnMissingBean(HiddenHttpMethodFilter.class)@ConditionalOnProperty(prefix = "spring.mvc.hiddenmethod.filter", name = "enabled", matchIfMissing = false)public OrderedHiddenHttpMethodFilter hiddenHttpMethodFilter() {return new OrderedHiddenHttpMethodFilter();}
//自定义filter @Bean public HiddenHttpMethodFilter hiddenHttpMethodFilter(){ HiddenHttpMethodFilter methodFilter = new HiddenHttpMethodFilter(); methodFilter.setMethodParam(“_m”); return methodFilter; }
-```html测试REST风格;<form action="/user" method="get"><input value="REST-GET 提交" type="submit"/></form><form action="/user" method="post"><input value="REST-POST 提交" type="submit"/></form><form action="/user" method="post"><input name="_method" type="hidden" value="delete"/><input name="_m" type="hidden" value="delete"/><input value="REST-DELETE 提交" type="submit"/></form><form action="/user" method="post"><input name="_method" type="hidden" value="PUT"/><input value="REST-PUT 提交" type="submit"/></form><hr/>
Rest原理(表单提交要使用REST的时候)
protected void doFilterInternal(HttpServletRequest request, HttpServletResponse response, FilterChain filterChain) throws ServletException, IOException {HttpServletRequest requestToUse = request;if ("POST".equals(request.getMethod()) && request.getAttribute("javax.servlet.error.exception") == null) {String paramValue = request.getParameter(this.methodParam);if (StringUtils.hasLength(paramValue)) {//会将请求都转化为大写,因此小写不影响String method = paramValue.toUpperCase(Locale.ENGLISH);if (ALLOWED_METHODS.contains(method)) {requestToUse = new HiddenHttpMethodFilter.HttpMethodRequestWrapper(request, method);}}}//将包装后的requesWrapper放行filterChain.doFilter((ServletRequest)requestToUse, response);}
表单提交会带上_method=PUT
- 请求过来被HiddenHttpMethodFilter拦截
- 请求是否正常,并且是POST
- 获取到_method的值。
- 兼容以下请求;PUT.DELETE.PATCH
- 原生request(post),包装模式requesWrapper重写了getMethod方法,返回的是传入的值。
```java //是原生的selevet,并重写了getMethod private static class HttpMethodRequestWrapper extends HttpServletRequestWrapper { private final String method;
- 原生request(post),包装模式requesWrapper重写了getMethod方法,返回的是传入的值。
public HttpMethodRequestWrapper(HttpServletRequest request, String method) { super(request); this.method = method; }
public String getMethod() { return this.method; } }
- **过滤器链放行的时候用wrapper。以后的方法调用getMethod是调用requesWrapper的。**-```ymlspring:mvc:hiddenmethod:filter:enabled: true #开启页面表单的Rest功能
Rest使用客户端工具
- 如PostMan直接发送Put、delete等方式请求,无需Filter。
如何把_method字段改成我们喜欢的
自己注入一个组件
@Configuration(proxyBeanMethods = false)public class WebConfig /*implements WebMvcConfigurer*/ {@Beanpublic HiddenHttpMethodFilter hiddenHttpMethodFilter(){HiddenHttpMethodFilter methodFilter = new HiddenHttpMethodFilter();methodFilter.setMethodParam("_m");return methodFilter;}}
2、请求映射原理

SpringMVC功能分析都从 org.springframework.web.servlet.DispatcherServlet-》doDispatch()
protected void doDispatch(HttpServletRequest request, HttpServletResponse response) throws Exception {HttpServletRequest processedRequest = request;HandlerExecutionChain mappedHandler = null;boolean multipartRequestParsed = false;WebAsyncManager asyncManager = WebAsyncUtils.getAsyncManager(request);try {ModelAndView mv = null;Exception dispatchException = null;try {processedRequest = checkMultipart(request);multipartRequestParsed = (processedRequest != request);// 找到当前请求使用哪个Handler(Controller的方法)处理mappedHandler = getHandler(processedRequest);//HandlerMapping:处理器映射。/xxx->>xxxx
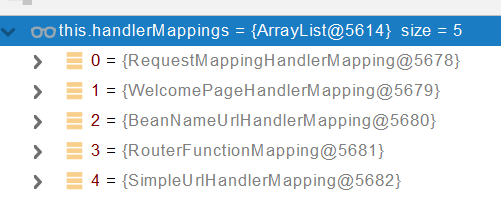
RequestMappingHandlerMapping:保存了所有@RequestMapping 和handler的映射规则。
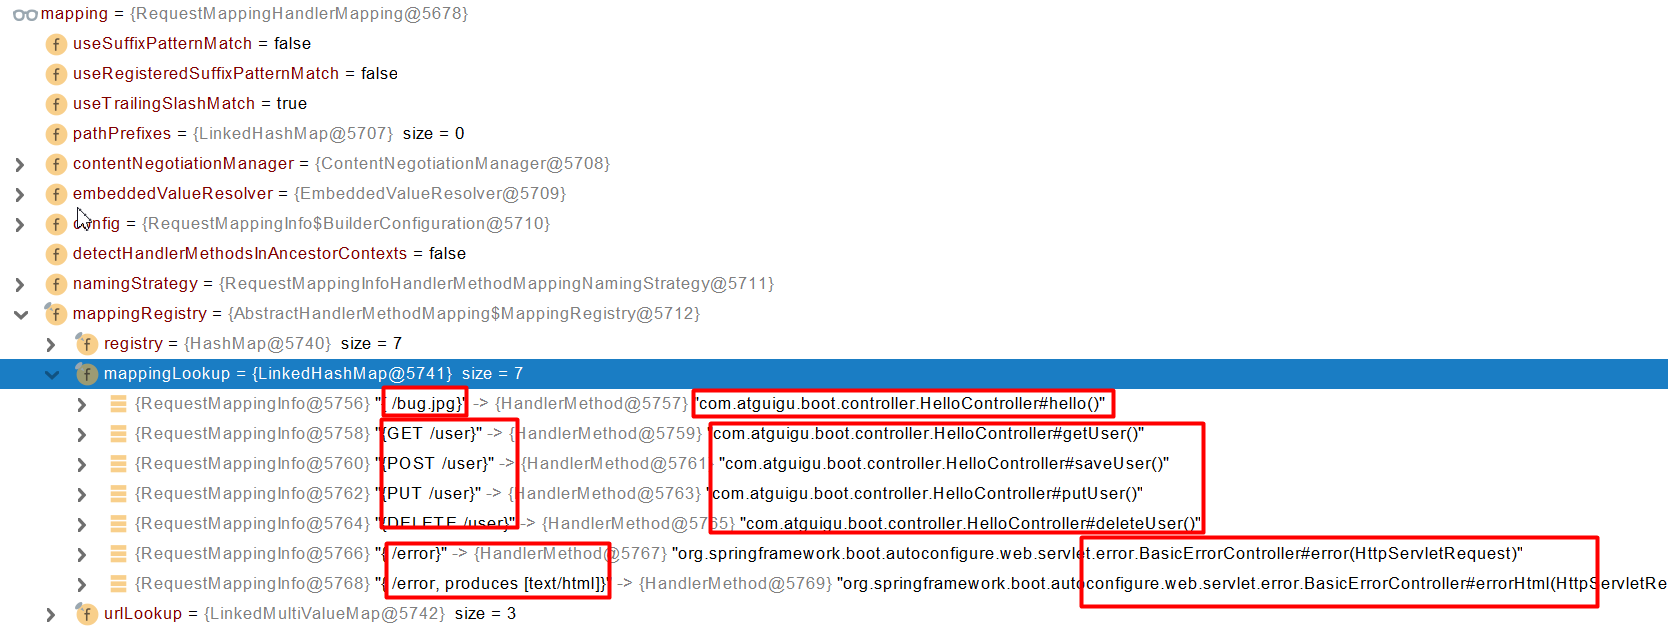
所有的请求映射都在HandlerMapping中。
- SpringBoot自动配置欢迎页的 WelcomePageHandlerMapping 。访问 /能访问到index.html;
- SpringBoot自动配置了默认 的 RequestMappingHandlerMapping
- 请求进来,挨个尝试所有的HandlerMapping看是否有请求信息。
- 如果有就找到这个请求对应的handler
已经找到DELETE的Handler
- 如果没有就是下一个 HandlerMapping
- 如果有就找到这个请求对应的handler
- 我们需要一些自定义的映射处理,我们也可以自己给容器中放HandlerMapping。自定义 HandlerMapping
@Nullableprotected HandlerExecutionChain getHandler(HttpServletRequest request) throws Exception {if (this.handlerMappings != null) {Iterator var2 = this.handlerMappings.iterator();while(var2.hasNext()) {HandlerMapping mapping = (HandlerMapping)var2.next();HandlerExecutionChain handler = mapping.getHandler(request);if (handler != null) {return handler;}}}return null;}
普通参数与基本注解
1.1、注解:
- @PathVariable、@RequestHeader、@ModelAttribute、@RequestParam、@MatrixVariable、@CookieValue、@RequestBody
```java @RestController public class ParameterTestController {
// car/2/owner/zhangsan@GetMapping("/car/{id}/owner/{username}")public Map<String,Object> getCar(@PathVariable("id") Integer id,@PathVariable("username") String name,@PathVariable Map<String,String> pv,@RequestHeader("User-Agent") String userAgent,@RequestHeader Map<String,String> header,@RequestParam("age") Integer age,@RequestParam("inters") List<String> inters,@RequestParam Map<String,String> params,@CookieValue("_ga") String _ga,@CookieValue("_ga") Cookie cookie){Map<String,Object> map = new HashMap<>();
// map.put(“id”,id); // map.put(“name”,name); // map.put(“pv”,pv); // map.put(“userAgent”,userAgent); // map.put(“headers”,header); map.put(“age”,age); map.put(“inters”,inters); map.put(“params”,params); map.put(“_ga”,_ga); System.out.println(cookie.getName()+”===>”+cookie.getValue()); return map; }
@PostMapping("/save")public Map postMethod(@RequestBody String content){Map<String,Object> map = new HashMap<>();map.put("content",content);return map;}//1、语法: 请求路径:/cars/sell;low=34;brand=byd,audi,yd//2、SpringBoot默认是禁用了矩阵变量的功能// 手动开启:原理。对于路径的处理。UrlPathHelper进行解析。// removeSemicolonContent(移除分号内容)支持矩阵变量的//再配置类中配置@Beanpublic WebMvcConfigurer webMvcConfigurer() {return new WebMvcConfigurer() {@Overridepublic void configurePathMatch(PathMatchConfigurer configurer) {UrlPathHelper urlPathHelper = new UrlPathHelper();//不溢出;后面的内容,矩阵变量功能就可以生效urlPathHelper.setRemoveSemicolonContent(false);configurer.setUrlPathHelper(urlPathHelper);}};}//3、矩阵变量必须有url路径变量才能被解析@GetMapping("/cars/{path}")public Map carsSell(@MatrixVariable("low") Integer low,@MatrixVariable("brand") List<String> brand,@PathVariable("path") String path){Map<String,Object> map = new HashMap<>();map.put("low",low);map.put("brand",brand);map.put("path",path);return map;}// /boss/1;age=20/2;age=10@GetMapping("/boss/{bossId}/{empId}")public Map boss(@MatrixVariable(value = "age",pathVar = "bossId") Integer bossAge,@MatrixVariable(value = "age",pathVar = "empId") Integer empAge){Map<String,Object> map = new HashMap<>();map.put("bossAge",bossAge);map.put("empAge",empAge);return map;}
}
<a name="2bffb82f"></a>## 5、视图解析与模板引擎- 视图解析:**SpringBoot默认不支持 JSP,需要引入第三方模板引擎技术实现页面渲染。**<a name="44c30e47"></a>### 1、视图解析<a name="b3068996"></a>#### 1、视图解析原理流程1、目标方法处理的过程中,所有数据都会被放在 **ModelAndViewContainer 里面。包括数据和视图地址****2、方法的参数是一个自定义类型对象(从请求参数中确定的),把他重新放在** **ModelAndViewContainer****3、任何目标方法执行完成以后都会返回 ModelAndView(数据和视图地址)。****4、processDispatchResult 处理派发结果(页面改如何响应)**- 1、**render**(**mv**, request, response); 进行页面渲染逻辑-- 1、根据方法的String返回值得到 **View** 对象【定义了页面的渲染逻辑】--- 1、所有的视图解析器尝试是否能根据当前返回值得到**View**对象- 2、得到了 **redirect:/main.html** --> Thymeleaf new **RedirectView**()--- 3、ContentNegotiationViewResolver 里面包含了下面所有的视图解析器,内部还是利用下面所有视图解析器得到视图对象。- 4、view.render(mv.getModelInternal(), request, response); 视图对象调用自定义的render进行页面渲染工作---- **RedirectView 如何渲染【重定向到一个页面】**- **1、获取目标url地址**---- **2、response.sendRedirect(encodedURL);****视图解析:**-- **返回值以 forward: 开始: new InternalResourceView(forwardUrl); --> 转发request.getRequestDispatcher(path).forward(request, response);**- **返回值以** **redirect: 开始:** **new RedirectView() --》 render就是重定向**-- **返回值是普通字符串: new ThymeleafView()--->**自定义视图解析器+自定义视图; **大厂学院。**<a name="680ecbd2"></a>### 2、模板引擎-Thymeleaf<a name="8be32646"></a>#### 1、thymeleaf简介- Thymeleaf is a modern server-side Java template engine for both web and standalone environments, capable of processing HTML, XML, JavaScript, CSS and even plain text.- **现代化、服务端Java模板引擎**<a name="25e14243"></a>#### 2、基本语法<a name="15d35776"></a>##### 1、表达式| 表达式名字 | 语法 | 用途 || --- | --- | --- || 变量取值 | ${...} | 获取请求域、session域、对象等值 || 选择变量 | *{...} | 获取上下文对象值 || 消息 | #{...} | 获取国际化等值 || 链接 | @{...} | 生成链接 || 片段表达式 | ~{...} | jsp:include 作用,引入公共页面片段 |<a name="366dca5b"></a>##### 2、字面量- 文本值: **'one text'** **,** **'Another one!'** **,…**数字: **0** **,** **34** **,** **3.0** **,** **12.3** **,…**布尔值: **true** **,** **false**- 空值: **null**- 变量: one,two,.... 变量不能有空格<a name="747ebdd0"></a>##### 3、文本操作- 字符串拼接: **+**- 变量替换: **|The name is ${name}|**<a name="fc4eaaf9"></a>##### 4、数学运算- 运算符: + , - , * , / , %<a name="17e851c3"></a>##### 5、布尔运算- 运算符: **and** **,** **or**- 一元运算: **!** **,** **not**<a name="ee3b4091"></a>##### 6、比较运算- 比较: **>** **,** **<** **,** **>=** **,** **<=** **(** **gt** **,** **lt** **,** **ge** **,** **le** **)**等式: **==** **,** **!=** **(** **eq** **,** **ne** **)**<a name="4252a13f"></a>##### 7、条件运算- If-then: **(if) ? (then)**- If-then-else: **(if) ? (then) : (else)**- Default: (value) **?: (defaultvalue)**<a name="2624a096"></a>##### 8、特殊操作- 无操作: _<a name="fed8d207"></a>#### 3、设置属性值-th:attr- 设置单个值```html<form action="subscribe.html" th:attr="action=@{/subscribe}"><fieldset><input type="text" name="email" /><input type="submit" value="Subscribe!" th:attr="value=#{subscribe.submit}"/></fieldset></form>
- 设置多个值
<img src="../../images/gtvglogo.png" th:attr="src=@{/images/gtvglogo.png},title=#{logo},alt=#{logo}" />
- 以上两个的代替写法 th:xxxx
<input type="submit" value="Subscribe!" th:value="#{subscribe.submit}"/><form action="subscribe.html" th:action="@{/subscribe}">
所有h5兼容的标签写法
https://www.thymeleaf.org/doc/tutorials/3.0/usingthymeleaf.html#setting-value-to-specific-attributes
4、迭代
<tr th:each="prod : ${prods}"><td th:text="${prod.name}">Onions</td><td th:text="${prod.price}">2.41</td><td th:text="${prod.inStock}? #{true} : #{false}">yes</td></tr>
<tr th:each="prod,iterStat : ${prods}" th:class="${iterStat.odd}? 'odd'"><td th:text="${prod.name}">Onions</td><td th:text="${prod.price}">2.41</td><td th:text="${prod.inStock}? #{true} : #{false}">yes</td></tr>
5、条件运算
<a href="comments.html"th:href="@{/product/comments(prodId=${prod.id})}"th:if="${not #lists.isEmpty(prod.comments)}">view</a>
<div th:switch="${user.role}"><p th:case="'admin'">User is an administrator</p><p th:case="#{roles.manager}">User is a manager</p><p th:case="*">User is some other thing</p></div>
6、属性优先级
3、thymeleaf使用
1、引入Starter
<dependency><groupId>org.springframework.boot</groupId><artifactId>spring-boot-starter-thymeleaf</artifactId></dependency>
2、自动配置好了thymeleaf
@Configuration(proxyBeanMethods = false)@EnableConfigurationProperties(ThymeleafProperties.class)@ConditionalOnClass({ TemplateMode.class, SpringTemplateEngine.class })@AutoConfigureAfter({ WebMvcAutoConfiguration.class, WebFluxAutoConfiguration.class })public class ThymeleafAutoConfiguration { }
自动配好的策略
- 1、所有thymeleaf的配置值都在 ThymeleafProperties
- 2、配置好了 SpringTemplateEngine
- 3、配好了 ThymeleafViewResolver
- 4、我们只需要直接开发页面
public static final String DEFAULT_PREFIX = "classpath:/templates/";public static final String DEFAULT_SUFFIX = ".html"; //xxx.html
3、页面开发
<!DOCTYPE html><html lang="en" xmlns:th="http://www.thymeleaf.org"><head><meta charset="UTF-8"><title>Title</title></head><body><h1 th:text="${msg}">哈哈</h1><h2><a href="www.atguigu.com" th:href="${link}">去百度</a> <br/><a href="www.atguigu.com" th:href="@{link}">去百度2</a></h2></body></html>
package boot.controller;import org.springframework.stereotype.Controller;import org.springframework.ui.Model;import org.springframework.web.bind.annotation.GetMapping;@Controllerpublic class TestController {@GetMapping("/hello")public String hello(Model model){model.addAttribute("link","http://www.baidu.com");model.addAttribute("msg","hello world!!!");return "success";}}
4、构建后台管理系统
1、项目创建
thymeleaf、web-starter、devtools、lombok
2、静态资源处理
自动配置好,我们只需要把所有静态资源放到 static 文件夹下
3、路径构建
th:action=”@{/login}”
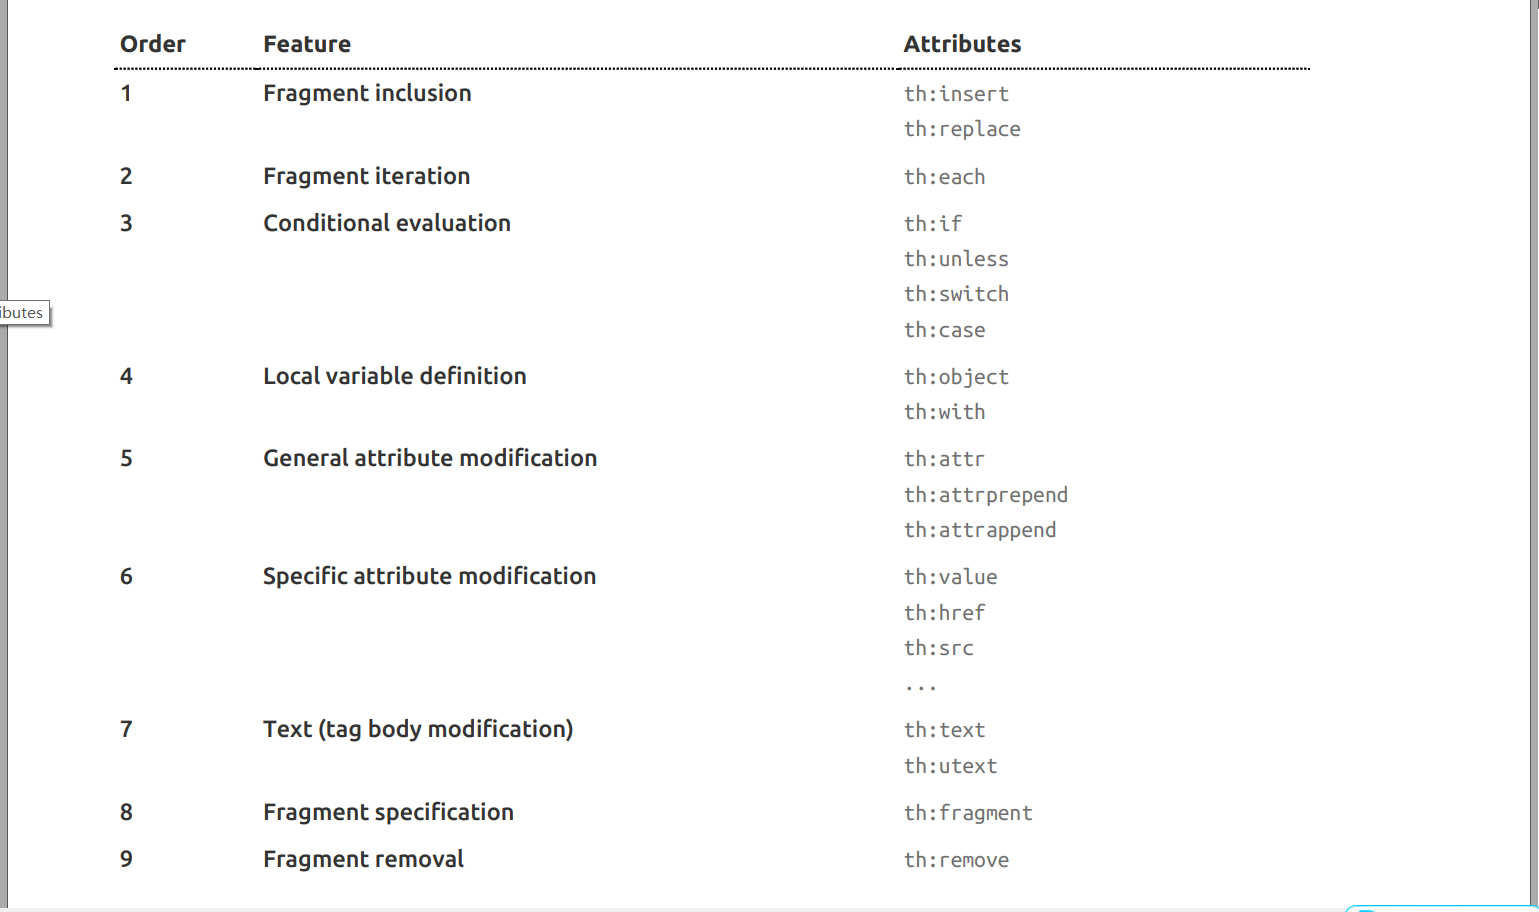
4、模板抽取
th:insert/replace/include
5、页面跳转
@PostMapping("/login")public String main(User user, HttpSession session, Model model){if(StringUtils.hasLength(user.getUserName()) && "123456".equals(user.getPassword())){//把登陆成功的用户保存起来session.setAttribute("loginUser",user);//登录成功重定向到main.html; 重定向防止表单重复提交return "redirect:/main.html";}else {model.addAttribute("msg","账号密码错误");//回到登录页面return "login";}}
6、数据渲染
@GetMapping("/dynamic_table")public String dynamic_table(Model model){//表格内容的遍历List<User> users = Arrays.asList(new User("zhangsan", "123456"),new User("lisi", "123444"),new User("haha", "aaaaa"),new User("hehe ", "aaddd"));model.addAttribute("users",users);return "table/dynamic_table";}<table class="display table table-bordered" id="hidden-table-info"><thead><tr><th>#</th><th>用户名</th><th>密码</th></tr></thead><tbody><tr class="gradeX" th:each="user,stats:${users}"><td th:text="${stats.count}">Trident</td><td th:text="${user.userName}">Internet</td><td >[[${user.password}]]</td></tr></tbody></table>
6、拦截器
1、HandlerInterceptor 接口
/*** 登录检查* 1、配置好拦截器要拦截哪些请求* 2、把这些配置放在容器中*/@Slf4jpublic class LoginInterceptor implements HandlerInterceptor {/*** 目标方法执行之前* @param request* @param response* @param handler* @return* @throws Exception*/@Overridepublic boolean preHandle(HttpServletRequest request, HttpServletResponse response, Object handler) throws Exception {String requestURI = request.getRequestURI();log.info("preHandle拦截的请求路径是{}",requestURI);//登录检查逻辑HttpSession session = request.getSession();Object loginUser = session.getAttribute("loginUser");if(loginUser != null){//放行return true;}//拦截住。未登录。跳转到登录页request.setAttribute("msg","请先登录");// re.sendRedirect("/");request.getRequestDispatcher("/").forward(request,response);return false;}/*** 目标方法执行完成以后* @param request* @param response* @param handler* @param modelAndView* @throws Exception*/@Overridepublic void postHandle(HttpServletRequest request, HttpServletResponse response, Object handler, ModelAndView modelAndView) throws Exception {log.info("postHandle执行{}",modelAndView);}/*** 页面渲染以后* @param request* @param response* @param handler* @param ex* @throws Exception*/@Overridepublic void afterCompletion(HttpServletRequest request, HttpServletResponse response, Object handler, Exception ex) throws Exception {log.info("afterCompletion执行异常{}",ex);}}
2、配置拦截器
/*** 1、编写一个拦截器实现HandlerInterceptor接口* 2、拦截器注册到容器中(实现WebMvcConfigurer的addInterceptors)* 3、指定拦截规则【如果是拦截所有,静态资源也会被拦截】*/@Configurationpublic class AdminWebConfig implements WebMvcConfigurer {@Overridepublic void addInterceptors(InterceptorRegistry registry) {registry.addInterceptor(new LoginInterceptor()).addPathPatterns("/**") //所有请求都被拦截包括静态资源.excludePathPatterns("/","/login","/css/**","/fonts/**","/images/**","/js/**"); //放行的请求}}
3、拦截器原理
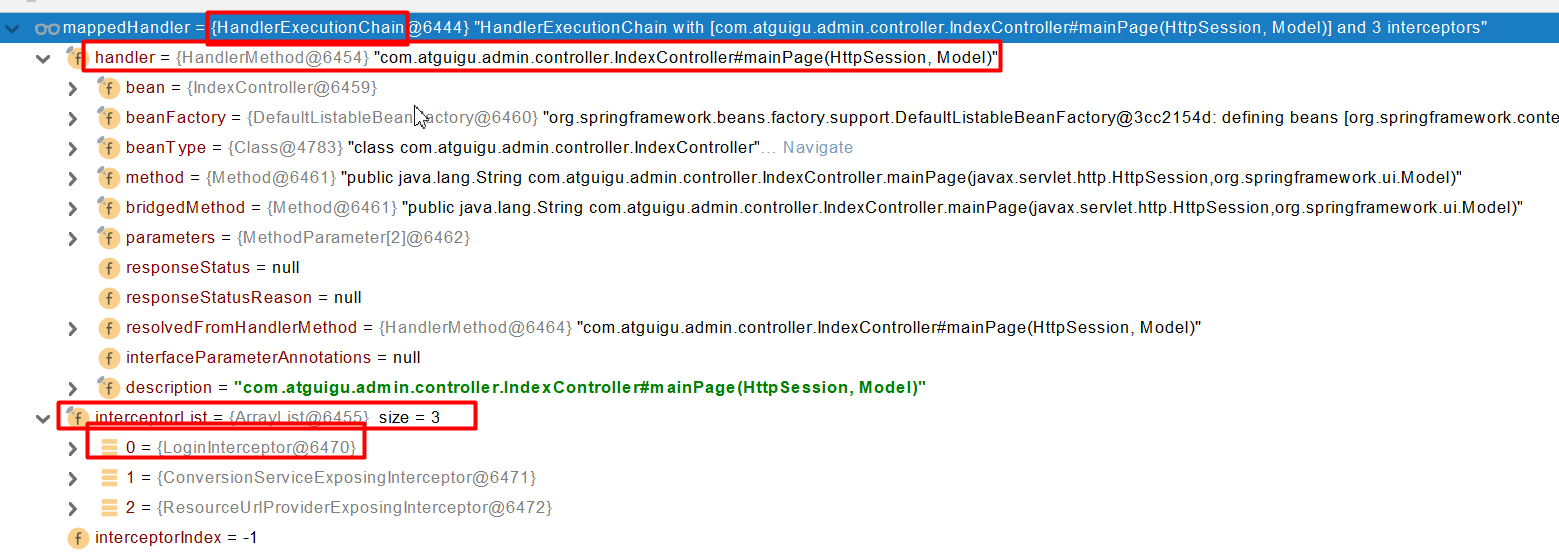
1、根据当前请求,找到HandlerExecutionChain【可以处理请求的handler以及handler的所有 拦截器】
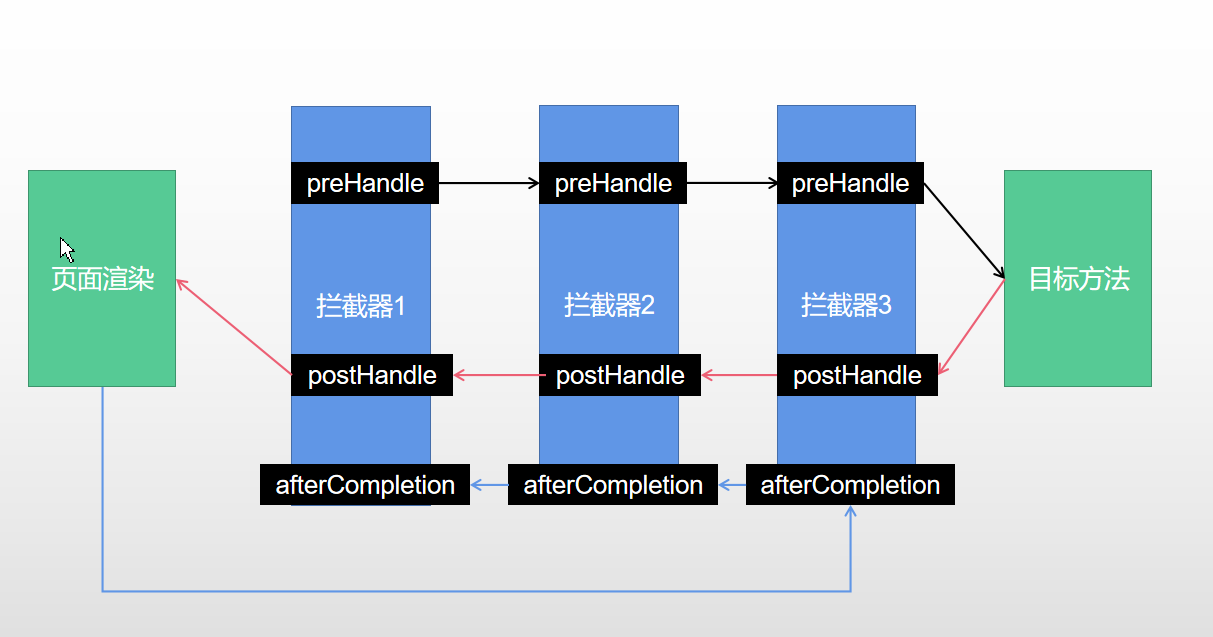
2、先来顺序执行 所有拦截器的 preHandle方法
- 1、如果当前拦截器prehandler返回为true。则执行下一个拦截器的preHandle
- 2、如果当前拦截器返回为false。直接 倒序执行所有已经执行了的拦截器的 afterCompletion;而为执行的拦截器则不执行afterCompletion
3、如果任何一个拦截器返回false。直接跳出不执行目标方法
4、所有拦截器都返回True。执行目标方法
5、倒序执行所有拦截器的postHandle方法。
6、前面的步骤有任何异常都会直接倒序触发 afterCompletion
7、页面成功渲染完成以后,也会倒序触发 afterCompletion
boolean applyPreHandle(HttpServletRequest request, HttpServletResponse response) throws Exception {for(int i = 0; i < this.interceptorList.size(); this.interceptorIndex = i++) {HandlerInterceptor interceptor = (HandlerInterceptor)this.interceptorList.get(i);if (!interceptor.preHandle(request, response, this.handler)) {this.triggerAfterCompletion(request, response, (Exception)null);return false;}}return true;}void applyPostHandle(HttpServletRequest request, HttpServletResponse response, @Nullable ModelAndView mv) throws Exception {for(int i = this.interceptorList.size() - 1; i >= 0; --i) {HandlerInterceptor interceptor = (HandlerInterceptor)this.interceptorList.get(i);interceptor.postHandle(request, response, this.handler, mv);}}void triggerAfterCompletion(HttpServletRequest request, HttpServletResponse response, @Nullable Exception ex) {for(int i = this.interceptorIndex; i >= 0; --i) {HandlerInterceptor interceptor = (HandlerInterceptor)this.interceptorList.get(i);try {interceptor.afterCompletion(request, response, this.handler, ex);} catch (Throwable var7) {logger.error("HandlerInterceptor.afterCompletion threw exception", var7);}}
7、文件上传
1、页面表单
<form method="post" action="/upload" enctype="multipart/form-data"><input type="file" name="file"><br><input type="submit" value="提交"></form>
2、文件上传代码
/*** MultipartFile 自动封装上传过来的文件* @param email* @param username* @param headerImg* @param photos* @return*/@PostMapping("/upload")public String upload(@RequestParam("email") String email,@RequestParam("username") String username,@RequestPart("headerImg") MultipartFile headerImg,@RequestPart("photos") MultipartFile[] photos) throws IOException {log.info("上传的信息:email={},username={},headerImg={},photos={}",email,username,headerImg.getSize(),photos.length);if(!headerImg.isEmpty()){//保存到文件服务器,OSS服务器String originalFilename = headerImg.getOriginalFilename();headerImg.transferTo(new File("H:\\cache\\"+originalFilename));}if(photos.length > 0){for (MultipartFile photo : photos) {if(!photo.isEmpty()){String originalFilename = photo.getOriginalFilename();photo.transferTo(new File("H:\\cache\\"+originalFilename));}}}return "main";}
3、application.properties中配置文件属性
spring.servlet.multipart.max-file-size=10MB //单个文件最大限制spring.servlet.multipart.maxRequestSize=100MB //多个文件最大限制
4、自动配置原理
文件上传自动配置类-MultipartAutoConfiguration-MultipartProperties
- 自动配置好了 StandardServletMultipartResolver 【文件上传解析器】
- 原理步骤
- 1、请求进来使用文件上传解析器判断(isMultipart)并封装(resolveMultipart,返回MultipartHttpServletRequest)文件上传请求
- 2、参数解析器来解析请求中的文件内容封装成MultipartFile
- 3、将request中文件信息封装为一个Map;MultiValueMap
- 3、将request中文件信息封装为一个Map;MultiValueMap
FileCopyUtils。实现文件流的拷贝
@PostMapping("/upload")public String upload(@RequestParam("email") String email,@RequestParam("username") String username,@RequestPart("headerImg") MultipartFile headerImg,@RequestPart("photos") MultipartFile[] photos)

8、异常处理
错误处理
1、默认规则
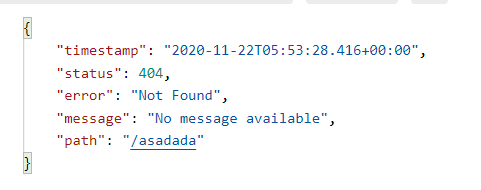
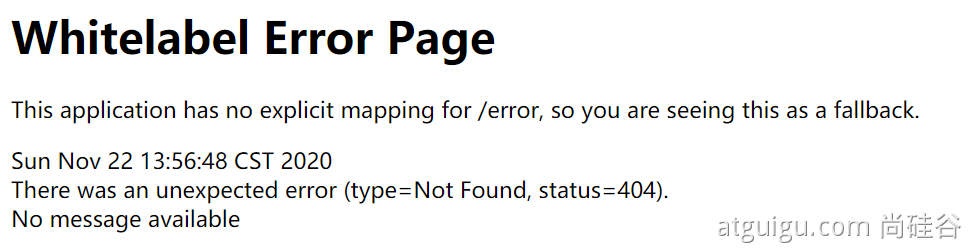
- 默认情况下,Spring Boot提供
/error处理所有错误的映射 - 对于机器客户端,它将生成JSON响应,其中包含错误,HTTP状态和异常消息的详细信息。对于浏览器客户端,响应一个“ whitelabel”错误视图,以HTML格式呈现相同的数据
- 要对其进行自定义,添加
**View**解析为**error**``** ** - 要完全替换默认行为,可以实现
ErrorController并注册该类型的Bean定义,或添加ErrorAttributes类型的组件以使用现有机制但替换其内容。 - error/下的4xx,5xx页面会被自动解析;
2、定制错误处理逻辑
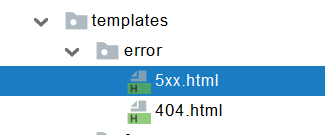
- 自定义错误页
- error/404.html error/5xx.html;有精确的错误状态码页面就匹配精确,没有就找 4xx.html;如果都没有就触发白页
- @ControllerAdvice+@ExceptionHandler处理全局异常;底层是 ExceptionHandlerExceptionResolver 支持的
- @ResponseStatus+自定义异常 ;底层是 ResponseStatusExceptionResolver ,把responsestatus注解的信息底层调用 response.sendError(statusCode, resolvedReason);tomcat发送的/error
- Spring底层的异常,如 参数类型转换异常;DefaultHandlerExceptionResolver 处理框架底层的异常。
- response.sendError(HttpServletResponse.SC_BAD_REQUEST, ex.getMessage());
- 自定义实现 HandlerExceptionResolver 处理异常;可以作为默认的全局异常处理规则
- ErrorViewResolver 实现自定义处理异常;
- response.sendError 。error请求就会转给controller
- 你的异常没有任何人能处理。tomcat底层 response.sendError。error请求就会转给controller
- basicErrorController 要去的页面地址是 ErrorViewResolver ;
3、异常处理自动配置原理
- ErrorMvcAutoConfiguration 自动配置异常处理规则
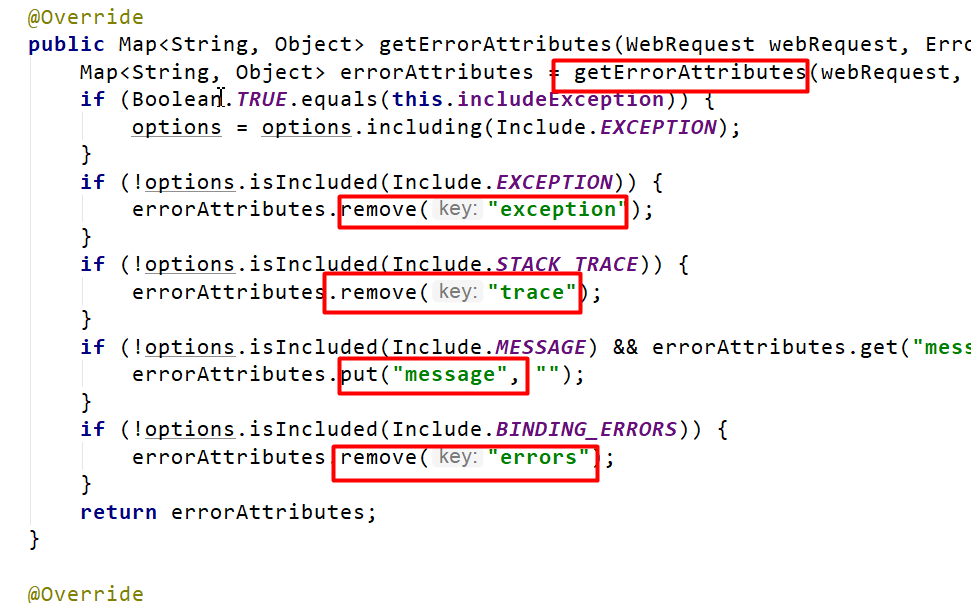
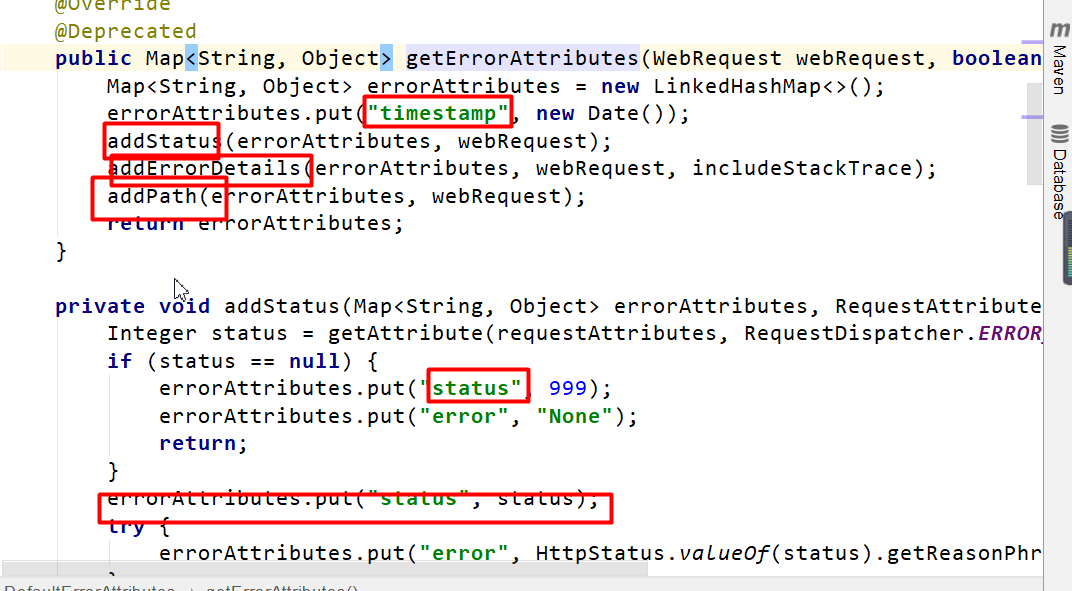
- 容器中的组件:类型:DefaultErrorAttributes -> id:errorAttributes
- public class DefaultErrorAttributes implements ErrorAttributes, HandlerExceptionResolver
- DefaultErrorAttributes:定义错误页面中可以包含哪些数据。
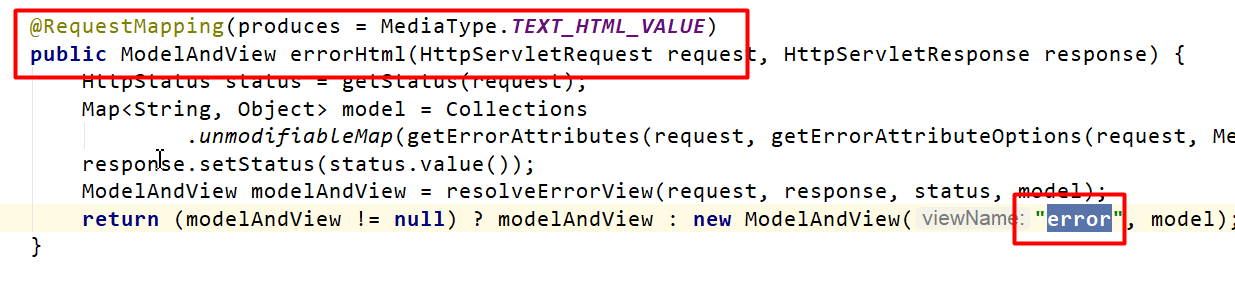
- 容器中的组件:类型:BasicErrorController —> id:basicErrorController(json+白页 适配响应)
- 处理默认 /error 路径的请求;页面响应 new ModelAndView(“error”, model);
- 容器中有组件 View->id是error;(响应默认错误页)
- 容器中放组件 BeanNameViewResolver(视图解析器);按照返回的视图名作为组件的id去容器中找View对象。
- 容器中的组件:类型:DefaultErrorViewResolver -> id:conventionErrorViewResolver
- 如果发生错误,会以HTTP的状态码 作为视图页地址(viewName),找到真正的页面
- error/404、5xx.html
如果想要返回页面;就会找error视图【StaticView】。(默认是一个白页)
 写出去json
 错误页
错误页
4、异常处理步骤流程
1、执行目标方法,目标方法运行期间有任何异常都会被catch、而且标志当前请求结束;并且用 dispatchException
2、进入视图解析流程(页面渲染?)
processDispatchResult(processedRequest, response, mappedHandler, mv, dispatchException);
3、mv = processHandlerException;处理handler发生的异常,处理完成返回ModelAndView;
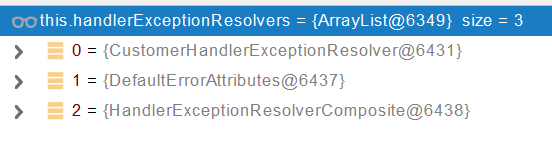
- 1、遍历所有的 handlerExceptionResolvers,看谁能处理当前异常【HandlerExceptionResolver处理器异常解析器】

- 2、系统默认的 异常解析器;
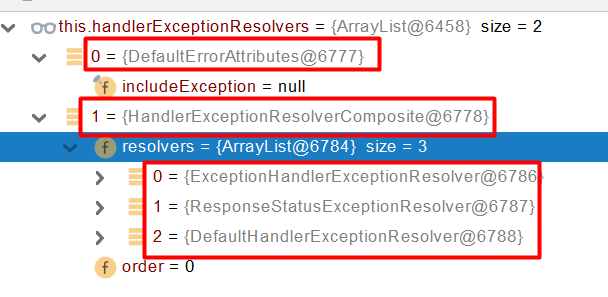
- 1、DefaultErrorAttributes先来处理异常。把异常信息保存到rrequest域,并且返回null;
- 2、默认没有任何人能处理异常,所以异常会被抛出
- 1、如果没有任何人能处理最终底层就会发送 /error 请求。会被底层的BasicErrorController处理
- 2、解析错误视图;遍历所有的 ErrorViewResolver 看谁能解析。

- 3、默认的 DefaultErrorViewResolver ,作用是把响应状态码作为错误页的地址,error/500.html
- 4、模板引擎最终响应这个页面 error/500.html
9、Web原生组件注入(Servlet、Filter、Listener)
1、使用Servlet API
@ServletComponentScan(basePackages = “com.atguigu.admin”) :指定原生Servlet组件都放在那里
@ServletComponentScan(basePackages = "com.example.pratice_springboot")@SpringBootApplicationpublic class PraticeSpringbootApplication {public static void main(String[] args) {SpringApplication.run(PraticeSpringbootApplication.class, args);}}
@WebServlet(urlPatterns = “/my”):效果:直接响应,没有经过Spring的拦截器?
@WebServlet(urlPatterns = "/myserlvet")public class MyServlet extends HttpServlet {@Overrideprotected void doGet(HttpServletRequest req, HttpServletResponse resp) throws ServletException, IOException {resp.getWriter().write("666666");}}
@WebFilter(urlPatterns={“/css/*”,“/images/*”})
@Slf4j//原生servlet使用/*,springboot使用/**@WebFilter(urlPatterns = "/css/*,/images/*")public class MyFilter implements Filter {@Overridepublic void init(FilterConfig filterConfig) throws ServletException {log.info("MyFilter初始化完成!!!");}@Overridepublic void doFilter(ServletRequest servletRequest, ServletResponse servletResponse, FilterChain filterChain) throws IOException, ServletException {log.info("MyFilter正在执行!!!");filterChain.doFilter(servletRequest, servletResponse);}@Overridepublic void destroy() {log.info("MyFilter被销毁!!!");}}
-
@Slf4j@WebListener()public class MyListener implements ServletContextListener {@Overridepublic void contextInitialized(ServletContextEvent sce) {log.info("MyListener监听到项目创建");}@Overridepublic void contextDestroyed(ServletContextEvent sce) {log.info("MyListener监听到项目销毁");}}
推荐可以这种方式;
扩展:DispatchServlet 如何注册进来
@Bean(name = {"dispatcherServletRegistration"})@ConditionalOnBean(value = {DispatcherServlet.class},name = {"dispatcherServlet"})public DispatcherServletRegistrationBean dispatcherServletRegistration(DispatcherServlet dispatcherServlet, WebMvcProperties webMvcProperties, ObjectProvider<MultipartConfigElement> multipartConfig) {DispatcherServletRegistrationBean registration = new DispatcherServletRegistrationBean(dispatcherServlet, webMvcProperties.getServlet().getPath());registration.setName("dispatcherServlet");registration.setLoadOnStartup(webMvcProperties.getServlet().getLoadOnStartup());multipartConfig.ifAvailable(registration::setMultipartConfig);return registration;}}
- 容器中自动配置了 DispatcherServlet 属性绑定到 WebMvcProperties;对应的配置文件配置项是 spring.mvc。
- 通过 ServletRegistrationBean 把 DispatcherServlet 配置进来。
- 默认映射的是 / 路径。
private String path = "/";
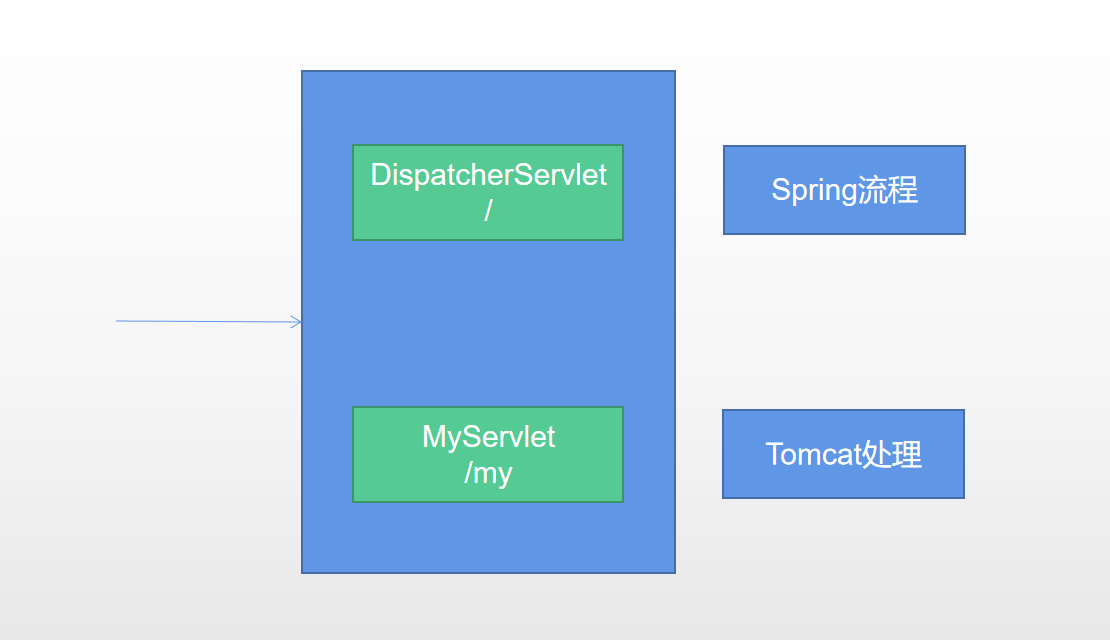
Tomcat-Servlet;
多个Servlet都能处理到同一层路径,精确优选原则
A: /my/
B: /my/1
2、使用RegistrationBean(代替注解)
ServletRegistrationBean`, `FilterRegistrationBean`, and `ServletListenerRegistrationBean@Configurationpublic class MyRegistConfig {//将servlet注入到组件中@Beanpublic ServletRegistrationBean myServlet(){MyServlet myServlet = new MyServlet();return new ServletRegistrationBean(myServlet,"/my","/my02");}@Beanpublic FilterRegistrationBean myFilter(){MyFilter myFilter = new MyFilter();//使用servlet的路径// return new FilterRegistrationBean(myFilter,myServlet());//自定义路径FilterRegistrationBean filterRegistrationBean = new FilterRegistrationBean(myFilter);filterRegistrationBean.setUrlPatterns(Arrays.asList("/my","/css/*"));return filterRegistrationBean;}@Beanpublic ServletListenerRegistrationBean myListener(){MySwervletContextListener mySwervletContextListener = new MySwervletContextListener();return new ServletListenerRegistrationBean(mySwervletContextListener);}}
10、嵌入式Servlet容器
1、切换嵌入式Servlet容器
- 默认支持的webServer
Tomcat,Jetty, orUndertowServletWebServerApplicationContext 容器启动寻找ServletWebServerFactory 并引导创建服务器
- 切换服务器

<dependency><groupId>org.springframework.boot</groupId><artifactId>spring-boot-starter-web</artifactId><exclusions><exclusion><groupId>org.springframework.boot</groupId><artifactId>spring-boot-starter-tomcat</artifactId></exclusion></exclusions></dependency>
- 原理
- SpringBoot应用启动发现当前是Web应用。web场景包-导入tomcat
- web应用会创建一个web版的ioc容器
ServletWebServerApplicationContext
ServletWebServerApplicationContext启动的时候寻找**ServletWebServerFactory**``(Servlet 的web服务器工厂---> Servlet 的web服务器)- SpringBoot底层默认有很多的WebServer工厂;
TomcatServletWebServerFactory,JettyServletWebServerFactory, orUndertowServletWebServerFactory
底层直接会有一个自动配置类。ServletWebServerFactoryAutoConfigurationServletWebServerFactoryAutoConfiguration导入了ServletWebServerFactoryConfiguration(配置类)
ServletWebServerFactoryConfiguration 配置类 根据动态判断系统中到底导入了那个Web服务器的包。(默认是web-starter导入tomcat包),容器中就有 TomcatServletWebServerFactoryTomcatServletWebServerFactory 创建出Tomcat服务器并启动;TomcatWebServer 的构造器拥有初始化方法initialize---this.tomcat.start();
内嵌服务器,就是手动把启动服务器的代码调用(tomcat核心jar包存在)
- ``
2、定制Servlet容器
- 实现 WebServerFactoryCustomizer
- 把配置文件的值和
**ServletWebServerFactory 进行绑定**
- 把配置文件的值和
- 修改配置文件 server.xxx
- 直接自定义 ConfigurableServletWebServerFactory
xxxxxCustomizer:定制化器,可以改变xxxx的默认规则
import org.springframework.boot.web.server.WebServerFactoryCustomizer;import org.springframework.boot.web.servlet.server.ConfigurableServletWebServerFactory;import org.springframework.stereotype.Component;@Componentpublic class CustomizationBean implements WebServerFactoryCustomizer<ConfigurableServletWebServerFactory> {@Overridepublic void customize(ConfigurableServletWebServerFactory server) {server.setPort(9000);}}
11、定制化原理
1、定制化的常见方式
- 修改配置文件;
- xxxxxCustomizer;
- 编写自定义的配置类 xxxConfiguration;+ @Bean替换、增加容器中默认组件;视图解析器
- Web应用 编写一个配置类实现 WebMvcConfigurer 即可定制化web功能;+ @Bean给容器中再扩展一些组件
@Configurationpublic class AdminWebConfig implements WebMvcConfigurer
- @EnableWebMvc + WebMvcConfigurer —— @Bean 可以全面接管SpringMVC,所有规则全部自己重新配置; 实现定制和扩展功能
- 原理
- 1、WebMvcAutoConfiguration 默认的SpringMVC的自动配置功能类。静态资源、欢迎页…..
- 2、一旦使用 @EnableWebMvc 、。会 @Import(DelegatingWebMvcConfiguration. class)
- 3、DelegatingWebMvcConfiguration 的 作用,只保证SpringMVC最基本的使用
- 把所有系统中的 WebMvcConfigurer 拿过来。所有功能的定制都是这些 WebMvcConfigurer 合起来一起生效
- 自动配置了一些非常底层的组件。RequestMappingHandlerMapping、这些组件依赖的组件都是从容器中获取
- public class DelegatingWebMvcConfiguration extends WebMvcConfigurationSupport
- 4、WebMvcAutoConfiguration 里面的配置要能生效 必须 @ConditionalOnMissingBean(WebMvcConfigurationSupport.class)
- 5、@EnableWebMvc 导致了 WebMvcAutoConfiguration 没有生效。
2、原理分析套路
场景starter - xxxxAutoConfiguration - 导入xxx组件 - 绑定xxxProperties — 绑定配置文件项
数据访问
1、SQL
1、数据源的自动配置-HikariDataSource
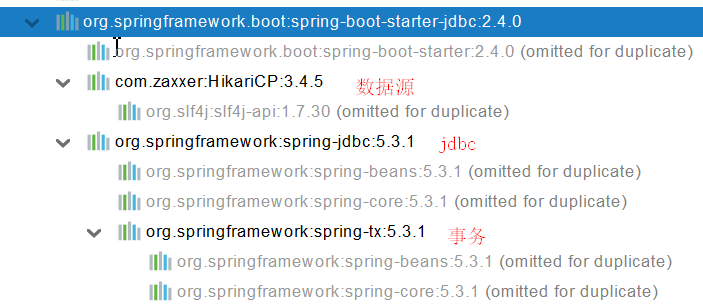
1、导入JDBC场景
<dependency><groupId>org.springframework.boot</groupId><artifactId>spring-boot-starter-data-jdbc</artifactId></dependency>
数据库驱动?
为什么导入JDBC场景,官方不导入驱动?官方不知道我们接下要操作什么数据库。
数据库版本和驱动版本对应
默认版本:<mysql.version>8.0.22</mysql.version><dependency><groupId>mysql</groupId><artifactId>mysql-connector-java</artifactId><!-- <version>5.1.49</version>--></dependency>想要修改版本1、直接依赖引入具体版本(maven的就近依赖原则)2、重新声明版本(maven的属性的就近优先原则)<properties><java.version>1.8</java.version><mysql.version>5.1.49</mysql.version></properties>
2、分析自动配置
1、自动配置的类
- DataSourceAutoConfiguration : 数据源的自动配置
- 修改数据源相关的配置:spring.datasource
- 数据库连接池的配置,是自己容器中没有DataSource才自动配置的
- 底层配置好的连接池是:HikariDataSource
@Configuration(proxyBeanMethods = false)@Conditional(PooledDataSourceCondition.class)@ConditionalOnMissingBean({ DataSource.class, XADataSource.class })@Import({ DataSourceConfiguration.Hikari.class, DataSourceConfiguration.Tomcat.class,DataSourceConfiguration.Dbcp2.class, DataSourceConfiguration.OracleUcp.class,DataSourceConfiguration.Generic.class, DataSourceJmxConfiguration.class })protected static class PooledDataSourceConfiguration
- DataSourceTransactionManagerAutoConfiguration: 事务管理器的自动配置
- JdbcTemplateAutoConfiguration: JdbcTemplate的自动配置,可以来对数据库进行crud
- 可以修改这个配置项@ConfigurationProperties(prefix = “spring.jdbc”) 来修改JdbcTemplate
- @Bean@Primary JdbcTemplate;容器中有这个组件
- JndiDataSourceAutoConfiguration: jndi的自动配置
- XADataSourceAutoConfiguration: 分布式事务相关的
3、修改配置项
spring:datasource:url: jdbc:mysql://localhost:3306/userusername: rootpassword: LJLljl20020728.+driver-class-name: com.mysql.cj.jdbc.Driver
4、测试
@Slf4j@SpringBootTestclass Boot05WebAdminApplicationTests {@AutowiredJdbcTemplate jdbcTemplate;@Testvoid contextLoads() {// jdbcTemplate.queryForObject("select * from account_tbl")// jdbcTemplate.queryForList("select * from account_tbl",)Long aLong = jdbcTemplate.queryForObject("select count(*) from account_tbl", Long.class);log.info("记录总数:{}",aLong);}}
2、使用Druid数据源
1、druid官方github地址
https://github.com/alibaba/druid
整合第三方技术的两种方式
- 自定义
- 找starter
2、自定义方式
1、创建数据源
<dependency><groupId>com.alibaba</groupId><artifactId>druid</artifactId><version>1.1.17</version></dependency><bean id="dataSource" class="com.alibaba.druid.pool.DruidDataSource"destroy-method="close"><property name="url" value="${jdbc.url}" /><property name="username" value="${jdbc.username}" /><property name="password" value="${jdbc.password}" /><property name="maxActive" value="20" /><property name="initialSize" value="1" /><property name="maxWait" value="60000" /><property name="minIdle" value="1" /><property name="timeBetweenEvictionRunsMillis" value="60000" /><property name="minEvictableIdleTimeMillis" value="300000" /><property name="testWhileIdle" value="true" /><property name="testOnBorrow" value="false" /><property name="testOnReturn" value="false" /><property name="poolPreparedStatements" value="true" /><property name="maxOpenPreparedStatements" value="20" />
2、StatViewServlet
StatViewServlet的用途包括:
- 提供监控信息展示的html页面
- 提供监控信息的JSON API
<servlet><servlet-name>DruidStatView</servlet-name><servlet-class>com.alibaba.druid.support.http.StatViewServlet</servlet-class></servlet><servlet-mapping><servlet-name>DruidStatView</servlet-name><url-pattern>/druid/*</url-pattern></servlet-mapping>
3、StatFilter
用于统计监控信息;如SQL监控、URI监控
需要给数据源中配置如下属性;可以允许多个filter,多个用,分割;如:<property name="filters" value="stat,slf4j" />
系统中所有filter:
| 别名 | Filter类名 |
|---|---|
| default | com.alibaba.druid.filter.stat.StatFilter |
| stat | com.alibaba.druid.filter.stat.StatFilter |
| mergeStat | com.alibaba.druid.filter.stat.MergeStatFilter |
| encoding | com.alibaba.druid.filter.encoding.EncodingConvertFilter |
| log4j | com.alibaba.druid.filter.logging.Log4jFilter |
| log4j2 | com.alibaba.druid.filter.logging.Log4j2Filter |
| slf4j | com.alibaba.druid.filter.logging.Slf4jLogFilter |
| commonlogging | com.alibaba.druid.filter.logging.CommonsLogFilter |
慢SQL记录配置
<bean id="stat-filter" class="com.alibaba.druid.filter.stat.StatFilter"><property name="slowSqlMillis" value="10000" /><property name="logSlowSql" value="true" /></bean>使用 slowSqlMillis 定义慢SQL的时长
3、使用官方starter方式
1、引入druid-starter
<dependency><groupId>com.alibaba</groupId><artifactId>druid-spring-boot-starter</artifactId><version>1.1.17</version></dependency>
2、分析自动配置
@Configuration@ConditionalOnClass({DruidDataSource.class})@AutoConfigureBefore({DataSourceAutoConfiguration.class})@EnableConfigurationProperties({DruidStatProperties.class, DataSourceProperties.class})@Import({DruidSpringAopConfiguration.class, DruidStatViewServletConfiguration.class, DruidWebStatFilterConfiguration.class, DruidFilterConfiguration.class})public class DruidDataSourceAutoConfigure {
- 扩展配置项 spring.datasource.druid
- DruidSpringAopConfiguration.class, 监控SpringBean的;配置项:spring.datasource.druid.aop-patterns
- DruidStatViewServletConfiguration.class, 监控页的配置:spring.datasource.druid.stat-view-servlet;默认开启
- DruidWebStatFilterConfiguration.class, web监控配置;spring.datasource.druid.web-stat-filter;默认开启
- DruidFilterConfiguration.class}) 所有Druid自己filter的配置
private static final String FILTER_STAT_PREFIX = "spring.datasource.druid.filter.stat";private static final String FILTER_CONFIG_PREFIX = "spring.datasource.druid.filter.config";private static final String FILTER_ENCODING_PREFIX = "spring.datasource.druid.filter.encoding";private static final String FILTER_SLF4J_PREFIX = "spring.datasource.druid.filter.slf4j";private static final String FILTER_LOG4J_PREFIX = "spring.datasource.druid.filter.log4j";private static final String FILTER_LOG4J2_PREFIX = "spring.datasource.druid.filter.log4j2";private static final String FILTER_COMMONS_LOG_PREFIX = "spring.datasource.druid.filter.commons-log";private static final String FILTER_WALL_PREFIX = "spring.datasource.druid.filter.wall";
3、配置示例
spring:datasource:url: jdbc:mysql://localhost:3306/userusername: rootpassword: LJLljl20020728.+driver-class-name: com.mysql.cj.jdbc.Driverdruid:aop-patterns: com.example.pratice_springboot.*filters: stat,wall # 底层开启功能,stat(sql监控),wall(防火墙)stat-view-servlet: # 配置监控页功能enabled: truelogin-username: adminlogin-password: adminresetEnable: false #关闭重置按钮web-stat-filter: # 监控webenabled: trueurlPattern: /*exclusions: '*.js,*.gif,*.jpg,*.png,*.css,*.ico,/druid/*'filter:stat: # 对上面filters里面的stat的详细配置slow-sql-millis: 1000logSlowSql: trueenabled: truewall:enabled: trueconfig:drop-table-allow: false
在路径http://localhost:8080/druid下可以查看druid的监控页面等…
SpringBoot配置示例
https://github.com/alibaba/druid/tree/master/druid-spring-boot-starter
3、整合MyBatis操作
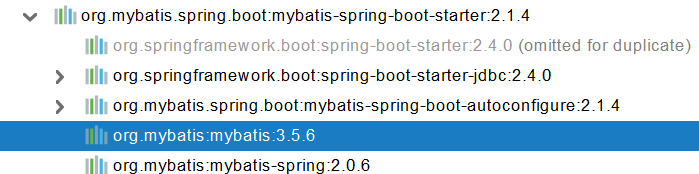
starter
SpringBoot官方的Starter:spring-boot-starter-*
第三方的: *-spring-boot-starter
<dependency><groupId>org.mybatis.spring.boot</groupId><artifactId>mybatis-spring-boot-starter</artifactId><version>2.1.4</version></dependency>
1、配置模式
- 全局配置文件
- SqlSessionFactory: 自动配置好了
- SqlSession:自动配置了 SqlSessionTemplate 组合了SqlSession
- @Import(AutoConfiguredMapperScannerRegistrar.class);
- Mapper: 只要我们写的操作MyBatis的接口标准了 @Mapper 就会被自动扫描进来
@EnableConfigurationProperties(MybatisProperties.class) : MyBatis配置项绑定类。@AutoConfigureAfter({ DataSourceAutoConfiguration.class, MybatisLanguageDriverAutoConfiguration.class })public class MybatisAutoConfiguration{}@ConfigurationProperties(prefix = "mybatis")public class MybatisProperties
可以修改配置文件中 mybatis 开始的所有;
# 配置mybatis规则mybatis:config-location: classpath:mybatis/mybatis-config.xml #全局配置文件位置mapper-locations: classpath:mybatis/mapper/*.xml #sql映射文件位置Mapper接口--->绑定Xml<?xml version="1.0" encoding="UTF-8" ?><!DOCTYPE mapperPUBLIC "-//mybatis.org//DTD Mapper 3.0//EN""http://mybatis.org/dtd/mybatis-3-mapper.dtd"><mapper namespace="com.example.pratice_springboot.mapper.AccountMapper"><select id="getAccountById" resultType="com.example.pratice_springboot.bean.Account">select * from account where user_id=#{userId}</select></mapper>
配置 private Configuration configuration; mybatis.configuration下面的所有,就是相当于改mybatis全局配置文件中的值
# 配置mybatis规则mybatis:# config-location: classpath:mybatis/mybatis-config.xmlmapper-locations: classpath:mybatis/mapper/*.xmlconfiguration:map-underscore-to-camel-case: true #开启驼峰命名规则可以不写全局;配置文件,所有全局配置文件的配置都放在configuration配置项中即可
- 导入mybatis官方starter
- 编写mapper接口。标准@Mapper注解
- 编写sql映射文件并绑定mapper接口
- 在application.yaml中指定Mapper配置文件的位置,以及指定全局配置文件的信息 (建议;配置在mybatis.configuration)
2、注解模式
@Mapperpublic interface CityMapper {@Select("select * from city where id=#{id}")public City getById(Long id);public void insert(City city);}
3、混合模式
@Mapperpublic interface CityMapper {@Select("select * from city where id=#{id}")public City getById(Long id);public void insert(City city);}
最佳实战:
- 引入mybatis-starter
- 配置application.yaml中,指定mapper-location位置即可
- 编写Mapper接口并标注@Mapper注解
- 简单方法直接注解方式
- 复杂方法编写mapper.xml进行绑定映射
- @MapperScan(“com.atguigu.admin.mapper”) 简化,其他的接口就可以不用标注@Mapper注解
单元测试
1、JUnit5 的变化
Spring Boot 2.2.0 版本开始引入 JUnit 5 作为单元测试默认库
作为最新版本的JUnit框架,JUnit5与之前版本的Junit框架有很大的不同。由三个不同子项目的几个不同模块组成。
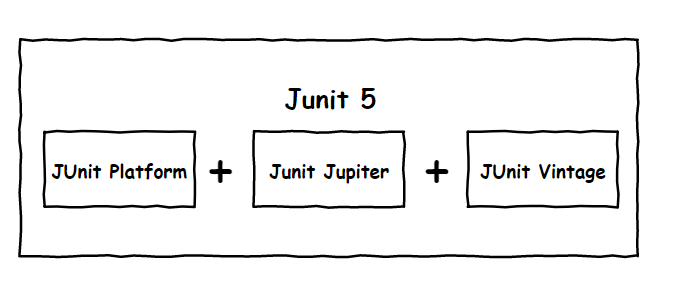
JUnit 5 = JUnit Platform + JUnit Jupiter + JUnit Vintage
JUnit Platform: Junit Platform是在JVM上启动测试框架的基础,不仅支持Junit自制的测试引擎,其他测试引擎也都可以接入。
JUnit Jupiter: JUnit Jupiter提供了JUnit5的新的编程模型,是JUnit5新特性的核心。内部 包含了一个测试引擎,用于在Junit Platform上运行。
JUnit Vintage: 由于JUint已经发展多年,为了照顾老的项目,JUnit Vintage提供了兼容JUnit4.x,Junit3.x的测试引擎。
注意:
SpringBoot 2.4 以上版本移除了默认对 Vintage 的依赖。如果需要兼容junit4需要自行引入(不能使用junit4的功能 @Test )
JUnit 5’s Vintage Engine Removed from **spring-boot-starter-test,如果需要继续兼容junit4需要自行引入vintage**
<dependency><groupId>org.junit.vintage</groupId><artifactId>junit-vintage-engine</artifactId><scope>test</scope><exclusions><exclusion><groupId>org.hamcrest</groupId><artifactId>hamcrest-core</artifactId></exclusion></exclusions></dependency>
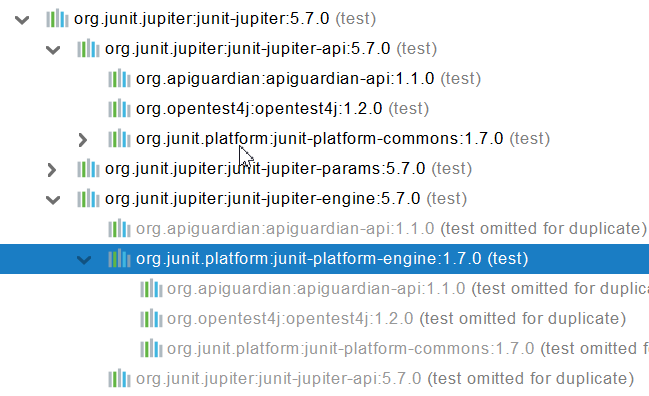
<dependency><groupId>org.springframework.boot</groupId><artifactId>spring-boot-starter-test</artifactId><scope>test</scope></dependency>
现在版本:
@SpringBootTestclass Boot05WebAdminApplicationTests {@Testvoid contextLoads() {}}
以前:
@SpringBootTest + @RunWith(SpringTest.class)
SpringBoot整合Junit以后。
- 编写测试方法:@Test标注(注意需要使用junit5版本的注解)
- Junit类具有Spring的功能,@Autowired、比如 @Transactional 标注测试方法,测试完成后自动回滚
2、JUnit5常用注解
JUnit5的注解与JUnit4的注解有所变化
https://junit.org/junit5/docs/current/user-guide/#writing-tests-annotations
- @Test : 表示方法是测试方法。但是与JUnit4的@Test不同,他的职责非常单一不能声明任何属性,拓展的测试将会由Jupiter提供额外测试
- @ParameterizedTest : 表示方法是参数化测试,下方会有详细介绍
- @RepeatedTest : 表示方法可重复执行,下方会有详细介绍
- @DisplayName : 为测试类或者测试方法设置展示名称
- @BeforeEach : 表示在每个单元测试之前执行
- @AfterEach : 表示在每个单元测试之后执行
- @BeforeAll : 表示在所有单元测试之前执行
- @AfterAll : 表示在所有单元测试之后执行
- @Tag : 表示单元测试类别,类似于JUnit4中的@Categories
- @Disabled : 表示测试类或测试方法不执行,类似于JUnit4中的@Ignore
- @Timeout : 表示测试方法运行如果超过了指定时间将会返回错误
- @ExtendWith : 为测试类或测试方法提供扩展类引用
import org.junit.jupiter.api.Test; //注意这里使用的是jupiter的Test注解!!public class TestDemo {@Test@DisplayName("第一次测试")public void firstTest() {System.out.println("hello world");}
3、断言(assertions)
断言(assertions)是测试方法中的核心部分,用来对测试需要满足的条件进行验证。这些断言方法都是 org.junit.jupiter.api.Assertions 的静态方法。JUnit 5 内置的断言可以分成如下几个类别:
检查业务逻辑返回的数据是否合理。
所有的测试运行结束以后,会有一个详细的测试报告;
1、简单断言
用来对单个值进行简单的验证。如:
| 方法 | 说明 |
|---|---|
| assertEquals | 判断两个对象或两个原始类型是否相等 |
| assertNotEquals | 判断两个对象或两个原始类型是否不相等 |
| assertSame | 判断两个对象引用是否指向同一个对象 |
| assertNotSame | 判断两个对象引用是否指向不同的对象 |
| assertTrue | 判断给定的布尔值是否为 true |
| assertFalse | 判断给定的布尔值是否为 false |
| assertNull | 判断给定的对象引用是否为 null |
| assertNotNull | 判断给定的对象引用是否不为 null |
@Test@DisplayName("simple assertion")public void simple() {assertEquals(3, 1 + 2, "simple math");assertNotEquals(3, 1 + 1);assertNotSame(new Object(), new Object());Object obj = new Object();assertSame(obj, obj);assertFalse(1 > 2);assertTrue(1 < 2);assertNull(null);assertNotNull(new Object());}
2、数组断言
通过 assertArrayEquals 方法来判断两个对象或原始类型的数组是否相等
@Test@DisplayName("array assertion")public void array() {assertArrayEquals(new int[]{1, 2}, new int[] {1, 2});}
3、组合断言
assertAll 方法接受多个 org.junit.jupiter.api.Executable 函数式接口的实例作为要验证的断言,可以通过 lambda 表达式很容易的提供这些断言
@Test@DisplayName("assert all")public void all() {assertAll("Math",() -> assertEquals(2, 1 + 1),() -> assertTrue(1 > 0));}
4、异常断言
在JUnit4时期,想要测试方法的异常情况时,需要用@Rule 注解的ExpectedException变量还是比较麻烦的。而JUnit5提供了一种新的断言方式Assertions.assertThrows() ,配合函数式编程就可以进行使用。
@Test@DisplayName("异常测试")public void exceptionTest() {ArithmeticException exception = Assertions.assertThrows(//扔出断言异常ArithmeticException.class, () -> System.out.println(1 % 0));}
5、超时断言
Junit5还提供了Assertions.assertTimeout() 为测试方法设置了超时时间
@Test@DisplayName("超时测试")public void timeoutTest() {//如果测试方法时间超过1s将会异常Assertions.assertTimeout(Duration.ofMillis(1000), () -> Thread.sleep(500));}
6、快速失败
通过 fail 方法直接使得测试失败
@Test@DisplayName("fail")public void shouldFail() {fail("This should fail");}
4、前置条件(assumptions)
JUnit 5 中的前置条件(assumptions【假设】)类似于断言,不同之处在于不满足的断言会使得测试方法失败,而不满足的前置条件只会使得测试方法的执行终止。前置条件可以看成是测试方法执行的前提,当该前提不满足时,就没有继续执行的必要。
@DisplayName("前置条件")public class AssumptionsTest {private final String environment = "DEV";@Test@DisplayName("simple")public void simpleAssume() {assumeTrue(Objects.equals(this.environment, "DEV"));assumeFalse(() -> Objects.equals(this.environment, "PROD"));}@Test@DisplayName("assume then do")public void assumeThenDo() {assumingThat(Objects.equals(this.environment, "DEV"),() -> System.out.println("In DEV"));}}
assumeTrue 和 assumFalse 确保给定的条件为 true 或 false,不满足条件会使得测试执行终止。assumingThat 的参数是表示条件的布尔值和对应的 Executable 接口的实现对象。只有条件满足时,Executable 对象才会被执行;当条件不满足时,测试执行并不会终止。
5、嵌套测试
JUnit 5 可以通过 Java 中的内部类和@Nested 注解实现嵌套测试,从而可以更好的把相关的测试方法组织在一起。在内部类中可以使用@BeforeEach 和@AfterEach 注解,而且嵌套的层次没有限制。
内层的Test可以驱动外层的Before(After)Each/All之类的方法前提/之后运行,而内层可以驱动外层
@DisplayName("A stack")class TestingAStackDemo {Stack<Object> stack;@Test@DisplayName("is instantiated with new Stack()")void isInstantiatedWithNew() {new Stack<>();}@Nested@DisplayName("when new")class WhenNew {@BeforeEachvoid createNewStack() {stack = new Stack<>();}@Test@DisplayName("is empty")void isEmpty() {assertTrue(stack.isEmpty());}@Test@DisplayName("throws EmptyStackException when popped")void throwsExceptionWhenPopped() {assertThrows(EmptyStackException.class, stack::pop);}@Test@DisplayName("throws EmptyStackException when peeked")void throwsExceptionWhenPeeked() {assertThrows(EmptyStackException.class, stack::peek);}@Nested@DisplayName("after pushing an element")class AfterPushing {String anElement = "an element";@BeforeEachvoid pushAnElement() {stack.push(anElement);}@Test@DisplayName("it is no longer empty")void isNotEmpty() {assertFalse(stack.isEmpty());}@Test@DisplayName("returns the element when popped and is empty")void returnElementWhenPopped() {assertEquals(anElement, stack.pop());assertTrue(stack.isEmpty());}@Test@DisplayName("returns the element when peeked but remains not empty")void returnElementWhenPeeked() {assertEquals(anElement, stack.peek());assertFalse(stack.isEmpty());}}}}
6、参数化测试
参数化测试是JUnit5很重要的一个新特性,它使得用不同的参数多次运行测试成为了可能,也为我们的单元测试带来许多便利。
利用@ValueSource 等注解,指定入参,我们将可以使用不同的参数进行多次单元测试,而不需要每新增一个参数就新增一个单元测试,省去了很多冗余代码。
@ValueSource : 为参数化测试指定入参来源,支持八大基础类以及String类型,Class类型
@NullSource : 表示为参数化测试提供一个null的入参
@EnumSource : 表示为参数化测试提供一个枚举入参
@CsvFileSource :表示读取指定CSV文件内容作为参数化测试入参
@MethodSource :表示读取指定方法的返回值作为参数化测试入参(注意方法返回需要是一个流)
当然如果参数化测试仅仅只能做到指定普通的入参还达不到让我觉得惊艳的地步。让我真正感到他的强大之处的地方在于他可以支持外部的各类入参。如:CSV,YML,JSON 文件甚至方法的返回值也可以作为入参。只需要去实现ArgumentsProvider接口,任何外部文件都可以作为它的入参。
@ParameterizedTest@ValueSource(strings = {"one", "two", "three"})@DisplayName("参数化测试1")public void parameterizedTest1(String string) {System.out.println(string);Assertions.assertTrue(StringUtils.isNotBlank(string));}@ParameterizedTest@MethodSource("method") //指定方法名@DisplayName("方法来源参数")public void testWithExplicitLocalMethodSource(String name) {System.out.println(name);Assertions.assertNotNull(name);}static Stream<String> method() {return Stream.of("apple", "banana");}
7、迁移指南
在进行迁移的时候需要注意如下的变化:
- 注解在 org.junit.jupiter.api 包中,断言在 org.junit.jupiter.api.Assertions 类中,前置条件在 org.junit.jupiter.api.Assumptions 类中。
- 把@Before 和@After 替换成@BeforeEach 和@AfterEach。
- 把@BeforeClass 和@AfterClass 替换成@BeforeAll 和@AfterAll。
- 把@Ignore 替换成@Disabled。
- 把@Category 替换成@Tag。
- 把@RunWith、@Rule 和@ClassRule 替换成@ExtendWith。

若有收获,就点个赞吧
0 人点赞
