激活函数
概述
激活函数是机器学习中很重要的一个概念.在神经网络中,我们经常使用线性运算来解决非线性问题.
在生活中大多数问题,都不是简单线性运算.这时,我们就需要用到激活函数来解决非线性的问题. 本节我们主要学习机器学习中常用的激活函数. 利用激活函数,建立一个简单的三层神经网络模型.
知识点:
- Sigmoid函数
- ReLU函数
- Tanh函数
激活函数
激活函数是机器学习中的很重要的概念.在神经网络中,我们经常使用线性运算来解决线性问题. 非线性的问题,我们需要用到激活函数
简单来说,传统的全连接网络是让数据不断的通过线性函数层和激活函数层,进而得到最终的预测结果. 因此, 如果我们学习完激活函数后, 就可以结合之前学过的线性函数来完成一个传统全连接网络模型了.
常见的激活函数有Sigmoid函数,tanh函数Relu函数
Sigmoid函数
sigmoid函数是机器学习中最经典的且最早被使用的激活函数之一.它的公式如下

import numpy as npimport matplotlib.pyplot as plt%matplotlib inline# 手写 sigmoid 函数def sigmoid(x): return 1 / (1 + np.exp(-x))# 画图y = np.linspace(-10, 10, 100)plt.plot(y, sigmoid(y), 'b')plt.grid(linestyle='--')plt.xticks([-4, -3, -2, -1, 0, 1, 2, 3, 4])plt.yticks([0, 0.5, 1])plt.ylim(0, 1)plt.xlim(-4, 4)plt.show()

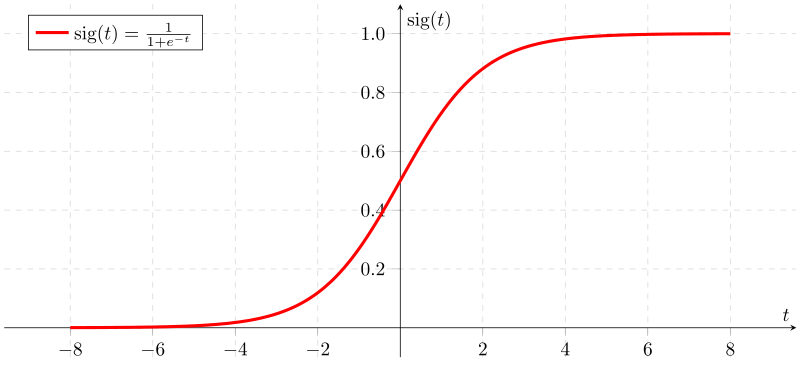
从图中可以看到,激活函数Sigmoid在定义域内处处可求导. 但是,通过曲线的斜率,可以发现,当输入一个较小或较大的数据时,该函数的导数会变得很小,梯度趋近于0. 例如, 每一次梯度值都减少0.25,如果神经网络层级过多,那么当梯度穿过多层后将变得非常接近于0,如0.03的n次方. 即出现梯度消失的现象,进而造成模型无法收敛. 这也就是曾经被广泛使用的sigmoid函数,现在却很少使用的原因
除了自定义sigmoid函数之后,我们还可以直接使用pytorch提供的
import torchimport torch.nn as nnimport torch.nn.functional as F# pytorch 中有两种实现方法x = torch.tensor([-1.0, 1.0, 2.0, 3.0])output = torch.sigmoid(x)print(output)s = nn.Sigmoid()output = s(x)print(output)
Tanh函数
Tanh是双曲函数中的双曲正切函数.在数学中, 双曲正切函数都是由双曲正弦函数和双曲余弦函数推导而来. 函数的具体形式如下:
 %20%3D%20%5Cfrac%7Be%5Ex%20-%20e%5E%7B-x%7D%7D%7Be%5Ex%20%2B%20e%5E%7B-x%7D%7D%0A#card=math&code=tanh%28x%29%20%3D%20%5Cfrac%7Be%5Ex%20-%20e%5E%7B-x%7D%7D%7Be%5Ex%20%2B%20e%5E%7B-x%7D%7D%0A&id=rLrGW)
Tanh的函数图像如下:
def tanh(x): return 2*sigmoid(2*x)-1y = np.linspace(-10, 10, 100)plt.plot(y, tanh(y), 'b')plt.grid(linestyle='--')plt.xlabel('X Axis')plt.ylabel('Y Axis')plt.xticks([-4, -3, -2, -1, 0, 1, 2, 3, 4])plt.yticks([-1, 0, 1])plt.ylim(-1, 1)plt.xlim(-4, 4)plt.show()
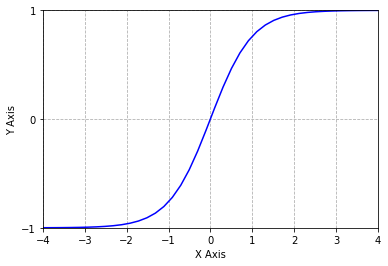

从上图可以看出,双曲正切函数和Sigmoid函数图像很想,但是tanh函数的范围是(-1,1), 而Sigmoid函数的范围为(0,1)
同Sigmoid类似,PyTorch中也实现了tanh
output = torch.tanh(x)print(output)t = nn.Tanh()output = t(x)print(output)
ReLU函数
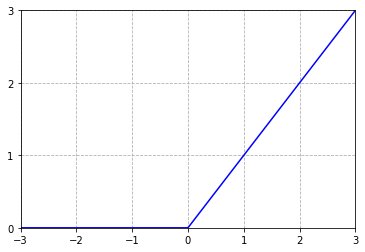
双曲正切函数和Sigmoid函数相似,都存在梯度消失的现象.且由于解析式中存在幂运算, 计算机需要消耗大量的时间成本. 因此, 为了解决梯度消失的问题, 线性修正单元函数(Rectified Linear Units,简称ReLU)就诞生了.
ReLU函数是目前最常用的激活函数之一
 %3D%20%5Cbegin%7Bcases%7D%200%26%20%5Ctext%7Bx%20%24%3C%24%200%7D%5C%5C%20x%26%20%5Ctext%7Bx%20%24%5Cgeq%24%200%7D%20%5Cend%7Bcases%7D%0A#card=math&code=f%28x%29%3D%20%5Cbegin%7Bcases%7D%200%26%20%5Ctext%7Bx%20%24%3C%24%200%7D%5C%5C%20x%26%20%5Ctext%7Bx%20%24%5Cgeq%24%200%7D%20%5Cend%7Bcases%7D%0A&id=I9BCj)
其中x为常数.可以看到, 当x < 0 时,ReLU全部取值为0, 梯度也为0,减少了梯度运算的成本. 当  时,ReLU的取值为x, 梯度始终为一个固定的值, 进而缓解了梯度消失的问题
def relu(x): return np.where(x >= 0, x, 0)y = np.linspace(-10, 10, 1000)plt.plot(y, relu(y), 'b')plt.grid(linestyle='--')plt.xticks([-3, -2, -1, 0, 1, 2, 3])plt.yticks([0, 1, 2, 3])plt.ylim(0, 3)plt.xlim(-3, 3)plt.show()

利用PyTorch中的ReLU函数处理输入数据:
output = torch.relu(x)print(output)relu = nn.ReLU()output = relu(x)print(output)
至此,我们学习完了机器学习中的常见几种激活函数. 当然上一节所学的Softmax函数也算一个激活函数,它主要应用于神经网络模型的最后一层.
如果我们需要解决二分类问题, 我们一般会将最后一层设置为Sigmoid函数层. 因此, 从Sigmoid函数图像可以看出,该函数范围为(0,1) 这样可以很好的表示概率值
综上, 考虑到每种激活函数的特型,我们得到了一下的规则:
- 如果在神经网络内部(隐藏层)需要使用激活函数,一般会使用ReLU函数或者ReLU函数的改进来进行激活
- 如果是二分类问题,那么在神经网络最后一层加上Sigmoid函数层
- 如果是多分类问题,那么会在神经网络最后一层加上Softmax函数层
神经网络的建立
神经网络其实就是很多线性函数和非线性函数组成的复杂函数. 至此, 我们已经学习了线性函数和非线性函数的定义方式. 接下来, 让我们根据这些知识点建立一个完整的神经网络模型.
在利用PyTorch建立神经网络模型时,需要注意以下几点:
- 自定义的神经网络模型必须继承nn.Module
- 自定义的类中需要实现
__init__和forward函数 __init__: 定义网络的结构forward: 定义数据在模型中的传播路径
# 神经网络的建立class NeuralNet(torch.nn.Module):def __init__(self,input_size,hidden_size):super(NeuralNet,self).__init__()self.linear1 = torch.nn.Linear(input_size,hidden_size)self.relu = torch.nn.ReLU()self.linear2 = torch.nn.Linear(hidden_size,1)self.sigmoid = torch.nn.Sigmoid()def forward(self,x):out = self.linear1(x)out = self.relu(out)out = self.linear2(out)out = self.sigmoid(out)return outmodel = NeuralNet(10,20)print(model)
从结果可以看出,我们建立的神经网络结构为: 连接层->ReLU层->连接层->Sigmoid函数层
如果中间有多个ReLU函数层,那么按照上面的思路,我们就需要定义relu1,relu2…等多个变量.
当然在定义激活层时, 我们可以将其放在forward()函数中,这样可以减少变量的定义
class NeuralNet(nn.Module):def __init__(self, input_size, hidden_size):super(NeuralNet, self).__init__()self.linear1 = nn.Linear(input_size, hidden_size)self.linear2 = nn.Linear(hidden_size, 1)# 将激活函数层直接放到 forward 中def forward(self, x):out = torch.relu(self.linear1(x))out = torch.sigmoid(self.linear2(out))return out# 测试代码model = NeuralNet(10, 20)model
这样写的话,在打印的时候就无法打印激活函数层了.因为激活函数层被放到了forward()中,只有调用forward()函数时,计算机才知道还需要激活处理
小结
本实验首先讲述了激活函数的主要形式以及用处,然后利用PyTorch建立了简单的神经网络模型

若有收获,就点个赞吧
0 人点赞
