Using Inspect for drivers
Pre-requisites
In case you are not familiarized with Inspect, it is recommend that you read the following pages:
Introduction
Inspect can be used by drivers. However, there are some special considerations that must be made given that drivers are not components.
Note: There is work being done to represent drivers as components using Components V2. For more information, see [Implementing drivers as components][roadmap-drivers-components].
Consider the following system topology diagram:
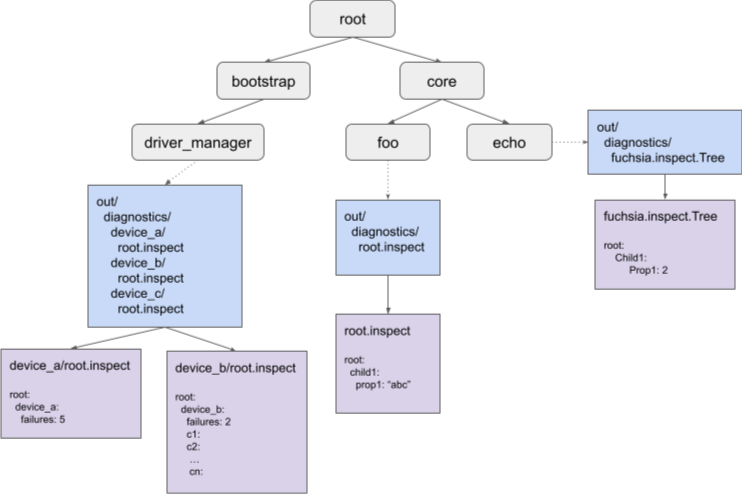
Diagram legend:
Gray: Components.
Blue: Component namespace that shows the out/diagnostics directory contents.
Purple: Contents of the out/diagnostics/* inspect files.
Components can expose inspect data in the following ways:
- VMO file: Typically called
root.inspect - Tree service: A service file for the
fuchsia.inspect.Treeprotocol
A component can expose one or more of these files. In the diagram above, components foo and
echo expose a single file. However, driver_manager exposes multiple files, one VMO file for
each device.
The reason for this is that each device is not a component, therefore driver_manager aggregates
their inspect VMOs and publishes them itself. This is a major difference between exposing inspect
data from a component and from a driver that has implications in how the data can be queried
through selectors.
If you wanted to query data for the foo and echo components, you can express that in a
specific selector. For example, core/foo:root/child1:prop1, core/echo:root/child1:prop1. You
have a unique way of querying each even if the properties and nodes are called the same way given
that you can uniquely identify them using their moniker.
However, when it comes to drivers, it’s recommended that all devices expose an inspect hierarchy where the root has a single child with the name of the device for a better experience using selectors to query their data. All other properties and nodes are children of this child.
In the diagram above, you can query: bootstrap/driver_manager:root/device_a:failures and
bootstrap/driver_manager:root/device_b:failures uniquely. If neither device_a nor device_b
exposed their inspect VMO with a root/{device name} node where all properties are located, you
wouldn’t have a way of differencing between both and the selector
bootstrap/driver_manager:root:failures would match both of them.
Including Inspect in drivers
These steps walk you through how to include Inspect in your drivers. For a full example of a driver with Inspect included, see the following example test driver.
Add the zircon inspect library to your driver dependencies in BUILD.gn:
deps = [..."//zircon/system/ulib/inspect",],
Include this header in your driver:
#include <lib/inspect/cpp/inspect.h>
Create an Inspector instance in your device class:
class TestDevice {…private:inspect::Inspector inspect_;}
Use this to create properties and children to build the inspect tree:
TestDevice::TestDevice() {state_ = inspect_.GetRoot().CreateString("state","invalid");// inspect is a tree; You can add children and structure your data.performance_ = inspect_.GetRoot().CreateChild("performance");call_count_ = performance_.CreateUint("call_count",0);total_time_ = performance_.CreateUint("total_time(ms)",0);...}TestDevice::SetState(State s) {call_count_.Add(1);...case kActive:state_.Set("active");}
Inspect currently supports a variety of property types like integers, strings, arrays, bool, double, histograms.
Inspect is RAII so remember to hold references to properties that you will update, otherwise they’ll be removed from the inspect VMO.
class TestDevice {…private:inspect::Inspector inspect_;inspect::StringProperty state_;inspect::Node performance_;inspect::UintProperty call_count_;inspect::UintProperty total_time_;}
You can add properties and nodes to an
inspect::ValueListinstead of holding references to them. This will tie the lifetime of the properties and nodes with the lifetime of theinspect::ValueList. Note thatinspect::Inspectorhappens to be a ValueList for convenience.inspect_.GetRoot().CreateString("name","test device",&inspect_);inspect_.GetRoot().CreateString("config_params",config,&inspect_);
Export inspect VMO to driver manager.
zx_status Bind() {…DdkAdd(ddk::DeviceAddArgs("test").set_inspect_vmo(inspect_.DuplicateVmo()));}
You can publish one inspect VMO per device; Instance devices do not count. To add inspect for instance devices, you can create child nodes from the devices’ inspect and add to it.
Done. Now you can view Inspect data for the driver.
- The device inspect file is hosted in /dev/diagnostics/class/
/xxx.inspect Check the inspect data using
iqueryfx iquery show-file /dev/diagnostics/class/ethernet/000.inspect// To view all of driver_manager and driver hostfx iquery show 'bootstrap/driver_manager'
- The device inspect file is hosted in /dev/diagnostics/class/
Run
fx snapshotand check if your inspect data is present ininspect.json. Note that the feedback component is not part of bringup, so taking snapshots is not very useful when working only with a bringup build. For these situations, prefer usingiquerywhich is available in bootfs.Note: Don’t forget to write tests for the inspect code. You can look at the inspect codelab or the driver host inspect test for some examples.
Isolated devmgr
You can view devfs with /hub, which enables tools like iquery on tests using isolated devmgr.
If you are using
src/lib/isolated_devmgr/isolated_devmgr.gni, then it’ll automatically be hosted in the test’s out directory.Example:
iquery show-file /hub/r/test_env_**/**/c/fs-management-devmgr.cmx/**/out/dev/diagnostics/driver_manager/dm.inspect
If you are using
zircon/system/ulib/devmgr-integration-test/isolated_devmgr.gni, you will need to callAddDevfsToOutgoingDiron the devmgr instance (example) to host devfs in the test’s out directory. Once this is done, viewing the inspect file is similar to the previous point.

若有收获,就点个赞吧
0 人点赞
