安装
采用压缩包的方式安装
下载地址 https://mirrors.bfsu.edu.cn/apache/maven/maven-3/3.6.3/binaries/apache-maven-3.6. 3-bin.tar.gz
配置以及环境变量
解压后找到一个配置文件 conf/settings.xml
配置本地仓库的路径
配置阿里云的中央仓库,用于自动下载依赖
windows下环境变量
 新增一个系统变量
然后在Path变量下添加一行

Linux下环境变量
先配置好Java环境变量
然后vim /etc/profile
export MAVEN_HOME=/usr/local/mavenexport PATH=$PATH:$MAVEN_HOME/bin
IDEA配置Maven
指定好settings.xml文件路径,本地仓库路径就会自动检测到

Nexus私服搭建
官网下载地址 http://download.sonatype.com/nexus/3/nexus-3.28.1-01-unix.tar.gz
点进去可能网页打不开,翻墙就好了解压
tar -zxvf nexus-3.28.1-01-unix.tar.gz
出现两个文件夹nexus-3.28.1-01nexus的核心文件 sonatype-work maven下载jar存放地址
nexus-3.28.1-01下的etc/nexus-default.properties为配置文件可以改端口,默认端口为8081
启动nexus ./bin/nexus start
开放端口
iptables -I INPUT -p tcp --dport 8081 -j ACCEPT
访问后点击sign in 提示用户admin的密码在此处查看

使用cat命令
cat /usr/local/nexus/sonatype-work/nexus3/admin.password
配置
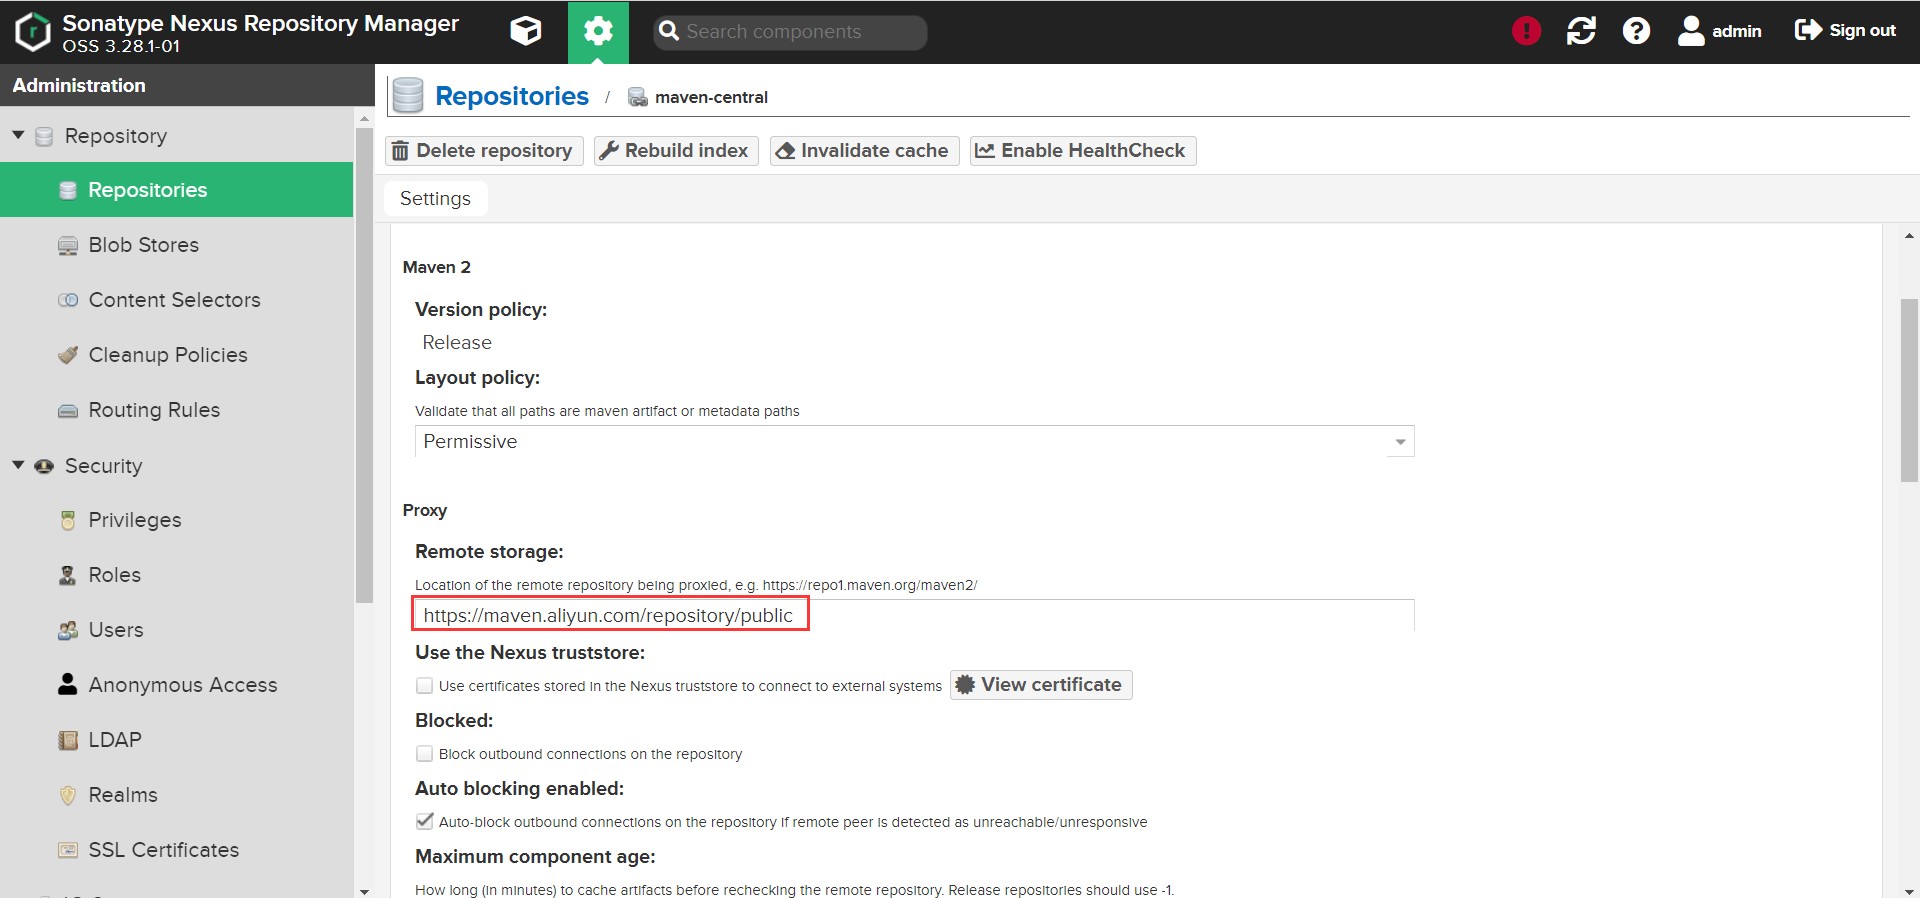
maven-central:maven 中 央 库 , 默 认 从 https://repo1.maven.org/maven2/ 拉 取 jar maven-releases:私库发行版jar,初次安装请将Deployment policy设置为Allow redeploy maven-snapshots:私库快照(调试版本)jar
maven-public:仓库分组,把上面三个仓库组合在一起对外提供服务,在本地maven基 础配置 settings.xml中使用
中央仓库默认的url访问比较慢可以换成阿里云的
本地maven settings.xml配置
服务器nexus环境配置
<profiles>
        <profile>
            <id>nexus-server</id>
            <repositories>
                <repository>
                    <id>central</id>
                    <url>http://xxx/repository/nexus- public/</url>
                    <releases><enabled>true</enabled></releases>
                    <snapshots>
                        <enabled>true</enabled>
                        <updatePolicy>always</updatePolicy>
                    </snapshots>
              <updatePolicy>always</updatePolicy>
                </repository>
            </repositories>
            <pluginRepositories>
                <pluginRepository>
                        <id>central</id>
                        <url>http://xxx/repository/nexus- public/</url>
                        <releases><enabled>true</enabled></releases>
                        <snapshots><enabled>true</enabled></snapshots>
                    <updatePolicy>always</updatePolicy>
                </pluginRepository>
            </pluginRepositories>
        </profile>
</profiles>
配置私服的镜像仓库地址
<mirrors>
    <mirror>
        <id>nexus</id>
        <mirrorOf>*</mirrorOf>
        <url>http://xxx/repository/nexus-public/</url>
    </mirror>
</mirrors>
激活配置,与上面profile的id保持一致
<activeProfiles>
        <activeProfile>nexus-server</activeProfile>
</activeProfiles>
配置用户名密码
<servers>
        <server>
            <id>nexus-releases</id>
            <username>admin</username>
            <password>admin123</password>
        </server>
        <server>
            <id>nexus-snapshot</id>
            <username>admin</username>
            <password>admin123</password>
        </server>
</servers>
完整的settings.xml配置文件信息
<?xml version="1.0" encoding="UTF-8"?>

<settings xmlns="http://maven.apache.org/SETTINGS/1.0.0"
          xmlns:xsi="http://www.w3.org/2001/XMLSchema-instance"
          xsi:schemaLocation="http://maven.apache.org/SETTINGS/1.0.0 http://maven.apache.org/xsd/settings-1.0.0.xsd">
        <!-- 仓库地址 -->
    <localRepository>f:\repository</localRepository>
    <pluginGroups>
    </pluginGroups>
    <proxies>
    </proxies>
    <servers>
        <server>
            <id>nexus-release</id>
            <username>admin</username>
            <password>admin123</password>
        </server>
        <server>
            <id>nexus-snapshots</id>
            <username>admin</username>
            <password>admin123</password>
        </server>
    </servers>
    <mirrors>
        <mirror>
            <id>nexus</id>
            <mirrorOf>*</mirrorOf>
            <url>http://xxx/repository/nexus-public/</url>
        </mirror>
    </mirrors>
    <profiles>
        <profile>
            <id>jdk18</id>
            <activation>
                <activeByDefault>true</activeByDefault>
                <jdk>1.8</jdk>
            </activation>
            <properties>
                <maven.compiler.source>1.8</maven.compiler.source>
                <maven.compiler.target>1.8</maven.compiler.target>
                <maven.compiler.compilerVersion>1.8</maven.compiler.compilerVersion>
            </properties>
        </profile>

        <profile>
            <id>nexus-server</id>
            <repositories>
                <repository>
                    <id>central</id>
                    <url>http://xxx/repository/nexus-public/</url>
                    <releases>
                        <enabled>true</enabled>
                    </releases>
                    <snapshots>
                        <enabled>true</enabled>
                    </snapshots>
                    <updatePolicy>always</updatePolicy>
                </repository>
            </repositories>
            <pluginRepositories>
                <pluginRepository>
                    <id>central</id>
                    <url>http:/xxx/repository/nexus-public/</url>
                    <releases>
                        <enabled>true</enabled>
                    </releases>
                    <snapshots>
                        <enabled>true</enabled>
                    </snapshots>
                    <updatePolicy>always</updatePolicy>
                </pluginRepository>
            </pluginRepositories>
        </profile>
    </profiles>
    <activeProfiles>
        <activeProfile>nexus-server</activeProfile>
    </activeProfiles>

</settings>
IDEA配置nexus私服
如果想要将自己的jar上传到私服,就需要在项目pom.xml添加如下配置
<distributionManagement>
    <repository>
        <id>nexus-releases</id>
        <name>admin</name>
        <url>http://10.27.10.177:8081/repository/maven-releases/</url>
    </repository>
    <snapshotRepository>
        <id>nexus-snapshots</id>
        <name>admin</name>
        <url>http://10.27.10.177:8081/repository/maven-snapshots/</url>
    </snapshotRepository>
</distributionManagement>
id必须与settings.xml中的server保持一致
手动添加jar包到本地仓库
mvn install:install-file -Dfile=jar包的位置 -DgroupId=自己的groupId -DartifactId=自己的artifactId -Dversion=自己的version -Dpackaging=jar
例:
mvn install:install-file -Dfile=D:\mvn\spring-context-support-3.1.0.RELEASE.jar -DgroupId=org.springframework -DartifactId=spring-context-support -Dversion=3.1.0.RELEASE -Dpackaging=jar

若有收获,就点个赞吧
0 人点赞
