第十一章 测试
在本章中,我们将会讨论如下话题:
- 使用Codeception测试应用
- 使用PHPUnit做单元测试
- 使用Atoum做单元测试
- 使用Behat做单元测试
介绍
在本章中,你将会学习如何如何使用最好技术用于测试,例如Codeception,PHPUnit,Atoum和Behat。你将会看到如何写简单的测试和如何在你的应用中避免拟合错误。
使用Codeception测试应用
默认情况下,基础和高级Yii2应用skeletons使用Codeception作为一个测试框架。Codeception支持写单元,函数,以及接受box之外的测试。对于单元测试,它使用PHPUnit测试框架,它将被在下个小节中讨论。
准备
- 按照官方指南http://www.yiiframework.com/doc-2.0/guide-start-installation.html的描述,使用Composer包管理器创建一个新
yii2-app-basic的应用。
注意:如果你用的是基础应用的2.0.9版本(或者更早),只需要手动升级tests文件夹,并添加config/test.php,config/test_db.php和web/index-test.php文件。此外你需要复制composer.json文件的require和require-dev部分,并运行composer update。
- 复制并应用如下migration:
<?phpuse yii\db\Migration;class m160309_070856_create_post extends Migration{public function up(){$this->createTable('{{%post}}', ['id' => $this->primaryKey(),'title' => $this->string()->notNull(),'text' => $this->text()->notNull(),'status' => $this->smallInteger()->notNull()->defaultValue(0),]);}public function down(){$this->dropTable('{{%post}}');}}
- 创建
Post模型:
<?phpnamespace app\models;use Yii;use yii\db\ActiveRecord;/*** @property integer $id* @property string $title* @property string $text* @property integer $status* @property integer $created_at* @property integer $updated_at*/class Post extends ActiveRecord{const STATUS_DRAFT = 0;const STATUS_ACTIVE = 1;public static function tableName(){return '{{%post}}';}public function rules(){return [[['title', 'text'], 'required'],[['text'], 'string'],['status', 'in', 'range' => [self::STATUS_DRAFT,self::STATUS_ACTIVE]],['status', 'default', 'value' =>self::STATUS_DRAFT],[['title'], 'string', 'max' => 255],];}public function behaviors(){return [TimestampBehavior::className(),];}public static function getStatusList(){return [self::STATUS_DRAFT => 'Draft',self::STATUS_ACTIVE => 'Active',];}public function publish(){if ($this->status == self::STATUS_ACTIVE) {throw new \DomainException('Post is already published.');}$this->status = self::STATUS_ACTIVE;}public function draft(){if ($this->status == self::STATUS_DRAFT) {throw new \DomainException('Post is already drafted.');}$this->status = self::STATUS_DRAFT;}}
- 生成CRUD:
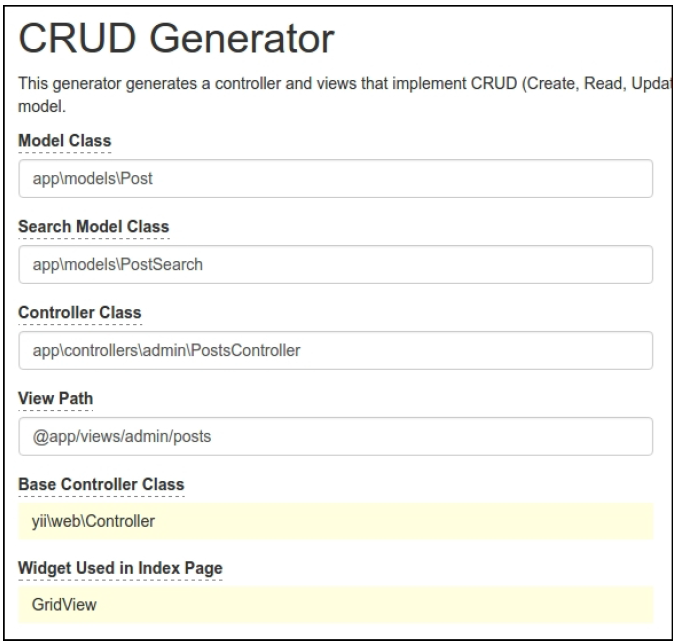
- 此外,在
views/admin/posts/_form.php文件中为status字段添加状态下拉菜单,以及提交按钮的名称:
<div class="post-form"><?php $form = ActiveForm::begin(); ?><?= $form->field($model, 'title')->textInput(['maxlength'=> true]) ?><?= $form->field($model, 'text')->textarea(['rows' => 6]) ?><?= $form->field($model, 'status')->dropDownList(Post::getStatusList()) ?><div class="form-group"><?= Html::submitButton($model->isNewRecord ? 'Create' :'Update', ['class' => $model->isNewRecord ? 'btn btn-success' : 'btn btn-primary','name' => 'submit-button',]) ?></div><?php ActiveForm::end(); ?></div>
- 现在检查控制器是否工作:
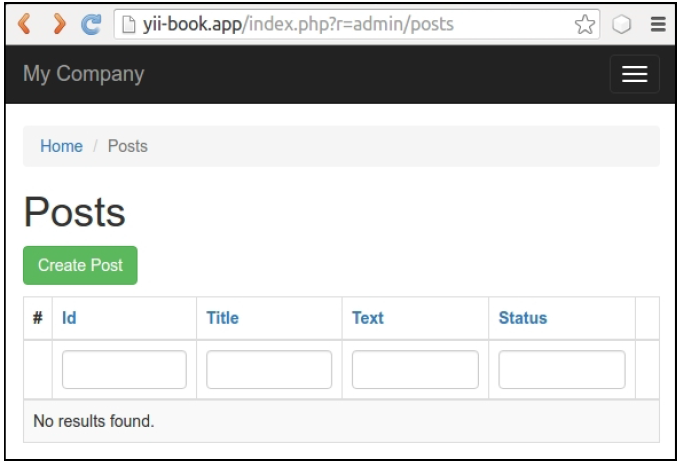
创建任意示例帖子。
如何做…
为测试做准备
跟着如下步骤来为测试做准备:
- 创建
yii2_basic_tests或者其它测试数据库,通过应用migration来更新它:
tests/bin/yii migrate
这个命令需要在测试文件夹中运行。你可以在配置文件/config/test_db.php中指定你的测试数据库选项。
- Codeception为我们的测试套件使用自动生成的Actor类。使用下面的命令创建他们:
composer exec codecept build
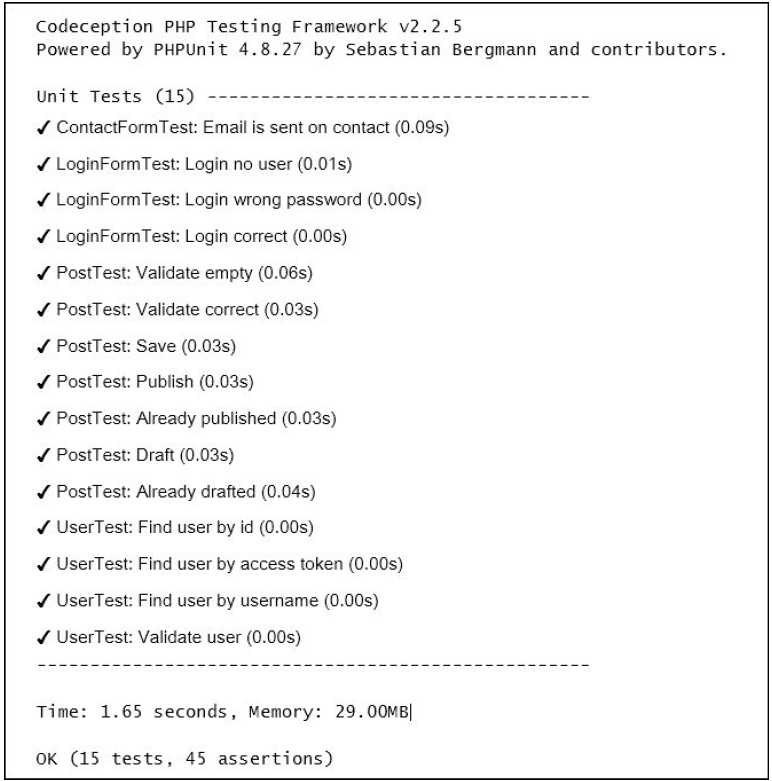
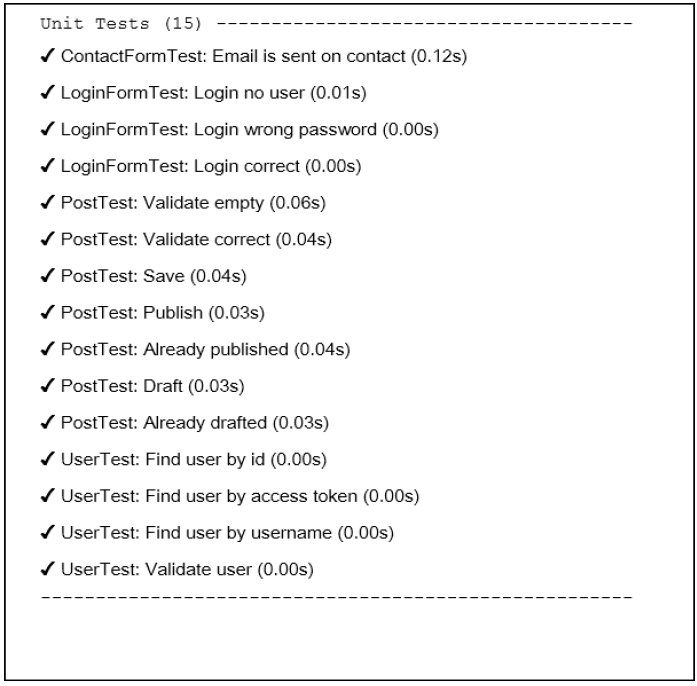
运行单元和功能测试
我们可以立即运行任何类型的应用测试:
# run all available testscomposer exec codecept run# run functional testscomposer exec codecept run functional# run unit testscomposer exec codecept run unit
结果是,你可以查看测试报告如下所示:
获取覆盖报告
你可以为你的代码获取代码覆盖率报告。默认情况下,代码覆盖率在配置文件tests/codeception.yml中是禁用的;你需要取消必要的注释,从而可以收集代码覆盖率:
coverage:enabled: truewhitelist:include:- models/*- controllers/*- commands/*- mail/*blacklist:include:- assets/*- config/*- runtime/*- vendor/*- views/*- web/*- tests/*
你需要安装XDebug PHP扩展,这可以从https://xdebug.org获取。例如,在Ubuntu或者Debian上,你可以在控制台中输入如下命令:
sudo apt-get install php5-xdebug
在Windows上,你必须打开php.ini文件,并添加到你PHP安装路径的自定义代码:
[xdebug]zend_extension_ts=C:/php/ext/php_xdebug.dll
或者,如果你使用的是非线程安全的版本,输入如下命令:
[xdebug]zend_extension=C:/php/ext/php_xdebug.dll
最后,你可以运行测试,并使用如下命令收集覆盖率报告:
#collect coverage for all testscomposer exec codecept run --coverage-html#collect coverage only for unit testscomposer exec codecept run unit --coverage-html#collect coverage for unit and functional testscomposer exec codecept run functional,unit --coverage-html
你可以在终端上看到文本的代码覆盖率输出:
Code Coverage Report:2016-03-31 08:13:05Summary:Classes: 20.00% (1/5)Methods: 40.91% (9/22)Lines: 30.65% (38/124)\app\models::ContactFormMethods: 33.33% ( 1/ 3) Lines: 80.00% ( 12/ 15)\app\models::LoginFormMethods: 100.00% ( 4/ 4) Lines: 100.00% ( 18/ 18)\app\models::UserMethods: 57.14% ( 4/ 7) Lines: 53.33% ( 8/ 15)Remote CodeCoverage reports are not printed to consoleHTML report generated in coverage
此外,你可以在tests/codeception/_output/coverage路径中看到HTML格式的报告:
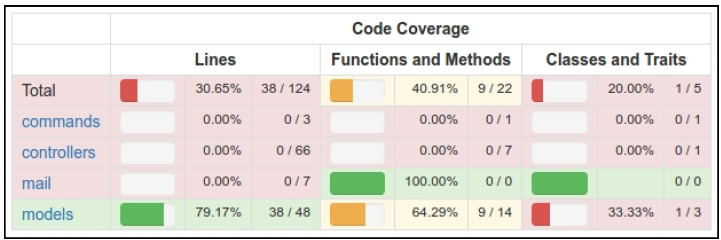
你可以点击任何类,并分析代码的哪些行在测试运行过程中还没有被执行到。
运行验收测试
在验收测试中,你可以使用基于Curl的PhpBrowser作为请求服务器。它可以帮助你检查网站控制器,并解析HTTP和HTML响应代码。但是如果你希望测试你的CSS或者JavaScript行为,你必须使用真正的浏览器。
Selenium服务器是一个交互式的工具,它集成到了Firefox以及其它浏览器中,可以让你打开站点页面,并模拟人类动作。
为了使用真正的浏览器,我们必须安装Selenium服务器:
- 需要完整版的Codeception包,而不是基础版的:
composer require --dev codeception/codeceptioncomposer remove --dev codeception/base
- 下载如下软件:
- 安装Mozilla Firefox浏览器,https://www.mozilla.org
- 安装jre(Java运行时环境),https://www.java.com/en/download/
- 下载Selenium独立服务器,http://www.seleniumhq.org/download/
- 下载Geckodriver,https://github.com/mozilla/geckodriver/releases
- 在新的控制台窗口中启动带有driver的服务器:
java -jar -Dwebdriver.gecko.driver=~/geckodriver ~/selenium-server-standalone-x.xx.x.jar
- 复制
tests/acceptance.suite.yml.example到tests/acceptance.suite.yml,并按如下配置:
class_name: AcceptanceTestermodules:enabled:- WebDriver:url: http://127.0.0.1:8080/browser: firefox- Yii2:part: ormentryScript: index-test.phpcleanup: false
- 打开新的终端,并启动web服务器:
tests/bin/yii serve
- 运行验收测试:
composer exec codecept run acceptance
你应该能看到Selenium是如何启动浏览器的,并检查所有的站点页面。
创建数据库fixtures
在运行自己的测试之前,我们必须清楚自己的测试数据库,并加载指定的测试数据。yii2-codeception扩展提供ActiveFixture基类,用于为自己的模型创建测试数据集。运行如下步骤创建数据库fixtures:
- 为
Post模型创建fixture类:
<?phpnamespace tests\fixtures;use yii\test\ActiveFixture;class PostFixture extends ActiveFixture{public $modelClass = 'app\modules\Post';public $dataFile = '@tests/_data/post.php';}
- 在
test/_data/post.php文件中添加一个演示数据集:
<?phpreturn [['id' => 1,'title' => 'First Post','text' => 'First Post Text','status' => 1,'created_at' => 1457211600,'updated_at' => 1457211600,],['id' => 2,'title' => 'Old Title For Updating','text' => 'Old Text For Updating','status' => 1,'created_at' => 1457211600,'updated_at' => 1457211600,],['id' => 3,'title' => 'Title For Deleting','text' => 'Text For Deleting','status' => 1,'created_at' => 1457211600,'updated_at' => 1457211600,],];
- 为单元测试和验收测试激活fixtures支持。只需要添加
fixtures部分到unit.suite.yml文件中:
class_name: UnitTestermodules:enabled:- Asserts- Yii2:part: [orm, fixtures, email]
此外,添加fixtures部分到acceptance.suite.yml文件中:
class_name: AcceptanceTestermodules:enabled:- WebDriver:url: http://127.0.0.1:8080/browser: firefox- Yii2:part: [orm, fixtures]entryScript: index-test.phpcleanup: false
- 运行如下命令,重新生成
tester类,应用这些修改:
composer exec codecept build
写单元或综合测试
单元和综合测试检查我们项目的源代码。
单元测试只检查当前的类,或者他们的方法和其它类无关,以及和其它资源也无关,比如数据库、文件等等。
综合测试检查你的类和其它类以及资源综合在一起时的表现。
Yii2中的ActiveRecord模型总是使用数据库加载表schema,所以我们必须创建一个真正的测试数据库,并且我们的测试将会是综合的。
- 写测试用于检查模型的校验、保存,并修改它的状态:
<?phpnamespace tests\unit\models;use app\models\Post;use Codeception\Test\Unit;use tests\fixtures\PostFixture;class PostTest extends Unit{/*** @var \UnitTester*/protected $tester;public function _before(){$this->tester->haveFixtures(['post' => ['class' => PostFixture::className(),'dataFile' => codecept_data_dir() . 'post.php']]);}public function testValidateEmpty(){$model = new Post();expect('model should not validate',$model->validate())->false();expect('title has error',$model->errors)->hasKey('title');expect('title has error',$model->errors)->hasKey('text');}public function testValidateCorrect(){$model = new Post(['title' => 'Other Post','text' => 'Other Post Text',]);expect('model should validate',$model->validate())->true();}public function testSave(){$model = new Post(['title' => 'Test Post','text' => 'Test Post Text',]);expect('model should save', $model->save())->true();expect('title is correct', $model->title)->equals('Test Post');expect('text is correct', $model->text)->equals('Test Post Text');expect('status is draft',$model->status)->equals(Post::STATUS_DRAFT);expect('created_at is generated',$model->created_at)->notEmpty();expect('updated_at is generated',$model->updated_at)->notEmpty();}public function testPublish(){$model = new Post(['status' => Post::STATUS_DRAFT]);expect('post is drafted',$model->status)->equals(Post::STATUS_DRAFT);$model->publish();expect('post is published',$model->status)->equals(Post::STATUS_ACTIVE);}public function testAlreadyPublished(){$model = new Post(['status' => Post::STATUS_ACTIVE]);$this->setExpectedException('\LogicException');$model->publish();}public function testDraft(){$model = new Post(['status' => Post::STATUS_ACTIVE]);expect('post is published',$model->status)->equals(Post::STATUS_ACTIVE);$model->draft();expect('post is drafted',$model->status)->equals(Post::STATUS_DRAFT);}public function testAlreadyDrafted(){$model = new Post(['status' => Post::STATUS_ACTIVE]);$this->setExpectedException('\LogicException');$model->publish();}}
- 运行测试:
composer exec codecept run unit
- 现在查看结果:
完成了。如果你故意或者偶然破坏了任何模型的方法,你将会看到一个坏的测试。
写功能测试
功能测试检查你的应用是否正常工作。这个套件会准备$_GET、$_POST以及其它请求变量,并调用Application::handleRequest方法。它帮助你测试控制器以及响应,而且这不需要运行真实服务器。
现在我们可以为我们的admin CRUD写测试:
- 生成一个新的测试类:
codecept generate:cest functional admin/Posts
- 在生成的文件中修正命名空间,并写自己的测试:
<?phpnamespace tests\functional\admin;use app\models\Post;use FunctionalTester;use tests\fixtures\PostFixture;use yii\helpers\Url;class PostsCest{function _before(FunctionalTester $I){$I->haveFixtures(['user' => ['class' => PostFixture::className(),'dataFile' => codecept_data_dir() . 'post.php']]);}public function testIndex(FunctionalTester $I){$I->amOnPage(['admin/posts/index']);$I->see('Posts', 'h1');}public function testView(FunctionalTester $I){$I->amOnPage(['admin/posts/view', 'id' => 1]);$I->see('First Post', 'h1');}public function testCreateInvalid(FunctionalTester $I){$I->amOnPage(['admin/posts/create']);$I->see('Create', 'h1');$I->submitForm('#post-form', ['Post[title]' => '','Post[text]' => '',]);$I->expectTo('see validation errors');$I->see('Title cannot be blank.', '.help-block');$I->see('Text cannot be blank.', '.help-block');}public function testCreateValid(FunctionalTester $I){$I->amOnPage(['admin/posts/create']);$I->see('Create', 'h1');$I->submitForm('#post-form', ['Post[title]' => 'Post Create Title','Post[text]' => 'Post Create Text','Post[status]' => 'Active',]);$I->expectTo('see view page');$I->see('Post Create Title', 'h1');}public function testUpdate(FunctionalTester $I){// ...}public function testDelete(FunctionalTester $I){$I->amOnPage(['/admin/posts/view', 'id' => 3]);$I->see('Title For Deleting', 'h1');$I->amGoingTo('delete item');$I->sendAjaxPostRequest(Url::to(['/admin/posts/delete','id' => 3]));$I->expectTo('see that post is deleted');$I->dontSeeRecord(Post::className(), ['title' => 'Title For Deleting',]);}}
- 运行测试命令:
composer exec codecept run functional
- 现在可以查看到结果:
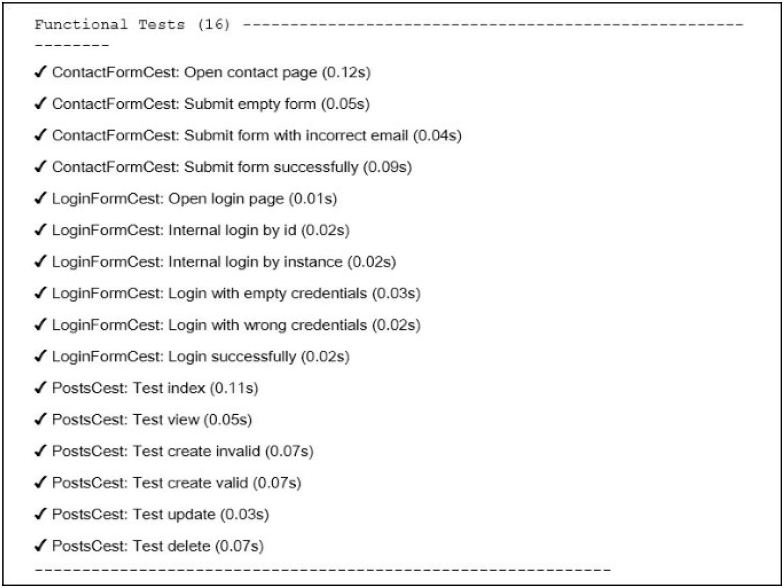
所有的测试是通过的。在其它例子中,你可以在tests/_output文件夹中看到失败测试的测试页面的截图:
写验收测试
- 验收测试员点击测试服务器中真正的网站,而不是只调用
Application::handleRequest方法。高级验收测试看起来像中级功能测试,但是在Selenium中它可以检查在真实浏览器中的Javascript行为。 - 你必须在
tests/acceptance文件夹下获取如下类:
<?phpnamespace tests\acceptance\admin;use AcceptanceTester;use tests\fixtures\PostFixture;use yii\helpers\Url;class PostsCest{function _before(AcceptanceTester $I){$I->haveFixtures(['post' => ['class' => PostFixture::className(),'dataFile' => codecept_data_dir() . 'post.php']]);}public function testIndex(AcceptanceTester $I){$I->wantTo('ensure that post index page works');$I->amOnPage(Url::to(['/admin/posts/index']));$I->see('Posts', 'h1');}public function testView(AcceptanceTester $I){$I->wantTo('ensure that post view page works');$I->amOnPage(Url::to(['/admin/posts/view', 'id' => 1]));$I->see('First Post', 'h1');}public function testCreate(AcceptanceTester $I){$I->wantTo('ensure that post create page works');$I->amOnPage(Url::to(['/admin/posts/create']));$I->see('Create', 'h1');$I->fillField('#post-title', 'Post Create Title');$I->fillField('#post-text', 'Post Create Text');$I->selectOption('#post-status', 'Active');$I->click('submit-button');$I->wait(3);$I->expectTo('see view page');$I->see('Post Create Title', 'h1');}public function testDelete(AcceptanceTester $I){$I->amOnPage(Url::to(['/admin/posts/view', 'id' => 3]));$I->see('Title For Deleting', 'h1');$I->click('Delete');$I->acceptPopup();$I->wait(3);$I->see('Posts', 'h1');}}
不要忘记调用wait方法,用于等待页面被打开或者重新加载。
- 在一个新的终端中运行PHP测试服务器:
tests/bin/yii serve
- 运行验收测试:
composer exec codecept run acceptance
- 查看结果:
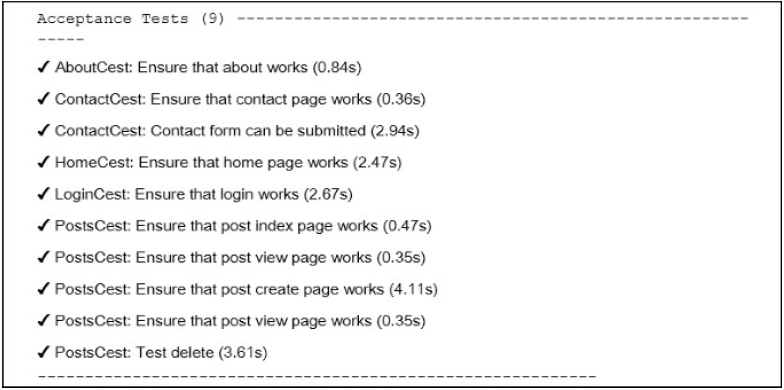
Selenium将会启动Firefox web浏览器,并执行我们的测试命令。
创建API测试套件
除了单元、功能以及验收套件,Codeception可以创建特殊的测试套件。例如,我们可以创建用于支持XML和JSON解析的API测试。
- 为
Post模型创建REST API控制器controllers/api/PostsController.php
<?phpnamespace app\controllers\api;use yii\rest\ActiveController;class PostsController extends ActiveController{public $modelClass = '\app\models\Post';}
- 在
config/web.php中为urlManager组件添加REST路由:
'components' => [// ...'urlManager' => ['enablePrettyUrl' => true,'showScriptName' => false,'rules' => [['class' => 'yii\rest\UrlRule', 'controller' => 'api/posts'],],],],
并在config/test.php文件中设置一些配置(启用showScriptName选项):
'components' => [// ...'urlManager' => ['enablePrettyUrl' => true,'showScriptName' => true,'rules' => [['class' => 'yii\rest\UrlRule', 'controller' => 'api/posts'],],],],
- 给
web/.htaccess文件添加如下内容:
RewriteEngine OnRewriteCond %{REQUEST_FILENAME} !-fRewriteCond %{REQUEST_FILENAME} !-dRewriteRule . index.php
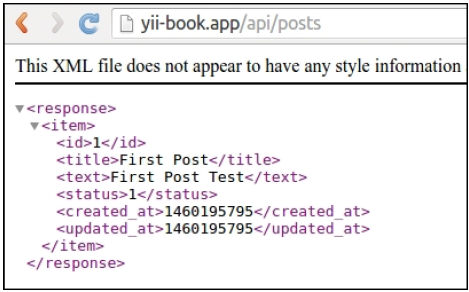
- 检查
api/posts控制器是否工作:
- 使用REST模块创建API测试套件
tests/api.suite.yml配置文件:
class_name: ApiTestermodules:enabled:- REST:depends: PhpBrowserurl: 'http://127.0.0.1:8080/index-test.php'part: [json]- Yii2:part: [orm, fixtures]entryScript: index-test.php
现在重新编译testers:
composer exec codecept build
- 创建
tests/api目录,并生成新的测试类:
composer exec codecept generate:cest api Posts
- 为你的REST-API写测试:
<?phpnamespace tests\api;use ApiTester;use tests\fixtures\PostFixture;use yii\helpers\Url;class PostsCest{function _before(ApiTester $I){$I->haveFixtures(['post' => ['class' => PostFixture::className(),'dataFile' => codecept_data_dir() . 'post.php']]);}public function testGetAll(ApiTester $I){$I->sendGET('/api/posts');$I->seeResponseCodeIs(200);$I->seeResponseIsJson();$I->seeResponseContainsJson([0 => ['title' => 'First Post']]);}public function testGetOne(ApiTester $I){$I->sendGET('/api/posts/1');$I->seeResponseCodeIs(200);$I->seeResponseIsJson();$I->seeResponseContainsJson(['title' => 'First Post']);}public function testGetNotFound(ApiTester $I){$I->sendGET('/api/posts/100');$I->seeResponseCodeIs(404);$I->seeResponseIsJson();$I->seeResponseContainsJson(['name' => 'Not Found']);}public function testCreate(ApiTester $I){$I->sendPOST('/api/posts', ['title' => 'Test Title','text' => 'Test Text',]);$I->seeResponseCodeIs(201);$I->seeResponseIsJson();$I->seeResponseContainsJson(['title' => 'Test Title']);}public function testUpdate(ApiTester $I){$I->sendPUT('/api/posts/2', ['title' => 'New Title',]);$I->seeResponseCodeIs(200);$I->seeResponseIsJson();$I->seeResponseContainsJson(['title' => 'New Title','text' => 'Old Text For Updating',]);}public function testDelete(ApiTester $I){$I->sendDELETE('/api/posts/3');$I->seeResponseCodeIs(204);}}
- 运行应用服务器:
tests/bin yii serve
- 运行API测试:
composer exec codecept run api
现在可以看到结果:
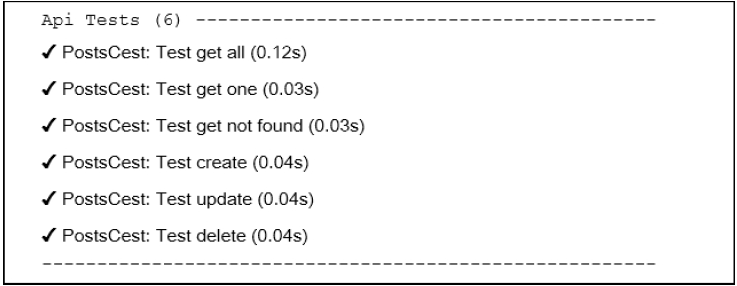
所有的测试通过了,我们的API能正常工作。
工作原理…
Codeception是一个高级测试框架,基于PHPUnit包可以提供用于写单元、综合、功能和验收测试。
我们可以使用Yii2的内置Codeception,它允许我们加载fixtures,使用models,以及Yii框架的其它东西。
参考
- 欲了解更多信息,参考:
- 基础或者高级应用中的
tests/README.md文件: - 使用PHPUnit做单元测试小节
使用PHPUnit做单元测试
PHPUnit是最流行的PHP测试框架。配置是使用非常简单。此外,这个框架支持代码覆盖率报告,还有需要额外的插件。上一小节中的Codeception使用PHPUnit来工作,并写单元测试。在这个小节中,我们将会使用PHPUnit测试创建一个购物车扩展示例。
准备
按照官方指南http://www.yiiframework.com/doc-2.0/guide-start-installation.html的描述,使用Composer包管理器创建一个新的yii2-app-basic应用。
如何做…
首先,我们必须为我们的扩展创建一个新的空目录。
准备扩展结构
- 首先,为你的扩展创建目录结构:
book└── cart├── src└── tests
为了将这个扩展做为一个Composer包,准备book/cart/composer.json:
{"name": "book/cart","type": "yii2-extension","require": {"yiisoft/yii2": "~2.0"},"require-dev": {"phpunit/phpunit": "4.*"},"autoload": {"psr-4": {"book\\cart\\": "src/","book\\cart\\tests\\": "tests/"}},"extra": {"asset-installer-paths": {"npm-asset-library": "vendor/npm","bower-asset-library": "vendor/bower"}}}
- 在
book/cart/.gitignore文件中添加如下内容:
/vendor/composer.lock
- 添加如下内容到PHPUnit默认配置文件中
book/cart/phpunit.xml.dist:
<?xml version="1.0" encoding="utf-8"?><phpunit bootstrap="./tests/bootstrap.php"colors="true"convertErrorsToExceptions="true"convertNoticesToExceptions="true"convertWarningsToExceptions="true"stopOnFailure="false"><testsuites><testsuite name="Test Suite"><directory>./tests</directory></testsuite></testsuites><filter><whitelist><directory suffix=".php">./src/</directory></whitelist></filter></phpunit>
- 安装扩展的所有依赖:
composer install
- 现在我们可以获取如下结构:
book└── cart├── src├── tests├── .gitignore├── composer.json├── phpunit.xml.dist└── vendor
写扩展代码
为了写扩展代码,执行如下步骤:
- 在
src文件夹中,创建book\cart\Cart类:
<?phpnamespace book\cart;use book\cart\storage\StorageInterface;use yii\base\Component;use yii\base\InvalidConfigException;class Cart extends Component{/*** @var StorageInterface*/private $_storage;/*** @var array*/private $_items;public function setStorage($storage){if (is_array($storage)) {$this->_storage = \Yii::createObject($storage);} else {$this->_storage = $storage;}}public function add($id, $amount = 1){$this->loadItems();if (isset($this->_items[$id])) {$this->_items[$id] += $amount;} else {$this->_items[$id] = $amount;}$this->saveItems();}public function set($id, $amount){$this->loadItems();$this->_items[$id] = $amount;$this->saveItems();}public function remove($id){$this->loadItems();if (isset($this->_items[$id])) {unset($this->_items[$id]);}$this->saveItems();}public function clear(){$this->loadItems();$this->_items = [];$this->saveItems();}public function getItems(){$this->loadItems();return $this->_items;}public function getCount(){$this->loadItems();return count($this->_items);}public function getAmount(){$this->loadItems();return array_sum($this->_items);}private function loadItems(){if ($this->_storage === null) {throw new InvalidConfigException('Storage must be set');}if ($this->_items === null) {$this->_items = $this->_storage->load();}}private function saveItems(){$this->_storage->save($this->_items);}}
- 在
src/storage子文件夹中创建StorageInterface接口:
<?phpnamespace book\cart\storage;interface StorageInterface{/*** @return array*/public function load();/*** @param array $items*/public function save(array $items);}
以及SessionStorage类:
<?phpnamespace book\cart\storage;use Yii;class SessionStorage implements StorageInterface{public $sessionKey = 'cart';public function load(){return Yii::$app->session->get($this->sessionKey, []);}public function save(array $items){Yii::$app->session->set($this->sessionKey, $items);}}}
- 现在我们可以得到如下结构:
book└── cart├── src│ ├── storage│ │ ├── SessionStorage.php│ │ └── StorageInterface.php│ └── Cart.php├── tests├── .gitignore├── composer.json├── phpunit.xml.dist└── vendor
写扩展测试
为了实施这个扩展测试,执行如下步骤:
- 为PHPUnit添加
book/cart/tests/bootstrap.php入口:
<?phpdefined('YII_DEBUG') or define('YII_DEBUG', true);defined('YII_ENV') or define('YII_ENV', 'test');require(__DIR__ . '/../vendor/autoload.php');require(__DIR__ . '/../vendor/yiisoft/yii2/Yii.php');
- 在每一个测试前,通过初始化Yii应用创建一个测试基类,然后在销毁应用时释放:
<?phpnamespace book\cart\tests;use yii\di\Container;use yii\web\Application;abstract class TestCase extends \PHPUnit_Framework_TestCase{protected function setUp(){parent::setUp();$this->mockApplication();}protected function tearDown(){$this->destroyApplication();parent::tearDown();}protected function mockApplication(){new Application(['id' => 'testapp','basePath' => __DIR__,'vendorPath' => dirname(__DIR__) . '/vendor',]);}protected function destroyApplication(){\Yii::$app = null;\Yii::$container = new Container();}}
- 添加一个基于内存的干净的fake类,这个类继承
StorageInterface接口:
<?phpnamespace book\cart\tests\storage;use book\cart\storage\StorageInterface;class FakeStorage implements StorageInterface{private $items = [];public function load(){return $this->items;}public function save(array $items){$this->items = $items;}}
它将会存储一些条目到一个私有变量中,而不是一个真正的session中。它允许我们能独立运行这个测试(不需要真正的存储驱动),并提高测试性能。
- 添加
CartTest类:
<?phpnamespace book\cart\tests;use book\cart\Cart;use book\cart\tests\storage\FakeStorage;class CartTest extends TestCase{/*** @var Cart*/private $cart;public function setUp(){parent::setUp();$this->cart = new Cart(['storage' => newFakeStorage()]);}public function testEmpty(){$this->assertEquals([], $this->cart->getItems());$this->assertEquals(0, $this->cart->getCount());$this->assertEquals(0, $this->cart->getAmount());}public function testAdd(){$this->cart->add(5, 3);$this->assertEquals([5 => 3], $this->cart->getItems());$this->cart->add(7, 14);$this->assertEquals([5 => 3, 7 => 14],$this->cart->getItems());$this->cart->add(5, 10);$this->assertEquals([5 => 13, 7 => 14],$this->cart->getItems());}public function testSet(){$this->cart->add(5, 3);$this->cart->add(7, 14);$this->cart->set(5, 12);$this->assertEquals([5 => 12, 7 => 14],$this->cart->getItems());}public function testRemove(){$this->cart->add(5, 3);$this->cart->remove(5);$this->assertEquals([], $this->cart->getItems());}public function testClear(){$this->cart->add(5, 3);$this->cart->add(7, 14);$this->cart->clear();$this->assertEquals([], $this->cart->getItems());}public function testCount(){$this->cart->add(5, 3);$this->assertEquals(1, $this->cart->getCount());$this->cart->add(7, 14);$this->assertEquals(2, $this->cart->getCount());}public function testAmount(){$this->cart->add(5, 3);$this->assertEquals(3, $this->cart->getAmount());$this->cart->add(7, 14);$this->assertEquals(17, $this->cart->getAmount());}public function testEmptyStorage(){$cart = new Cart();$this->setExpectedException('yii\base\InvalidConfigException');$cart->getItems();}}
- 添加一个独立的测试,用于检查
SessionStorage类:
<?phpnamespace book\cart\tests\storage;use book\cart\storage\SessionStorage;use book\cart\tests\TestCase;class SessionStorageTest extends TestCase{/*** @var SessionStorage*/private $storage;public function setUp(){parent::setUp();$this->storage = new SessionStorage(['key' => 'test']);}public function testEmpty(){$this->assertEquals([], $this->storage->load());}public function testStore(){$this->storage->save($items = [1 => 5, 6 => 12]);$this->assertEquals($items, $this->storage->load());}}
- 现在我们可以得到如下结构:
book└── cart├── src│ ├── storage│ │ ├── SessionStorage.php│ │ └── StorageInterface.php│ └── Cart.php├── tests│ ├── storage│ │ ├── FakeStorage.php│ │ └── SessionStorageTest.php│ ├── bootstrap.php│ ├── CartTest.php│ └── TestCase.php├── .gitignore├── composer.json├── phpunit.xml.dist└── vendor
运行测试
在使用composer install命令安装所有的依赖时,Composer包管理器安装了PHPUnit包到vendor文件中,并将可执行的文件phpunit放在了vendor/bin子文件夹中。
现在我们可以运行如下脚本:
cd book/cartvendor/bin/phpunit
我们可以看到如下测试报告:
PHPUnit 4.8.26 by Sebastian Bergmann and contributors...........Time: 906 ms, Memory: 11.50MBOK (10 tests, 16 assertions)
每一个点都对应了一次成功的测试。
class Cart extends Component{…public function remove($id){$this->loadItems();if (isset($this->_items[$id])) {// unset($this->_items[$id]);}$this->saveItems();}...}
'components' => [// …'cart' => ['class' => 'book\cart\Cart','storage' => ['class' => 'book\cart\storage\SessionStorage',],],],
再次运行测试:
PHPUnit 4.8.26 by Sebastian Bergmann and contributors....F......Time: 862 ms, Memory: 11.75MBThere was 1 failure:1) book\cart\tests\CartTest::testRemoveFailed asserting that two arrays are equal.--- Expected+++ Actual@@ @@Array (+ 5 => 3)/book/cart/tests/CartTest.php:52FAILURES!Tests: 10, Assertions: 16, Failures: 1
在这个例子中,我们看到了一次失败(用F标记),以及一次错误报告。
分析代码覆盖率
你必须安装XDebug PHP扩展,https://xdebug.org。例如,在Ubuntu或者Debian上,你可以在终端中,输入如下命令:
sudo apt-get install php5-xdebug
在Windows上,你必须打开php.ini文件,并添加自定义代码到PHP安装路径中:
[xdebug]zend_extension_ts=C:/php/ext/php_xdebug.dll
或者,如果你使用非线程安全的版本,输入如下内容:
[xdebug]zend_extension=C:/php/ext/php_xdebug.dll
安装过XDebug以后,使用--coverage-html标志再次运行测试,并指定一个报告路径:
vendor/bin/phpunit --coverage-html tests/_output
在浏览器中打开tests/_output/index.html,你将会看到每一个路径和类的一个明确的覆盖率报告:
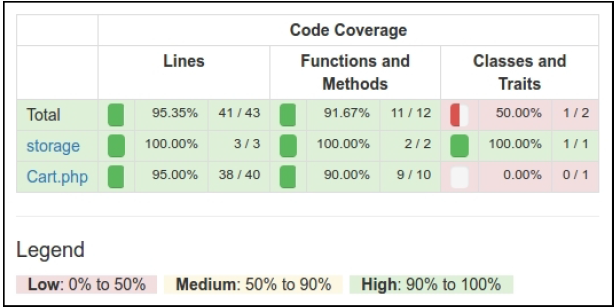
你可以点击任何类,并分析代码的哪一行在测试期间还没有被执行。例如,打开Cart类报告:
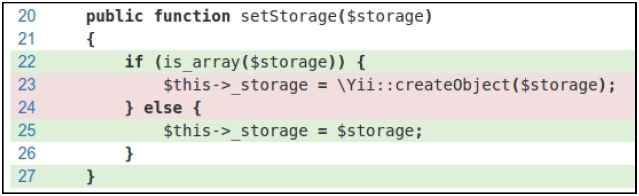
在我们的例子中,我们忘记测试从数组配置中创建storage。
组件的使用
在Packagist上发布扩展后,我们可以安装一个one-to-any项目:
composer require book/cart
此外,在应用的配置文件中激活组件:
'components' => [// …'cart' => ['class' => 'book\cart\Cart','storage' => ['class' => 'book\cart\storage\SessionStorage',],],],
另外一种方法,不需要在Packagist上发布扩展,我们必须设置@book alias,从而激活正确的类自动加载:
$config = ['id' => 'basic','basePath' => dirname(__DIR__),'bootstrap' => ['log'],'aliases' => ['@book' => dirname(__DIR__) . '/book',],'components' => ['cart' => ['class' => 'book\cart\Cart','storage' => ['class' => 'book\cart\storage\SessionStorage',],],// ...],]
无论如何,我们可以在我们的项目中以Yii::$app->cart组件的方式使用它:
工作原理…
在创建我们自己的测试前,你必须创建一个子目录,并在你的项目的根目录中添加phpinit.xml或者phpunit.xml.dist文件:
<?xml version="1.0" encoding="utf-8"?><phpunit bootstrap="./tests/bootstrap.php"colors="true"convertErrorsToExceptions="true"convertNoticesToExceptions="true"convertWarningsToExceptions="true"stopOnFailure="false"><testsuites><testsuite name="Test Suite"><directory>./tests</directory></testsuite></testsuites><filter><whitelist><directory suffix=".php">./src/</directory></whitelist></filter></phpunit>
如果第二个文件在工作目录中不存在,PHPUnit从第二个文件中加载配置。此外,你可以通过创建bootstrap.php文件来初始化autoloader和你框架的环境:
<?phpdefined('YII_DEBUG') or define('YII_DEBUG', true);defined('YII_ENV') or define('YII_ENV', 'test');require(__DIR__ . '/../vendor/autoload.php');require(__DIR__ . '/../vendor/yiisoft/yii2/Yii.php');
最后,你可以通过Composer安装PHPUnit(局部或者全局),并在有XML配置文件的目录中使用phpunit控制台命令。
PHPUnit扫描测试文件,并找到一*Test.php为后缀的文件。所有的测试类必须继承PHPUnit_Framework_TestCase类,并包含以test*为前缀的公共方法:
class MyTest extends TestCase{public function testSomeFunction(){$this->assertTrue(true);}}
在你的测试中,你可以用任何已有的assert*方法:
$this->assertEqual('Alex', $model->name);$this->assertTrue($model->validate());$this->assertFalse($model->save());$this->assertCount(3, $items);$this->assertArrayHasKey('username', $model->getErrors());$this->assertNotNull($model->author);$this->assertInstanceOf('app\models\User', $model->author);
此外,你可以复写setUp()或者tearDown()方法,用来添加表达式,它将在每一个测试方法之前或者之后运行。
例如,你可以通过重新初始化Yii应用定义自己的基类TestCase:
<?phpnamespace book\cart\tests;use yii\di\Container;use yii\web\Application;abstract class TestCase extends \PHPUnit_Framework_TestCase{protected function setUp(){parent::setUp();$this->mockApplication();}protected function tearDown(){$this->destroyApplication();parent::tearDown();}protected function mockApplication(){new Application(['id' => 'testapp','basePath' => __DIR__,'vendorPath' => dirname(__DIR__) . '/vendor',]);}protected function destroyApplication(){\Yii::$app = null;\Yii::$container = new Container();}}
现在你可以在你的子类中扩展这个类。你的test方法在会在一个自己的应用实例中运行。它会帮助你避免副作用,并创建独立了测试。
注意
Yii 2.0.*使用旧版的PHPUnit 4.*,用于兼容PHP5.4。
参考
- 所有关于PHPUnit使用方法的信息,参考官方文档https://phpunit.de/manual/current/en/index.html
- 使用Codeception测试应用小节
使用Atoum测试
除了PHPUnit和Codeception,Atoum是一个简单的单元测试框架。你可以使用这个框架,用于测试你的扩展,或者测试你应用的代码。
准备
为新的项目创建一个空文件夹。
如何做…
在这个小节中,我们将会创建一个演示,使用Atoum测试购物车扩展。
准备扩展框架
- 首先,为你的扩展创建目录结构:
book└── cart├── src└── tests
- 作为一个composer包使用扩展。准备
book/cart/composer.json文件:
{"name": "book/cart","type": "yii2-extension","require": {"yiisoft/yii2": "~2.0"},"require-dev": {"atoum/atoum": "^2.7"},"autoload": {"psr-4": {"book\\cart\\": "src/","book\\cart\\tests\\": "tests/"}},"extra": {"asset-installer-paths": {"npm-asset-library": "vendor/npm","bower-asset-library": "vendor/bower"}}}
- 添加如下内容到
book/cart/.gitignore文件:
/vendor/composer.lock
- 安装扩展所有的依赖:
composer install
- 现在我们将会得到如下结构:
book└── cart├── src├── tests├── .gitignore├── composer.json├── phpunit.xml.dist└── vendor
写扩展代码
从使用PHPUnit作单元测试小节复制Cart、StorageInterface和SessionStorage类。
最后,我们可以得到如下结构:
book└── cart├── src│ ├── storage│ │ ├── SessionStorage.php│ │ └── StorageInterface.php│ └── Cart.php├── tests├── .gitignore├── composer.json└── vendor
写扩展测试
- 添加
book/cart/tests/bootstrap.php入口脚本:
<?phpdefined('YII_DEBUG') or define('YII_DEBUG', true);defined('YII_ENV') or define('YII_ENV', 'test');require(__DIR__ . '/../vendor/autoload.php');require(__DIR__ . '/../vendor/yiisoft/yii2/Yii.php');
- 在每一个测试前,通过初始化Yii应用创建一个测试基类,然后在销毁它:
<?phpnamespace book\cart\tests;use yii\di\Container;use yii\console\Application;use mageekguy\atoum\test;abstract class TestCase extends test{public function beforeTestMethod($method){parent::beforeTestMethod($method);$this->mockApplication();}public function afterTestMethod($method){$this->destroyApplication();parent::afterTestMethod($method);}protected function mockApplication(){new Application(['id' => 'testapp','basePath' => __DIR__,'vendorPath' => dirname(__DIR__) . '/vendor','components' => ['session' => ['class' => 'yii\web\Session',],]]);}protected function destroyApplication(){\Yii::$app = null;\Yii::$container = new Container();}}
- 添加一个基于内存的干净的fake类,并继承
StorageInterface接口:
<?phpnamespace book\cart\tests;use book\cart\storage\StorageInterface;class FakeStorage implements StorageInterface{private $items = [];public function load(){return $this->items;}public function save(array $items){$this->items = $items;}}
它会存储条目到一个私有变量中,而不是使用真正的session。它允许我们独立运行测试(不适用真正的存储驱动),并提升测试性能。
- 添加
Cart测试类:
<?phpnamespace book\cart\tests\units;use book\cart\tests\FakeStorage;use book\cart\Cart as TestedCart;use book\cart\tests\TestCase;class Cart extends TestCase{/*** @var TestedCart*/private $cart;public function beforeTestMethod($method){parent::beforeTestMethod($method);$this->cart = new TestedCart(['storage' => newFakeStorage()]);}public function testEmpty(){$this->array($this->cart->getItems())->isEqualTo([]);$this->integer($this->cart->getCount())->isEqualTo(0);$this->integer($this->cart->getAmount())->isEqualTo(0);}public function testAdd(){$this->cart->add(5, 3);$this->array($this->cart->getItems())->isEqualTo([5 =>3]);$this->cart->add(7, 14);$this->array($this->cart->getItems())->isEqualTo([5 =>3, 7 => 14]);$this->cart->add(5, 10);$this->array($this->cart->getItems())->isEqualTo([5 =>13, 7 => 14]);}public function testSet(){$this->cart->add(5, 3);$this->cart->add(7, 14);$this->cart->set(5, 12);$this->array($this->cart->getItems())->isEqualTo([5 =>12, 7 => 14]);}public function testRemove(){$this->cart->add(5, 3);$this->cart->remove(5);$this->array($this->cart->getItems())->isEqualTo([]);}public function testClear(){$this->cart->add(5, 3);$this->cart->add(7, 14);$this->cart->clear();$this->array($this->cart->getItems())->isEqualTo([]);}public function testCount(){$this->cart->add(5, 3);$this->integer($this->cart->getCount())->isEqualTo(1);$this->cart->add(7, 14);$this->integer($this->cart->getCount())->isEqualTo(2);}public function testAmount(){$this->cart->add(5, 3);$this->integer($this->cart->getAmount())->isEqualTo(3);$this->cart->add(7, 14);$this->integer($this->cart->getAmount())->isEqualTo(17);}public function testEmptyStorage(){$cart = new TestedCart();$this->exception(function () use ($cart) {$cart->getItems();})->hasMessage('Storage must be set');}}
- 添加一个独立的测试,用于检查
SessionStorage类:
<?phpnamespace book\cart\tests\units\storage;use book\cart\storage\SessionStorage as TestedStorage;use book\cart\tests\TestCase;class SessionStorage extends TestCase{/*** @var TestedStorage*/private $storage;public function beforeTestMethod($method){parent::beforeTestMethod($method);$this->storage = new TestedStorage(['key' => 'test']);}public function testEmpty(){$this->given($storage = $this->storage)->then->array($storage->load())->isEqualTo([]);}public function testStore(){$this->given($storage = $this->storage)->and($storage->save($items = [1 => 5, 6 => 12]))->then->array($this->storage->load())->isEqualTo($items);}}
- 现在我们将会得到如下结构:
book└── cart├── src│ ├── storage│ │ ├── SessionStorage.php│ │ └── StorageInterface.php│ └── Cart.php├── tests│ ├── units│ │ ├── storage│ │ │ └── SessionStorage.php│ │ └── Cart.php│ ├── bootstrap.php│ ├── FakeStorage.php│ └── TestCase.php├── .gitignore├── composer.json└── vendor
运行测试
在使用composer install命令安装所有的依赖期间,Composer包管理器安装Atoum包到vendor目录中,并将可执行文件atoum放在vendor/bin子文件夹中。
现在我们可以运行如下脚本:
cd book/cartvendor/bin/atoum -d tests/units -bf tests/bootstrap.php
此外,我们可以看到如下测试报告:
> atoum path: /book/cart/vendor/atoum/atoum/vendor/bin/atoum> atoum version: 2.7.0> atoum path: /book/cart/vendor/atoum/atoum/vendor/bin/atoum> atoum version: 2.7.0> PHP path: /usr/bin/php5> PHP version:=> PHP 5.5.9-1ubuntu4.16 (cli)> book\cart\tests\units\Cart...[SSSSSSSS__________________________________________________][8/8]=> Test duration: 1.13 seconds.=> Memory usage: 3.75 Mb.> book\cart\tests\units\storage\SessionStorage...[SS________________________________________________________][2/2]=> Test duration: 0.03 second.=> Memory usage: 1.00 Mb.> Total tests duration: 1.15 seconds.> Total tests memory usage: 4.75 Mb.> Code coverage value: 16.16%
每一个S符号表示一次成功的测试。
尝试通过注释unset操作故意破坏cart:
class Cart extends Component{...public function remove($id){$this->loadItems();if (isset($this->_items[$id])) {// unset($this->_items[$id]);}$this->saveItems();}...}
再次运行测试:
> atoum version: 2.7.0> PHP path: /usr/bin/php5> PHP version:=> PHP 5.5.9-1ubuntu4.16 (cli)book\cart\tests\units\Cart...[SSFSSSSS__________________________________________________][8/8]=> Test duration: 1.09 seconds.=> Memory usage: 3.25 Mb.> book\cart\tests\units\storage\SessionStorage...[SS________________________________________________________][2/2]=> Test duration: 0.02 second.=> Memory usage: 1.00 Mb....Failure (2 tests, 10/10 methods, 0 void method, 0 skipped method, 0uncompleted method, 1 failure, 0 error, 0 exception)!> There is 1 failure:=> book\cart\tests\units\Cart::testRemove():In file /book/cart/tests/units/Cart.php on line 53, mageekguy\atoum\asserters\phpArray() failed: array(1) is not equal to array(0)-Expected+Actual@@ -1 +1,3 @@-array(0) {+array(1) {+ [5] =>+ int(3)
在这个例子中,我们看到一次错误(用F表示),以及一个错误报告。
分析代码覆盖率
你必须安装XDebug PHP扩展,https://xdebug.org。例如,在Ubuntu或者Debian上,你可以在终端中输入如下命令:
sudo apt-get install php5-xdebug
在Windows上,你需要打开php.ini文件,并添加自定义代码路径到你的PHP安装目录下:
[xdebug]zend_extension_ts=C:/php/ext/php_xdebug.dll
或者,如果你使用非线程安全的版本,输入如下:
[xdebug]zend_extension=C:/php/ext/php_xdebug.dll
安装过XDebug以后,创建book/cart/coverage.php配置文件,并添加覆盖率报告选项:
<?phpuse \mageekguy\atoum;/** @var atoum\scripts\runner $script */$report = $script->addDefaultReport();$coverageField = new atoum\report\fields\runner\coverage\html('Cart', __DIR__ . '/tests/coverage');$report->addField($coverageField);
现在使用-c选项来使用这个配置再次运行测试:
vendor/bin/atoum -d tests/units -bf tests/bootstrap.php -c coverage.php
在运行这个测试以后,在浏览器中打开tests/coverage/index.html。你将会看到每一个目录和类的一个明确的覆盖率报告:
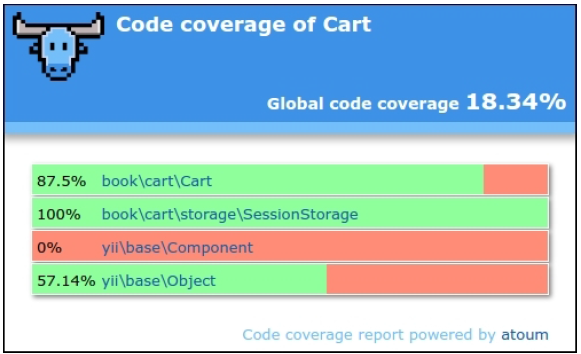
你可以点击任何类,并分析代码的哪些行在测试过程中还没有被执行。
工作原理…
Atoum测试框架支持行为驱动设计(BDD)语法流,如下:
public function testSome(){$this->given($cart = new TestedCart())->and($cart->add(5, 13))->then->sizeof($cart->getItems())->isEqualTo(1)->array($cart->getItems())->isEqualTo([5 => 3])->integer($cart->getCount())->isEqualTo(1)->integer($cart->getAmount())->isEqualTo(3);}
但是,你可以使用常用的类PHPUnit语法来写单元测试:
public function testSome(){$cart = new TestedCart();$cart->add(5, 3);$this->array($cart->getItems())->isEqualTo([5 => 3])->integer($cart->getCount())->isEqualTo(1)->integer($cart->getAmount())->isEqualTo(3);}
Atoum也支持代码覆盖率报告,用于分析测试质量。
参考
- 欲了解更多关于Atoum的信息,参考http://docs.atoum.org/en/latest/
- 源代码和使用例子,参考https://github.com/atoum/atoum
- 使用PHPUnit做单元测试小节
使用Behat作单元测试
Behat是一个BDD框架,以人类可读的语句测试你的代码,这些语句以多个使用例子描述你的代码行为。
准备
为一个新的项目创建一个空的目录。
如何做…
在这个小节中,我们将会创建一个演示,使用Behat测试购物车扩展。
准备扩展结构
- 首先,为你的扩展创建一个目录结构:
book└── cart├── src└── features
- 作为一个Composer包使用这个扩展,准备
book/cart/composer.json文件如下:
{"name": "book/cart","type": "yii2-extension","require": {"yiisoft/yii2": "~2.0"},"require-dev": {"phpunit/phpunit": "4.*","behat/behat": "^3.1"},"autoload": {"psr-4": {"book\\cart\\": "src/","book\\cart\\features\\": "features/"}},"extra": {"asset-installer-paths": {"npm-asset-library": "vendor/npm","bower-asset-library": "vendor/bower"}}}
- 添加如下内容到
book/cart/.gitignore:
/vendor/composer.lock
- 安装扩展所有的依赖:
composer install
- 现在我们得到如下结构:
book└── cart├── src├── features├── .gitignore├── composer.json└── vendor
写扩展代码
从使用PHPUnit做单元测试小节复制Cart、StorageInterface和SessionStorage类。
最后,我们得到如下结构。
book└── cart├── src│ ├── storage│ │ ├── SessionStorage.php│ │ └── StorageInterface.php│ └── Cart.php├── features├── .gitignore├── composer.json└── vendor
写扩展测试
- 添加
book/cart/features/bootstrap/bootstrap.php入口脚本:
<?phpdefined('YII_DEBUG') or define('YII_DEBUG', true);defined('YII_ENV') or define('YII_ENV', 'test');require_once __DIR__ . '/../../vendor/yiisoft/yii2/Yii.php';
- 创建
features/cart.feature文件,并写cart测试场景:
Feature: Shopping cartIn order to buy productsAs a customerI need to be able to put interesting products into a cartScenario: Checking empty cartGiven there is a clean cartThen I should have 0 productsThen I should have 0 productAnd the overall cart amount should be 0Scenario: Adding products to the cartGiven there is a clean cartWhen I add 3 pieces of 5 productThen I should have 3 pieces of 5 productAnd I should have 1 productAnd the overall cart amount should be 3When I add 14 pieces of 7 productThen I should have 3 pieces of 5 productAnd I should have 14 pieces of 7 productAnd I should have 2 productsAnd the overall cart amount should be 17When I add 10 pieces of 5 productThen I should have 13 pieces of 5 productAnd I should have 14 pieces of 7 productAnd I should have 2 productsAnd the overall cart amount should be 27Scenario: Change product count in the cartGiven there is a cart with 5 pieces of 7 productWhen I set 3 pieces for 7 productThen I should have 3 pieces of 7 productScenario: Remove products from the cartGiven there is a cart with 5 pieces of 7 productWhen I add 14 pieces of 7 productAnd I clear cartThen I should have empty cart
- 添加
features/storage.feature存储测试文件:
Feature: Shopping cart storageI need to be able to put items into a storageScenario: Checking empty storageGiven there is a clean storageThen I should have empty storageScenario: Save items into storageGiven there is a clean storageWhen I save 3 pieces of 7 product to the storageThen I should have 3 pieces of 7 product in the storage
- 在
features/bootstrap/CartContext.php文件中,为所有的步骤添加实现:
<?phpuse Behat\Behat\Context\SnippetAcceptingContext;use book\cart\Cart;use book\cart\features\bootstrap\storage\FakeStorage;use yii\di\Container;use yii\web\Application;require_once __DIR__ . '/bootstrap.php';class CartContext implements SnippetAcceptingContext{/*** @var Cart* */private $cart;/*** @Given there is a clean cart*/public function thereIsACleanCart(){$this->resetCart();}/*** @Given there is a cart with :pieces of :product product*/public function thereIsAWhichCostsPs($product, $amount){$this->resetCart();$this->cart->set($product, floatval($amount));}/*** @When I add :pieces of :product*/public function iAddTheToTheCart($product, $pieces){$this->cart->add($product, $pieces);}/*** @When I set :pieces for :arg2 product*/public function iSetPiecesForProduct($pieces, $product){$this->cart->set($product, $pieces);}/*** @When I clear cart*/public function iClearCart(){$this->cart->clear();}/*** @Then I should have empty cart*/public function iShouldHaveEmptyCart(){PHPUnit_Framework_Assert::assertEquals(0,$this->cart->getCount());}/*** @Then I should have :count product(s)*/public function iShouldHaveProductInTheCart($count){PHPUnit_Framework_Assert::assertEquals(intval($count),$this->cart->getCount());}/*** @Then the overall cart amount should be :amount*/public function theOverallCartPriceShouldBePs($amount){PHPUnit_Framework_Assert::assertSame(intval($amount),$this->cart->getAmount());}/*** @Then I should have :pieces of :product*/public function iShouldHavePiecesOfProduct($pieces,$product){PHPUnit_Framework_Assert::assertArraySubset([intval($product) => intval($pieces)],$this->cart->getItems());}private function resetCart(){$this->cart = new Cart(['storage' => newFakeStorage()]);}}
- 此外,在
features/bootstrap/StorageContext.php文件中,添加如下内容:
<?phpuse Behat\Behat\Context\SnippetAcceptingContext;use book\cart\Cart;use book\cart\features\bootstrap\storage\FakeStorage;use book\cart\storage\SessionStorage;use yii\di\Container;use yii\web\Application;require_once __DIR__ . '/bootstrap.php';class StorageContext implements SnippetAcceptingContext{/*** @var SessionStorage* */private $storage;/*** @Given there is a clean storage*/public function thereIsACleanStorage(){$this->mockApplication();$this->storage = new SessionStorage(['key' => 'test']);}/*** @When I save :pieces of :product to the storage*/public function iSavePiecesOfProductToTheStorage($pieces,$product){$this->storage->save([$product => $pieces]);}/*** @Then I should have empty storage*/public function iShouldHaveEmptyStorage(){PHPUnit_Framework_Assert::assertCount(0,$this->storage->load());}/*** @Then I should have :pieces of :product in the storage*/public functioniShouldHavePiecesOfProductInTheStorage($pieces, $product){PHPUnit_Framework_Assert::assertArraySubset([intval($product) => intval($pieces)],$this->storage->load());}private function mockApplication(){Yii::$container = new Container();new Application(['id' => 'testapp','basePath' => __DIR__,'vendorPath' => __DIR__ . '/../../vendor',]);}}
- 添加
features/bootstrap/CartContext/FakeStorage.php文件,这是一个fake存储类:
<?phpnamespace book\cart\features\bootstrap\storage;use book\cart\storage\StorageInterface;class FakeStorage implements StorageInterface{private $items = [];public function load(){return $this->items;}public function save(array $items){$this->items = $items;}}
- 添加
book/cart/behat.yml:
default:suites:default:contexts:- CartContext- StorageContext
- 现在我们将得到如下结构:
book└── cart├── src│ ├── storage│ │ ├── SessionStorage.php│ │ └── StorageInterface.php│ └── Cart.php├── features│ ├── bootstrap│ │ ├── storage│ │ │ └── FakeStorage.php│ │ ├── bootstrap.php│ │ ├── CartContext.php│ │ └── StorageContext.php│ ├── cart.feature│ └── storage.feature├── .gitignore├── behat.yml├── composer.json└── vendor
现在我们运行我们的测试。
运行测试
在使用composer install命令安装所有依赖期间,Composer包管理器安装Behat包到vendor目录中,并将可执行文件behat放到vendor/bin子文件夹中。
现在我们可以运行如下脚本:
cd book/cartvendor/bin/behat
此外,我们将会看到如下测试报告:
Feature: Shopping cartIn order to buy productsAs a customerI need to be able to put interesting products into a cartScenario: Checking empty cart # features/cart.feature:6Given there is a clean cart # thereIsACleanCart()Then I should have 0 products #iShouldHaveProductInTheCart()Then I should have 0 product #iShouldHaveProductInTheCart()And the overall cart amount should be 0 #theOverallCartPriceShouldBePs()...Feature: Shopping cart storageI need to be able to put items into a storageScenario: Checking empty storage # features/storage.feature:4Given there is a clean storage # thereIsACleanStorage()Then I should have empty storage # iShouldHaveEmptyStorage()...6 scenarios (6 passed)31 steps (31 passed)0m0.23s (13.76Mb)
通过注释unset操作,故意破坏cart:
class Cart extends Component{…public function set($id, $amount){$this->loadItems();// $this->_items[$id] = $amount;$this->saveItems();}...}
现在再次运行测试:
Feature: Shopping cartIn order to buy productsAs a customerFeature: Shopping cartIn order to buy productsAs a customerI need to be able to put interesting products into a cart...Scenario: Change product count in the cart # features/cart.feature:31Given there is a cart with 5 pieces of 7 prod #thereIsAWhichCostsPs()When I set 3 pieces for 7 product #iSetPiecesForProduct()Then I should have 3 pieces of 7 product #iShouldHavePiecesOf()Failed asserting that an array has the subset Array &0 (7 => 3).Scenario: Remove products from the cart # features/cart.feature:36Given there is a cart with 5 pieces of 7 prod #thereIsAWhichCostsPs()When I add 14 pieces of 7 product #iAddTheToTheCart()And I clear cart # iClearCart()Then I should have empty cart #iShouldHaveEmptyCart()--- Failed scenarios:features/cart.feature:316 scenarios (5 passed, 1 failed)31 steps (30 passed, 1 failed)0m0.22s (13.85Mb)
在这个例子中,我们看到了一次失败和一次失败报告。
工作原理…
Behat是一个BDD测试框架。它促进writing preceding human-readable testing scenarios to low-level technical implementation。
当我们为每一个特性写场景时,我们可以使用操作的一个集合:
Scenario: Adding products to the cartGiven there is a clean cartWhen I add 3 pieces of 5 productThen I should have 3 pieces of 5 productAnd I should have 1 productAnd the overall cart amount should be 3
Behat解析我们的句子,并找到相关的实现:
class FeatureContext implements SnippetAcceptingContext{/*** @When I add :pieces of :product*/public function iAddTheToTheCart($product, $pieces){$this->cart->add($product, $pieces);}}
你可以创建一个单FeatureContext类(默认),或者为特性集合场景创建指定的上下文的集合。
参考
欲了解更多关于Behat的信息,参考如下URL:
欲了解更多关于其它测试框架的信息,参考本章中的其它小节。

若有收获,就点个赞吧
0 人点赞
