官方扩展
在本章中,我们将会讨论如下话题:
- 身份认证客户端
- SwitchMailer电子邮件库
- Faker fixture数据生成器
- Imagine库
- MongoDB驱动
- ElasticSearch引擎适配器
- Gii代码生成器
- Pjax JQuery插件
- Redis数据库驱动
介绍
Yii2官方库为一些流行的库、数据库和搜索引擎提供了适配器。在本章中,我们将会向你展示如何在你的项目中安装和使用官方扩展。你也将会了解到如何写自己的扩展,并分享给其它开发者。
身份认证客户端
这个扩展为Yii2框架添加了OpenID、OAuth和OAuth2 consumers。
准备
- 按照官方指南http://www.yiiframework.com/doc-2.0/guide-start-installation.html的描述,使用Composer包管理器创建一个新的应用。
- 使用如下命令安装扩展:
composer require yiisoft/yii2-authclient
如何做…
- 打开你的Github应用页面
https://github.com/settings/applications并添加自己的新应用:
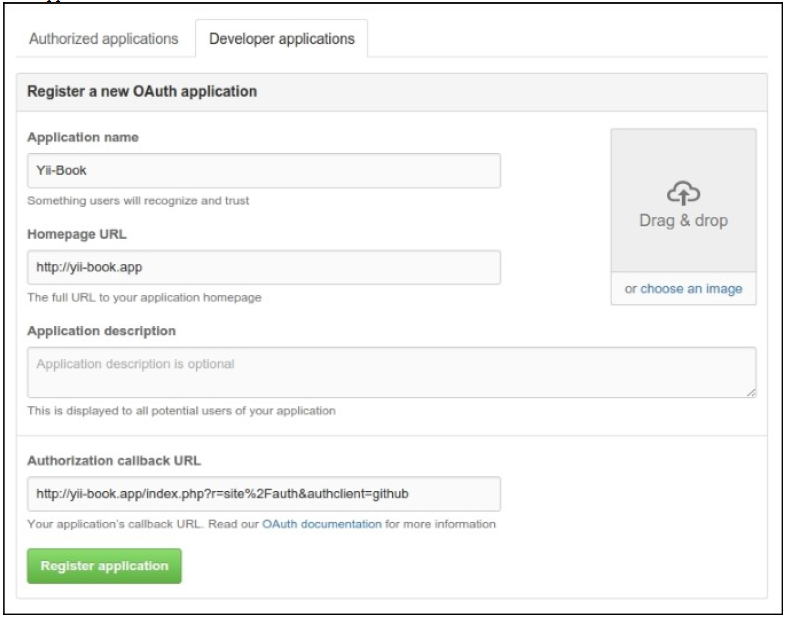
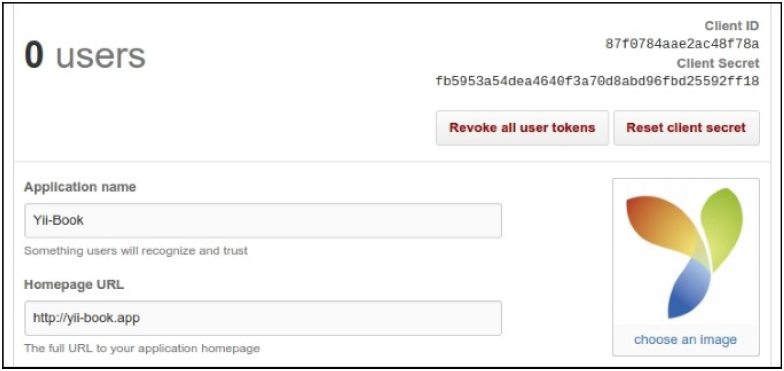
- 获取Client ID和Client Secret:
- 配置你的web配置,并为
authClientCollection组件设置相应的选项:
'components' => [// ...'authClientCollection' => ['class' => 'yii\authclient\Collection','clients' => ['google' => ['class' =>'yii\authclient\clients\GoogleOpenId'],'github' => ['class' => 'yii\authclient\clients\GitHub','clientId' => '87f0784aae2ac48f78a','clientSecret' =>'fb5953a54dea4640f3a70d8abd96fbd25592ff18',],// etc.],],],
- 打开你的
SiteController并添加auth独立动作和成功回调方法:
use yii\authclient\ClientInterface;public function actions(){return [// ...'auth' => ['class' => 'yii\authclient\AuthAction','successCallback' => [$this, 'onAuthSuccess'],],];}public function onAuthSuccess(ClientInterface $client){$attributes = $client->getUserAttributes();\yii\helpers\VarDumper::dump($attributes, 10, true);exit;}
- 打开
views/site/login.php文件并插入AuthChoice小组件:
<div class="site-login"><h1><?= Html::encode($this->title) ?></h1><div class="panel panel-default"><div class="panel-body"><?= yii\authclient\widgets\AuthChoice::widget(['baseAuthUrl' => ['site/auth'], 'popupMode' => false,]) ?></div></div><p>Please fill out the following fields to login:</p>...</div>
- 你将会看到你配置的图标:

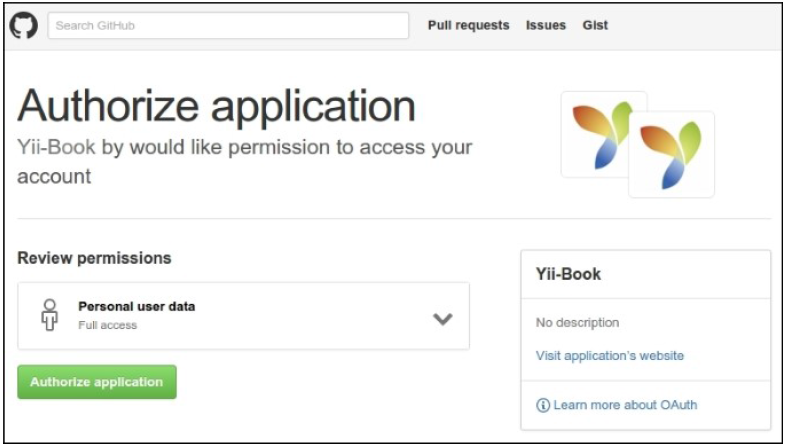
- 为了使用Github provider进行验证:
- 如果成功,你的回调将会展示验证的用户属性:
['login' => 'Name''id' => 0000000'avatar_url' =>'https://avatars.githubusercontent.com/u/0000000?v=3''gravatar_id' => '''url' => 'https://api.github.com/users/Name''html_url' => 'https://github.com/Name'//...'name' => 'YourName''blog' =>site.com''email => mail@site.com'//...]
- 在
onAuthSuccess方法中创建你自己认证的代码,可参考例子https://github.com/yiisoft/yii2-authclient/blob/master/docs/guide/quick-start.md。
工作原理…
这个扩展为你的应用提供了OpenID、OAuth和OAuth2认证客户端。
AuthChoice小组件在一个选择的服务网站上打开了一个身份认证页面,存储auth动作URL。身份认证以后,通过一个POST请求发送认证数据时,当前的服务将用户重定向回去。AuthAction收到这个请求,并调用相应的回调。
你可以使用任何存在的客户端或者创建自己的。
参考
- 为了了解更多关于扩展使用的信息,参考:
- 欲了解更多关于OpenID、OAuth和OAuth2认证技术,参考:
SwitchMailer电子邮件库
许多web应用因为安全原因需要通过电子邮件发送通知和确认客户端动作。Yii2框架为已存在的SwitchMailer库提供了一个warpper,yiisoft/yii2-swiftmailer。
准备
按照官方指南http://www.yiiframework.com/doc-2.0/guide-start-installation.html的描述,使用Composer包管理器创建一个新的应用。
基础应用和高级应用都包含这个扩展。
如何做…
现在我们将会尝试从我们自己的应用中发送任何种类的电子邮件。
发送纯文本电子邮件
- 在
config/console.php文件中设置mailer配置:
'components' => [// ...'mailer' => ['class' => 'yii\swiftmailer\Mailer','useFileTransport' => true,],// ...],
- 创建一个测试控制台控制器,
MailController:
<?phpnamespace app\commands;use yii\console\Controller;use Yii;class MailController extends Controller{public function actionSend(){Yii::$app->mailer->compose()->setTo('to@yii-book.app')->setFrom(['from@yii-book.app' => Yii::$app->name])->setSubject('My Test Message')->setTextBody('My Text Body')->send();}}
- 运行如下控制台命令:
php yii main/send
- 检查你的
runtime/mail目录。它应该包含你的邮件文件。
注意:邮件文件包含了特殊电子邮件源格式的信息,兼容任何邮件软件。你可以按纯文本文件打开。
- 设置
useFileTransport参数为false,或者从配置中移除这个字符串:
'mailer' => ['class' => 'yii\swiftmailer\Mailer',],
然后将你真实的电子邮件ID放入setTo()方法:
->setTo('my@real-email.com')
- 再次运行控制台命令:
php yii mail/send
- 检查你的
inbox目录。
注意:默认情况下,SwiftMailer使用了一个标准的PHP函数,mail(),来发送邮件。请检查你的服务器是否正确设置,从而可以使用mail()函数发送邮件。
需要邮箱系统拒绝没有DKIM和SPF签名的邮件(例如使用mail()函数发送的邮件)或者将他们放到垃圾文件夹中。
发送HTML内容
- 检查你应用中的
mail/layouts/html.php文件并使用如下内容添加mail/layouts/text.php文件:
<?php/* @var $this \yii\web\View *//* @var $message \yii\mail\MessageInterface *//* @var $content string */?><?php $this->beginPage() ?><?php $this->beginBody() ?><?= $content ?><?php $this->endBody() ?><?php $this->endPage() ?>
- 在
mail/message-html.php文件中创建你自己的视图:
<?phpuse yii\helpers\Html;/* @var $this yii\web\View *//* @var $name string */?><p>Hello, <?= Html::encode($name) ?>!</p>Create a mail/message-text.php file with the same content, but without HTML tags:<?phpuse yii\helpers\Html;/* @var $this yii\web\View *//* @var $name string */?>Hello, <?= Html::encode($name) ?>!
- 使用如下代码创建一个控制台控制器
MailController:
<?phpnamespace app\commands;use yii\console\Controller;use Yii;class MailController extends Controller{public function actionSendHtml(){$name = 'John';Yii::$app->mailer->compose('message-html',['name' => $name])->setTo('to@yii-book.app')->setFrom(['from@yii-book.app' => Yii::$app->name])->setSubject('My Test Message')->send();}public function actionSendCombine(){$name = 'John';Yii::$app->mailer->compose(['html' => 'message-html', 'text' => 'message-text'], ['name' => $name,])->setTo('to@yii-book.app')->setFrom(['from@yii-book.app'=> Yii::$app->name])->setSubject('My Test Message')->send();}}
- 运行如下控制台命令:
php yii mail/send-htmlphp yii mail/send-combine
使用SMTP传输
- 为
mailer组件设置transport参数:
'mailer' => ['class' => 'yii\swiftmailer\Mailer','transport' => ['class' => 'Swift_SmtpTransport','host' => 'smtp.gmail.com','username' => 'username@gmail.com','password' => 'password','port' => '587','encryption' => 'tls',],],
- 书写并运行如下代码:
Yii::$app->mailer->compose()->setTo('to@yii-book.app')->setFrom('username@gmail.com')->setSubject('My Test Message')->setTextBody('My Text Body')->send();
- 检查你的Gmail收件箱。
注意:Gmail自动重写From字段为你的默认电子邮件ID,但其他电子邮件系统没有这么做。在传输配置中总是使用一个唯一电子邮件ID,并在setFrom()方法中为其它电子邮件系统中传递反垃圾邮件政策。
添加附件和图片
添加相关的方法来附加任何文件到你的邮件中:
class MailController extends Controller{public function actionSendAttach(){Yii::$app->mailer->compose()->setTo('to@yii-book.app')->setFrom(['from@yii-book.app' => Yii::$app->name])->setSubject('My Test Message')->setTextBody('My Text Body')->attach(Yii::getAlias('@app/README.md'))->send();}}
或者在你的电子邮件视图文件中使用embed()方法来粘贴一个图片到电子邮件内容中:
<img src="<?= $message->embed($imageFile); ?>">
它会自动添加图片文件附件并插入它的唯一标识。
工作原理…
wrapper实现了\yii\mail\MailerInterface。它的compose()方法返回了一个消息对象(\yii\mail\MessageInterface的一个实现)。
你可以使用setTextBody()和setHtmlBody()手动设置纯文本和HTML内容,或者你可以将你的视图和视图参数传递给compose()方法。在这个例子中,mailer调用\yii\web\View::render()方法来渲染相应的内容。
useFileTransport参数在文件中存储电子邮件而不是真正的发送。它对于本地开发和应用测试非常有用。
参考
- 欲了解更多关于
yii2-swiftmailer扩展的信息,访问如下地址: - 欲了解更多关于
SwiftMailer库,参考如下地址:
Fake fixture 数据生成器
fzaninotto/faker是一个PHP扩展,它可以生成需要种类的假数据:名称、电话、地址,以及随机字符串和数字等等。它可以帮助你生成需要随机记录,用于性能和逻辑测试。你可以通过写自己的formatters和generators来扩展你支持的类型集合。
在Yii2应用骨架中,yiisoft/yii2-faker wrapper被包含在composer.json文件的require-dev部分中,这部分用于测试代码(第十一章,测试)。这个wrapper为控制台应用和测试环境提供FixtureController控制台。
准备
按照官方指南http://www.yiiframework.com/doc-2.0/guide-start-installation.html的描述,使用Composer包管理器创建一个新的应用。
如何做…
- 打开目录
tests/codeception/templates并添加fixture模板文件users.txt:
<?php/*** @var $faker \Faker\Generator* @var $index integer*/return ['name' => $faker->firstName,'phone' => $faker->phoneNumber,'city' => $faker->city,'about' => $faker->sentence(7, true),'password' => Yii::$app->getSecurity()->generatePasswordHash('password_' . $index),'auth_key' => Yii::$app->getSecurity()->generateRandomString(),];
- 运行测试控制台
yii命令:
php tests/codeception/bin/yii fixture/generate users --count=2
确认migration生成。
检查
tests/codeception/fixtures是否包含新的users.php文件,以及自动生成的数据:
return [['name' => 'Isadore','phone' => '952.877.8545x190','city' => 'New Marvinburgh','about' => 'Ut quidem voluptatem itaque veniam voluptas dolores.','password' => '$2y$13$Fi3LOl/sKlomUH.DLgqBkOB/uCLmgCoPPL1KXiW0hffnkrdkjCzAC','auth_key' => '1m05hlgaAG8zfm0cyDyoRGMkbQ9W6hj1',],['name' => 'Raleigh','phone' => '1-655-488-3585x699','city' => 'Reedstad','about' => 'Dolorem quae impedit tempore libero doloribus nobis dicta tempora facere.','password' => '$2y$13$U7Qte5Y1jVLrx/pnhwdwt.1uXDegGXuNVzEQyUsb65WkBtjyjUuYm','auth_key' => 'uWWJDgy5jNRk6KjqpxS5JuPv0OHearqE',],],
使用你自己的数据类型
- 使用你自定义生成逻辑创建你自己的provider:
<?phpnamespace tests\codeception\faker\providers;use Faker\Provider\Base;class UserStatus extends Base{public function userStatus(){return $this->randomElement([0, 10, 20, 30]);}}
- 在
/tests/codeception/config/config.php文件中添加provider到provider列表中:
return ['controllerMap' => ['fixture' => ['class' => 'yii\faker\FixtureController','fixtureDataPath' => '@tests/codeception/fixtures','templatePath' => '@tests/codeception/templates','namespace' => 'tests\codeception\fixtures','providers' => ['tests\codeception\faker\providers\UserStatus',],],],// ...];
- 添加
status字段到你的fixture模板文件中:
<?php/*** @var $faker \Faker\Generator* @var $index integer*/return ['name' => $faker->firstName,'status' => $faker->userStatus,];
- 使用控制台命令生成fixture:
php tests/codeception/bin/yii fixture/generate users --count=2
- 检查
fixtures/users.php生成的代码是否包含你的自定义值:
return [['name' => 'Christelle','status' => 30,],['name' => 'Theo','status' => 10,],];
工作原理…
yii2-faker扩展包含一个控制台生成器(它使用你的模板来生成fixture数据文件),并给了你一个准备好的原始Faker对象实例。你可以生成所有或者指定的fixtures,并且你可以在控制台参数中传递自定义数值或者语言。
注意
如果你的测试使用这些fixtures的话,小心已存在的测试文件,因为自动生成会完全覆盖旧数据。
参考
- 源代码以及关于扩展的更多信息,参考:
- https://github.com/yiisoft/yii2-faker/tree/master/docs/guide
- http://www.yiiframework.com/doc-2.0/ext-faker-index.html
- 欲了解更多关于原始库的信息,参考:
- https://github.com/fzaninotto/Faker
- 第十一章,测试
Imagine库
Imagine是用于操作图片的OOP库。它可以让你在GD、Imagic和Gmagic PHP扩展的帮助下,对多种格式的图片进行裁剪、缩放以及执行其它操作。Yii2-Imagine是队这个库的轻量静态封装。
准备
- 按照官方指南http://www.yiiframework.com/doc-2.0/guide-start-installation.html的描述,使用Composer包管理器创建一个新的应用。
- 使用如下命令安装扩展:
composer require yiisoft/yii2-imagine
如何做…
在你的项目中,你可以以两种方式使用扩展:
- 作为工厂使用
- 使用内部方法
作为工厂使用
你可以使用Imagine库类的一个实例:
$imagine = new Imagine\Gd\Imagine();// or$imagine = new Imagine\Imagick\Imagine();// or$imagine = new Imagine\Gmagick\Imagine();
但是,这依赖于你系统中已存在的PHP扩展。你可以使用getImagine()方法:
$imagine = \yii\imagine\Image::getImagine();
使用内部方法
你可以使用corp()、thumbnail()、watermark()、text()、frame()方法用于常见的高级操作:
<?phpuse yii\imagine\Image;Image::crop('path/to/image.jpg', 100, 100, ManipulatorInterface::THUMBNAIL_OUTBOUND)->save('path/to/destination/image.jpg', ['quality' => 90]);
在\yii\imagine\BaseImage的源代码中查看所有支持的方法以及细节。
工作原理…
这个扩展准备用户数据,创建一个原始的Imagine对象,并调用对应的方法。所有的方法都会返回原始的iamge对象。你可以继续操作这个图像,或者将结果保存到你的磁盘上。
参考
- 欲了解更多关于这个扩展的信息,参考如下地址:
- 欲了解更多关于原始库的信息,参考http://imagine.readthedocs.org/en/latest/。
MongoDB驱动
这个扩展为Yii2框架提供了MongoDB的集成,允许你通过ActiveRecord风格的模型使用MongoDB collection的记录。
准备
- 按照官方指南http://www.yiiframework.com/doc-2.0/guide-start-installation.html的描述,使用Composer包管理器创建一个新的应用。
- 从https://docs.mongodb.org/manual/installation/使用正确的安装过程为你的系统安装MongoDB。
- 安装
php5-mongoPHP扩展 - 使用如下命令安装组件:
composer require yiisoft/yii2-mongodb
如何做…
- 首先,创建新的MongoDB数据库。在
mongo-clientshell中运行它,并输入数据库的名称:
mongo> use mydatabase
- 添加连接信息到你的
components配置部分:
return [// ...'components' => [// ...'mongodb' => ['class' => '\yii\mongodb\Connection','dsn' => 'mongodb://localhost:27017/mydatabase',],],];
- 添加新的控制台控制器到你的控制台配置文件中:
return [// ...'controllerMap' => ['mongodb-migrate' => 'yii\mongodb\console\controllers\MigrateController'],];
- 使用shell命令创建新的migration:
php yii mongodb-migrate/create create_customer_collection
- 输入如下代码到
up()和down()方法中:
<?phpuse yii\mongodb\Migration;class m160201_102003_create_customer_collection extends Migration{public function up(){$this->createCollection('customer');}public function down(){$this->dropCollection('customer');}}
- 应用migration:
php yii mongodb-migrate/up
- 添加MongoDB调试板,以及模型生成器到你的配置中:
<?phpif (YII_ENV_DEV) {// configuration adjustments for 'dev' environment$config['bootstrap'][] = 'debug';$config['modules']['debug'] = ['class' => 'yii\debug\Module','panels' => ['mongodb' => ['class' => 'yii\mongodb\debug\MongoDbPanel',],],];$config['bootstrap'][] = 'gii';$config['modules']['gii'] = ['class' => 'yii\gii\Module','generators' => ['mongoDbModel' => ['class' => 'yii\mongodb\gii\model\Generator']],];}
- 运行Gii生成器:
- 启动新的
MongoDB Model Generator来为你的collection生成新的模型:

- 点击预览和生成按钮
- 检查你是否有了新的模型
app\models\Customer:
<?phpnamespace app\models;use Yii;use yii\mongodb\ActiveRecord;/*** This is the model class for collection "customer".** @property \MongoId|string $_id* @property mixed $name* @property mixed $email* @property mixed $address* @property mixed $status*/class Customer extends ActiveRecord{public static function collectionName(){return 'customer';}public function attributes(){return ['_id','name','email','address','status',];}public function rules(){return [[['name', 'email', 'address', 'status'], 'safe']];}public function attributeLabels(){return ['_id' => 'ID','name' => 'Name','email' => 'Email','address' => 'Address','status' => 'Status',];}}
- 再次运行Gii,并生成CRUD:
- 检查你已经生成了
CustomerController类,并运行新的customer管理页面:
- 你可以创建、更新和删除你的顾客数据。
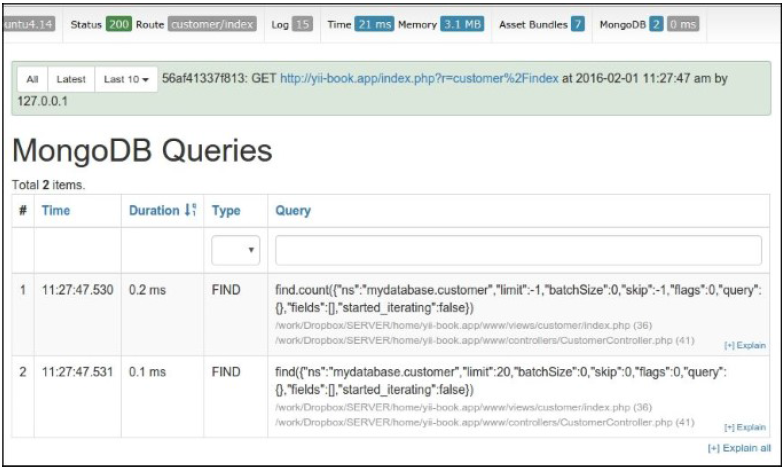
- 在页面的底部查看调试板:

- 你可以看到整个MongoDB查询数以及完整的执行时间。点击计数badge和查询指示:
基本用法
你可以通过\yii\mongodb\Collection实例访问数据库和集合:
$collection = Yii::$app->mongodb->getCollection('customer');$collection->insert(['name' => 'John Smith', 'status' => 1]);
为了执行find查询,你应该使用\yii\mongodb\Query:
use yii\mongodb\Query;$query = new Query;// compose the query$query->select(['name', 'status'])->from('customer')->limit(10);// execute the query$rows = $query->all();
注意:MongoDB文档id(“_id”字段)不是数量,是一个\MongoId类的实例。你不需要关心从整形或者字符串$id转换为\MongoId,因为查询创建会自动转换:
$query = new \yii\mongodb\Query;$row = $query->from('item')->where(['_id' => $id]) // implicit typecast to \MongoId->one();
为了获取真实的Mongo ID字符串,你应该将\MongoId做类型转为字符串:
$query = new Query;$row = $query->from('customer')->one();var_dump($row['_id']); // outputs:"object(MongoId)"var_dump((string)$row['_id']);
工作原理…
这个扩展的Query、ActiveQuery以及ActiveRecord继承了yii\db\QueryInterface和yii\db\BaseActiveRecord。因此他们和框架内置的Query、ActiveQuery以及ActiveRecord是兼容的。
你可以为你的模型使用yii\mongodb\ActiveRecord,yii\mongodb\ActiveQuery构建器来获取你的模型,并在你的data provider使用他们:
use yii\data\ActiveDataProvider;use app\models\Customer;$provider = new ActiveDataProvider(['query' => Customer::find(),'pagination' => ['pageSize' => 10,]]);
关于如何使用Yii ActiveRecord的一般信息,请参考第三章,ActiveRecord,模型和数据库。
参考
- 欲了解更多关于该扩展的信息,请参考如下地址:
- 关于原始库的信息,参考
- 关于ActiveRecord的信息参考第三章,ActiveRecord,模型和数据库
ElasticSearch引擎适配器
这个扩展是一个类ActiveRecord的包装,将ElasticSearch全文搜索引擎集成到Yii2框架中。它允许你使用任何模型数据,并使用ActiveRecord模式在ElasticSearch数据集中获取和存储数据。
准备
- 按照官方指南http://www.yiiframework.com/doc-2.0/guide-start-installation.html的描述,使用Composer包管理器创建一个新的应用。
- 从https://www.elastic.co/downloads/elasticsearch安装
ElasticSearch服务。 - 使用如下命令安装扩展:
composer require yiisoft/yii2-elasticsearch
如何做…
在你的应用配置中设置新的ElasticSearch连接。
return [//....'components' => ['elasticsearch' => ['class' => 'yii\elasticsearch\Connection','nodes' => [['http_address' => '127.0.0.1:9200'],// configure more hosts if you have a cluster],],]];
使用查询类
你可以使用Query类,用于在任何数据集中进行低级查询:
use \yii\elasticsearch\Query;$query = new Query;$query->fields('id, name')->from('myindex', 'users')->limit(10);$query->search();
你也可以创建一个命令,直接运行:
$command = $query->createCommand();$rows = $command->search();
使用ActiveRecord
使用ActiveRecord是一种常用的方法来访问你的数据。只需要扩展yii\elasticsearch\ActiveRecord类,并继承attributes()方法,来定义你文档的属性。
例如,你可以写Customer模型:
class Buyer extends \yii\elasticsearch\ActiveRecord{public function attributes(){return ['id', 'name', 'address', 'registration_date'];}public function getOrders(){return $this->hasMany(Order::className(), ['buyer_id' => 'id'])->orderBy('id');}}
然后写Order模型:
class Order extends \yii\elasticsearch\ActiveRecord{public function attributes(){return ['id', 'user_id', 'date'];}public function getBuyer(){return $this->hasOne(Customer::className(), ['id' => 'buyer_id']);}}
你可以复写index()和type()来定义这个记录的index和type。
下边是一个使用例子:
$buyer = new Buyer();$buyer>primaryKey = 1; // it equivalent to $customer->id = 1;$buyer>name = 'test';$buyer>save();$buyer = Buyer::get(1);$buyer = Buyer::mget([1,2,3]);$buyer = Buyer::find()->where(['name' => 'test'])->one();
你可以使用Query DSL做指定查询:
$result = Article::find()->query(["match" => ["title" => "yii"]])->all();$query = Article::find()->query(["fuzzy_like_this" => ["fields" => ["title", "description"],"like_text" => "Some search text","max_query_terms" => 12]]);$query->all();
你可以添加facets到你的搜索中:
$query->addStatisticalFacet('click_stats', ['field' => 'visit_count']);$query->search();
使用ElasticSearch调试板
这个扩展包含了一个特殊的面板,用于yii2-debug模块。它允许你查看所有执行的查询。你可以在你的配置文件中包含这个面板:
if (YII_ENV_DEV) {// configuration adjustments for 'dev' environment$config['bootstrap'][] = 'debug';$config['modules']['debug'] = ['class' => 'yii\debug\Module','panels' => ['elasticsearch' => ['class' => 'yii\elasticsearch\DebugPanel',],],];$config['bootstrap'][] = 'gii';$config['modules']['gii'] = 'yii\gii\Module';}
工作原理…
这个扩展提供了一个低级命令构建器,以及高级ActiveRecord实现,用于从ElasticSearch中查询记录。
这个扩展的ActiveRecord的用法和数据库的ActiveRecord非常类似,后者可以参考第三章,ActiveRecord,模型和数据库,此外还有join()、groupBy()、having()、union()ActiveQuery操作。
注意:ElasticSearch默认限制返回的记录数量,如果你使用via()选项来使用关系,注意这个限制。
参考
- 欲了解更多关于这个扩展的信息,参考
- 你也可以访问官方扩展网站https://www.elastic.co/products/elasticsearch
- 欲了解更多关于Query DSL的信息,你可以访问:
- ActiveRecord的用法参考第三章,ActiveRecord,模型和数据库
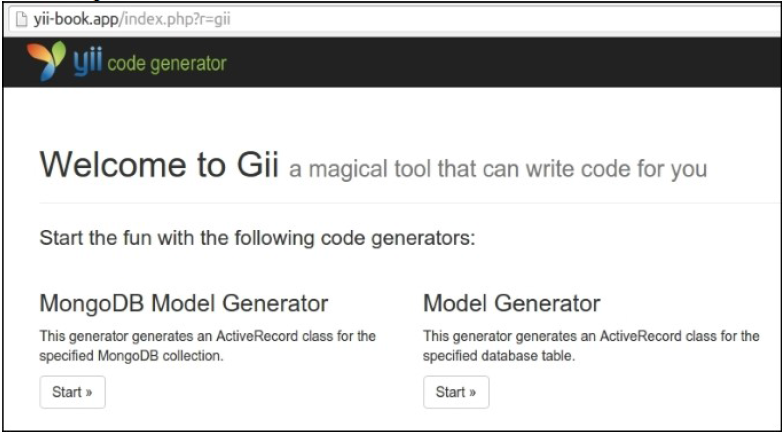
Gii代码生成器
这个扩展为Yii2应用提供了一个基于web的代码生成器,名叫Gii。你可以使用Gii来快速生成模型、表单、模块、CRUD等等。
准备
- 按照官方指南http://www.yiiframework.com/doc-2.0/guide-start-installation.html的描述,使用Composer包管理器创建一个新的应用。
- 使用shell命令创建一个新的migration:
php yii migrate/create create_customer_table
- 将如下代码放在
up()和down()两个方法中:
use yii\db\Schema;use yii\db\Migration;class m160201_154207_create_customer_table extends Migration{public function up(){$tableOptions = null;if ($this->db->driverName === 'mysql') {$tableOptions ='CHARACTER SET utf8 COLLATE utf8_unicode_ci ENGINE=InnoDB';}$this->createTable('{{%customer}}', ['id' => Schema::TYPE_PK,'name' => Schema::TYPE_STRING . ' NOT NULL','email' => Schema::TYPE_STRING . ' NOT NULL','address' => Schema::TYPE_STRING,], $tableOptions);}public function down(){$this->dropTable('{{%customer}}');}}
- 应用这个migration:
php yii migrate/up
如何做…
在你的项目中,你可以以两种方式使用这个扩展:
- 使用GUI
- 使用CLI
使用GUI
- 检查你的web配置是否包含如下代码:
if (YII_ENV_DEV) {$config['bootstrap'][] = 'gii';$config['modules']['gii'] = ['class' => 'yii\gii\Module',];}
- 你的
web/index.php文件将会定义开发环境:
defined('YII_ENV') or define('YII_ENV', 'dev');
先前的配置表明,如果是在开发环境中,这个应用将会包含一个名叫gii的模块,它的类是yii\gii\Module。
默认情况下,这个模块允许IP地址为127.0.0.1访问。如果你在其它地方访问,将你的IP地址添加到allowedIPs属性中:
$config['modules']['gii'] = ['class' => 'yii\gii\Module',allowedIPs = ['127.0.0.1', '::1', '192.168.0.*'],];
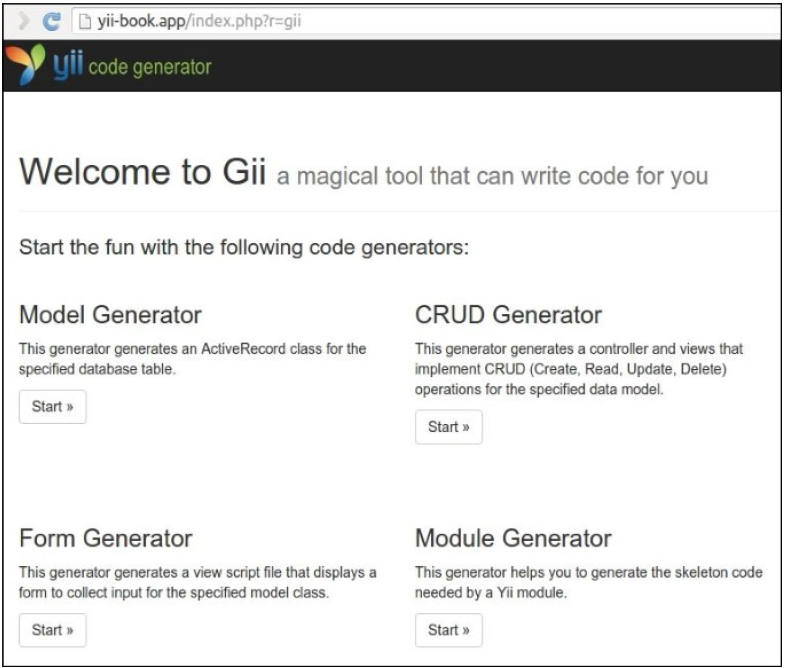
- 访问
http://localhost/index.php?r=gii:
- 点击
模型生成器按钮,在表单中填写你的标明和模型名:
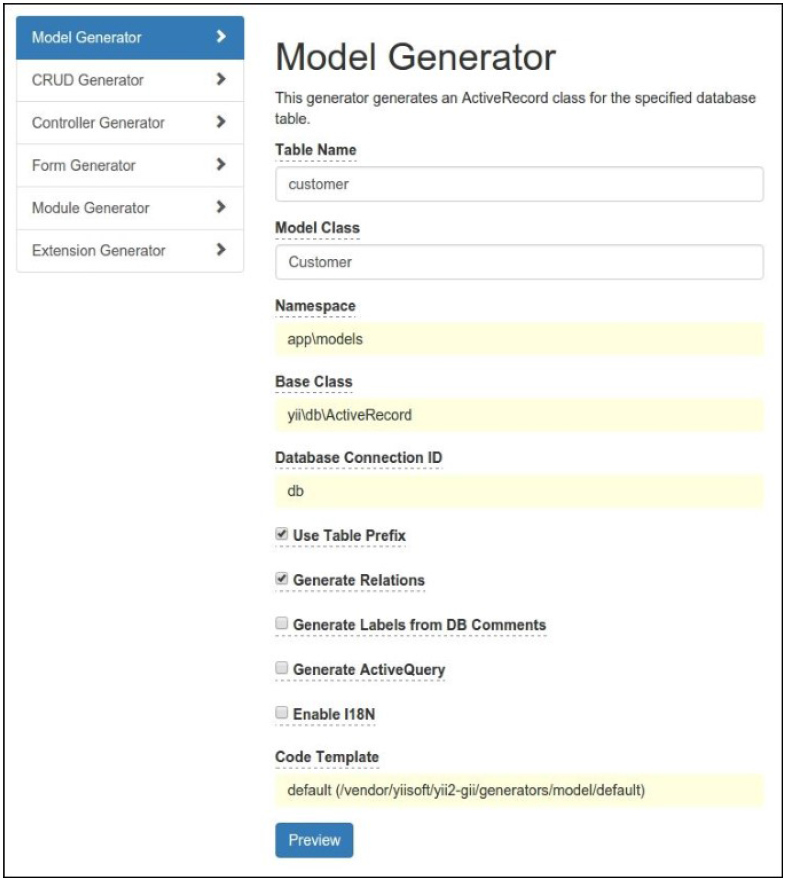
- 点击预览按钮。你能看到文件列表:
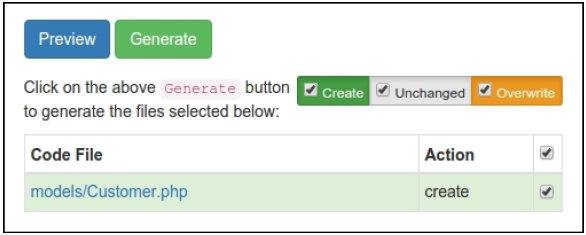
- 如果想重新生成已经存在的文件,Gii将会用黄色标记:
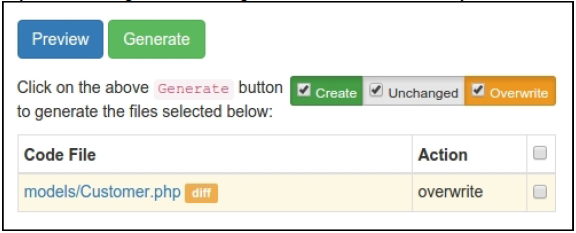
- 在这种情况下,你可以查看存在的文件和新文件之间的区别,如果需要就覆盖目标。
- 做完这些以后,点击生成按钮:
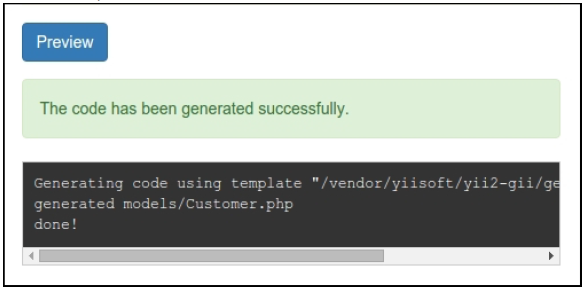
- 检查新的类,
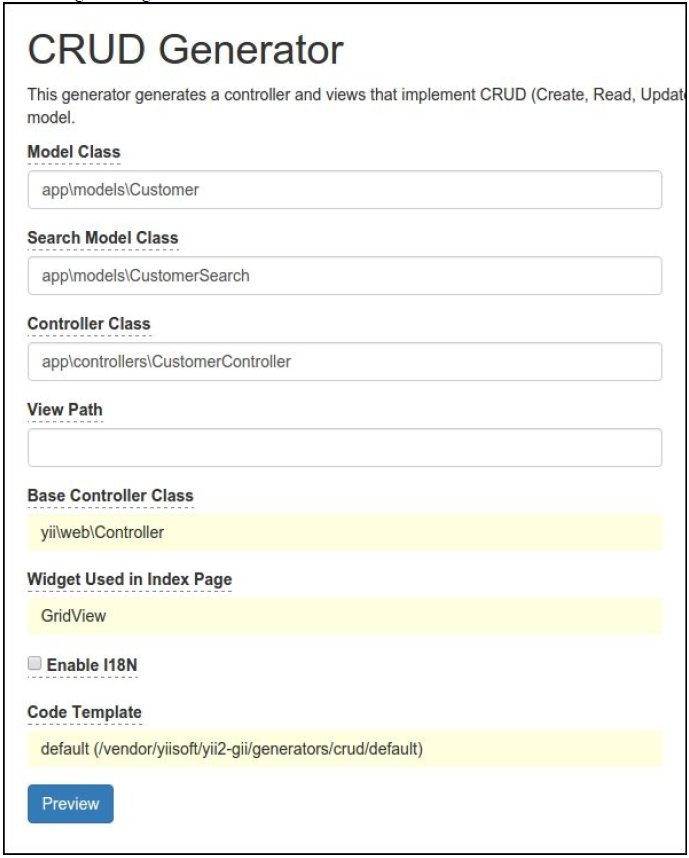
\app\models\Customer。 - CRUD是一个缩写,代表四种常用的任务:创建、读取、更新和删除。为了使用Gii创建CRUD,选择CRUD生成器部分。指定你的模型类,并输出其它字段:
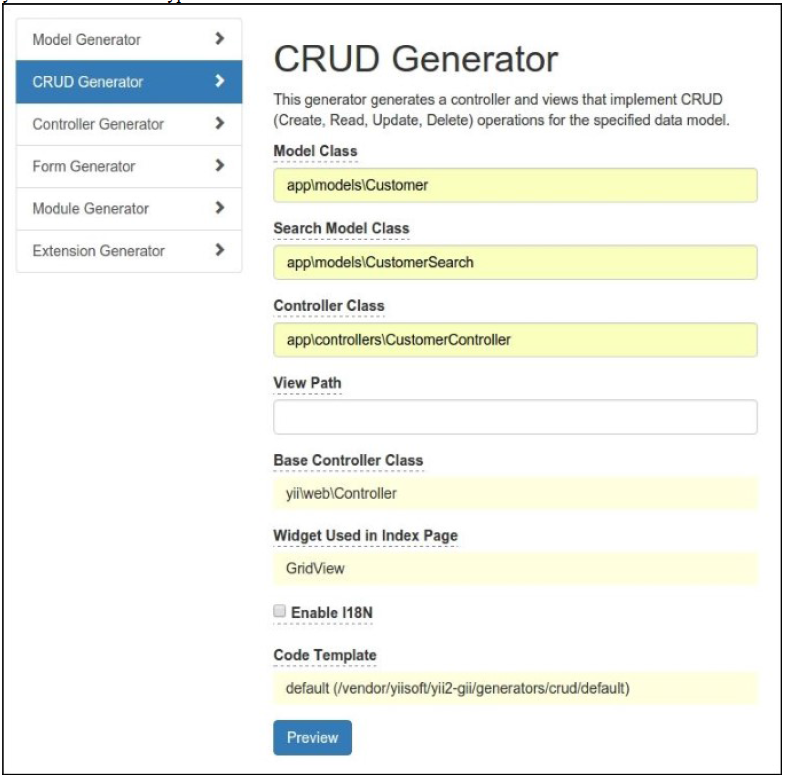
- 生成新的条目:

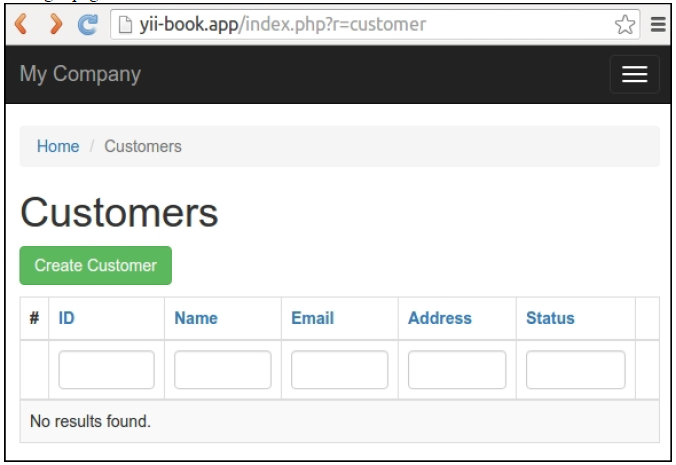
- 然后,尝试打开新的控制器:
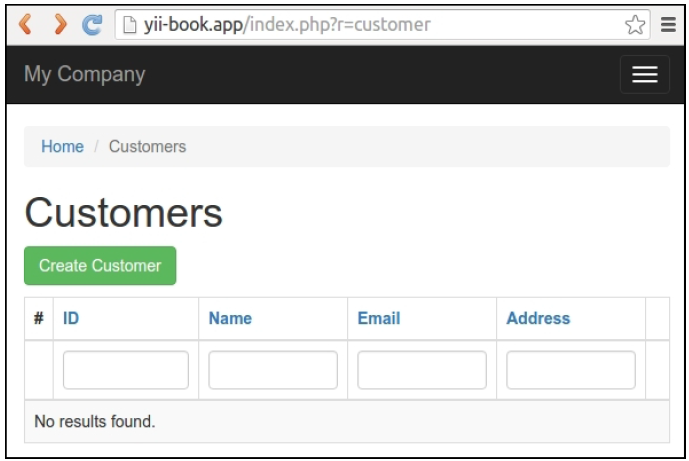
- 你将会看到一个数据grid,展示了数据表中的消费者数据。尝试创建一个新的条目,你可以对这个表格进行排序或者在列头上输入过滤条件进行过滤。
使用CLI
Gii为代码生成提供了一个控制台控制器:
- 检查你的控制台配置是否包含Gii模块设置:
return [// ...'modules' => ['gii' => 'yii\gii\Module',],// ...];
- 运行任何shell命令获取帮助:
php yii help giiphp yii help gii/model
- 输出如下命令启动一个模型生成过程:
php yii gii/model --tableName=customer --modelClass=Customer --useTablePrefix=1
- 检查新的类
\app\models\Customer: - 为你的模型生成CRUD:
php yii gii/crud --modelClass=app\\models\\Customer \--searchModelClass=app\\models\\CustomerSearch \--controllerClass=app\\controllers\\CustomerController
工作原理…
Gii允许你生成一些标准代码元素,而不是手动输入。它提供了基于web的和控制台接口来使用每一个生成器。
参考
- 欲了解关于这个扩展的更多信息,参考:
- 对于MongoDB集成,参考第八章扩展Yii中的创建一个小组件小节
Pjax JQuery插件
Pjax是一个小组件,它集成了pjax jQuery插件。所有被这个小组件包括的内容,可以通过AJAX加载,而不需要刷新当前页面,这个小组件在你浏览器的地址栏中也使用HTML5 History API来修改当前URL。
准备
按照官方指南http://www.yiiframework.com/doc-2.0/guide-start-installation.html的描述,使用Composer包管理器创建一个新的应用。
如何做…
在下面的例子中,你可以看到如何通过yii\grid\GridView小组件来使用Pjax:
<?phpuse yii\widgets\Pjax;?><?php Pjax::begin(); ?><?= GridView::widget([...]); ?><?php Pjax::end(); ?>
只需要在Pjax::begin()和Pjax::end()包裹任何代码片段。
这将会渲染出如下HTML代码:
<div id="w1"><div id="w2" class="grid-view">...</div></div><script type="text/javascript">jQuery(document).ready(function () {jQuery(document).pjax("#w1 a", "#w1", {...});});</script>
所有被包裹的内容,包括翻页和排序链接,都会通过AJAX重新加载。
指定一个自定义ID
Pjax从AJAX请求获取页面内容,然后使用相同的ID释放它自己的DOM元素。你可以通过渲染没有布局的内容加速页面渲染性能,尤其是对于Pjax请求:
public function actionIndex(){$dataProvider = ...;if (Yii::$app->request->isPjax) {return $this->renderPartial('_items', ['dataProvider' => $dataProvider,]);} else {return $this->render('index', ['dataProvider' => $dataProvider,]);}}
默认情况下,yii\base\Widget::getId方法会自增标识符,因此小组件在任何页面上,都会有一个自增的属性:
<nav id="w0">...</nav> // Main navigation<ul id="w1">...</ul> // Breadcrumbs widget<div id="w2">...</div> // Pjax widget
使用renderPartial()或者renderAjax()方法进行渲染,不需要渲染布局,你自己的页面将会有一个带有数字0的小组件:
<div id="w0">...</div> // Pjax widget
在这个结果中,你自己的小组件将不会在下次请求中通过w2选择器找到自己的block。
但是,Pjax将会在Ajax响应中通过w2选择器找到相同的block。在这个结果中,你自己的小组件将不会在下次请求中通过w2选择器找到这个block。
因此,你必须为你的Pjax小组件手动指定一个唯一标识符,来避免冲突:
<?php Pjax::begin(['id' => 'countries']) ?><?= GridView::widget([...]); ?><?php Pjax::end() ?>
使用ActiveForm
默认情况下,Pjax只和被包裹的快交互。如果你想和ActiveForm小组件一起使用它,你必须使用表单的data-pjax选项:
<?phpuse \yii\widgets\Pjaxuse \yii\widgets\ActiveForm;<?php yii\widgets\Pjax::begin(['id' => 'my-block']) ?><?php $form = ActiveForm::begin(['options' => ['data-pjax' => true,]]); ?><?= $form->field($model, 'name') ?><?php ActiveForm::end(); ?><?php Pjax::end(); ?>
它会为表单的提交事件添加相应的监听器。
你也可以使用Pjax小组件的$formSelector选项,来指定什么表单提交将会出发pjax。
使用客户端脚本
你可以订阅容器事件:
<?php $this->registerJs('$("#my-block").on("pjax:complete", function() {alert('Pjax is completed');});'); ?>
或者,你可以通过使用它的选择器,手动重新加载容器:
<?php $this->registerJs('$("#my-button").on("click", function() {$.pjax.reload({container:"#my-block"});});'); ?>
工作原理…
Pjax是任何代表片段的一个容器。它订阅片段中所有链接的点击事件,并替换整个页面,使用Ajax调用重新加载它。我们可以使用data-pjax属性用于被包裹的表单,以及任何表单提交将会触发一个Ajax请求。
这个小组件将会加载和更新on-the-fly小组件内容,而不需要再加布局资源(JS,CSS)。
你可以配置小组件的$linkSelector来指定什么链接将会触发Pjax,以及配置$formSelector来指定什么样的表单提交将会触发Pjax。
你可以为容器中一个指定的链接禁用Pjax,方法是给这个链接添加一个data-pjax="0"属性。
参考
- 欲了解更多关于这个扩展的用法,参考:
- 欲了解更多关于客户端选项和方法的信息,参考https://github.com/yiisoft/jquery-pjax#usage
Redis数据库驱动
这个扩展允许你在基于Yii2框架的任何项目中使用Redis键值对存储。它包含了Cache和Session两个存储句柄,以及这个扩展,它实现了ActiveRecord模式,用于访问Redis数据库记录。
准备
- 按照官方指南http://www.yiiframework.com/doc-2.0/guide-start-installation.html的描述,使用Composer包管理器创建一个新的应用。
- 安装存储http://redis.io
- 使用如下命令安装migration:
composer require yiisoft/yii2-redis
如何做…
首先,在你的配置文件中配置Connection类:
return [//....'components' => ['redis' => ['class' => 'yii\redis\Connection','hostname' => 'localhost','port' => 6379,'database' => 0,],]];
直接使用方法
对于Redis命令的低级使用,你可以使用这个连接组件的executeCommand()方法:
Yii::$app->redis->executeCommand('hmset', ['test_collection', 'key1', 'val1', 'key2', 'val2']);
你也可以使用简化的快捷方式,而不是调用executeCommand:
Yii::$app->redis->hmset('test_collection', 'key1', 'val1', 'key2', 'val2')
使用ActiveRecord
欲通过ActiveRecord模式访问Redis记录,你的记录类需要从yii\redis\ActiveRecord基类扩展,并实现attributes()方法:
class Customer extends \yii\redis\ActiveRecord{public function attributes(){return ['id', 'name', 'address', 'registration_date'];}public function getOrders(){return $this->hasMany(Order::className(), ['customer_id' => 'id']);}}
任何模型的主键可以通过primaryKey()方法定义,如果没有指定,它的缺省值是id。如果你没有通过primaryKey()手动执行这个主键的话,它需要被放置在属性列表中。
下面是一个使用例子:
$customer = new Customer();$customer->name = 'test';$customer->save();echo $customer->id; // id will automatically be incremented if not set explicitly// find by query$customer = Customer::find()->where(['name' => 'test'])->one();
工作原理…
这个扩展提供了一个Connection组件,用于对Redis存储记录的低级访问。
你也可以使用一个类ActiveRecord的模型,它带有一些方法的集合(where(),limit(),offset()和indexBy())。其它方法不存在,因为Redis不支持SQL查询。
在Redis中没有表,所以你不能定义via relation via a junction table name。你只需要通过hasMany关系定义一个多对多的关系。
关于Yii的ActiveRecord的一般信息,参考第三章,ActiveRecord,模型和数据库。
参考
- 欲了解更多关于这个扩展使用的信息,参考:
- 欲了解关于Redis键值对存储的信息,参考:http://redis.io/documentation
- 第三章,ActiveRecord,模型和数据库中的ActiveRecord用法

若有收获,就点个赞吧
0 人点赞
