参考
http://xiejava.ishareread.com/posts/57cef505/
https://hujiekang.top/2019/11/01/centos-python3/
环境的搭建是进行开发的第一步,python因为存在python2和python3两个版本,让在建立python环境时造成不便,并且由于在Linux环境下不像Window环境安装那么友好,存在一些小坑。本教程记录了CentOS7下安装python3.8的过程和注意事项。
一、查看系统版本
[root@localhost ~]# cat /etc/centos-releaseCentOS Linux release 7.2.1511 (Core)
[root@localhost ~]# uname -aLinux localhost.localdomain 3.10.0-327.el7.x86_64 #1 SMP Thu Nov 19 22:10:57 UTC 2015 x86_64 x86_64 x86_64 GNU/Linux
查看python版本
[root@localhost ~]# python -VPython 2.7.5
系统默认安装了Python 2.7.5
二、安装依赖
yum install zlib-devel bzip2-devel openssl-devel ncurses-devel sqlite-devel readline-devel tk-devel gcc make
如果有提示一路选择Y就可以
三、下载python源码包
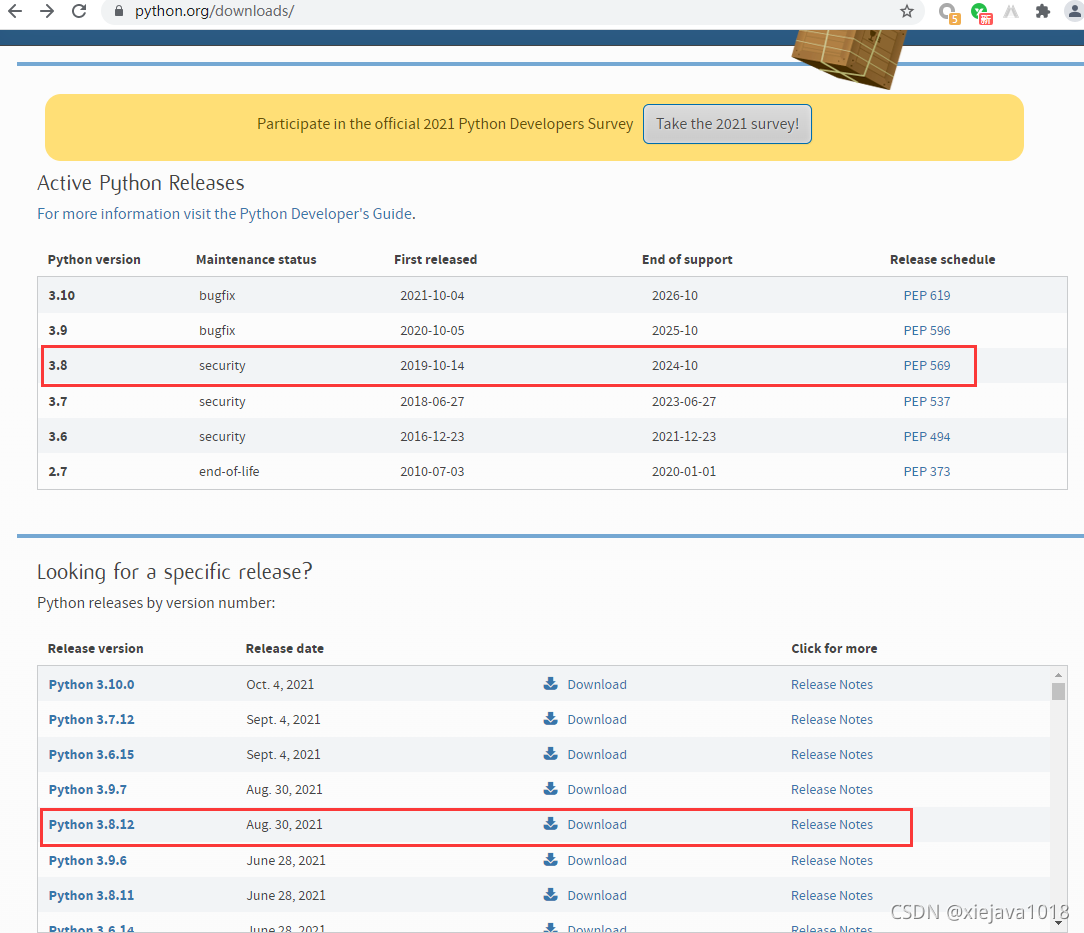
python官网https://www.python.org/ 目前python最新版本是python3.10
下载稳定版本3.8版
wget https://www.python.org/ftp/python/3.8.12/Python-3.8.12.tgz
四、解压安装python源码包
1、解压
tar -zxvf Python-3.8.12.tgz
2、安装
进入解压后的目录进行编译和安装
cd Python-3.8.12/[root@localhost Python-3.8.12]#
# --enable-shared 启用共享,方便其他依赖python的一些内置库的资源的正常安装# --enable-optimizations 优化性能有10%[root@localhost Python-3.8.12]# ./configure --enable-shared --enable-optimizations[root@localhost Python-3.8.12]# make altinstall
打开上述选项在编译的时候会启动下面两项最佳化:
- Profile guided optimization (PGO):又称之为profile-directed feedback (PDF)或是feedback-directed optimization (FDO)。像是Windows用的Firefox或是google Chrome在编译的时候都有加入这个最佳化选项以提高执行时的效能
- Link Time Optimization (LTO):在将object档案组合而成程式的时候做得最佳化
看网路上面的说法是Python code可以加快大概10-20%,代价是要花约莫半小时在编译上。
执行完后显示安装成功
ssl 支持
I encountered the problem when installing 3.8.11. I tried the above posts but they didn't work.This is how I finally made it compile:1) Install openssl 1.1.1g;2) untar the tarball;3) enter the source directory;4) run ./config --prefix=/usr/local/openssl_1.1 --openssldir=/usr/local/openssl_1.1to install to /usr/local/openssl_1.1.make & make install.You can customize the directory.5)Download python 3.8 source tarball;6)untar the tarball. Enter the source/Modules;7) edit the file Setup;8) find the lines:SSL=/usr/local/sslssl _ssl.c \-DUSE_SSL -I$(SSL)/include -I$(SSL)/include/openssl \-L$(SSL)/lib -lssl -lcryptochange SSL=/usr/local/ssl to SSL=/usr/local/openssl_1.19) Switch to the source directory. run./configure --prefix=/usr/local/python3.8 --with-openssl=/usr/local/openssl_1.110) export LD_LIBRARY_PATH=/usr/local/openssl_1.1/lib:$LD_LIBRARY_PATH11) make & make install. If you need sudo, also export LD_LIBRARY_PATH in sudo
3、建立命令软链接
python
虽然python3.8.12安装成功了,但默认输入python还是显示是2.7版本的。如果要用python3.8.12需要输入python3即可,有时候不太方便。可以通过修改软链接的方式将默认的python指向python3.8.12。
先看一下默认的python及新安装的python3都安装在哪里
[root@localhost]# which python/usr/bin/python[root@localhost]# which python3/usr/local/bin/python3[root@localhost]# ln -s /usr/local/python3/bin/python3.8 /usr/bin/python3[root@localhost]# ln -s /usr/local/python3/bin/pip3.8 /usr/bin/pip3[root@localhost]# python --verison[root@localhost]# pip -V
提示动态库问题
[root@localhost]# python3 --versionpython3: error while loading shared libraries: libpython3.8.so.1.0:cannot open shared object file: No such file or directory[root@localhost]# find / -name libpython3.8.so.1.0/usr/local/python3/lib/libpython3.8.so.1.0[root@localhost]# cp /usr/local/python3/lib/libpython3.6m.so.1.0 /usr/lib/or[root@localhost]# cp /usr/local/python3/lib/libpython3.6m.so.1.0 /usr/lib64/
五、配置yum
安装python3改完软链接以后发现yum命令报错了,yum是依赖python2.7的,你把python改成了3.8了,所以报错了。
[root@localhost Python-3.8.12]# yumFile "/usr/bin/yum", line 30except KeyboardInterrupt, e:^SyntaxError: invalid syntax
可以修改yum里对python2的依赖即可。虽然安装了python3但是系统里python2依旧还在系统里,可以通过python2来指定用python2.7的命令,首先来看下python2的命令在哪里
[root@localhost ~]# which python2/usr/bin/python2
可以cd到/usr/bin目录下 通过ls -alh|grep python查看python命令的详细情况。
[root@localhost bin]# ls -alh|grep python

可以看到python软连接是执行的python3命令,python2是执行的python2.7的命令
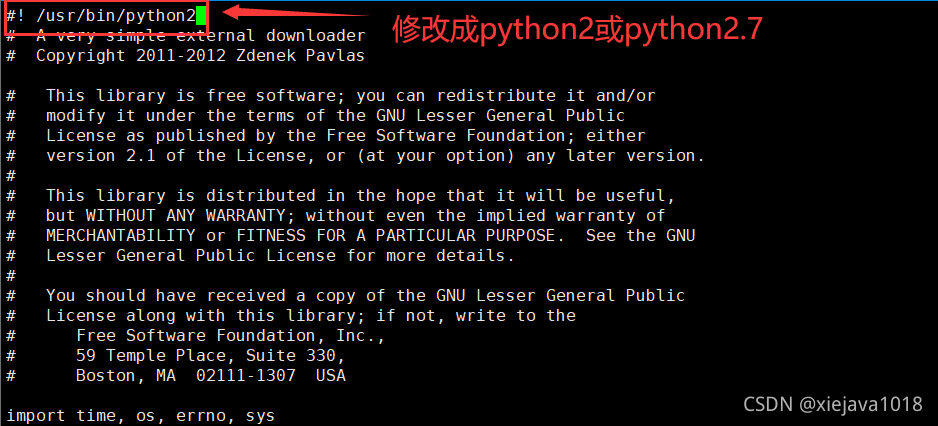
vi /usr/libexec/urlgrabber-ext-down
修改对python的依赖,修改成python2或python2.7都可以。
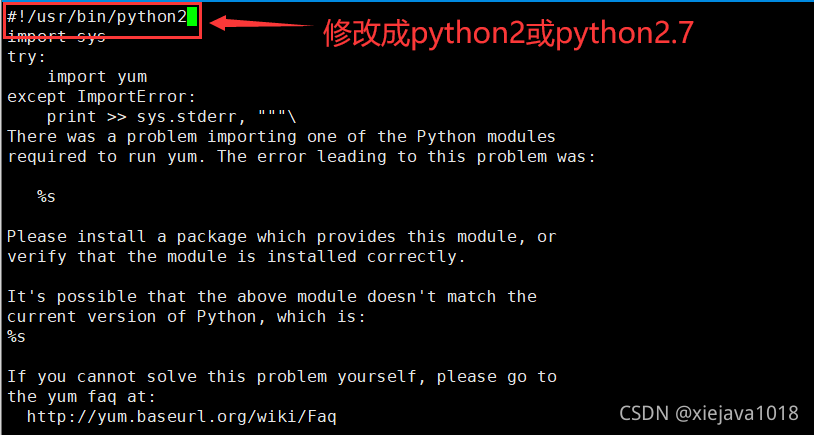
vi /usr/bin/yum

修改完这两个文件后,再敲yum命令就不会报错了。
至此CentOS7环境下python3.8.12已经成功安装!
作者博客:http://xiejava.ishareread.com/
自动安装脚本
原文 https://blog.slogra.com/post-767.html
#!/bin/bashPATH=/usr/local/sbin:/usr/local/bin:/usr/sbin:/usr/binexport PATHversion="3.8.13"echo "Please enter the version number you need:"read -p "(Default version: 3.8.13):" versionif [ "$version" = "" ]; thenversion="3.8.13"finame="Python"pyfile="$name-$version.tgz"check_ver=$(echo $version | awk '{printf ("%3.1f\n",$1)}')py3_dir="/usr/local/python3"function check_login_user() {# Check if user is rootif [ "$(id -u)" != "0" ]; thenecho "Error: You must be root to run this script, please use root to initialization OS."exit 1fi}function install_dev_tools() {rpm=$(rpm -qa libffi-devel | awk -F "-" '{print $1}')if [ -z "$rpm" ]; thenyum -y install wget gcc gcc-c++ make openssl-devel bzip2-devel libffi-develelseecho -e "\033[40;31m libffi [found]\033[40;37m"fi}function uninstall_python3() {if [ -e "${py3_dir}" ]; then#卸载pyhton3rpm -qa | grep python3 | xargs rpm -ev --allmatches --nodeps#删除所有残余文件whereis python3 | xargs rm -frvelseecho -e "\033[40;31m python [no found]\033[40;37m"fi}function install_python3() {if [ -s "${pyfile}" ]; thenecho -e "\033[40;31m $pyfile [found]\033[40;37m"else# 使用华为镜像# https://mirrors.huaweicloud.com/python/3.8.13/Python-3.8.13.tgzwget https://mirrors.huaweicloud.com/python/$version/$pyfile -O /tmp/$pyfilecd /tmp && tar zxf $pyfileficd /tmp/${name}-${version} || exit./configure --prefix=/usr/local/python3 --enable-optimizationsmake altinstallif [ "$check_ver" = "3.7" ]; thenln -s /usr/local/python3/bin/python3.7 /usr/bin/python3ln -s /usr/local/python3/bin/pip3.7 /usr/bin/pip3elif [ "$check_ver" = "3.8" ]; thenln -s /usr/local/python3/bin/python3.8 /usr/bin/python3ln -s /usr/local/python3/bin/pip3.8 /usr/bin/pip3fi}function set_pip_config() {if [ -d /root/.pip ]; thenecho -e "\033[40;31m file is [found]\033[40;37m"elsemkdir ~/.pipcat >~/.pip/pip.conf <<EOF[global]index-url = https://mirrors.aliyun.com/pypi/simple/[install]trusted-host=mirrors.aliyun.comdisable-pip-version-check = truetimeout = 6000EOFfi}function upgrade_pip3() {pip3 install --upgrade pipecho -e "\nInstalled Python and pip version is ... "python3 -V && pip3 -Vecho -e "\033[32m \nInstall Successfully! \033[0m"}function main() {check_login_userinstall_dev_toolsuninstall_python3install_python3set_pip_configupgrade_pip3}main

