Python 高性能 web 框架 - FastApi 全面指南
一、简介
FastAPI 是一个用于构建 API 的现代、快速(高性能)的 web 框架,使用 Python 3.6+ 并基于标准的 Python 类型提示。
它具有如下这些优点:
快速:可与 NodeJS 和 Go 比肩的极高性能(归功于 Starlette 和 Pydantic)
高效编码:提高功能开发速度约 200% 至 300%
更少 bug:减少约 40% 的人为(开发者)导致错误。
智能:极佳的编辑器支持。处处皆可自动补全,减少调试时间
简单:设计的易于使用和学习,阅读文档的时间更短
简短:使代码重复最小化。通过不同的参数声明实现丰富功能。bug 更少
健壮:生产可用级别的代码。还有自动生成的交互式文档
标准化:基于(并完全兼容)API 的相关开放标准:OpenAPI (以前被称为 Swagger) 和 JSON Schema。
二、安装
pip install fastapi
ASGI 服务器可以使用uvicorn:
pip install uvicorn[standard]
三、简单示例
创建一个 main.py 文件并写入以下内容:
from typing import Optionalfrom fastapi import FastAPIapp = FastAPI()@app.get("/")def read_root():return {"Hello": "World"}@app.get("/items/{item_id}")def read_item(item_id: int, q: Optional[str] = None):return {"item_id": item_id, "q": q}
启动服务器:
uvicorn main:app --reload
访问URL:http://127.0.0.1:8000/items/5?q=somequery,你将会看到如下 JSON 响应:
{"item_id": 5, "q": "somequery"}
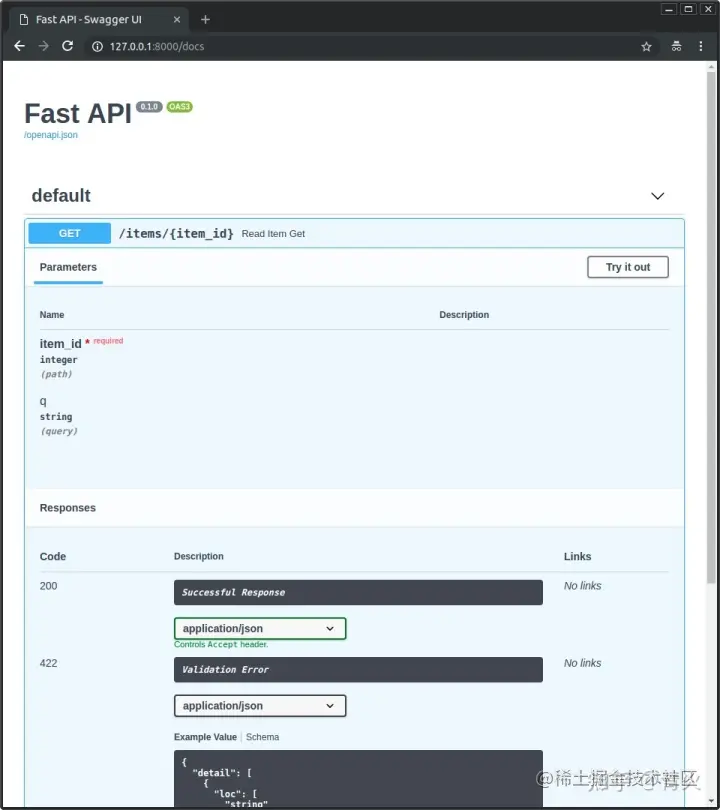
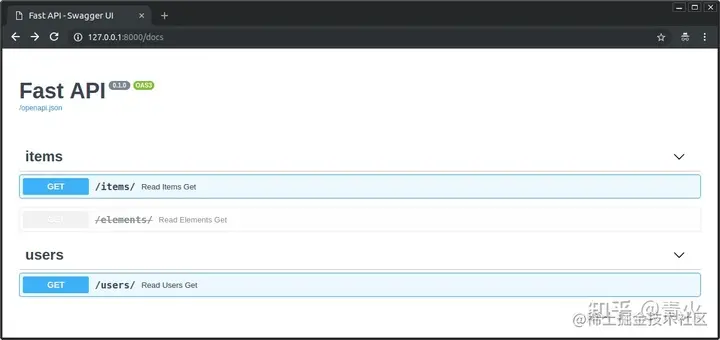
访问URL:http://127.0.0.1:8000/docs,你会看到自动生成的交互式 API 文档,由Swagger UI 生成:
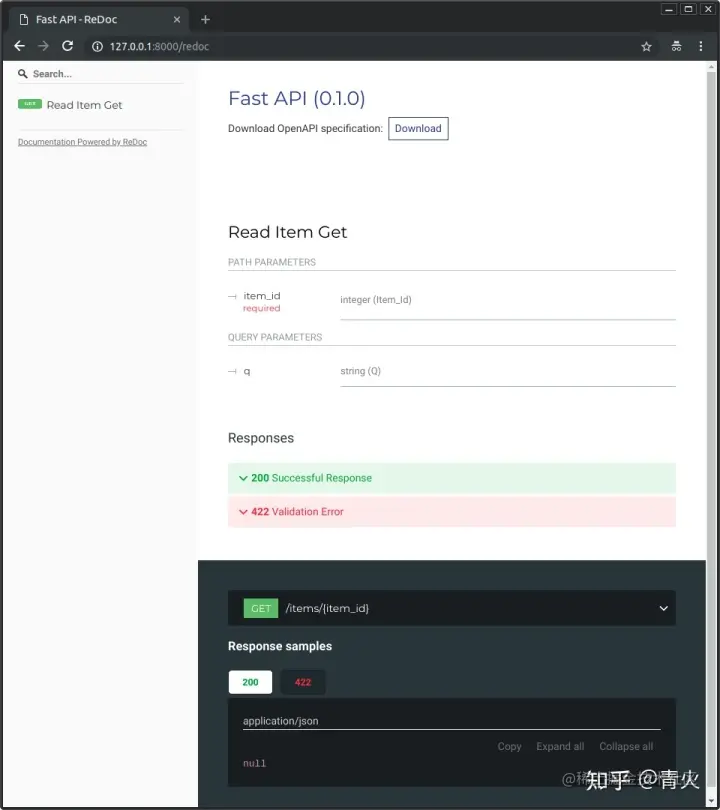
访问URL:http://127.0.0.1:8000/redoc,你会看到另一个自动生成的文档(由ReDoc生成):
四、请求
使用与 Python 格式化字符串相同的语法来声明路径”参数”或”变量”:
from fastapi import FastAPIapp = FastAPI()@app.get("/items/{item_id}")async def read_item(item_id):return {"item_id": item_id}
路径参数item_id的值将作为参数item_id传递给你的函数。声明不属于路径参数的其他函数参数时,它们将被自动解释为”查询字符串”参数:
from fastapi import FastAPIapp = FastAPI()fake_items_db = [{"item_name": "Foo"}, {"item_name": "Bar"}, {"item_name": "Baz"}]@app.get("/items/")async def read_item(skip: int = 0, limit: int = 10):return fake_items_db[skip : skip + limit]
查询字符串是键值对的集合,这些键值对位于 URL 的?之后,并以&符号分隔。
可以使用Query对查询进行额外的校验:
from typing import Optionalfrom fastapi import FastAPI, Queryapp = FastAPI()@app.get("/items/")async def read_items(q: Optional[str] = Query(None, max_length=50)):results = {"items": [{"item_id": "Foo"}, {"item_id": "Bar"}]}if q:results.update({"q": q})return results
Query 有如下这些字段校验:
- min_length 最小长度
- max_length 最大长度
- regex 正则匹配
- Query 第一个参数为默认值,
...表示是必需的
Path和Query用法一样,也能对查询字段进行校验。
而且你还可以声明数值校验:
from fastapi import FastAPI, Path, Queryapp = FastAPI()@app.get("/items/{item_id}")async def read_items(*,item_id: int = Path(..., title="The ID of the item to get", ge=0, le=1000),q: str,size: float = Query(..., gt=0, lt=10.5)):results = {"item_id": item_id}if q:results.update({"q": q})return results
gt:大于ge:大于等于lt:小于le:小于等于
类似的还有Cookie:
from typing import Optionalfrom fastapi import Cookie, FastAPIapp = FastAPI()@app.get("/items/")async def read_items(ads_id: Optional[str] = Cookie(None)):return {"ads_id": ads_id}
以及Header:
from typing import Optionalfrom fastapi import FastAPI, Headerapp = FastAPI()@app.get("/items/")async def read_items(user_agent: Optional[str] = Header(None)):return {"User-Agent": user_agent}
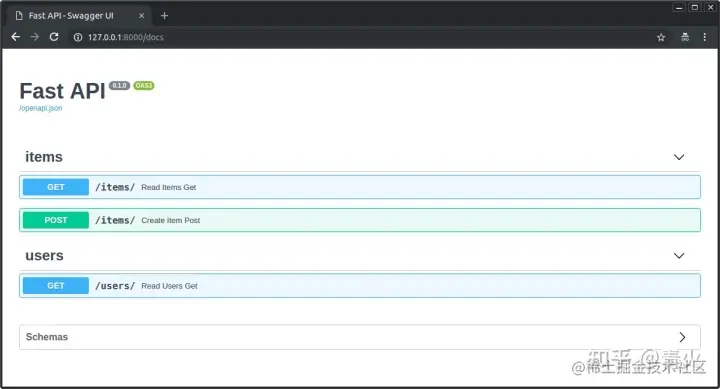
还可以为路径设置tags标签进行分组:
from typing import Optional, Setfrom fastapi import FastAPIfrom pydantic import BaseModelapp = FastAPI()class Item(BaseModel):name: strdescription: Optional[str] = Noneprice: floattax: Optional[float] = Nonetags: Set[str] = []@app.post("/items/", response_model=Item, tags=["items"])async def create_item(item: Item):return item@app.get("/items/", tags=["items"])async def read_items():return [{"name": "Foo", "price": 42}]@app.get("/users/", tags=["users"])async def read_users():return [{"username": "johndoe"}]
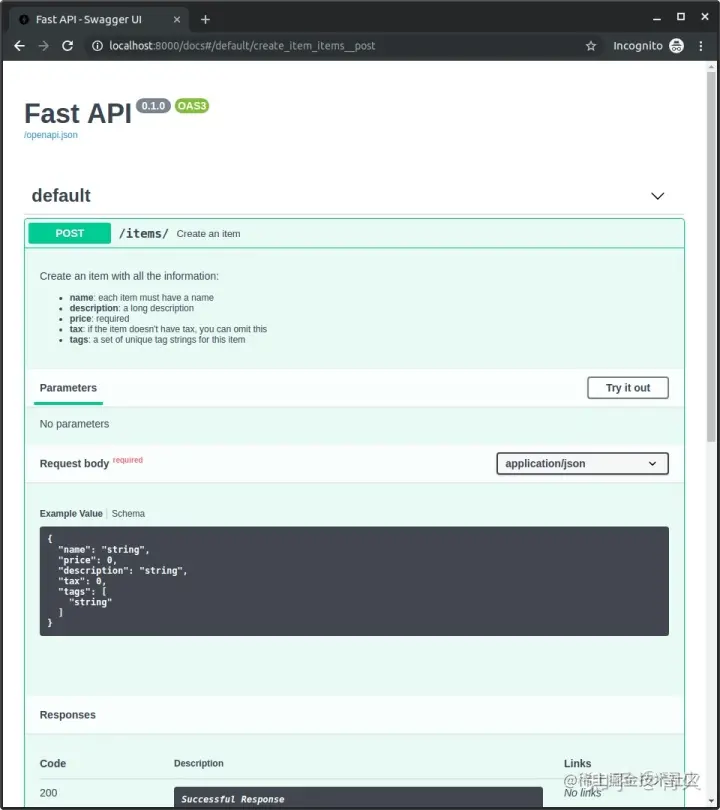
还可以设置summary 和 description:
from typing import Optional, Setfrom fastapi import FastAPIfrom pydantic import BaseModelapp = FastAPI()class Item(BaseModel):name: strdescription: Optional[str] = Noneprice: floattax: Optional[float] = Nonetags: Set[str] = []@app.post("/items/",response_model=Item,summary="Create an item",description="Create an item with all the information, name, description, price, tax and a set of unique tags",)async def create_item(item: Item):return item
多行注释:
from typing import Optional, Setfrom fastapi import FastAPIfrom pydantic import BaseModelapp = FastAPI()class Item(BaseModel):name: strdescription: Optional[str] = Noneprice: floattax: Optional[float] = Nonetags: Set[str] = []@app.post("/items/", response_model=Item, summary="Create an item")async def create_item(item: Item):"""Create an item with all the information:- **name**: each item must have a name- **description**: a long description- **price**: required- **tax**: if the item doesn't have tax, you can omit this- **tags**: a set of unique tag strings for this item"""return item
废弃路由:
from fastapi import FastAPIapp = FastAPI()@app.get("/items/", tags=["items"])async def read_items():return [{"name": "Foo", "price": 42}]@app.get("/users/", tags=["users"])async def read_users():return [{"username": "johndoe"}]@app.get("/elements/", tags=["items"], deprecated=True)async def read_elements():return [{"item_id": "Foo"}]
五、响应
使用response_model参数来声明用于响应的模型:
from typing import List, Optionalfrom fastapi import FastAPIfrom pydantic import BaseModelapp = FastAPI()class Item(BaseModel):name: strdescription: Optional[str] = Noneprice: floattax: Optional[float] = Nonetags: List[str] = []@app.post("/items/", response_model=Item)async def create_item(item: Item):return item
response_model_exclude_unset=True:响应中将不会包含那些默认值,而是仅有实际设置的值response_model_include包含哪些属性response_model_exclude省略某些属性
status_code参数来声明用于响应的 HTTP 状态码:
from fastapi import FastAPIapp = FastAPI()@app.post("/items/", status_code=201)async def create_item(name: str):return {"name": name}
表单字段时,要使用Form:
from fastapi import FastAPI, Formapp = FastAPI()@app.post("/login/")async def login(username: str = Form(...), password: str = Form(...)):return {"username": username}
File用于定义客户端的上传文件(接收上传文件,要预先安装[python-multipart](https%3A//andrew-d.github.io/python-multipart/)):
from fastapi import FastAPI, File, UploadFileapp = FastAPI()@app.post("/files/")async def create_file(file: bytes = File(...)):return {"file_size": len(file)}@app.post("/uploadfile/")async def create_upload_file(file: UploadFile = File(...)):return {"filename": file.filename}
向客户端返回 HTTP 错误响应,可以使用HTTPException。
from fastapi import FastAPI, HTTPExceptionapp = FastAPI()items = {"foo": "The Foo Wrestlers"}@app.get("/items/{item_id}")async def read_item(item_id: str):if item_id not in items:raise HTTPException(status_code=404, detail="Item not found")return {"item": items[item_id]}
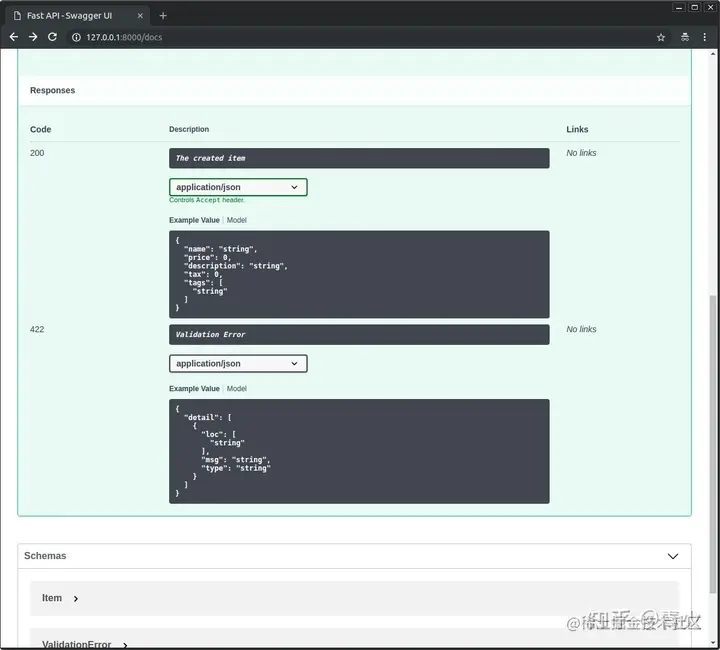
使用response_description设置响应描述:
from typing import Optional, Setfrom fastapi import FastAPIfrom pydantic import BaseModelapp = FastAPI()class Item(BaseModel):name: strdescription: Optional[str] = Noneprice: floattax: Optional[float] = Nonetags: Set[str] = []@app.post("/items/",response_model=Item,summary="Create an item",response_description="The created item",)async def create_item(item: Item):"""Create an item with all the information:- **name**: each item must have a name- **description**: a long description- **price**: required- **tax**: if the item doesn't have tax, you can omit this- **tags**: a set of unique tag strings for this item"""return item
六、JSON兼容
在某些情况下,你可能需要把数据(例如Pydantic模型)转换成JSON形式,例如存储在数据库中,这时候你就需要用到jsonable_encoder()方法。
from datetime import datetimefrom typing import Optionalfrom fastapi import FastAPIfrom fastapi.encoders import jsonable_encoderfrom pydantic import BaseModelfake_db = {}class Item(BaseModel):title: strtimestamp: datetimedescription: Optional[str] = Noneapp = FastAPI()@app.put("/items/{id}")def update_item(id: str, item: Item):json_compatible_item_data = jsonable_encoder(item)fake_db[id] = json_compatible_item_data
七、依赖注入
FastAPI 提供了简单易用,但功能强大的依赖注入系统,可以让开发人员轻松地把组件集成至FastAPI。
什么是「依赖注入」?
依赖注入是一种消除类之间依赖关系的设计模式。把有依赖关系的类放到容器中,解析出这些类的实例,就是依赖注入。目的是实现类的解耦。
示例:
from typing import Optionalfrom fastapi import Depends, FastAPIapp = FastAPI()async def common_parameters(q: Optional[str] = None, skip: int = 0, limit: int = 100):return {"q": q, "skip": skip, "limit": limit}@app.get("/items/")async def read_items(commons: dict = Depends(common_parameters)):return commons@app.get("/users/")async def read_users(commons: dict = Depends(common_parameters)):return commons
本例中的依赖项预期接收如下参数:
- 类型为
str的可选查询参数q - 类型为
int的可选查询参数skip,默认值是0 - 类型为
int的可选查询参数limit,默认值是100
然后,依赖项函数返回包含这些值的 dict。
使用Class作为依赖:
from typing import Optionalfrom fastapi import Depends, FastAPIapp = FastAPI()fake_items_db = [{"item_name": "Foo"}, {"item_name": "Bar"}, {"item_name": "Baz"}]class CommonQueryParams:def __init__(self, q: Optional[str] = None, skip: int = 0, limit: int = 100):self.q = qself.skip = skipself.limit = limit@app.get("/items/")async def read_items(commons: CommonQueryParams = Depends(CommonQueryParams)):response = {}if commons.q:response.update({"q": commons.q})items = fake_items_db[commons.skip : commons.skip + commons.limit]response.update({"items": items})return response
使用嵌套子依赖:
from typing import Optionalfrom fastapi import Cookie, Depends, FastAPIapp = FastAPI()def query_extractor(q: Optional[str] = None):return qdef query_or_cookie_extractor(q: str = Depends(query_extractor), last_query: Optional[str] = Cookie(None)):if not q:return last_queryreturn q@app.get("/items/")async def read_query(query_or_default: str = Depends(query_or_cookie_extractor)):return {"q_or_cookie": query_or_default}
在路径中使用依赖:
from fastapi import Depends, FastAPI, Header, HTTPExceptionapp = FastAPI()async def verify_token(x_token: str = Header(...)):if x_token != "fake-super-secret-token":raise HTTPException(status_code=400, detail="X-Token header invalid")async def verify_key(x_key: str = Header(...)):if x_key != "fake-super-secret-key":raise HTTPException(status_code=400, detail="X-Key header invalid")return x_key@app.get("/items/", dependencies=[Depends(verify_token), Depends(verify_key)])async def read_items():return [{"item": "Foo"}, {"item": "Bar"}]
全局依赖项,可以为所有路径操作应用该依赖项:
from fastapi import Depends, FastAPI, Header, HTTPExceptionasync def verify_token(x_token: str = Header(...)):if x_token != "fake-super-secret-token":raise HTTPException(status_code=400, detail="X-Token header invalid")async def verify_key(x_key: str = Header(...)):if x_key != "fake-super-secret-key":raise HTTPException(status_code=400, detail="X-Key header invalid")return x_keyapp = FastAPI(dependencies=[Depends(verify_token), Depends(verify_key)])@app.get("/items/")async def read_items():return [{"item": "Portal Gun"}, {"item": "Plumbus"}]@app.get("/users/")async def read_users():return [{"username": "Rick"}, {"username": "Morty"}]
八、安全
在许多框架和系统中,仅处理安全性和身份认证就会花费大量的精力和代码(在许多情况下,可能占编写的所有代码的 50% 或更多)。
FastAPI 提供了多种工具,可帮助你以标准的方式轻松、快速地处理安全性,而无需研究和学习所有的安全规范。
JWT 表示 「JSON Web Tokens」。
它是一个将 JSON 对象编码为密集且没有空格的长字符串的标准。字符串看起来像这样:
eyJhbGciOiJIUzI1NiIsInR5cCI6IkpXVCJ9.eyJzdWIiOiIxMjM0NTY3ODkwIiwibmFtZSI6IkpvaG4gRG9lIiwiaWF0IjoxNTE2MjM5MDIyfQ.SflKxwRJSMeKKF2QT4fwpMeJf36POk6yJV_adQssw5c
它没有被加密,因此任何人都可以从字符串内容中还原数据。
但它经过了签名。因此,当你收到一个由你发出的令牌时,可以校验令牌是否真的由你发出。
通过这种方式,你可以创建一个有效期为 1 周的令牌。然后当用户第二天使用令牌重新访问时,你知道该用户仍然处于登入状态。
一周后令牌将会过期,用户将不会通过认证,必须再次登录才能获得一个新令牌。而且如果用户(或第三方)试图修改令牌以篡改过期时间,你将因为签名不匹配而能够发觉。
OAuth2
OAuth2是一个规范,它定义了几种处理身份认证和授权的方法。
它是一个相当广泛的规范,涵盖了一些复杂的使用场景。
它包括了使用「第三方」进行身份认证的方法。
这就是所有带有「使用 Facebook,Google,Twitter,GitHub 登录」的系统背后所使用的机制。
下面演示了如何使用OAuth2 和 JWT进行用户验证。
from datetime import datetime, timedeltafrom typing import Optionalfrom fastapi import Depends, FastAPI, HTTPException, statusfrom fastapi.security import OAuth2PasswordBearer, OAuth2PasswordRequestFormfrom jose import JWTError, jwtfrom passlib.context import CryptContextfrom pydantic import BaseModel# to get a string like this run:# openssl rand -hex 32SECRET_KEY = "09d25e094faa6ca2556c818166b7a9563b93f7099f6f0f4caa6cf63b88e8d3e7"ALGORITHM = "HS256"ACCESS_TOKEN_EXPIRE_MINUTES = 30fake_users_db = {"johndoe": {"username": "johndoe","full_name": "John Doe","email": "johndoe@example.com","hashed_password": "$2b$12$EixZaYVK1fsbw1ZfbX3OXePaWxn96p36WQoeG6Lruj3vjPGga31lW","disabled": False,}}class Token(BaseModel):access_token: strtoken_type: strclass TokenData(BaseModel):username: Optional[str] = Noneclass User(BaseModel):username: stremail: Optional[str] = Nonefull_name: Optional[str] = Nonedisabled: Optional[bool] = Noneclass UserInDB(User):hashed_password: strpwd_context = CryptContext(schemes=["bcrypt"], deprecated="auto")oauth2_scheme = OAuth2PasswordBearer(tokenUrl="token")app = FastAPI()def verify_password(plain_password, hashed_password):return pwd_context.verify(plain_password, hashed_password)def get_password_hash(password):return pwd_context.hash(password)def get_user(db, username: str):if username in db:user_dict = db[username]return UserInDB(**user_dict)def authenticate_user(fake_db, username: str, password: str):user = get_user(fake_db, username)if not user:return Falseif not verify_password(password, user.hashed_password):return Falsereturn userdef create_access_token(data: dict, expires_delta: Optional[timedelta] = None):to_encode = data.copy()if expires_delta:expire = datetime.utcnow() + expires_deltaelse:expire = datetime.utcnow() + timedelta(minutes=15)to_encode.update({"exp": expire})encoded_jwt = jwt.encode(to_encode, SECRET_KEY, algorithm=ALGORITHM)return encoded_jwtasync def get_current_user(token: str = Depends(oauth2_scheme)):credentials_exception = HTTPException(status_code=status.HTTP_401_UNAUTHORIZED,detail="Could not validate credentials",headers={"WWW-Authenticate": "Bearer"},)try:payload = jwt.decode(token, SECRET_KEY, algorithms=[ALGORITHM])username: str = payload.get("sub")if username is None:raise credentials_exceptiontoken_data = TokenData(username=username)except JWTError:raise credentials_exceptionuser = get_user(fake_users_db, username=token_data.username)if user is None:raise credentials_exceptionreturn userasync def get_current_active_user(current_user: User = Depends(get_current_user)):if current_user.disabled:raise HTTPException(status_code=400, detail="Inactive user")return current_user@app.post("/token", response_model=Token)async def login_for_access_token(form_data: OAuth2PasswordRequestForm = Depends()):user = authenticate_user(fake_users_db, form_data.username, form_data.password)if not user:raise HTTPException(status_code=status.HTTP_401_UNAUTHORIZED,detail="Incorrect username or password",headers={"WWW-Authenticate": "Bearer"},)access_token_expires = timedelta(minutes=ACCESS_TOKEN_EXPIRE_MINUTES)access_token = create_access_token(data={"sub": user.username}, expires_delta=access_token_expires)return {"access_token": access_token, "token_type": "bearer"}@app.get("/users/me/", response_model=User)async def read_users_me(current_user: User = Depends(get_current_active_user)):return current_user@app.get("/users/me/items/")async def read_own_items(current_user: User = Depends(get_current_active_user)):return [{"item_id": "Foo", "owner": current_user.username}]
OAuth2PasswordBearer:访问tokenUrl地址,获取token并返回OAuth2PasswordRequestForm是一个类依赖项,声明了如下的请求表单:usernamepassword一个可选的
scope字段,是一个由空格分隔的字符串组成的大字符串一个可选的
grant_type一个可选的
client_id一个可选的
client_secret
九、中间件
“中间件”是一个函数,它在每个请求被特定的路径操作处理之前,以及在每个响应返回之前工作。
要创建中间件你可以在函数的顶部使用装饰器 @app.middleware("http").
中间件参数接收如下参数:
request一个函数
call_next它将接收request作为参数- 这个函数将
request传递给相应的 路径操作 - 然后它将返回由相应的路径操作生成的
response
- 这个函数将
- 然后你可以在返回
response前进一步修改它
import timefrom fastapi import FastAPI, Requestapp = FastAPI()@app.middleware("http")async def add_process_time_header(request: Request, call_next):start_time = time.time()response = await call_next(request)process_time = time.time() - start_timeresponse.headers["X-Process-Time"] = str(process_time)return response
十、跨域设置
你可以在FastAPI应用中使用CORSMiddleware来配置跨域:
from fastapi import FastAPIfrom fastapi.middleware.cors import CORSMiddlewareapp = FastAPI()origins = ["http://localhost.tiangolo.com","https://localhost.tiangolo.com","http://localhost","http://localhost:8080",]app.add_middleware(CORSMiddleware,allow_origins=origins,allow_credentials=True,allow_methods=["*"],allow_headers=["*"],)@app.get("/")async def main():return {"message": "Hello World"}
它支持以下参数:
allow_origins- 一个允许跨域请求的源列表。例如['https://example.org', 'https://www.example.org']。你可以使用['*']允许任何源。allow_origin_regex- 一个正则表达式字符串,匹配的源允许跨域请求。例如'https://.*\.example\.org'。allow_methods- 一个允许跨域请求的 HTTP 方法列表。默认为['GET']。你可以使用['*']来允许所有标准方法。allow_headers- 一个允许跨域请求的 HTTP 请求头列表。默认为[]。你可以使用['*']允许所有的请求头。Accept、Accept-Language、Content-Language以及Content-Type请求头总是允许 CORS 请求。allow_credentials- 指示跨域请求支持 cookies。默认是False。另外,允许凭证时allow_origins不能设定为['*'],必须指定源。expose_headers- 指示可以被浏览器访问的响应头。默认为[]。max_age- 设定浏览器缓存 CORS 响应的最长时间,单位是秒。默认为600。
十一、APIRouter
使用APIRouter同样也能对路由进行操作:
from fastapi import APIRouterrouter = APIRouter()@router.get("/users/", tags=["users"])async def read_users():return [{"username": "Rick"}, {"username": "Morty"}]@router.get("/users/me", tags=["users"])async def read_user_me():return {"username": "fakecurrentuser"}@router.get("/users/{username}", tags=["users"])async def read_user(username: str):return {"username": username}
为所有路径进行同样的操作:
from fastapi import APIRouter, Depends, HTTPExceptionfrom ..dependencies import get_token_headerrouter = APIRouter(prefix="/items",tags=["items"],dependencies=[Depends(get_token_header)],responses={404: {"description": "Not found"}},)fake_items_db = {"plumbus": {"name": "Plumbus"}, "gun": {"name": "Portal Gun"}}@router.get("/")async def read_items():return fake_items_db@router.get("/{item_id}")async def read_item(item_id: str):if item_id not in fake_items_db:raise HTTPException(status_code=404, detail="Item not found")return {"name": fake_items_db[item_id]["name"], "item_id": item_id}@router.put("/{item_id}",tags=["custom"],responses={403: {"description": "Operation forbidden"}},)async def update_item(item_id: str):if item_id != "plumbus":raise HTTPException(status_code=403, detail="You can only update the item: plumbus")return {"item_id": item_id, "name": "The great Plumbus"}
该示例,就为所有的路径添加了前缀,标签、依赖和返回,而不用在每个路径上单独声明,简化了代码。
十二、Background Tasks
background tasks 就是在返回响应之后立即运行的任务。
from fastapi import BackgroundTasks, FastAPIapp = FastAPI()def write_notification(email: str, message=""):with open("log.txt", mode="w") as email_file:content = f"notification for {email}: {message}"email_file.write(content)@app.post("/send-notification/{email}")async def send_notification(email: str, background_tasks: BackgroundTasks):background_tasks.add_task(write_notification, email, message="some notification")return {"message": "Notification sent in the background"}
十三、静态文件
首先需要安装aiofiles:
pip install aiofiles
使用:
from fastapi import FastAPIfrom fastapi.staticfiles import StaticFilesapp = FastAPI()app.mount("/static", StaticFiles(directory="static"), name="static")
十四、子应用
如果你有2个独立的FastAPI的应用,你可以设置一个为主应用,另外一个为子应用:
from fastapi import FastAPIapp = FastAPI()@app.get("/app")def read_main():return {"message": "Hello World from main app"}subapi = FastAPI()@subapi.get("/sub")def read_sub():return {"message": "Hello World from sub API"}app.mount("/subapi", subapi)
十五、代理
可以使用root_path来设置代理。
使用命令行:
uvicorn main:app --root-path /api/v1
或者在代码中设置:
from fastapi import FastAPI, Requestapp = FastAPI(root_path="/api/v1")@app.get("/app")def read_main(request: Request):return {"message": "Hello World", "root_path": request.scope.get("root_path")}
十六、使用模板
你可以在FastAPI中使用任何模板,常用的选择是Jinja2。
pip install jinja2
使用:
from fastapi import FastAPI, Requestfrom fastapi.responses import HTMLResponsefrom fastapi.staticfiles import StaticFilesfrom fastapi.templating import Jinja2Templatesapp = FastAPI()app.mount("/static", StaticFiles(directory="static"), name="static")templates = Jinja2Templates(directory="templates")@app.get("/items/{id}", response_class=HTMLResponse)async def read_item(request: Request, id: str):return templates.TemplateResponse("item.html", {"request": request, "id": id})
模板文件templates/item.html:
<html><head><title>Item Details</title><link href="{{ url_for('static', path='/styles.css') }}" rel="stylesheet"></head><body><h1>Item ID: {{ id }}</h1></body></html>
十七:WebSockets
from fastapi import FastAPI, WebSocketfrom fastapi.responses import HTMLResponseapp = FastAPI()html = """<!DOCTYPE html><html><head><title>Chat</title></head><body><h1>WebSocket Chat</h1><form action="" onsubmit="sendMessage(event)"><input type="text" id="messageText" autocomplete="off"/><button>Send</button></form><ul id='messages'></ul><script>var ws = new WebSocket("ws://localhost:8000/ws");ws.onmessage = function(event) {var messages = document.getElementById('messages')var message = document.createElement('li')var content = document.createTextNode(event.data)message.appendChild(content)messages.appendChild(message)};function sendMessage(event) {var input = document.getElementById("messageText")ws.send(input.value)input.value = ''event.preventDefault()}</script></body></html>"""@app.get("/")async def get():return HTMLResponse(html)@app.websocket("/ws")async def websocket_endpoint(websocket: WebSocket):await websocket.accept()while True:data = await websocket.receive_text()await websocket.send_text(f"Message text was: {data}")
十八、startup - shutdown事件
你可以设置应用的启动和关闭事件回调函数:
from fastapi import FastAPIapp = FastAPI()items = {}@app.on_event("shutdown")def shutdown_event():with open("log.txt", mode="a") as log:log.write("Application shutdown")@app.on_event("startup")async def startup_event():items["foo"] = {"name": "Fighters"}items["bar"] = {"name": "Tenders"}@app.get("/items/{item_id}")async def read_items(item_id: str):return items[item_id]

若有收获,就点个赞吧
0 人点赞
