介绍
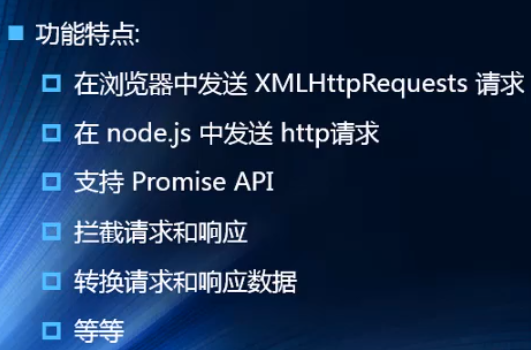
https://github.com/axios/axios
中文说明
安装
1、脚手架里面安装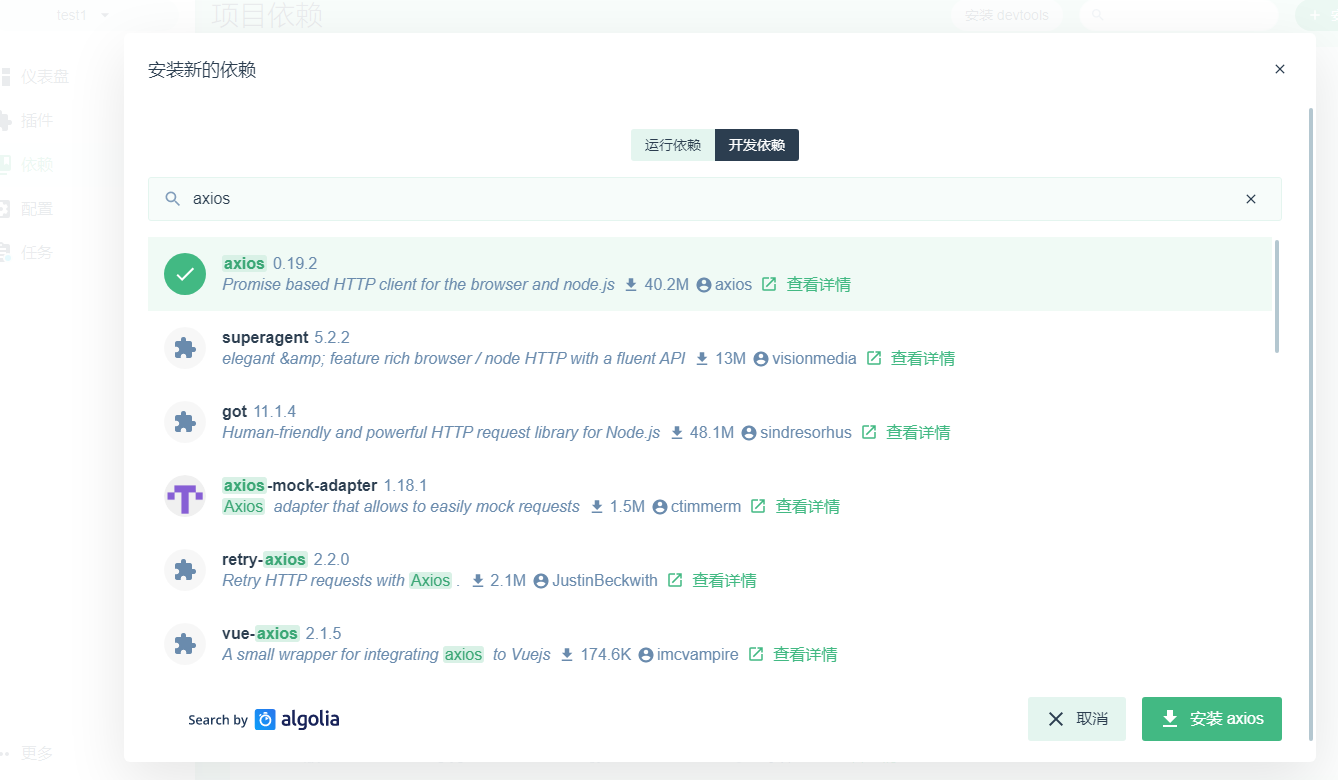
2、通过npm安装
npm i axios -S
3、通过cdn引入
<script src="https://cdn.jsdelivr.net/npm/axios/dist/axios.min.js"></script><!-- 或 --><script src="https://unpkg.com/axios/dist/axios.min.js"></script>
引入
在main.js中,添加如下代码
//1.引入axiosimport axios from 'axios'//2.设置默认请求的urlaxios.defaults.baseURL = 'http://mockjs.com/api'//3.设置Vue的默认http请求用axiosVue.prototype.$http = axios
使用
请求方式
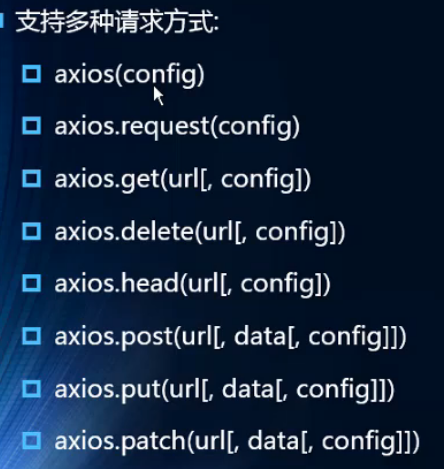
后面模块主要是使用axios(config)的方式
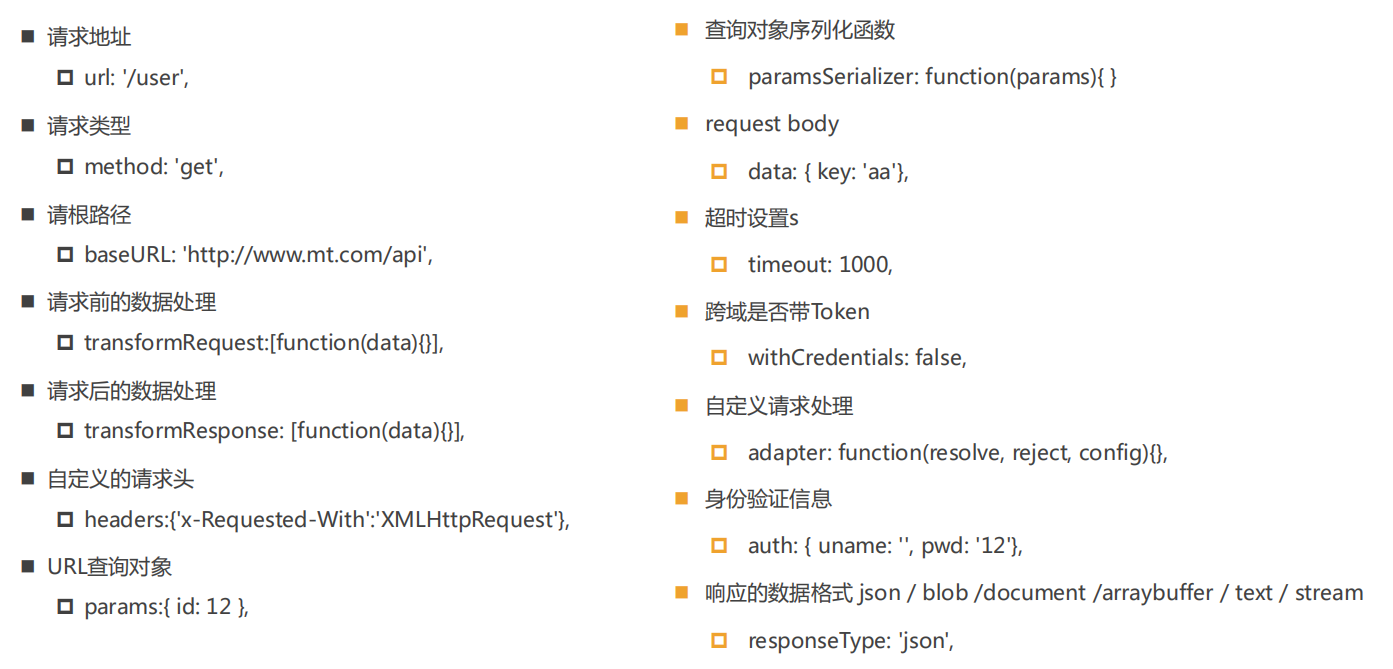
常见属性
单个请求
import Vue from 'vue'import App from './App.vue'import router from './router'import store from './store'import axios from 'axios';//阻止启动生产消息,如see more tips at xxx.com这些提示Vue.config.productionTip = falsenew Vue({router,store,render: h => h(App)}).$mount('#app')//发送一个请求,默认是get,本地也算跨域axios({url:'http://localhost:81/ax.php'}).then(res => { //then支持一个回调函数console.log(res);})
并发请求 axios.all([])
axios.all([axios({}),axios({})]).then(res => {//返回一个数组,里面分别是多个请求的结果console.log(res[0])console.log(res[1])})
axios.all([axios({}),axios({})]).then(axios.spread(//axios.spread(回调函数),可以直接展开(res0,res1) => {console.log(res0)console.log(res1)})
模拟请求
网站:http://httpbin.org/,可以模拟后端,你可以发送各种各样的请求获取数据
====================
封装
好处
为了避免对某个框架(如这里的axios)过度依赖,我们需要对这个框架封装到1个文件中,项目只要都引用这个文件即可。
这样假如axios不再维护要换框架,此时只要改那个文件即可。
JS封装
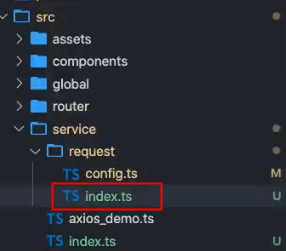
建议创建network文件夹,里面创建一个专门发送请求的文件
//1.引入框架(这里是axios)import axios from 'axios'// 实际上就是创建了axios的对象实例,也就是一个对象,对象里面有一些方法和属性//2.导出一个请求函数request到全局,给其他需要的组件引用/*** @param {Object} config 全局配置* @param {Object} success 请求成功时返回* @param {Object} failure 请求失败时返回*/export function request(config, success, failure) {//3.创建这个请求的实例x = axios.create({请求的配置})const x = axios.create({//设置路径,可以在其他组件内具体使用时,使用具体的url,而不是在这里统一设置url:"/",//设置基本的路径,自动加在 `url` 前面,除非 `url` 是一个绝对 URLbaseURL: "http://localhost:80/php/php",//设置请求的方法,默认是getmethod:"get" ,// `params` 即将与请求一起发送的get请求的 URL 参数,如/php?ID=12345// 必须是一个无格式对象(plain object)或 URLSearchParams 对象// params: {// ID: 12345// },//设置请求方法post// method:"post" ,// `data` 是作为post的请求主体被发送的数据// 只适用于这些请求方法 'PUT', 'POST', 和 'PATCH'// 在没有设置 `transformRequest` 时,必须是以下类型之一:// - string, plain object, ArrayBuffer, ArrayBufferView, URLSearchParams// - 浏览器专属:FormData, File, Blob// - Node 专属: Stream// data: {// firstName: 'Fred'// },// `timeout` 指定请求超时的毫秒数(0 表示无超时时间)// 如果请求话费了超过 `timeout` 的时间,请求将被中断timeOut: 5000,// `headers` 是即将被发送的自定义请求头// headers: {'X-Requested-With': 'XMLHttpRequest'},// `transformRequest` 允许在向服务器发送前,修改请求数据// 只能用在 'PUT', 'POST' 和 'PATCH' 这几个请求方法// 后面数组中的函数必须返回一个字符串,或 ArrayBuffer,或 Stream// transformRequest: [function (data, headers) {// // 对 data 进行任意转换处理// return data;// }],// `transformResponse` 拿到服务器数据后,在传递给 then/catch 前,允许修改响应数据// transformResponse: [function (data) {// // 对 data 进行任意转换处理// return data;// }],})//4.当外部调用request函数时,用实例x的配置,发送真正的网络请求//axios是继承promise的,因此可以直接调用success,failure 作为//promise的resole 和 rejectreturn x(config, success, failure)}
需要用到这个请求时,在模板.vue内,引入并使用
<template><el-button type="success" @click="getPerson">成功按钮</el-button></template><script>//1.引入这个请求的这个函数import { request } from '../network/request.js';export default {data() {return {};},methods: {getPerson() {//2.创建函数,调用request请求request({url: 'getUser.php',})//成功时返回结果res.then(res => {console.log(res.data);})//失败时返回结果err.catch(err =>{console.log(err);})}}};</script>
TS封装
思路就是,把 axios 的实例 axios.create(config),封装成一个自定义请求类 YJLRequest,通过x = new YJLRequest( config ) 的方式创建请求实例,最后通过调用这个 x 的方法发送请求。
为什么要封装成一个类?这样配置可以更灵活,比如
请求1是使用配置1、配置2,就把 请求1 = new YJLRequest( { 配置1 , 配置2} ),直接调用请求1.request() 发送。
请求2是使用配置2、配置3,就把 请求2 = new YJLRequest( { 配置2 , 配置3} ),直接调用请求2.request() 发送。
如果你只是把axios封装成一个函数,这样请求1和请求2共用的是同一个实例,如果配置不一样会比较麻烦(比如配置1是超时时间10秒,配置3是超时时间20秒),每次发送都要手动先修改配置。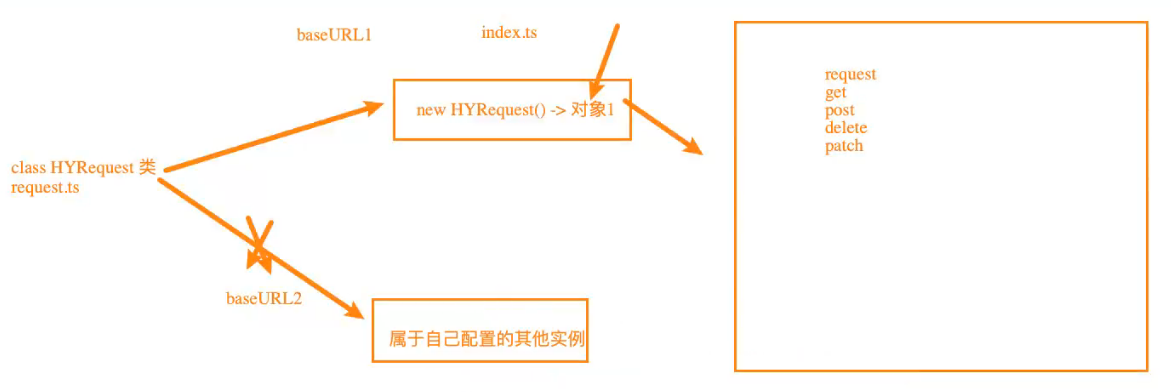
1、封装基础的请求类
下面是以 Ant Design Vue 2.x 为例子,
把弹窗提示message 和 提示框notification 封装进来,以及把全局Loading封装进来,这样好处是每一个请求开始时都会全屏显示加载中,请求结束后自动取消加载中,若返回的是成功的结果,自动显示操作成功;若返回失败的结果,自动弹出提示框显示失败的内容。
这样不用在外面页面单独配置这些。
而且自定义了3重拦截器,
1、在请求1里面可以自定义拦截器
2、给所有的axios配置了通用的拦截器(弹窗提示message、提示框notification、 全局Loading)
3、外部页面使用时可以自定义拦截器
// =================== 0、引入 ===================import axios from "axios"// AxiosInstance 为axios的实例类型import type { AxiosInstance} from "axios"// 引入 其他ui组件的加载中弹窗和弹窗的类型import { message, notification } from "ant-design-vue"import store from "@/store"// =================== 1、定义 自定义请求类的 接口 ===================import type { myRequestConfig,myRequestInterceptors } from "./type";// =================== 2、封装请求类 ===================/*** 自定义请求类;* 用类进行封装,封装性会更强,而且可以有多个不同的实例*/class YJLRequest {// =================== 2.1、类的基本属性 ===================/** 储存axios的实例 */instance: AxiosInstance/** 自定义拦截器 */interceptors?: myRequestInterceptors// =================== 2.2、构造函数 ===================/** 自定义请求 的构造器 */constructor(config: myRequestConfig) {// 创建 axios 实例this.instance = axios.create(config)// 自定义拦截器,从外面的config传入this.interceptors = config.interceptors// =================== 2.2.1、拦截器 ===================// 1、从 config 中取出自定义拦截器// 拦截请求this.instance.interceptors.request.use(this.interceptors?.requestInterceptor,this.interceptors?.requestInterceptorCatch)// 拦截响应this.instance.interceptors.response.use(this.interceptors?.responseInterceptor,this.interceptors?.responseInterceptorCatch)// 2.添加所有的实例都有的拦截器// 拦截请求this.instance.interceptors.request.use(// 发送请求拦截(config) => {console.log("所有的实例都有的拦截器: 请求成功拦截")// 全局加载中store.commit("showLoading")return config},(err) => {console.log("所有的实例都有的拦截器: 请求失败拦截")// 失败提示notification["error"]({message: "发送请求失败",description: `失败原因为:${err}`})return err})// 拦截响应this.instance.interceptors.response.use(// 拦截响应(res) => {console.log("所有的实例都有的拦截器: 响应成功拦截")// 取消全局加载中store.commit("hiddenLoading")// 响应成功,获取dataconst data = res.data// 这里可以根据不同的返回情况,设置不同的提示if (res.status === 200) {// 成功提示if (!(config.hiddenSuccessMessage === true)) {message.success({content: "操作成功",duration: 1})}return data} else {// 失败提示notification["error"]({message: "响应失败",description: `错误代码为:${res.status}`})return data}},(err) => {console.log("所有的实例都有的拦截器: 响应失败拦截")// 取消全局加载中store.commit("hiddenLoading")// 这里可以判断不同的HttpErrorCode显示不同的错误信息// 失败提示notification["error"]({message: "响应失败",description: `失败原因:${err}`})return err})}// =================== 2.3、请求方法 ===================/** 发送请求方法 */request<T>(config: myRequestConfig<T>): Promise<T> {// 如果有请求的拦截器,这里可以在传入的时候给你修改一下配置if (config.interceptors?.requestInterceptor) {config = config.interceptors.requestInterceptor(config)}// 返回 Promise ,让外面可以通过 .then 接收res 或 errreturn new Promise((resolve, reject) => {// 1.单个请求对请求config的处理if (config.interceptors?.requestInterceptor) {config = config.interceptors.requestInterceptor(config)}// 通过 axios 实例的 request 方法发送请求this.instance.request<any,T>(config).then((res) => {// 1.单个请求对数据的处理if (config.interceptors?.responseInterceptor) {res = config.interceptors.responseInterceptor(res)}// 2.将结果resolve返回出去resolve(res)}).catch((err) => {reject(err)})})}// 发送get请求get<T>(config: myRequestConfig<T>): Promise<T> {return this.request<T>({ ...config, method: 'GET' })}// 发送post请求post<T>(config: myRequestConfig<T>): Promise<T> {return this.request<T>({ ...config, method: 'POST' })}// 发送delete请求delete<T>(config: myRequestConfig<T>): Promise<T> {return this.request<T>({ ...config, method: 'DELETE' })}// 发送patch请求patch<T>(config: myRequestConfig<T>): Promise<T> {return this.request<T>({ ...config, method: 'PATCH' })}}export default YJLRequest
2、封装请求函数
// 网络请求统一的出口// import yjlRequest from "@/service/"import YJLRequest from "@/service/request"/*** 自定义请求的实例*/const yjlRequest = new YJLRequest({// 这里的类型是 myRequestConfig 类型baseURL:"/api",// hiddenSuccessMessage:true})// 可以定义多个请求实例,不同实例有不同的默认配置,很灵活// export const yjlRequest2 = new YJLRequest()export default yjlRequest
3、外部使用
<script setup lang="ts">import yjlRequest from "@/network"/** 服务器返回的结果类型,自己根据实际情况定义 */interface DataType {path: stringhttpMethod: stringheaders: anyqueryStringParameters: anyisBase64Encoded: booleanbody: any}const testFun = () => {yjlRequest.get<DataType>({url: "/http/testFun"}).then((res) => {console.log(`res`, res)})}</script>
====================
拦截器
用于发送请求或者得到相应结果时拦截,进行对应的处理
拦截请求
1.用于改变本次请求的配置,用来满足接受服务器的要求
2.可以用于播放请求中的动画,如点击按钮后有个图标在转(拦截拦截,然后播放图标动画),有回应时停止转动(拦截回应,然后停止 播放动画)
3.某些请求,必须携带一些特殊的信息(比如登录的token)
例如打开页面,就会发送请求给服务器,此时拦截,判断是否登录了,如果没登录就跳转到登录页面;如果登录了就继续发送请求
4、请求失败时,可以显示失败的原因
//拦截请求axios.interceptors.request.use(config => {//请求发送成功时,执行这里的代码//config指的是这次拦截的请求的配置config//拦截后,必须用return 把请求发回出去,否则就只光拦截了return config}, error => {//请求发送失败时,执行这里的代码});
拦截响应
1、可以对服务器回应的数据作基本的转化
2、响应失败时,可以显示失败的原因
//响应拦截axios.interceptors.response.use(res => {//成功接收服务器回应时,执行这里的代码//config指的是这次拦截的请求返回结果的config//拦截后,必须用return 把请求发回出去,否则就只光拦截了//一般只需要返回data就可以了,其他的没什么用return res.data;}, error => {NProgress.done();return Promise.reject(new Error(error));})

若有收获,就点个赞吧
0 人点赞
