参考:https://blog.csdn.net/w410589502/article/details/70787468、https://www.cnblogs.com/xxoome/p/5866475.html、https://www.cnblogs.com/bluestorm/p/4574688.html、https://blog.51cto.com/u_13363488/2349546、https://blog.csdn.net/qq_20143059/article/details/114935719
下载nginx地址:https://nginx.org/download/
安装所需插件
yum install -y pcre pcre-devel openssl openssl-devel gcc gcc gcc-c++ ncurses-devel perl
下载nginx安装包
wget http://nginx.org/download/nginx-1.9.9.tar.gz
解压
tar -zxvf nginx-1.9.9.tar.gz
更改文件名称
mv nginx-1.9.9 nginx
配置、编译、安装
cd /usr/local/nginx./configure # 配置# 装ssl的证书需要按照下面进行配置./configure --prefix=/usr/local/nginx --with-http_stub_status_module --with-http_ssl_modulemake # 编译make install # 安装
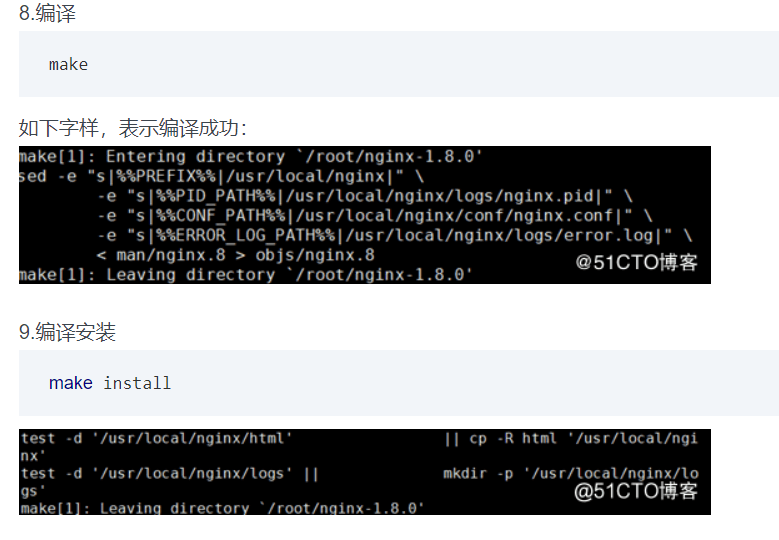
注意:如果你走到make这一步的时候只出现了一行“make[1]: Leaving directory `/usr/local/nginx-1.12.1;”提示,不用管它,继续走make install ; 然后: 1、我只需要去看/usr/local下面是否有nginx文件夹? 2、如果已经有nginx文件夹? 3、我们再去看nginx是否可以正常启动? 4、如果nginx启动也可以成功,我们再去看下网站是否可以访问,是否会出现“Welcome to nginx!”? 5、如果上面都成功了,说明你的nginx已经ok!
测试是否安装成功
# cd到刚才配置的安装目录/usr/loca/nginx/./sbin/nginx -t
错误信息
nginx: [alert] could not open error log file: open() "/usr/local/nginx/logs/error.log" failed (2: No such file or directory)2016/09/13 19:08:56 [emerg] 6996#0: open() "/usr/local/nginx/logs/access.log" failed (2: No such file or directory)
解决方法:
mkdir logschmod 700 logs
正常情况的信息输出:
nginx: the configuration file /usr/local/nginx/conf/nginx.conf syntax is oknginx: configuration file /usr/local/nginx/conf/nginx.conf test is successful
查找安装路径命令:
whereis nginx
启动、停止nginx
cd /usr/local/nginx/sbin/./nginx # 开启./nginx -s stop # 停止./nginx -s quit./nginx -s reload
./nginx -s quit:此方式停止步骤是待nginx进程处理任务完毕进行停止。./nginx -s stop:此方式相当于先查出nginx进程id再使用kill命令强制杀掉进程。
强制杀死进程
1、查看进程号
ps -ef|grep nginx

2、杀死进程
# 第一种kill -QUIT 2072# 第二种kill -TERM 2072或 kill -INT 2072# 第三种强制停止pkill -9 nginx
修改端口号
默认端口号为80,因为通常80端口都是服务于tomcat的,所以这里我们需要修改一下端口号。
cd /usr/local/nginx/conf # 注:这里是usr下的,不是我们解压安装包路径下的。cp nginx.conf nginx.conf.back # 备份配置文件(备份是个好习惯,可省略)vi nginx.conf # 编辑nginx.conf配置文件
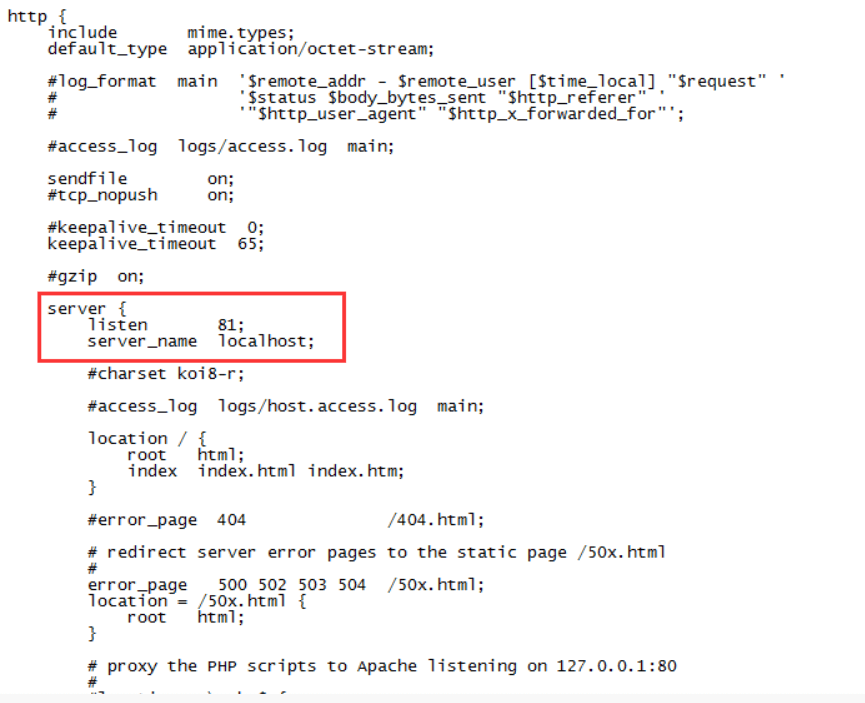
将端口号修改为81(自定)Esc退出 :wq(保存并退出)./nginx -s reload # 重新启动一下(注:记住要进入/usr/local/nginx/sbin路径下执行命令)ps aux|grep nginx # 查询nginx进程
nginx文件配置
location / {alias /home/wwwroot/default/dist/; #默认访问vue静态文件目录(dist路径)index index.html; #默认访问文件try_files $uri $uri/ /index.html; #目录不存在则执行index.html}
重启 nginx
参考:https://www.cnblogs.com/codingcloud/p/5095066.html
1.先停止再启动(推荐)
对 nginx 进行重启相当于先停止再启动,即先执行停止命令再执行启动命令。如下:
./nginx -s quit./nginx
2.重新加载配置文件
当修改nginx.conf 修改,要想让配置生效需要重启nginx,使用./nginx -s reload不用先停止nginx再启动,即可将配置信息在nginx中生效。
./nginx -s reload
启动成功后,输入你的IP地址还有配置的nginx端口号在浏览器可以看到这样的页面: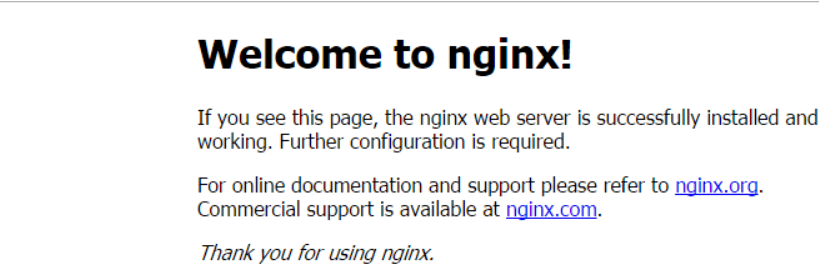
这就说明我们nginx配置成功了。
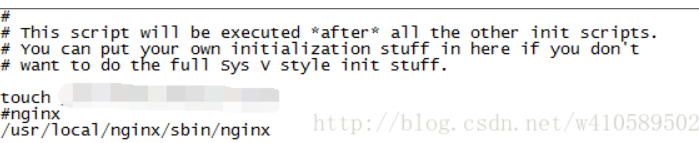
开机自启动
在etc的rc.local增加启动代码就可以了。
vi /etc/rc.local/usr/local/nginx/sbin/nginx # 添加的语句chmod 755 /etc/rc.local # 设置权限
查询nginx进程
ps aux|grep nginx # 查询nginx进程
在nginx装好之后发现没有http_ssl_module模块,无法配置https时,使用下面的操作
参考:https://blog.csdn.net/qq_27328865/article/details/103118364
本例是在安装好nginx的前提下进行的(没有太多差别,主要是少了一步install)
nginx如果未开启SSL模块,配置https时出现提示错误。
nginx: [emerg] the “ssl” parameter requires ngx_http_ssl_module in /usr/local/nginx/conf/nginx.conf:xxx
nginx缺少http_ssl_module模块,编译安装的时候带上—with-http_ssl_module配置就行了。
本场景是服务器已经安装过nginx,但是未安装http_ssl_module。
1.进入到源码包,如:
cd /app/download/nginx-1.12.2
2.configure:
./configure --prefix=/usr/local/nginx --with-http_stub_status_module --with-http_ssl_module
3.make:
make
4.不需要执行make install,否则就覆盖安装了。
5.备份原有的nginx,如:
cp /usr/local/nginx/sbin/nginx /usr/local/nginx/sbin/nginx_bak
6.然后将刚刚编译好的nginx覆盖掉原有的nginx(nginx需要停止)
cp ./objs/nginx /usr/local/nginx/sbin/
7.查看安装情况:
/usr/local/nginx/sbin/nginx -V
nginx version: nginx/1.12.2built by gcc 4.8.5 20150623 (Red Hat 4.8.5-16) (GCC)built with OpenSSL 1.0.2k-fips 26 Jan 2017TLS SNI support enabledconfigure arguments: --prefix=/usr/local/nginx --with-http_stub_status_module --with-http_ssl_module

若有收获,就点个赞吧
0 人点赞
