1.为什么需要标准库
1.1、传统单片机软件开发方式
(1)芯片厂商提供数据手册、示例代码、开发环境
(2)单片机软件工程师面向产品功能,查阅数据手册,参考官方示例代码进行开发
(3)硬件操作的方式是用C语言对寄存器进行读写以操作硬件
(4)主要工作量分2块:一是调通各种外设,二是实现产品功能
(5)在简单单片机(如51单片机)上这一套工作的很好,但是随着单片机变复杂就带来一些问题
1.2、外设库有什么价值
(1)外设库其实就是以前芯片公司提供的示例代码的标准化产物
(2)外设库简化了我们开发产品的2大工作量的第一个
(3)外设库以源码方式提供,这个源码本身写的很标准,可以用作学习素材
1.3、学习和使用外设库的难点
(1)要有规范化编程的意识和能力
(2)C语言功底要过关
(3)要有一定的框架和层次认识
(4)要会没有外设库时直接C语言操作寄存器的方式(看原理图、查数据手册、位操作等)
1.4、再次强调
(1)外设库只是帮助我们简化编程,简化的主要是劳动量
(2)外设库一定程度上降低了编程难度,但是只会库、离了库就不会编程、库函数调用出了问题就束手无策这种还是没戏。(难度降低是对所有人的,你并不能从中得到好处)
2.外设库结构介绍

2.1、文件夹结构和主要文件的作用
CMSIS(STM32内部ARM核心相关内容)
CM3(Cortex-M3)
CoreSupport
内核相关的一些设置的寄存器集合及其封装
DeviceSupport
ST
STM32F10x
startup(起始文件)
stm32f10x.h
system_stm32f10x.c
system_stm32f10x.h
STM32F10x_StdPeriph_Driver(外设驱动)
inc(include,头文件,.h)
src(source,源文件, .c)
2.2 、后续的学习方法
(1)先搞清楚库对STM32这个硬件的封装和表达方式
(2)再彻底理解库中使用的结构体式访问硬件寄存器的方式
(3)初步建立起面向对象式编程的概念并且去体会
(4)以模块为单位去研究这个模块的库函数,并且用库函数去编程,并且实验结果,并且分析代码,去体会去熟悉库函数使用的方法
(5)最终达到什么程度?眼里有库心中无库。用人话说就是:思维能够穿透库函数直达内部对寄存器的操作。
2.3、标准库对硬件信息的封装方式
- 寄存器地址的封装
- 寄存器位定义的封装
- 外设操作的封装
2.4、使用结构体方式访问寄存器的原理
(1)C语言访问寄存器的本质是C语言访问内存,本质思路是:定义一个指针(临时变量)指向这块内存,然后*p = xx这种方式去解引用指针从而向目标内存中写入内容。
(2)缺陷:当寄存器多了之后每一个寄存器都要定义一套套路,很麻烦。
(3)解决思路:就是打包,批发式的定义,用结构体(想一下为什么不用数组?数组只能定义一种变量)的方式进行打包。具体做法是:把整个一个模块的所有寄存器(地址是连接的)打包在一个结构体中,每个寄存器对应结构体中的一个元素,然后结构体基地址对应寄存器组的基地址,将来就可以通过结构体的各个元素来访问各个寄存器了。
(4)结构体方式来访问寄存器和指针式访问寄存器,本质上其实是一样的,区别是C语言的封装不同。语法糖~~
#define GPIOA ((GPIO_TypeDef *) GPIOA_BASE)// GPIOA 指针变量,本身占4个字节,指向一个数据类型是TIM_TypeDef的类型,指向的是一个内存区域#define GPIOA_BASE (APB2PERIPH_BASE + 0x0800)//不同端口的寄存器的列表typedef struct{__IO uint32_t CRL; 0__IO uint32_t CRH; 4__IO uint32_t IDR; 8__IO uint32_t ODR; c__IO uint32_t BSRR;__IO uint32_t BRR;__IO uint32_t LCKR;} GPIO_TypeDef;// 结构体自动计算偏移量
之前就玩儿过
#ifndef H_GPIO_G#define H_GPIO_Gtypedef unsigned int u32;#define PERIPH_BASE 0x40000000#define GPIOG_BASE (PERIPH_BASE + 0x12000)#define RCC_APB2ENR ((unsigned int *)0x40021018)typedef struct{u32 CRL; //*u32 CRH; //*u32 IDR; //*u32 ODR; //*u32 BSRR;u32 BRR; //*}GPIOG_TypeDef;#define GPIOG ((GPIOG_TypeDef *)GPIOG_BASE)#endif
3.外设库的使用
3.1了解基本框架
打开工程模板

注意define:这里预先进行了宏定义~~~~
在代码里定义和这里定义功能上是相同的
USE_STDPERIPH_DRIVER, 外设驱动
STM32F10X_HD_VL, 芯片的选择
USE_STM32100E_EVAL 工程实例
如果打开stm3210x.h
这里同上,需要哪个启动代码,打开哪个,也可在工程中配置,如上图。
#if !defined (STM32F10X_LD) && !defined (STM32F10X_LD_VL) && !defined (STM32F10X_MD) && !defined (STM32F10X_MD_VL) && !defined (STM32F10X_HD) && !defined (STM32F10X_HD_VL) && !defined (STM32F10X_XL) && !defined (STM32F10X_CL)/* #define STM32F10X_LD */ /*!< STM32F10X_LD: STM32 Low density devices *//* #define STM32F10X_LD_VL */ /*!< STM32F10X_LD_VL: STM32 Low density Value Line devices *//* #define STM32F10X_MD */ /*!< STM32F10X_MD: STM32 Medium density devices *//* #define STM32F10X_MD_VL */ /*!< STM32F10X_MD_VL: STM32 Medium density Value Line devices *//* #define STM32F10X_HD */ /*!< STM32F10X_HD: STM32 High density devices *//* #define STM32F10X_HD_VL */ /*!< STM32F10X_HD_VL: STM32 High density value line devices *//* #define STM32F10X_XL */ /*!< STM32F10X_XL: STM32 XL-density devices *//* #define STM32F10X_CL */ /*!< STM32F10X_CL: STM32 Connectivity line devices */#endif
上面两个都可以使用
头文件包含:
因此只要包含了stm3210x.h,就包含了所有的头文件
#ifdef USE_STDPERIPH_DRIVER#include "stm32f10x_conf.h" //包含所有外设头文件#endif#include "stm32f10x_adc.h"#include "stm32f10x_bkp.h"#include "stm32f10x_can.h"#include "stm32f10x_cec.h"#include "stm32f10x_crc.h"#include "stm32f10x_dac.h"#include "stm32f10x_dbgmcu.h"#include "stm32f10x_dma.h"#include "stm32f10x_exti.h"#include "stm32f10x_flash.h"#include "stm32f10x_fsmc.h"#include "stm32f10x_gpio.h"#include "stm32f10x_i2c.h"#include "stm32f10x_iwdg.h"#include "stm32f10x_pwr.h"#include "stm32f10x_rcc.h"#include "stm32f10x_rtc.h"#include "stm32f10x_sdio.h"#include "stm32f10x_spi.h"#include "stm32f10x_tim.h"#include "stm32f10x_usart.h"#include "stm32f10x_wwdg.h"#include "misc.h" /* High level functions for NVIC and SysTick (add-on to CMSIS functions) */
断言配置
如果定义了USE_FULL_ASSERT 就会使用
#ifdef USE_FULL_ASSERT/*** @brief The assert_param macro is used for function's parameters check.* @param expr: If expr is false, it calls assert_failed function which reports* the name of the source file and the source line number of the call* that failed. If expr is true, it returns no value.* @retval None*/#define assert_param(expr) ((expr) ? (void)0 : assert_failed((uint8_t *)__FILE__, __LINE__))/* Exported functions ------------------------------------------------------- */void assert_failed(uint8_t* file, uint32_t line);#else#define assert_param(expr) ((void)0)#endif /* USE_FULL_ASSERT */
3.2标准库配置
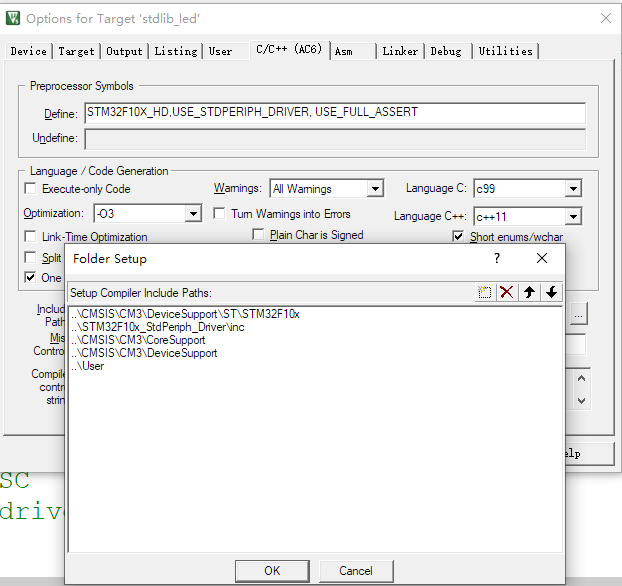
库移植成功后,我们原来的代码也可以直接使用
#include "stm32f10x.h"void led_init(void);void Delay(void);void flash(void);int main(void){led_init();while(1){flash();};return 0;}void led_init(void){RCC->APB2ENR = 0x00000100;GPIOG->CRL = (0x33 << 24);}void Delay(void){unsigned int i = 0, j = 0;for( i = 0; i < 2000; i++){for( j = 0; j < 2000; j++);}}void flash(void){GPIOG->BSRR = 0x000000080;Delay();GPIOG->BSRR = 0x00000040;Delay();GPIOG->BSRR = 0x00ff0000;Delay();}

若有收获,就点个赞吧
0 人点赞
