任务1 虚拟化介绍
1. 简介
虚拟化,是指通过虚拟化技术将一台计算机虚拟为多台逻辑计算机。在一台计算机上同时运行多个逻辑计算机,每个逻辑计算机可运行不同的操作系统,并且应用程序都可以在相互独立的空间内运行而互不影响,从而显著提高计算机的工作效率
虚拟化使用软件的方法重新定义划分IT资源,可以实现IT资源的动态分配、灵活调度、跨域共享,提高IT资源利用率,使IT资源能够真正成为社会基础设施,服务于各行各业中灵活多变的应用需求。
2. 虚拟化分类
虚拟化技术可分为:全虚拟化和半虚拟化。
★全虚拟化:最流行的虚拟化方法使用名为Hypervisor的一种软件,在虚拟服务器和底层硬件之间建立一个抽象层。VMware和微软的VirtualPC是代表该方法的两个商用产品,而基于核心的虚拟机(KVM)是面向Linux系统的开源产品。Hypervisor可以捕获CPU指令,为指令访问硬件控制器和外设充当中介。因而,完全虚拟化技术几乎能让任何一款操作系统不用改动就能安装到虚拟服务器上,而它们不知道自己运行在虚拟化环境下。主要缺点是,Hypervisor 给处理器带来的负荷会很大。
★半虚拟化:完全虚拟化是处理器密集型技术,因为它要求Hypervisor管理各个虚拟服务器,并让它们彼此独立。减轻这种负担的一种方法就是,改动客户端操作系统,让它以为自己运行在虚拟环境下,能够与Hypervisor 协同工作。这种方法就叫准虚拟化(para-virtualization)Xen。它是开源准虚拟化技术的一个例子。操作系统作为虚拟服务器在Xen hypervisor上运行之前,它必须在核心层面进行某些改变。因此,Xen适用于BSD、Linux、Solaris及其他开源操作系统,但不适合像Windows这些专有的操作系统进行虚拟化处理,因为它们无法改动。准虚拟化技术的优点是性能高,经过准虚拟化处理的服务器可与Hypervisor协同工作,其响应能力几乎不亚于未经过虚拟化处理的服务器。准虚拟化与完全虚拟化相比优点明显,以至于微软和VMware都在开发这项技术,以完善各自的产品。
3. 虚拟化架构
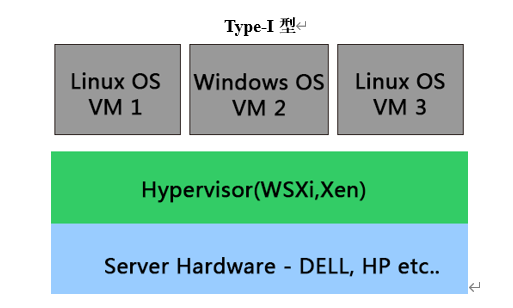
Hypervisor直接安装在物理机上,多个虚拟机在 Hypervisor 上运行。Hypervisor 实现方式一般是一个特殊定制的Linux系统。Xen和VMWare的ESXi 都属于这个类型。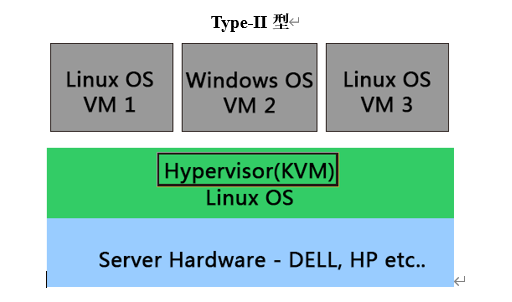
物理机上首先安装常规的操作系统,比如 RedHat、Ubuntu和Windows。Hypervisor作为OS上的一个程序模块运行,并对管理虚拟机进行管理。KVM、VirtualBox和 VMWare Workstation 都属于这个类型。
任务2 KVM介绍
1. 简介
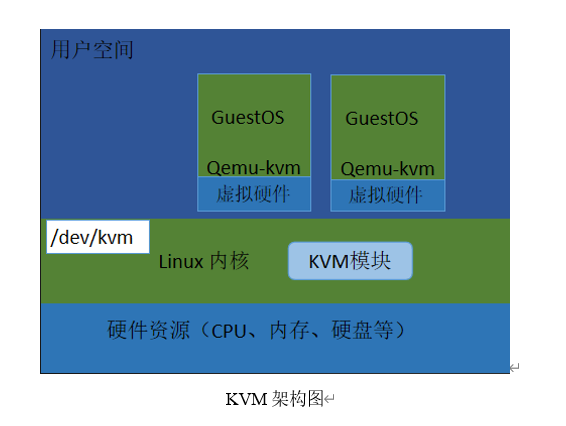
KVM(Kernel-Based Virtual Machines)是一个基于Linux内核的虚拟化技术, 可以直接将Linux内核转换为Hypervisor(系统管理程序)从而使得Linux内核能够直接管理虚拟机, 直接调用Linux内核中的内存管理、进程管理子系统来管理虚拟机。
KVM的虚拟化需要硬件支持(如Intel VT技术或者AMD V技术)。是基于硬件的完全虚拟化。而Xen早期则是基于软件模拟的Para-Virtualization,新版本则是基于硬件支持的完全虚拟化。但Xen本身有自己的进程调度器、存储管理模块等,所以代码较为庞大。广为流传的商业系统虚拟化软件VMware ESX系列是基于软件模拟的Full-Virtualization。
2. 架构
任务3 安装KVM
1. 调整虚拟机
修改虚拟机内存,至少设置成2 GB,双击“编辑虚拟机设置”按钮,如下图所示: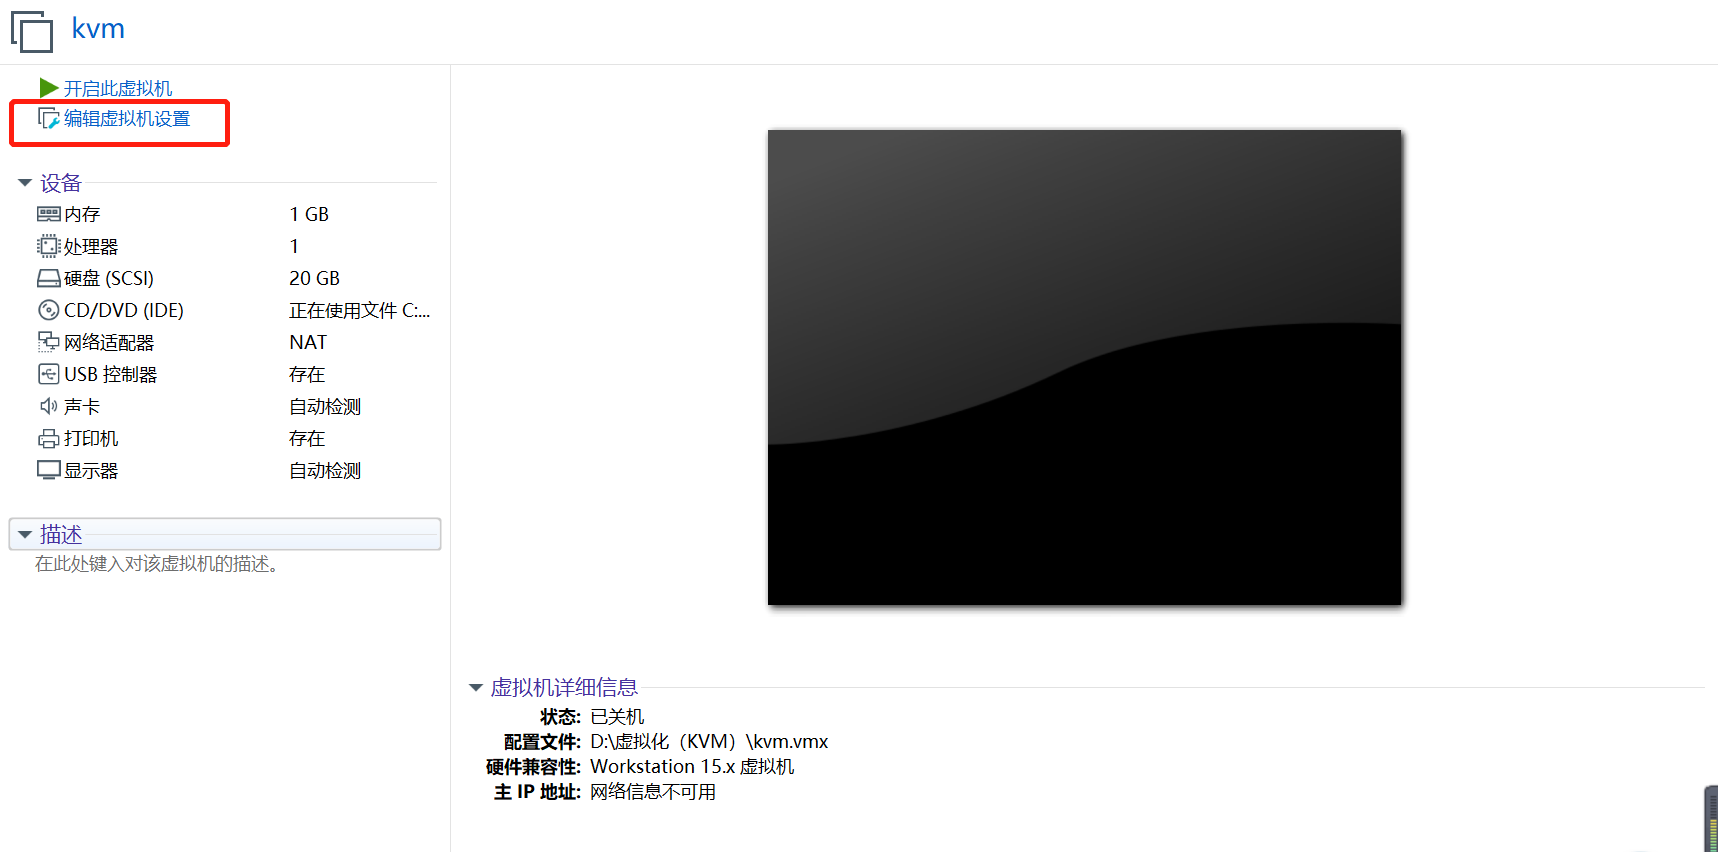
将虚拟机的内存修改为“2048”,如图所示: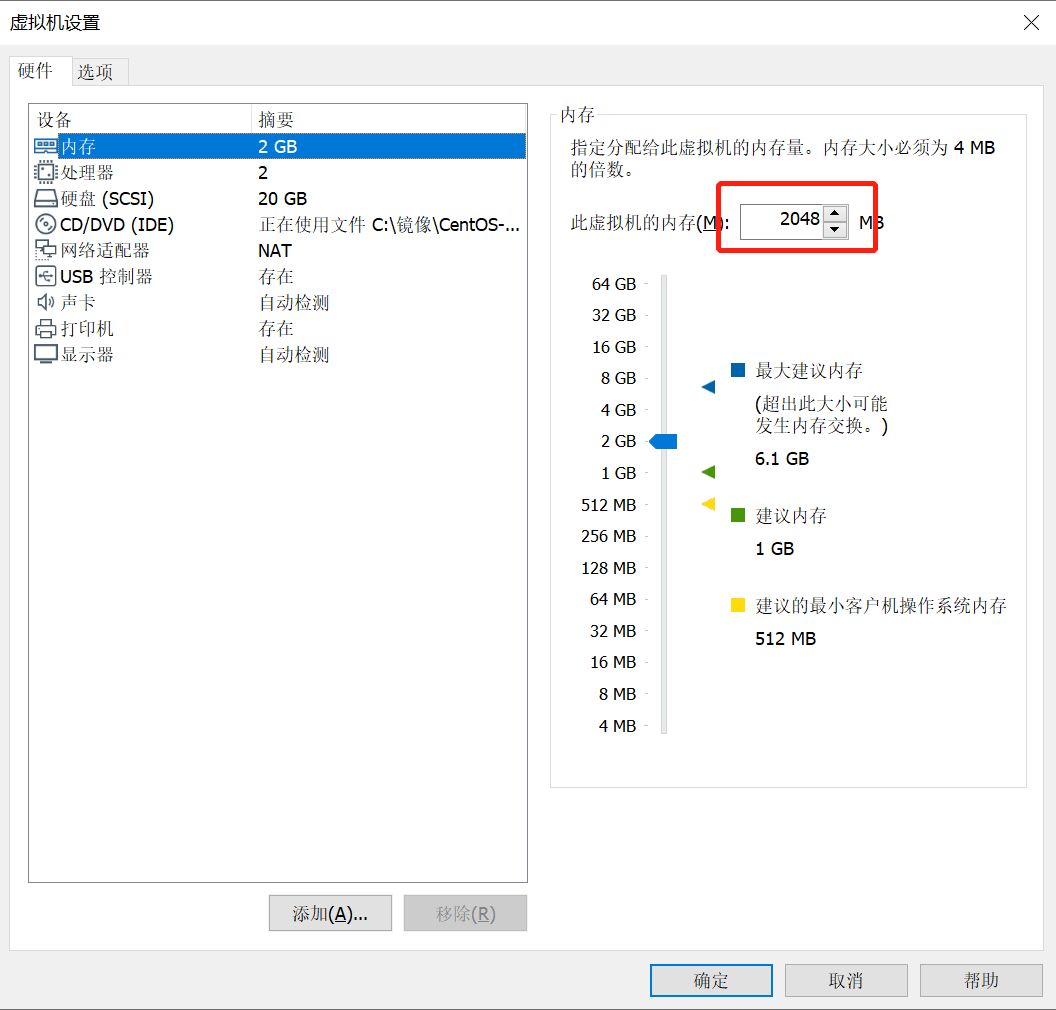
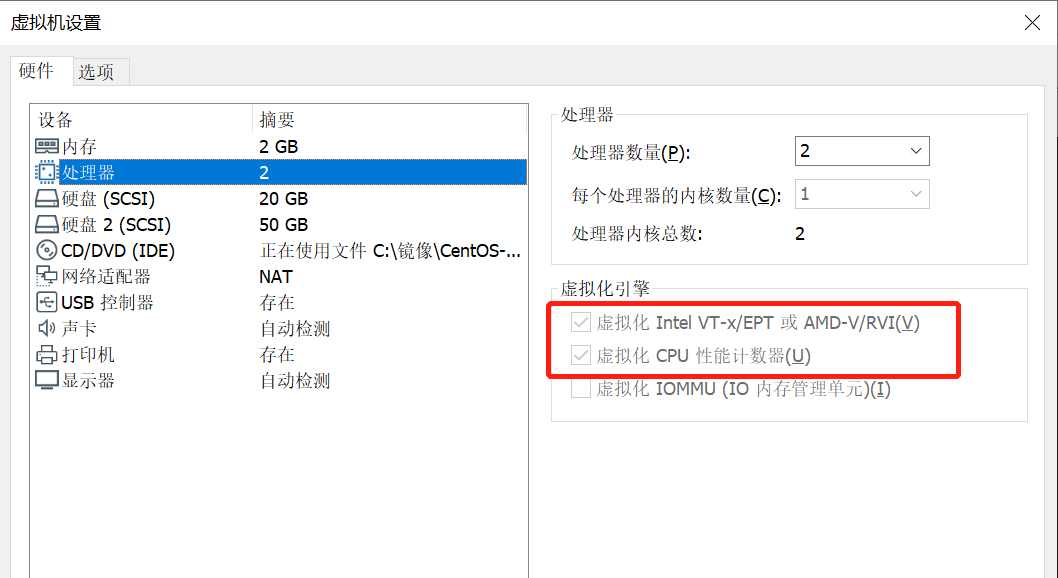
在“硬件”选项卡中单击“处理器”,在虚拟化引擎中勾选如红框内所示选项,如下图所示: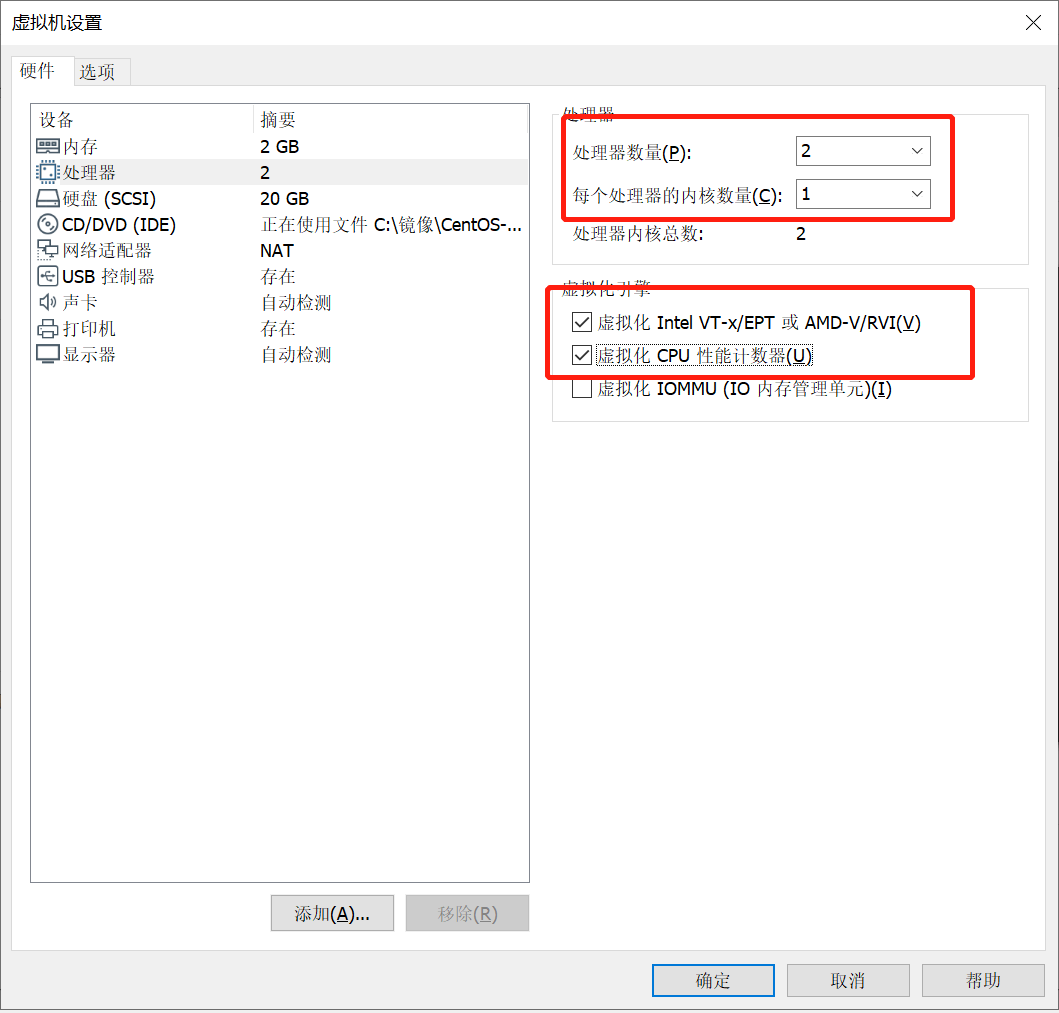
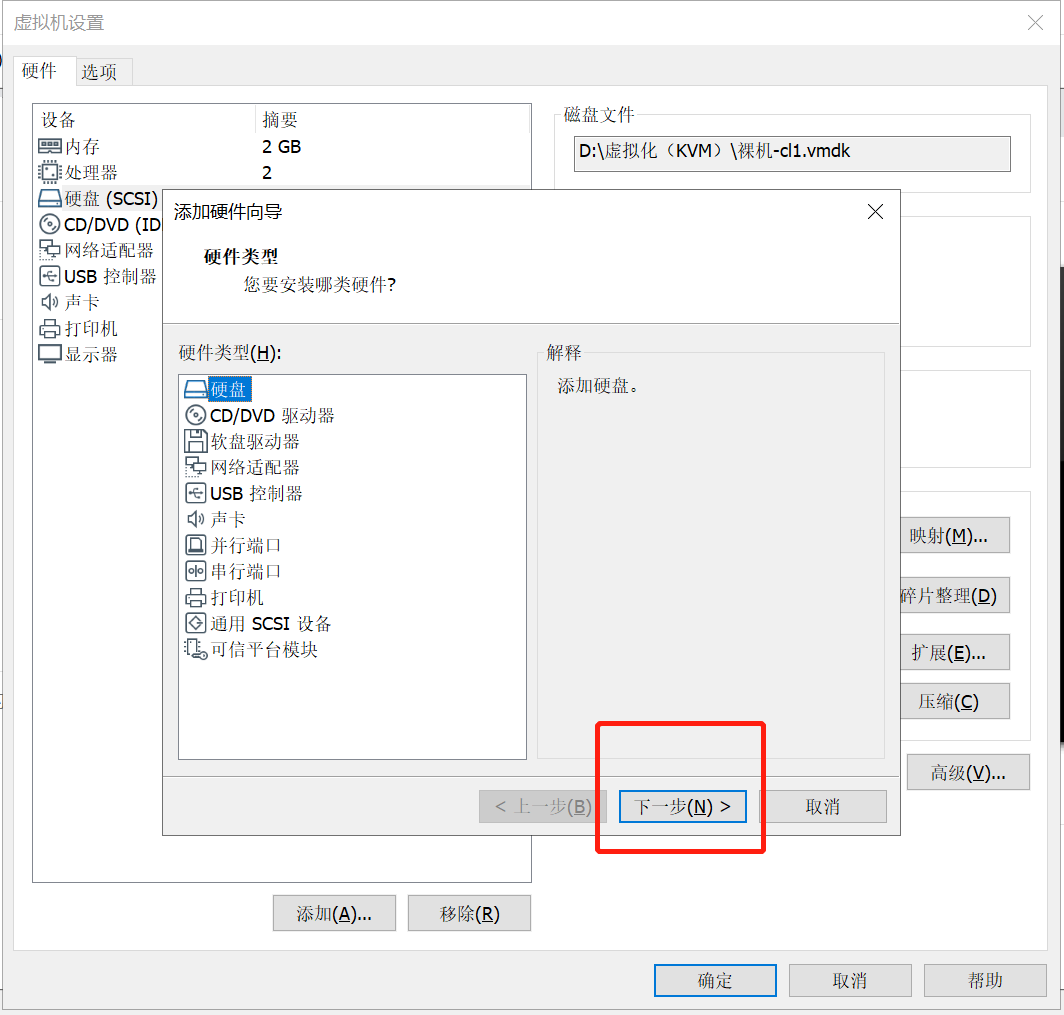
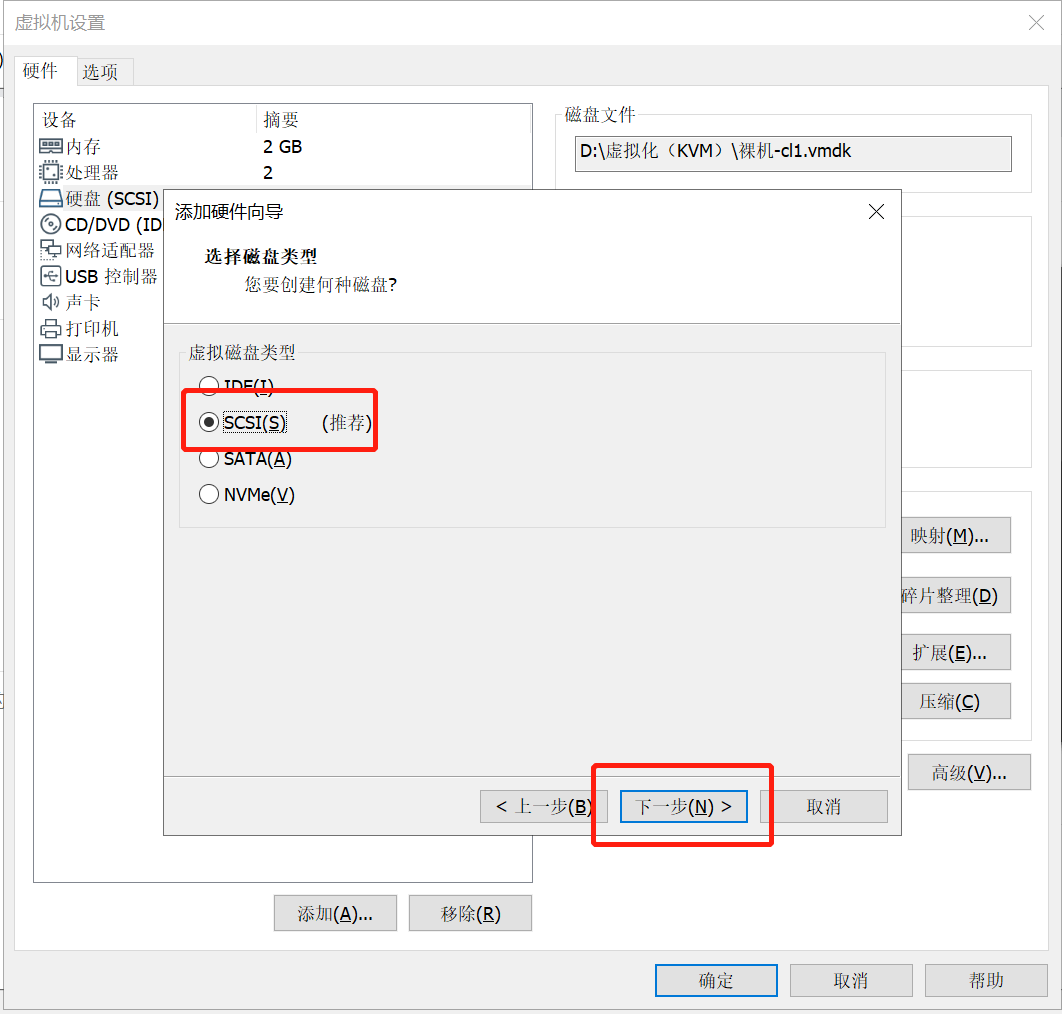
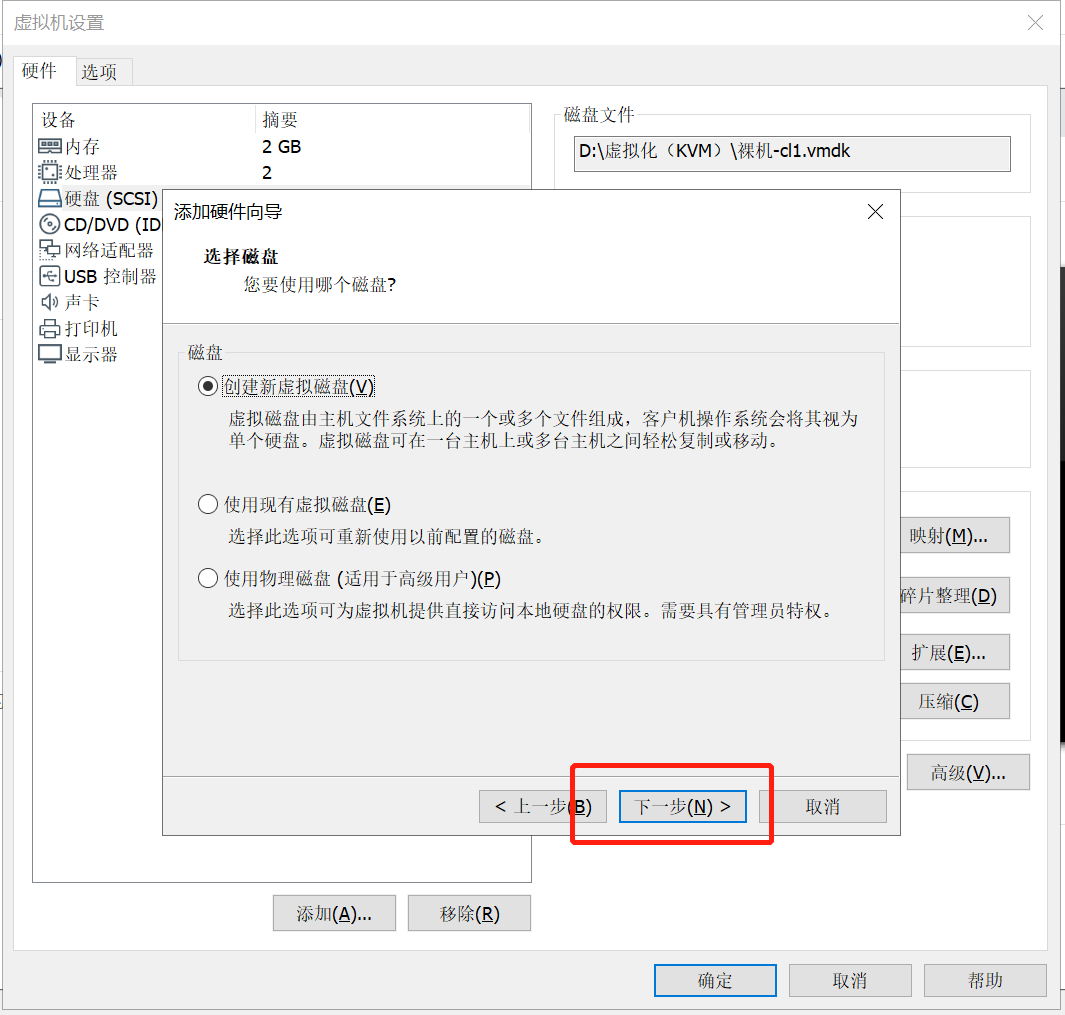
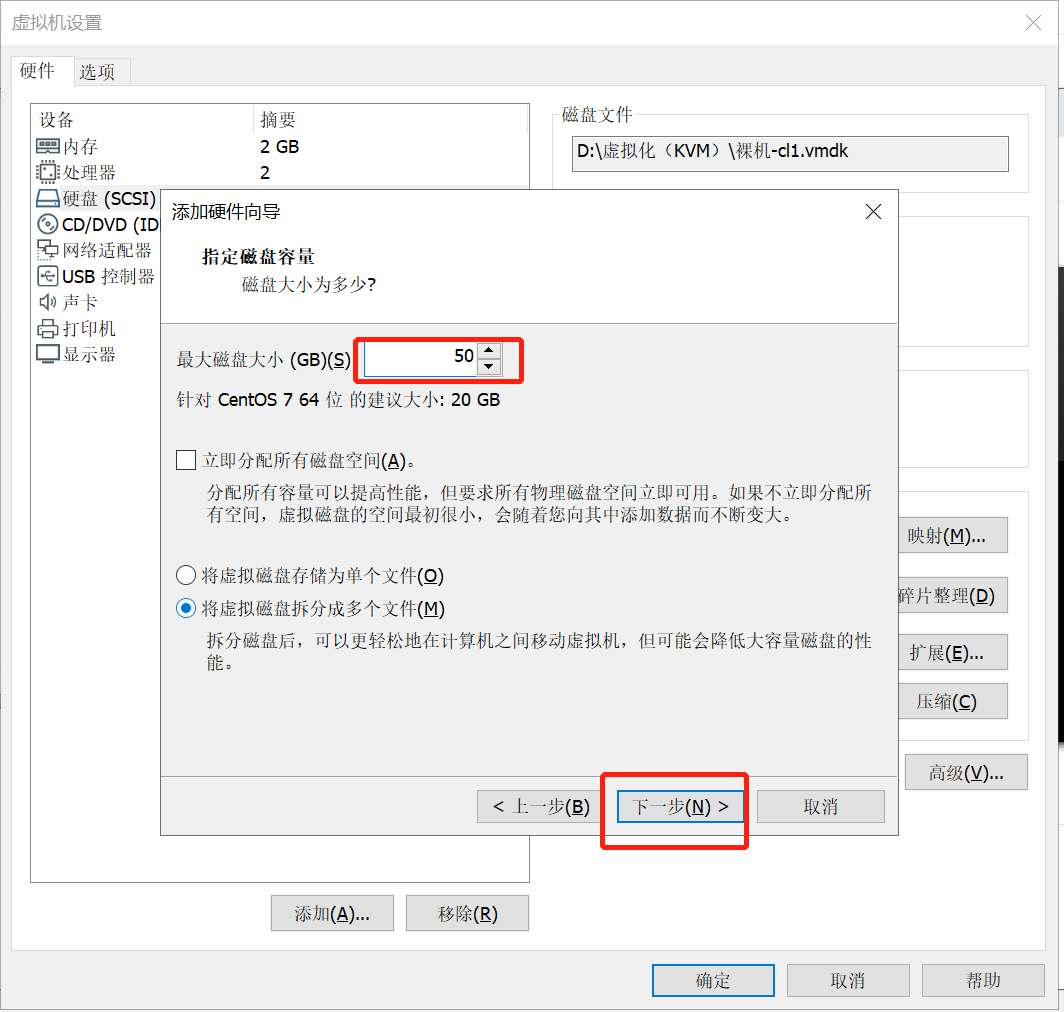
接下来,我们添加硬盘,单击“添加”,如下图所示: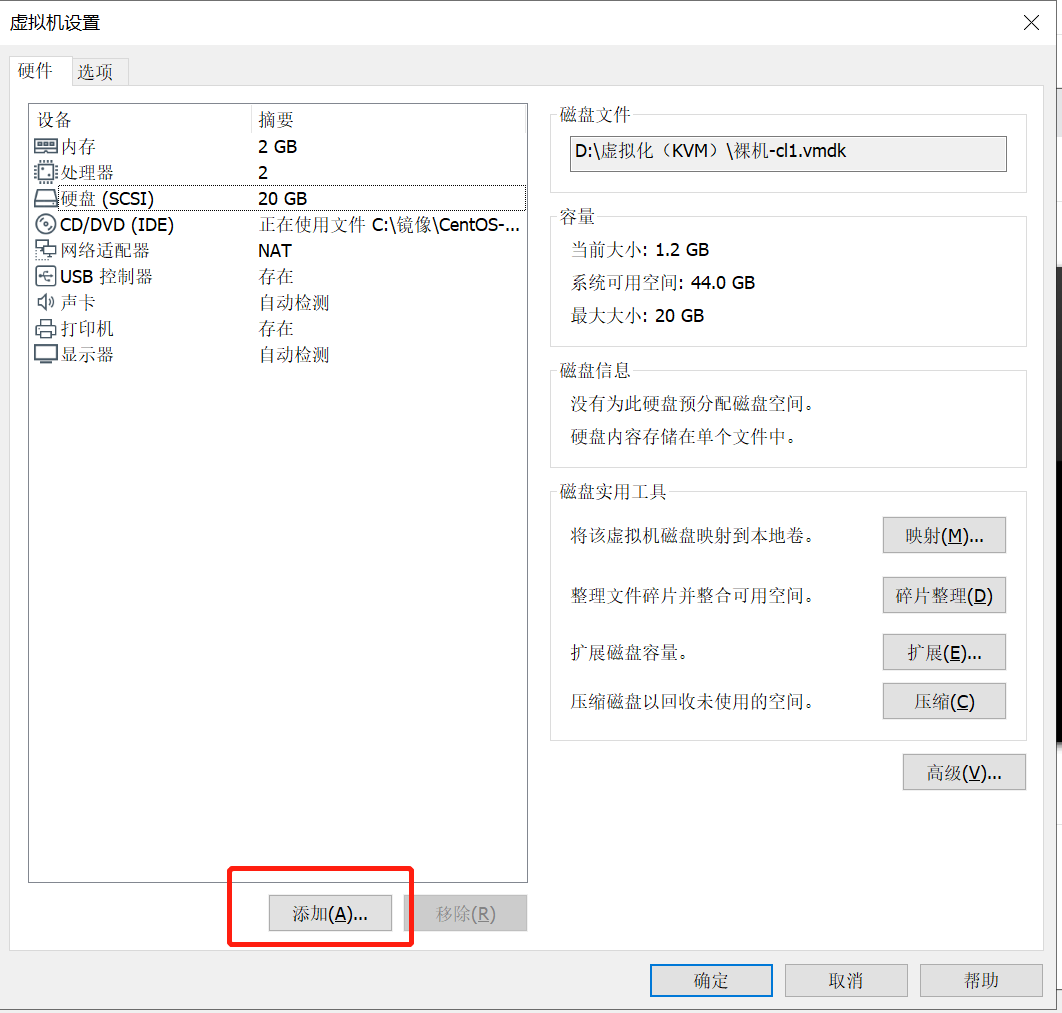
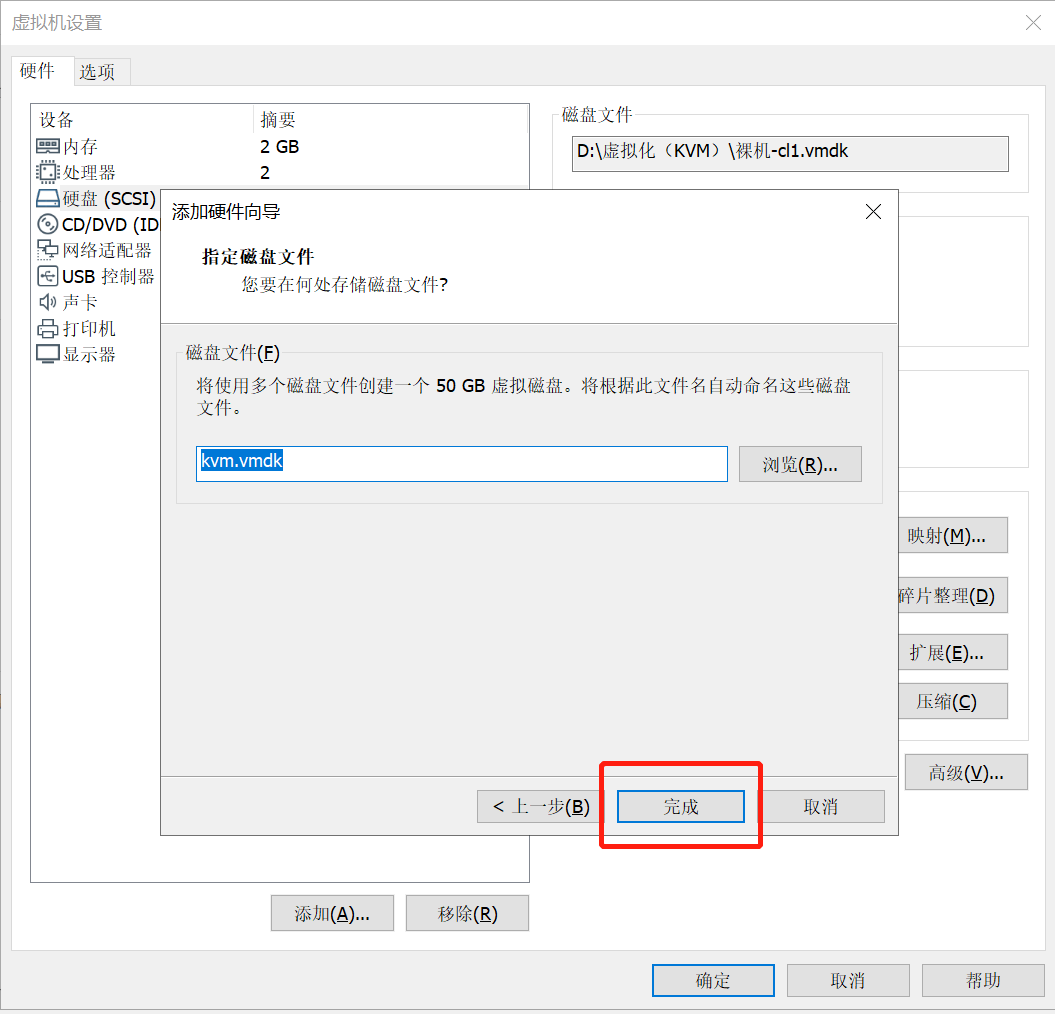
单击“确定”按钮,如下图所示: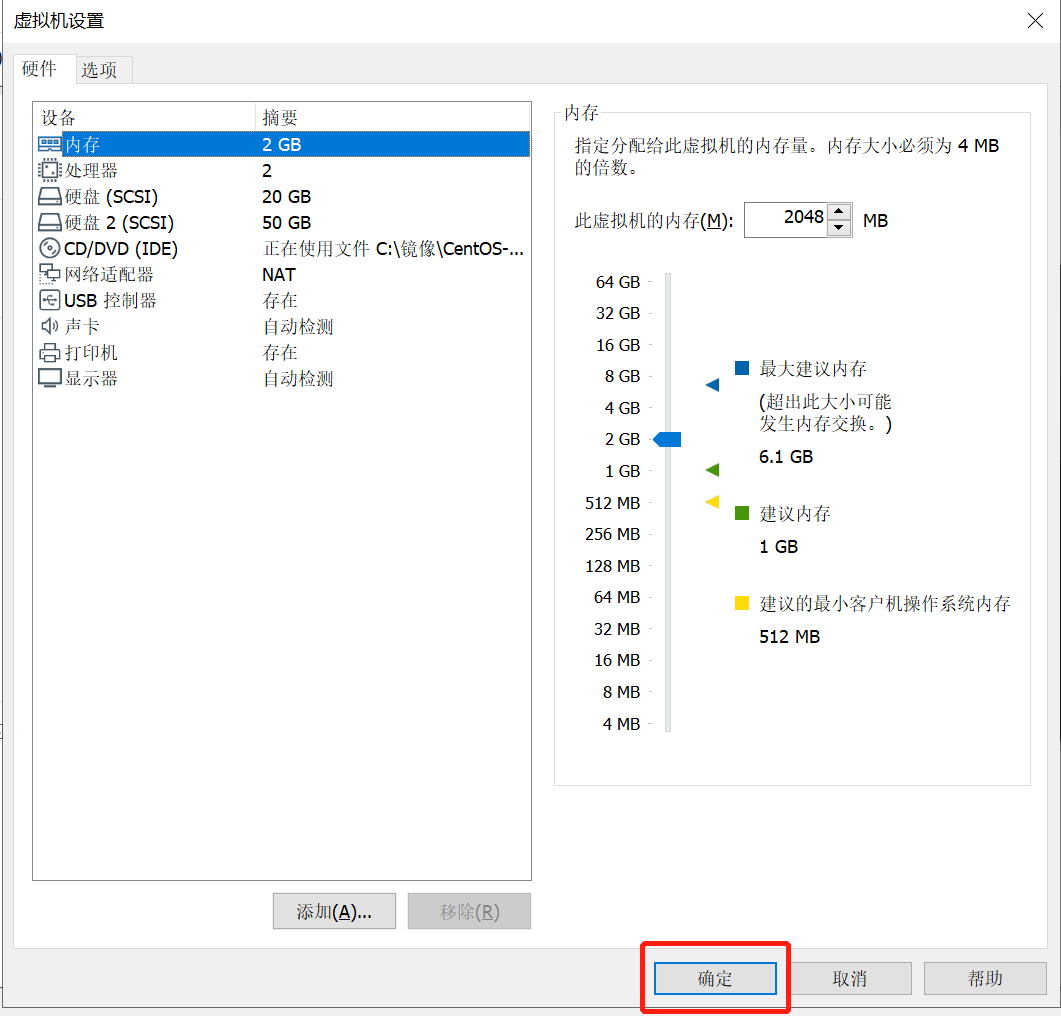
至此,虚拟机设置完成。如图所示: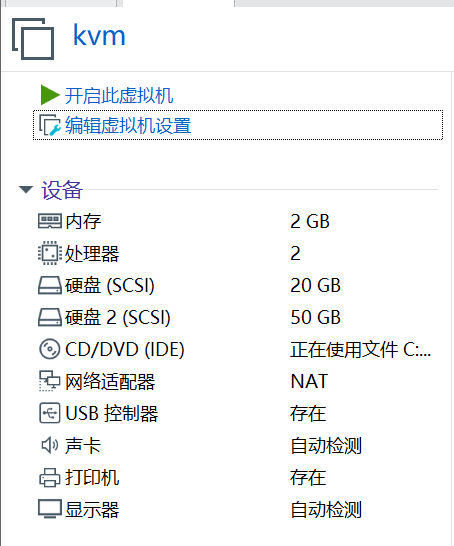
配置完成,我们启动虚拟机。
2. 检查CPU参数
启动虚拟机,我们查看以下,内存是否更改成功,命令如下:
# 修改主机名[root@localhost ~]# hostnamectl set-hostname kvm[root@localhost ~]# su[root@kvm ~]#[root@kvm ~]# freetotal used free shared buff/cache availableMem: 1868688 99352 1620776 8784 148560 1622204Swap: 2097148 0 2097148[root@kvm ~]#
检查CPU是否开启虚拟化支持,命令如下:
[root@kvm ~]# grep -Ei 'vmx|svm' /proc/cpuinfo

3. 挂载新磁盘
使用lsblk命令,检查虚拟机是否新增一块50 GB的磁盘,命令如下:
[root@kvm ~]# lsblkNAME MAJ:MIN RM SIZE RO TYPE MOUNTPOINTsda 8:0 0 20G 0 disk├─sda1 8:1 0 500M 0 part /boot└─sda2 8:2 0 19.5G 0 part├─centos-root 253:0 0 17.5G 0 lvm /└─centos-swap 253:1 0 2G 0 lvm [SWAP]sdb 8:16 0 50G 0 disksr0 11:0 1 4.5G 0 rom /mnt/centos
我们可以看到确实新增了一块磁盘名为sdb。
接下来格式化这块磁盘,格式化成ext4格式,命令如下:
[root@kvm ~]# mkfs.ext4 /dev/sdbmke2fs 1.42.9 (28-Dec-2013)/dev/sdb is entire device, not just one partition!无论如何也要继续? (y,n) y文件系统标签=OS type: Linux块大小=4096 (log=2)分块大小=4096 (log=2)Stride=0 blocks, Stripe width=0 blocks3276800 inodes, 13107200 blocks655360 blocks (5.00%) reserved for the super user第一个数据块=0Maximum filesystem blocks=2162163712400 block groups32768 blocks per group, 32768 fragments per group8192 inodes per groupSuperblock backups stored on blocks:32768, 98304, 163840, 229376, 294912, 819200, 884736, 1605632, 2654208,4096000, 7962624, 11239424Allocating group tables: 完成正在写入inode表: 完成Creating journal (32768 blocks): 完成Writing superblocks and filesystem accounting information: 完成[root@kvm ~]# blkid /dev/sdb//blkid+磁盘:查看磁盘信息/dev/sdb: UUID="1cd04c8c-0d3a-49f4-9429-0c3e83b96ccf" TYPE="ext4"
格式化完成后,我们挂载磁盘,先创建挂载目录/kvm_data,然后进行挂载,命令如下:
[root@kvm ~]# mkdir /kvm_data[root@kvm ~]# mount /dev/sdb /kvm_data/
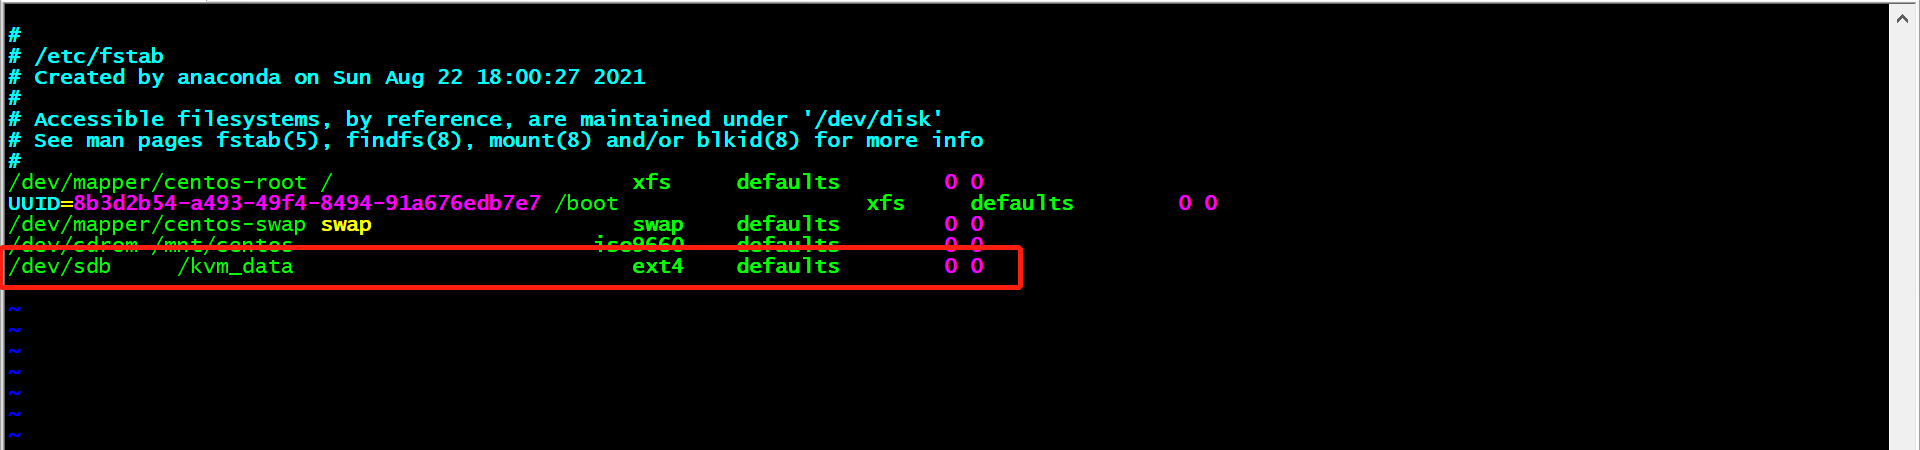
这种方式挂载,重启虚拟机后,需要再次重新挂载,我们为了方便开机后可以自动挂载,编写/etc/fstab文件,添加文件最末一行,命令如下:
[root@kvm ~]# vim /etc/fstab[root@kvm ~]# cat /etc/fstab## /etc/fstab# Created by anaconda on Sun Aug 22 18:00:27 2021## Accessible filesystems, by reference, are maintained under '/dev/disk'# See man pages fstab(5), findfs(8), mount(8) and/or blkid(8) for more info#/dev/mapper/centos-root / xfs defaults 0 0UUID=8b3d2b54-a493-49f4-8494-91a676edb7e7 /boot xfs defaults 0 0/dev/mapper/centos-swap swap swap defaults 0 0/dev/cdrom /mnt/centos iso9660 defaults 0 0/dev/sdb /kvm_data ext4 defaults 0 0
4. 关闭防火墙和selinux
关闭防火墙并设置开机不自启,命令如下:
[root@kvm ~]# systemctl stop firewalld[root@kvm ~]# systemctl disable firewalld
关闭SELinux,编辑/etc/selinux/config,将enforcing修改为disabled,命令如下:
[root@kvm ~]# vim /etc/selinux/config[root@kvm ~]# cat /etc/selinux/config

修改完成后,重启虚拟机,使其生效,使用getenforce查看,命令如下:
[root@kvm ~]# getenforceDisabled
5. 安装KVM
上述操作完成后,我们使用Yum进行安装KVM,命令如下:
[root@kvm ~]# yum install -y virt-* libvirt bridge-utils qemu-img# 升级系统内核[root@kvm ~]# yum upgrade -y
任务4 启动KVM
1. 配置网卡
增加桥接网卡ifcfg-br0,命令如下:
[root@kvm ~]# cd /etc/sysconfig/network-scripts/[root@kvm network-scripts]# cp ifcfg-ifcfg-eno16777736 ifcfg-lo[root@kvm network-scripts]# cp ifcfg-eno16777736 ifcfg-br0//ifcfg-eno16777736为配置IP的网卡,你的网卡可能与我的不同
修改桥接网卡ifcfg-br0的内容,命令如下:
[root@kvm network-scripts]# vim ifcfg-br0[root@kvm network-scripts]# cat ifcfg-br0TYPE=BridgeBOOTPROTO=noneNAME=br0DEVICE=br0ONBOOT=yesIPADDR=192.168.200.50NETMASK=255.255.255.0GATEWAY=192.168.200.2DNS1=114.114.114.114DNS2=8.8.8.8
修改NAT网卡ifcfg-eno16777736,内容如下:
[root@kvm network-scripts]# vim ifcfg-eno16777736[root@kvm network-scripts]# cat ifcfg-eno16777736TYPE=EthernetBOOTPROTO=noneNAME=eno16777736DEVICE=eno16777736ONBOOT=yesBRIDGE=br0
修改完成网卡内容后,重新启动网卡服务并查看网卡信息,命令如下:
[root@kvm network-scripts]# service network restartRestarting network (via systemctl): [ 确定 ][root@kvm network-scripts]# ifconfigbr0: flags=4163<UP,BROADCAST,RUNNING,MULTICAST> mtu 1500inet 192.168.200.50 netmask 255.255.255.0 broadcast 192.168.200.255inet6 fe80::20c:29ff:fe2c:c8ee prefixlen 64 scopeid 0x20<link>ether 00:0c:29:2c:c8:ee txqueuelen 1000 (Ethernet)RX packets 24 bytes 1288 (1.2 KiB)RX errors 0 dropped 0 overruns 0 frame 0TX packets 19 bytes 1598 (1.5 KiB)TX errors 0 dropped 0 overruns 0 carrier 0 collisions 0eno16777736: flags=4163<UP,BROADCAST,RUNNING,MULTICAST> mtu 1500ether 00:0c:29:2c:c8:ee txqueuelen 1000 (Ethernet)RX packets 92 bytes 8212 (8.0 KiB)RX errors 0 dropped 0 overruns 0 frame 0TX packets 70 bytes 9137 (8.9 KiB)TX errors 0 dropped 0 overruns 0 carrier 0 collisions 0lo: flags=73<UP,LOOPBACK,RUNNING> mtu 65536inet 127.0.0.1 netmask 255.0.0.0inet6 ::1 prefixlen 128 scopeid 0x10<host>loop txqueuelen 1000 (Local Loopback)RX packets 0 bytes 0 (0.0 B)RX errors 0 dropped 0 overruns 0 frame 0TX packets 0 bytes 0 (0.0 B)TX errors 0 dropped 0 overruns 0 carrier 0 collisions 0virbr0: flags=4099<UP,BROADCAST,MULTICAST> mtu 1500inet 192.168.122.1 netmask 255.255.255.0 broadcast 192.168.122.255ether 52:54:00:c3:eb:c3 txqueuelen 1000 (Ethernet)RX packets 0 bytes 0 (0.0 B)RX errors 0 dropped 0 overruns 0 frame 0TX packets 0 bytes 0 (0.0 B)TX errors 0 dropped 0 overruns 0 carrier 0 collisions 0
可以清楚的看到br0网卡出现并且带有IP,而以前的eno16777736网卡则没有IP。网卡配置完成
2. 启动libvirtd服务
首先检查KVM模块是否加载,命令如下:
[root@kvm network-scripts]# lsmod|grep kvmkvm_intel 188740 0kvm 637515 1 kvm_intelirqbypass 13503 1 kvm
启动libvirtd并检查是否成功启动,命令如下:
[root@kvm network-scripts]# systemctl start libvirtd[root@kvm network-scripts]# ps -ef |grep libvirtroot 1004 1 0 03:22 ? 00:00:00 /usr/sbin/libvirtdnobody 1669 1 0 03:22 ? 00:00:00 /usr/sbin/dnsmasq --conf-file=/var/lib/libvirt/dnsmasq/default.conf --leasefile-ro --dhcp-script=/usr/libexec/libvirt_leaseshelperroot 1670 1669 0 03:22 ? 00:00:00 /usr/sbin/dnsmasq --conf-file=/var/lib/libvirt/dnsmasq/default.conf --leasefile-ro --dhcp-script=/usr/libexec/libvirt_leaseshelperroot 8837 8324 0 03:26 pts/0 00:00:00 grep --color=auto libvirt
启动成功后,使用brctl命令可以看到两个网卡,如下代码所示:
[root@kvm network-scripts]# cd[root@kvm ~]# brctl showbridge name bridge id STP enabled interfacesbr0 8000.000c292cc8ee no eno16777736virbr0 8000.525400c3ebc3 yes virbr0-nic
3. 命令行安装CentOS 7
CentOS7镜像下载地址:
http://mirrors.163.com/centos/7/isos/x86_64/CentOS-7-x86_64-DVD-2003.iso
首先,通过SCRT上传CentOS 7镜像到/tmp目录下,如果没有镜像的可以自行下载。上传后,使用ll命令查看/tmp目录下是否存在CentOS 7镜像文件,命令如下:
[root@kvm ~]# cd /opt/用量 4228096-rw-r--r-- 1 root root 4329570304 8月 22 09:54 CentOS-7-x86_64-DVD-1511.iso
镜像存在,接下来使用virt-install进行CentOS 7的安装,命令如下:
[root@kvm opt]# virt-install --name=test --memory=512,maxmemory=1024 --vcpus=1,maxvcpus=2 --os-type=linux --os-variant=rhel7 --location=/opt/CentOS-7-x86_64-DVD-1511.iso --disk path=/kvm_data/test.img,size=10 --bridge=br0 --graphics=none --console=pty,target_type=serial --extra-args="console=tty0 console=ttyS0"
命令解释:
l —name:指定虚拟机的名称。
l —memory:指定分配给虚拟机的内存资源大小。
l maxmemory:指定可调节的最大内存资源大小,因为KVM支持热调整虚拟机的资源。
l —vcpus:指定分配给虚拟机的CPU核心数量。
l maxvcpus:指定可调节的最大CPU核心数量。
l —os-type:指定虚拟机安装的操作系统类型。
l —os-variant:指定系统的发行版本。
l —location:指定ISO镜像文件所在的路径,支持使用网络资源路径,也就是说可以使用URL。
l —disk path:指定虚拟硬盘所存放的路径及名称,size则是指定该硬盘的可用大小,单位是G。
l —bridge:指定使用哪一个桥接网卡,也就是说使用桥接的网络模式。
l —graphics:指定是否开启图形。
l —console:定义终端的属性,target_type 则是定义终端的类型。
l —extra-args:定义终端额外的参数。
打完上面那条命令后,等一会,就可以看见下面这段命令,这是系统基础设置,带[!]基本都是需要配置的,接下来我们开始配置“Timezone settings”,输入“2”,按Enter键,命令如下:
Starting installer, one moment...anaconda 21.48.22.56-1 for CentOS 7 started.* installation log files are stored in /tmp during the installation* shell is available on TTY2* when reporting a bug add logs from /tmp as separate text/plain attachments17:01:51 Not asking for VNC because we don't have a network================================================================================================================================================================Installation1) [x] Language settings 2) [!] Timezone settings(English (United States)) (Timezone is not set.)3) [!] Installation source 4) [!] Software selection(Processing...) (Processing...)5) [!] Installation Destination 6) [x] Kdump(No disks selected) (Kdump is enabled)7) [ ] Network configuration 8) [!] Root password(Not connected) (Password is not set.)9) [!] User creation(No user will be created)Please make your choice from above ['q' to quit | 'b' to begin installation | 'r' to refresh]: 2=====================================================================
“Timezone settings”时区设置选择5) Asia亚洲,再选择城市 62) Shanghai上海,命令如下:
Timezone settingsAvailable regions1) Africa 6) Atlantic 10) Pacific2) America 7) Australia 11) US3) Antarctica 8) Europe 12) Etc4) Arctic 9) Indian5) AsiaPlease select the timezone.Use numbers or type names directly [b to region list, q to quit]: 5================================================================================================================================================================Timezone settingsAvailable timezones in region Asia1) Aden 28) Irkutsk 54) Pyongyang2) Almaty 29) Jakarta 55) Qatar3) Amman 30) Jayapura 56) Qyzylorda4) Anadyr 31) Jerusalem 57) Rangoon5) Aqtau 32) Kabul 58) Riyadh6) Aqtobe 33) Kamchatka 59) Sakhalin7) Ashgabat 34) Karachi 60) Samarkand8) Baghdad 35) Kathmandu 61) Seoul9) Bahrain 36) Khandyga 62) Shanghai10) Baku 37) Kolkata 63) Singapore11) Bangkok 38)Krasnoyarsk 64) Srednekolymsk12) Beirut 39) Kuala_Lumpur 65) Taipei13) Bishkek 40) Kuching 66) Tashkent14) Brunei 41) Kuwait 67) Tbilisi15) Chita 42) Macau 68) Tehran16) Choibalsan 43) Magadan 69) Thimphu17) Colombo 44) Makassar 70) Tokyo18) Damascus 45) Manila 71) Ulaanbaatar19) Dhaka 46) Muscat 72) Urumqi20) Dili 47) Nicosia 73) Ust-Nera21) Dubai 48) Novokuznetsk 74) Vientiane22) Dushanbe 49) Novosibirsk 75) VladivostokPress ENTER to continue23) Gaza 50) Omsk 76) Yakutsk24) Hebron 51) Oral 77) Yekaterinburg25) Ho_Chi_Minh 52) Phnom_Penh 78) Yerevan26) Hong_Kong 53) Pontianak27) HovdPlease select the timezone.Use numbers or type names directly [b to region list, q to quit]: 62================================================================================
输入完毕后,可以发现2的[!]变成了[x],证明配置完毕。
接下来我们配置“Software selection”,选择“4”,在选择“c”,因为默认就是minimalinstall,按Enter键,命令如下:
Installation1) [x] Language settings 2) [x] Timezone settings(English (United States)) (Asia/Shanghai timezone)3) [x] Installation source 4) [!] Software selection(Local media) (Minimal Install)5) [!] Installation Destination 6) [x] Kdump(No disks selected) (Kdump is enabled)7) [ ] Network configuration 8) [!] Root password(Not connected) (Password is not set.)9) [!] User creation(No user will be created)Please make your choice from above ['q' to quit | 'b' to begin installation |'r' to refresh]: 4================================================================================================================================================================Base environmentSoftware selectionBase environment1) [x] Minimal Install 7) [ ] Server with GUI2) [ ] Compute Node 8) [ ] GNOME Desktop3) [ ] Infrastructure Server 9) [ ] KDE Plasma Workspaces4) [ ] File and Print Server 10) [ ] Development and Creative Work5) [ ] Basic Web Server station6) [ ] Virtualization HostPlease make your choice from above ['q' to quit | 'c' to continue |'r' to refresh]: c
接下来我们配置“Installation Destination”,选择“5”,其余的依次选择“c”,按Enter键,命令如下:
Installation1) [x] Language settings 2) [x] Timezone settings(English (United States)) (Asia/Shanghai timezone)3) [!] Installation source 4) [!] Software selection(Processing...) (Processing...)5) [!] Installation Destination 6) [x] Kdump(No disks selected) (Kdump is enabled)7) [ ] Network configuration 8) [!] Root password(Not connected) (Password is not set.)9) [!] User creation(No user will be created)Please make your choice from above ['q' to quit | 'b' to begin installation |'r' to refresh]: 5================================================================================================================================================================Probing storage...Installation Destination[x] 1) : 10 GiB (vda)1 disk selected; 10 GiB capacity; 10 GiB free ...Please make your choice from above ['q' to quit | 'c' to continue |'r' to refresh]: c================================================================================================================================================================Autopartitioning Options[ ] 1) Replace Existing Linux system(s)[x] 2) Use All Space[ ] 3) Use Free SpaceInstallation requires partitioning of your hard drive. Select what space to usefor the install target.Please make your choice from above ['q' to quit | 'c' to continue |'r' to refresh]: c================================================================================================================================================================Partition Scheme Options[ ] 1) Standard Partition[ ] 2) Btrfs[x] 3) LVM[ ] 4) LVM Thin ProvisioningSelect a partition scheme configuration.Please make your choice from above ['q' to quit | 'c' to continue |'r' to refresh]: cGenerating updated storage configurationChecking storage configuration...================================================================================================================================================================
接下来配置“Root password”,选择8,按Enter键,命令如下:
Installation1) [x] Language settings 2) [x] Timezone settings(English (United States)) (Asia/Shanghai timezone)3) [x] Installation source 4) [x] Software selection(Local media) (Minimal Install)5) [x] Installation Destination 6) [x] Kdump(Automatic partitioning selecte (Kdump is enabled)d) 8) [!] Root password7) [ ] Network configuration (Password is not set.)(Not connected)9) [!] User creation(No user will be created)Please make your choice from above ['q' to quit | 'b' to begin installation |'r' to refresh]: 8================================================================================================================================================================Please select new root password. You will have to type it twice.
依次输入两次密码,密码相同,我设置的为123456,命令如下:
Password: 123456//密码为密文,不显示。Password (confirm): 123456================================================================================================================================================================QuestionYou have provided a weak password: The password fails the dictionary check - itis too simplistic/systematicWould you like to use it anyway?//这句话的意思:你的密码太过简单,是否使用它,输入yes即可。Please respond 'yes' or 'no': yes==================================================================================================================
配置完成,选择“b”,按Enter键后,开始安装,命令如下:
Installation1) [x] Language settings 2) [x] Timezone settings(English (United States)) (Asia/Shanghai timezone)3) [x] Installation source 4) [x] Software selection(Local media) (Minimal Install)5) [x] Installation Destination 6) [x] Kdump(Automatic partitioning selecte (Kdump is enabled)d) 8) [x] Root password7) [ ] Network configuration (Password is set.)(Not connected)9) [ ] User creation(No user will be created)Please make your choice from above ['q' to quit | 'b' to begin installation |'r' to refresh]: b================================================================================================================================================================ProgressSetting up the installation environment.Creating disklabel on /dev/vda.Creating xfs on /dev/vda1.Creating lvmpv on /dev/vda2.Creating swap on /dev/mapper/centos-swap.……………………Installing readline (34/297)Installing gawk (35/297)Installing elfutils-libelf (36/297)Installing libgpg-error (37/297)Installing libffi (38/297)Installing libattr (39/297)Installing libacl (40/297)Installing libcap (41/297)Installing libgcrypt (42/297)Installing cpio (43/297)Installing libxml2 (44/297)Installing libnl3 (45/297)Installing expat (46/297)Installing p11-kit (47/297)…………………….Performing post-installation setup tasks.Configuring installed system.Writing network configuration.Creating users.Configuring addons.Generating initramfs.Running post-installation scripts.Use of this product is subject to the license agreement found at /usr/share/centos-release/EULAInstallation complete. Press return to quit//按回车……………………CentOS Linux 7 (Core)Kernel 3.10.0-327.el7.x86_64 on an x86_64localhost login: rootPassword: 123456[root@localhost ~]#//自动获取IP给新的虚拟机[root@localhost ~]# dhclient eth0//按“Ctrl+]”键,退出终端,回到宿主机。[root@kvm ~]#
任务5 虚拟机管理
1. KVM基本管理
完成虚拟机安装,已经退回到宿主机,接下来我们来通过宿主机virsh命令进行管理刚才安装的CentOS 7虚拟机。
查看虚拟机列表,命令如下:
[root@kvm ~]# virsh list//查看虚拟机列表,只能看到正在运行的虚拟机Id 名称 状态----------------------------------------------------2 test running[root@kvm ~]# virsh list --all//查看虚拟机列表,包括未运行的虚拟机Id 名称 状态----------------------------------------------------2 test running
进入指定的虚拟,命令如下:
[root@kvm ~]# virsh console testConnected to domain testEscape character is ^]//如果迟迟未动敲下回车就ok,下面就是正常登录时需要输入的用户名密码CentOS Linux 7 (Core)Kernel 3.10.0-327.el7.x86_64 on an x86_64localhost login:
若发生以下报错信息,命令如下:
[root@kvm ~]# virsh console testConnected to domain testEscape character is ^]error: operation failed: Active console session exists for this domain
解决方式,命令如下:
[root@kvm ~]# ps -ef |grep consoleroot 11167 10987 0 01:55 tty1 00:00:00 virsh console testroot 16017 15750 0 10:01 pts/1 00:00:00 grep --color=auto console[root@kvm ~]# kill -9 11167
vrish常用命令,命令如下:
virsh shutdown test//关闭虚拟机virsh start test//开启虚拟机virsh destroy test//类似stop,这个是强制停止virsh undefine test//彻底销毁虚拟机,会删除虚拟机配置文件,virsh list --all就看不到virsh autostart test//宿主机开机该虚拟机也开机virsh autostart --disable test//解除开机启动virsh suspend test//挂起virsh resume test//恢复
2. 克隆虚拟机
克隆虚拟机之前,要先关闭虚拟机,不然会提示这种错误,命令如下:
[root@kvm ~]# virt-clone --original test --name test02 --file /kvm_data/test02.imgERROR Domain with devices to clone must be paused or shutoff.
关闭虚拟机后,再次进行克隆,命令如下:
[root@kvm ~]# virt-clone --original test --name test02 --file /kvm_data/test02.img正在分配 'test02.img' | 10 GB 00:00:07成功克隆 'test02'。
命令解释:
l —original:指定克隆源虚拟机。
l —name:指定克隆后的虚拟机名字。
l —file:指定目标虚拟机的虚拟磁盘文件。
查看虚拟机配置文件/etc/libvirt/qemu/,看是否增加test02.xml文件,命令如下:
[root@kvm ~]# ls /etc/libvirt/qemu/networks test02.xml test.xml
接下来,我们启动刚刚克隆的虚拟机test02,首先查看虚拟机列表,然后启动克隆的虚拟机test02,命令如下:
[root@kvm ~]# virsh list --allId 名称 状态----------------------------------------------------- test 关闭- test02 关闭
3. 快照管理
快照是在我们使用Vmware的时候,很常用的一个功能。它可以回到之前的某一状态。在KVM中RAW格式的虚拟磁盘不支持做快照,qcow2支持。
创建快照,命令如下:
[root@kvm ~]# virsh snapshot-create test已生成域快照 1633907626
查看test.img信息,同时会查看到快照列表,命令如下:
[root@kvm ~]# qemu-img info /kvm_data/test.imgimage: /kvm_data/test.imgfile format: qcow2virtual size: 10G (10737418240 bytes)disk size: 1.1Gcluster_size: 65536Snapshot list:ID TAG VM SIZE DATE VM CLOCK1 1633907626 0 2021-10-11 07:13:46 00:00:00.000Format specific information:compat: 1.1lazy refcounts: true
列出所有快照,命令如下:
[root@kvm ~]# virsh snapshot-list test名称 生成时间 状态------------------------------------------------------------1633907626 2021-10-11 07:13:46 +0800 shutoff
查看当前快照版本,命令如下:
[root@kvm ~]# virsh snapshot-current test<domainsnapshot><name>1633907626</name><state>shutoff</state><creationTime>1633907626</creationTime><memory snapshot='no'/><disks><disk name='vda' snapshot='internal'/><disk name='hda' snapshot='no'/></disks><domain type='kvm'><name>test</name><uuid>e7654728-bed3-4920-a448-678da4346b54</uuid><memory unit='KiB'>1048576</memory><currentMemory unit='KiB'>524288</currentMemory><vcpu placement='static' current='1'>2</vcpu><os><type arch='x86_64' machine='pc-i440fx-rhel7.0.0'>hvm</type><boot dev='hd'/></os><features><acpi/><apic/></features><cpu mode='custom' match='exact' check='partial'><model fallback='allow'>Broadwell-noTSX-IBRS</model><feature policy='require' name='md-clear'/><feature policy='require' name='spec-ctrl'/><feature policy='require' name='ssbd'/></cpu><clock offset='utc'><timer name='rtc' tickpolicy='catchup'/><timer name='pit' tickpolicy='delay'/><timer name='hpet' present='no'/></clock><on_poweroff>destroy</on_poweroff><on_reboot>restart</on_reboot><on_crash>destroy</on_crash><pm><suspend-to-mem enabled='no'/><suspend-to-disk enabled='no'/></pm><devices><emulator>/usr/libexec/qemu-kvm</emulator><disk type='file' device='disk'><driver name='qemu' type='qcow2'/><source file='/kvm_data/test.img'/><target dev='vda' bus='virtio'/><address type='pci' domain='0x0000' bus='0x00' slot='0x06' function='0x0'/></disk><disk type='file' device='cdrom'><driver name='qemu' type='raw'/><target dev='hda' bus='ide'/><readonly/><address type='drive' controller='0' bus='0' target='0' unit='0'/></disk><controller type='usb' index='0' model='ich9-ehci1'><address type='pci' domain='0x0000' bus='0x00' slot='0x04' function='0x7'/></controller><controller type='usb' index='0' model='ich9-uhci1'><master startport='0'/><address type='pci' domain='0x0000' bus='0x00' slot='0x04' function='0x0' multifunction='on'/></controller><controller type='usb' index='0' model='ich9-uhci2'><master startport='2'/><address type='pci' domain='0x0000' bus='0x00' slot='0x04' function='0x1'/></controller><controller type='usb' index='0' model='ich9-uhci3'><master startport='4'/><address type='pci' domain='0x0000' bus='0x00' slot='0x04' function='0x2'/></controller><controller type='ide' index='0'><address type='pci' domain='0x0000' bus='0x00' slot='0x01' function='0x1'/></controller><controller type='virtio-serial' index='0'><address type='pci' domain='0x0000' bus='0x00' slot='0x05' function='0x0'/></controller><controller type='pci' index='0' model='pci-root'/><interface type='bridge'><mac address='52:54:00:53:d4:0f'/><source bridge='br0'/><model type='virtio'/><address type='pci' domain='0x0000' bus='0x00' slot='0x03' function='0x0'/></interface><serial type='pty'><target type='isa-serial' port='0'><model name='isa-serial'/></target></serial><console type='pty'><target type='serial' port='0'/></console><channel type='unix'><target type='virtio' name='org.qemu.guest_agent.0'/><address type='virtio-serial' controller='0' bus='0' port='1'/></channel><input type='mouse' bus='ps2'/><input type='keyboard' bus='ps2'/><memballoon model='virtio'><address type='pci' domain='0x0000' bus='0x00' slot='0x07' function='0x0'/></memballoon><rng model='virtio'><backend model='random'>/dev/urandom</backend><address type='pci' domain='0x0000' bus='0x00' slot='0x08' function='0x0'/></rng></devices></domain></domainsnapshot>
查看所有快照配置文件,命令如下:
[root@kvm ~]# ls /var/lib/libvirt/qemu/snapshot/test/1633907626.xml
恢复指定快照,命令如下:
[root@kvm ~]# virsh snapshot-revert test 1633907626
删除指定快照,命令如下:
[root@kvm ~]# virsh snapshot-delete test 1633907626已删除域快照 1633907626
4. 磁盘格式
查看虚拟磁盘格式,命令如下:
[root@kvm ~]# qemu-img info /kvm_data/test.imgimage: /kvm_data/test.imgfile format: qcow2virtual size: 10G (10737418240 bytes)disk size: 1.1Gcluster_size: 65536Format specific information:compat: 1.1lazy refcounts: true
创建2 GB的RAW格式磁盘,命令如下:
[root@kvm ~]# qemu-img create -f raw /kvm_data/test_1.img 2GFormatting '/kvm_data/test_1.img', fmt=raw size=2147483648
RAW格式的磁盘转换为qcow2格式,命令如下:
[root@kvm ~]# qemu-img convert -O qcow2 /kvm_data/test_1.img /kvm_data/test_1.qcow2
查看test1.img大小,命令如下:
[root@kvm ~]# ls -lh /kvm_data/test_1.img-rw-r--r-- 1 root root 2.0G 10月 11 07:19 /kvm_data/test_1.img[root@kvm ~]# ls -lh /kvm_data/test_1.qcow2-rw-r--r-- 1 root root 193K 10月 11 07:20 /kvm_data/test_1.qcow2//可以看到qcow2文件比较小,raw文件大小和我们指定空间大小一样是2G//raw格式的磁盘性能比qcow2要好,但是raw格式的磁盘无法做快照
将test02转成raw格式,命令如下:
[root@kvm ~]# qemu-img convert -O raw /kvm_data/test02.img /kvm_data/test02_2.raw
更改磁盘格式和文件路径,然后启动test02虚拟机,命令如下:
[root@kvm ~]# virsh edit test02…………<disk type='file' device='disk'><driver name='qemu' type='qcow'/><source file='/kvm_data/test02.img'/><target dev='vda' bus='virtio'/><address type='pci' domain='0x0000' bus='0x00' slot='0x06' function='0x0'/></disk>//找到上面这部分将qcow修改为raw,/kvm_data/test02.img改为/kvm_data/test02_2.raw<disk type='file' device='disk'><driver name='qemu' type='raw'/><source file='/kvm_data/test02_2.raw'/><target dev='vda' bus='virtio'/><address type='pci' domain='0x0000' bus='0x00' slot='0x06' function='0x0'/></disk>………………
查看磁盘所属用户和组,命令如下:
[root@kvm ~]# ls -l /kvm_data/总用量 3426900drwx------ 2 root root 16384 10月 11 05:05 lost+found-rw-r--r-- 1 root root 10737418240 10月 11 07:26 test02_2.raw-rw------- 1 root root 1173749760 10月 11 07:10 test02.img-rw-r--r-- 1 root root 2147483648 10月 11 07:19 test_1.img-rw-r--r-- 1 root root 197120 10月 11 07:20 test_1.qcow2-rw------- 1 root root 10739384832 10月 11 07:17 test.img
启动虚拟机test02,然后再次查看磁盘所属用户和组,命令如下:
[root@kvm ~]# virsh start test02域 test02 已开始[root@kvm ~]# ls -l /kvm_data/总用量 3426900drwx------ 2 root root 16384 10月 11 05:05 lost+found-rw-r--r-- 1 qemu qemu 10737418240 10月 11 07:26 test02_2.raw-rw------- 1 root root 1173749760 10月 11 07:10 test02.img-rw-r--r-- 1 root root 2147483648 10月 11 07:19 test_1.img-rw-r--r-- 1 root root 197120 10月 11 07:20 test_1.qcow2-rw------- 1 root root 10739384832 10月 11 07:17 test.img
5. 磁盘扩容
我们知道,在这里磁盘一共有两种格式,一种是RAW格式,一种是qcow2格式,接下来我们分别给这两种磁盘格式进行扩容。
首先扩容RAW格式,命令如下:
[root@kvm ~]# qemu-img resize /kvm_data/test02_2.raw +2GImage resized.
查看test02_2.raw信息,命令如下:
[root@kvm ~]# qemu-img info /kvm_data/test02_2.rawimage: /kvm_data/test02_2.rawfile format: rawvirtual size: 12G (12884901888 bytes)disk size: 1.1G
进入虚拟机test02,使用fdisk -l查看磁盘,命令如下:
[root@kvm ~]# virsh console test02连接到域 test02换码符为 ^]//回车CentOS Linux 7 (Core)Kernel 3.10.0-327.el7.x86_64 on an x86_64localhost login: rootPassword:Last login: Mon Oct 11 06:58:54 on ttyS0
进入虚拟机test02,使用fdisk -l查看磁盘,命令如下:
[root@localhost ~]# fdisk -lDisk /dev/vda: 10.7 GB, 10737418240 bytes, 20971520 sectorsUnits = sectors of 1 * 512 = 512 bytesSector size (logical/physical): 512 bytes / 512 bytesI/O size (minimum/optimal): 512 bytes / 512 bytesDisk label type: dosDisk identifier: 0x00028cabDevice Boot Start End Blocks Id System/dev/vda1 * 2048 1026047 512000 83 Linux/dev/vda2 1026048 20971519 9972736 8e Linux LVMDisk /dev/mapper/centos-root: 9093 MB, 9093251072 bytes, 17760256 sectorsUnits = sectors of 1 * 512 = 512 bytesSector size (logical/physical): 512 bytes / 512 bytesI/O size (minimum/optimal): 512 bytes / 512 bytesDisk /dev/mapper/centos-swap: 1073 MB, 1073741824 bytes, 2097152 sectorsUnits = sectors of 1 * 512 = 512 bytesSector size (logical/physical): 512 bytes / 512 bytesI/O size (minimum/optimal): 512 bytes / 512 bytes//可以看到磁盘还是10 GB
退出终端,关闭test02虚拟机,重新启动,然后再次进入虚拟机test02,使用fdisk -l查看磁盘,命令如下:
[root@kvm ~]# virsh destroy test02域 test02 被删除[root@kvm ~]# virsh start test02域 test02 已开始[root@kvm ~]# virsh console test02连接到域 test02换码符为 ^][root@localhost ~]# fdisk -lDisk /dev/vda: 12.9 GB, 12884901888 bytes, 25165824 sectorsUnits = sectors of 1 * 512 = 512 bytesSector size (logical/physical): 512 bytes / 512 bytesI/O size (minimum/optimal): 512 bytes / 512 bytesDisk label type: dosDisk identifier: 0x00028cabDevice Boot Start End Blocks Id System/dev/vda1 * 2048 1026047 512000 83 Linux/dev/vda2 1026048 20971519 9972736 8e Linux LVMDisk /dev/mapper/centos-root: 9093 MB, 9093251072 bytes, 17760256 sectorsUnits = sectors of 1 * 512 = 512 bytesSector size (logical/physical): 512 bytes / 512 bytesI/O size (minimum/optimal): 512 bytes / 512 bytesDisk /dev/mapper/centos-swap: 1073 MB, 1073741824 bytes, 2097152 sectorsUnits = sectors of 1 * 512 = 512 bytesSector size (logical/physical): 512 bytes / 512 bytesI/O size (minimum/optimal): 512 bytes / 512 bytes
可以看到已经变成12 GB了。
接下来,我们怎么使用新增加的这2 GB磁盘,那就是分区,命令如下:
[root@localhost ~]# fdisk /dev/vdaWelcome to fdisk (util-linux 2.23.2).Changes will remain in memory only, until you decide to write them.Be careful before using the write command.Command (m for help): n//新建分区Partition type:p primary (2 primary, 0 extended, 2 free)e extendedSelect (default p): pPartition number (3,4, default 3)://按Enter键First sector (20971520-25165823, default 20971520)://按Enter键Using default value 20971520Last sector, +sectors or +size{K,M,G} (20971520-25165823, default 25165823)://按Enter键Using default value 25165823Partition 3 of type Linux and of size 2 GiB is setCommand (m for help): p//查看分区列表Disk /dev/vda: 12.9 GB, 12884901888 bytes, 25165824 sectorsUnits = sectors of 1 * 512 = 512 bytesSector size (logical/physical): 512 bytes / 512 bytesI/O size (minimum/optimal): 512 bytes / 512 bytesDisk label type: dosDisk identifier: 0x00028cabDevice Boot Start End Blocks Id System/dev/vda1 * 2048 1026047 512000 83 Linux/dev/vda2 1026048 20971519 9972736 8e Linux LVM/dev/vda3 20971520 25165823 2097152 83 LinuxCommand (m for help): w//保存退出并退出终端The partition table has been altered!Calling ioctl() to re-read partition table.WARNING: Re-reading the partition table failed with error 16: Device or resource busy.The kernel still uses the old table. The new table will be used atthe next reboot or after you run partprobe(8) or kpartx(8)Syncing disks.
除了对已有磁盘扩容外,还可以额外增加磁盘,命令如下:
[root@kvm ~]# qemu-img create -f raw /kvm_data/test02_3.raw 5GFormatting '/kvm_data/test02_3.raw', fmt=raw size=5368709120
使用virsh edit编辑test02虚拟机,将新磁盘增加到test02虚拟机,命令如下:
[root@kvm ~]# virsh edit test02………………<disk type='file' device='disk'><driver name='qemu' type='raw'/><source file='/kvm_data/test02_2.raw'/><target dev='vda' bus='virtio'/><address type='pci' domain='0x0000' bus='0x00' slot='0x06'function='0x0'/></disk>//找到这一部分内容,在下面增加以下内容<disk type='file' device='disk'><driver name='qemu' type='raw'/><source file='/kvm_data/test02_3.raw'/><target dev='vdb' bus='virtio'/><address type='pci' domain='0x0000' bus='0x00' slot='0x09'function='0x0'/></disk>………………
关闭test02虚拟机,重新启动,然后进入该虚拟机,使用fdisk -l查看磁盘,命令如下:
[root@kvm ~]# virsh destroy test02域 test02 被删除[root@kvm ~]# virsh start test02域 test02 已开始[root@kvm ~]# virsh console test02连接到域 test02换码符为 ^][root@localhost ~]# fdisk -lDisk /dev/vda: 12.9 GB, 12884901888 bytes, 25165824 sectorsUnits = sectors of 1 * 512 = 512 bytesSector size (logical/physical): 512 bytes / 512 bytesI/O size (minimum/optimal): 512 bytes / 512 bytesDisk label type: dosDisk identifier: 0x00028cabDevice Boot Start End Blocks Id System/dev/vda1 * 2048 1026047 512000 83 Linux/dev/vda2 1026048 20971519 9972736 8e Linux LVM/dev/vda3 20971520 25165823 2097152 83 LinuxDisk /dev/vdb: 5368 MB, 5368709120 bytes, 10485760 sectorsUnits = sectors of 1 * 512 = 512 bytesSector size (logical/physical): 512 bytes / 512 bytesI/O size (minimum/optimal): 512 bytes / 512 bytesDisk /dev/mapper/centos-root: 9093 MB, 9093251072 bytes, 17760256 sectorsUnits = sectors of 1 * 512 = 512 bytesSector size (logical/physical): 512 bytes / 512 bytesI/O size (minimum/optimal): 512 bytes / 512 bytesDisk /dev/mapper/centos-swap: 1073 MB, 1073741824 bytes, 2097152 sectorsUnits = sectors of 1 * 512 = 512 bytesSector size (logical/physical): 512 bytes / 512 bytesI/O size (minimum/optimal): 512 bytes / 512 bytes
可以看到多了一块5 GB的磁盘,退出终端。
接下来,我们扩容qcow2格式的磁盘,命令如下:
[root@kvm ~]# qemu-img resize /kvm_data/test.img +2GImage resized.//若提示qemu-img: Can't resize an image which has snapshots,需要删除快照
查看test.img信息,命令如下:
[root@kvm ~]# qemu-img info /kvm_data/test.imgimage: /kvm_data/test.imgfile format: qcow2virtual size: 12G (12884901888 bytes)disk size: 1.1Gcluster_size: 65536Format specific information:compat: 1.1lazy refcounts: true
关闭test虚拟机,重新启动,然后再次进入虚拟机test02,使用fdisk -l查看磁盘,命令如下:
[root@kvm ~]# virsh destroy testDomain test destroyed[root@kvm ~]# virsh start testDomain test started[root@kvm ~]# virsh console test[root@localhost ~]# fdisk -lDisk /dev/vda: 12.9 GB, 12884901888 bytes, 25165824 sectorsUnits = sectors of 1 * 512 = 512 bytesSector size (logical/physical): 512 bytes / 512 bytesI/O size (minimum/optimal): 512 bytes / 512 bytesDisk label type: dosDisk identifier: 0x00028cabDevice Boot Start End Blocks Id System/dev/vda1 * 2048 1026047 512000 83 Linux/dev/vda2 1026048 20971519 9972736 8e Linux LVMDisk /dev/mapper/centos-root: 9093 MB, 9093251072 bytes, 17760256 sectorsUnits = sectors of 1 * 512 = 512 bytesSector size (logical/physical): 512 bytes / 512 bytesI/O size (minimum/optimal): 512 bytes / 512 bytesDisk /dev/mapper/centos-swap: 1073 MB, 1073741824 bytes, 2097152 sectorsUnits = sectors of 1 * 512 = 512 bytesSector size (logical/physical): 512 bytes / 512 bytesI/O size (minimum/optimal): 512 bytes / 512 bytes
分区新增加的2 GB磁盘,命令如下:
[root@localhost ~]# fdisk /dev/vdaWelcome to fdisk (util-linux 2.23.2).Changes will remain in memory only, until you decide to write them.Be careful before using the write command.Command (m for help): nPartition type:p primary (2 primary, 0 extended, 2 free)e extendedSelect (default p): pPartition number (3,4, default 3):First sector (20971520-25165823, default 20971520):Using default value 20971520Last sector, +sectors or +size{K,M,G} (20971520-25165823, default 25165823):Using default value 25165823Partition 3 of type Linux and of size 2 GiB is setCommand (m for help): wThe partition table has been altered!Calling ioctl() to re-read partition table.WARNING: Re-reading the partition table failed with error 16: Device or resource busy.The kernel still uses the old table. The new table will be used atthe next reboot or after you run partprobe(8) or kpartx(8)Syncing disks.//保存并退出终端
新增一块qcow2格式的磁盘,命令如下:
[root@kvm ~]# qemu-img create -f qcow2 /kvm_data/test_2.img 5GFormatting '/kvm_data/test_2.img', fmt=qcow2 size=5368709120 encryption=off cluster_size=65536 lazy_refcounts=off
使用virsh edit编辑test虚拟机,将新磁盘增加到test虚拟机,命令如下:

若有收获,就点个赞吧
0 人点赞
