一、主从数据库概述
从字面意思上来了解,主从复制的意思其实就是用来建立一个和主数据库完全统一的数据库环境,这种数据库被称之为从数据库,主数据库一般是为准实时的业务数据库。
二、主从复制的优点
1、做数据的热备,作为后备数据库,主数据库服务器故障后,可切换到从数据库继续工作,避免数据丢失。
2、架构的扩展。业务量越来越大,I/O访问频率过高,单机无法满足,此时做多库的存储,降低磁盘I/O访问的频率,提高单个机器的I/O性能。
3、读写分离,使数据库能支撑更大的并发。在报表中尤其重要。由于部分报表sql语句非常的慢,导致锁表,影响前台服务。如果前台使用master,报表使用slave,那么报表sql将不会造成前台锁,保证了前台速度。
三、主从数据库的工作流程
支撑主从数据库工作的三个线程:
1.binlog输出线程:每当有从库连接到主库的时候,主库都会创建一个线程然后发送binlog内容到从库。
在从库里,当复制开始的时候,从库就会创建两个线程进行处理:
2.从库I/O线程:当START SLAVE语句在从库开始执行之后,从库创建一个I/O线程,该线程连接到主库并请求主库发送binlog里面的更新记录到从库上。从库I/O线程读取主库的binlog输出线程发送的更新并拷贝这些更新到本地文件,其中包括relay log文件。
3.从库的SQL线程:从库创建一个SQL线程,这个线程读取从库I/O线程写到relay log的更新事件并执行。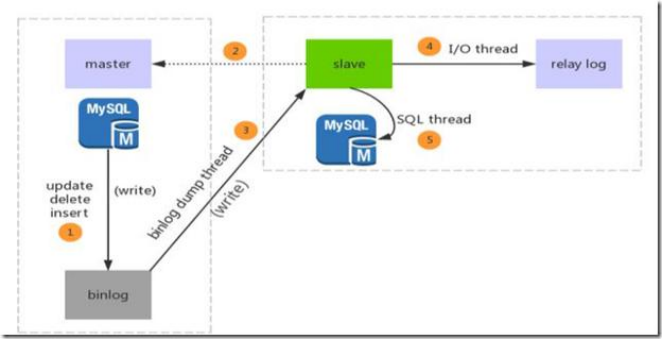
具体流程:
①主库db的更新事件(update、insert、delete)被写到binlog
②:从库发起连接,连接到主库
③:此时主库创建一个binlog dump thread线程,把binlog的内容发送到从库
④:从库启动之后,创建一个I/O线程,读取主库传过来的binlog内容并写入到relay log.
⑤:还会创建一个SQL线程,从relay log里面读取内容,从Exec_Master_Log_Pos位置开始执行读取到的更新事件,将更新内容写入到slave的db.
主从同步复制有以下几种方式:
(1)同步复制,master的变化,必须等待slave-1,slave-2,…,slave-n完成后才能返回。
(2)异步复制,master只需要完成自己的数据库操作即可,至于slaves是否收到二进制日志,是否完成操作,不用关心。MYSQL的默认设置。
(3)半同步复制,master只保证slaves中的一个操作成功,就返回,其他slave不管。这个功能,是由google为MYSQL引入的。
四、读写分离
什么是读写分离?
让主数据库(master)处理事务性增、改、删操作(INSERT、UPDATE、DELETE),而从数据库(slave)处理SELECT查询操作。在数据库中,数据库的“写”操作(写10000条数据到数据库可能要3分钟)操作是比较耗时的。但是数据库的“读”(从数据库读10000条数据可能只要5秒钟)。所以读写分离,解决的是数据库的写入,影响了查询的效率。
什么是MyCat?
MyCAT 是一款开源软件,也是目前最流行的基于Java语言编写的数据库中间件,实现了MySQL协议的服务器,前端用户可以把它看作是一个数据库代理,用MySQL客户端工具和命令行访问,而其后端可以用MySQL原生协议与多个MySQL服务器通信,也可以用JDBC协议与大多数主流数据库服务器通信,其核心功能是分表分库,即将一个大表水平分割为多个小表,存储在后端MySQL服务器里或者其他数据库里。
配和主从数据库使用可实现读写分离功能。
五、主从数据库部署
1.修改三台节点主机名
[root@localhost ~]# hostnamectl set-hostname mycat[root@localhost ~]# hostnamectl set-hostname db1[root@localhost ~]# hostnamectl set-hostname db2
2.配置三台节点主机名映射文件
[root@mycat ~]# vi /etc/hosts127.0.0.1 localhost localhost.localdomain localhost4 localhost4.localdomain4::1 localhost localhost.localdomain localhost6 localhost6.localdomain6192.168.200.40 mycat192.168.200.50 db1192.168.200.60 db2//将第一台节点的hosts文件发送到第二台节点[root@mycat ~]# scp /etc/hosts db1:/etc/hostsThe authenticity of host 'db2 (192.168.200.60)' can't be established.ECDSA key fingerprint is SHA256:Lmr7gTzopJeRGxI8QEh1dATe5NNvhoZYJJlEFK2oiqI.ECDSA key fingerprint is MD5:58:6b:96:dc:db:45:d7:aa:7f:8a:af:78:df:5a:b4:21.Are you sure you want to continue connecting (yes/no)? yesWarning: Permanently added 'db1,192.168.200.60' (ECDSA) to the list of known hosts.root@db2's password:hosts 100% 217 237.8KB/s 00:00
3.配置yum源
//在第一台节点上安装ftp服务[root@mycat ~]# yum -y install vsftpd//编辑ftp配置文件[root@mycat ~]# vi /etc/vsftpd/vsftpd.confanon_root=/opt //在文件顶部添加//重启ftp服务[root@mycat ~]# systemctl restart vsftpd//设置服务开机自启[root@mycat ~]# systemctl enable vsftpdCreated symlink from /etc/systemd/system/multi-user.target.wants/vsftpd.service to /usr/lib/systemd/system/vsftpd.service.//在第二台节点移除网络源[root@db1 ~]# mv /etc/yum.repos.d/* /media///编辑本地local.repo文件[root@db1 ~]# vi /etc/yum.repos.d/local.repo[centos]name=centos7baseurl=ftp://mycat/centosgpgcheck=0enable=1//在第三台节点移除网络源[root@db2 ~]# mv /etc/yum.repos.d/* /media///编辑本地local.repo文件[root@db2 ~]# vi /etc/yum.repos.d/local.repo[centos]name=centos7baseurl=ftp://mycat/centosgpgcheck=0enable=1
4.关闭三台节点防火墙以及selinux
//关闭三台节点防火墙与selinux[root@mycat ~]# systemctl stop firewalld && systemctl disable firewalld[root@mycat ~]# setenforce 0
5.第二台和第三台节点安装数据库服务
[root@db1 ~]# yum -y install mariadb mariadb-server
6.初始化第二台和第三台节点数据库,数据库密码全部设置为123456(同步配置)
[root@db1 ~]# systemctl restart mariadb[root@db1 ~]# mysql_secure_installationNOTE: RUNNING ALL PARTS OF THIS SCRIPT IS RECOMMENDED FOR ALL MariaDBSERVERS IN PRODUCTION USE! PLEASE READ EACH STEP CAREFULLY!In order to log into MariaDB to secure it, we'll need the currentpassword for the root user. If you've just installed MariaDB, andyou haven't set the root password yet, the password will be blank,so you should just press enter here.Enter current password for root (enter for none):OK, successfully used password, moving on...Setting the root password ensures that nobody can log into the MariaDBroot user without the proper authorisation.Set root password? [Y/n] yNew password:Re-enter new password:Password updated successfully!Reloading privilege tables..... Success!By default, a MariaDB installation has an anonymous user, allowing anyoneto log into MariaDB without having to have a user account created forthem. This is intended only for testing, and to make the installationgo a bit smoother. You should remove them before moving into aproduction environment.Remove anonymous users? [Y/n] y... Success!Normally, root should only be allowed to connect from 'localhost'. Thisensures that someone cannot guess at the root password from the network.Disallow root login remotely? [Y/n] n... skipping.By default, MariaDB comes with a database named 'test' that anyone canaccess. This is also intended only for testing, and should be removedbefore moving into a production environment.Remove test database and access to it? [Y/n] y- Dropping test database...... Success!- Removing privileges on test database...... Success!Reloading the privilege tables will ensure that all changes made so farwill take effect immediately.Reload privilege tables now? [Y/n] y... Success!Cleaning up...All done! If you've completed all of the above steps, your MariaDBinstallation should now be secure.Thanks for using MariaDB!
7.配置第二台和第三台
[root@db1 ~]# vi /etc/my.cnf //编辑数据库配置文件[mysqld]log_bin = mysql-binbinlog_ignore_db = mysqlserver_id = 50[root@db1 ~]# systemctl restart mariadb //重启数据库[root@db2 ~]# vi /etc/my.cnf //编辑第三台[mysqld]log_bin = mysql-binbinlog_ignore_db = mysqlserver_id = 60[root@db2 ~]# systemctl restart mariadb
8.登录第一台数据库配置权限
//登录[root@db1 ~]# mysql -uroot -p123456Welcome to the MariaDB monitor. Commands end with ; or \g.Your MariaDB connection id is 2Server version: 5.5.56-MariaDB MariaDB ServerCopyright (c) 2000, 2017, Oracle, MariaDB Corporation Ab and others.Type 'help;' or '\h' for help. Type '\c' to clear the current input statement.MariaDB [(none)]> grant all privileges on *.* to root@'%' identified by "123456";Query OK, 0 rows affected (0.00 sec)MariaDB [(none)]> grant replication slave on *.* to 'user'@'db2' identified by '123456';Query OK, 0 rows affected (0.00 sec)MariaDB [(none)]>
9.配置第二台数据库权限
[root@db2 ~]# mysql -uroot -p123456Welcome to the MariaDB monitor. Commands end with ; or \g.Your MariaDB connection id is 2Server version: 5.5.56-MariaDB MariaDB ServerCopyright (c) 2000, 2017, Oracle, MariaDB Corporation Ab and others.Type 'help;' or '\h' for help. Type '\c' to clear the current input statement.MariaDB [(none)]> change master to master_host='db1',master_user='user',master_password='123456';Query OK, 0 rows affected (0.00 sec)MariaDB [(none)]> start slave;Query OK, 0 rows affected (0.00 sec)MariaDB [(none)]> show slave status\G*************************** 1. row ***************************Slave_IO_State: Waiting for master to send eventMaster_Host: db1Master_User: userMaster_Port: 3306Connect_Retry: 60Master_Log_File: mysql-bin.000001Read_Master_Log_Pos: 527Relay_Log_File: mariadb-relay-bin.000002Relay_Log_Pos: 811Relay_Master_Log_File: mysql-bin.000001Slave_IO_Running: YesSlave_SQL_Running: YesReplicate_Do_DB:Replicate_Ignore_DB:Replicate_Do_Table:Replicate_Ignore_Table:Replicate_Wild_Do_Table:Replicate_Wild_Ignore_Table:Last_Errno: 0Last_Error:Skip_Counter: 0Exec_Master_Log_Pos: 527Relay_Log_Space: 1107Until_Condition: NoneUntil_Log_File:Until_Log_Pos: 0Master_SSL_Allowed: NoMaster_SSL_CA_File:Master_SSL_CA_Path:Master_SSL_Cert:Master_SSL_Cipher:Master_SSL_Key:Seconds_Behind_Master: 0Master_SSL_Verify_Server_Cert: NoLast_IO_Errno: 0Last_IO_Error:Last_SQL_Errno: 0Last_SQL_Error:Replicate_Ignore_Server_Ids:Master_Server_Id: 501 row in set (0.00 sec)MariaDB [(none)]>
10.验证数据库同步
MariaDB [(none)]> create database test; //在db1节点创建test库Query OK, 1 row affected (0.00 sec)MariaDB [(none)]> use test; //进入到test库中Database changedMariaDB [test]> create table company(id int not null primary key,name varchar(50),addr varchar(255)); //创建数据表Query OK, 0 rows affected (0.00 sec)MariaDB [test]> insert into company values(1,"facebook","usa"); //插入数据Query OK, 1 row affected (0.00 sec)MariaDB [test]> select * from company; //查看数据+----+----------+------+| id | name | addr |+----+----------+------+| 1 | facebook | usa |+----+----------+------+1 row in set (0.00 sec)MariaDB [(none)]> show databases; //在db2节点查询数据库+--------------------+| Database |+--------------------+| information_schema || mysql || performance_schema || test |+--------------------+4 rows in set (0.00 sec)MariaDB [(none)]> use test; //进入数据库Reading table information for completion of table and column namesYou can turn off this feature to get a quicker startup with -ADatabase changedMariaDB [test]> select * from company; //查询数据表中的内容+----+----------+------+| id | name | addr |+----+----------+------+| 1 | facebook | usa |+----+----------+------+1 row in set (0.00 sec)
六、读写分离部署
1.第一台节点安装MYCAT服务

[root@mycat ~]# yum install -y java-1.8.0-openjdk java-1.8.0-openjdk-devel//解压mycat安装包至/usr/local目录下[root@mycat ~]# tar -zxvf Mycat-server-1.6-RELEASE-20161028204710-linux.tar.gz -C /usr/local//将mycat下的包赋予所有权限[root@mycat ~]# chmod -R 777 /usr/local/mycat///在系统环境下添加Mycat变量[root@mycat ~]# echo export MYCAT_HOME=/usr/local/mycat/ >> /etc/profile//生效环境变量[root@mycat ~]# source /etc/profile
2.编辑Mycat 的逻辑库配置文件
[root@mycat ~]# vi /usr/local/mycat/conf/schema.xml//编辑mycat逻辑库(将原来的文件直接删除然后进行覆盖添加即可) //ip修改为db1和db2的<?xml version="1.0"?><!DOCTYPE mycat:schema SYSTEM "schema.dtd"><mycat:schema xmlns:mycat="http://io.mycat/"><schema name="USERDB" checkSQLschema="true" sqlMaxLimit="100" dataNode="dn1"></schema><dataNode name="dn1" dataHost="localhost1" database="test" /><dataHost name="localhost1" maxCon="1000" minCon="10" balance="3" dbType="mysql" dbDriver="native" writeType="0" switchType="1" slaveThreshold="100"><heartbeat>select user()</heartbeat><writeHost host="hostM1" url="192.168.200.50:3306" user="root" password="123456"><readHost host="hostS1" url="192.168.200.60:3306" user="root" password="123456" /></writeHost></dataHost></mycat:schema>//修改逻辑库配置文件权限
3.编辑Mycta访问用户
[root@mycat ~]# vi /usr/local/mycat/conf/server.xml //编辑文件在配置文件的最后部分<user name="root"><property name="password">123456</property><property name="schemas">USERDB</property> //将TESTDB改为USERDB然后删除以下几行内容<user name="user"><property name="password">user</property><property name="schemas">TESTDB</property><property name="readOnly">true</property></user>
4.启动Mycat服务
[root@mycat ~]# /bin/bash /usr/local/mycat/bin/mycat startStarting Mycat-server...//启动之后使用netstat -ntpl命令查询端口号,寻找暴露端口8066、9066端口,如果还想端口暴露则服务正常[root@mycat ~]# netstat -ntplActive Internet connections (only servers)Proto Recv-Q Send-Q Local Address Foreign Address State PID/Program nametcp 0 0 127.0.0.1:32000 0.0.0.0:* LISTEN 11380/javatcp 0 0 0.0.0.0:22 0.0.0.0:* LISTEN 916/sshdtcp 0 0 127.0.0.1:25 0.0.0.0:* LISTEN 1165/mastertcp6 0 0 :::1984 :::* LISTEN 11380/javatcp6 0 0 :::8066 :::* LISTEN 11380/javatcp6 0 0 :::9066 :::* LISTEN 11380/javatcp6 0 0 :::21 :::* LISTEN 11106/vsftpdtcp6 0 0 :::34422 :::* LISTEN 11380/javatcp6 0 0 :::22 :::* LISTEN 916/sshdtcp6 0 0 ::1:25 :::* LISTEN 1165/mastertcp6 0 0 :::40827 :::* LISTEN 11380/java
5.验证mycat读写分离信息

//上传压缩包[root@mycat ~]# yum install -y unzip[root@mycat ~]# unzip gpmall-repo.zip[root@mycat ~]# lsanaconda-ks.cfg gpmall-repo gpmall-repo.zip Mycat-server-1.6-RELEASE-20161028204710-linux.tar.gz[root@mycat ~]# mv gpmall-repo /opt/[root@mycat ~]# cd /opt/[root@mycat opt]# lscentos gpmall-repo[root@mycat opt]# vi /etc/yum.repos.d/local.repo[centos]name=centosbaseurl=file:///opt/centosgpgcheck=0enable=1[gpmall]name=gpmallbaseurl=file:///opt/gpmall-repogpgcheck=0enabled=1[root@mycat opt]# yum clean all[root@mycat opt]# yum repolist//现在第一台节点上安装数据库插件[root@mycat ~]# yum install -y MariaDB-client[root@mycat ~]# mysql -h127.0.0.1 -P8066 -uroot -p123456Welcome to the MariaDB monitor. Commands end with ; or \g.Your MySQL connection id is 2Server version: 5.6.29-mycat-1.6-RELEASE-20161028204710 MyCat Server (OpenCloundDB)Copyright (c) 2000, 2018, Oracle, MariaDB Corporation Ab and others.Type 'help;' or '\h' for help. Type '\c' to clear the current input statement.MySQL [(none)]> insert into company values(2,"bastetball","usa");ERROR 3000 (HY000): No MyCAT Database selectedMySQL [(none)]> show databases;+----------+| DATABASE |+----------+| USERDB |+----------+1 row in set (0.000 sec)MySQL [(none)]> use USERDBReading table information for completion of table and column namesYou can turn off this feature to get a quicker startup with -ADatabase changedMySQL [USERDB]> show tables;+----------------+| Tables_in_test |+----------------+| company |+----------------+1 row in set (0.001 sec)MySQL [USERDB]> select * from company;+----+----------+------+| id | name | addr |+----+----------+------+| 1 | facebook | usa |+----+----------+------+1 row in set (0.002 sec)//使用Mycat服务添加数据表MySQL [USERDB]> insert into company values(2,"bastetball","usa");Query OK, 1 row affected (0.002 sec)MySQL [USERDB]> select * from company;+----+------------+------+| id | name | addr |+----+------------+------+| 1 | facebook | usa || 2 | bastetball | usa |+----+------------+------+2 rows in set (0.001 sec)MySQL [USERDB]>
7.验证读写分离操作
在 Mycat 虚拟机节点使用 mysql 命令,通过 9066 端口查询对数据库读写操作的分离信 息。可以看到所有的写入操作 WRITE_LOAD 数都在 db1 主数据库节点上,所有的读取操作 READ_LOAD 数都在 db2 主数据库节点上。[root@mycat ~]# mysql -h127.0.0.1 -P9066 -uroot -p123456 -e 'show @@datasource;'+----------+--------+-------+----------------+------+------+--------+------+------+---------+-----------+------------+| DATANODE | NAME | TYPE | HOST | PORT | W/R | ACTIVE | IDLE | SIZE | EXECUTE | READ_LOAD | WRITE_LOAD |+----------+--------+-------+----------------+------+------+--------+------+------+---------+-----------+------------+| dn1 | hostM1 | mysql | 192.168.200.50 | 3306 | W | 0 | 10 | 1000 | 132 | 0 | 1 || dn1 | hostS1 | mysql | 192.168.200.60 | 3306 | R | 0 | 8 | 1000 | 136 | 7 | 0 |+----------+--------+-------+----------------+------+------+--------+------+------+---------+-----------+------------+[root@mycat ~]# netstat -ntplActive Internet connections (only servers)Proto Recv-Q Send-Q Local Address Foreign Address State PID/Program nametcp 0 0 127.0.0.1:32000 0.0.0.0:* LISTEN 11380/javatcp 0 0 0.0.0.0:22 0.0.0.0:* LISTEN 916/sshdtcp 0 0 127.0.0.1:25 0.0.0.0:* LISTEN 1165/mastertcp6 0 0 :::1984 :::* LISTEN 11380/javatcp6 0 0 :::8066 :::* LISTEN 11380/javatcp6 0 0 :::9066 :::* LISTEN 11380/javatcp6 0 0 :::21 :::* LISTEN 11106/vsftpdtcp6 0 0 :::34422 :::* LISTEN 11380/javatcp6 0 0 :::22 :::* LISTEN 916/sshdtcp6 0 0 ::1:25 :::* LISTEN 1165/mastertcp6 0 0 :::40827 :::* LISTEN 11380/java

若有收获,就点个赞吧
0 人点赞
