任务1 安装配置MySQL
安装MySQL
1.修改主机名
[root@localhost ~]# hostnamectl set-hostname lnmp[root@localhost ~]# su

2.上传二进制面编译包至虚拟机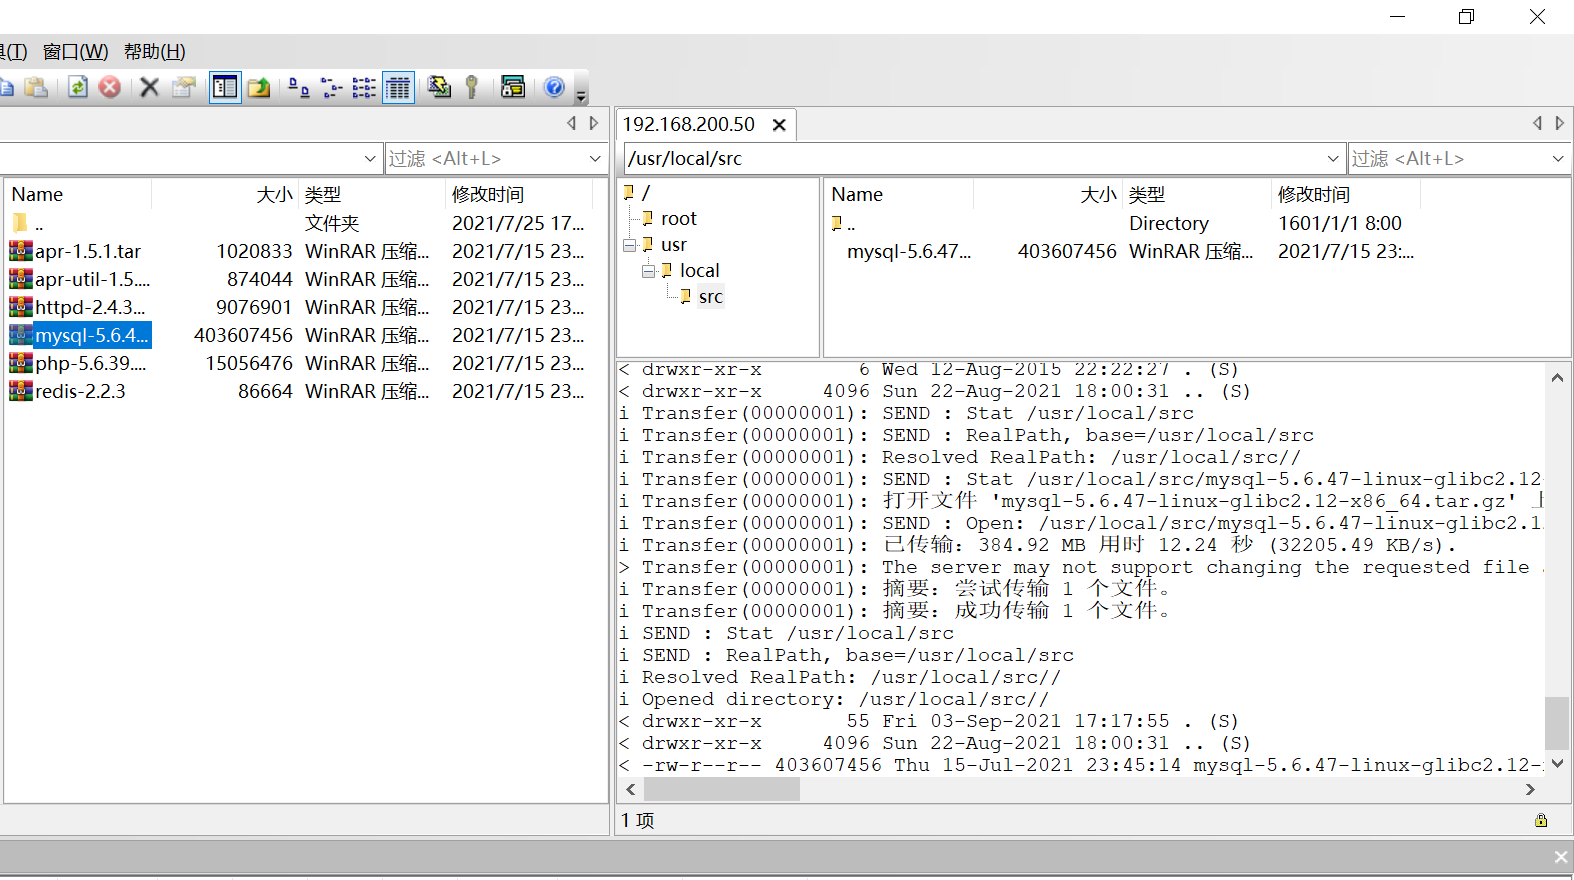
[root@lnmp ~]# cd /usr/local/src/[root@lnmp src]# lsmysql-5.6.47-linux-glibc2.12-x86_64.tar.gz

3.安装常用工具
[root@lnmp src]# yum install -y vim net-tools tree

4.解压安装包
[root@lnmp src]# tar -zxvf mysql-5.6.47-linux-glibc2.12-x86_64.tar.gz
5.移动
[root@lnmp src]# mv mysql-5.6.47-linux-glibc2.12-x86_64 /usr/local/mysql

6.创建MySQL用户,不可登录。启动需要
[root@lnmp src]# useradd -s /sbin/nologin mysql[root@lnmp src]# cd /usr/local/mysql/

7.创建存放数据目录;更改权限
[root@lnmp mysql]# mkdir -p /data/mysql[root@lnmp mysql]# chown -R mysql:mysql /data/mysql/[root@lnmp mysql]# cd /data/mysql/[root@lnmp mysql]# ls -la总用量 0drwxr-xr-x 2 mysql mysql 6 9月 3 17:28 .drwxr-xr-x 3 root root 18 9月 3 17:28 ..[root@lnmp mysql]# cd /usr/local/mysql/

8.需要依赖
[root@lnmp mysql]# yum install -y perl-Module-Install

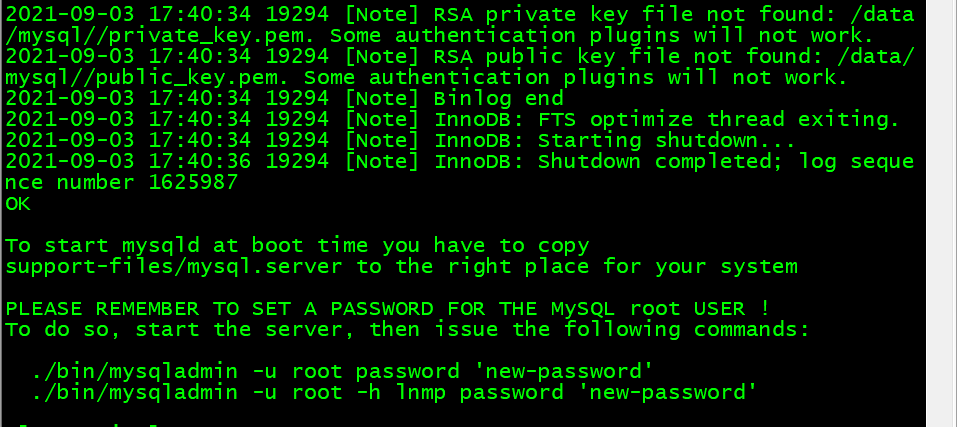
9.初始化,上面有两个ok确定安装成功
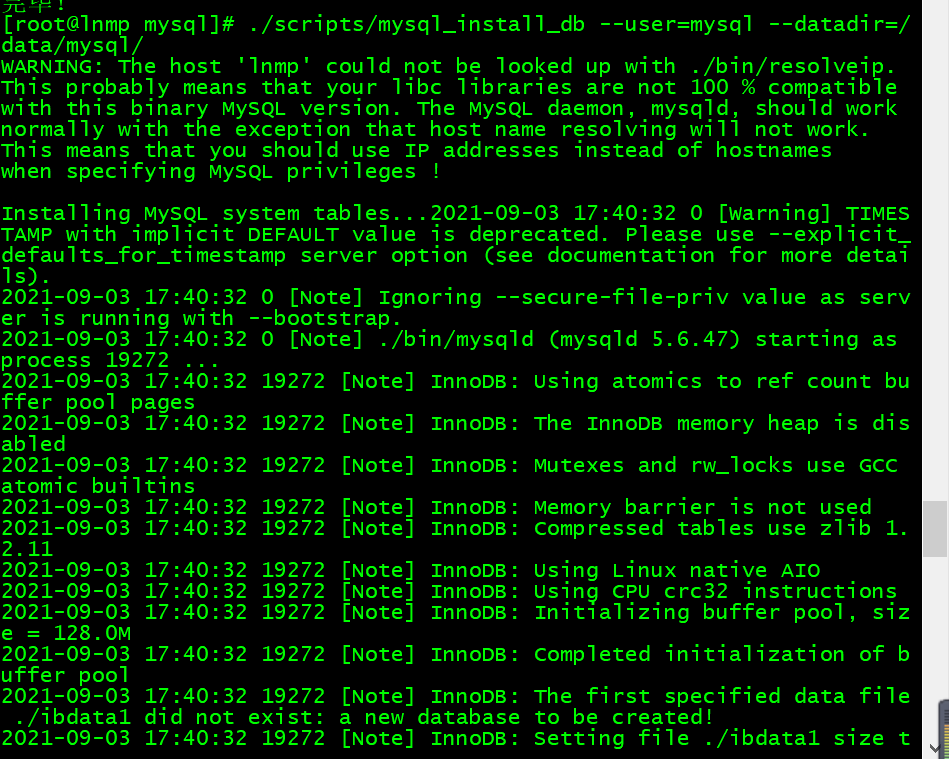
[root@lnmp mysql]# ./scripts/mysql_install_db --user=mysql --datadir=/data/mysql/

出现报错缺少autoconf
[root@lnmp mysql]# yum install -y autoconf
配置MySQL
1.修改配置文件
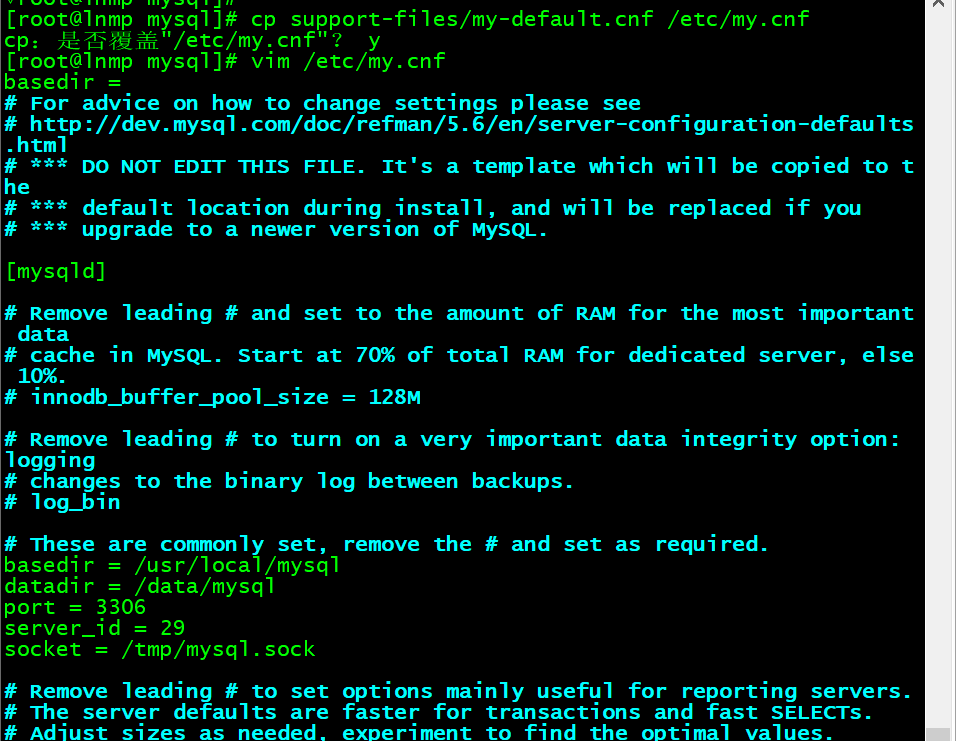
[root@lnmp mysql]# cp support-files/my-default.cnf /etc/my.cnfcp:是否覆盖"/etc/my.cnf"? y[root@lnmp mysql]# vim /etc/my.cnfbasedir = /usr/local/mysqldatadir = /data/mysqlport = 3306server_id = 29socket = /tmp/mysql.sock
2.配置启动脚本
[root@lnmp mysql]# cp support-files/mysql.server /etc/init.d/mysqld[root@lnmp mysql]# chmod 777 /etc/init.d/mysqld[root@lnmp mysql]# vim /etc/init.d/mysqldbasedir=/usr/local/mysqldatadir=/data/mysql


[root@lnmp mysql]# chkconfig --add mysqld[root@lnmp mysql]# chkconfig mysqld on[root@lnmp mysql]# service mysqld startStarting MySQL SUCCESS!

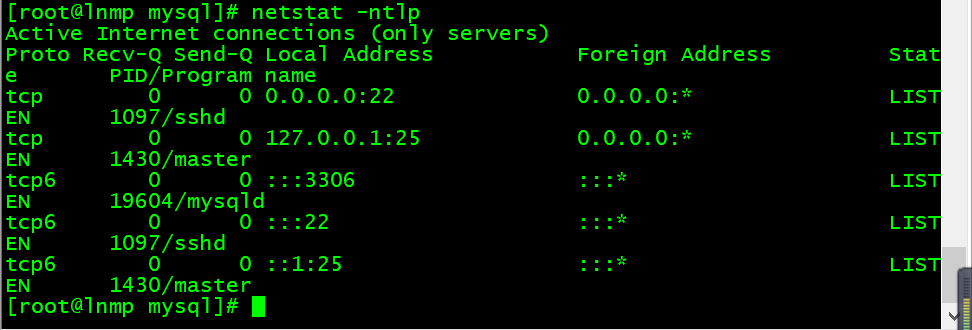
[root@lnmp mysql]# netstat -ntlpActive Internet connections (only servers)Proto Recv-Q Send-Q Local Address Foreign Address State PID/Program nametcp 0 0 0.0.0.0:22 0.0.0.0:* LISTEN 1097/sshdtcp 0 0 127.0.0.1:25 0.0.0.0:* LISTEN 1430/mastertcp6 0 0 :::3306 :::* LISTEN 19604/mysqldtcp6 0 0 :::22 :::* LISTEN 1097/sshdtcp6 0 0 ::1:25 :::* LISTEN 1430/master
任务2 安装配置PHP
安装PHP
1.上传二进制面编译包至虚拟机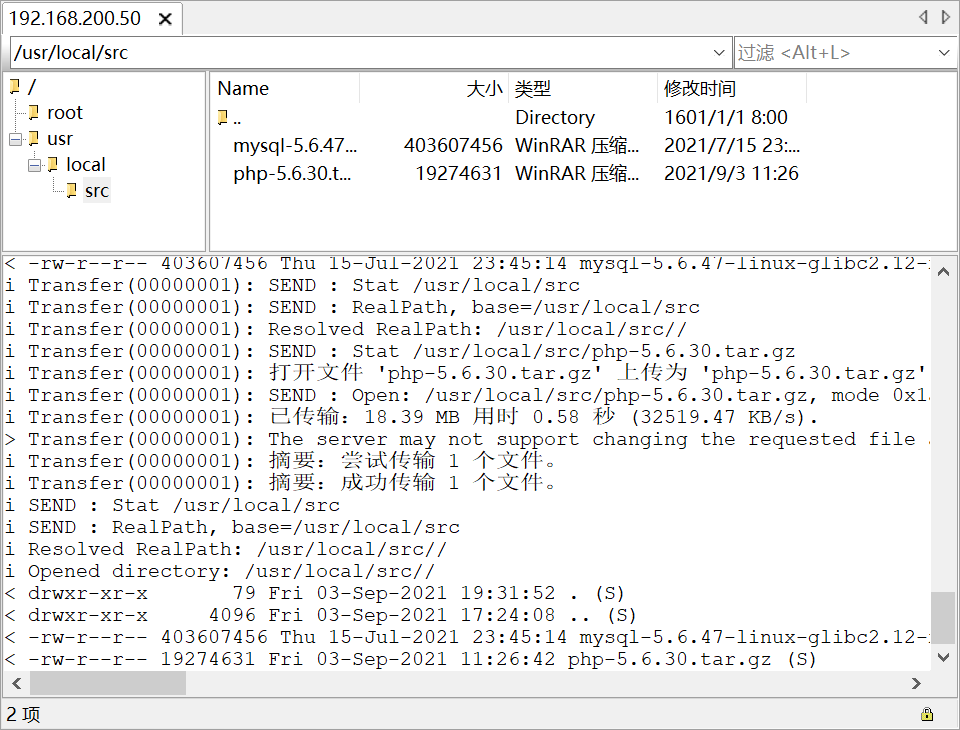
[root@lnmp mysql]# cd /usr/local/src/[root@lnmp src]# lsmysql-5.6.47-linux-glibc2.12-x86_64.tar.gz php-5.6.30.tar.gz

2.需要依赖
[root@lnmp src]# yum install -y gcc[root@lnmp src]# yum install -y libxml2-devel[root@lnmp src]# yum install -y openssl[root@lnmp src]# yum install -y openssl-devell[root@lnmp src]# yum install -y bzip2[root@lnmp src]# yum install -y bzip2-devel[root@lnmp src]# yum install -y libpng[root@lnmp src]# yum install -y libpng-devel[root@lnmp src]# yum install -y freetype[root@lnmp src]# yum install -y freetype-devel[root@lnmp src]# yum install -y eplel-release[root@lnmp src]# yum install -y libmcrypt-devel[root@lnmp src]# yum install -y libcurl-devel[root@lnmp src]# yum install -y libjpeg-devel[root@lnmp src]# yum install -y epel-release[root@lnmp src]# tar -zxvf php-5.6.30.tar.gz[root@lnmp src]# cd php-5.6.30[root@lnmp php-5.6.30]# ./configure --prefix=/usr/local/php-fpm --with-config-file-path=/usr/local/php-fpm/etc --enable-fpm --with-fpm-user=php-fpm --with-fpm-group=php-fpm --with-mysql=/usr/local/mysql --with-mysql-sock=/tmp/mysql.sock --with-libxml-dir --with-gd --with-jpeg-dir --with-png-dir --with-freetype-dir --with-iconv-dir --with-zlib-dir --with-mcrypt --enable-soap --enable-gd-native-ttf --enable-ftp --enable-mbstring --enable-exif --disable-ipv6 --with-pear --with-curl --with-openssl进行编辑,时间会很久[root@lnmp php-5.6.30]# make && make install检查成功出现0[root@lnmp php-5.6.30]# echo $?0
配置PHP
1.复制配置文件
[root@lnmp php-5.6.30]# cp php.ini-production /usr/local/php-fpm/etc/php.ini

2.修改配置文件
[root@lnmp php-5.6.30]# vim /usr/local/php-fpm/etc/php-fpm.conf[global]pid = /usr/local/php-fpm/var/run/php-fpm.piderror_log = /usr/local/php-fpm/var/log/php-fpm.log[zzx]listen = /tmp/php-fcgi.socklisten.mode = 666user = php-fpmgroup = php-fpmpm = dynamicpm.max_children = 50pm.start_servers = 20pm.min_spare_servers = 5pm.max_spare_servers = 35pm.max_requests = 500rlimit_files = 1024
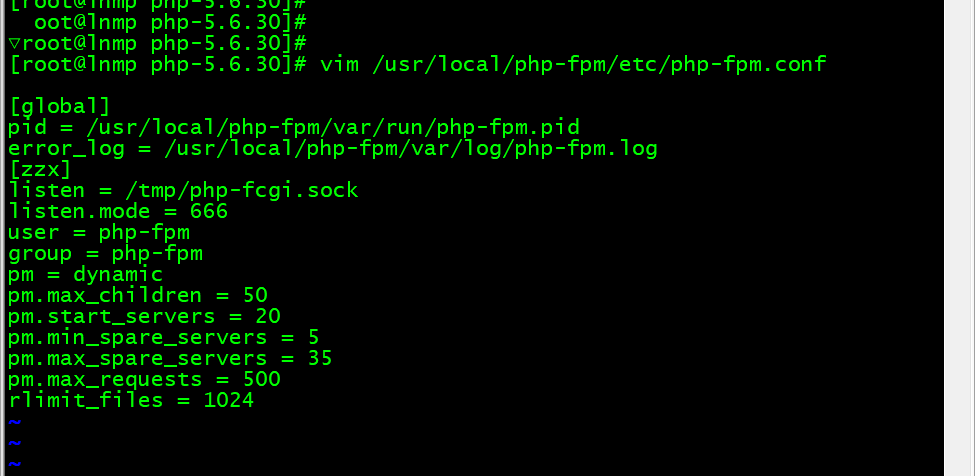
3.带有successful 表示成功
[root@lnmp php-5.6.30]# /usr/local/php-fpm/sbin/php-fpm -t[03-Sep-2021 22:37:59] NOTICE: configuration file /usr/local/php-fpm/etc/php-fpm.conf test is successful

4.启动php-fpm
[root@lnmp php-5.6.30]# cp /usr/local/src/php-5.6.30/sapi/fpm/init.d.php-fpm /etc/init.d/php-fpm[root@lnmp php-5.6.30]# chmod 755 /etc/init.d/php-fpm创建php-fpm[root@lnmp php-5.6.30]# useradd -s /sbin/nologin php-fpm[root@lnmp php-5.6.30]# service php-fpm restartGracefully shutting down php-fpm . doneStarting php-fpm done[root@lnmp php-5.6.30]# ps aux |grep php-fpmroot 36500 0.0 0.5 128132 5068 ? Ss 23:22 0:00 php-fpm: master process (/usr/local/php-fpm/etc/php-fpm.conf)php-fpm 36501 0.0 0.4 128132 4816 ? S 23:22 0:00 php-fpm: pool zzxphp-fpm 36502 0.0 0.4 128132 4816 ? S 23:22 0:00 php-fpm: pool zzxphp-fpm 36503 0.0 0.4 128132 4816 ? S 23:22 0:00 php-fpm: pool zzxphp-fpm 36504 0.0 0.4 128132 4816 ? S 23:22 0:00 php-fpm: pool zzxphp-fpm 36505 0.0 0.4 128132 4820 ? S 23:22 0:00 php-fpm: pool zzxphp-fpm 36506 0.0 0.4 128132 4820 ? S 23:22 0:00 php-fpm: pool zzxphp-fpm 36507 0.0 0.4 128132 4824 ? S 23:22 0:00 php-fpm: pool zzxphp-fpm 36508 0.0 0.4 128132 4824 ? S 23:22 0:00 php-fpm: pool zzxphp-fpm 36509 0.0 0.4 128132 4824 ? S 23:22 0:00 php-fpm: pool zzxphp-fpm 36510 0.0 0.4 128132 4824 ? S 23:22 0:00 php-fpm: pool zzxphp-fpm 36511 0.0 0.4 128132 4824 ? S 23:22 0:00 php-fpm: pool zzxphp-fpm 36512 0.0 0.4 128132 4824 ? S 23:22 0:00 php-fpm: pool zzxphp-fpm 36513 0.0 0.4 128132 4824 ? S 23:22 0:00 php-fpm: pool zzxphp-fpm 36514 0.0 0.4 128132 4824 ? S 23:22 0:00 php-fpm: pool zzxphp-fpm 36515 0.0 0.4 128132 4824 ? S 23:22 0:00 php-fpm: pool zzxphp-fpm 36516 0.0 0.4 128132 4824 ? S 23:22 0:00 php-fpm: pool zzxphp-fpm 36517 0.0 0.4 128132 4824 ? S 23:22 0:00 php-fpm: pool zzxphp-fpm 36518 0.0 0.4 128132 4824 ? S 23:22 0:00 php-fpm: pool zzxphp-fpm 36519 0.0 0.4 128132 4824 ? S 23:22 0:00 php-fpm: pool zzxphp-fpm 36520 0.0 0.4 128132 4824 ? S 23:22 0:00 php-fpm: pool zzxroot 36543 0.0 0.0 112660 964 pts/0 R+ 23:25 0:00 grep --color=auto php-fpm
任务3 安装配置nginx
建议选择一个稳定的版本进行安装。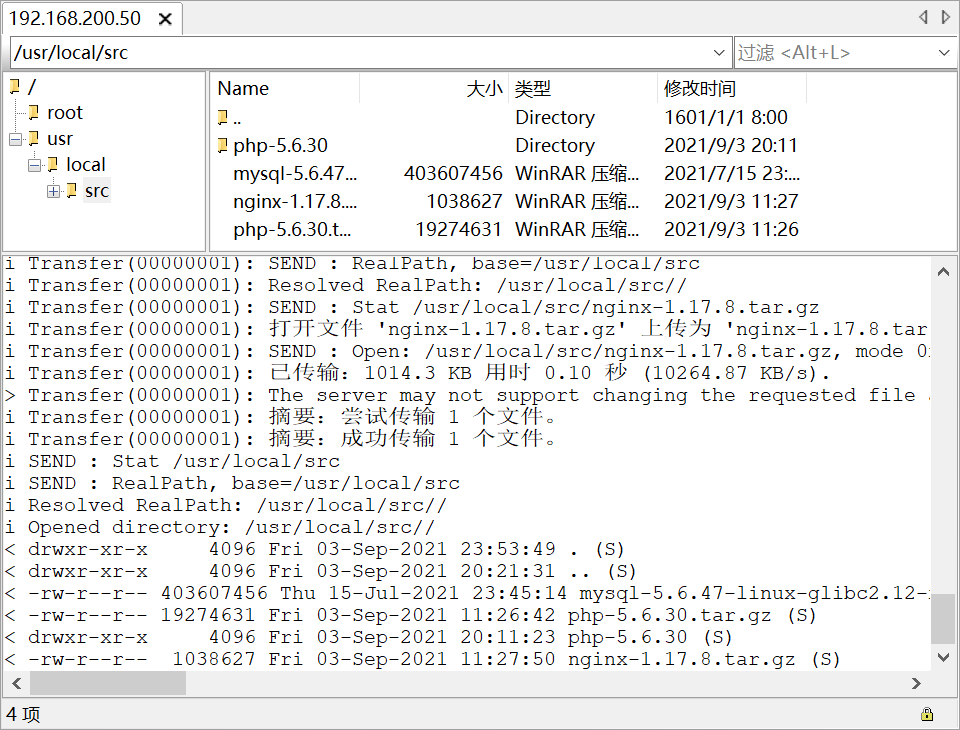
1.上传安装包
[root@lnmp ~]# cd /usr/local/src/[root@lnmp src]# lsmysql-5.6.47-linux-glibc2.12-x86_64.tar.gz php-5.6.30nginx-1.17.8.tar.gz php-5.6.30.tar.gz[root@lnmp src]# tar -zxvf nginx-1.17.8.tar.gz[root@lnmp src]# cd nginx-1.17.8[root@lnmp nginx-1.17.8]# ./configure --prefix=/usr/local/nginx[root@lnmp nginx-1.17.8]# make && make install[root@lnmp nginx-1.17.8]# echo $?0#因为文件比较小,安装速度很快。

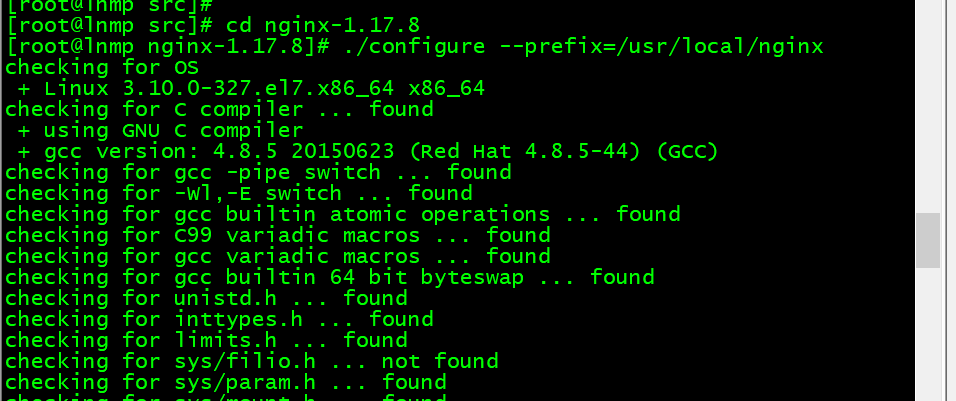
2.编辑配置文件
▽root@lnmp nginx-1.17.8]# vim /etc/init.d/nginx{echo -n $"Reloading $prog: "killproc -p $NGINX_PID $NGINX_SBIN -HUPRETVAL=$?echoreturn $RETVAL}restart(){stopstart}configtest(){$NGINX_SBIN -c $NGINX_CONF -treturn 0}case "$1" instart)start;;stop)stop;;reload)reload;;restart)restart;;configtest)configtest;;*)echo $"Usage: $0 {start|stop|reload|restart|configtest}"RETVAL=1esacexit $RETVAL
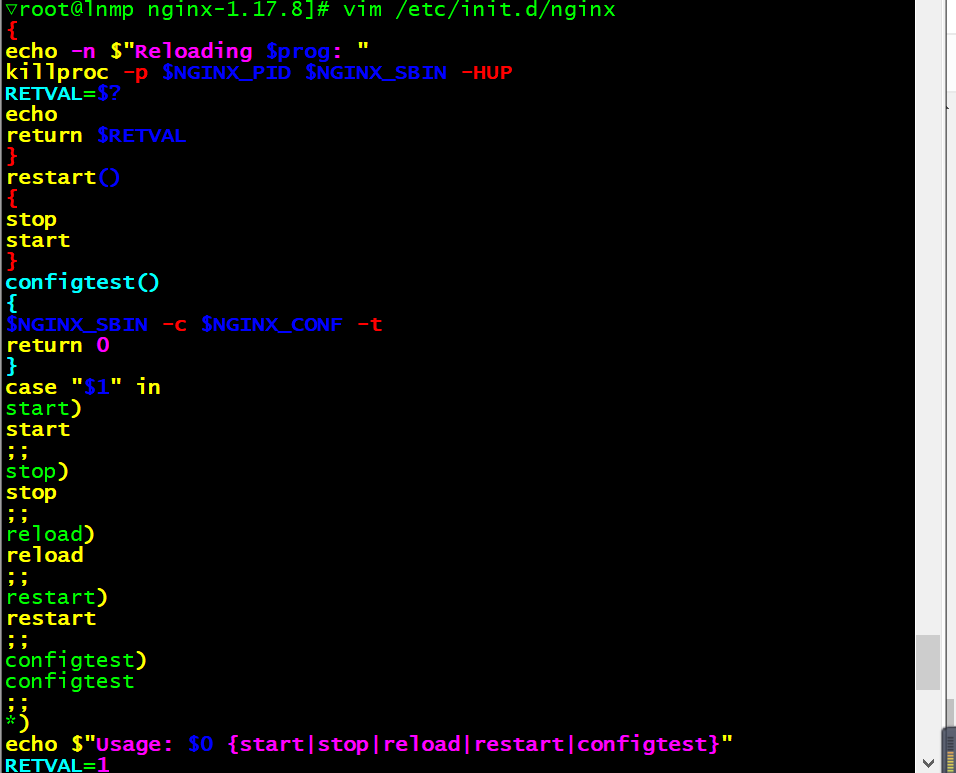
▽root@lnmp nginx-1.17.8]# chmod 755 /etc/init.d/nginx[root@lnmp nginx-1.17.8]# chkconfig --add nginx[root@lnmp nginx-1.17.8]# chkconfig nginx on[root@lnmp nginx-1.17.8]# > /usr/local/nginx/conf/nginx.conf[root@lnmp nginx-1.17.8]# vim /usr/local/nginx/conf/nginx.confuser nobody nobody;worker_processes 2;error_log /usr/local/nginx/logs/nginx_error.log crit;pid /usr/local/nginx/logs/nginx.pid;worker_rlimit_nofile 51200;events{use epoll;worker_connections 6000;}http{include mime.types;default_type application/octet-stream;server_names_hash_bucket_size 3526;server_names_hash_max_size 4096;' $host "$request_uri" $status'' "$http_referer" "$http_user_agent"';keepalive_timeout 30;client_header_timeout 3m;client_body_timeout 3m;send_timeout 3m;connection_pool_size 256;client_header_buffer_size 1k;large_client_header_buffers 8 4k;request_pool_size 4k;output_buffers 4 32k;postpone_output 1460;client_max_body_size 10m;client_body_buffer_size 256k;client_body_temp_path /usr/local/nginx/client_body_temp;proxy_temp_path /usr/local/nginx/proxy_temp;fastcgi_temp_path /usr/local/nginx/fastcgi_temp;fastcgi_intercept_errors on;tcp_nodelay on;gzip on;gzip_min_length 1k;gzip_buffers 4 8k;gzip_comp_level 5;gzip_http_version 1.1;gzip_types text/plain application/x-javascript text/css text/htmapplication/xml;server{listen 80;server_name localhost;index index.html index.htm index.php;root /usr/local/nginx/html;location ~ \.php${include fastcgi_params;fastcgi_pass unix:/tmp/php-fcgi.sock;fastcgi_index index.php;fastcgi_param SCRIPT_FILENAME /usr/local/nginx/html$fastcgi_script_name;}}}[root@lnmp nginx-1.17.8]# /usr/local/nginx/sbin/nginx -tnginx: the configuration file /usr/local/nginx/conf/nginx.conf syntax is oknginx: configuration file /usr/local/nginx/conf/nginx.conf test is successful

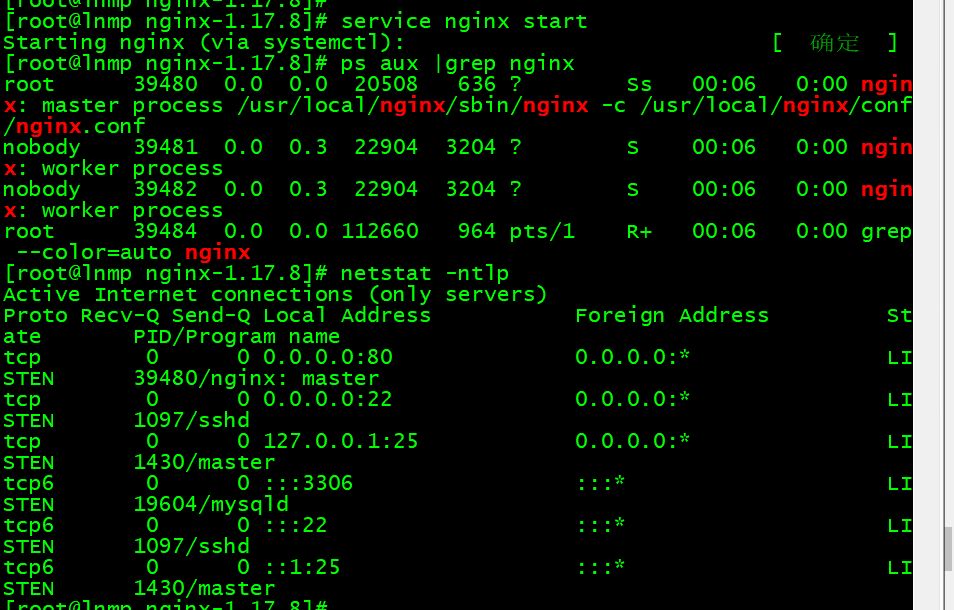
3.启动服务
[root@lnmp nginx-1.17.8]# service nginx startStarting nginx (via systemctl): [ 确定 ][root@lnmp nginx-1.17.8]# ps aux |grep nginxroot 39480 0.0 0.0 20508 636 ? Ss 00:06 0:00 nginx: master process /usr/local/nginx/sbin/nginx -c /usr/local/nginx/conf/nginx.confnobody 39481 0.0 0.3 22904 3204 ? S 00:06 0:00 nginx: worker processnobody 39482 0.0 0.3 22904 3204 ? S 00:06 0:00 nginx: worker processroot 39484 0.0 0.0 112660 964 pts/1 R+ 00:06 0:00 grep --color=auto nginx[root@lnmp nginx-1.17.8]# netstat -ntlpActive Internet connections (only servers)Proto Recv-Q Send-Q Local Address Foreign Address State PID/Program nametcp 0 0 0.0.0.0:80 0.0.0.0:* LISTEN 39480/nginx: mastertcp 0 0 0.0.0.0:22 0.0.0.0:* LISTEN 1097/sshdtcp 0 0 127.0.0.1:25 0.0.0.0:* LISTEN 1430/mastertcp6 0 0 :::3306 :::* LISTEN 19604/mysqldtcp6 0 0 :::22 :::* LISTEN 1097/sshdtcp6 0 0 ::1:25 :::* LISTEN 1430/master
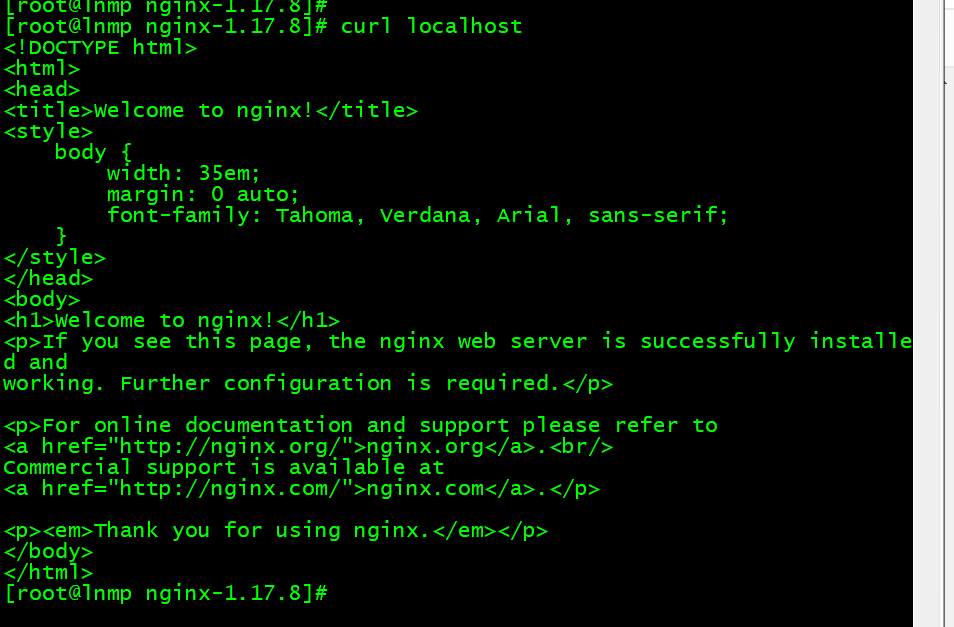
[root@lnmp nginx-1.17.8]# curl localhost<!DOCTYPE html><html><head><title>Welcome to nginx!</title><style>body {width: 35em;margin: 0 auto;font-family: Tahoma, Verdana, Arial, sans-serif;}</style></head><body><h1>Welcome to nginx!</h1><p>If you see this page, the nginx web server is successfully installed andworking. Further configuration is required.</p><p>For online documentation and support please refer to<a href="http://nginx.org/">nginx.org</a>.<br/>Commercial support is available at<a href="http://nginx.com/">nginx.com</a>.</p><p><em>Thank you for using nginx.</em></p></body></html>
4.测试
#测试能否正确解析PHP▽root@lnmp nginx-1.17.8]# vim /usr/local/nginx/html/1.php<?phpecho "test php scripts"?>[root@lnmp nginx-1.17.8]# curl localhost/1.phptest php scripts[root@lnmp nginx-1.17.8]##测试成功
任务4 nginx配置
1.配置前先修改一下配置文件
# 找到server删除下面这些server{listen 80;server_name localhost;index index.html index.htm index.php;root /usr/local/nginx/html;location ~ \.php${include fastcgi_params;fastcgi_pass unix:/tmp/php-fcgi.sock;fastcgi_index index.php;fastcgi_param SCRIPT_FILENAME /usr/local/nginx/html$fastcgi_script_name;}}
# 最后添加一行,把server那一段删了,加入这一句 include vhost/*.conf;[root@lnmp nginx-1.17.8]#oot@lnmp nginx-1.17.8]# vim /usr/local/nginx/conf/nginx.confuser nobody nobody;worker_processes 2;error_log /usr/local/nginx/logs/nginx_error.log crit;pid /usr/local/nginx/logs/nginx.pid;worker_rlimit_nofile 51200;events{use epoll;worker_connections 6000;}http{include mime.types;default_type application/octet-stream;server_names_hash_bucket_size 3526;server_names_hash_max_size 4096;log_format combined_realip '$remote_addr $http_x_forwarded_for [$time_local]'' $host "$request_uri" $status'' "$http_referer" "$http_user_agent"';sendfile on;tcp_nopush on;keepalive_timeout 30;client_header_timeout 3m;client_body_timeout 3m;send_timeout 3m;connection_pool_size 256;client_header_buffer_size 1k;large_client_header_buffers 8 4k;request_pool_size 4k;output_buffers 4 32k;postpone_output 1460;client_max_body_size 10m;client_body_buffer_size 256k;client_body_temp_path /usr/local/nginx/client_body_temp;proxy_temp_path /usr/local/nginx/proxy_temp;fastcgi_temp_path /usr/local/nginx/fastcgi_temp;fastcgi_intercept_errors on;tcp_nodelay on;gzip on;gzip_min_length 1k;gzip_buffers 4 8k;gzip_comp_level 5;gzip_http_version 1.1;gzip_types text/plain application/x-javascript text/css text/htmapplication/xml;include vhost/*.conf;}[root@lnmp nginx-1.17.8]# mkdir /usr/local/nginx/conf/vhost[root@lnmp nginx-1.17.8]# cd /usr/local/nginx/conf/vhost/[root@lnmp vhost]# /usr/local/nginx/sbin/nginx -tnginx: the configuration file /usr/local/nginx/conf/nginx.conf syntax is oknginx: configuration file /usr/local/nginx/conf/nginx.conf test is successful[root@lnmp vhost]# /usr/local/nginx/sbin/nginx -s reload
一、默认虚拟主机
1.配置
[root@lnmp vhost]# vim default.confserver{listen 80 default_server; # 有这个标记的就是默认虚拟主机server_name aaa.com;index index.html index.htm index.php;root /data/nginx/default;}[root@lnmp vhost]# /usr/local/nginx/sbin/nginx -tnginx: the configuration file /usr/local/nginx/conf/nginx.conf syntax is oknginx: configuration file /usr/local/nginx/conf/nginx.conf test is successful[root@lnmp vhost]# /usr/local/nginx/sbin/nginx -s reload
2.测试
[root@lnmp vhost]# mkdir -p /data/nginx/default[root@lnmp vhost]# echo " default server! " > /data/nginx/default/index.html# dingyi的为aaa.com[root@lnmp vhost]# curl -x127.0.0.1:80 bbb.comdefault server![root@lnmp vhost]# curl -x127.0.0.1:80 aaa.comdefault server!
二、用户认证
1、整个域名认证
1.1、配置
[root@lnmp vhost]# cd /usr/local/nginx/conf/vhost/[root@lnmp vhost]# lsdefault.conf[root@lnmp vhost]# vim test.com.confserver{listen 80;server_name test.com;index index.html index.htm index.php;root /data/nginx/test.com;location /{auth_basic "Auth";auth_basic_user_file /usr/local/nginx/conf/htpasswd;}}[root@lnmp vhost]# yum install -y httpd[root@lnmp vhost]# htpasswd -c /usr/local/nginx/conf/htpasswd zzxNew password: # 密码:0Re-type new password: # 密码:0Adding password for user zzx[root@lnmp vhost]# /usr/local/nginx/sbin/nginx -s reload[root@lnmp vhost]# mkdir /data/nginx/test.com[root@lnmp vhost]# echo "test.com" > /data/nginx/test.com/index.html

1.2、测试
[root@lnmp vhost]# /usr/local/nginx/sbin/nginx -tnginx: the configuration file /usr/local/nginx/conf/nginx.conf syntax is oknginx: configuration file /usr/local/nginx/conf/nginx.conf test is successful[root@lnmp vhost]# /usr/local/nginx/sbin/nginx -s reload

在自己电脑修改hosts文件
C:\Windows\System32\drivers\etc
[root@lnmp vhost]# curl -x127.0.0.1:80 test.com # 状态码为401说明需要验证<html><head><title>401 Authorization Required</title></head><body><center><h1>401 Authorization Required</h1></center><hr><center>nginx/1.17.8</center></body></html>[root@lnmp vhost]# curl -usxs:0 -x127.0.0.1:80 test.com # 正常访问状态码变为200,我这里报错是因为编译文件路径写错<html><head><title>403 Forbidden</title></head><body><center><h1>403 Forbidden</h1></center><hr><center>nginx/1.17.8</center></body></html>
2、针对目录认证
一般用来保护后台admin目录
2.1配置
针对目录做用户认证要修改location后面的路径
▽root@lnmp vhost]# vim test.com.confserver{listen 80;server_name test.com;index index.html index.htm index.php;root /data/nginx/test.com;location /admin/{auth_basic "Auth";auth_basic_user_file /usr/local/nginx/conf/htpasswd;}}[root@lnmp vhost]# mkdir /data/nginx/test.com/admin[root@lnmp vhost]# echo "asdfadmin" > /data/nginx/test.com/admin/index.html[root@lnmp vhost]# /usr/local/nginx/sbin/nginx -tnginx: the configuration file /usr/local/nginx/conf/nginx.conf syntax is oknginx: configuration file /usr/local/nginx/conf/nginx.conf test is successful[root@lnmp vhost]# /usr/local/nginx/sbin/nginx -s reload
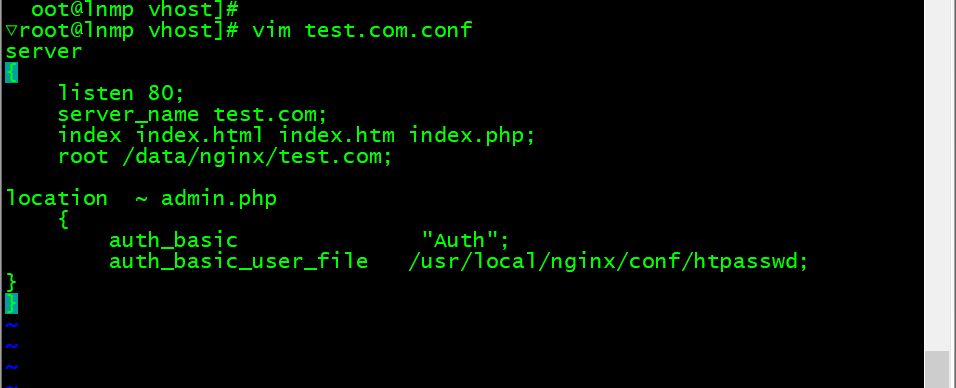
3、URL认证
针对URL做认证,即链接中带了某个关键字
3.1配置
▽root@lnmp vhost]# vim test.com.confserver{listen 80;server_name test.com;index index.html index.htm index.php;root /data/nginx/test.com;location ~ admin.php{auth_basic "Auth";auth_basic_user_file /usr/local/nginx/conf/htpasswd;}}
3.2测试
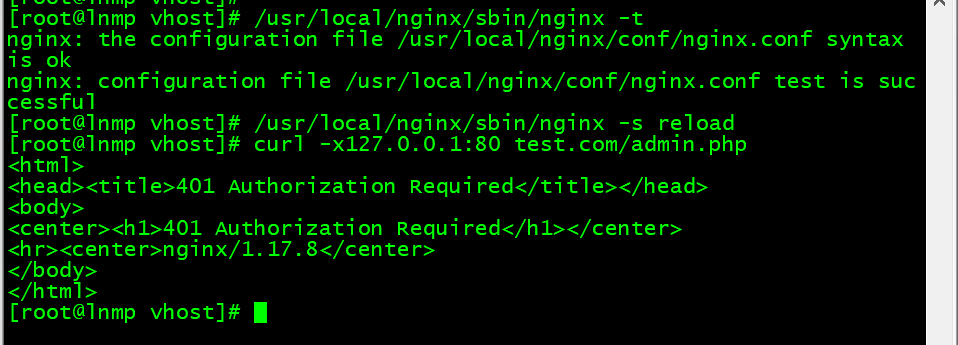
[root@lnmp vhost]# /usr/local/nginx/sbin/nginx -tnginx: the configuration file /usr/local/nginx/conf/nginx.conf syntax is oknginx: configuration file /usr/local/nginx/conf/nginx.conf test is successful[root@lnmp vhost]# /usr/local/nginx/sbin/nginx -s reload[root@lnmp vhost]# curl -x127.0.0.1:80 test.com/admin.php<html><head><title>401 Authorization Required</title></head><body><center><h1>401 Authorization Required</h1></center><hr><center>nginx/1.17.8</center></body></html>
三、域名重定向
1、配置
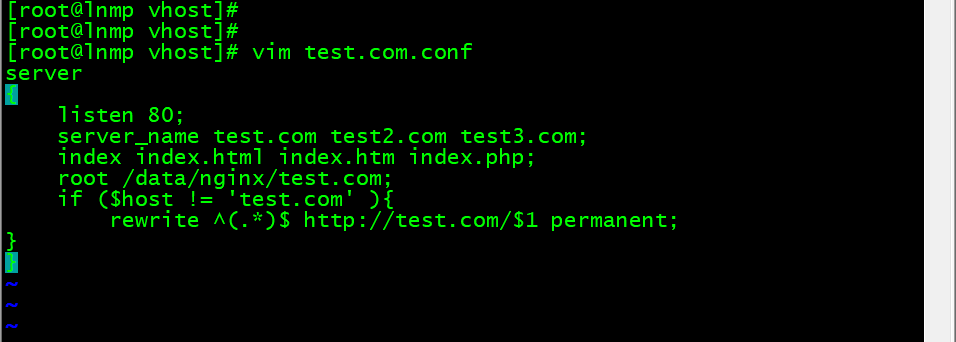
[root@lnmp vhost]# vim test.com.conf # 更改test.com.confserver{listen 80;server_name test.com test2.com test3.com; # 后面支持写多个域名,这里要和httpd的做一个对比index index.html index.htm index.php;root /data/nginx/test.com;if ($host != 'test.com' ){rewrite ^(.*)$ http://test.com/$1 permanent; # 为永久重定向,状态码为301,如果写redirect则为302}}
2、测试
[root@lnmp vhost]# /usr/local/nginx/sbin/nginx -tnginx: the configuration file /usr/local/nginx/conf/nginx.conf syntax is oknginx: configuration file /usr/local/nginx/conf/nginx.conf test is successful[root@lnmp vhost]# /usr/local/nginx/sbin/nginx -s reload# 状态码301就是域名重定[root@lnmp vhost]# curl -x127.0.0.1:80 test2.com<html><head><title>301 Moved Permanently</title></head><body><center><h1>301 Moved Permanently</h1></center><hr><center>nginx/1.17.8</center></body></html>[root@lnmp vhost]# curl -x127.0.0.1:80 test2.com -IHTTP/1.1 301 Moved PermanentlyServer: nginx/1.17.8Date: Fri, 03 Sep 2021 17:26:31 GMTContent-Type: text/htmlContent-Length: 169Connection: keep-aliveLocation: http://test.com//[root@lnmp vhost]# curl -x127.0.0.1:80 test2.com<html><head><title>301 Moved Permanently</title></head><body><center><h1>301 Moved Permanently</h1></center><hr><center>nginx/1.17.8</center></body></html>[root@lnmp vhost]# curl -x127.0.0.1:80 test2.com -IHTTP/1.1 301 Moved PermanentlyServer: nginx/1.17.8Date: Fri, 03 Sep 2021 17:37:31 GMTContent-Type: text/htmlContent-Length: 169Connection: keep-aliveLocation: http://test.com//
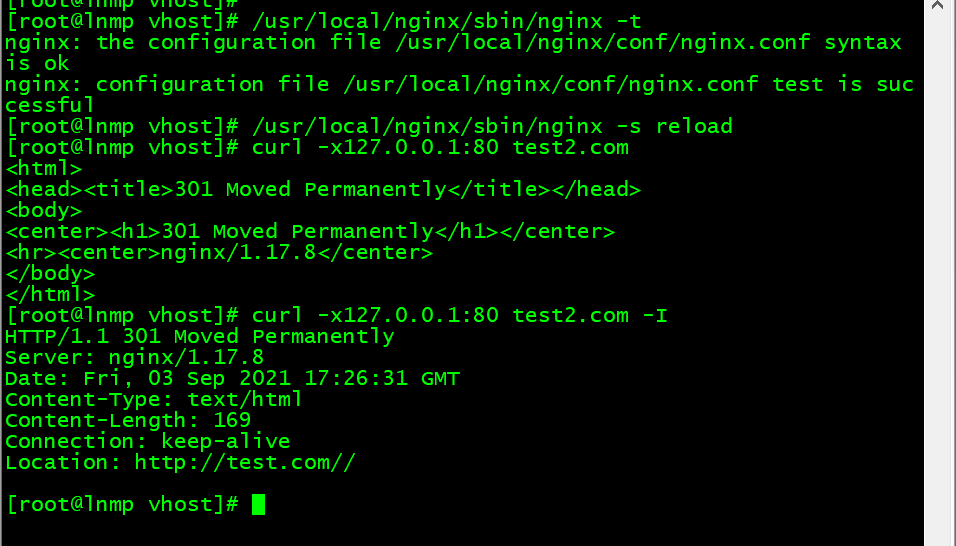
在windows上测试需要将两个域名都写入hosts文件,并使用没有缓存的浏览器。
四、nginx访问日志
1、配置
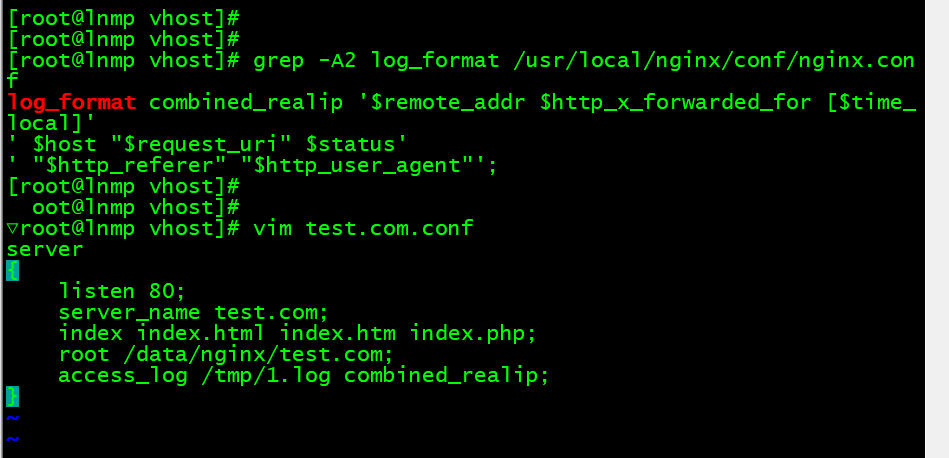
# nginx 默认格式[root@lnmp vhost]# grep -A2 log_format /usr/local/nginx/conf/nginx.conflog_format combined_realip '$remote_addr $http_x_forwarded_for [$time_local]'' $host "$request_uri" $status'' "$http_referer" "$http_user_agent"';# combined_realip为日志格式名字,$remote_addr为网站的用户的出口IP;# $http_x_forwarded_for 为代理服务器的IP,如果使用了代理,则会记录IP# $time_local为当前时间;$host为主机名;$request_uri为访问的URL地址# $status为状态码,$http_referer为referer地址,$http_user_agent为user_agent▽root@lnmp vhost]# vim test.com.confserver{listen 80;server_name test.com;index index.html index.htm index.php;root /data/nginx/test.com;access_log /tmp/1.log combined_realip;}
2、测试
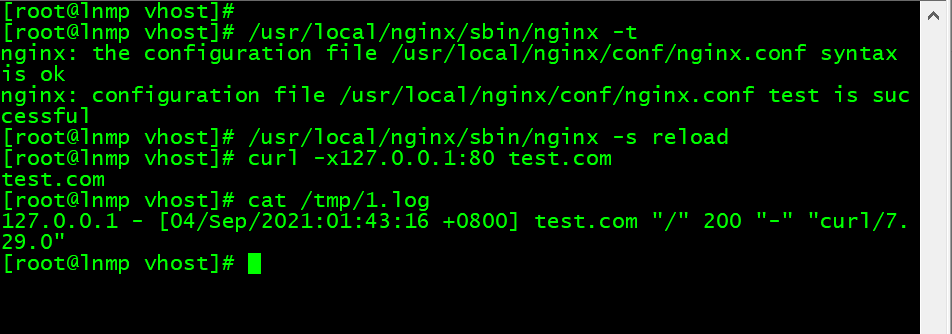
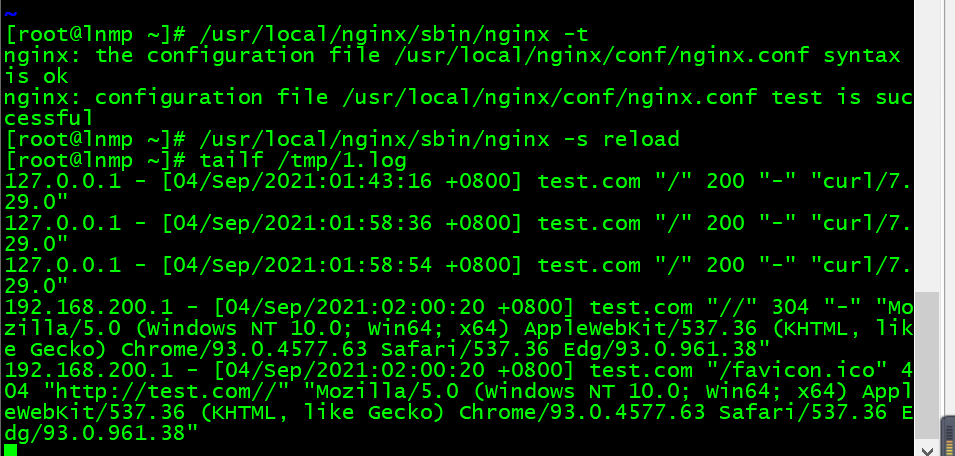
[root@lnmp vhost]# /usr/local/nginx/sbin/nginx -tnginx: the configuration file /usr/local/nginx/conf/nginx.conf syntax is oknginx: configuration file /usr/local/nginx/conf/nginx.conf test is successful[root@lnmp vhost]# /usr/local/nginx/sbin/nginx -s reload[root@lnmp vhost]# curl -x127.0.0.1:80 test.comtest.com# 每访问一次就会增加一条日志[root@lnmp vhost]# cat /tmp/1.log127.0.0.1 - [04/Sep/2021:01:43:16 +0800] test.com "/" 200 "-" "curl/7.29.0"# 两种方法问直接访问显示[root@lnmp ~]# tailf /tmp/1.log127.0.0.1 - [04/Sep/2021:01:43:16 +0800] test.com "/" 200 "-" "curl/7.29.0"127.0.0.1 - [04/Sep/2021:01:58:36 +0800] test.com "/" 200 "-" "curl/7.29.0"127.0.0.1 - [04/Sep/2021:01:58:54 +0800] test.com "/" 200 "-" "curl/7.29.0"网页访问显示192.168.200.1 - [04/Sep/2021:02:00:20 +0800] test.com "//" 304 "-" "Mozilla/5.0 (Windows NT 10.0; Win64; x64) AppleWebKit/537.36 (KHTML, like Gecko) Chrome/93.0.4577.63 Safari/537.36 Edg/93.0.961.38"192.168.200.1 - [04/Sep/2021:02:00:20 +0800] test.com "/favicon.ico" 404 "http://test.com//" "Mozilla/5.0 (Windows NT 10.0; Win64; x64) AppleWebKit/537.36 (KHTML, like Gecko) Chrome/93.0.4577.63 Safari/537.36 Edg/93.0.961.38"
五、nginx日志切割
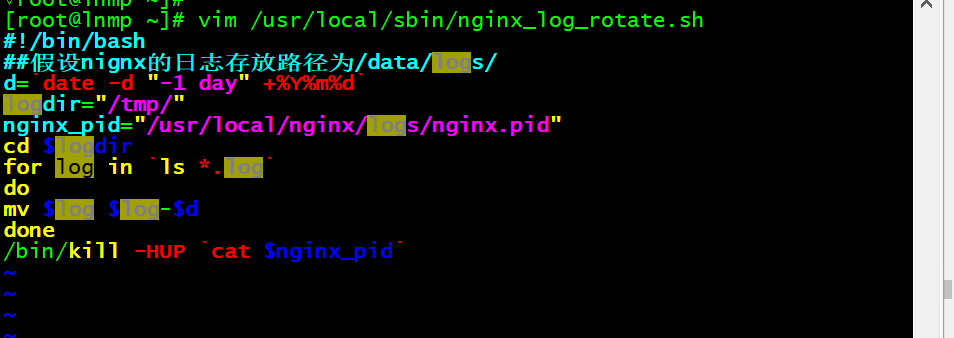
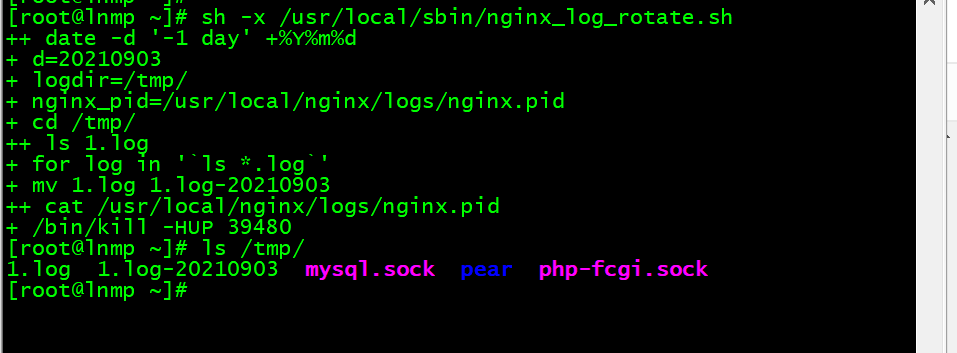
# 自己写一个shell脚本[root@lnmp ~]# vim /usr/local/sbin/nginx_log_rotate.sh # 写入如下内容#!/bin/bash##假设nignx的日志存放路径为/data/logs/d=`date -d "-1 day" +%Y%m%d`logdir="/tmp/"nginx_pid="/usr/local/nginx/logs/nginx.pid"cd $logdirfor log in `ls *.log`domv $log $log-$ddone/bin/kill -HUP `cat $nginx_pid`[root@lnmp ~]# chmod 755 /usr/local/sbin/nginx_log_rotate.sh[root@lnmp ~]# crontab -eno crontab for root - using an empty one0 0 * * * /bin/bash /usr/local/sbin/nginx_log_rotate.sh[root@lnmp ~]# ls /tmp/1.log mysql.sock pear php-fcgi.sock[root@lnmp ~]# sh -x /usr/local/sbin/nginx_log_rotate.sh++ date -d '-1 day' +%Y%m%d+ d=20210903+ logdir=/tmp/+ nginx_pid=/usr/local/nginx/logs/nginx.pid+ cd /tmp/++ ls 1.log+ for log in '`ls *.log`'+ mv 1.log 1.log-20210903++ cat /usr/local/nginx/logs/nginx.pid+ /bin/kill -HUP 39480[root@lnmp ~]# ls /tmp/1.log 1.log-20210903 mysql.sock pear php-fcgi.sock
六、配置静态文件不记录日志并添加过期时间
和LAMP一样,配置静态文件不记录日志,并添加过期时间。 目的是为了减少记录不必要的日志文件。缓存文件为了下次访问速度变快。
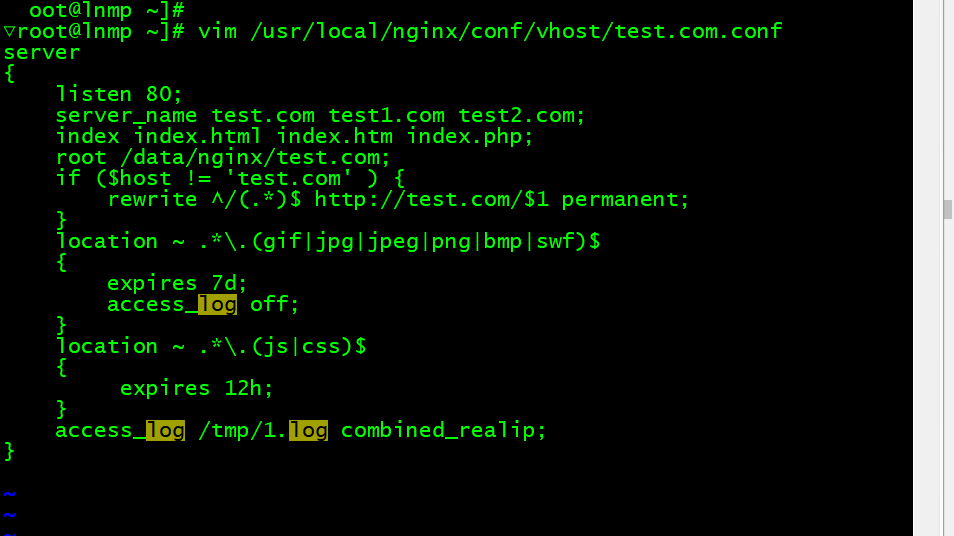
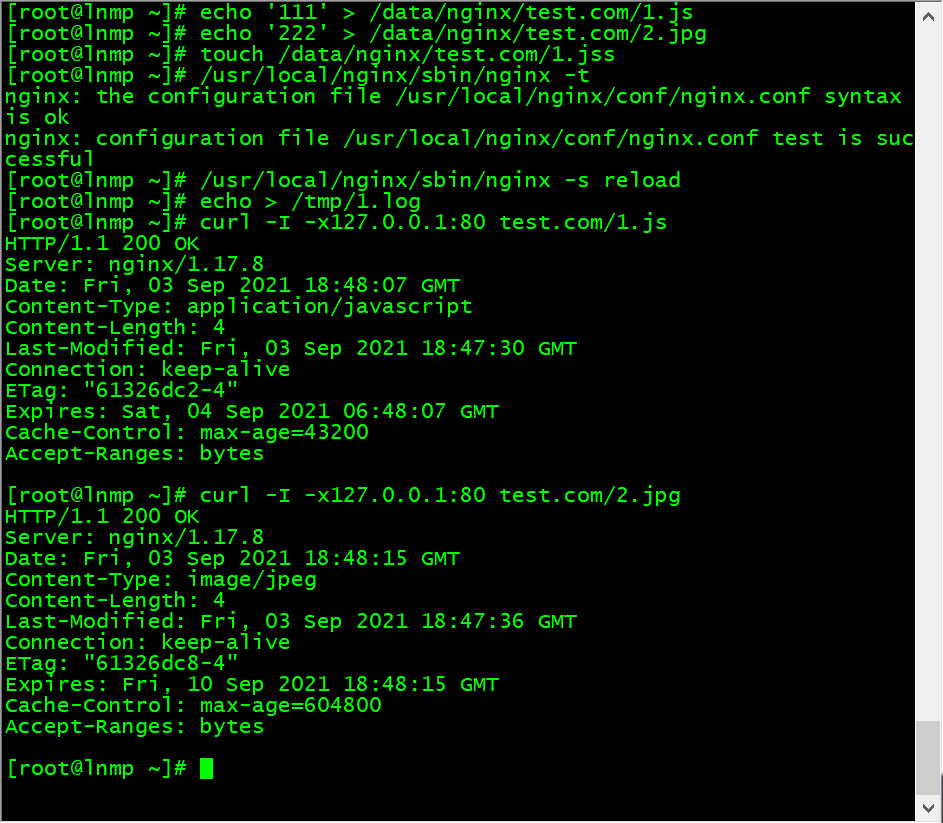
▽root@lnmp ~]# vim /usr/local/nginx/conf/vhost/test.com.confserver{listen 80;server_name test.com test1.com test2.com;index index.html index.htm index.php;root /data/nginx/test.com;if ($host != 'test.com' ) {rewrite ^/(.*)$ http://test.com/$1 permanent;}location ~ .*\.(gif|jpg|jpeg|png|bmp|swf)${expires 7d;access_log off;}location ~ .*\.(js|css)${expires 12h;}access_log /tmp/1.log combined_realip;}[root@lnmp ~]# echo '111' > /data/nginx/test.com/1.js[root@lnmp ~]# echo '222' > /data/nginx/test.com/2.jpg[root@lnmp ~]# touch /data/nginx/test.com/1.jss[root@lnmp ~]# /usr/local/nginx/sbin/nginx -tnginx: the configuration file /usr/local/nginx/conf/nginx.conf syntax is oknginx: configuration file /usr/local/nginx/conf/nginx.conf test is successful[root@lnmp ~]# /usr/local/nginx/sbin/nginx -s reload[root@lnmp ~]# echo > /tmp/1.log[root@lnmp ~]# curl -I -x127.0.0.1:80 test.com/1.jsHTTP/1.1 200 OKServer: nginx/1.17.8Date: Fri, 03 Sep 2021 18:48:07 GMTContent-Type: application/javascriptContent-Length: 4Last-Modified: Fri, 03 Sep 2021 18:47:30 GMTConnection: keep-aliveETag: "61326dc2-4"Expires: Sat, 04 Sep 2021 06:48:07 GMTCache-Control: max-age=43200Accept-Ranges: bytes[root@lnmp ~]# curl -I -x127.0.0.1:80 test.com/2.jpgHTTP/1.1 200 OKServer: nginx/1.17.8Date: Fri, 03 Sep 2021 18:48:15 GMTContent-Type: image/jpegContent-Length: 4Last-Modified: Fri, 03 Sep 2021 18:47:36 GMTConnection: keep-aliveETag: "61326dc8-4"Expires: Fri, 10 Sep 2021 18:48:15 GMTCache-Control: max-age=604800Accept-Ranges: bytes[root@lnmp ~]# cat /tmp/1.log127.0.0.1 - [04/Sep/2021:02:48:07 +0800] test.com "/1.js" 200 "-" "curl/7.29.0"127.0.0.1 - [04/Sep/2021:02:49:40 +0800] test.com "/1.jss" 200 "-" "curl/7.29.0"
七、Nginx防盗链
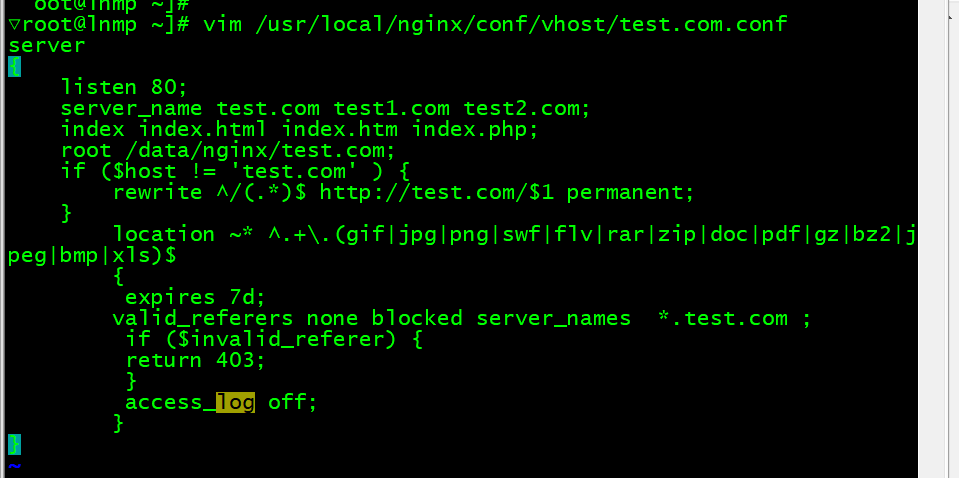
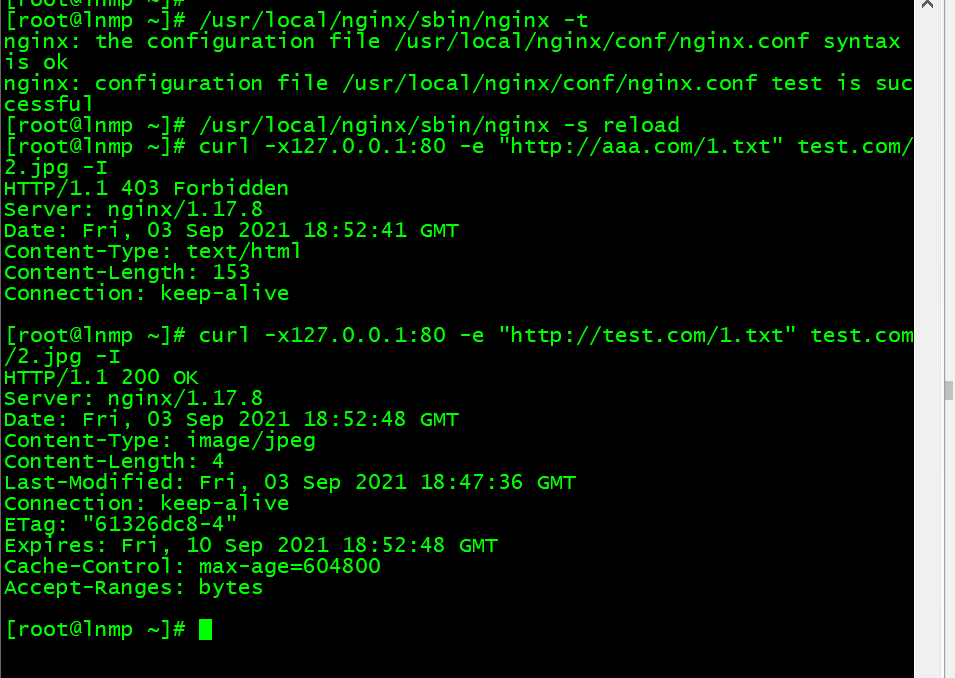
▽root@lnmp ~]# vim /usr/local/nginx/conf/vhost/test.com.confserver{listen 80;server_name test.com test1.com test2.com;index index.html index.htm index.php;root /data/nginx/test.com;if ($host != 'test.com' ) {rewrite ^/(.*)$ http://test.com/$1 permanent;}location ~* ^.+\.(gif|jpg|png|swf|flv|rar|zip|doc|pdf|gz|bz2|jpeg|bmp|xls)${expires 7d;valid_referers none blocked server_names *.test.com ;if ($invalid_referer) {return 403;}access_log off;}}[root@lnmp ~]# /usr/local/nginx/sbin/nginx -tnginx: the configuration file /usr/local/nginx/conf/nginx.conf syntax is oknginx: configuration file /usr/local/nginx/conf/nginx.conf test is successful[root@lnmp ~]# /usr/local/nginx/sbin/nginx -s reload[root@lnmp ~]# curl -x127.0.0.1:80 -e "http://aaa.com/1.txt" test.com/2.jpg -IHTTP/1.1 403 ForbiddenServer: nginx/1.17.8Date: Fri, 03 Sep 2021 18:52:41 GMTContent-Type: text/htmlContent-Length: 153Connection: keep-alive[root@lnmp ~]# curl -x127.0.0.1:80 -e "http://test.com/1.txt" test.com/2.jpg -IHTTP/1.1 200 OKServer: nginx/1.17.8Date: Fri, 03 Sep 2021 18:52:48 GMTContent-Type: image/jpegContent-Length: 4Last-Modified: Fri, 03 Sep 2021 18:47:36 GMTConnection: keep-aliveETag: "61326dc8-4"Expires: Fri, 10 Sep 2021 18:52:48 GMTCache-Control: max-age=604800Accept-Ranges: bytes
八、访问控制
1、针对目录进行访问控制
1.1 配置
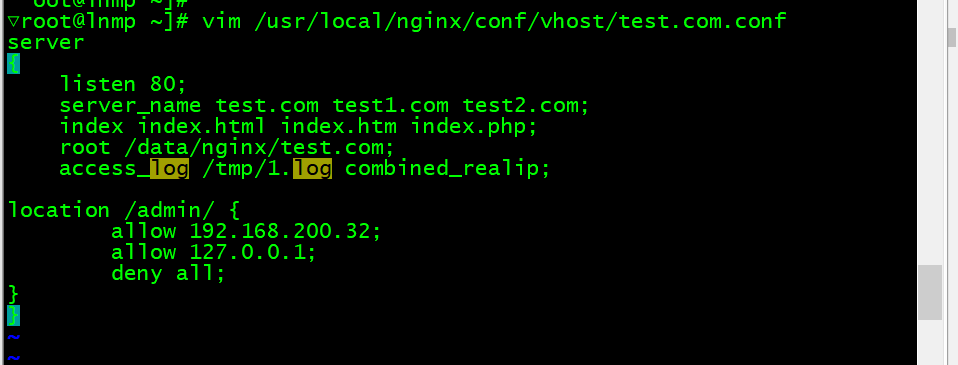
▽root@lnmp ~]# vim /usr/local/nginx/conf/vhost/test.com.confserver{listen 80;server_name test.com test1.com test2.com;index index.html index.htm index.php;root /data/nginx/test.com;access_log /tmp/1.log combined_realip;# 需求:访问/admin/目录的请求,只允许某几个IP访问,配置如下:location /admin/ {allow 192.168.200.32;allow 127.0.0.1;deny all;}}[root@lnmp ~]# /usr/local/nginx/sbin/nginx -tnginx: the configuration file /usr/local/nginx/conf/nginx.conf syntax is oknginx: configuration file /usr/local/nginx/conf/nginx.conf test is successful[root@lnmp ~]# /usr/local/nginx/sbin/nginx -s reload

1.2测试
[root@lnmp ~]# echo "1234" > /data/nginx/test.com/admin/1.html# 测试 可以把配置文件改为192.168.200.1允许访问,使用浏览器测试[root@tomcat ~]# curl test.com/admin/1.html1234[root@tomcat ~]# curl test.com/admin/1.html<html><head><title>403 Forbidden</title></head><body><center><h1>403 Forbidden</h1></center><hr><center>nginx/1.17.8</center></body></html>
九、nginx解析PHP
配置
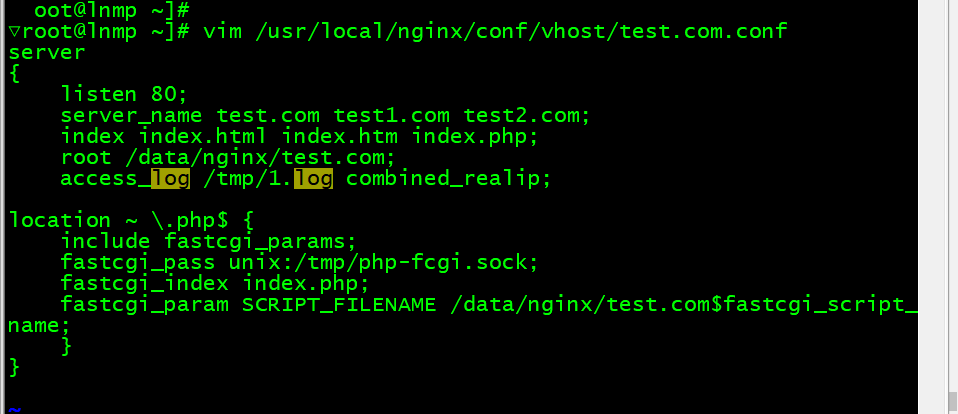
▽root@lnmp ~]# vim /usr/local/nginx/conf/vhost/test.com.confserver{listen 80;server_name test.com test1.com test2.com;index index.html index.htm index.php;root /data/nginx/test.com;access_log /tmp/1.log combined_realip;location ~ \.php$ {include fastcgi_params;fastcgi_pass unix:/tmp/php-fcgi.sock;fastcgi_index index.php;fastcgi_param SCRIPT_FILENAME /data/nginx/test.com$fastcgi_script_name; # fastcgi_pass 用来指定php-fpm监听的地址或者socket}}▽root@lnmp ~]# vim /data/nginx/test.com/3.php<?phpphpinfo();?># fastcgi_pass用来指定php-fpm的地址 路径如果错误,则报错502# 路径在这个配置文件中[root@lnmp ~]# cat /usr/local/php-fpm/etc/php-fpm.conf[global]pid = /usr/local/php-fpm/var/run/php-fpm.piderror_log = /usr/local/php-fpm/var/log/php-fpm.log[zzx]listen = /tmp/php-fcgi.sock# listen = 127.0.0.1:9000 # 也可以这样配置,但是他们的配置文件要对应。listen.mode = 666user = php-fpmgroup = php-fpmpm = dynamicpm.max_children = 50pm.start_servers = 20pm.min_spare_servers = 5pm.max_spare_servers = 35pm.max_requests = 500rlimit_files = 1024# 注意一下这三行的配置文件与nginx配置文件的关系listen = /tmp/php-fcgi.sock# listen = 127.0.0.1:9000 # 也可以这样配置,但是他们的配置文件要对应。listen.mode = 666
测试
[root@lnmp ~]# curl -x127.0.0.1:80 test.com/3.php<?phpphpinfo();?>[root@lnmp ~]# /usr/local/nginx/sbin/nginx -tnginx: the configuration file /usr/local/nginx/conf/nginx.conf syntax is oknginx: configuration file /usr/local/nginx/conf/nginx.conf test is successful[root@lnmp ~]# /usr/local/nginx/sbin/nginx -s reload
十、Nginx代理
一个没有公网IP的服务器要提供web服务,可以通过代理实现。
配置
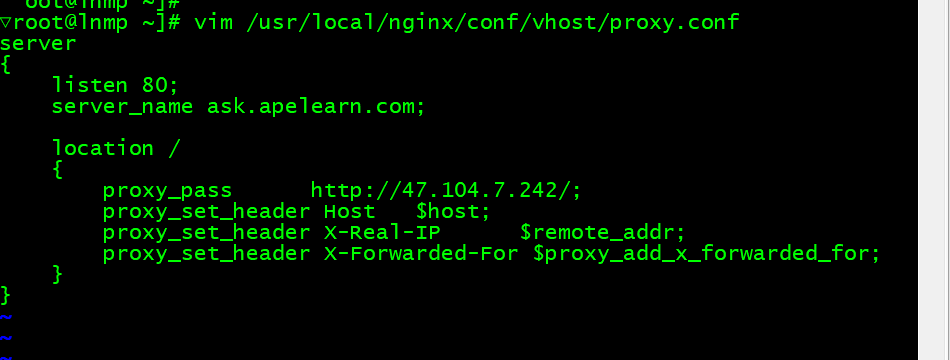
▽root@lnmp ~]# vim /usr/local/nginx/conf/vhost/proxy.confserver{listen 80;server_name ask.apelearn.com;location /{proxy_pass http://47.104.7.242/;proxy_set_header Host $host;proxy_set_header X-Real-IP $remote_addr;proxy_set_header X-Forwarded-For $proxy_add_x_forwarded_for;}}
测试
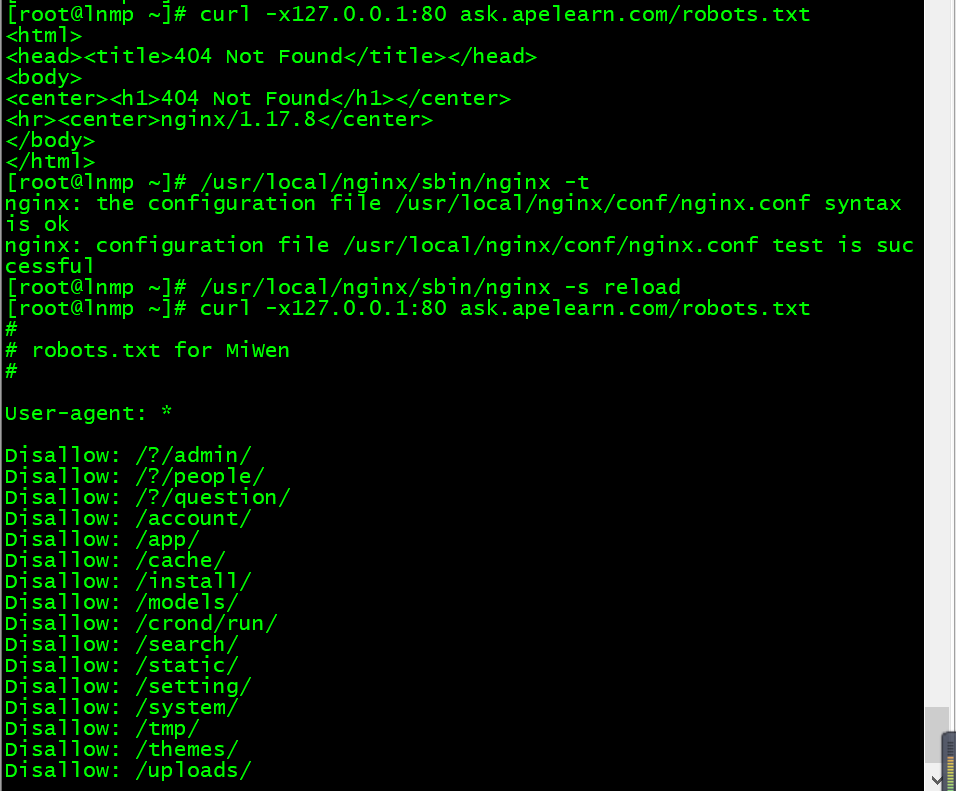
[root@lnmp ~]# curl -x127.0.0.1:80 ask.apelearn.com/robots.txt<html><head><title>404 Not Found</title></head><body><center><h1>404 Not Found</h1></center><hr><center>nginx/1.17.8</center></body></html>[root@lnmp ~]# /usr/local/nginx/sbin/nginx -tnginx: the configuration file /usr/local/nginx/conf/nginx.conf syntax is oknginx: configuration file /usr/local/nginx/conf/nginx.conf test is successful[root@lnmp ~]# /usr/local/nginx/sbin/nginx -s reload[root@lnmp ~]# curl -x127.0.0.1:80 ask.apelearn.com/robots.txt## robots.txt for MiWen#User-agent: *Disallow: /?/admin/Disallow: /?/people/Disallow: /?/question/Disallow: /account/Disallow: /app/Disallow: /cache/Disallow: /install/Disallow: /models/Disallow: /crond/run/Disallow: /search/Disallow: /static/Disallow: /setting/Disallow: /system/Disallow: /tmp/Disallow: /themes/Disallow: /uploads/Disallow: /url-*Disallow: /views/Disallow: /*/ajax/[root@lnmp ~]#
十一、负载均衡
配置
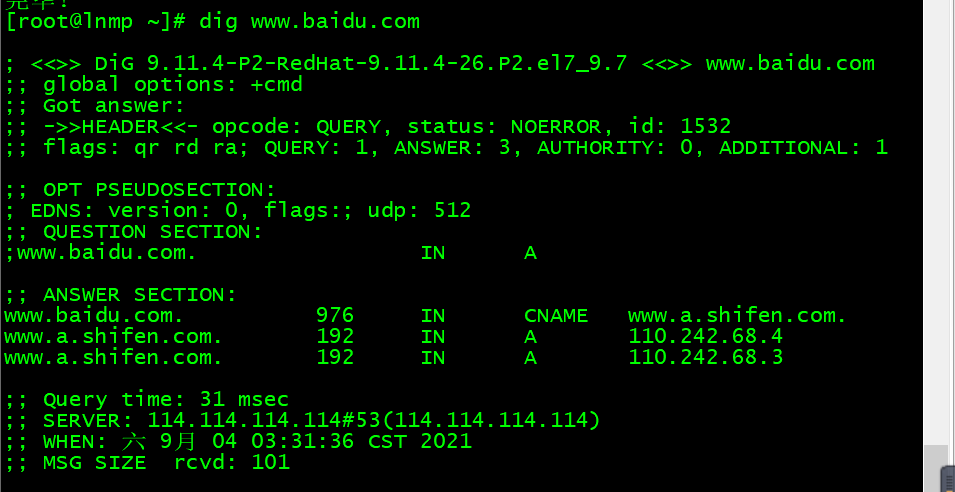
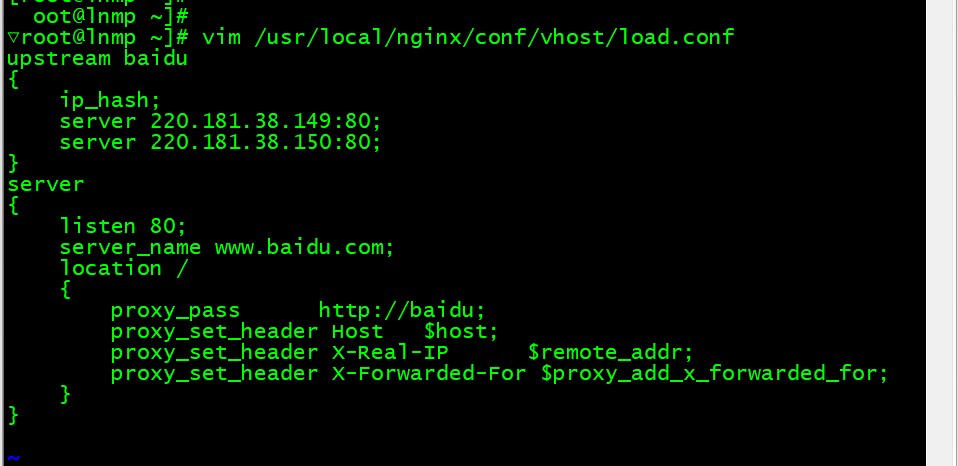
# 安装dig命令[root@lnmp ~]# yum install -y bind-utils# 通过dig命令获取相应域名的地址# 这里是拿百度的做测试[root@lnmp ~]# dig www.baidu.com; <<>> DiG 9.11.4-P2-RedHat-9.11.4-26.P2.el7_9.7 <<>> www.baidu.com;; global options: +cmd;; Got answer:;; ->>HEADER<<- opcode: QUERY, status: NOERROR, id: 1532;; flags: qr rd ra; QUERY: 1, ANSWER: 3, AUTHORITY: 0, ADDITIONAL: 1;; OPT PSEUDOSECTION:; EDNS: version: 0, flags:; udp: 512;; QUESTION SECTION:;www.baidu.com. IN A;; ANSWER SECTION:www.baidu.com. 976 IN CNAME www.a.shifen.com.www.a.shifen.com. 192 IN A 110.242.68.4www.a.shifen.com. 192 IN A 110.242.68.3;; Query time: 31 msec;; SERVER: 114.114.114.114#53(114.114.114.114);; WHEN: 六 9月 04 03:31:36 CST 2021;; MSG SIZE rcvd: 101▽root@lnmp ~]# vim /usr/local/nginx/conf/vhost/load.confupstream baidu{ip_hash;server 220.181.38.149:80;server 220.181.38.150:80;}server{listen 80;server_name www.baidu.com;location /{proxy_pass http://baidu;proxy_set_header Host $host;proxy_set_header X-Real-IP $remote_addr;proxy_set_header X-Forwarded-For $proxy_add_x_forwarded_for;}}# upstream来指定多个web server# upstream后面的名字要和proxy_pass后面的名字相同
测试
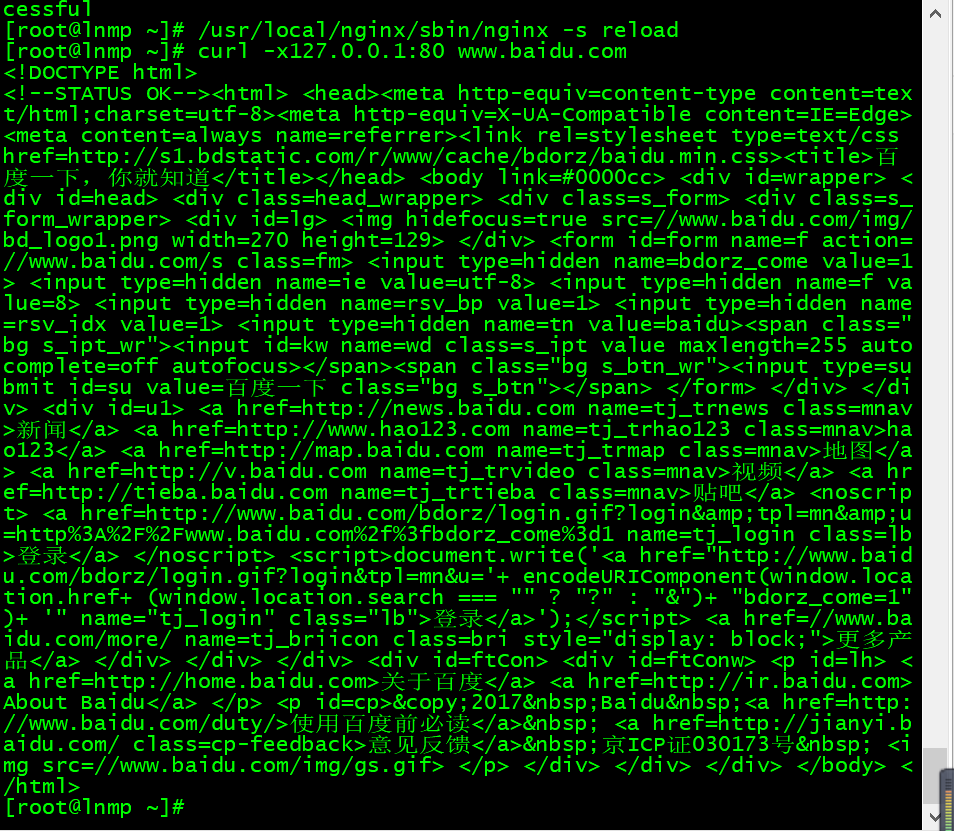
[root@lnmp ~]# curl -x127.0.0.1:80 www.baidu.comdefault server![root@lnmp ~]# /usr/local/nginx/sbin/nginx -tnginx: the configuration file /usr/local/nginx/conf/nginx.conf syntax is oknginx: configuration file /usr/local/nginx/conf/nginx.conf test is successful[root@lnmp ~]# /usr/local/nginx/sbin/nginx -s reload[root@lnmp ~]# curl -x127.0.0.1:80 www.baidu.com<!DOCTYPE html><!--STATUS OK--><html> <head><meta http-equiv=content-type content=text/html;charset=utf-8><meta http-equiv=X-UA-Compatible content=IE=Edge><meta content=always name=referrer><link rel=stylesheet type=text/css href=http://s1.bdstatic.com/r/www/cache/bdorz/baidu.min.css><title>百度一下,你就知道</title></head> <body link=#0000cc> <div id=wrapper> <div id=head> <div class=head_wrapper> <div class=s_form> <div class=s_form_wrapper> <div id=lg> <img hidefocus=true src=//www.baidu.com/img/bd_logo1.png width=270 height=129> </div> <form id=form name=f action=//www.baidu.com/s class=fm> <input type=hidden name=bdorz_come value=1> <input type=hidden name=ie value=utf-8> <input type=hidden name=f value=8> <input type=hidden name=rsv_bp value=1> <input type=hidden name=rsv_idx value=1> <input type=hidden name=tn value=baidu><span class="bg s_ipt_wr"><input id=kw name=wd class=s_ipt value maxlength=255 autocomplete=off autofocus></span><span class="bg s_btn_wr"><input type=submit id=su value=百度一下 class="bg s_btn"></span> </form> </div> </div> <div id=u1> <a href=http://news.baidu.com name=tj_trnews class=mnav>新闻</a> <a href=http://www.hao123.com name=tj_trhao123 class=mnav>hao123</a> <a href=http://map.baidu.com name=tj_trmap class=mnav>地图</a> <a href=http://v.baidu.com name=tj_trvideo class=mnav>视频</a> <a href=http://tieba.baidu.com name=tj_trtieba class=mnav>贴吧</a> <noscript> <a href=http://www.baidu.com/bdorz/login.gif?login&tpl=mn&u=http%3A%2F%2Fwww.baidu.com%2f%3fbdorz_come%3d1 name=tj_login class=lb>登录</a> </noscript> <script>document.write('<a href="http://www.baidu.com/bdorz/login.gif?login&tpl=mn&u='+ encodeURIComponent(window.location.href+ (window.location.search === "" ? "?" : "&")+ "bdorz_come=1")+ '" name="tj_login" class="lb">登录</a>');</script> <a href=//www.baidu.com/more/ name=tj_briicon class=bri style="display: block;">更多产品</a> </div> </div> </div> <div id=ftCon> <div id=ftConw> <p id=lh> <a href=http://home.baidu.com>关于百度</a> <a href=http://ir.baidu.com>About Baidu</a> </p> <p id=cp>©2017 Baidu <a href=http://www.baidu.com/duty/>使用百度前必读</a> <a href=http://jianyi.baidu.com/ class=cp-feedback>意见反馈</a> 京ICP证030173号 <img src=//www.baidu.com/img/gs.gif> </p> </div> </div> </div> </body> </html># 百度一下,你就知道
十二、SSL
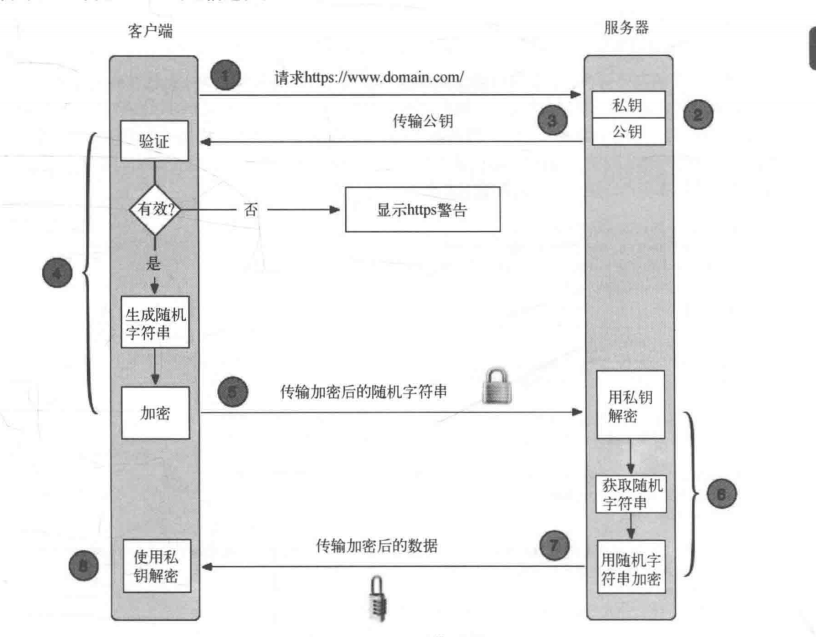
我们通常访问的网站有http和https 其中https就是和ssl证书有关。
SSL工作流程
 生成ssl密钥对
[root@lnmp ~]# rpm -qa opensslopenssl-1.0.2k-21.el7_9.x86_64[root@lnmp ~]# cd /usr/local/nginx/conf/# 配置密码必须是四位或者四位以上[root@lnmp conf]# openssl genrsa -des3 -out tmp.key 2048 # key文件为私钥Generating RSA private key, 2048 bit long modulus.........................................+++.................+++e is 65537 (0x10001)Enter pass phrase for tmp.key:Verifying - Enter pass phrase for tmp.key:[root@lnmp conf]# openssl rsa -in tmp.key -out aminglinux.key # 转换key,取消密码Enter pass phrase for tmp.key:writing RSA key[root@lnmp conf]# lsadminglinux.csr htpasswd test.csradminglinux.key koi-utf test.keyaminglinux.crt koi-win tmp.keyaminglinux.csr mime.types uwsgi_paramsaminglinux.key mime.types.default uwsgi_params.defaultfastcgi.conf nginx.conf vhostfastcgi.conf.default nginx.conf.default win-utffastcgi_params scgi_paramsfastcgi_params.default scgi_params.default[root@lnmp conf]# rm -rf tmp.key[root@lnmp conf]# openssl req -new -key aminglinux.key -out aminglinux.csr # 生成证书请求文件,需要拿这个文件和私钥一起生产公钥文件You are about to be asked to enter information that will be incorporated # 这里的aminglinux.crt为公钥into your certificate request.What you are about to enter is what is called a Distinguished Name or a DN.There are quite a few fields but you can leave some blankFor some fields there will be a default value,If you enter '.', the field will be left blank.-----Country Name (2 letter code) [XX]:66State or Province Name (full name) []:beijingLocality Name (eg, city) [Default City]:beijingOrganization Name (eg, company) [Default Company Ltd]:cnOrganizational Unit Name (eg, section) []:cnCommon Name (eg, your name or your server's hostname) []:cnEmail Address []:cn@168.comPlease enter the following 'extra' attributesto be sent with your certificate requestA challenge password []:1234An optional company name []:1234[root@lnmp conf]# openssl x509 -req -days 365 -in aminglinux.csr -signkey aminglinux.key -out aminglinux.crtSignature oksubject=/C=66/ST=beijing/L=beijing/O=cn/OU=cn/CN=cn/emailAddress=cn@168.comGetting Private key
配置SSL
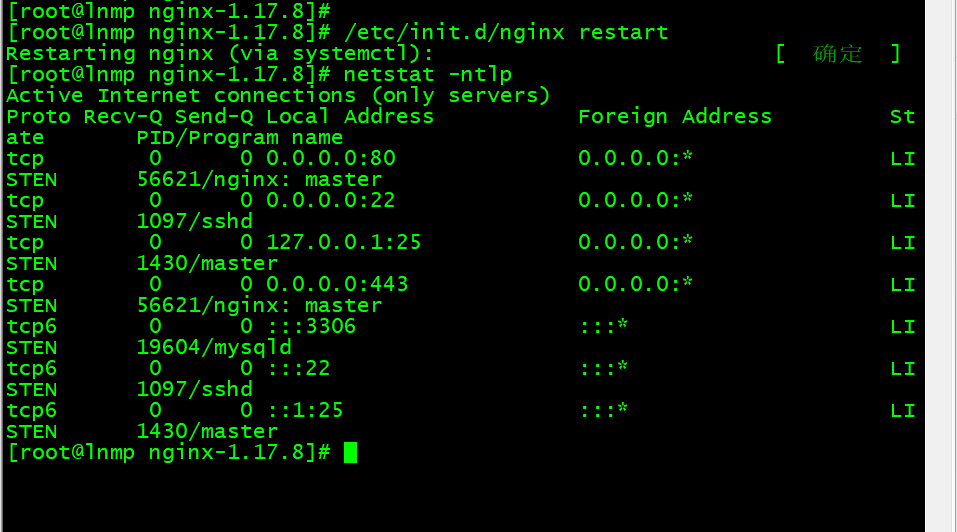
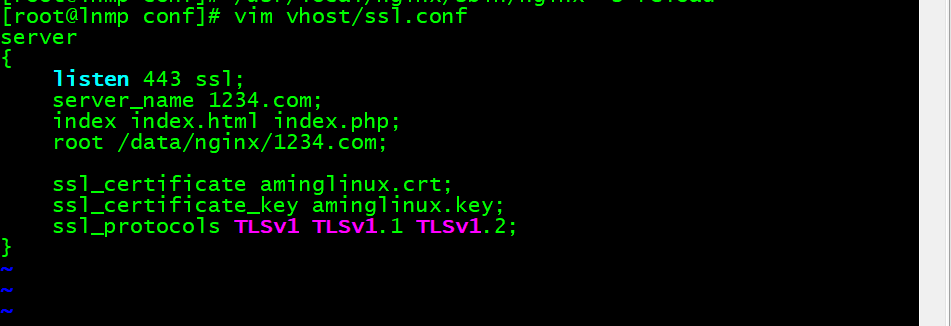
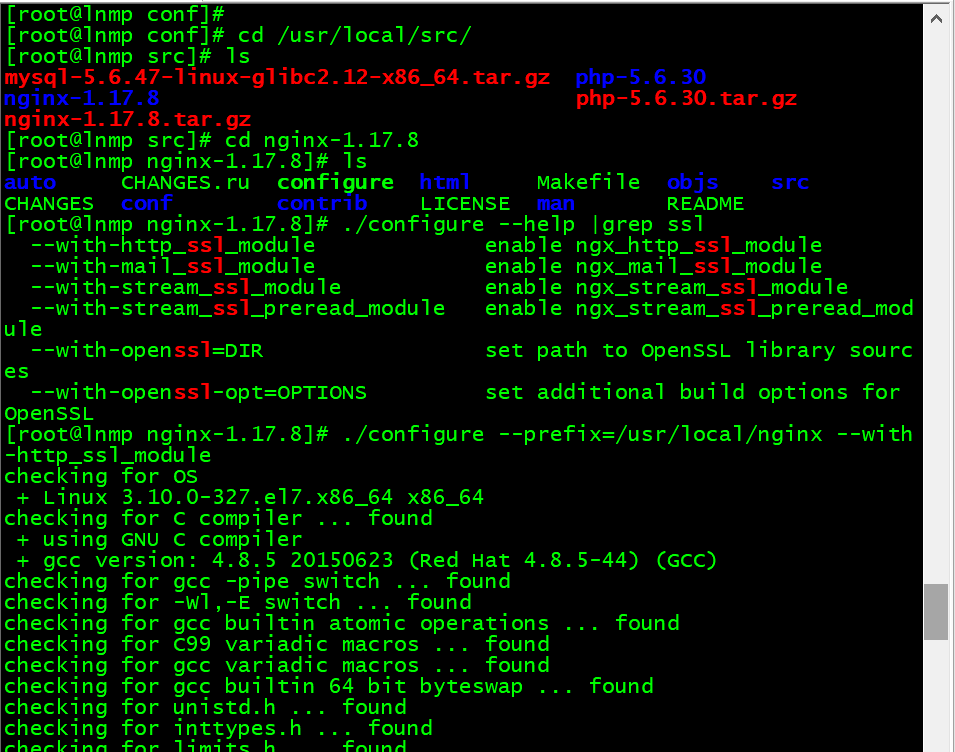
▽root@lnmp conf]# vim /usr/local/nginx/conf/vhost/ssl.confserver{listen 443 ssl; # 低版本用listen 443;server_name 1234.com;index index.html index.php;root /data/nginx/1234.com;# 低版本这里需要添加ssl on;ssl_certificate aminglinux.crt;ssl_certificate_key aminglinux.key;ssl_protocols TLSv1 TLSv1.1 TLSv1.2;}[root@lnmp conf]# /usr/local/nginx/sbin/nginx -tnginx: the configuration file /usr/local/nginx/conf/nginx.conf syntax is oknginx: configuration file /usr/local/nginx/conf/nginx.conf test is successful# 重新编译安装nginx[root@lnmp conf]# cd /usr/local/src/[root@lnmp src]# lsmysql-5.6.47-linux-glibc2.12-x86_64.tar.gz php-5.6.30nginx-1.17.8 php-5.6.30.tar.gznginx-1.17.8.tar.gz[root@lnmp src]# cd nginx-1.17.8[root@lnmp nginx-1.17.8]# lsauto CHANGES.ru configure html Makefile objs srcCHANGES conf contrib LICENSE man README[root@lnmp nginx-1.17.8]# ./configure --help |grep ssl--with-http_ssl_module enable ngx_http_ssl_module--with-mail_ssl_module enable ngx_mail_ssl_module--with-stream_ssl_module enable ngx_stream_ssl_module--with-stream_ssl_preread_module enable ngx_stream_ssl_preread_module--with-openssl=DIR set path to OpenSSL library sources--with-openssl-opt=OPTIONS set additional build options for OpenSSL[root@lnmp nginx-1.17.8]# ./configure --prefix=/usr/local/nginx --with-http_ssl_module[root@lnmp nginx-1.17.8]# make && make install[root@lnmp nginx-1.17.8]# /etc/init.d/nginx restartRestarting nginx (via systemctl): [ 确定 ][root@lnmp nginx-1.17.8]# netstat -ntlpActive Internet connections (only servers)Proto Recv-Q Send-Q Local Address Foreign Address State PID/Program nametcp 0 0 0.0.0.0:80 0.0.0.0:* LISTEN 56621/nginx: mastertcp 0 0 0.0.0.0:22 0.0.0.0:* LISTEN 1097/sshdtcp 0 0 127.0.0.1:25 0.0.0.0:* LISTEN 1430/mastertcp 0 0 0.0.0.0:443 0.0.0.0:* LISTEN 56621/nginx: mastertcp6 0 0 :::3306 :::* LISTEN 19604/mysqldtcp6 0 0 :::22 :::* LISTEN 1097/sshdtcp6 0 0 ::1:25 :::* LISTEN 1430/master
任务5 php-fpm
php-fpm的pool
Nginx可以配置多个主机,php-fpm也可以配置多个pool
配置多个pool可以隔离开各个网站,例如一个网站有问题,把PHP资源耗尽了,那其他网站和这个网站使用的是同一个pool 那也会受到影响,所以我们可以给每个站点都配置一个pool。网站报错502一般和PHP有关。
给不同的站点分别配置不同的pool
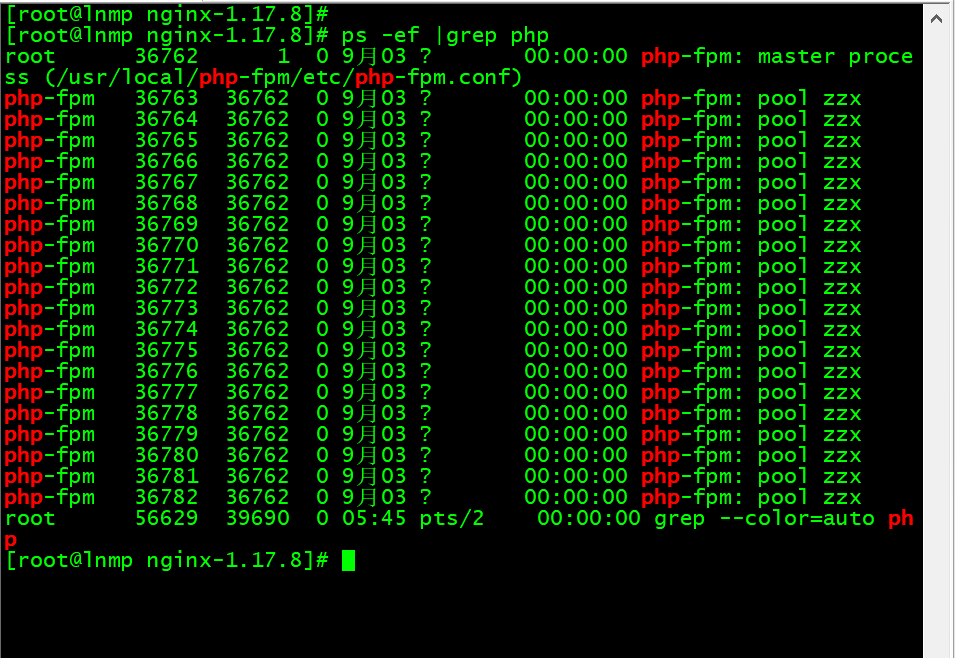
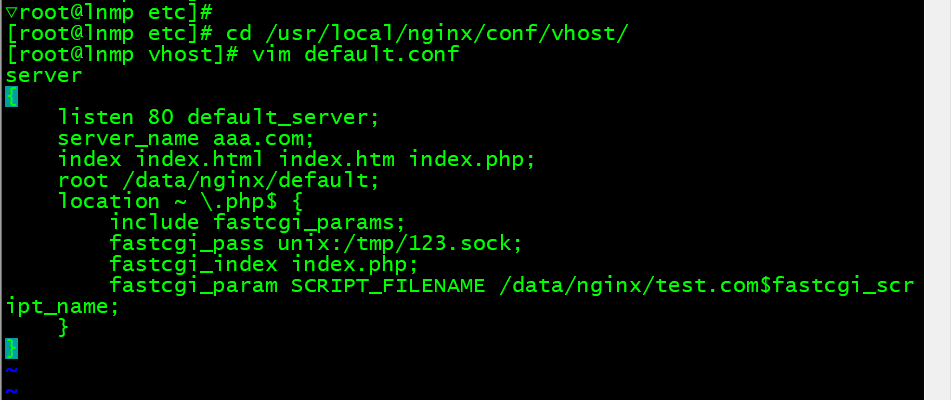
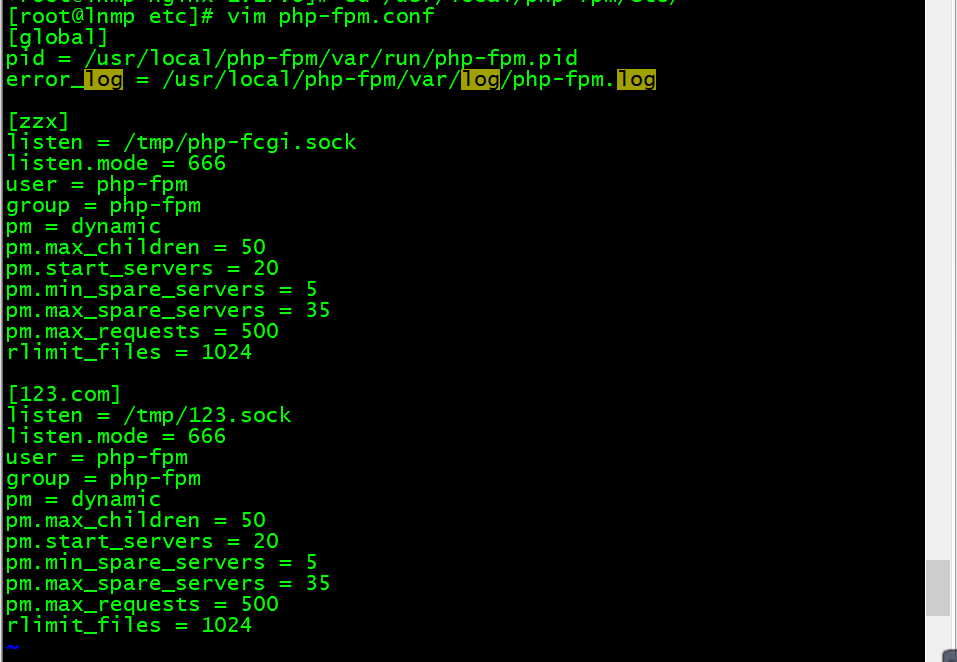
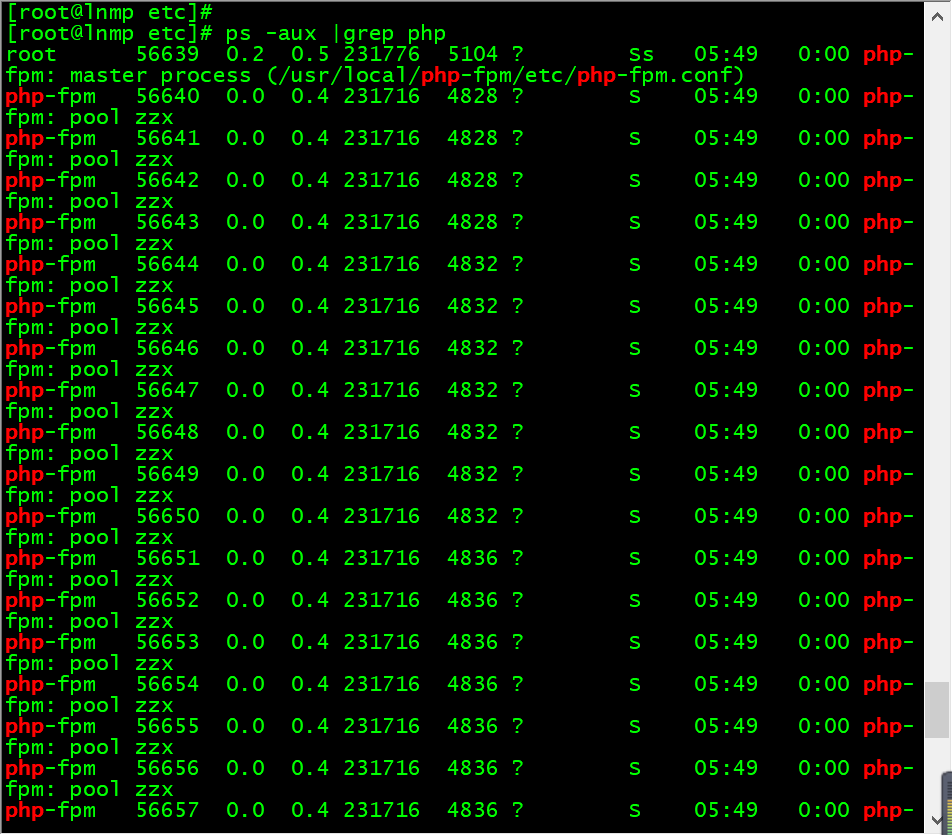
# 给两个站点分别配置不同的pool[root@lnmp nginx-1.17.8]# ps -ef |grep phproot 36762 1 0 9月03 ? 00:00:00 php-fpm: master process (/usr/local/php-fpm/etc/php-fpm.conf)php-fpm 36763 36762 0 9月03 ? 00:00:00 php-fpm: pool zzxphp-fpm 36764 36762 0 9月03 ? 00:00:00 php-fpm: pool zzxphp-fpm 36765 36762 0 9月03 ? 00:00:00 php-fpm: pool zzxphp-fpm 36766 36762 0 9月03 ? 00:00:00 php-fpm: pool zzxphp-fpm 36767 36762 0 9月03 ? 00:00:00 php-fpm: pool zzxphp-fpm 36768 36762 0 9月03 ? 00:00:00 php-fpm: pool zzxphp-fpm 36769 36762 0 9月03 ? 00:00:00 php-fpm: pool zzxphp-fpm 36770 36762 0 9月03 ? 00:00:00 php-fpm: pool zzxphp-fpm 36771 36762 0 9月03 ? 00:00:00 php-fpm: pool zzxphp-fpm 36772 36762 0 9月03 ? 00:00:00 php-fpm: pool zzxphp-fpm 36773 36762 0 9月03 ? 00:00:00 php-fpm: pool zzxphp-fpm 36774 36762 0 9月03 ? 00:00:00 php-fpm: pool zzxphp-fpm 36775 36762 0 9月03 ? 00:00:00 php-fpm: pool zzxphp-fpm 36776 36762 0 9月03 ? 00:00:00 php-fpm: pool zzxphp-fpm 36777 36762 0 9月03 ? 00:00:00 php-fpm: pool zzxphp-fpm 36778 36762 0 9月03 ? 00:00:00 php-fpm: pool zzxphp-fpm 36779 36762 0 9月03 ? 00:00:00 php-fpm: pool zzxphp-fpm 36780 36762 0 9月03 ? 00:00:00 php-fpm: pool zzxphp-fpm 36781 36762 0 9月03 ? 00:00:00 php-fpm: pool zzxphp-fpm 36782 36762 0 9月03 ? 00:00:00 php-fpm: pool zzxroot 56629 39690 0 05:45 pts/2 00:00:00 grep --color=auto php# 进入配置文件目录[root@lnmp nginx-1.17.8]# cd /usr/local/php-fpm/etc/# 添加一个pool为123.com[root@lnmp etc]# vim php-fpm.conf[global]pid = /usr/local/php-fpm/var/run/php-fpm.piderror_log = /usr/local/php-fpm/var/log/php-fpm.log[zzx]listen = /tmp/php-fcgi.socklisten.mode = 666user = php-fpmgroup = php-fpmpm = dynamicpm.max_children = 50pm.start_servers = 20pm.min_spare_servers = 5pm.max_spare_servers = 35pm.max_requests = 500rlimit_files = 1024[123.com]listen = /tmp/123.socklisten.mode = 666user = php-fpmgroup = php-fpmpm = dynamicpm.max_children = 50pm.start_servers = 20pm.min_spare_servers = 5pm.max_spare_servers = 35pm.max_requests = 500rlimit_files = 1024# 检查语法[root@lnmp etc]# /usr/local/php-fpm/sbin/php-fpm -t[04-Sep-2021 05:49:14] NOTICE: configuration file /usr/local/php-fpm/etc/php-fpm.conf test is successful# 重启[root@lnmp etc]# /etc/init.d/php-fpm restartGracefully shutting down php-fpm . doneStarting php-fpm done# 看到多了新的pool[root@lnmp etc]# ps -aux |grep phproot 56639 0.2 0.5 231776 5104 ? Ss 05:49 0:00 php-fpm: master process (/usr/local/php-fpm/etc/php-fpm.conf)php-fpm 56640 0.0 0.4 231716 4828 ? S 05:49 0:00 php-fpm: pool zzxphp-fpm 56641 0.0 0.4 231716 4828 ? S 05:49 0:00 php-fpm: pool zzxphp-fpm 56642 0.0 0.4 231716 4828 ? S 05:49 0:00 php-fpm: pool zzxphp-fpm 56643 0.0 0.4 231716 4828 ? S 05:49 0:00 php-fpm: pool zzxphp-fpm 56644 0.0 0.4 231716 4832 ? S 05:49 0:00 php-fpm: pool zzxphp-fpm 56645 0.0 0.4 231716 4832 ? S 05:49 0:00 php-fpm: pool zzxphp-fpm 56646 0.0 0.4 231716 4832 ? S 05:49 0:00 php-fpm: pool zzxphp-fpm 56647 0.0 0.4 231716 4832 ? S 05:49 0:00 php-fpm: pool zzxphp-fpm 56648 0.0 0.4 231716 4832 ? S 05:49 0:00 php-fpm: pool zzxphp-fpm 56649 0.0 0.4 231716 4832 ? S 05:49 0:00 php-fpm: pool zzxphp-fpm 56650 0.0 0.4 231716 4832 ? S 05:49 0:00 php-fpm: pool zzxphp-fpm 56651 0.0 0.4 231716 4836 ? S 05:49 0:00 php-fpm: pool zzxphp-fpm 56652 0.0 0.4 231716 4836 ? S 05:49 0:00 php-fpm: pool zzxphp-fpm 56653 0.0 0.4 231716 4836 ? S 05:49 0:00 php-fpm: pool zzxphp-fpm 56654 0.0 0.4 231716 4836 ? S 05:49 0:00 php-fpm: pool zzxphp-fpm 56655 0.0 0.4 231716 4836 ? S 05:49 0:00 php-fpm: pool zzxphp-fpm 56656 0.0 0.4 231716 4836 ? S 05:49 0:00 php-fpm: pool zzxphp-fpm 56657 0.0 0.4 231716 4836 ? S 05:49 0:00 php-fpm: pool zzxphp-fpm 56658 0.0 0.4 231716 4836 ? S 05:49 0:00 php-fpm: pool zzxphp-fpm 56659 0.0 0.4 231716 4836 ? S 05:49 0:00 php-fpm: pool zzxphp-fpm 56660 0.0 0.4 231716 4832 ? S 05:49 0:00 php-fpm: pool 123.comphp-fpm 56661 0.0 0.4 231716 4832 ? S 05:49 0:00 php-fpm: pool 123.comphp-fpm 56662 0.0 0.4 231716 4832 ? S 05:49 0:00 php-fpm: pool 123.comphp-fpm 56663 0.0 0.4 231716 4832 ? S 05:49 0:00 php-fpm: pool 123.comphp-fpm 56664 0.0 0.4 231716 4836 ? S 05:49 0:00 php-fpm: pool 123.comphp-fpm 56665 0.0 0.4 231716 4836 ? S 05:49 0:00 php-fpm: pool 123.comphp-fpm 56666 0.0 0.4 231716 4836 ? S 05:49 0:00 php-fpm: pool 123.comphp-fpm 56667 0.0 0.4 231716 4840 ? S 05:49 0:00 php-fpm: pool 123.comphp-fpm 56668 0.0 0.4 231716 4840 ? S 05:49 0:00 php-fpm: pool 123.comphp-fpm 56669 0.0 0.4 231716 4840 ? S 05:49 0:00 php-fpm: pool 123.comphp-fpm 56670 0.0 0.4 231716 4840 ? S 05:49 0:00 php-fpm: pool 123.comphp-fpm 56671 0.0 0.4 231716 4840 ? S 05:49 0:00 php-fpm: pool 123.comphp-fpm 56672 0.0 0.4 231716 4840 ? S 05:49 0:00 php-fpm: pool 123.comphp-fpm 56673 0.0 0.4 231716 4840 ? S 05:49 0:00 php-fpm: pool 123.comphp-fpm 56674 0.0 0.4 231716 4840 ? S 05:49 0:00 php-fpm: pool 123.comphp-fpm 56675 0.0 0.4 231716 4840 ? S 05:49 0:00 php-fpm: pool 123.comphp-fpm 56676 0.0 0.4 231716 4840 ? S 05:49 0:00 php-fpm: pool 123.comphp-fpm 56677 0.0 0.4 231716 4840 ? S 05:49 0:00 php-fpm: pool 123.comphp-fpm 56678 0.0 0.4 231716 4840 ? S 05:49 0:00 php-fpm: pool 123.comphp-fpm 56679 0.0 0.4 231716 4840 ? S 05:49 0:00 php-fpm: pool 123.comroot 56682 0.0 0.0 112660 964 pts/2 R+ 05:50 0:00 grep --color=auto php[root@lnmp vhost]# vim default.confserver{listen 80 default_server;server_name aaa.com;index index.html index.htm index.php;root /data/nginx/default;location ~ \.php$ {include fastcgi_params;fastcgi_pass unix:/tmp/123.sock;fastcgi_index index.php;fastcgi_param SCRIPT_FILENAME /data/nginx/test.com$fastcgi_script_name;}}# fastcgi_pass unix:/tmp/123.sock; 主要就是修改这一行配置文件选择不同的pool。[root@lnmp vhost]# /usr/local/nginx/sbin/nginx -tnginx: the configuration file /usr/local/nginx/conf/nginx.conf syntax is oknginx: configuration file /usr/local/nginx/conf/nginx.conf test is successful[root@lnmp vhost]# /usr/local/nginx/sbin/nginx -s reload
配置拆分多个pool
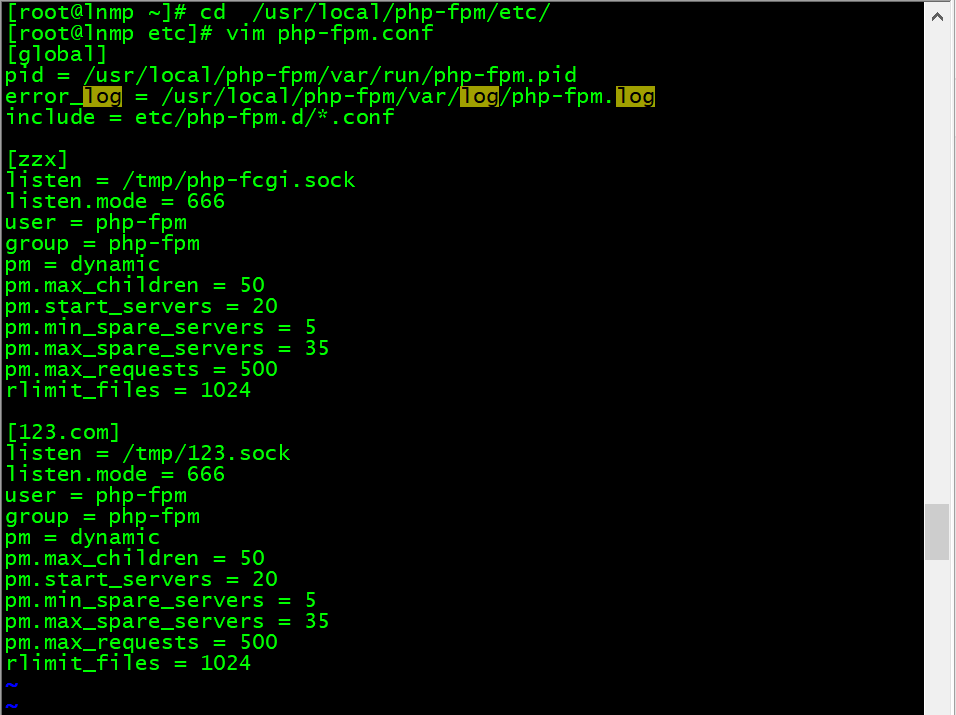
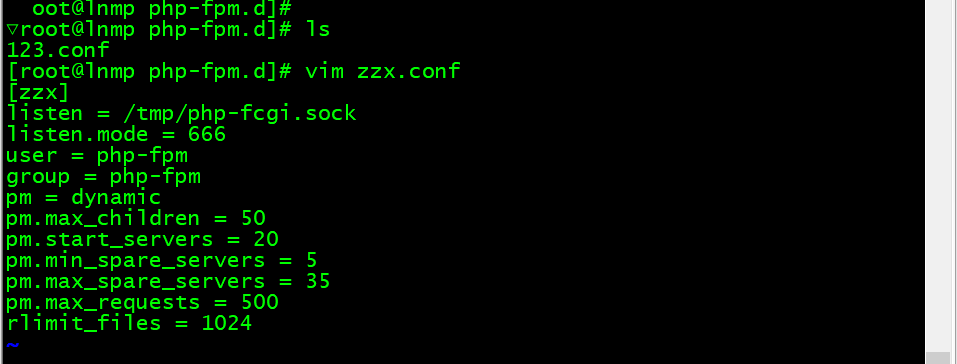
在nginx.conf这个配置文件下有一行配置文件为 include vhost/*.conf; 他的作用为识别指定目录下以conf为结尾的配置文件,让每个站点为一个配置文件。
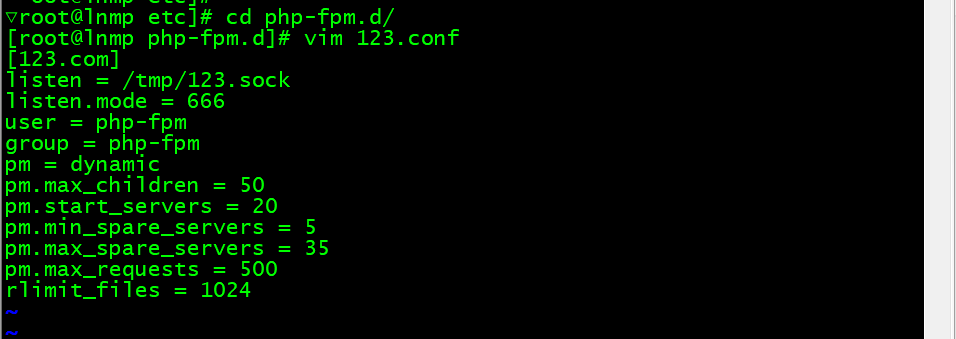
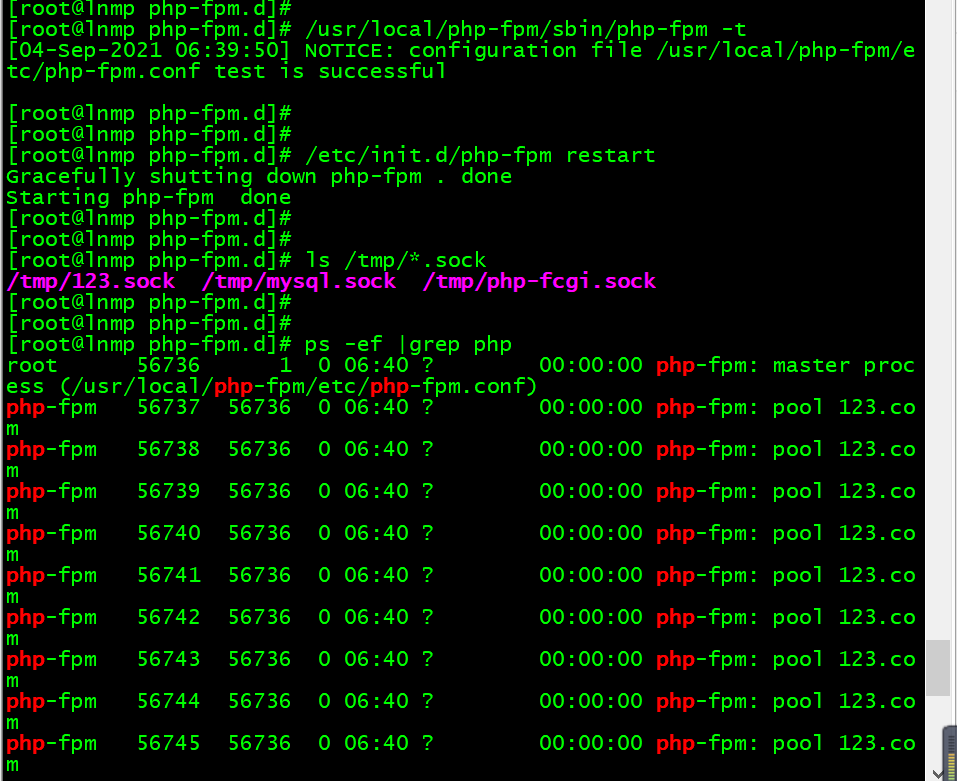
# 进入配置文件目录▽root@lnmp vhost]# cd /usr/local/php-fpm/etc/# 加入一行include[root@lnmp etc]# vim php-fpm.conf[global]pid = /usr/local/php-fpm/var/run/php-fpm.piderror_log = /usr/local/php-fpm/var/log/php-fpm.loginclude = etc/php-fpm.d/*.conf[zzx]listen = /tmp/php-fcgi.socklisten.mode = 666user = php-fpmgroup = php-fpmpm = dynamicpm.max_children = 50pm.start_servers = 20pm.min_spare_servers = 5pm.max_spare_servers = 35pm.max_requests = 500rlimit_files = 1024[123.com]listen = /tmp/123.socklisten.mode = 666user = php-fpmgroup = php-fpmpm = dynamicpm.max_children = 50pm.start_servers = 20pm.min_spare_servers = 5pm.max_spare_servers = 35pm.max_requests = 500rlimit_files = 1024# 创建存放配置文件的目录▽root@lnmp etc]# mkdir php-fpm.d[root@lnmp etc]# cd php-fpm.d/[root@lnmp php-fpm.d]# vim 123.conf[123.com]listen = /tmp/123.socklisten.mode = 666user = php-fpmgroup = php-fpmpm = dynamicpm.max_children = 50pm.start_servers = 20pm.min_spare_servers = 5pm.max_spare_servers = 35pm.max_requests = 500rlimit_files = 1024[root@lnmp php-fpm.d]# vim zzx.conf[zzx]listen = /tmp/php-fcgi.socklisten.mode = 666user = php-fpmgroup = php-fpmpm = dynamicpm.max_children = 50pm.start_servers = 20pm.min_spare_servers = 5pm.max_spare_servers = 35pm.max_requests = 500rlimit_files = 1024[root@lnmp php-fpm.d]# /usr/local/php-fpm/sbin/php-fpm -t[04-Sep-2021 06:39:50] NOTICE: configuration file /usr/local/php-fpm/etc/php-fpm.conf test is successful# 重启服务[root@lnmp php-fpm.d]# /etc/init.d/php-fpm restartGracefully shutting down php-fpm . doneStarting php-fpm done# 查看一下sock文件[root@lnmp php-fpm.d]# ls /tmp/*.sock/tmp/123.sock /tmp/mysql.sock /tmp/php-fcgi.sock[root@lnmp php-fpm.d]# ps -ef |grep phproot 56736 1 0 06:40 ? 00:00:00 php-fpm: master process (/usr/local/php-fpm/etc/php-fpm.conf)php-fpm 56737 56736 0 06:40 ? 00:00:00 php-fpm: pool 123.comphp-fpm 56738 56736 0 06:40 ? 00:00:00 php-fpm: pool 123.comphp-fpm 56739 56736 0 06:40 ? 00:00:00 php-fpm: pool 123.comphp-fpm 56740 56736 0 06:40 ? 00:00:00 php-fpm: pool 123.comphp-fpm 56741 56736 0 06:40 ? 00:00:00 php-fpm: pool 123.comphp-fpm 56742 56736 0 06:40 ? 00:00:00 php-fpm: pool 123.comphp-fpm 56743 56736 0 06:40 ? 00:00:00 php-fpm: pool 123.comphp-fpm 56744 56736 0 06:40 ? 00:00:00 php-fpm: pool 123.comphp-fpm 56745 56736 0 06:40 ? 00:00:00 php-fpm: pool 123.comphp-fpm 56746 56736 0 06:40 ? 00:00:00 php-fpm: pool 123.comphp-fpm 56747 56736 0 06:40 ? 00:00:00 php-fpm: pool 123.comphp-fpm 56748 56736 0 06:40 ? 00:00:00 php-fpm: pool 123.comphp-fpm 56749 56736 0 06:40 ? 00:00:00 php-fpm: pool 123.comphp-fpm 56750 56736 0 06:40 ? 00:00:00 php-fpm: pool 123.comphp-fpm 56751 56736 0 06:40 ? 00:00:00 php-fpm: pool 123.comphp-fpm 56752 56736 0 06:40 ? 00:00:00 php-fpm: pool 123.comphp-fpm 56753 56736 0 06:40 ? 00:00:00 php-fpm: pool 123.comphp-fpm 56754 56736 0 06:40 ? 00:00:00 php-fpm: pool 123.comphp-fpm 56755 56736 0 06:40 ? 00:00:00 php-fpm: pool 123.comphp-fpm 56756 56736 0 06:40 ? 00:00:00 php-fpm: pool 123.comphp-fpm 56757 56736 0 06:40 ? 00:00:00 php-fpm: pool zzxphp-fpm 56758 56736 0 06:40 ? 00:00:00 php-fpm: pool zzxphp-fpm 56759 56736 0 06:40 ? 00:00:00 php-fpm: pool zzxphp-fpm 56760 56736 0 06:40 ? 00:00:00 php-fpm: pool zzxphp-fpm 56761 56736 0 06:40 ? 00:00:00 php-fpm: pool zzxphp-fpm 56762 56736 0 06:40 ? 00:00:00 php-fpm: pool zzxphp-fpm 56763 56736 0 06:40 ? 00:00:00 php-fpm: pool zzxphp-fpm 56764 56736 0 06:40 ? 00:00:00 php-fpm: pool zzxphp-fpm 56765 56736 0 06:40 ? 00:00:00 php-fpm: pool zzxphp-fpm 56766 56736 0 06:40 ? 00:00:00 php-fpm: pool zzxphp-fpm 56767 56736 0 06:40 ? 00:00:00 php-fpm: pool zzxphp-fpm 56768 56736 0 06:40 ? 00:00:00 php-fpm: pool zzxphp-fpm 56769 56736 0 06:40 ? 00:00:00 php-fpm: pool zzxphp-fpm 56770 56736 0 06:40 ? 00:00:00 php-fpm: pool zzxphp-fpm 56771 56736 0 06:40 ? 00:00:00 php-fpm: pool zzxphp-fpm 56772 56736 0 06:40 ? 00:00:00 php-fpm: pool zzxphp-fpm 56773 56736 0 06:40 ? 00:00:00 php-fpm: pool zzxphp-fpm 56774 56736 0 06:40 ? 00:00:00 php-fpm: pool zzxphp-fpm 56775 56736 0 06:40 ? 00:00:00 php-fpm: pool zzxphp-fpm 56776 56736 0 06:40 ? 00:00:00 php-fpm: pool zzxroot 56780 39690 0 06:41 pts/2 00:00:00 grep --color=auto php
php-fpm查看慢执行日志
通过配置慢执行日志,可以让我们清晰的了解到PHP脚本在哪里执行时间长,可以定位到哪一行。
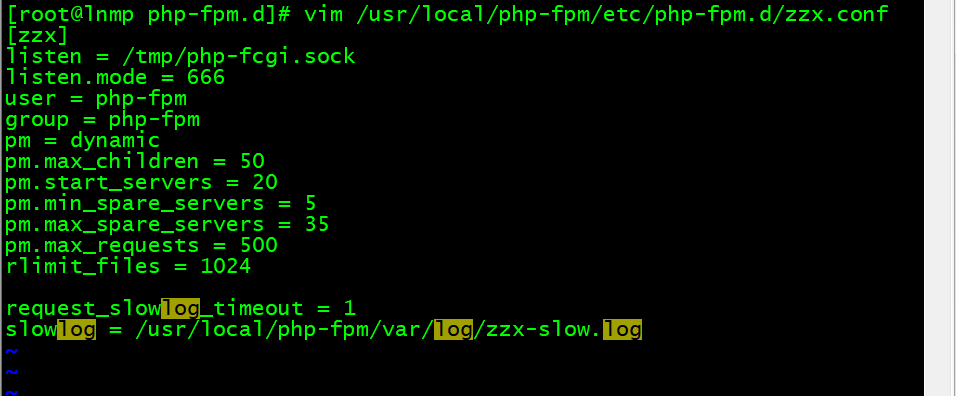
# 添加两行配置文件[root@lnmp php-fpm.d]# vim /usr/local/php-fpm/etc/php-fpm.d/zzx.confrequest_slowlog_timeout = 1slowlog = /usr/local/php-fpm/var/log/zzx-slow.log[root@lnmp php-fpm.d]# /usr/local/php-fpm/sbin/php-fpm -t[04-Sep-2021 06:48:16] NOTICE: configuration file /usr/local/php-fpm/etc/php-fpm.conf test is successful# 重载PHP服务[root@lnmp php-fpm.d]# /etc/init.d/php-fpm reloadReload service php-fpm done# 可以看到我们配置的路径已经多了一个[root@lnmp php-fpm.d]# ls /usr/local/php-fpm/var/log/php-fpm.log zzx-slow.log# 现在的www-slow.log还是一个空文件。只会记录执行时间大于1s的日志[root@lnmp php-fpm.d]# cat /usr/local/php-fpm/var/log/zzx-slow.log# 测试 写一个慢执行文件▽root@lnmp php-fpm.d]# vim /data/nginx/test.com/sleep.php<?phpecho "test slow log";sleep(2);echo "done";?># 执行这个脚本的时候可以明显看到慢了一下。[root@lnmp php-fpm.d]# curl -x127.0.0.1:80 test.com/sleep.phptest slow logdone[root@lnmp php-fpm.d]## 可以看到日志多出一行。说哪个文件,第三行 sellp()问题。[root@lnmp php-fpm.d]# cat /usr/local/php-fpm/var/log/zzx-slow.log[04-Sep-2021 06:54:05] [pool zzx] pid 56827script_filename = /data/nginx/test.com/sleep.php[0x00007fd1f18cf288] sleep() /data/nginx/test.com/sleep.php:3
php-fpm定义open_basedir
open_basedir目的就是安全,httpd可以针对每个虚拟机设置一个open_basedir
php-fpm同样也可以对不同的pool设置的不同的open_basedir
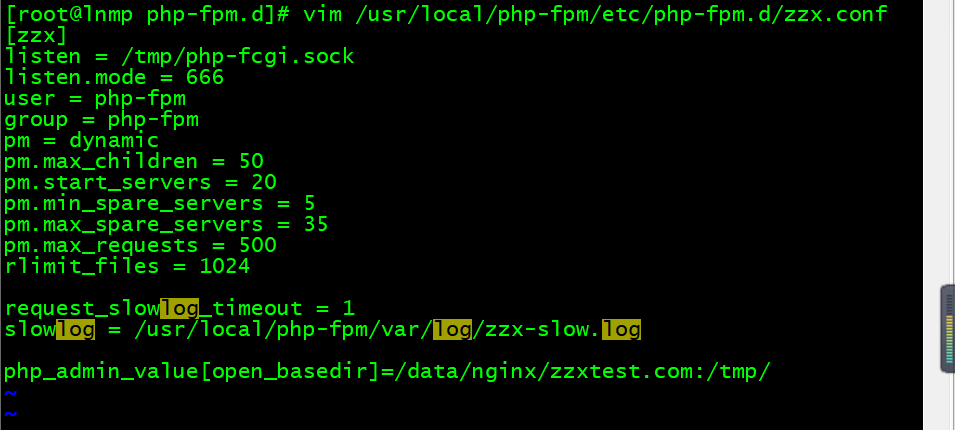
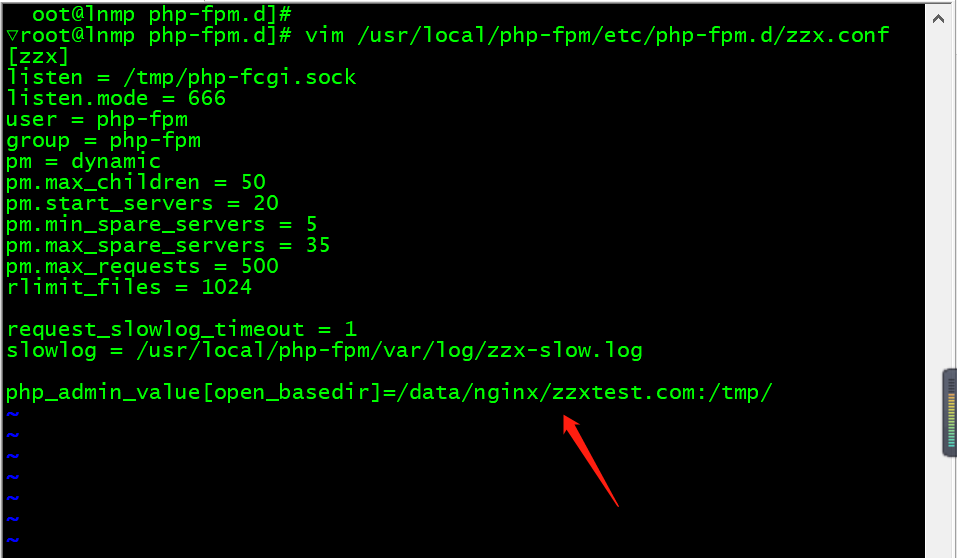
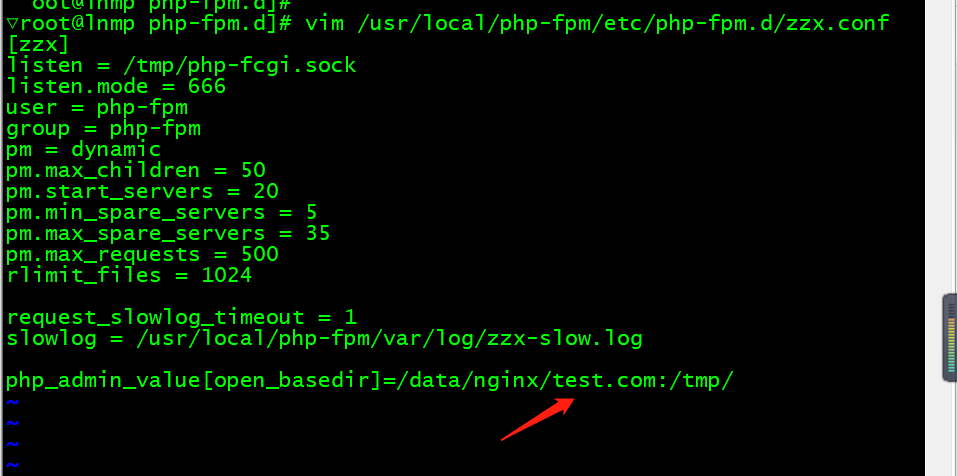
# 修改配置文件,特意配置为错误路径# 添加一行配置文件,其中test.com的路径为错误路径[root@lnmp php-fpm.d]# vim /usr/local/php-fpm/etc/php-fpm.d/zzx.confphp_admin_value[open_basedir]=/data/nginx/zzxtest.com:/tmp/[root@lnmp php-fpm.d]# /etc/init.d/php-fpm restartGracefully shutting down php-fpm . doneStarting php-fpm done# 测试发现这些PHP文件都无法访问,就是因为php open_basedir做了限制。[root@lnmp php-fpm.d]# ls /data/nginx/test.com/1.js 1.jss 2.jpg 3.php admin index.html sleep.php[root@lnmp php-fpm.d]# curl -x127.0.0.1:80 test.com/sleep.php -IHTTP/1.1 404 Not FoundServer: nginx/1.17.8Date: Fri, 03 Sep 2021 23:02:37 GMTContent-Type: text/html; charset=UTF-8Connection: keep-aliveX-Powered-By: PHP/5.6.30[root@lnmp php-fpm.d]# curl -x127.0.0.1:80 test.com/3.php -IHTTP/1.1 404 Not FoundServer: nginx/1.17.8Date: Fri, 03 Sep 2021 23:02:48 GMTContent-Type: text/html; charset=UTF-8Connection: keep-aliveX-Powered-By: PHP/5.6.30# 把配置文件改为正确的# 发现可以正常使用▽root@lnmp php-fpm.d]# vim /usr/local/php-fpm/etc/php-fpm.d/zzx.confphp_admin_value[open_basedir]=/data/nginx/test.com:/tmp/[root@lnmp php-fpm.d]# /etc/init.d/php-fpm restartGracefully shutting down php-fpm . doneStarting php-fpm done[root@lnmp php-fpm.d]# curl -x127.0.0.1:80 test.com/3.php -IHTTP/1.1 200 OKServer: nginx/1.17.8Date: Fri, 03 Sep 2021 23:05:20 GMTContent-Type: text/html; charset=UTF-8Connection: keep-aliveX-Powered-By: PHP/5.6.30[root@lnmp php-fpm.d]# curl -x127.0.0.1:80 test.com/sleep.php -IHTTP/1.1 200 OKServer: nginx/1.17.8Date: Fri, 03 Sep 2021 23:05:27 GMTContent-Type: text/html; charset=UTF-8Connection: keep-aliveX-Powered-By: PHP/5.6.30
配置错误日志
配置记录php执行错误的日志
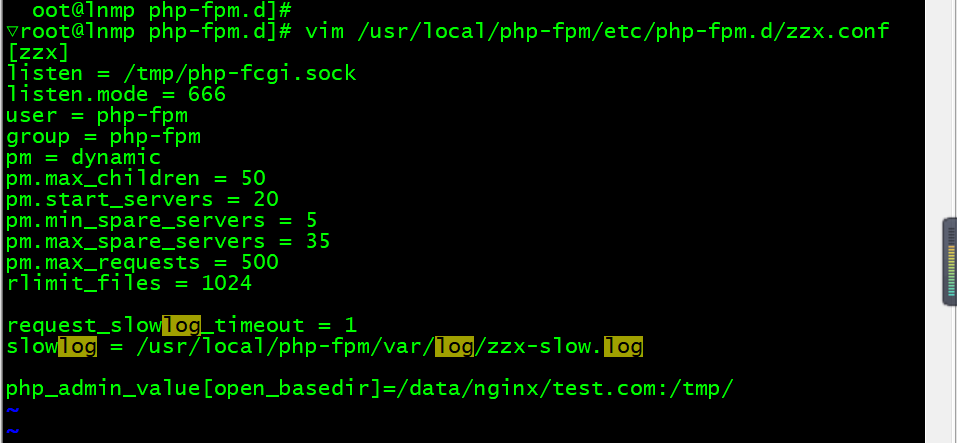
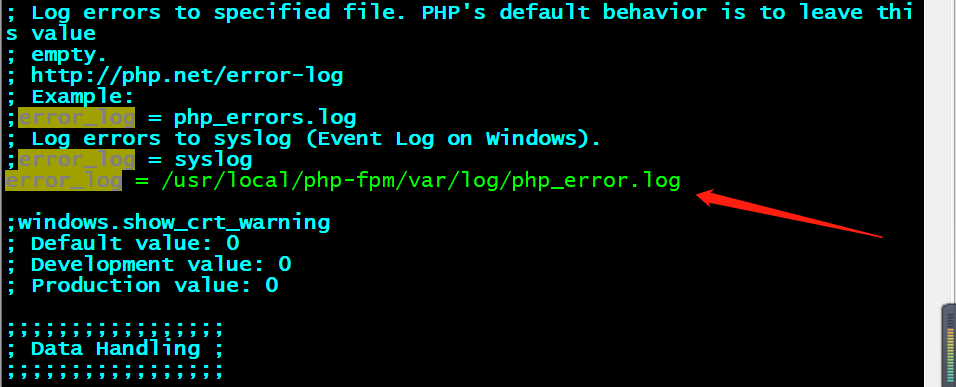
# 配置[root@lnmp php-fpm.d]# vim /usr/local/php-fpm/etc/php.inidisplay_errors = Offlog_errors = Onerror_log = /usr/local/php-fpm/var/log/php_error.log;error_reporting = E_ALL & ~E_DEPRECATED & ~E_STRICTerror_reporting = E_ALL# 再次将php的配置文件改错[root@lnmp php-fpm.d]# vim /usr/local/php-fpm/etc/php-fpm.d/zzx.confphp_admin_value[open_basedir]=/data/nginx/zzxtest.com:/tmp/# 这个日志文件不会自动生成,所以我们自己创建一个,并授权。[root@lnmp php-fpm.d]# touch /usr/local/php-fpm/var/log/php_error.log[root@lnmp php-fpm.d]# chmod 777 /usr/local/php-fpm/var/log/php_error.log[root@lnmp php-fpm.d]# /etc/init.d/php-fpm restartGracefully shutting down php-fpm . doneStarting php-fpm done[root@lnmp php-fpm.d]# curl -x127.0.0.1:80 test.com/3.php -IHTTP/1.1 404 Not FoundServer: nginx/1.17.8Date: Fri, 03 Sep 2021 23:26:40 GMTContent-Type: text/html; charset=UTF-8Connection: keep-aliveX-Powered-By: PHP/5.6.30[root@lnmp php-fpm.d]# curl -x127.0.0.1:80 test.com/sleep.php -IHTTP/1.1 404 Not FoundServer: nginx/1.17.8Date: Fri, 03 Sep 2021 23:28:18 GMTContent-Type: text/html; charset=UTF-8Connection: keep-aliveX-Powered-By: PHP/5.6.30[root@lnmp php-fpm.d]# curl -x127.0.0.1:80 test.com/sleep.phpNo input file specified.# 查看错误日志,显示open_basedir限制生效,目录不能访问[root@lnmp php-fpm.d]# cat /usr/local/php-fpm/var/log/php_error.log[03-Sep-2021 23:26:40 UTC] PHP Warning: Unknown: open_basedir restriction in effect. File(/data/nginx/test.com/3.php) is not within the allowed path(s): (/data/nginx/zzxtest.com:/tmp/) in Unknown on line 0[03-Sep-2021 23:26:40 UTC] PHP Warning: Unknown: failed to open stream: Operation not permitted in Unknown on line 0[03-Sep-2021 23:27:43 UTC] PHP Warning: Unknown: open_basedir restriction in effect. File(/data/nginx/test.com/sleep.php) is not within the allowed path(s): (/data/nginx/zzxtest.com:/tmp/) in Unknown on line 0[03-Sep-2021 23:27:43 UTC] PHP Warning: Unknown: failed to open stream: Operation not permitted in Unknown on line 0[03-Sep-2021 23:27:55 UTC] PHP Warning: Unknown: open_basedir restriction in effect. File(/data/nginx/test.com/sleep.php) is not within the allowed path(s): (/data/nginx/zzxtest.com:/tmp/) in Unknown on line 0[03-Sep-2021 23:27:55 UTC] PHP Warning: Unknown: failed to open stream: Operation not permitted in Unknown on line 0[03-Sep-2021 23:28:18 UTC] PHP Warning: Unknown: open_basedir restriction in effect. File(/data/nginx/test.com/sleep.php) is not within the allowed path(s): (/data/nginx/zzxtest.com:/tmp/) in Unknown on line 0[03-Sep-2021 23:28:18 UTC] PHP Warning: Unknown: failed to open stream: Operation not permitted in Unknown on line 0[03-Sep-2021 23:28:41 UTC] PHP Warning: Unknown: open_basedir restriction in effect. File(/data/nginx/test.com/sleep.php) is not within the allowed path(s): (/data/nginx/zzxtest.com:/tmp/) in Unknown on line 0[03-Sep-2021 23:28:41 UTC] PHP Warning: Unknown: failed to open stream: Operation not permitted in Unknown on line 0# 再次将配置文件修改回来▽root@lnmp php-fpm.d]# vim /usr/local/php-fpm/etc/php-fpm.d/zzx.conf[zzx]listen = /tmp/php-fcgi.socklisten.mode = 666user = php-fpmgroup = php-fpmpm = dynamicpm.max_children = 50pm.start_servers = 20pm.min_spare_servers = 5pm.max_spare_servers = 35pm.max_requests = 500rlimit_files = 1024request_slowlog_timeout = 1slowlog = /usr/local/php-fpm/var/log/zzx-slow.logphp_admin_value[open_basedir]=/data/nginx/test.com:/tmp/# 重启服务,可以正常使用,也没有产生错误日志。[root@lnmp php-fpm.d]# /etc/init.d/php-fpm restartGracefully shutting down php-fpm . doneStarting php-fpm done[root@lnmp php-fpm.d]# curl -x127.0.0.1:80 test.com/sleep.php -IHTTP/1.1 200 OKServer: nginx/1.17.8Date: Fri, 03 Sep 2021 23:32:04 GMTContent-Type: text/html; charset=UTF-8Connection: keep-aliveX-Powered-By: PHP/5.6.30[root@lnmp php-fpm.d]# curl -x127.0.0.1:80 test.com/3.php -IHTTP/1.1 200 OKServer: nginx/1.17.8Date: Fri, 03 Sep 2021 23:32:09 GMTContent-Type: text/html; charset=UTF-8Connection: keep-aliveX-Powered-By: PHP/5.6.30
php-fpm进程管理
pm = dynamic //动态进程管理,也可以是static 如果是静态的,会直接启动最大子进程数
pm.max_children = 50 //最大子进程数,ps aux可以查看
pm.start_servers = 20 //启动服务时会启动的进程数
pm.min_spare_servers = 5 //定义在空闲时段,子进程数的最少数量,如果达到这个数值时,php-fpm服务会自动派生新的子进程。
pm.max_spare_servers = 35 //定义在空闲时段,子进程数的最大值,如果高于这个数值就开始清理空闲的子进程。
pm.max_requests = 500 //定义一个子进程最多处理的请求数,也就是说在一个php-fpm的子进程最多可以处理这么多请求,当达到这个数值时,它会自动退出。

Shell
复制代码
Shell
复制代码
Shell
复制代码
 ">
">