前驱知识准备
模块机制
CMJ 规范的可使用场景:
- 服务端JS应用
- 命令行工具
- 图形化用户界面(GUI)桌面应用
- 混合应用(如Titanium,Adobe AIR等)
模块上下文
module.exports | exports
模块寻径算法
- .js => .json => .node
- 递归父目录的
node_modules模块缓存机制
通常一个包一旦被加载了,那么在第二次执行require()的时候就会在缓存中获取暴露的API,而不会重新加载一遍该模块里面的代码再次返回。
包机制
包描述文件
包目录
- package.json 在根目录下
- 二进制文件应当在bin目录下
- JS源码应当在lib目录下
- 文档应当在doc目录下
- 单元测试文件应当在test目录下
Node依赖简介(deps)
高效的V8
- JIT(Just in time):即时编译,编译出的结果直接是机器语言,而非字节码
- 垃圾回收:借鉴了 JAVA VM 的精确垃圾回收管理,别家是保守垃圾管理
- 内联缓存(InLine Cache):提高属性的访问效率,无须每次访问属性都对哈希表进行一次寻址,有了缓存,V8能立马知道这个属性的偏移量,不用再次计算寻址的偏移量了
-
驱动事件循环的 libuv
基于epoll/kqueue/IOCP/event ports实现的全能事件循环
- 异步TCP和UDP套接字
- 异步DNS解析
- 异步文件、文件系统操作
- 文件系统事件
- ANSI转义码控制的TTY
- 使用UNIX domain 套接字或者命名管道实现的套接字共享IPC
- 子进程
- 线程池
- 信号(Signal)处理
- 高精度时钟
-
http-parser
一个C实现的HTTP消息解析器
无依赖
- 持久化连接的流式处理(keep-alive)
- 分段信息(chunk)的解码
- 缓冲区溢出攻击的防御
- 解析HTTP消息
zlib
提供数据压缩功能的库。
facebook开发的另一套zstd据说压缩比zlib优秀。
环境
node-gyp
npm install -g node-gyp # 全局安装node-gyp -h # 查看帮助NODEJS_ORG_MIRROR=https://npm.taobao.org/mirrors/node node-gyp install # 把当前执行的node.js相应版本的源码头文件、lib文件等下载解压到当前用户目录的.node-gyp目录下node-gyp build # 调用make以构建模块node-gyp clean # 清理生成的构建文件以及out目录node-gyp configure # 为当前模块生成Makefile项目配置文件node-gyp rebuild # 一次性依次执行clean/configure和buildnode-gyp install # 为指定版本的node.js安装开发环境的文件node-gyp list # 输出当前安装的node.js开发环境文件node-gyp remove # 移除指定版本的node.js开发环境文件
:::info 扩展:install命令有一个环境变量NODEJS_ORG_MIRROR,这个变量指向安装包的registry,因此将其设置为阿里巴巴的镜像地址,就能够顺利下载node文件 :::
什么是C++拓展
- 一个编译好的C++模块除了后缀名是.node之外,它其实就是一个系统的动态链接库。相当于Windows下的.dll、Linux下的.so、macOS 下的.dylib
- 在 node.js 中引入一个C++模块的过程实际上就是Node.js在运行时引入了一个动态链接库的过程。
模块加载原理
nodev6.9.4
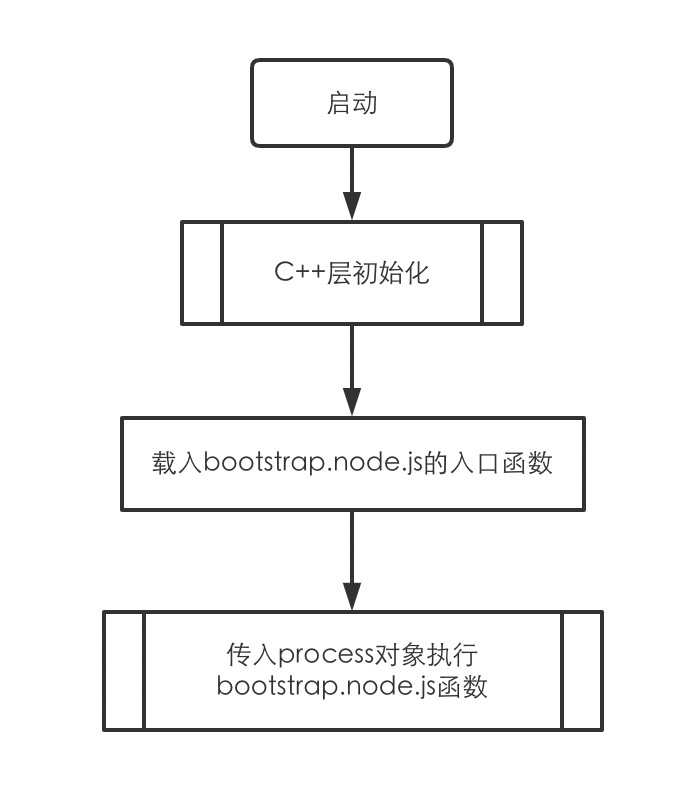
node入口:node_main.cc
Start函数是 node.cc 中的,进一步深入到LoadEnvironment会发现如下代码:int main(int argc, char *argv[]) {// Disable stdio buffering, it interacts poorly with printf()// calls elsewhere in the program (e.g., any logging from V8.)setvbuf(stdout, nullptr, _IONBF, 0);setvbuf(stderr, nullptr, _IONBF, 0);return node::Start(argc, argv);}
这段代码的意思是node.js执行// Execute the lib/internal/bootstrap_node.js file which was included as a// static C string in node_natives.h by node_js2c.// 'internal_bootstrap_node_native' is the string containing that source code.Local<String> script_name = FIXED_ONE_BYTE_STRING(env->isolate(), "bootstrap_node.js");Local<Value> f_value = ExecuteString(env, MainSource(env), script_name);// ...Local<Function> f = Local<Function>::Cast(f_value);// ...// We start the process this way in order to be more modular. Developers// who do not like how bootstrap_node.js sets up the module system but do// like Node's I/O bindings may want to replace 'f' with their own function.Local<Value> arg = env->process_object();f->Call(Null(env->isolate()), 1, &arg);
lib/internal/bootstrap_node.js文件以进行初始化启动。执行该文件后得到的f_value就是bootstrap_node.js文件中所实现的那个函数对象。
SetupProcessObject就是用来实现全局对象process的,可以看到其设置API的部分代码如下:
env->SetMethod(process, "hrtime", Hrtime);env->SetMethod(process, "cpuUsage", CPUUsage);env->SetMethod(process, "dlopen", DLOpen);env->SetMethod(process, "uptime", Uptime);env->SetMethod(process, "memoryUsage", MemoryUsage);env->SetMethod(process, "binding", Binding);
几种模块的加载过程
- C++核心模块:采用纯C++编写,存在于Node.js源码中且编译进Node.js的可执行二进制文件中。
- Node.js内置模块:即lib下以同名JS代码形式实现的模块,也被编译进Node.js的可执行二进制文件中了。
- 用户源码模块:非Node.js内置模块的JS源码模块。如入口模块
-
C++核心模块
static void Binding(const FunctionCallbackInfo<Value>& args) {Environment* env = Environment::GetCurrent(args);// 从参数中获得文件标识的字符串(文件名)并赋值给 module_vLocal<String> module = args[0]->ToString(env->isolate());node::Utf8Value module_v(env->isolate(), module);Local<Object> cache = env->binding_cache_object();Local<Object> exports;if (cache->Has(env->context(), module).FromJust()) {exports = cache->Get(module)->ToObject(env->isolate());args.GetReturnValue().Set(exports);return;}// 将一个字符串附加在 process.moduleLoadList 后面char buf[1024];snprintf(buf, sizeof(buf), "Binding %s", *module_v);Local<Array> modules = env->module_load_list_array();uint32_t l = modules->Length();modules->Set(l, OneByteString(env->isolate(), buf));// 在得到标识字符串后,获取 C++ 核心模块// get_builtin_module 内部就是在 modlist_builtin 的 C++ 核心模块链表上对比文件标识,从而返回相应的模块node_module* mod = get_builtin_module(*module_v);if (mod != nullptr) {exports = Object::New(env->isolate());// 内置的模块对象并没有 "module" 对象,只有 exports.CHECK_EQ(mod->nm_register_func, nullptr);CHECK_NE(mod->nm_context_register_func, nullptr);Local<Value> unused = Undefined(env->isolate());mod->nm_context_register_func(exports, unused,env->context(), mod->nm_priv);cache->Set(module, exports);} else if (!strcmp(*module_v, "constants")) {exports = Object::New(env->isolate());DefineConstants(env->isolate(), exports);cache->Set(module, exports);} else if (!strcmp(*module_v, "natives")) {exports = Object::New(env->isolate());DefineJavaScript(env, exports);cache->Set(module, exports);} else {char errmsg[1024];snprintf(errmsg,sizeof(errmsg),"No such module: %s",*module_v);return env->ThrowError(errmsg);}args.GetReturnValue().Set(exports);}
C++ 核心模块是在 node_module_register中被逐一注册进链表中的。 ```cpp extern “C” void node_module_register(void m) { struct node_module mp = reinterpret_cast
(m); // 如果传入待注册模块的标识位是内置模块,就将其加入C++核心模块的链表中;否则将认为是其他模块 if (mp->nm_flags & NM_F_BUILTIN) { mp->nm_link = modlist_builtin; modlist_builtin = mp; } else if (!node_is_initialized) { // “Linked” modules are included as part of the node project. // Like builtins they are registered before node::Init runs. mp->nm_flags = NM_F_LINKED; mp->nm_link = modlist_linked; modlist_linked = mp; } else { modpending = mp; } }
struct node_module get_builtin_module(const char name) { struct node_module* mp;
for (mp = modlist_builtin; mp != nullptr; mp = mp->nm_link) { if (strcmp(mp->nm_modname, name) == 0) break; }
CHECK(mp == nullptr || (mp->nm_flags & NM_F_BUILTIN) != 0); return (mp); }
node.h 中有一个[`NODE_MODULE_CONTEXT_AWARE_X`](https://github.com/nodejs/node/blob/v6.9.4/src/node.h#L458) 宏是用于注册C++核心模块的。即推测只要在C++核心模块中调用该宏就会被注册进Node.js核心模块链中。<br />我们看看file模块的源码[node_file.cc](https://github.com/nodejs/node/blob/v6.9.4/src/node_file.cc#L1511),其最后一行代码```cppNODE_MODULE_CONTEXT_AWARE_BUILTIN(fs, node::InitFs)
至此,真相大白,基本上每个C++核心模块的源码末尾都有一个宏调用将该模块注册进C++核心模块的链表中,以供process.binding时进行获取。
Node.js内置模块
node的启动脚本lib/internal/bootstrap_node.js中有一个NativeModule的声明,其负责处理Node.js内置模块。
function NativeModule(id) {this.filename = `${id}.js`;this.id = id;this.exports = {};this.loaded = false;this.loading = false;}// NativeModule._source 是 process.binding的返回结果,即DefineJavaScript的处理结果NativeModule._source = process.binding('natives');NativeModule._cache = {};// 当id值为'native_module'时返回它自身,否则就进入到nativeModule.compile进行编译NativeModule.require = function(id) {if (id === 'native_module') {return NativeModule;}//...process.moduleLoadList.push(`NativeModule ${id}`);const nativeModule = new NativeModule(id);nativeModule.cache();nativeModule.compile();return nativeModule.exports;};// ...NativeModule.getSource = function(id) {return NativeModule._source[id];};NativeModule.wrap = function(script) {return NativeModule.wrapper[0] + script + NativeModule.wrapper[1];};NativeModule.wrapper = ['(function (exports, require, module, __filename, __dirname) { ','\n});'];NativeModule.prototype.compile = function() {// 通过 NativeModule.getSource 获取源码,其返回的是 NativeModule._source 数组中的相应内容var source = NativeModule.getSource(this.id);source = NativeModule.wrap(source);this.loading = true;try {const fn = runInThisContext(source, {filename: this.filename,lineOffset: 0,displayErrors: true});// 进行包裹,形成一段闭包代码,之后将其放入到 vm 中运行,并传入事先准备好的 module 和 exports 对象供其导出fn(this.exports, NativeModule.require, this, this.filename);this.loaded = true;} finally {this.loading = false;}};
在 src/node_javascript.cc 中有一个DefineJavaScript,它做的事情就是遍历一遍natives数组里面的内容,并将其一一加入要返回的对象中,其中对象名的键名为源码文件名标识,键值是源码本体的字符串。
那这个natives 又是怎么来的呢——是 node.gyp 编译而来。node.gyp 其中有一步是 node_js2c,这一步就是用 Python 去调用 tools/js2c.py 的文件,其主要作用就是将lib下的JS文件转换成 src/node_natives.h 文件。这个src/node_natives.h 会在Node.js编译前完成,这样在编译到src/node_javascript.cc 时它所需要的 src/node_natives.h 头文件就存在了。
也就是说,在Node.js中调用 NativeModule.require 时,会根据传入的文件标识来返回相应的 JS 源文件内容。
用户源码模块
与内置模块类似,会被加上一个闭包的头尾,然后Node.js执行这个闭包产生结果。
在源码中执行的require()就是lib/module.js中的Module类实例对象的require()函数
Module.prototype.require = function(path) {assert(path, 'missing path');assert(typeof path === 'string', 'path must be a string');return Module._load(path, this, /* isMain */ false);};
即直接调用了静态函数Module._load
Module._load = function(request, parent, isMain) {// ...var filename = Module._resolveFilename(request, parent, isMain);var cachedModule = Module._cache[filename];if (cachedModule) {return cachedModule.exports;}if (NativeModule.nonInternalExists(filename)) {debug('load native module %s', request);return NativeModule.require(filename);}var module = new Module(filename, parent);if (isMain) {process.mainModule = module;module.id = '.';}Module._cache[filename] = module;tryModuleLoad(module, filename); // 尝试载入模块return module.exports;};
function tryModuleLoad(module, filename) {var threw = true;try {module.load(filename);threw = false;} finally {if (threw) {delete Module._cache[filename];}}}
load()相当于一个适配器,根据传进来的文件名的后缀名不同,会使用不同的载入规则:
Module.prototype.load = function(filename) {debug('load %j for module %j', filename, this.id);assert(!this.loaded);this.filename = filename;this.paths = Module._nodeModulePaths(path.dirname(filename));var extension = path.extname(filename) || '.js';if (!Module._extensions[extension]) extension = '.js';Module._extensions[extension](this, filename);this.loaded = true;};
默认有3种规则:
- Module._extensions[“.js”]
- Module._extensions[“.json”]
Module._extensions[“.node”]
// Native extension for .jsModule._extensions['.js'] = function(module, filename) {var content = fs.readFileSync(filename, 'utf8');module._compile(internalModule.stripBOM(content), filename);};
Module._extensions['.js']这种规则做了两件事情:同步读取源码的内容,使用
fs.readFileSync(filename, 'utf8');调用
module._compile()编译源码并执行 ```cpp // 生成闭包源码,然后传入相应的函数执行 Module.prototype._compile = function(content, filename) { // Remove shebang var contLen = content.length; if (contLen >= 2) { if (content.charCodeAt(0) === 35/#/ &&content.charCodeAt(1) === 33/*!*/) {if (contLen === 2) {// Exact matchcontent = '';} else {// Find end of shebang line and slice it offvar i = 2;for (; i < contLen; ++i) {var code = content.charCodeAt(i);if (code === 10/*\n*/ || code === 13/*\r*/)break;}if (i === contLen)content = '';else {// Note that this actually includes the newline character(s) in the// new output. This duplicates the behavior of the regular expression// that was previously used to replace the shebang linecontent = content.slice(i);}}
} }
// 生成闭包源码 var wrapper = Module.wrap(content); // 用 vm 编译 wrapper var compiledWrapper = vm.runInThisContext(wrapper, { filename: filename, lineOffset: 0, displayErrors: true });
if (process._debugWaitConnect && process._eval == null) { if (!resolvedArgv) {
// we enter the repl if we're not given a filename argument.if (process.argv[1]) {resolvedArgv = Module._resolveFilename(process.argv[1], null);} else {resolvedArgv = 'repl';}
}
// Set breakpoint on module start if (filename === resolvedArgv) {
delete process._debugWaitConnect;const Debug = vm.runInDebugContext('Debug');Debug.setBreakPoint(compiledWrapper, 0, 0);
} } var dirname = path.dirname(filename); var require = internalModule.makeRequireFunction.call(this); var args = [this.exports, require, this, filename, dirname]; var depth = internalModule.requireDepth; if (depth === 0) stat.cache = new Map(); var result = compiledWrapper.apply(this.exports, args); if (depth === 0) stat.cache = null; return result; };
- 开发者调用`require(filename)`(等同于调用`module.load(filename);`)- 源码加闭包马甲:一个模块的源码经过闭包化后,就形成了一个接收exports、require、module、__filename和__dirname的闭包函数。这就是我们平时编写代码的时候能直接使用exports、require、module等内容的原因了。在我们编写的源码模块被载入的时候,这些变量会随着闭包传进来而被使用。这个闭包会在第一次加载该模块的时候执行一次,之后就一直存在于模块缓存中(除非手动清除缓存)。也即一个模块逻辑代码只会被执行一次。- 用 `vm` 编译 `wrapper`- 传入参数执行`vm`<a name="JcP0J"></a>#### 入口模块[src/node_main.cc](https://github.com/nodejs/node/blob/master/src/node_main.cc#L127)```cppreturn node::Start(argc, argv);
C++拓展模块
用户源码模块和C++扩展模块加载的区别是通后后缀名来区分的。Module._extensions[".node"]则是C++拓展模块。
Module._extensions['.node'] = function(module, filename) {return process.dlopen(module, path._makeLong(filename));};
实际调用的就是在src/node.cc中SetupProcessObject里挂载上去的DLOpen
env->SetMethod(process, "dlopen", DLOpen);
// DLOpen is process.dlopen(module, filename).// Used to load 'module.node' dynamically shared objects.// FIXME(bnoordhuis) Not multi-context ready. TBD how to resolve the conflict// when two contexts try to load the same shared object. Maybe have a shadow// cache that's a plain C list or hash table that's shared across contexts?void DLOpen(const FunctionCallbackInfo<Value>& args) {Environment* env = Environment::GetCurrent(args);uv_lib_t lib;CHECK_EQ(modpending, nullptr);if (args.Length() != 2) {env->ThrowError("process.dlopen takes exactly 2 arguments.");return;}Local<Object> module = args[0]->ToObject(env->isolate()); // Castnode::Utf8Value filename(env->isolate(), args[1]); // Cast// 使用uv_dlopen加载链接库const bool is_dlopen_error = uv_dlopen(*filename, &lib);// Objects containing v14 or later modules will have registered themselves// on the pending list. Activate all of them now. At present, only one// module per object is supported.node_module* const mp = modpending;modpending = nullptr;if (is_dlopen_error) {Local<String> errmsg = OneByteString(env->isolate(), uv_dlerror(&lib));uv_dlclose(&lib);#ifdef _WIN32// Windows needs to add the filename into the error messageerrmsg = String::Concat(errmsg, args[1]->ToString(env->isolate()));#endif // _WIN32env->isolate()->ThrowException(Exception::Error(errmsg));return;}if (mp == nullptr) {uv_dlclose(&lib);env->ThrowError("Module did not self-register.");return;}if (mp->nm_version != NODE_MODULE_VERSION) {char errmsg[1024];snprintf(errmsg,sizeof(errmsg),"Module version mismatch. Expected %d, got %d.",NODE_MODULE_VERSION, mp->nm_version);// NOTE: `mp` is allocated inside of the shared library's memory, calling// `uv_dlclose` will deallocate ituv_dlclose(&lib);env->ThrowError(errmsg);return;}if (mp->nm_flags & NM_F_BUILTIN) {uv_dlclose(&lib);env->ThrowError("Built-in module self-registered.");return;}// 将加载的链接库句柄转移到 mp 上mp->nm_dso_handle = lib.handle;mp->nm_link = modlist_addon;modlist_addon = mp;Local<String> exports_string = env->exports_string();// exports_string其实就是 exports// 这句的意思是`exports = module.exports`Local<Object> exports = module->Get(exports_string)->ToObject(env->isolate());if (mp->nm_context_register_func != nullptr) {mp->nm_context_register_func(exports, module, env->context(), mp->nm_priv);} else if (mp->nm_register_func != nullptr) {mp->nm_register_func(exports, module, mp->nm_priv);} else {uv_dlclose(&lib);env->ThrowError("Module has no declared entry point.");return;}// Tell coverity that 'handle' should not be freed when we return.// coverity[leaked_storage]}
DLOpen先使用uv_dlopen(*filename, &lib)打开了*.node扩展(动态链接库),将其载入到内存uv_lib_t中,然后通过
V8 基础
V8 宿主:
- chrome宿主:HTML DOM、window对象等内容
- node 宿主:沙盒机制(VM)、文件系统、网络操作等
Node:
- V8: JS 运行时,用于解释执行JS
- libuv: 实现了“事件循环”
内存机制
JS的数据类型都是由V8内部的内存机制进行管理的。即V8创建的数据存储单元只能被它的内存回收机制所回收,而不能被我们自己进行管理。
V8 堆内存:
- 新生代内存区:基本的数据对象都会被分配到这里。特点是小而频。
- 老生代指针区:这是一堆指向老生代内存区具体数据内容的指针。基本上从新生代蜕变过来的对象都会被移动至此。
- 老生代数据区:存放数据对象,而不是指向其他对象的指针。老生代指针区的指针就往这边指
- 大对象区:这里存放体积超越其他区大小的对象,每个对象有自己的内存,垃圾回收并不会移动大对象。
- 代码区:代码对象(就是包含JIT之后指令的对象)会被分配到这里。这是唯一拥有执行权限的内存区
- Cell区、属性Cell区、Map区:存放cell、属性cell 和 Map,每个区域都是存放相同大小的元素,结构简单。
新生代内存区
Scavenge 算法:将内存一分为二,有较大的空间浪费
- From空间:处于使用状态
- To空间:处于闲置状态
在分配对象时,总使用 From空间进行分配;
在 GC 时,V8 检查 From 空间中的存活对象,将这些对象复制到 To 空间中,剩下的对象就会被释放,完成复制后From 和 To 角色对调。
经过多次新生代 GC 后如果某个对象依旧坚挺,则会被晋升到老生代内存。
- 至少经历过一次 GC 的过程
- 如果 To 的使用空间已经超过了25%
老生代内存
这里保存的对象都是些生命周期很长甚至是常驻内存的对象,且老生代占用的内存较多。
- Mark-Sweep(标记清除)
- 标记:遍历,并标记活着的对象
- 清除:只清除没有被标记的对象
- Mark-Compact(标记整理)
- 在清除的时候,让活着的剩余对象尽可能往内存区域前面靠
- 即内存区域的紧缩
- 惰性清理:因为标记了,所以直到哪些是活得,哪些是死的,因此不会实时清理,会根据自身需要延迟清理。
隔离实例(Isolate)
Isolate 就是 V8 引擎的实例,也可以理解为引擎本体。Isolate 内部拥有完全独立的各种状态、包括堆管理、垃圾回收等,但是不执行JS。可被创建多个。上下文(Context)
Context 用来定义 JS 的执行环境。可以理解为一个沙箱化的执行上下文环境,内部预置了一系列的对象和函数。脚本(Script)
Script是一个包含一段已经编译好的JS脚本的对象,数据类型就是Script。它在编译时就与一个处于活动状态的上下文进行绑定。
句柄(Handle)
句柄是用于获取JS对象实体的一种事物,有有效句柄连接的对象实体不会被垃圾回收器进行回收,而失去了所有句柄引用的对象实体会被认为是垃圾,从而在下次垃圾回收的时候被释放。
句柄类型:
- 本地句柄(v8::Local): 存在于栈内存中,并在对应的析构函数被调用时被删除。生命周期由句柄作用域决定。
- 创建:new()
- 清除:clear()
- 是否为空:isEmpty()
- 转换数据类型:As/Cast
- 持久句柄(v8::Persistent): 存在于堆内存中,
- 清除:clear()
- 是否为空:isEmpty
- 置为弱持久句柄:SetWeak()
- 取消弱持久句柄:ClearWeak()
- 标记独立句柄:MarkIndependent()
- 是否为弱的:isWeak()
- 是否为独立的:isIndependent()
- 永生句柄(v8::Eternal)
- 待实本地句柄
- 其他句柄
句柄的存在形式是C++的一个模板类,其需要根据不同的V8数据类型进行不同的声明。
句柄作用域
句柄作用域实际上是维护一堆句柄的类。以栈的形式一层一层套着,存在于Isolate实例中,栈顶的作用域是当前活动作用域,每次新建对象时得到的句柄都会与当前活动作用域绑定,当一个句柄作用域对象的析构函数被调用时,在这个作用域中创建的所有句柄都会被从栈中抹去。于是,通常情况下这些句柄所指的对象将会失去所有引用,然后会被垃圾回收器统一处理。这里有一种例外,就是可逃句柄作用域所设置的已逃脱句柄可以逃过一劫。
上下文(Context)
Context是独立且允许存在多个的,是JS代码的执行环境。一个Context为JS的执行提供了内置的对象和方法。
node 的内置模块 vm 的本质就是利用 Context 可以多个的特性。
lib/vm.js
模板(Template)
V8中的模板指的是在Context中JS对象及函数的一个模具。
Template的派生类
- 函数模板(Function Template)
-
常用数据类型
Value
- String
- Number
- Integer
- Int32
- Uint32
- Boolean
- Object
- Function
- Array
- FunctionCallbackInfo
-
异常
TryCatch对象:对应JS中的 try-catch 代码块
- Isolate::Throw-Exception:对应 JS 的 throw 操作
Exception::Error: 对应 new Error 操作,并且这个静态类能生成的不只是普通的 Error 对象,还能生成诸如SyntaxError 等错误对象。
资源工具
NodeJS使用淘宝npm镜像站的各种姿势:https://www.jianshu.com/p/253cb9003411
- node-scripts:https://docs.npmjs.com/misc/scripts
- V8: http://developers.google.com/v8/

若有收获,就点个赞吧
0 人点赞
