ArrayList
要点总结:
- ArrayList中维护了一个Object类型的数组elementData;
- 当创建对象时,如果使用的是无参构造器,则初始elementData容量为0(jdk7是10);
- 如果使用的是指定容量capacity的构造器,则初始elementData容量为capacity;
- 当添加元素时,先判断是否需要扩容,如果需要扩容,则调用grow方法,否则直接添加元素到合适位置;
- 如果使用的是无参构造器,如果第一次添加,需要扩容的话则扩容elementData为10,如果需要再次扩容的话elementData为1.5倍;
- 如果使用的是指定容量capacity的构造器,如果需要扩容,则直接扩容elementData为1.5倍。
属性
public class ArrayList<E> extends AbstractList<E>implements List<E>, RandomAccess, Cloneable, java.io.Serializable{private static final long serialVersionUID = 8683452581122892189L;/*** 初始容量*/private static final int DEFAULT_CAPACITY = 10;/*** 空对象*/private static final Object[] EMPTY_ELEMENTDATA = {};/*** 一个空对象,如果使用默认构造函数创建,则默认对象内容默认是该值*/private static final Object[] DEFAULTCAPACITY_EMPTY_ELEMENTDATA = {};/*** 当前数据对象存放地方,当前对象不参与序列化*/transient Object[] elementData;/*** 当前数组长度*/private int size;/*** 最大长度*/private static final int MAX_ARRAY_SIZE = Integer.MAX_VALUE - 8;...}
构造方法
public ArrayList() {this.elementData = DEFAULTCAPACITY_EMPTY_ELEMENTDATA;}
无参构造方法创建时,会默认创建容量为空的Object数组,而不是10,只有当add()时,才分配大小。
add()
public boolean add(E e) {ensureCapacityInternal(size + 1);elementData[size++] = e;return true;}
首先会先判断是否需要扩容,不需要就使用数组添加元素的方法。
grow()
private void grow(int minCapacity) {// overflow-conscious codeint oldCapacity = elementData.length;int newCapacity = oldCapacity + (oldCapacity >> 1);if (newCapacity - minCapacity < 0)newCapacity = minCapacity;if (newCapacity - MAX_ARRAY_SIZE > 0)newCapacity = hugeCapacity(minCapacity);// minCapacity is usually close to size, so this is a win:elementData = Arrays.copyOf(elementData, newCapacity);}
扩容时,会扩容1.5倍,同时进行最小最大容量判断,最后通过Arrays.copyOf()来复制新的数组。
LinkedList
LinkedList底层维护着一个Node组成的双向链表。
Node内部类
private static class Node<E> {E item;Node<E> next;Node<E> prev;Node(Node<E> prev, E element, Node<E> next) {this.item = element;this.next = next;this.prev = prev;}}
它有着指向上一个结点的prev以及指向下一个结点的next。
属性
transient int size = 0;// 指向第一个结点transient Node<E> first;// 指向最后一个结点transient Node<E> last;
add
public boolean add(E e) {linkLast(e);return true;}/*** 添加为链尾元素*/void linkLast(E e) {final Node<E> l = last;final Node<E> newNode = new Node<>(l, e, null);last = newNode;if (l == null)first = newNode;elsel.next = newNode;size++;modCount++;}
从源码看出,add()方法是添加链尾元素。
get
public E get(int index) {// 下标合法性检查checkElementIndex(index);// 进行遍历搜索return node(index).item;}Node<E> node(int index) {// assert isElementIndex(index);// 小于size/2,从左向右遍历if (index < (size >> 1)) {Node<E> x = first;for (int i = 0; i < index; i++)x = x.next;return x;} else {// 大于size/2,从右向左遍历Node<E> x = last;for (int i = size - 1; i > index; i--)x = x.prev;return x;}}
当进行get获取元素的时候,首先进行下标的合法性检查,检查完毕后,如果下标小于size/2,从左向右遍历搜索;否则从右向左遍历搜索。
remove
public E remove(int index) {checkElementIndex(index);return unlink(node(index));}E unlink(Node<E> x) {// assert x != null;final E element = x.item;final Node<E> next = x.next;final Node<E> prev = x.prev;if (prev == null) {first = next;} else {prev.next = next;x.prev = null;}if (next == null) {last = prev;} else {next.prev = prev;x.next = null;}x.item = null;size--;modCount++;return element;}
同样的,删除元素时,先判断下标合法性,查找对应元素,然后执行链表的删除流程。
除了List接口的几个方法外,LinkedList还实现了Deque的几个方法,如addFirst(E e),addLast(E e),push(E e),peek()方法等。
CopyOnWriteArrayList
ArrayList线程不安全场景
由于添加元素为elementData[size++] = e,可能elementData[1]的值可能被赋值两次,而size++执行了两次,导致elementData[2]为空;
也有可能是elementData需要扩容了,但是多线程并发导致都判断为不需要扩容,刚好放下,所以会抛出越界异常。
属性
public class CopyOnWriteArrayList<E>implements List<E>, RandomAccess, Cloneable, java.io.Serializable {private static final long serialVersionUID = 8673264195747942595L;/** The lock protecting all mutators */final transient ReentrantLock lock = new ReentrantLock();/** The array, accessed only via getArray/setArray. */private transient volatile Object[] array;}
主要有两个关键属性,一个是ReentrantLock,一个是Object数组。
add
public boolean add(E e) {final ReentrantLock lock = this.lock;lock.lock();try {Object[] elements = getArray();int len = elements.length;Object[] newElements = Arrays.copyOf(elements, len + 1);newElements[len] = e;setArray(newElements);return true;} finally {lock.unlock();}}
首先会锁住,然后创建新的数组,然后添加元素到新数组中,这样可以保持读写分离。因为读的时候还是老的array。
HashMap
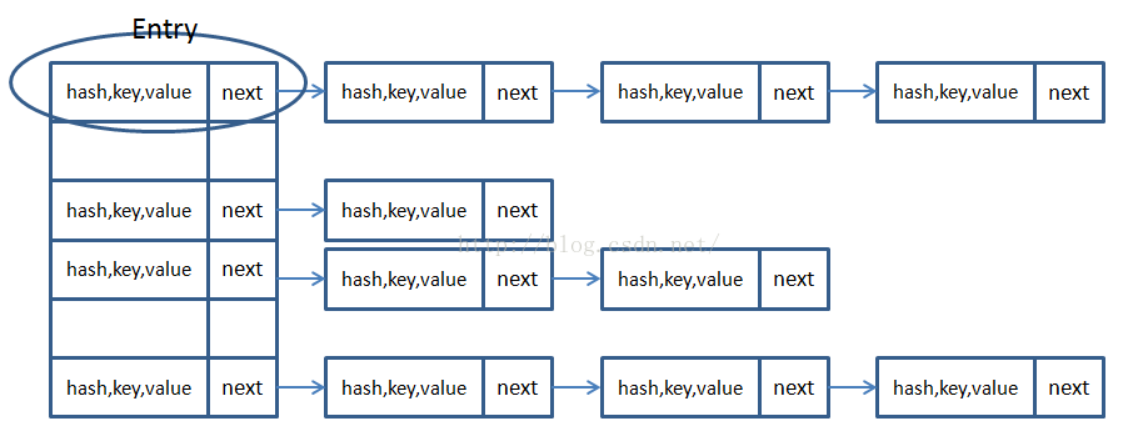
HashMap主要是采用数组加链表的形式存储k,v的一种Java集合类。通过计算key的hash值,将其散列到数组上。如果造成Hash冲突的话会在数组这个位置上加一个链表,当链表长度超过8的时候,会转成红黑树,目的是为了节省查询开销。
属性
public class HashMap<K,V> extends AbstractMap<K,V>implements Map<K,V>, Cloneable, Serializable {private static final long serialVersionUID = 362498820763181265L;// 初始容量为16static final int DEFAULT_INITIAL_CAPACITY = 1 << 4;// 最大容量static final int MAXIMUM_CAPACITY = 1 << 30;// 扩容因子static final float DEFAULT_LOAD_FACTOR = 0.75f;// 转红黑树的阈值static final int TREEIFY_THRESHOLD = 8;// 转链表的阈值static final int UNTREEIFY_THRESHOLD = 6;// 转红黑树的最小容量static final int MIN_TREEIFY_CAPACITY = 64;// 桶数组,使用transient表示不用进行序列化,原因是数据数量会小于数组容量,造成空数据的缓存, 同时序列化后的散列函数不一定一样,可能造成数据错位transient Node<K,V>[] table;// 映射的视图transient Set<Map.Entry<K,V>> entrySet;// 集合元素的数量transient int size;// 修改次数,用于快速失败transient int modCount;// 扩容后的容量阈值int threshold;// 加载因子final float loadFactor;static class Node<K,V> implements Map.Entry<K,V> {final int hash;final K key;V value;Node<K,V> next;...}...}
hash
static final int hash(Object key) {int h;return (key == null) ? 0 : (h = key.hashCode()) ^ (h >>> 16);}
可以发现,HashMap key可以为null,同时求hash是通过高低十六位异或得出的,目的是为了更好地散列。
get
public V get(Object key) {Node<K,V> e;return (e = getNode(hash(key), key)) == null ? null : e.value;}final Node<K,V> getNode(int hash, Object key) {Node<K,V>[] tab; Node<K,V> first, e; int n; K k;// first=tab[(n-1)&hash]表示查找节点散列到桶上的值if ((tab = table) != null && (n = tab.length) > 0 &&(first = tab[(n - 1) & hash]) != null) {// 先检查这个链表上的第一个元素的hash值if (first.hash == hash &&((k = first.key) == key || (key != null && key.equals(k))))return first;if ((e = first.next) != null) {if (first instanceof TreeNode)// 如果是树类型,进入树的get逻辑return ((TreeNode<K,V>)first).getTreeNode(hash, key);do {// 否则循环查找if (e.hash == hash &&((k = e.key) == key || (key != null && key.equals(k))))return e;} while ((e = e.next) != null);}}return null;}
get()步骤如下:
- 先查找当前结点散列到桶上的位置,使用(n-1)&hash来计算;
- 判断第一个元素是否就是预期值;
- 如果不是判断是否是红黑树,如果是红黑树进入树的get逻辑;
- 循环链表查找元素。
put
public V put(K key, V value) {return putVal(hash(key), key, value, false, true);}final V putVal(int hash, K key, V value, boolean onlyIfAbsent,boolean evict) {Node<K,V>[] tab; Node<K,V> p; int n, i;// 参数校验阶段if ((tab = table) == null || (n = tab.length) == 0)n = (tab = resize()).length;if ((p = tab[i = (n - 1) & hash]) == null)// 如果桶上此位置没有元素,就插入tab[i] = newNode(hash, key, value, null);else {Node<K,V> e; K k;if (p.hash == hash &&((k = p.key) == key || (key != null && key.equals(k))))e = p;else if (p instanceof TreeNode)// 如果是红黑树,转树的逻辑e = ((TreeNode<K,V>)p).putTreeVal(this, tab, hash, key, value);else {// 链表for (int binCount = 0; ; ++binCount) {if ((e = p.next) == null) {p.next = newNode(hash, key, value, null);if (binCount >= TREEIFY_THRESHOLD - 1)// 如果元素超过8,就树化treeifyBin(tab, hash);break;}if (e.hash == hash &&((k = e.key) == key || (key != null && key.equals(k))))break;p = e;}}if (e != null) { // existing mapping for keyV oldValue = e.value;if (!onlyIfAbsent || oldValue == null)e.value = value;afterNodeAccess(e);return oldValue;}}++modCount;if (++size > threshold)// 判断是否需要扩容resize();afterNodeInsertion(evict);return null;}
push()步骤如下:
- 参数校验,判断table是否需要初始化;
- 计算散列值,判断位置上的元素是否为空,如果为空就新建Node结点插入;
- 判断是否是红黑树,如果是红黑树就进入树的插入逻辑;
- 进入链表插入逻辑,如果插入后的元素值大于8就转红黑树;
- 插入完成后,判断容器是否需要扩容。
resize
final Node<K,V>[] resize() {Node<K,V>[] oldTab = table;int oldCap = (oldTab == null) ? 0 : oldTab.length;int oldThr = threshold;int newCap, newThr = 0;// 旧桶不为空if (oldCap > 0) {if (oldCap >= MAXIMUM_CAPACITY) {threshold = Integer.MAX_VALUE;return oldTab;}else if ((newCap = oldCap << 1) < MAXIMUM_CAPACITY &&oldCap >= DEFAULT_INITIAL_CAPACITY)// 新桶长度为旧桶的两倍newThr = oldThr << 1;}else if (oldThr > 0) // initial capacity was placed in thresholdnewCap = oldThr;else {// 初始化桶newCap = DEFAULT_INITIAL_CAPACITY;newThr = (int)(DEFAULT_LOAD_FACTOR * DEFAULT_INITIAL_CAPACITY);}if (newThr == 0) {// 新桶的阈值为容量*0.75float ft = (float)newCap * loadFactor;newThr = (newCap < MAXIMUM_CAPACITY && ft < (float)MAXIMUM_CAPACITY ?(int)ft : Integer.MAX_VALUE);}threshold = newThr;@SuppressWarnings({"rawtypes","unchecked"})// 构造新桶Node<K,V>[] newTab = (Node<K,V>[])new Node[newCap];table = newTab;if (oldTab != null) {// 迁移原桶中的数据for (int j = 0; j < oldCap; ++j) {Node<K,V> e;if ((e = oldTab[j]) != null) {oldTab[j] = null;if (e.next == null)// 只有一个元素newTab[e.hash & (newCap - 1)] = e;else if (e instanceof TreeNode)// 红黑树的逻辑((TreeNode<K,V>)e).split(this, newTab, j, oldCap);else {// 迁移链表Node<K,V> loHead = null, loTail = null;Node<K,V> hiHead = null, hiTail = null;Node<K,V> next;do {next = e.next;// 拆分为两个链表// 最高位==0,说明索引不变if ((e.hash & oldCap) == 0) {if (loTail == null)loHead = e;elseloTail.next = e;loTail = e;}// 最高位==1,说明索引发生了改变else {if (hiTail == null)hiHead = e;elsehiTail.next = e;hiTail = e;}} while ((e = next) != null);if (loTail != null) {loTail.next = null;// 放在新桶的相同下标j处newTab[j] = loHead;}if (hiTail != null) {hiTail.next = null;// 放在新桶下标j+oldCap处newTab[j + oldCap] = hiHead;}}}}}return newTab;}
resize()步骤如下:
- 设置新桶的容量以及重新设置扩容阈值;
- 循环迁移,判断当前索引下元素数量是否为1,为1则直接迁移;
- 判断是否是红黑树,是的话进入树的迁移逻辑;
- 进入链表的迁移逻辑,创建两个链表,根据hash&oldCap==0来插入对应的数据,如果是等于0,就放入新表的原位置上,否则放在新表(原位置+oldCap)位置上。
treeifyBin
红黑树:
- 一个节点标记为红色或者黑色。
- 根是黑色的。
- 如果一个节点是红色的,那么它的子节点必须是黑色的(这就是为什么叫红黑树)。
- 一个节点到到一个null引用的每一条路径必须包含相同数目的黑色节点(所以红色节点不影响)。
红黑树的几个特色:
- 新加入的节点必须是红色的,因为加入黑色节点会破坏该路径上黑色节点的数量。
- 与AVL树相比,节点不用保存节点高度变量,节省内存,同时,不是以递归实现,而是以循环实现,最坏时间复杂度为O(logN)。
- 有三种变换,分别是单旋转、双旋转(两次相反的旋转),上下颠倒(最后一个变换是指当两个子节点都是红色,为了防止冲突,则将两个叶子结点变为黑色,根结点先变红,再变黑)。
final void treeifyBin(Node<K,V>[] tab, int hash) {int n, index; Node<K,V> e;if (tab == null || (n = tab.length) < MIN_TREEIFY_CAPACITY)// 扩容resize();else if ((e = tab[index = (n - 1) & hash]) != null) {TreeNode<K,V> hd = null, tl = null;do {// 将节点包装成TreeNodeTreeNode<K,V> p = replacementTreeNode(e, null);if (tl == null)hd = p;else {// 将所有节点连接成链表结构p.prev = tl;tl.next = p;}tl = p;} while ((e = e.next) != null);if ((tab[index] = hd) != null)// 对链表进行树化hd.treeify(tab);}}final void treeify(Node<K,V>[] tab) {TreeNode<K,V> root = null;// for循环遍历链表for (TreeNode<K,V> x = this, next; x != null; x = next) {next = (TreeNode<K,V>)x.next;x.left = x.right = null;if (root == null) {x.parent = null;x.red = false;root = x;}else {K k = x.key;int h = x.hash;Class<?> kc = null;// 此时已经有了根节点,现在进行for循环自顶向下进行添加for (TreeNode<K,V> p = root;;) {int dir, ph;K pk = p.key;if ((ph = p.hash) > h)dir = -1;else if (ph < h)dir = 1;else if ((kc == null &&(kc = comparableClassFor(k)) == null) ||(dir = compareComparables(kc, k, pk)) == 0)dir = tieBreakOrder(k, pk);TreeNode<K,V> xp = p;// 找到适合添加的位置if ((p = (dir <= 0) ? p.left : p.right) == null) {x.parent = xp;if (dir <= 0)xp.left = x;elsexp.right = x;// 维护添加后红黑树的红黑结构,具体有左旋转和右旋转等root = balanceInsertion(root, x);break;}}}}moveRootToFront(tab, root);}
treeifyBin()步骤如下:
- 首先判断是否需要扩容;
- 将节点包装成Node,构造成链表的结构;
将链表树化,自顶向下构造红黑树,每构造完一个节点,就通过balanceInsertion方法维护红黑树,具体有左旋转和右旋转。
线程不安全场景
多线程插入会互相覆盖值的问题;
- 1.7版本扩容时使用头插法可能造成环形链表。
null场景
hashMap支持key和value为null,但是null作为key只能有一个,null作为value可以有多个。key为null hash值为0。为什么扩容因子选择0.75?
加载因子 = 填入哈希表中的数据个数 / 哈希表的长度
这就意味着:
- 加载因子越小,填满的数据就越少,哈希冲突的几率就减少了,但浪费了空间,而且还会提高扩容的触发几率;
- 加载因子越大,填满的数据就越多,空间利用率就高,但哈希冲突的几率就变大了。
为什么扩容乘以2?
一方面扩容乘以2可以保证空间永远是2的幂次,获取桶可以通过位运算,提高效率;还有另外一个原因,那就是在扩容迁移的时候不需要再重新通过哈希定位新的位置了。扩容后,元素新的位置,要么在原脚标位,要么在原脚标位+扩容长度这么一个位置是否移位,由扩容后表示的最高位是否1为所决定,由于移动的方向只有一个,即向高位移动。因此,可以根据对最高位进行检测的结果来决定是否移位,从而可以优化性能,不用每一个元素都进行移位,因为为0说明刚好在移位完之后的位置,为1说明需要移动oldCap。
ConcurrentHashMap
HashMap的线程安全版本,并且是fast-safe。在jdk1.8是使用CAS+Sychronized实现的,jdk1.7是使用分段锁实现的,为什么放弃分段锁官方的说法如下:
- 加入多个分段锁浪费内存空间,毕竟只有链表的头结点与红黑树的根结点需要同步。
- 生产环境中,map 在放入时竞争同一个锁的概率非常小,分段锁反而会造成更新等操作的长时间等待。
- 为了提高 GC 的效率。
1.7版本
分段锁概念
先分段再锁,将原本的一整个的Entry数组分成了若干段,分别将这若干段放在了不同的新的Segment数组中(分房间),每个Segment有各自的锁,以此提高效率。
1.7版本ConcurrentHashMap 与HashMap和Hashtable 最大的不同在于:put和 get 两次Hash到达指定的HashEntry,第一次hash到达Segment,第二次到达Segment里面的Entry,然后在遍历entry链表.获取数目
多线程下,size是不准确的,可能随时有删除,添加,所以这边需要特殊处理:
使用不加锁的模式去尝试多次计算ConcurrentHashMap的size,最多三次,比较前后两次计算的结果,结果一致就认为当前没有元素加入,计算的结果是准确的;如果不一致,则会给每个Segment加上锁,然后计算ConcurrentHashMap的size返回。属性
public class ConcurrentHashMap<K,V> extends AbstractMap<K,V>implements ConcurrentMap<K,V>, Serializable {private static final long serialVersionUID = 7249069246763182397L;private static final int MAXIMUM_CAPACITY = 1 << 30;private static final int DEFAULT_CAPACITY = 16;static final int MAX_ARRAY_SIZE = Integer.MAX_VALUE - 8;private static final int DEFAULT_CONCURRENCY_LEVEL = 16;private static final float LOAD_FACTOR = 0.75f;static final int TREEIFY_THRESHOLD = 8;static final int UNTREEIFY_THRESHOLD = 6;static final int MIN_TREEIFY_CAPACITY = 64;private static final int MIN_TRANSFER_STRIDE = 16;// sizeCtl用于生成stamp的位数private static int RESIZE_STAMP_BITS = 16;/* ---------------- Fields -------------- */transient volatile Node<K,V>[] table;// 只有扩容时才不为空private transient volatile Node<K,V>[] nextTable;// 计数器,通过CAS更新private transient volatile long baseCount;// 0默认值,-1表示正在哈希表初始化,大于0表示threshold,小于-1表示多个线程在扩容private transient volatile int sizeCtl;...}
initTable
private final Node<K,V>[] initTable() {Node<K,V>[] tab; int sc;// 参数校验while ((tab = table) == null || tab.length == 0) {// sizeCtl<0,说明正在初始化,直接放弃操作if ((sc = sizeCtl) < 0)Thread.yield(); // lost initialization race; just spinelse if (U.compareAndSwapInt(this, SIZECTL, sc, -1)) {try {// 双重校验if ((tab = table) == null || tab.length == 0) {int n = (sc > 0) ? sc : DEFAULT_CAPACITY;@SuppressWarnings("unchecked")Node<K,V>[] nt = (Node<K,V>[])new Node<?,?>[n];table = tab = nt;// 阈值=n*0.75sc = n - (n >>> 2);}} finally {// 设置阈值sizeCtl = sc;}break;}}return tab;}
初始化表时,只允许一个线程对表进行初始化,如果有其他线程进来了,就执行Thread.yield()。
helpTransfer
final Node<K,V>[] helpTransfer(Node<K,V>[] tab, Node<K,V> f) {Node<K,V>[] nextTab; int sc;if (tab != null && (f instanceof ForwardingNode) &&(nextTab = ((ForwardingNode<K,V>)f).nextTable) != null) {// 返回16位的扩容校验标识int rs = resizeStamp(tab.length);while (nextTab == nextTable && table == tab &&(sc = sizeCtl) < 0) {// 判断校验标识是否相等,如果不相等或者扩容已经完成,直接退出循环if ((sc >>> RESIZE_STAMP_SHIFT) != rs || sc == rs + 1 ||sc == rs + MAX_RESIZERS || transferIndex <= 0)break;if (U.compareAndSwapInt(this, SIZECTL, sc, sc + 1)) {// sc+1表示新增了一个线程进行扩容,进入transfertransfer(tab, nextTab);break;}}return nextTab;}return table;}private final void transfer(Node<K,V>[] tab, Node<K,V>[] nextTab) {int n = tab.length, stride;// 参数校验if ((stride = (NCPU > 1) ? (n >>> 3) / NCPU : n) < MIN_TRANSFER_STRIDE)stride = MIN_TRANSFER_STRIDE; // subdivide range// 刚开始扩容,初始化nextTabif (nextTab == null) { // initiatingtry {@SuppressWarnings("unchecked")Node<K,V>[] nt = (Node<K,V>[])new Node<?,?>[n << 1];nextTab = nt;} catch (Throwable ex) { // try to cope with OOMEsizeCtl = Integer.MAX_VALUE;return;}nextTable = nextTab;// 指向最后一个桶,方便从后向前遍历transferIndex = n;}int nextn = nextTab.length;ForwardingNode<K,V> fwd = new ForwardingNode<K,V>(nextTab);boolean advance = true;boolean finishing = false; // to ensure sweep before committing nextTab// i指向当前桶,bound表示要处理的区间下限for (int i = 0, bound = 0;;) {Node<K,V> f; int fh;while (advance) {int nextIndex, nextBound;if (--i >= bound || finishing)advance = false;// 说明没有需要处理的桶了else if ((nextIndex = transferIndex) <= 0) {i = -1;advance = false;}// 更新transferIndex// 为当前线程分配任务,处理的区间为(nextBound,nextIndex)else if (U.compareAndSwapInt(this, TRANSFERINDEX, nextIndex,nextBound = (nextIndex > stride ?nextIndex - stride : 0))) {bound = nextBound;i = nextIndex - 1;advance = false;}}// 当前线程所有任务完成if (i < 0 || i >= n || i + n >= nextn) {int sc;if (finishing) {nextTable = null;table = nextTab;sizeCtl = (n << 1) - (n >>> 1);return;}if (U.compareAndSwapInt(this, SIZECTL, sc = sizeCtl, sc - 1)) {if ((sc - 2) != resizeStamp(n) << RESIZE_STAMP_SHIFT)return;finishing = advance = true;i = n; // recheck before commit}}// 待迁移桶为空,那么在此位置 CAS 添加 ForwardingNode 结点标识该桶已经被处理过了else if ((f = tabAt(tab, i)) == null)advance = casTabAt(tab, i, null, fwd);// 如果扫描到 ForwardingNode,说明此桶已经被处理过了,跳过即可else if ((fh = f.hash) == MOVED)advance = true; // already processedelse {synchronized (f) {if (tabAt(tab, i) == f) {Node<K,V> ln, hn;// 链表迁移操作if (fh >= 0) {...for (Node<K,V> p = f; p != lastRun; p = p.next) {int ph = p.hash; K pk = p.key; V pv = p.val;if ((ph & n) == 0)ln = new Node<K,V>(ph, pk, pv, ln);elsehn = new Node<K,V>(ph, pk, pv, hn);}// 将两条链表迁移到nextTab中setTabAt(nextTab, i, ln);setTabAt(nextTab, i + n, hn);// 标识为已处理setTabAt(tab, i, fwd);advance = true;}// 红黑树else if (f instanceof TreeBin) {...}}}}}}
helpTransfer()步骤如下:
- 前置参数校验,校验通过后进入扩容逻辑;
- 判断是否需要初始化nextTab,需要的话就初始化nextTab;
- 领取自己的任务区间,—i遍历自己的任务区间,对每个桶进行处理;
- 如果桶为空,标识为ForwardingNode 标识该桶已经被处理完成了;
- 如果已经处理了,就跳进下一个桶;
- 如果是正常的桶,锁住头结点,进行链表或者红黑树的迁移操作。
put
final V putVal(K key, V value, boolean onlyIfAbsent) {if (key == null || value == null) throw new NullPointerException();// 计算哈希,高低十六位异或后,与运算一个0x7fffffff// (h ^ (h >>> 16)) & HASH_BITSint hash = spread(key.hashCode());int binCount = 0;for (Node<K,V>[] tab = table;;) {Node<K,V> f; int n, i, fh;// 初始化if (tab == null || (n = tab.length) == 0)tab = initTable();// 找到索引位置// 如果为空,CAS添加节点else if ((f = tabAt(tab, i = (n - 1) & hash)) == null) {if (casTabAt(tab, i, null,new Node<K,V>(hash, key, value, null)))break; // no lock when adding to empty bin}// 如果检测到桶节点在扩容else if ((fh = f.hash) == MOVED)// 协助扩容tab = helpTransfer(tab, f);else {// 普通节点V oldVal = null;// 锁住头结点,尾插法synchronized (f) {if (tabAt(tab, i) == f) {// 普通链表if (fh >= 0) {binCount = 1;for (Node<K,V> e = f;; ++binCount) {K ek;if (e.hash == hash &&((ek = e.key) == key ||(ek != null && key.equals(ek)))) {oldVal = e.val;if (!onlyIfAbsent)e.val = value;break;}Node<K,V> pred = e;if ((e = e.next) == null) {pred.next = new Node<K,V>(hash, key,value, null);break;}}}// 红黑树else if (f instanceof TreeBin) {Node<K,V> p;binCount = 2;if ((p = ((TreeBin<K,V>)f).putTreeVal(hash, key,value)) != null) {oldVal = p.val;if (!onlyIfAbsent)p.val = value;}}}}//binCount != 0 说明向链表或者红黑树中添加或修改一个节点成功//binCount == 0 说明 put 操作将一个新节点添加成为某个桶的首节点if (binCount != 0) {// 链表长度超过8,转红黑树if (binCount >= TREEIFY_THRESHOLD)treeifyBin(tab, i);// 说明是修改操作,无需检查是否要扩容,直接返回if (oldVal != null)return oldVal;break;}}}// CAS更新baseCount,并判断是否需要扩容addCount(1L, binCount);return null;}
put()步骤如下:
- 计算结点hash值:(h ^ (h >>> 16)) & HASH_BITS,找到桶位置;
- 如果是空节点,就CAS添加元素;
- 如果检测到桶节点在扩容,则协助扩容;
- 如果是普通结点,则锁住头结点,使用尾插法,进行链表或者红黑树的节点插入;
- 判断是否需要转红黑树,是否是修改操作,如果是修改操作,则直接返回;
- CAS更新baseCount,并判断是否需要扩容。
size
```java public int size() { long n = sumCount(); return ((n < 0L) ? 0 :
}(n > (long)Integer.MAX_VALUE) ? Integer.MAX_VALUE :(int)n);
final long sumCount() { CounterCell[] as = counterCells; CounterCell a; long sum = baseCount; if (as != null) { for (int i = 0; i < as.length; ++i) { if ((a = as[i]) != null) sum += a.value; } } return sum; }
@sun.misc.Contended static final class CounterCell { volatile long value; CounterCell(long x) { value = x; } }
可以发现,它是遍历CounterCell累加并加上baseCount得到最终大小。CounterCell中存放的是CAS更新失败的值。<a name="vhsQI"></a>### HashSet带着问题思考,HashSet怎么实现去重?```javapublic class HashSet<E>extends AbstractSet<E>implements Set<E>, Cloneable, java.io.Serializable{static final long serialVersionUID = -5024744406713321676L;// 内部直接复用HashMapprivate transient HashMap<E,Object> map;// Dummy value to associate with an Object in the backing Mapprivate static final Object PRESENT = new Object();/*** Constructs a new, empty set; the backing <tt>HashMap</tt> instance has* default initial capacity (16) and load factor (0.75).*/public HashSet() {map = new HashMap<>();}public boolean add(E e) {// 待插入元素作为key值,而hashMap的key显然是不能重复的,所以hashSet成功实现了去重return map.put(e, PRESENT)==null;}}
ThreadLocal
线程本地变量,通过维护一个静态内部类ThreadLocalMap,通过k,v保存每个线程的副本,k是当前ThreadLocal实例对象,v是要保存的副本值。两个ThreadLocal可以用threadLocalHashCode标识。
使用场景
- 每个线程需要有自己单独的实例。
- 实例需要在多个方法中共享,但不希望被多线程共享。
具体举例:
- 登录时,存储用户信息:我们会选择在拦截器的业务中, 获取到保存的用户信息,然后存入ThreadLocal,那么当前线程在任何地方如果需要拿到用户信息都可以使用ThreadLocal的get()方法 (异步程序中ThreadLocal是不可靠的),这个场景使用的比较多,当用户登录后,会将用户信息存入Token中返回前端,当用户调用需要授权的接口时,需要在header中携带 Token,然后拦截器中解析Token,获取用户信息,调用自定义的类(AuthNHolder)存 ThreadLocal中,当请求结束的时候,将ThreadLocal存储数据清空, 中间的过程无需在关注如何获取用户信息,只需要使用工具类的get方法即可。
- 获取数据库连接时:每个请求线程使用Connection的时候,都会从ThreadLocal获取一次,如果为null,说明没有进行过数据库连接,连接后存入ThreadLocal中,如此一来,每一个请求线程都保存有一份 自己的Connection。于是便解决了线程安全问题,否则可能多个线程拿了同一个连接,彼此影响。
ThreadLocalMap
ThreadLocal的静态内部类,在Thread类中引用:
static class ThreadLocalMap {static class Entry extends WeakReference<ThreadLocal<?>> {/** The value associated with this ThreadLocal. */Object value;Entry(ThreadLocal<?> k, Object v) {super(k);value = v;}}// 初始容量为16private static final int INITIAL_CAPACITY = 16;private Entry[] table;/*** 扩容时需要重新哈希*/private void rehash() {expungeStaleEntries();// 当超过3/4容量时需要扩容if (size >= threshold - threshold / 4)resize();}/*** 扩容方法*/private void resize() {Entry[] oldTab = table;int oldLen = oldTab.length;// 扩容为原来容量的2倍int newLen = oldLen * 2;Entry[] newTab = new Entry[newLen];int count = 0;...}}
可以发现,跟HashMap是有异曲同工的,同样也是维护了一个Entry数组,并且初始容量为16,扩容阈值比为3/4,扩容因子为2,解决哈希冲突方法为开放寻址法。
Set()&&get()
public void set(T value) {Thread t = Thread.currentThread();ThreadLocalMap map = getMap(t);if (map != null)// key是当前线程实例,value是用户上传的值map.set(this, value);else// 如果map还没创建就执行创建逻辑createMap(t, value);}private void set(ThreadLocal<?> key, Object value) {Entry[] tab = table;int len = tab.length;int i = key.threadLocalHashCode & (len-1);/**根据获取到的索引进行循环,如果当前索引上的table[i]不为空,在没有return的情况下,* 就使用nextIndex()获取下一个(线性探测法)。*/for (Entry e = tab[i];e != null;e = tab[i = nextIndex(i, len)]) {ThreadLocal<?> k = e.get();// table[i]上key不为空,并且和当前key相同,更新valueif (k == key) {e.value = value;return;}/**table[i]上的key为空,说明被回收了* 说明改table[i]可以重新使用,用新的key-value将其替换,并删除其他无效的entry*/if (k == null) {replaceStaleEntry(key, value, i);return;}}// //不存在也没有旧元素就创建一个tab[i] = new Entry(key, value);int sz = ++size;if (!cleanSomeSlots(i, sz) && sz >= threshold)rehash();}public T get() {Thread t = Thread.currentThread();ThreadLocalMap map = getMap(t);if (map != null) {ThreadLocalMap.Entry e = map.getEntry(this);if (e != null) {@SuppressWarnings("unchecked")T result = (T)e.value;return result;}}return setInitialValue();}
注意点
- 线程池中线程调用使用ThreadLocal 由于线程池中对线程管理都是采用线程复用的方法。在线程池中线程非常难结束甚至于永远不会结束。这将意味着线程持续的时间将不可预測,甚至与JVM的生命周期一致
- 异步程序中,ThreadLocal的參数传递是不靠谱的, 由于线程将请求发送后。就不再等待远程返回结果继续向下运行了,真正的返回结果得到后,处理的线程可能是其他的线程。Java8中的并发流也要考虑这种情况
- 使用完ThreadLocal ,最好手动调用 remove() 方法,防止出现内存溢出,因为中使用的key为ThreadLocal的弱引用, 如果ThreadLocal没有被外部强引用的情况下,在垃圾回收的时候会被清理掉的,但是如果value是强引用,不会被清理, 这样一来就会出现 key 为 null 的 value。
为什么ThreadLocal使用开放寻址法?
ThreadLocal 往往存放的数据量不会特别大,使用开放寻址法更能节省空间,提高效率。ReentrantLock
1.ReentrantLock可以根据构造方法实现公平和非公平锁。
2.ReentrantLock是可重入的锁。
3.ReentrantLock的核心就是AQS,内部类Sync继承AQS提供了非公平和公平锁的实现,AQS通过一个state成员变量和一个双向队列来实现的。state代表是否有线程访问当前的临界资源,通过CAS算法保证其原子性,state为0表示没有线程访问临界区资源。双端队列中存储了封装了当前线程的Node节点,共有五种状态表示当前节点的状态,默认为0。如果当前lock线程没有获取到锁,则会把当前线程封装成Node节点,扔到双端队列中,此时并不会挂起这个线程,而是通过tryAcquire尝试获取锁,如果获取锁还是不成功,就根据当前节点的前驱节点的状态waitStatus来判断是否需要挂起当前线程。当线程主动释放锁的时候,到队列中找到一个waitStatus不为CANCELED的节点,并唤醒这个节点的线程。
首先需要看下AQS的几个关键字段,重点关注state:
static final class Node {/** 共享模式 */static final Node SHARED = new Node();/** 独占模式 */static final Node EXCLUSIVE = null;/** 当前线程因为超时或者中断被取消 */static final int CANCELLED = 1;/** 成功线程需要被唤醒 */static final int SIGNAL = -1;/** 在等待 */static final int CONDITION = -2;/*** 共享锁的唤醒*/static final int PROPAGATE = -3;/*** Status field, taking on only the values:* SIGNAL: The successor of this node is (or will soon be)* blocked (via park), so the current node must* unpark its successor when it releases or* cancels. To avoid races, acquire methods must* first indicate they need a signal,* then retry the atomic acquire, and then,* on failure, block.* CANCELLED: This node is cancelled due to timeout or interrupt.* Nodes never leave this state. In particular,* a thread with cancelled node never again blocks.* CONDITION: This node is currently on a condition queue.* It will not be used as a sync queue node* until transferred, at which time the status* will be set to 0. (Use of this value here has* nothing to do with the other uses of the* field, but simplifies mechanics.)* PROPAGATE: A releaseShared should be propagated to other* nodes. This is set (for head node only) in* doReleaseShared to ensure propagation* continues, even if other operations have* since intervened.* 0: None of the above** The values are arranged numerically to simplify use.* Non-negative values mean that a node doesn't need to* signal. So, most code doesn't need to check for particular* values, just for sign.** The field is initialized to 0 for normal sync nodes, and* CONDITION for condition nodes. It is modified using CAS* (or when possible, unconditional volatile writes).*/volatile int waitStatus;/*** 链表前节点*/volatile Node prev;/*** 链表后节点*/volatile Node next;/*** The thread that enqueued this node. Initialized on* construction and nulled out after use.*/volatile Thread thread;/*** Link to next node waiting on condition, or the special* value SHARED. Because condition queues are accessed only* when holding in exclusive mode, we just need a simple* linked queue to hold nodes while they are waiting on* conditions. They are then transferred to the queue to* re-acquire. And because conditions can only be exclusive,* we save a field by using special value to indicate shared* mode.*/Node nextWaiter;}
获取锁
以非公平锁为例
// 1.ReentrantLock静态内部类static final class NonfairSync extends Sync {private static final long serialVersionUID = 7316153563782823691L;/*** Performs lock. Try immediate barge, backing up to normal* acquire on failure.*/final void lock() {// 这里如果成功将AbstractQueuedSynchronizer的state值设置为1,代表没有出现多线程竞争的情况直接把当前线程设置为独占线程就好了,否则调用acquire方法。if (compareAndSetState(0, 1))setExclusiveOwnerThread(Thread.currentThread());else//acquire(1);}protected final boolean tryAcquire(int acquires) {// 3.调用sync的nonfairTryAcquirereturn nonfairTryAcquire(acquires);}}// 2.AQS的acquirepublic final void acquire(int arg) {if (!tryAcquire(arg) &&acquireQueued(addWaiter(Node.EXCLUSIVE), arg))selfInterrupt();}/*** 4.nonfairTryAcquire*/abstract static class Sync extends AbstractQueuedSynchronizer {private static final long serialVersionUID = -5179523762034025860L;/*** Performs {@link Lock#lock}. The main reason for subclassing* is to allow fast path for nonfair version.*/abstract void lock();/*** 非公平锁*/final boolean nonfairTryAcquire(int acquires) {final Thread current = Thread.currentThread();int c = getState();// 为0代表当前没有线程占有临界资源if (c == 0) {// CAS更换状态if (compareAndSetState(0, acquires)) {// 如果CAS成功就把当前线程设置为独占线程setExclusiveOwnerThread(current);return true;}}// 如果state不为0,判断占有临界资源的线程是否和当前获取锁的线程是一个线程,如果是调用setState重置当前state的值,这里我们可以看出来,ReentrantLock它是可重入的锁和synchronized一样else if (current == getExclusiveOwnerThread()) {int nextc = c + acquires;if (nextc < 0) // overflowthrow new Error("Maximum lock count exceeded");setState(nextc);return true;}// 尝试获取锁还是失败的话 回到AbstractQueuedSynchronizer的addWaiter方法return false;}}// 5.AQS的addWaiterprivate Node addWaiter(Node mode) {Node node = new Node(Thread.currentThread(), mode);// Try the fast path of enq; backup to full enq on failureNode pred = tail;if (pred != null) {node.prev = pred;// 自旋,将node放入队尾,这边就是双向链表实现的一个双端队列if (compareAndSetTail(pred, node)) {pred.next = node;return node;}}enq(node);return node;}// 6.获取锁final boolean acquireQueued(final Node node, int arg) {boolean failed = true;try {boolean interrupted = false;for (;;) {final Node p = node.predecessor();// 这里再次通过tryAcquire尝试去获取锁,如果获取锁成功 则不需要挂起当前线程if (p == head && tryAcquire(arg)) {setHead(node);p.next = null; // help GCfailed = false;return interrupted;}// 如果上面尝试获取锁还是不成功,就根据前驱节点判断是否要阻塞 然后调用parkAndCheckInterrupt挂起当前线程。if (shouldParkAfterFailedAcquire(p, node) &&parkAndCheckInterrupt())interrupted = true;}} finally {if (failed)cancelAcquire(node);}}// 7.根据前驱结点状态判断是否需要挂起private static boolean shouldParkAfterFailedAcquire(Node pred, Node node) {// 获取前驱节点的状态int ws = pred.waitStatus;if (ws == Node.SIGNAL)/** This node has already set status asking a release* to signal it, so it can safely park.*/return true;if (ws > 0) {/** 跳过CANCELLED状态*/do {node.prev = pred = pred.prev;} while (pred.waitStatus > 0);pred.next = node;} else {/** 当前驱节点状态为0或者PROAGATE(-3),设置前驱节点的等待状态为SINGAL,* 重新进入上面的死循环后 tryAcquire如果还是不成功 前驱节点的状态就是SIGNAL了 当前这个线程就会被挂起*/compareAndSetWaitStatus(pred, ws, Node.SIGNAL);}return false;}
释放锁
public void unlock() {sync.release(1);}public final boolean release(int arg) {// 1. 这里先调用tryRelease尝试释放锁if (tryRelease(arg)) {Node h = head;if (h != null && h.waitStatus != 0)unparkSuccessor(h);return true;}return false;}// 2.sync的释放锁protected final boolean tryRelease(int releases) {int c = getState() - releases;// 释放锁的线程不是当前独占线程则抛出异常if (Thread.currentThread() != getExclusiveOwnerThread())throw new IllegalMonitorStateException();boolean free = false;// 重新设置state值 如过state为0 当前独占线程设置为nullif (c == 0) {free = true;setExclusiveOwnerThread(null);}setState(c);return free;}// 3.唤醒private void unparkSuccessor(Node node) {/** 获取头节点的waitSatus*/int ws = node.waitStatus;if (ws < 0)compareAndSetWaitStatus(node, ws, 0);// 找到头节点的下个节点Node s = node.next;// 如果这个节点是null或者waitStatus>0,就从队列尾部开始找找到一个waitStatus < 0的节点if (s == null || s.waitStatus > 0) {s = null;for (Node t = tail; t != null && t != node; t = t.prev)if (t.waitStatus <= 0)s = t;}if (s != null)// 通过LockSupport.unpark方法唤醒这个节点的线程LockSupport.unpark(s.thread);}
如果是公平锁,那么优先判断当前结点是否是队首元素,hasQueuedPredecessors为true说明存在前驱结点,会获取失败
protected final boolean tryAcquire(int acquires) {final Thread current = Thread.currentThread();int c = getState();if (c == 0) {// 只有不存在前驱结点才可以获取成功if (!hasQueuedPredecessors() &&compareAndSetState(0, acquires)) {setExclusiveOwnerThread(current);return true;}}else if (current == getExclusiveOwnerThread()) {int nextc = c + acquires;if (nextc < 0)throw new Error("Maximum lock count exceeded");setState(nextc);return true;}return false;}public final boolean hasQueuedPredecessors() {// The correctness of this depends on head being initialized// before tail and on head.next being accurate if the current// thread is first in queue.Node t = tail; // Read fields in reverse initialization orderNode h = head;Node s;return h != t &&((s = h.next) == null || s.thread != Thread.currentThread());}
ThreadPool
线程池主要就是指定线程池核心线程数大小,最大线程数,存储的队列,拒绝策略,空闲线程存活时长。
当需要任务大于核心线程数时候,就开始把任务往存储任务的队列里,当存储队列满了的话,就开始增加线程池创建的线程数量,如果当线程数量也达到了最大,就开始执行拒绝策略,比如说记录日志,直接丢弃,或者丢弃最老的任务。
ThreadPoolExecutor
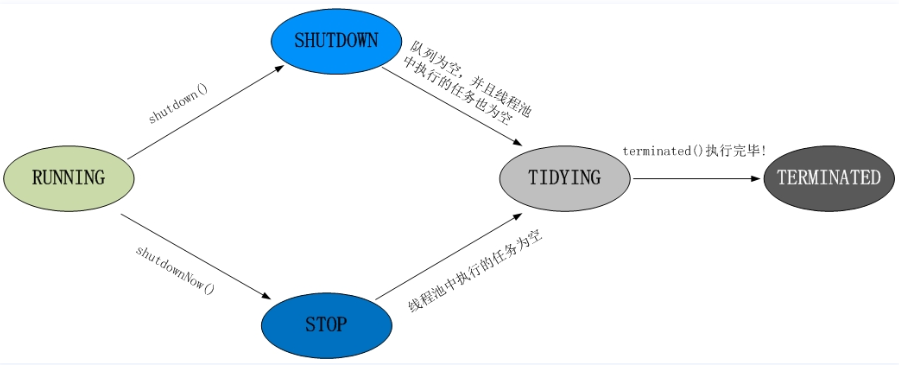
public class ThreadPoolExecutor extends AbstractExecutorService {private final AtomicInteger ctl = new AtomicInteger(ctlOf(RUNNING, 0));// 32-3private static final int COUNT_BITS = Integer.SIZE - 3;private static final int CAPACITY = (1 << COUNT_BITS) - 1;// 线程池状态private static final int RUNNING = -1 << COUNT_BITS;private static final int SHUTDOWN = 0 << COUNT_BITS;private static final int STOP = 1 << COUNT_BITS;private static final int TIDYING = 2 << COUNT_BITS;private static final int TERMINATED = 3 << COUNT_BITS;// 线程工厂private volatile ThreadFactory threadFactory;// 存活时间private volatile long keepAliveTime;// 核心线程数private volatile int corePoolSize;// 最大线程数private volatile int maximumPoolSize;// 拒绝策略,默认为AbortPolicy()private static final RejectedExecutionHandler defaultHandler =new AbortPolicy();public ThreadPoolExecutor(int corePoolSize,int maximumPoolSize,long keepAliveTime,TimeUnit unit,BlockingQueue<Runnable> workQueue) {this(corePoolSize, maximumPoolSize, keepAliveTime, unit, workQueue,Executors.defaultThreadFactory(), defaultHandler);}...}
状态改变:
拒绝策略
- AbortPolicy——舍弃任务
直接RejectedExecutionException抛出异常。 - CallerRunsPolicy——只用调用者所在线程来执行任务
直接在 execute 方法的调用线程中运行被拒绝的任务;如果执行程序已关闭,则会丢弃该任务。 - DiscardOldestPolicy——丢弃最前任务
丢弃队列最前面的任务,然后重新提交被拒绝的任务。
DiscardPolicy——丢弃任务
丢弃任务,但是不抛出异常。
四种经典线程池
CachedThreadPool
public static ExecutorService newCachedThreadPool() {return new ThreadPoolExecutor(0, Integer.MAX_VALUE,60L, TimeUnit.SECONDS,new SynchronousQueue<Runnable>());}
核心线程数为0,最大线程数为Integer.MAX_VALUE,适用于突然会有大量任务且可以短时间完成的场景,适用于处理I/O密集型,但是如果操作不当容易造成系统资源的耗尽,需要谨慎使用。FixedThreadPool
public static ExecutorService newFixedThreadPool(int nThreads) {return new ThreadPoolExecutor(nThreads, nThreads,0L, TimeUnit.MILLISECONDS,new LinkedBlockingQueue<Runnable>());}
固定线程数,数目可以由用户提供,适用于处理cpu密集型的任务,确保cpu在长期被工作线程使用的情况下,尽可能少的分配线程,即适用长期的任务。SingleThreadExecutor
public static ExecutorService newSingleThreadExecutor() {return new FinalizableDelegatedExecutorService(new ThreadPoolExecutor(1, 1,0L, TimeUnit.MILLISECONDS,new LinkedBlockingQueue<Runnable>()));}
只有一个线程数的线程池,适用于串行化任务,一个任务接着一个任务执行。ScheduledThreadPool ```java public static ScheduledExecutorService newScheduledThreadPool(int corePoolSize) { return new ScheduledThreadPoolExecutor(corePoolSize); }
public ScheduledThreadPoolExecutor(int corePoolSize) { super(corePoolSize, Integer.MAX_VALUE, 0, NANOSECONDS, new DelayedWorkQueue()); }
<br />可以定时执行线程任务,创建实例完成后可以使用scheduleAtFixedRate()来设置执行时间间隔。<a name="kPzxB"></a>### 阻塞队列ArrayBlockingQueue```javapublic class ArrayBlockingQueue<E> extends AbstractQueue<E>implements BlockingQueue<E>, java.io.Serializable {/*** Serialization ID. This class relies on default serialization* even for the items array, which is default-serialized, even if* it is empty. Otherwise it could not be declared final, which is* necessary here.*/private static final long serialVersionUID = -817911632652898426L;/** The queued items */final Object[] items;/** items index for next take, poll, peek or remove */int takeIndex;/** items index for next put, offer, or add */int putIndex;/** Number of elements in the queue */int count;/** Concurrency control uses the classic two-condition algorithm* found in any textbook.*//** Main lock guarding all access */final ReentrantLock lock;/** Condition for waiting takes */private final Condition notEmpty;/** Condition for waiting puts */private final Condition notFull;/*** Shared state for currently active iterators, or null if there* are known not to be any. Allows queue operations to update* iterator state.*/transient Itrs itrs = null;public void put(E e) throws InterruptedException {checkNotNull(e);final ReentrantLock lock = this.lock;lock.lockInterruptibly();try {// 队列满了,就阻塞while (count == items.length)notFull.await();enqueue(e);} finally {lock.unlock();}}// 插入private void enqueue(E x) {// assert lock.getHoldCount() == 1;// assert items[putIndex] == null;final Object[] items = this.items;items[putIndex] = x;if (++putIndex == items.length)putIndex = 0;count++;// 唤醒空锁,可以执行take了notEmpty.signal();}// 获取public E take() throws InterruptedException {final ReentrantLock lock = this.lock;lock.lockInterruptibly();try {// 如果空了,就阻塞while (count == 0)notEmpty.await();return dequeue();} finally {lock.unlock();}}private E dequeue() {// assert lock.getHoldCount() == 1;// assert items[takeIndex] != null;final Object[] items = this.items;@SuppressWarnings("unchecked")E x = (E) items[takeIndex];items[takeIndex] = null;if (++takeIndex == items.length)takeIndex = 0;count--;if (itrs != null)itrs.elementDequeued();// 唤醒插入锁notFull.signal();return x;}}
Object
public class Object {private static native void registerNatives();static {registerNatives();}/*** 获取类*/public final native Class<?> getClass();/*** 获取hashCode*/public native int hashCode();/*** 判断两个对象地址是否相等*/public boolean equals(Object obj) {return (this == obj);}/*** 克隆*/protected native Object clone() throws CloneNotSupportedException;/*** toString 类名+@+该对象hashcode的16进制字符串*/public String toString() {return getClass().getName() + "@" + Integer.toHexString(hashCode());}/*** 唤醒*/public final native void notify();/*** 唤醒全部*/public final native void notifyAll();/*** 超时自动释放*/public final native void wait(long timeout) throws InterruptedException;/*** 超时自动释放*/public final void wait(long timeout, int nanos) throws InterruptedException {if (timeout < 0) {throw new IllegalArgumentException("timeout value is negative");}if (nanos < 0 || nanos > 999999) {throw new IllegalArgumentException("nanosecond timeout value out of range");}if (nanos > 0) {timeout++;}wait(timeout);}/*** 阻塞*/public final void wait() throws InterruptedException {wait(0);}/*** 垃圾回收用*/protected void finalize() throws Throwable { }}

若有收获,就点个赞吧
0 人点赞
