Netty群聊天室(高)
案例要求:
1. 编写一个 Netty 群聊系统,实现服务器端和客户端之间的数据简单通讯
2. 实现多人群聊
3. 服务器端:可以监测用户上线,离线,并实现消息转发功能
4. 客户端:可以发送消息给其它所有用户,同时可以接受其它用户发送的消息
聊天室服务端编写
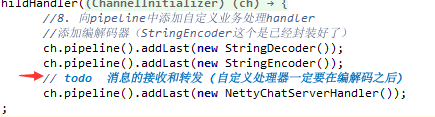
public class NettyChatServer {//端口号private int port;public NettyChatServer(int port) {this.port = port;}// 作为启动的一个方法public void run() throws InterruptedException {//1. 创建bossGroup线程组: 处理网络事件--连接事件EventLoopGroup bossGroup = null;//2. 创建workerGroup线程组: 处理网络事件--读写事件 2*处理器线程数EventLoopGroup workerGroup = null;try {bossGroup = new NioEventLoopGroup(1);workerGroup = new NioEventLoopGroup();//3. 创建服务端启动助手ServerBootstrap serverBootstrap = new ServerBootstrap();//4. 设置bossGroup线程组和workerGroup线程组serverBootstrap.group(bossGroup, workerGroup).channel(NioServerSocketChannel.class) //5. 设置服务端通道实现为NIO.option(ChannelOption.SO_BACKLOG, 128)//6. 参数设置.childOption(ChannelOption.SO_KEEPALIVE, Boolean.TRUE)//6. 参数设置.childHandler(new ChannelInitializer<SocketChannel>() { //7. 创建一个通道初始化对象@Overrideprotected void initChannel(SocketChannel ch) throws Exception {//8. 向pipeline中添加自定义业务处理handler//添加编解码器(StringEncoder这个是已经封装好了)ch.pipeline().addLast(new StringDecoder());ch.pipeline().addLast(new StringEncoder());// todo 消息的接收和转发 (自定义处理器一定要在编解码之后)ch.pipeline().addLast(new NettyChatServerHandler());}});//9. 启动服务端并绑定端口,同时将异步改为同步ChannelFuture future = serverBootstrap.bind(port);future.addListener(new ChannelFutureListener() {@Overridepublic void operationComplete(ChannelFuture future) throws Exception {if (future.isSuccess()) {System.out.println("端口绑定成功!");} else {System.out.println("端口绑定失败!");}}});System.out.println("聊天室服务端启动成功.");//10. 关闭通道(并不是真正意义上关闭,而是监听通道关闭的状态)和关闭连接池future.channel().closeFuture().sync();} finally {bossGroup.shutdownGracefully();workerGroup.shutdownGracefully();}}public static void main(String[] args) throws InterruptedException {new NettyChatServer(9998).run();}}
服务端自定义Handler
聊天室业务处理类(处理消息入站的)
public class NettyChatServerHandler extends SimpleChannelInboundHandler<String> {
    public static List<Channel> channelList = new ArrayList<>();

    /**
     * 通道就绪事件
     * 需要重写这个方法
     * @param ctx
     * @throws Exception
     */
    @Override
    public void channelActive(ChannelHandlerContext ctx) throws Exception {
        Channel channel = ctx.channel();
        //当有新的客户端连接的时候, 通过上下文得到连接的通道,将通道放入集合,后面就可以使用了
        channelList.add(channel);
        // 可以监听客户端上线的操作
        System.out.println("[Server]:" +
                channel.remoteAddress().toString().substring(1) + "在线.");
    }

    /**
     * 重写这个方法进行下线
     * 通道未就绪--channel下线
     *
     * @param ctx
     * @throws Exception
     */
    @Override
    public void channelInactive(ChannelHandlerContext ctx) throws Exception {
        // 通过上下文的对象得到当前的通道
        Channel channel = ctx.channel();
        //当有客户端断开连接的时候,就移除对应的通道
        channelList.remove(channel);
        System.out.println("[Server]:" +
                channel.remoteAddress().toString().substring(1) + "下线.");
    }

    /**
     * 通道读取事件
     *
     * @param ctx
     * @param msg
     * @throws Exception
     */
    @Override
    protected void channelRead0(ChannelHandlerContext ctx, String msg) throws Exception {
        //当前发送消息的通道, 当前发送的客户端连接
        Channel channel = ctx.channel();
        for (Channel channel1 : channelList) {
            //排除自身通道(排出自己给自己发送的通道)
            if (channel != channel1) {
                // 给每一个缓存的通道发消息
                channel1.writeAndFlush("[" + channel.remoteAddress().toString().substring(1)
                        + "]说:" + msg);
            }
        }
    }

    /**
     * 还需要重写异常的方法
     * 异常处理事件
     *
     * @param ctx
     * @param cause
     * @throws Exception
     */
    @Override
    public void exceptionCaught(ChannelHandlerContext ctx, Throwable cause) throws Exception {
        cause.printStackTrace();
        Channel channel = ctx.channel();
        //移除集合
        channelList.remove(channel);
        System.out.println("[Server]:" +
                channel.remoteAddress().toString().substring(1) + "异常.");
    }
}
然后就可以启动了
聊天室客户端编写
public class NettyChatClient {
private String ip;//服务端IP
private int port;//服务端端口号
public NettyChatClient(String ip, int port) {
this.ip = ip;
this.port = port;
}
public void run() throws InterruptedException {
//1. 创建线程组
EventLoopGroup group = null;
try {
group = new NioEventLoopGroup();
//2. 创建客户端启动助手
Bootstrap bootstrap = new Bootstrap();
//3. 设置线程组
bootstrap.group(group)
.channel(NioSocketChannel.class)//4. 设置客户端通道实现为NIO
.handler(new ChannelInitializer<SocketChannel>() { //5. 创建一个通道初始化对象
@Override
protected void initChannel(SocketChannel ch) throws Exception {
//6. 向pipeline中添加自定义业务处理handler
//添加编解码器
ch.pipeline().addLast(new StringDecoder());
ch.pipeline().addLast(new StringEncoder());
//添加客户端的处理类
ch.pipeline().addLast(new NettyChatClientHandler());
}
});
//7. 启动客户端,等待连接服务端,同时将异步改为同步
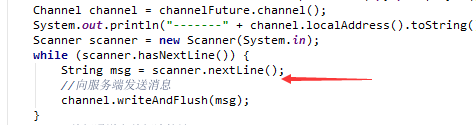
ChannelFuture channelFuture = bootstrap.connect(ip, port).sync();
Channel channel = channelFuture.channel();
System.out.println("-------" + channel.localAddress().toString().substring(1) + "--------");
Scanner scanner = new Scanner(System.in);
while (scanner.hasNextLine()) {
String msg = scanner.nextLine();
//向服务端发送消息
channel.writeAndFlush(msg);
}
//8. 关闭通道和关闭连接池
channelFuture.channel().closeFuture().sync();
} finally {
group.shutdownGracefully();
}
}
public static void main(String[] args) throws InterruptedException {
new NettyChatClient("127.0.0.1", 9998).run();
}
}
客户端自定义Handler
public class NettyChatClientHandler extends SimpleChannelInboundHandler<String> {

    /**
     * 通道读取就绪事件
     *
     * @param ctx
     * @param msg
     * @throws Exception
     */
    @Override
    protected void channelRead0(ChannelHandlerContext ctx, String msg) throws Exception {
        System.out.println(msg);
    }
}
基于Netty的Http服务器开发
Netty的HTTP协议栈无论在性能还是可靠性上,都表现优异,非常适合在非Web容器的场景下应 用,相比于传统的Tomcat、Jetty等Web容器,它更加轻量和小巧,灵活性和定制性也更好。 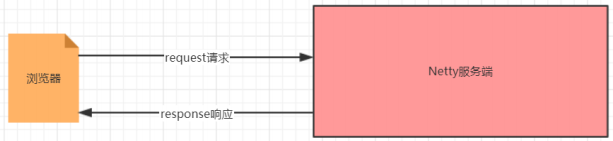
功能需求
1. Netty 服务器在 8080 端口监听
2. 浏览器发出请求 “http://localhost:8080/ “
3. 服务器可以回复消息给客户端 “Hello! 我是Netty服务器 “ ,并对特定请求资源进行过滤.
服务端代码实现
public class NettyHttpServer {
    //端口号
    private int port;

    public NettyHttpServer(int port) {
        this.port = port;
    }

    public void run() throws InterruptedException {
        //1. 创建bossGroup线程组: 处理网络事件--连接事件
        EventLoopGroup bossGroup = null;
        //2. 创建workerGroup线程组: 处理网络事件--读写事件 2*处理器线程数
        EventLoopGroup workerGroup = null;
        try {
            bossGroup = new NioEventLoopGroup(1);
            workerGroup = new NioEventLoopGroup();
            //3. 创建服务端启动助手
            ServerBootstrap serverBootstrap = new ServerBootstrap();
            //4. 设置bossGroup线程组和workerGroup线程组
            serverBootstrap.group(bossGroup, workerGroup)
                    .channel(NioServerSocketChannel.class) //5. 设置服务端通道实现为NIO
                    .option(ChannelOption.SO_BACKLOG, 128)//6. 参数设置
                    .childOption(ChannelOption.SO_KEEPALIVE, Boolean.TRUE)//6. 参数设置
                    .childHandler(new ChannelInitializer<SocketChannel>() { //7. 创建一个通道初始化对象
                        @Override
                        protected void initChannel(SocketChannel ch) throws Exception {
                            //8. 向pipeline中添加自定义业务处理handler
                            //添加编解码器
                            ch.pipeline().addLast(new HttpServerCodec());
                            // 自定义业务处理类
                            ch.pipeline().addLast(new NettyHttpServerHandler());
                        }
                    });
            //9. 启动服务端并绑定端口,同时将异步改为同步
            ChannelFuture future = serverBootstrap.bind(port);
            future.addListener(new ChannelFutureListener() {
                @Override
                public void operationComplete(ChannelFuture future) throws Exception {
                    if (future.isSuccess()) {
                        System.out.println("端口绑定成功!");
                    } else {
                        System.out.println("端口绑定失败!");
                    }
                }
            });
            System.out.println("http服务端启动成功.");
            //10. 关闭通道(并不是真正意义上关闭,而是监听通道关闭的状态)和关闭连接池
            future.channel().closeFuture().sync();
        } finally {
            bossGroup.shutdownGracefully();
            workerGroup.shutdownGracefully();
        }
    }

    public static void main(String[] args) throws InterruptedException {
        new NettyHttpServer(8080).run();
    }
}
NettyHttp自定义handler
http服务器处理类,处理消息的入站,网络的传输是通过http进行传输
public class NettyHttpServerHandler extends SimpleChannelInboundHandler<HttpObject> {
    /**
     * 读取就绪事件
     *
     * @param ctx
     * @param msg
     * @throws Exception
     */
    @Override
    protected void channelRead0(ChannelHandlerContext ctx, HttpObject msg) throws Exception {
        //1.判断请求是不是HTTP请求
        if (msg instanceof HttpRequest) {
            // 如果是http请求,就使用http具体的实现类
            DefaultHttpRequest request = (DefaultHttpRequest) msg;
            System.out.println("浏览器请求路径:" + request.uri());

            /**对请求的路径进行过滤*/
            if ("/favicon.ico".equals(request.uri())) {
                System.out.println("图标不响应");
                return;
            }
            //2.给浏览器进行响应(别人请求过来,就需要给别人一个响应啊)用有byteBuf的才可以传具体数据
            ByteBuf byteBuf = Unpooled.copiedBuffer("Hello! 我是Netty服务器 ", CharsetUtil.UTF_8);
            DefaultFullHttpResponse response =
                    new DefaultFullHttpResponse(HttpVersion.HTTP_1_1,
                            HttpResponseStatus.OK, byteBuf);
            //2.1 设置响应头
            response.headers().set(HttpHeaderNames.CONTENT_TYPE,
                    "text/html;charset=utf-8");
            response.headers().set(HttpHeaderNames.CONTENT_LENGTH,
                    byteBuf.readableBytes());
            // 设置好之后,将消息进行出站
            ctx.writeAndFlush(response);
        }
    }
}
重点注意:
基于Netty的WebSocket开发网页版聊天室
WebSocket是一种在单个TCP连接上进行全双工通信的协议。WebSocket使得客户端和服务器之间 的数据交换变得更加简单,允许服务端主动向客户端推送数据。在WebSocket API中,客户端和服务器 只需要完成一次握手,两者之间就直接可以创建持久性的连接,并进行双向数据传输。
应用场景十分广泛:
1. 社交订阅
2. 协同编辑/编程
3. 股票基金报价
4. 体育实况更新
5. 多媒体聊天
6. 在线教育
WebSocket和HTTP的区别
http协议是用在应用层的协议,他是基于tcp协议的,http协议建立连接也必须要有三次握手才能发 送信息。 http连接分为短连接,长连接,短连接是每次请求都要三次握手才能发送自己的信息。即每一 个request对应一个response。长连接是在一定的期限内保持连接。保持TCP连接不断开。客户端与服 务器通信,必须要有客户端先发起, 然后服务器返回结果。客户端是主动的,服务器是被动的。 客户端 要想实时获取服务端消息就得不断发送长连接到服务端.
WebSocket实现了多路复用,他是全双工通信。在webSocket协议下服务端和客户端可以同时发送 信息。 建立了WebSocket连接之后, 服务端可以主动发送信息到客户端。而且信息当中不必在带有head 的部分信息了与http的长链接通信来说,这种方式,不仅能降低服务器的压力。而且信息当中也减少了部分多余的信息。
A、导入基础环境
1、将资料中Netty-Springboot工程导入到idea

2、相关依赖
<!--整合web模块-->
<dependency>
    <groupId>org.springframework.boot</groupId>
    <artifactId>spring-boot-starter-web</artifactId>
</dependency>
<!--整合模板引擎 -->
<dependency>
    <groupId>org.springframework.boot</groupId>
    <artifactId>spring-boot-starter-thymeleaf</artifactId>
</dependency>
<dependency>
    <groupId>org.projectlombok</groupId>
    <artifactId>lombok</artifactId>
</dependency>
3、静态资源
也就是静态的基础页面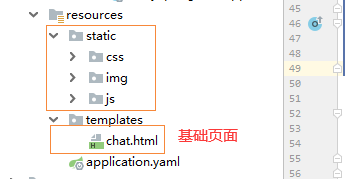
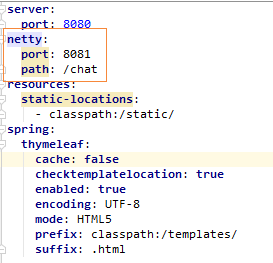
4、yam配置文件
server:
  port: 8080
resources:
  static-locations:
    - classpath:/static/
spring:
  thymeleaf:
    cache: false
    checktemplatelocation: true
    enabled: true
    encoding: UTF-8
    mode: HTML5
    prefix: classpath:/templates/
    suffix: .html
启动调整页面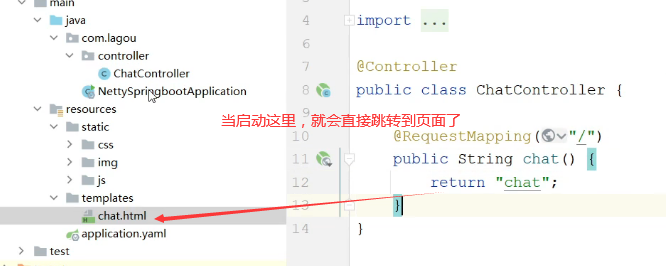
B、服务端开发
1、 添加Netty依赖
<!--引入netty依赖 -->
<dependency>
    <groupId>io.netty</groupId>
    <artifactId>netty-all</artifactId>
</dependency>
2、加入Netty相关配置
netty:
  port: 8081
  path: /chat
3、创建 Netty配置类
通过创建的配置类来读取配置信息
@Component
@ConfigurationProperties(prefix = "netty")
@Data
public class NettyConfig {

    // 提供两个属性
    private int port;//netty监听的端口

    private String path;//websocket访问路径
}
4、NettyWebSocketServer开发
Netty服务器,实现Runnable(进行实现多线程的接口)
@Component
public class NettyWebSocketServer implements Runnable {

    @Autowired
    NettyConfig nettyConfig;

    @Autowired
    WebSocketChannelInit webSocketChannelInit;


    private EventLoopGroup bossGroup = new NioEventLoopGroup(1);

    private EventLoopGroup workerGroup = new NioEventLoopGroup();

    /**
     * 资源关闭--在容器(ioc)销毁是关闭
     *
     */
    @PreDestroy
    public void close() {
        bossGroup.shutdownGracefully();
        workerGroup.shutdownGracefully();
    }

    @Override
    public void run() {
        try {
            //1.创建服务端启动助手
            ServerBootstrap serverBootstrap = new ServerBootstrap();
            //2.设置线程组
            serverBootstrap.group(bossGroup, workerGroup);
            //3.设置参数
            serverBootstrap
                    .channel(NioServerSocketChannel.class) // 第一个设置通道的实现
                    .handler(new LoggingHandler(LogLevel.DEBUG))//设置日志处理
                    .childHandler(webSocketChannelInit);// 设置通道初始化对象(后面将它抽取为一个bean对象)
            //4.启动(启动服务端,可以通过配置文件类获取)
            ChannelFuture channelFuture = serverBootstrap.bind(nettyConfig.getPort()).sync();
            System.out.println("--Netty服务端启动成功---");
            channelFuture.channel().closeFuture().sync();
        } catch (Exception e) {
            e.printStackTrace();
            // 关闭资源
            bossGroup.shutdownGracefully();
            workerGroup.shutdownGracefully();
        } finally {
            bossGroup.shutdownGracefully();
            workerGroup.shutdownGracefully();
        }
    }
}
5、通道初始化对象
通道初始化对象,添加了Component实现让Spring容器进行管理
@Component
public class WebSocketChannelInit extends ChannelInitializer {

    /*将配置类注入进来就能得到websocket的路径*/
    @Autowired
    NettyConfig nettyConfig;

    @Autowired
    WebSocketHandler webSocketHandler;

    // 根据channel得到pipeline,然后向里面添加编解码器,还有自定义的handler
    @Override
    protected void initChannel(Channel channel) throws Exception {
        ChannelPipeline pipeline = channel.pipeline();
        //对http协议的支持.(编解码器)
        pipeline.addLast(new HttpServerCodec());
        // 对大数据流的支持
        pipeline.addLast(new ChunkedWriteHandler());
        //post请求分三部分. request line / request header / message body
        // HttpObjectAggregator将多个信息转化成单一的request或者response对象
        pipeline.addLast(new HttpObjectAggregator(8000));
        // 将http协议升级为ws协议. websocket的支持(添加的路径是websocket的路径)
        pipeline.addLast(new WebSocketServerProtocolHandler(nettyConfig.getPath()));
        // 自定义处理handler
        pipeline.addLast(webSocketHandler);

    }
}
6、处理对象
* 自定义处理类
TextWebSocketFrame: websocket数据是帧的形式处理
处理消息入站,在这里处理整个聊天的逻辑
_泛型之所以写_TextWebSocketFrame是因为对WebSocket的支持
@Component
@ChannelHandler.Sharable //设置通道共享(才可以多人使用,不然只能第一个使用)
public class WebSocketHandler extends SimpleChannelInboundHandler<TextWebSocketFrame> {
/*用来缓存当前连接的channel*/
public static List<Channel> channelList = new ArrayList<>();
/**
* 通道就绪事件
*
* @param ctx
* @throws Exception
*/
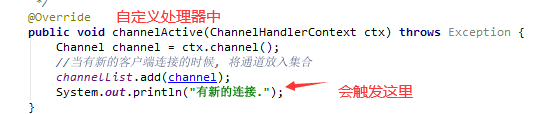
@Override
public void channelActive(ChannelHandlerContext ctx) throws Exception {
Channel channel = ctx.channel();
//当有新的客户端连接的时候, 将通道放入集合
channelList.add(channel);
System.out.println("有新的连接.");
}
/**
* 通道未就绪--channel下线
*
* @param ctx
* @throws Exception
*/
@Override
public void channelInactive(ChannelHandlerContext ctx) throws Exception {
Channel channel = ctx.channel();
//当有客户端断开连接的时候,就移除对应的通道
channelList.remove(channel);
}
/**
* 读就绪事件
*
* @param ctx
* @param textWebSocketFrame
* @throws Exception
*/
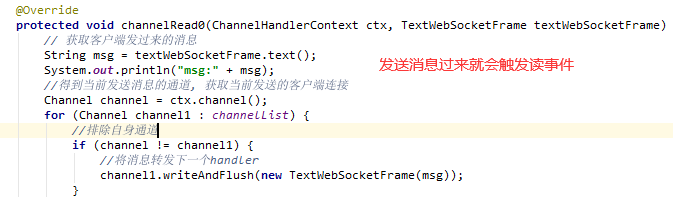
@Override
protected void channelRead0(ChannelHandlerContext ctx, TextWebSocketFrame textWebSocketFrame) throws Exception {
// 获取客户端发过来的消息
String msg = textWebSocketFrame.text();
System.out.println("msg:" + msg);
//得到当前发送消息的通道, 获取当前发送的客户端连接
Channel channel = ctx.channel();
for (Channel channel1 : channelList) {
//排除自身通道
if (channel != channel1) {
//将消息转发下一个handler
channel1.writeAndFlush(new TextWebSocketFrame(msg));
}
}
}
/**
* 异常处理事件
*
* @param ctx
* @param cause
* @throws Exception
*/
@Override
public void exceptionCaught(ChannelHandlerContext ctx, Throwable cause) throws Exception {
cause.printStackTrace();
Channel channel = ctx.channel();
//移除集合
channelList.remove(channel);
}
}
7、启动类
整个容器启动之后,再来启动这个服务
/*继承CommandLineRunner接口就会实现run方法*/
@SpringBootApplication
public class NettySpringbootApplication implements CommandLineRunner {

    @Autowired
    NettyWebSocketServer nettyWebSocketServer;

    public static void main(String[] args) {
        SpringApplication.run(NettySpringbootApplication.class, args);
    }

    /*在这个run方法中就可以写启动的方法了,
    因为NettyWebSocketServer实现了Runnable,所以可以以线程的方式启动new Thread()*/
    @Override
    public void run(String... args) throws Exception {
        new Thread(nettyWebSocketServer).start();
    }
}
到此网页版的聊天室就整好了
8、前端js开发(也是客户端)

—————————————————
$(function () {
    //这里需要注意的是,prompt有两个参数,前面是提示的话,后面是当对话框出来后,在对话框里的默认值
    var username = "";
    while (true) {
        //弹出一个输入框,输入一段文字,可以提交
        username = prompt("请输入您的名字", ""); //将输入的内容赋给变量 name ,
        if (username.trim() === "")//如果返回的有内容
        {
            alert("名称不能输入空")
        } else {
            $("#username").text(username);
            break;
        }
    }

    var ws = new WebSocket("ws://localhost:8081/chat");
    ws.onopen = function () {
        console.log("连接成功.")
    }
    ws.onmessage = function (evt) {
        showMessage(evt.data);
    }
    ws.onclose = function (){
        console.log("连接关闭")
    }

    ws.onerror = function (){
        console.log("连接异常")
    }

    /*显示其他人发送的消息,显示在左侧*/
    function showMessage(message) {
        // 张三:你好
        var str = message.split(":");
        $("#msg_list").append(`<li class="active"}>
                                  <div class="main">
                                    <img class="avatar" width="30" height="30" src="/img/user.png">
                                    <div>
                                        <div class="user_name">${str[0]}</div>
                                        <div class="text">${str[1]}</div>
                                    </div>
                                   </div>
                              </li>`);
        // 置底
        setBottom();
    }

    $('#my_test').bind({
        focus: function (event) {
            event.stopPropagation()
            $('#my_test').val('');
            $('.arrow_box').hide()
        },
        keydown: function (event) {
            event.stopPropagation()
            if (event.keyCode === 13) {
                if ($('#my_test').val().trim() === '') {
                    this.blur()
                    $('.arrow_box').show()
                    setTimeout(() => {
                        this.focus()
                    }, 1000)
                } else {
                    $('.arrow_box').hide()
                    //发送消息
                    sendMsg();
                    this.blur()
                    setTimeout(() => {
                        this.focus()
                    })
                }
            }
        }
    });
    $('#send').on('click', function (event) {
        event.stopPropagation()
        if ($('#my_test').val().trim() === '') {
            $('.arrow_box').show()
        } else {
            sendMsg();
        }
    })

    /*自己发送出去消息,显示在右边*/
    function sendMsg() {
        var message = $("#my_test").val();
        $("#msg_list").append(`<li class="active"}>
                                  <div class="main self">
                                      <div class="text">` + message + `</div>
                                  </div>
                              </li>`);
        $("#my_test").val('');

        //发送消息
        message = username + ":" + message;
        ws.send(message);
        // 置底
        setBottom();
    }

    // 置底
    function setBottom() {
        // 发送消息后滚动到底部
        const container = $('.m-message')
        const scroll = $('#msg_list')
        container.animate({
            scrollTop: scroll[0].scrollHeight - container[0].clientHeight + container.scrollTop() + 100
        });
    }
});
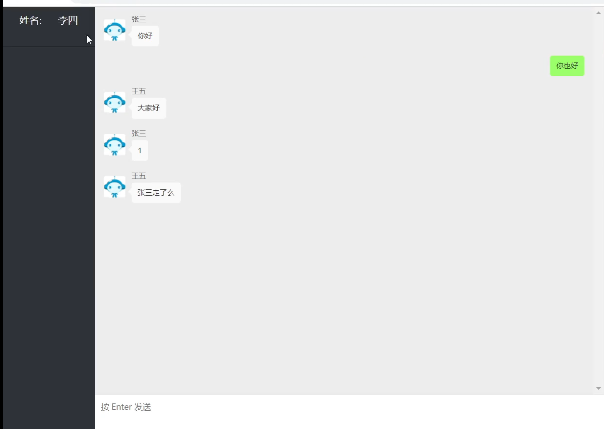
到此网页版的聊天室整完了。
主要是将http转为w,
并且进行编解码,自定义处理器处理接收的信息和发送出去的信息。然后就是js页面展示了哦

若有收获,就点个赞吧
0 人点赞
