Spring Boot默认采用整合SpringData的方式统一处理数据访问层,通过添加大量自动配置,引入各种数据访问模板xxxTemplate以及统一的Repository接口,从而达到简化数据访问层的操作。
Spring Data提供了多种类型数据库支持,对支持的的数据库进行了整合管理。
Spring Boot整合MyBatis
因为Spring Boot框架开发的便利性,所以实现Spring Boot与数据访问层框架(例如MyBatis)的
整合非常简单,主要是引入对应的依赖启动器,并进行数据库相关参数设置即可。
1、数据准备
2、创建项目,引入相应的启动器
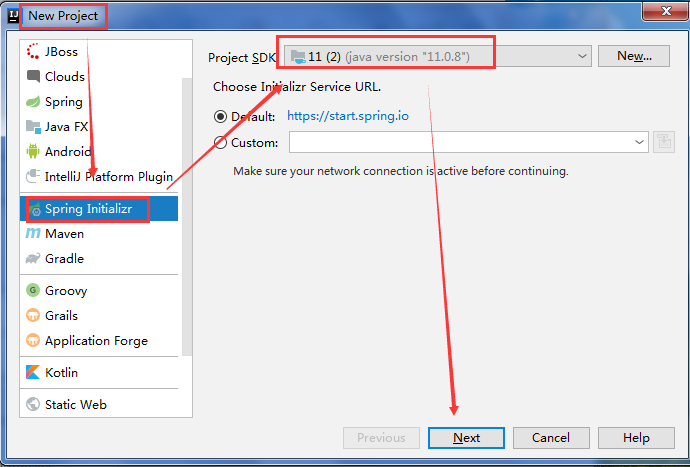
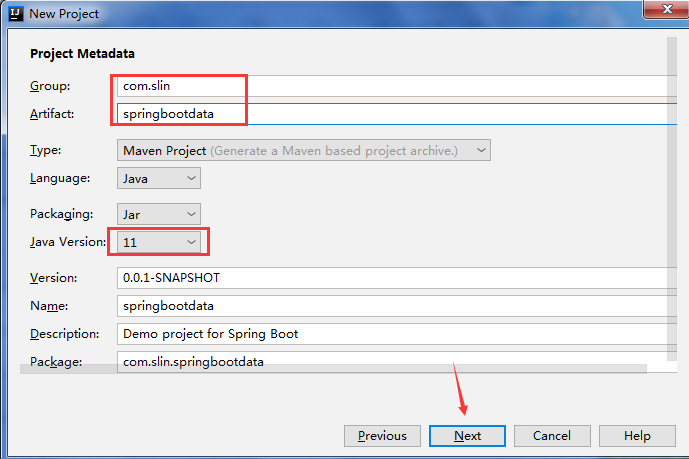
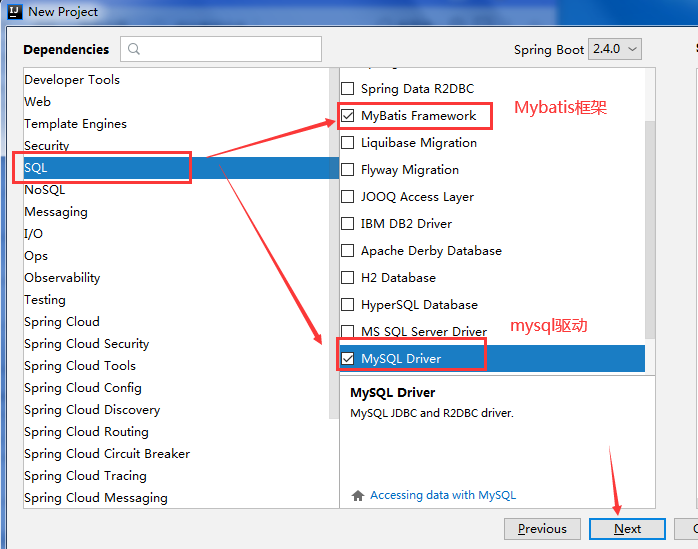
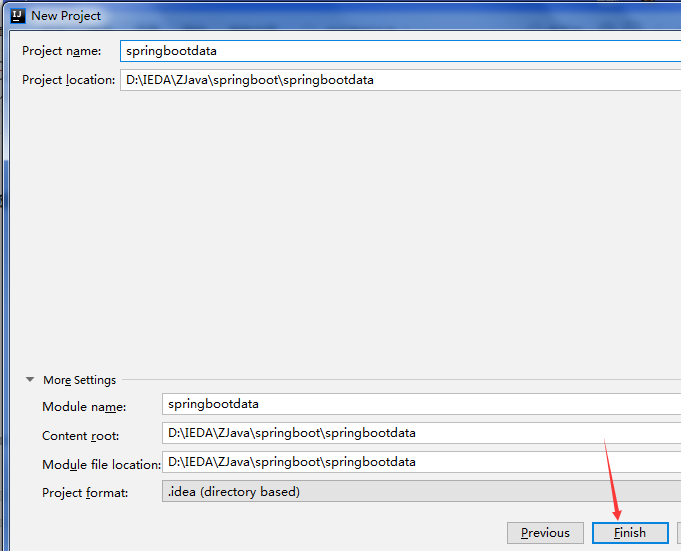
注意: 如果不是这样引入,而是在pom.xml下添加,则如下
<!-- 配置数据库驱动和mybatis dependency --><dependency><groupId>org.mybatis.spring.boot</groupId><artifactId>mybatis-spring-boot-starter</artifactId><version>1.3.2</version></dependency><!--在maven中配置数据库驱动--><dependency><groupId>mysql</groupId><artifactId>mysql-connector-java</artifactId></dependency><!--配置spring-boot-starter-jdbc--><dependency><groupId>org.springframework.boot</groupId><artifactId>spring-boot-starter-jdbc</artifactId></dependency>
3、编写实体类
与数据库表t_comment和t_article对应的实体类Comment和Article
public class Comment {private Integer id;private String content;private String author;private Integer aId;// get/set方法,toString方法}
public class Article {private Integer id;private String title;private String content;// get/set方法,toString方法}
4、编写配置文件
在application.properties配置文件中进行数据库连接配置
spring.datasource.driver-class-name=com.mysql.cj.jdbc.Driver# MySQL数据库连接配置spring.datasource.url=jdbc:mysql://localhost:3306/springbootdata?serverTimezone=UTCspring.datasource.username=rootspring.datasource.password=000000
如果在application.yml文件中进行数据库连接配置如下
spring:datasource:username: rootpassword: rooturl: jdbc:mysql:///springbootdata?useUnicode=true&characterEncoding=utf8&useSSL=true&serverTimezone=UTCdriver-class-name: com.mysql.jdbc.Driver# 使用druid数据源type: com.alibaba.druid.pool.DruidDataSource
接下来分别用注解、配置文件等方法进行整合Mybatis
A、先用注解整合Mybatis
1、创建接口
一个用于对数据库表t_comment数据操作的接口CommentMapper
@Mapper //表示该类是一个MyBatis接口文件,并保证能够被Spring Boot自动扫描到public interface CommentMapper {@Select("SELECT * FROM t_comment WHERE id =#{id}")public Comment findById(Integer id);}
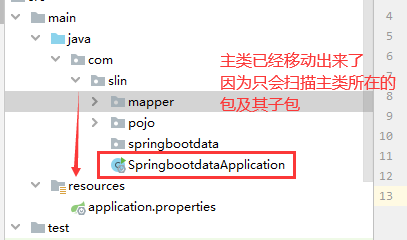
注意:
2、编写测试方法
@RunWith(SpringRunner.class)@SpringBootTestclass SpringbootdataApplicationTests {@Autowiredprivate CommentMapper commentMapper;@Testvoid contextLoads() {Comment byId = commentMapper.findById(1);System.out.println(byId);}}
3、结果为:

4、添加开启驼峰命名匹配映射配置
外键没有映射成功。这是因为编写的实体类Comment中使用了驼峰命名方式将t_comment表中的a_id字段设计成了aId属性,所以无法正确映射查询结果。为了解决上述由于驼峰命名方式造成的表字段值无法正确映射到类属性的情况,可以在Spring Boot全局配置文件application.properties中添加开启驼峰命名匹配映射配置,示例代码如下
#开启驼峰命名匹配映射mybatis.configuration.map-underscore-to-camel-case=true

5、再次打印结果如下

B、使用配置文件的方式整合MyBatis
1、创建一个用于对数据库表t_article数据操作的接口ArticleMapper
2、创建XML映射文件
resources目录下创建一个统一管理映射文件的包mapper,并在该包下编写与ArticleMapper接口方应的映射文件ArticleMapper.xml
<?xml version="1.0" encoding="UTF-8" ?><!DOCTYPE mapper PUBLIC "-//mybatis.org//DTD Mapper 3.0//EN""http://mybatis.org/dtd/mybatis-3-mapper.dtd"><mapper namespace="com.slin.mapper.ArticleMapper"><select id="selectArticle" resultType="com.slin.pojo.Article" >select * from t_article where id = #{id}</select></mapper>
3、配置XML映射文件路径。
在项目中编写的XML映射文件,Spring Boot并无从知晓,所以无法扫描到该自定义编写的XML配置文件,还必须在全局配置文件application.properties中添加MyBatis映射文件路径的配置,同时需要添加实体类别名映射路径示例代码如下
#配置MyBatis的xml配置文件路径mybatis.mapper-locations=classpath:mapper/*.xml# 配置XML映射文件中指定的实体类别名路径mybatis.type-aliases-package=com.slin.pojo

4、编写单元测试进行接口方法测试
@Autowiredprivate ArticleMapper articleMapper;@Testpublic void selectArticle(){Article article = articleMapper.selectArticle(1);System.out.println(article);}
运行结果为:

使用了别名后,resultType=”article” 返回值的类型就是别名类型了。
采用包扫描Mapper接口
如果有很多Mapper接口。那么就不需要再每一个接口上面添加@Mapper。只需要在项目启动类添加
Spring Boot整合JPA
1、添加Spring Data JPA依赖启动器。
在项目的pom.xml文件中添加Spring Data JPA依赖启动器。
<dependency><groupId>org.springframework.boot</groupId><artifactId>spring-boot-starter-data-jpa</artifactId></dependency>
2、编写ORM实体类与表的映射关系。
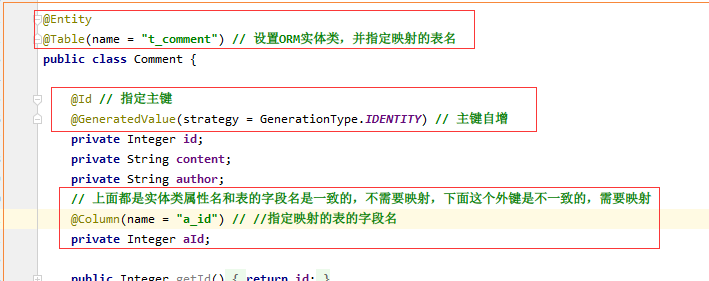
@Entity@Table(name = "t_comment") // 设置ORM实体类,并指定映射的表名public class Comment {@Id // 指定主键@GeneratedValue(strategy = GenerationType.IDENTITY) // 主键自增private Integer id;private String content;private String author;// 上面都是实体类属性名和表的字段名是一致的,不需要映射,下面这个外键是不一致的,需要映射@Column(name = "a_id") // //指定映射的表的字段名private Integer aId;// get/set ,toString}
3、编写Repository接口 :CommentRepository
// 继承于JpaRepository就具有单表的增删改查操作public interface CommentRepository extends JpaRepository<Comment,Integer> {}
4、测试
@Autowiredprivate CommentRepository commentRepository;@Testpublic void selectComment(){Optional<Comment> byId = commentRepository.findById(1);if(byId.isPresent()){System.out.println(byId.get());}}
5、测试结果

Spring Boot整合Redis
除了对关系型数据库的整合支持外,Spring Boot对非关系型数据库也提供了非常好的支持。
Spring Boot与非关系型数据库Redis的整合使用 。
1、添加Spring Data Redis依赖启动器
先在项目的pom.xml文件中添加Spring Data Redis依赖启动器.
<dependency><groupId>org.springframework.boot</groupId><artifactId>spring-boot-starter-data-redis</artifactId></dependency>
2、编写实体类
此处为了演示Spring Boot与Redis数据库的整合使用,在项目的com.slin.pojo包下编写几个对应的实体类
//此处表示针对Person实体类的数据操作都存储在Redis数据库中名为persons的存储空间下。@RedisHash("persons") // 指定操作实体类对象在Redis数据库中的存储空间public class Person {//在Redis数据库中会默认生成字符串形式的HashKey表示唯一的实体//对象id,当然也可以在数据存储时手动指定id@Id // 标识实体类主键private String id;//使用该注解后会在Redis数据库中//生成属性对应的二级索引,索引名称就是属性名,可以方便的进行数据条件查询@Indexed // 标识对应属性在Redis数据库中生成二级索引private String firstname;@Indexedprivate String lastname;private Address address;// toString ,set/get}
public class Address {@Indexedprivate String city;@Indexedprivate String country;// get/set/toString}
3、编写Repository接口
Spring Boot针对包括Redis在内的一些常用数据库提供了自动化配置,可以通过实现Repository接口简化对数据库中的数据进行增删改查操作
//在操作Redis数据库时编写的Repository接口文件需要继承最底层的CrudRepository接口,//而不是继承JpaRepository,这是因为JpaRepository是Spring Boot整合/PA特有的。public interface PersonRepository extends CrudRepository<Person,String> {List<Person> findByAddress_City(String name);}

4、Redis数据库连接配置
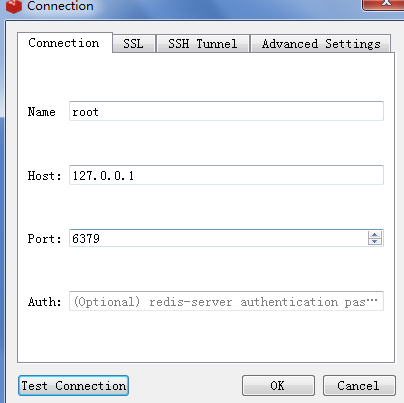
在项目的全局配置文件application.properties中添加Redis数据库的连接 配置
# Redis服务器地址spring.redis.host=127.0.0.1# Redis服务器连接端口spring.redis.port=6379# Redis服务器连接密码(默认为空)spring.redis.password=
5、执行测试代码(添加模块)
// 整合Redis@Autowiredprivate PersonRepository personRepository;@Testpublic void savePerson(){Person person = new Person();person.setFirstname("张");person.setLastname("三");Address address = new Address();address.setCity("北京");address.setCountry("中国");person.setAddress(address);// 向Redis数据库添加数据personRepository.save(person);}
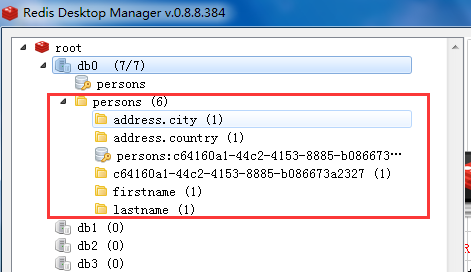
6、查看redis发现已经成功存入redis数据库中
7、执行查询
@Testpublic void selectPerson(){List<Person> personList = personRepository.findByAddress_City("北京");for (Person person : personList) {System.out.println(person);}}
查询结果


