更详细的阐述:https://www.yuque.com/jixiangkuaile/kk8w4w/tka8zh#VocfX
服务注册中心一般原理
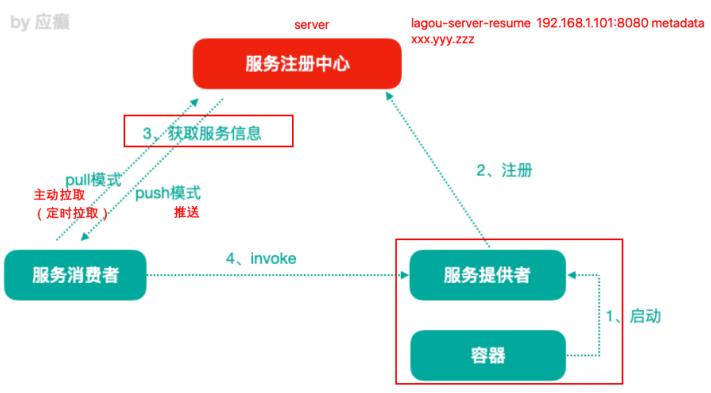
分布式微服务架构中,服务注册中心用于存储服务提供者地址信息、服务发布相关的属性信息,消费者通过主动查询和被动通知的方式获取服务提供者的地址信息,而不再需要通过硬编码方式得到提供者的地址信。消费者只需要知道当前系统发布了那些服务,不需要知道服务具体存在于什么位置,这就是透明化路由。
1)服务提供者启动
2)服务提供者将相关服务信息主动注册到注册中心
3)服务消费者获取服务注册信息
pull模式:服务消费者可以主动拉取可用的服务提供者清单
push模式:服务消费者订阅服务(当服务提供者有变化时,注册中心也会主动推送更新后的服务清单给消费者
4)服务消费者直接调用服务提供者
5)注册中心也需要完成服务提供者的健康监控,当发现服务提供者失效时需要及时剔除;
主流服务中心对比
Zookeeper 存储+监听通知
Eureka 服务注册与发现组件
Consul 分布式高可用的服务 发布和注册服务软件
Nacos 注册中心 + 配置中心的组合
服务注册中心组件Eureka

Eureka 交互流程及原理
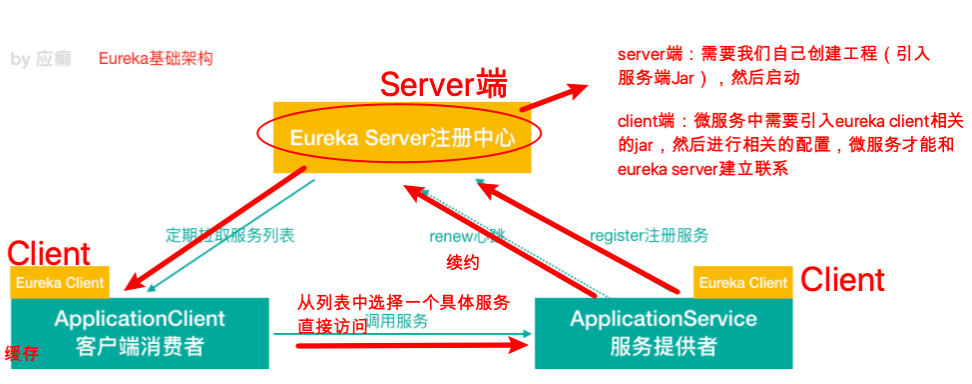
Eureka 包含两个组件:Eureka Server 和 Eureka Client,Eureka Client是一个Java客户端,用于简化与Eureka Server的交互;Eureka Server提供服务发现的能力,各个微服务启动时,会通过Eureka Client向Eureka Server 进行注册自己的信息(例如网络信息),Eureka Server会存储该服务的信息;
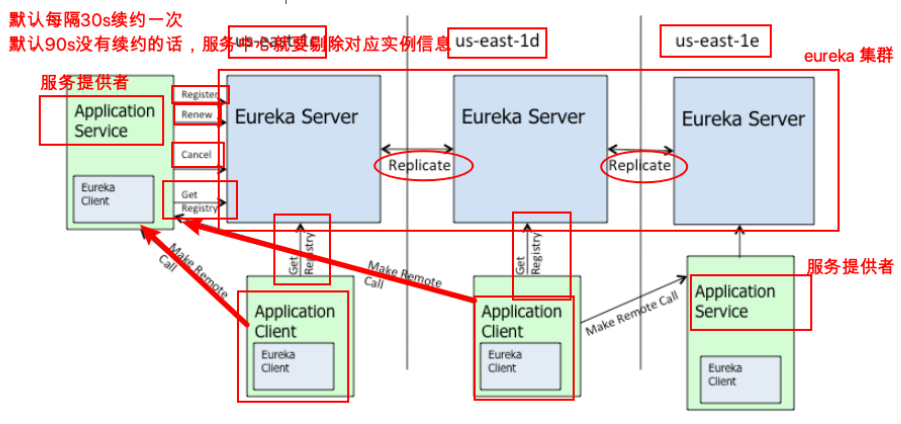
1)图中us-east-1c、us-east-1d,us-east-1e代表不同的区也就是不同的机房
2)图中每一个Eureka Server都是一个集群。
3)图中Application Service作为服务提供者,向Eureka Server中注册服务,Eureka Server接受到注册事件会在集群和分区中进行数据同步,ApplicationClient作为消费端(服务消费者)可以从Eureka Server中获取到服务注册信息,进行服务调用。
4)微服务启动后,会周期性地向Eureka Server发送心跳(默认周期为30秒)以续约自己的信息
5)Eureka Server在一定时间内没有接收到某个微服务节点的心跳,EurekaServer将会注销该微服务节点(默认90秒)
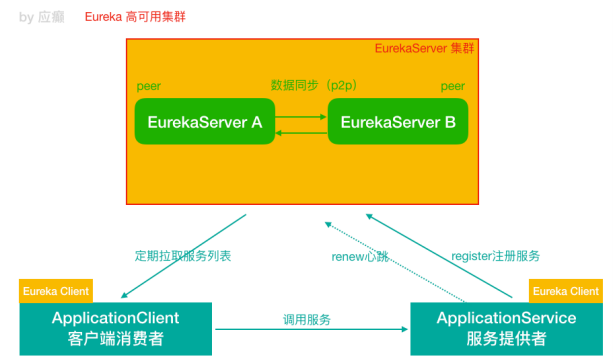
6)每个Eureka Server同时也是Eureka Client,多个Eureka Server之间通过复制的方式完成服务注册列表的同步
7)Eureka Client会缓存Eureka Server中的信息。即使所有的Eureka Server节点都宕掉,服务消费者依然可以使用缓存中的信息找到服务提供者
注:Eureka通过心跳检测、健康检查和客户端缓存等机制,提高系统的灵活性、可伸缩性和可用性。
搭建单例Eureka Server服务注册中心
1、创建一个子项目 lagou-cloud-eureka-server-8761
2、在父的pom中添加Spring Cloud 依赖
<dependencyManagement><dependencies><!--spring cloud依赖管理,引入了Spring Cloud的版本--><dependency><groupId>org.springframework.cloud</groupId><artifactId>spring-cloud-dependencies</artifactId><version>Greenwich.RELEASE</version><type>pom</type><scope>import</scope></dependency></dependencies></dependencyManagement>
3、子项目8761的pom.xml中引入Eureka server依赖
<!--Eureka server依赖--><dependency><groupId>org.springframework.cloud</groupId><artifactId>spring-cloud-starter-netflix-eureka-server</artifactId></dependency>
4、在父的pom.xml中引入jaxb
<!--因为Jdk9之后默认没有加载jaxb该模块,EurekaServer使用到,所以需要手动导入,否则EurekaServer服务无法启动--><!--eureka server 需要引入Jaxb,开始--><dependency><groupId>com.sun.xml.bind</groupId><artifactId>jaxb-core</artifactId><version>2.2.11</version></dependency><dependency><groupId>javax.xml.bind</groupId><artifactId>jaxb-api</artifactId></dependency><dependency><groupId>com.sun.xml.bind</groupId><artifactId>jaxb-impl</artifactId><version>2.2.11</version></dependency><dependency><groupId>org.glassfish.jaxb</groupId><artifactId>jaxb-runtime</artifactId><version>2.2.10-b140310.1920</version></dependency><dependency><groupId>javax.activation</groupId><artifactId>activation</artifactId><version>1.1.1</version></dependency><!--引入Jaxb,结束-->
5、配置 application.yml
#eureka server服务端口server:port: 8761spring:application:name: lagou-cloud-eureka-server # 应用名称,应用名称会在Eureka中作为服务名称# eureka 客户端配置(和Server交互),Eureka Server 其实也是一个Clienteureka:instance:hostname: LagouCloudEurekaServerA # 当前eureka实例的主机名client:service-url:# 配置客户端所交互的Eureka Server的地址#(Eureka Server集群中每一个Server其实相对于其它Server来说都是Client)# 集群模式下,defaultZone应该指向其它Eureka Server,如果有更多其它Server实例,逗号拼接即可defaultZone: http://LagouCloudEurekaServerB:8762/eurekaregister-with-eureka: false # 单例是false,集群模式下改成truefetch-registry: false # 集群模式下可以改成true##单例模式下自己就是服务不需要从Eureka Server获取服务信息,默认为true,置为false##集群模式下,就需要改为true,从集群上获取信息dashboard:enabled: true
6、 声明当前项目为EurekaServer服务
在SpringBoot启动类上面,使用@EnableEurekaServer声明当前项目为EurekaServer服务@SpringBootApplication// 声明本项目是一个Eureka服务@EnableEurekaServerpublic class LagouEurekaServerApp8761 {public static void main(String[] args) {SpringApplication.run(LagouEurekaServerApp8761.class,args);}。。。。。。。
7、完整的父项目中的pom.xml添加的配置
<!--父工程打包方式为pom--><packaging>pom</packaging><!--spring boot 父启动器依赖--><parent><groupId>org.springframework.boot</groupId><artifactId>spring-boot-starter-parent</artifactId><version>2.1.6.RELEASE</version></parent><dependencyManagement><dependencies><!--spring cloud依赖管理,引入了Spring Cloud的版本--><dependency><groupId>org.springframework.cloud</groupId><artifactId>spring-cloud-dependencies</artifactId><version>Greenwich.RELEASE</version><type>pom</type><scope>import</scope></dependency></dependencies></dependencyManagement><dependencies><!--web依赖--><dependency><groupId>org.springframework.boot</groupId><artifactId>spring-boot-starter-web</artifactId></dependency><!--日志依赖--><dependency><groupId>org.springframework.boot</groupId><artifactId>spring-boot-starter-logging</artifactId></dependency><!--测试依赖--><dependency><groupId>org.springframework.boot</groupId><artifactId>spring-boot-starter-test</artifactId><scope>test</scope></dependency><!--lombok工具--><dependency><groupId>org.projectlombok</groupId><artifactId>lombok</artifactId><version>1.18.4</version><scope>provided</scope></dependency><!-- Actuator可以帮助你监控和管理Spring Boot应用--><dependency><groupId>org.springframework.boot</groupId><artifactId>spring-boot-starter-actuator</artifactId></dependency><!--热部署--><dependency><groupId>org.springframework.boot</groupId><artifactId>spring-boot-devtools</artifactId><optional>true</optional></dependency><!--因为Jdk9之后默认没有加载jaxb该模块,EurekaServer使用到,所以需要手动导入,否则EurekaServer服务无法启动--><!--eureka server 需要引入Jaxb,开始--><dependency><groupId>com.sun.xml.bind</groupId><artifactId>jaxb-core</artifactId><version>2.2.11</version></dependency><dependency><groupId>javax.xml.bind</groupId><artifactId>jaxb-api</artifactId></dependency><dependency><groupId>com.sun.xml.bind</groupId><artifactId>jaxb-impl</artifactId><version>2.2.11</version></dependency><dependency><groupId>org.glassfish.jaxb</groupId><artifactId>jaxb-runtime</artifactId><version>2.2.10-b140310.1920</version></dependency><dependency><groupId>javax.activation</groupId><artifactId>activation</artifactId><version>1.1.1</version></dependency><!--引入Jaxb,结束--></dependencies><build><plugins><!--编译插件--><plugin><groupId>org.apache.maven.plugins</groupId><artifactId>maven-compiler-plugin</artifactId><configuration><source>11</source><target>11</target><encoding>utf-8</encoding></configuration></plugin><!--打包插件--><plugin><groupId>org.springframework.boot</groupId><artifactId>spring-boot-maven-plugin</artifactId></plugin></plugins></build>
搭建Eureka Server HA高可用集群注册中心
1、修改本机host属性
127.0.0.1 LagouCloudEurekaServerA127.0.0.1 LagouCloudEurekaServerB
2、修改 lagou-cloud-eureka-server 工程中的yml配置文件
赋值一份***server-8761的版本,改为****-8762#eureka server服务端口server:port: 8762spring:application:name: lagou-cloud-eureka-server # 应用名称,应用名称会在Eureka中作为服务名称# eureka 客户端配置(和Server交互),Eureka Server 其实也是一个Clienteureka:instance:hostname: LagouCloudEurekaServerB # 当前eureka实例的主机名client:service-url: # 配置客户端所交互的Eureka Server的地址#把另外的实例LagouCloudEurekaServerA作为了集群中的镜像节点defaultZone: http://LagouCloudEurekaServerA:8761/eurekaregister-with-eureka: truefetch-registry: true----------------------------------------------------------------------------------------------------------原来的8761的配置只需要修改为true即可(就可以在集群模式下注册服务)register-with-eureka: truefetch-registry: true
3、启动eureka-server
微服务提供者注册到Eureka Server集群
子项目的名称是lagou-service-resume-8080
注册简历微服务(简历服务部署两个实例,分别占用8080、8081端⼝)
1、创建commons 模块用于添加实体类,并引入当前子项目中
2、父工程中引入spring-cloud-commons依赖
<dependency><groupId>org.springframework.cloud</groupId><artifactId>spring-cloud-commons</artifactId></dependency>
3、在当前子项目中引入eureka client的相关坐标
<!--eureka client 客户端依赖引入--><dependency><groupId>org.springframework.cloud</groupId><artifactId>spring-cloud-starter-netflix-eureka-client</artifactId></dependency>
4、配置application.yml文件
在application.yml 中添加Eureka Server高可用集群的地址及相关配置
server:port: 8080#注册到Eureka服务中心eureka:client:service-url:# 注册到集群,就把多个Eurekaserver地址使用逗号连接起来即可;注册到单实例(非集群模式),那就写一个就okdefaultZone: http://LagouCloudEurekaServerA:8761/eureka,http://LagouCloudEurekaServerB:8762/eurekainstance:prefer-ip-address: true #服务实例中显示ip,而不是显示主机名(兼容老的eureka版本)# 实例名称: 192.168.1.103:lagou-service-resume:8080,我们可以自定义它instance-id: ${spring.cloud.client.ip-address}:${spring.application.name}:${server.port}:@project.version@# 自定义Eureka元数据metadata-map:cluster: cl1region: rn1spring:application:name: lagou-service-resume #服务提供者的名称,会出现在eureka注册中心的
经验:自定义实例显示格式,加上版本号,便于多版本管理
5、启动类添加注解
EnableDiscoveryClient的通用性更加强
@SpringBootApplication@EntityScan("com.lagou.edu.pojo")//@EnableEurekaClient // 开启Eureka Client(Eureka独有)@EnableDiscoveryClient // 开启注册中心客户端 (通用型注解,比如注册到Eureka、Nacos等)// 说明:从SpringCloud的Edgware版本开始,不加注解也ok,但是建议大家加上public class LagouResumeApplication8080 {public static void main(String[] args) {SpringApplication.run(LagouResumeApplication8080.class,args);}}
微服务消费者注册到Eureka Server集群
子项目的名称是lagou-service-autodeliver-8090
1、父工程中引入spring-cloud-commons依赖
<dependency><groupId>org.springframework.cloud</groupId><artifactId>spring-cloud-commons</artifactId></dependency>
2、当前项目的pom.xml中引入eureka client 客户端
<!--eureka client 客户端依赖引入--><dependency><groupId>org.springframework.cloud</groupId><artifactId>spring-cloud-starter-netflix-eureka-client</artifactId></dependency>
3、 配置application.yml文件
在application.yml 中添加Eureka Server高可用集群的地址及相关配置
server:port: 8090#注册到Eureka服务中心eureka:client:service-url:# 注册到集群,就把多个Eurekaserver地址使用逗号连接起来即可;注册到单实例(非集群模式),那就写一个就okdefaultZone: http://LagouCloudEurekaServerA:8761/eureka,http://LagouCloudEurekaServerB:8762/eurekainstance:prefer-ip-address: true #服务实例中显示ip,而不是显示主机名(兼容老的eureka版本)# 实例名称: 192.168.1.103:lagou-service-resume:8080,我们可以自定义它instance-id: ${spring.cloud.client.ip-address}:${spring.application.name}:${server.port}:@project.version@spring:application:name: lagou-service-autodeliver #服务消费者的名称,会出现在eureka注册中心的
4、启动类添加注解
@EnableDiscoveryClient和@EnableEurekaClient⼆者的功能是一样的。但 是如果选用的是eureka服务器,那么就推荐@EnableEurekaClient,如果是其 他的注册中心,那么推荐使用@EnableDiscoveryClient,考虑到通用性,后期 我们可以使用@EnableDiscoveryClient
@SpringBootApplication@EnableDiscoveryClient // 开启服务发现public class AutodeliverApplication8090 {public static void main(String[] args) {SpringApplication.run(AutodeliverApplication8090.class,args);}
5、服务消费者调用服务提供者(通过Eureka)
@RestController@RequestMapping("/autodeliver")public class AutodeliverController {@Autowiredprivate RestTemplate restTemplate;@Autowiredprivate DiscoveryClient discoveryClient;/*** 服务注册到Eureka之后的改造* @param userId* @return*/@GetMapping("/checkState/{userId}")public Integer findResumeOpenState(@PathVariable Long userId) {// TODO 从Eureka Server中获取我们关注的那个服务的实例信息以及接口信息// 1、从 Eureka Server中获取lagou-service-resume服务的实例信息(使用客户端对象做这件事)List<ServiceInstance> instances = discoveryClient.getInstances("lagou-service-resume");// 2、如果有多个实例,选择一个使用(负载均衡的过程)ServiceInstance serviceInstance = instances.get(0);// 3、从元数据信息获取host port 拼接请求地址String host = serviceInstance.getHost();int port = serviceInstance.getPort();String url = "http://" + host + ":" + port + "/resume/openstate/" + userId;System.out.println("===============>>>从EurekaServer集群获取服务实例拼接的url:" + url);// 4、消费者之间调用服务提供者// 调用远程服务—> 简历微服务接口 RestTemplate -> JdbcTempate// httpclient封装好多内容进行远程调用Integer forObject = restTemplate.getForObject(url, Integer.class);return forObject;}


