创建实体类、添加repository、添加配置信息、添加测试类等
目前就用city表进行操作,那么只需要对配置信息、测试类进行操作即可。
1、创建新的配置文件、并指向之
在resource下面创建application-master-slave.properties文件,然后主配置指向新配置
2、添加配置信息
主要是这个主从配置信息
######datasource(数据源,有两个库)#######spring.shardingsphere.datasource.names=master,slave0######配置第一个库是主节点########使用连接池spring.shardingsphere.datasource.master.type=com.zaxxer.hikari.HikariDataSource#使用驱动spring.shardingsphere.datasource.master.driver-class-name=com.mysql.jdbc.Driver#数据库连接(如果是服务器的就只需要把localhost改为服务器的ip即可)spring.shardingsphere.datasource.master.jdbc-url=jdbc:mysql://localhost:3306/lagou1#数据库用户和密码spring.shardingsphere.datasource.master.username=rootspring.shardingsphere.datasource.master.password=root######配置第二个库是从节点#######spring.shardingsphere.datasource.slave0.type=com.zaxxer.hikari.HikariDataSourcespring.shardingsphere.datasource.slave0.driver-class-name=com.mysql.jdbc.Driverspring.shardingsphere.datasource.slave0.jdbc-url=jdbc:mysql://localhost:3306/lagou2spring.shardingsphere.datasource.slave0.username=rootspring.shardingsphere.datasource.slave0.password=root########master、slave的配置spring.shardingsphere.masterslave.name=dataSource#指定谁是主库spring.shardingsphere.masterslave.master-data-source-name=master#指定谁是从库spring.shardingsphere.masterslave.slave-data-source-names=slave0#如果是多个从库,则需要负载均衡吗,可以是轮询、也可以是随机spring.shardingsphere.masterslave.load-balance-algorithm-type=ROUND_ROBIN#配置city的id主键,采用雪花片算法spring.shardingsphere.sharding.tables.city.key-generator.column=idspring.shardingsphere.sharding.tables.city.key-generator.type=SNOWFLAKE
3、实现对主库操作的测试
package com.slin.test;import com.slin.RunBoot;import com.slin.entity.City;import com.slin.repository.CityRepository;import org.junit.Test;import org.junit.runner.RunWith;import org.springframework.boot.test.context.SpringBootTest;import org.springframework.test.context.junit4.SpringRunner;import javax.annotation.Resource;//通过它来启动@RunWith(SpringRunner.class)//通过RunBoot来创建boot容器@SpringBootTest(classes = RunBoot.class)public class MasterSlaveSardingTest {@Resourceprivate CityRepository cityRepository;// 对主库是写操作@Testpublic void masterTest(){City city = new City();city.setName("nanning");city.setProvince("guangxi");cityRepository.save(city);}}
4、效果展示
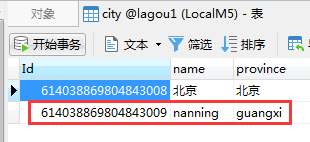
主库lagou1有记录。说明入主库成功
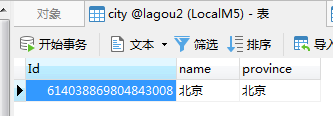
从库lagou2没有记录
5、实现对从库操作的测试
package com.slin.test;import com.slin.RunBoot;import com.slin.entity.City;import com.slin.repository.CityRepository;import org.junit.Test;import org.junit.runner.RunWith;import org.springframework.boot.test.context.SpringBootTest;import org.springframework.test.context.junit4.SpringRunner;import javax.annotation.Resource;import java.util.List;//通过它来启动@RunWith(SpringRunner.class)//通过RunBoot来创建boot容器@SpringBootTest(classes = RunBoot.class)public class MasterSlaveSardingTest {@Resourceprivate CityRepository cityRepository;// 对从库是读操作@Testpublic void slaveTest(){List<City> all = cityRepository.findAll();System.out.println("###########开始打印##############");all.forEach(city->{System.out.println(city.getId()+" "+city.getName()+" "+city.getProvince());});System.out.println("&&&&&&&&&&&end打印&&&&&&&&&&&&");}}
6、效果展示
结果是从从库里面查询出来的,说明查询从库成功
从库只有一条记录

