涉及三个文件:
- 增加一个类库文件(.cs文件):这里是规定数据仓库、声明类并定义属性
- UI文件(.xaml文件):这里完成属性路径绑定及单/双向方式
- UI架构器文件(.xaml.cs文件):这里完成界面路径绑定
使用WPF的.Net Framework框架。
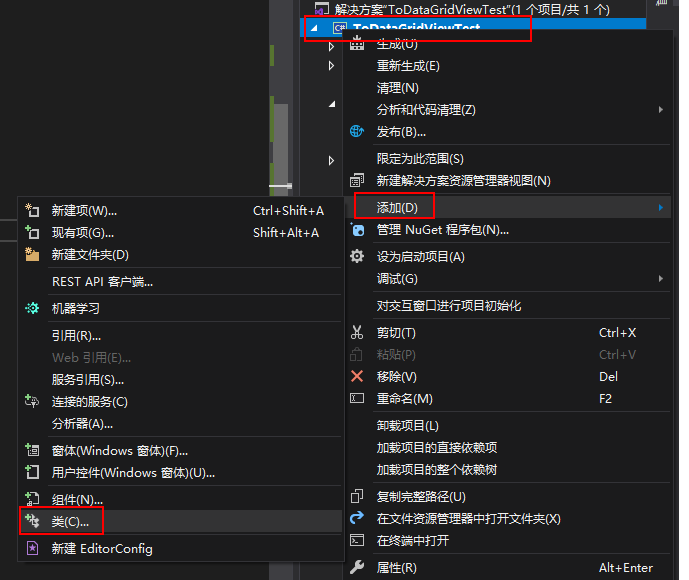
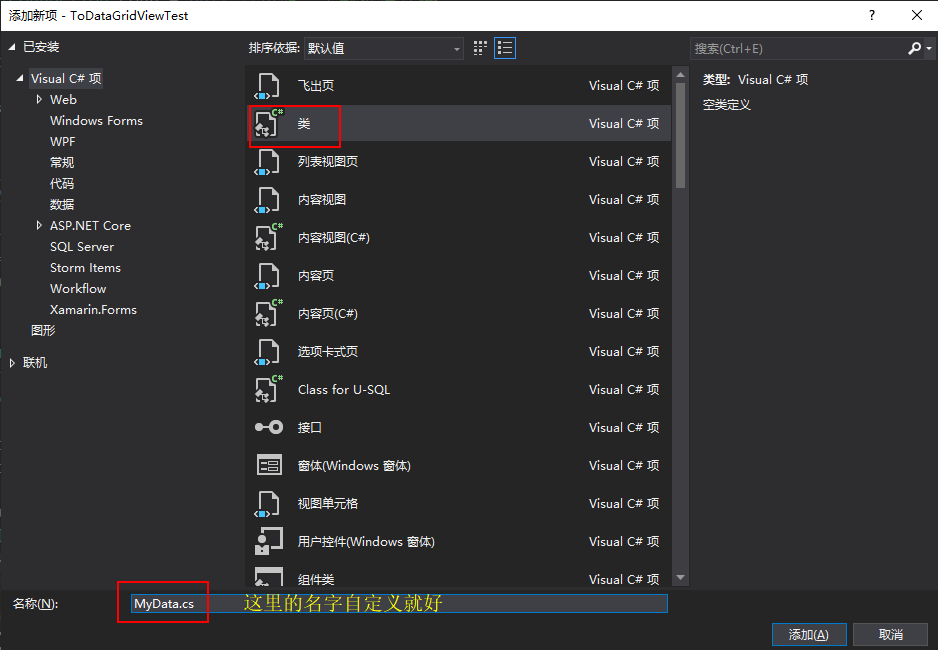
第一步:添加类库文件,声明类并定义属性
在解决方案资源管理器中右键项目—>添加类,为项目增加一个作为”绑定源”的数据的类。名字为MyData.cs,这个名字可以自己定义。
这其实就是界面的后台数据仓库,一个界面可以建一个类,一个界面上不同的控件可以建不同的类,多个界面也可以使用一个类。只要在绑定时选择绑定哪一个类就好。
然后在类库文件中声明类并定义属性。对于TextBox控件,希望输入值改变后数据仓库同时变化,要加一些语句。代码如下:
using System;using System.Collections.Generic;using System.ComponentModel;using System.Linq;using System.Text;using System.Threading.Tasks;namespace FourStepBinding{// 第一步:声明一个类,准备必要的属性public class DataLib : INotifyPropertyChanged //注:声明的类,{public int _customerID; //第1个 属性(开始)public int CustomerID{get { return this._customerID; }set { this._customerID = value; }} //第1个 属性(结束)public string _sampleCircle; //第2个 属性(开始)public string SampleCircle{get { return this._sampleCircle; }set { this._sampleCircle = value; }} //第2个 属性(结束)}}/*说明:1、名称空间的引用部分 using System.ComponentModel; 是因为类体继承了 INotifyPropertyChanged 接口才用到的。2、继承这个接口的原因:要实现"内容改变时后台数据同步改变"这个功能。3、"value" 是数据绑定的路径。4、"this." 是界面的路径。*/
第二步:在类中实现INotifyPropertyChanged接口
在数据类文件中完成”双向”的功能。在定义的类中,最后一个属性下面添加代码:
         public string _sampleCircle;            //第2个 属性(开始)

     public string SampleCircle
     {
       get { return this._sampleCircle; }
       set { this._sampleCircle = value; }
      }                           //第2个 属性(结束)

         //第二步:完成"具有双向的功能"
         public event PropertyChangedEventHandler PropertyChanged;
         protected virtual void OnPropertyChanged(string propertyName)
         {
             if (PropertyChanged != null)
             {
                 PropertyChanged(this,
                 new PropertyChangedEventArgs(propertyName));
             }
         }
这是一个方法,里面没有用户要编写的代码。OnPropertyChanged 方法引发 PropertyChanged 事件。
PropertyChanged 事件的 PropertyChangedEventArgs 参数指定了发生改变的属性的名称。该值作为参数传给 OnPropertyChanged 方法。
第一步中的继承 INotifyPropertyChanged 接口加上第二步完成”具有双向的功能”合称为:在类中实现 INotifyPropertyChanged 接口。
同时,修改Customer类的所有属性的set访问器,指定的值被修改时都调用 OnPropertyChanged 方法。每个属性都要添加:
        public int _customerID;               //第1个 属性(开始)
        public int CustomerID
        {
            get { return this._customerID; }
            set
            {
                this._customerID = value;
                this.OnPropertyChanged("SampleCircle");//添加的内容
            }
         }                          //第1个 属性(结束)

     public string _sampleCircle;            //第2个 属性(开始)

     public string SampleCircle
     {
       get { return this._sampleCircle; }
       set
             {
                 this._sampleCircle = value;
                 this.OnPropertyChanged("SampleCircle");//添加的内容
             }
      }                           //第2个 属性(结束)
(不理解)第三步:属性路径绑定
在xaml文件即界面视图文件中绑定。出处:https://www.cnblogs.com/moiska/p/4925842.html
 <!--2-->
        <StackPanel Grid.Row="1" Grid.Column="2"  Style="{StaticResource TheStackPanelStyle}" >
            <StackPanel>
                <Label Style="{StaticResource TheLabeltyle}">采样周期</Label>
                <TextBox Style="{StaticResource TheTextBoxStyle}"
                         Name="inputSC"
                         Text="{Binding SampleCircle,Mode=TwoWay}"
                         />
            </StackPanel>
            <StackPanel>
                <Label Style="{StaticResource TheLabeltyle}">公制/英制</Label>
                <ComboBox Style="{StaticResource TheComboBoxStyle}" Background="{DynamicResource {x:Static SystemColors.ActiveBorderBrushKey}}">
                    <ComboBoxItem Style="{StaticResource ThComboBoxItemStyle}">公制</ComboBoxItem>
                    <ComboBoxItem Style="{StaticResource ThComboBoxItemStyle}">英制</ComboBoxItem>
                    <ComboBoxItem Style="{StaticResource ThComboBoxItemStyle}">华制</ComboBoxItem>
                </ComboBox>
            </StackPanel>
            <StackPanel>
                <Label Style="{StaticResource TheLabeltyle}">采样周期1</Label>
                <TextBox Style="{StaticResource TheTextBoxStyle}"
                         Name="outputSC"
                         Text="{Binding SampleCircle,Mode=TwoWay}"
                         />
            </StackPanel>
第四步:架构路径绑定
在界面的代码隐藏中进行”界面路径绑定”。绑定完成。
在 .xaml.cs文件(MainWindow.xaml.cs)中的MainWindow构造器中添加如下代码:
        public MainWindow()
        {
            InitializeComponent();
            DataLib dataLib = new DataLib
            {
                SampleCircle = "John"
          CustomerID = 8
       };
       this.DataContext = dataLib;
     }

若有收获,就点个赞吧
0 人点赞
