一、MVVM介绍
WPF是通过数据绑定来更新UI;在响应用户操作上,WPF使用命令绑定的方式来处理,降低了耦合度。
MVVM直观展现:
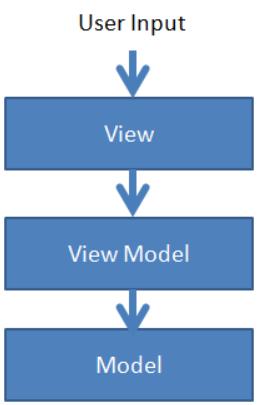
1、View就是用XAML实现的界面,负责与用户交互,接收用户输入,把数据展现给用户。
2、ViewModel是一个C#类,负责收集需要绑定的数据和命令,聚合Model对象,通过View类的DataContext属性绑定到View,同时也可以处理一些UI逻辑。
3、Model,就是系统中的对象,可以包含属性和行为。
三者之间的关系:View对应一个ViewModel,ViewModel可以聚合N个Model,ViewModel可以对应多个View。
二、MVVM的优势
MVVM的根本思想就是界面和业务功能进行分离,View的职责就是负责如何显示数据及发送命令,ViewModel的功能就是如何提供数据和执行命令。各司其职,互不影响。在实际的业务场景中我们经常会遇到客户对界面提出建议要求修改,使用MVVM模式开发,当设计的界面不满足客户时,我们仅仅只需要对View作修改,不会影响到ViewModel中的功能代码,减少了犯错的机会。随着功能地增加,系统越来越复杂,相应地程序中会增加View和ViewModel文件,将复杂的界面分离成局部的View,局部的View对应局部的ViewModel,功能点散落在各个ViewModel中,每个ViewModel只专注自己职能之内的事情。ViewModel包含了View要显示的数据,并且知道View的交互代码,所以ViewModel就像一个无形的View。 MVVM优势: ①易维护 ②灵活拓展 ③易测试 ④用户界面设计师与程序开发者能更好地合作三、MVVM实例(初步理解)
以下示例并不是我们使用MVVM的正确方式。
using System;using System.Collections.Generic;using System.Linq;using System.Text;using System.Threading.Tasks;namespace MVVM{//这就是Model层public class Name{#region Fieldsprivate string _userName;private string _companyName;#endregion#region Property/// <summary>/// 用户名/// </summary>public string UserName{get { return _userName; }set { _userName = value; }}/// <summary>/// 公司名/// </summary>public string CompanyName{get { return _companyName; }set { _companyName = value; }}#endregion}}
using System;using System.Collections.Generic;using System.ComponentModel;using System.Linq;using System.Text;using System.Threading.Tasks;namespace MVVM{//这就是ViewModel层,用来处理View层的逻辑public class NameViewModel : INotifyPropertyChanged{public NameViewModel(){_userName = new Name() { UserName = "张三", CompanyName = "AAAAA" };}#region FieldsName _userName;#endregion#region Propertypublic string UserName{get { return _userName.UserName; }set { _userName.UserName = value; RaisePropertyChanged("UserName"); }}public string CompanyName{get { return _userName.CompanyName; }set { _userName.CompanyName = value; RaisePropertyChanged("CompanyName"); }}#endregion#region INotifyPropertyChanged属性public event PropertyChangedEventHandler PropertyChanged;#endregion#region 属性更改方法private void RaisePropertyChanged(string propertyName){PropertyChangedEventHandler handler = PropertyChanged;if(handler != null){handler(this, new PropertyChangedEventArgs(propertyName));}}#endregion}}
<Window x:Class="MVVM.MainWindow"xmlns="http://schemas.microsoft.com/winfx/2006/xaml/presentation"xmlns:x="http://schemas.microsoft.com/winfx/2006/xaml"xmlns:d="http://schemas.microsoft.com/expression/blend/2008"xmlns:mc="http://schemas.openxmlformats.org/markup-compatibility/2006"xmlns:local="clr-namespace:MVVM"mc:Ignorable="d"Title="MainWindow" Height="450" Width="400"><Window.DataContext><!--声明并创建一个NameViewModel的实例--><local:NameViewModel/></Window.DataContext><StackPanel VerticalAlignment="Center" Orientation="Horizontal"><TextBlock Text="用户名:" Margin="20"/><TextBlock Text="{Binding UserName}" Margin="0,20"/><TextBlock Text="公司名称:" Margin="20"/><TextBlock Text="{Binding CompanyName}" Margin="0,20"/><Button Content="更新" Click="Update_Click" Margin="20"/></StackPanel></Window>
using System;using System.Collections.Generic;using System.Linq;using System.Text;using System.Threading.Tasks;using System.Windows;using System.Windows.Controls;using System.Windows.Data;using System.Windows.Documents;using System.Windows.Input;using System.Windows.Media;using System.Windows.Media.Imaging;using System.Windows.Navigation;using System.Windows.Shapes;namespace MVVM{/// <summary>/// MainWindow.xaml 的交互逻辑/// </summary>public partial class MainWindow : Window{/// <summary>/// 视图模型/// </summary>NameViewModel _viewModel;public MainWindow(){InitializeComponent();//已经在XAML代码中声明了视图模型的实例,获取到引用,因此我们可以在按钮click事件里使用它_viewModel = base.DataContext as NameViewModel;}private void Update_Click(object sender, RoutedEventArgs e){_viewModel.UserName = "测试";_viewModel.CompanyName = "HHHHH";}}}
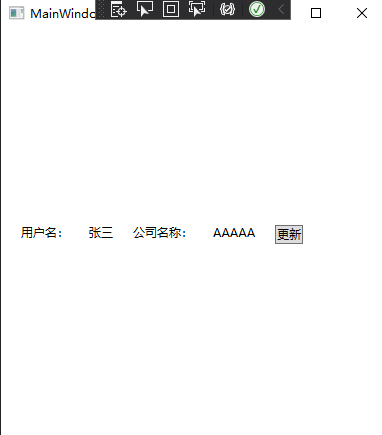
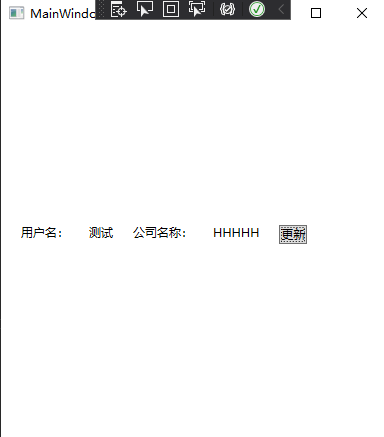
实现效果:

若有收获,就点个赞吧
0 人点赞
