一、配置
Tip: 首先创建项目时得选中路由
之后app.component.html会多出
<router-outlet></router-outlet>相当于vue中的<router-view></router-view>
app.routing.module.js配置
import { HomeComponent } from './components/home/home.component';import { NewsComponent } from './components/news/news.component';const routes: Routes = [{path:'home',component:HomeComponent},{path:'news',component:NewsComponent}]
二、路由重定向
{path:'',redirectTo:'home',pathMatch:'full'//严格匹配}
三、匹配错误路由处理
{//匹配没有设置的路由path:'**',component:ErrorComponent}
四、路由导航
<ul>//也可写成<li><a [routerLink]="['/home']" routerLinkActive="router-link-active">home</a></li><li><a routerLink="/home" routerLinkActive="router-link-active">home</a></li><li><a routerLink="/news" routerLinkActive="router-link-active">news</a></li><li><a routerLink="/about" routerLinkActive="router-link-active">about</a></li></ul><router-outlet></router-outlet>
routerLinkActive
当url是当前的时候,a标签将会被加上router-link-active。当url变化为别的时,class将会被移除。
也可以给routerLinkActive进行配置参数
<a routerLink="/user/login" routerLinkActive="red">login</a>当url是user或者/user/login的时候,a标签将会被加上classred。当url变化为别的时,class将会被移除。如何添加两个class<a routerLink="/user/login" routerLinkActive="class1 class2">login</a>也可以给routerLinkActive进行配置参数传递exact: true表示路由完全匹配时才高亮,如<a routerLink="/user/login" routerLinkActive="red"[routerLinkActiveOptions]="{exact: true}">login</a>
五、路由跳转传值
5-1 get传值
home页
<a [routerLink]="['/detail']" [queryParams]="{id:id}">跳转detail</a>export class HomeComponent implements OnInit {public id:string = "123"constructor() { }ngOnInit() {}}
detail页接收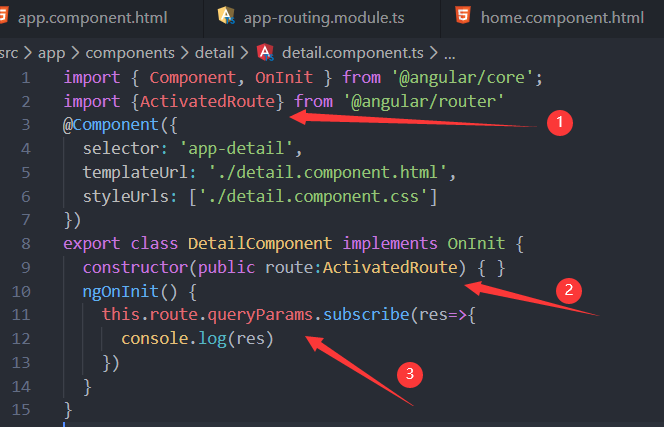
import { Component, OnInit } from '@angular/core';//导入正在显示的路由import {ActivatedRoute} from '@angular/router'@Component({selector: 'app-detail',templateUrl: './detail.component.html',styleUrls: ['./detail.component.css']})export class DetailComponent implements OnInit {constructor(public route:ActivatedRoute) { }ngOnInit() {this.route.queryParams.subscribe(res=>{console.log(res)})}}
5-2 动态路由
路由配置
{path:'detail/:id',component:DetailComponent}
home页
//第一种跳转<a [routerLink]="['/detail',id]" >跳转detail</a>export class HomeComponent implements OnInit {public id:string = "123"constructor() { }ngOnInit() {}}
//第二种<a routerLink="/detail/{{id}}" >跳转detail</a>
detail页接收
import {ActivatedRoute} from '@angular/router'...export class DetailComponent implements OnInit {constructor(public route:ActivatedRoute) { }ngOnInit() {this.route.params.subscribe(res=>{console.log(res)})}}
六、事件跳转传值
6-1 动态路由事件跳转
{path:'detail/:id',component:DetailComponent}
home页
<button (click)="handleClick()">跳转detail</button>
import {Router} from "@angular/router"...export class HomeComponent implements OnInit {public id:string = "123"constructor(private router:Router) { }ngOnInit() {}handleClick(){//传值this.router.navigate(['/detail',this.id])}}
detail页接收
import {ActivatedRoute} from '@angular/router'...export class DetailComponent implements OnInit {constructor(public route:ActivatedRoute) { }ngOnInit() {this.route.params.subscribe(res=>{console.log(res)})}}
6-2 get事件传值
home页
Tip: 另导入NavigationExtras模块
import {Router,NavigationExtras} from "@angular/router"...export class HomeComponent implements OnInit {public id:string = "123"constructor(private router:Router) { }ngOnInit() {}handleClick(){let navigationExtras:NavigationExtras = {queryParams:{"id":this.id}}this.router.navigate(['/detail'],navigationExtras)}}
detail页接收
import { Component, OnInit } from '@angular/core';import {ActivatedRoute} from '@angular/router'...export class DetailComponent implements OnInit {constructor(public route:ActivatedRoute) { }ngOnInit() {this.route.queryParams.subscribe(res=>{console.log(res)})}}
七、二级路由
{path:'news',component:NewsComponent,children:[{path:"morning",component:MorningComponent},{path:"night",component:NightComponent},// 路由重定向{path:"",redirectTo:"morning",pathMatch:"full"}]}
Tip:在一级路由对应的组件中的html中配置
<router-outlet></router-outlet>

若有收获,就点个赞吧
0 人点赞
